1
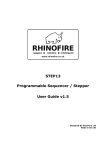
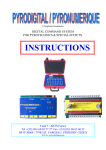
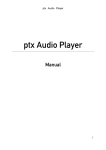
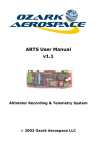
CH18W
18 CUE WATERPROOF
WIRELESS FIRING SYSTEM WITH
EXTERNAL TRIGGER
USER MANUAL v.2
© 2010
www.easypyro.com
CONTENTS
DISCLAIMER............................................................................................. 1
SAFETY..................................................................................................... 1
DESCRIPTION .......................................................................................... 1
ACCESSORIES........................................................................................... 1
BASIC OPERATION ................................................................................... 2
PROGRAMMING THE RECEIVER WITH A NEW TRANSMITTER.................... 3
SETTING THE RECEIVER OPERATING MODE ............................................. 4
SETTING THE TIME DELAY FOR CONTINUOUS MODE (SEQUENCER) ......... 4
USING THE TRIGGER FUNCTION............................................................... 4
EXPANDING THE SYSTEM ......................................................................... 5
© 2010
www.easypyro.com
DISCLAIMER
The manufacturer(s), distributor(s) and / or seller(s) accept no responsibility
whatsoever for any damage, injury or loss, financial or otherwise, resulting
directly or indirectly from the use, misuse, function or malfunction of this device.
By purchasing and using this device you understand and accept this disclaimer.
SAFETY
Safety is the user’s responsibility.
All pyrotechnic effect and firework safety guidelines should be followed
completely.
DESCRIPTION
CH18W is an 18 cue waterproof wireless firing system for pyrotechnics and
fireworks. It features a sequencer, handheld remote control and external trigger
function.
It is expandable up to 54 cues in single fire mode using up to 3 receivers. Single
fire mode means the operator has full control of each individual cue and can fire a
cue on command.
It is also expandable up to 288 cues in CONTINUOUS, STEP or ALL fire mode
using up to 16 receivers. This means that the operator does not have full control
of each cue. The operator may only fire the cues manually in sequence (STEP
mode), continuously with a preset delay between each cue (CONTINUOUS mode)
or fire all cues simultaneously (ALL mode).
Unlike previous models, the operator can now disable the SINGLE, CONTINUOUS,
STEP or ALL fire functions to prevent accidental firing.
ACCESSORIES
The optional waterproof transmitter can be used with this system.
•
•
•
•
•
•
•
•
•
© 2009
www.easypyro.com
Professional.
Waterproof when closed.
Start and Stop the Sequencer.
Long range.
Long battery life.
Fire more Cues.
Safe “2 Button” firing.
Metal ARM key switch.
FCC Approved.
-1-
CHARGING THE SYSTEM
The Battery Status Light will only operate when the unit is switched ON and in
FIRE mode. However the system will charge even when switched off.
Battery Status Light
RED (flashing)
RED (steady)
RED / GREEN (flashing)
GREEN (steady)
Description
Battery Low.
Battery Charging.
Battery Almost Full.
Battery Full.
Lead Acid Batteries naturally discharge over time. To keep the battery in good
condition it is recommended the system is charged every 3 months.
Storing the system in extremely low or high temperatures will shorten the life of
the battery.
BASIC OPERATION
Note:
When using multiple receivers, it is good practise to re-programme
each receiver with the correct remote control before use.
Ensure the battery is fully charged before use.
For maximum safety please follow the firing procedure below.
1. Clear the receiver and program it with a transmitter.
2. Ensure SAFETY SWITCH is keyed to OFF and FUNCTION SELECTION is set
to TEST.
3. Connect igniters.
4. Check continuity. The display will read “E[XX]” where [XX] is the cue
numbers that DO NOT have continuity.
5. Set the correct mode of operation (X.XX, ALL, SINGLE, STEP).
6. Set FUNCTION SELECTION to FIRE.
7. Key SAFETY SWITCH to ON.
8. Extend receiver antenna.
9. Ensure the area is safe and secure and retreat to a safe distance.
10. Extend transmitter antenna.
11. Switch transmitter ON.
12. Set transmitter SLIDE SWITCH to correct position.
13. Fire desired cues.
© 2009
www.easypyro.com
-2-
Transmitter Control Description
Button
1 - 18
ALL
STEP
CONT
Slide Switch (1,2,3,4)
Description
Fires individual cue.
Fires all the cues.
Fires the cues sequentially with each successive
button press. Holding STEP down will cause
multiple cues to fire.
Fires the cues in sequence with a set delay
between each cue.
Selects which receiver to control when up to 3
receivers are used. Should be set in position 4
when the system is configured with more than 3
receivers.
Receiver Control Description
Button
Function Selection
(FIRE, OFF, TEST)
Safety Switch (ON, OFF)
Program
Up-Arrow
Right-Arrow
OK / Delete
Add
Description
Controls the mode of the receiver. TEST mode
tests the cues for continuity. OFF mode turns
the receiver off. FIRE mode allows the system to
be programmed and cues to be fired.
This arms and disarms the system.
Programs the receiver with a new transmitter.
Increments the selected delay digit.
Sets which delay digit to change AND changes
the receiver operating mode.
Enters the current time and Operating Mode
setting / Deletes the current time setting and
resets the Operating Mode.
Sets 1 of 16 possible receiver Addresses for
expansion up to 16 receivers, giving 288 cues
available in ALL, STEP and CONT firing modes.
PROGRAMMING THE RECEIVER WITH A NEW TRANSMITTER
WARNING
Never program the receiver when another transmitter is transmitting. This may
cause the receiver to be programmed with the wrong transmitter.
To clear the receiver of previously stored transmitters:
1. Put FUNCTION SELECTION switch to FIRE position.
2. Hold the PROGRAM button until the program light goes out.
To program the receiver with a new transmitter:
1. Put FUNCTION SELECTION switch to FIRE position.
2. Press and hold a button on the transmitter.
3. Press and release the PROGRAM button briefly. The program light blinks twice
to indicate the receiver has been programmed.
© 2009
www.easypyro.com
-3-
SETTING THE RECEIVER OPERATING MODE
The receiver must be set to the correct mode before using the system. This
ensures that accidentally pressing a button on the transmitter will not have an
unwanted effect!
Mode
Continuous (Sequencer)
All Fire
Display Shows …
0.00 or the current
delay between cues.
ALL
Single Shot
SIN
Step
STE
Description
Sequencer with a set delay
between each cue.
Fires all cues when the ALL
button on transmitter is
pressed.
Fires the correct cue when the
button 1- 18 is pressed on the
transmitter.
Fires the next cue when STEP
is pressed on the transmitter.
To set the receiver operating mode follow the steps below.
1. Hold down OK button until the display reads 0.00
2. Press RIGHT-ARROW to cycle through the digits and operating modes.
3. Press OK to set the correct receiver operating mode.
SETTING THE TIME DELAY FOR CONTINUOUS MODE
(SEQUENCER)
The time delay is used when firing in continuous mode. The delay can be set from
0.01 to 9.99 seconds.
1.
2.
3.
4.
Hold OK button until the display reads 0.00 .
Press RIGHT-ARROW to cycle through the digits.
Press UP-ARROW to increment the time delay.
Press OK to set the time.
USING THE TRIGGER FUNCTION
The sequencer can be started by applying a 6 – 30 volt DC pulse into the Trigger
Input terminals. At the end of the sequencer a voltage pulse will appear at the
Trigger Output terminals.
This feature can be used to make the CH18W system a ‘slave’ sequencer of
another firing system. Simply connecting the Trigger Input to any cue on the
‘master’ firing system and the CH18W sequencer will start when the ‘master’ cue
is fired.
© 2009
www.easypyro.com
-4-
EXPANDING THE SYSTEM
The system can be used with other CH18W systems or it can be used in
combination with other CH20S and CH20W systems.
The system is expandable in the following ways:
1) UP TO 3 RECEIVERS GIVING 54 INDIVIDUALLY ADDRESSABLE CUES
Program receiver 1 with the transmitter slide switch in position ‘1’, program
receiver 2 with the transmitter slide switch in position ‘2’, program receiver 3
with the transmitter slide switch in position ‘3’.
1
2
3
Each cue can be
fired by the
operator.
54 Cue Configuration
© 2009
www.easypyro.com
-5-
2) UP TO 16 RECEIVERS GIVING 288 CUES
Each receiver will need to be set up with an address in the following way.
1. Press ADD button.
2. Use RIGHT-ARROW and UP-ARROW to set 1 of 16 addresses.
3. Press ADD button again.
All the receivers will need to be programmed with the transmitter in the usual
way except the transmitter slide switch must be in position ‘4’ at all times.
The cues can only be fired in the ALL, STEP and CONT firing modes.
INFORMATION
For CONT mode, all receivers need to have the same time delay.
Note:
This is because for receivers above number 1, a receiver offsets
the time it starts sequencing from by the following formula:
Time to sequence begin = delay x 18 x (receiver number-1)
Example:
Assume time delay is set to 1 second and 4 receivers are in the
system. When CONT is pressed, all receivers receive the signal
at the same time. Receiver 1 starts to sequence immediately.
Receiver 2 starts to sequence after 18 seconds. Receiver 3
starts to sequence after 36 seconds. Receiver 4 starts to
sequence after 54 seconds etc. There is no communication
between receivers, so if, for example receiver 3 is OFF, then
receivers 1, 2 and 4 will still operate, albeit with a 18 second
gap between receivers 2 and 4.
CONT and STEP mode will only work ONCE. All receivers will need to be
switched OFF and ON again to use those modes again.
Example:
6 receivers are set up giving 108 cues. Press CONT and all cues
will fire in sequence with the programmed delay. However,
CONT will not be able to be used again until all receivers are
switched OFF and ON again.
Example:
10 receivers are set up giving 180 cues. Press STEP and each
cue will fire one after the other on each sequential button press.
Holding down STEP will cause multiple cues to fire rapidly.
However once all cues are fired STEP will not be able to be used
again until all receivers are switched OFF and ON again.
Example:
16 receivers are set up giving 288 cues. Press ALL and all cues
will fire on all receivers. ALL can be used again without
switching the receivers OFF and ON again.
© 2009
www.easypyro.com
-6-
1
2
16
Each Cue can be
fired in CONT, STEP
and ALL fire mode
only.
288 Cue Configuration
© 2009
www.easypyro.com
-7-