1
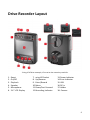
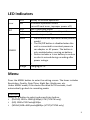
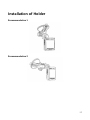
User Manual V737 V737W V747 V747W Designed by Flexmedia in Taiwan Table of Contents Important Instructions ........................................................................... 3 Package Checklist ................................................................................... 5 Drive Recorder Layout ........................................................................... 6 Using Memory Cards .............................................................................. 7 Using V737/V737W/V747/V747W ......................................................... 7 LED Indicators ........................................................................................ 8 Menu ..................................................................................................... 8 Installation of Holder ........................................................................... 13 USB Connection ................................................................................... 15 Recording Screenshot .......................................................................... 16 Playback Screenshot ............................................................................ 17 General Information ............................................................................ 18 Frequently Asked Questions ................................................................ 19 Contact Us ........................................................................................... 20 *Functions and specifications stated in the manual are subject to change, please refer to the official website www.flexmedia.com.tw for the most updated information. Important Instructions Thank you for purchase of V737/V737W/V747/V747W drive recorder. It has been engineered and manufactured with the highest priority on safety. However, improper use can result in potential danger. Please observe the following important instructions. Before using V737/V737W/747/V747W, please check the following: Make sure the car charger is properly connected. Make sure the memory card has been formatted. Check www.flexmedia.com.tw to download the most updated firmware for improved features or new functions. WARNING Under no circumstances should you try to repair the system yourself, as this will invalidate the warranty. Do not open the drive recorder as there is a risk of electrical shock. If a fault occurs, first check the points listed below before taking the system for repair. If you are unable to remedy a problem, consult your dealer or service center. The drive recorder is only used as a tool to provide video evidence, it is not responsible for driver safety and does not guarantee driver safety. It is recommended that a driver still has the proper car and driver insurance. The video recorded should not be used for illegal purposes, Flexmedia is not responsible for any illegal use of the video recorded. Flexmedia does not guarantee that the recorded video can be used in court for legal purposes. The videos should be used for reference only. Installation of the drive recorder should be performed by authorized personnel, Flexmedia is not responsible for any damage on other car parts caused during installation. The mounting bracket could fall after months 3 of constant extreme heat or direct sunlight, which might cause the damage to the drive recorder or other car parts. Flexmedia only provides warranty services for the drive recorder. It is recommended that the mounting bracket to be checked constantly to avoid falling during driving. Battery Usage The built-in battery stops charging at 65℃ (149℉). The battery requires some time and possibility multiple times of driving (to provide power to the drive recorder) for the battery to have full charge, but the recorder without a full charge battery does not affect its normal operation. Flat battery requires 3hrs for full charge. Due to the higher device temperature for V747/V747W, it will stop charging after about 45 minutes of charging. FCC Certifications This equipment has been tested and found to comply with the limits for a Class B digital device, pursuant to Part 15 of the FCC Rules. These limits are designed to provide reasonable protection against harmful interference in a residential installation. This equipment generates uses and can radiate radio frequency energy and, if not installed and used in accordance with the instructions, may cause harmful interference to radio communications. However, there is no guarantee that interference will not occur in a particular installation. If this equipment does cause harmful interference to radio or television reception, which can be determined by turning the equipment off and on, the user is encouraged to try to correct the interference by one or more of the following measures: Reorient or relocate the receiving antenna. Increase the separation between the equipment and receiver. Connect the equipment into an outlet on a circuit different from that to which the receiver is connected. Consult the dealer or an experienced technician for help. 4 IMPORTANT WARRANTY INFORMATION To reduce the risk of fire or shock hazard, do not expose this equipment to rain, any liquid or moisture. Flexmedia shall have no obligation to repair, replace or refund until the customer returns the defective product to Flexmedia. The repairs and replacement service will not apply to units that were misused, repaired without authorization ort by other reasons beyond the range of intended use. Any replacement product may be either new or like-new, provided that it has functionality at least equal to that of the product being replaced. Flexmedia is not responsible for any data stored on returned products, please backup any data prior to shipping the unit. All OUT OF WARRANTY repairs maybe subject to a normal repair fee. Please contact your dealer or Flexmedia for charges. Package Checklist Main Device Suction Holder User Manual Car Charger Cable Clip Sticker Replacement Holder USB Cable(V737/V737W only) 5 Drive Recorder Layout *Using V747W as example, V7xx series has same keys and IOs. 1. 2. 3. 4. 5. 6. Reset On/Off Playback Speaker Microphone 2.4” LCD Display 7. microSD Socket 8. Up/Reverse 9. Enter/Record 10.Menu 11.Down/Fast Forward 12.Recording Indicator 13.Power Indicator 14.Error Indicator 15.USB 16.DC-in 17.Holder 18. Camera 6 Using Memory Cards To ensure the recording quality and performance, a class 10 microSD card with well known brand is recommended. Open the memory card door and press the microSD memory card into its slot until it clicks into place. Do not remove your memory card while the device is recording. To remove the memory card, push the card in until it clicks. It begins to slide out, and you can slide it the rest of the way out. Using V737/V737W/V747/V747W 1. Fasten the drive recorder to the suction holder. 2. Insert the microSD card into the card slot. NOTE: Please carefully insert the memory card with the front of the card facing the LCD. 3. Plug the car charger to working cigarette lighter. 4. Switch on the cigarette lighter to start recording. 5. The video will be created as every 200MB or 400MB segments. 6. To stop recording, please press Enter button and the red recording icon will disappear on the screen. It will record automatically after 8 sec if no key is pressed. 7. To ensure no critical shot is ever missed after power outage, the unit will continue recording automatically based on your Power off Record Timer. To completely shut down the unit, you can press Power on/off button. 8. The drive recorder can set up the Power Off Record Time to 30 seconds (default) or shut down automatically after 2 minutes. 9. Only when recorder runs on battery, and no microSD card is inserted, the recorder will automatically switches off itself after 30 seconds. Warning: To avoid the power loss, please remove the car charger when you leave the car. Because in some vehicles, the battery will continue to supply power to the cigarette lighter even you turn off the engine. 7 LED Indicators Error REC Unlit Red Unlit Red Unlit Steady for normal operation Erroneous operation occurs (microSD card error, improper power off) Not in recording mode Slow blink: Steady for normal operation Recorder is power off Green POWER Orange Stand-alone unit operation mode (battery mode) The On/Off button is disabled when the unit is connected to constant power via car adapter or AC power. The button is only enabled when running on battery. Device includes a Li-ion battery to ensure no shot is missed during recording after power outage. Charging/DC in Menu Press the MENU button to enter the setting screen. The items includes Resolution, Quality, Date/Time, Night Rec. Brightness, etc. Under MENU mode, if the device has idled for 20 seconds, it will automatically go back to recording mode. Resolution Using /button to select and press Enter button. (Full HD) 1920 x 1080 @30fps (V747/V747W only) (HD) 1280 x720 Pixels@30fps (WVGA) 848 x 480 pixels@60fps (V737/V737W only) 8 Quality Choose between HQ and LQ. The difference between HQ and LQ is the bit rate. Full HD: HQ (12Mbps) & LQ (9Mbps), HD: HQ (8Mbps) & LQ (4Mbps) Date / Time 1. Press the menu button 2. Using button to select MENU and press Enter button. 3. Press Enter button to highlight date/ time. 4. Set the value by using /button. 5. Press Enter button again to release the highlight. 6. To change between year, month, hours, minutes, seconds, short press the /button. Night Rec. Brightness The number of bars indicates the brightness level of the recorded video. If you prefer a brighter video, set the number of bars at 5. If you would like a normal brightness, set it as 1 bar. H.Mirror Choose between ON or OFF. This function is used for users who install recorders shooting towards the back of the car. Color Balance (For V747W only) This feature allows users to choose between a more natural video color balance (yellow icon), and a brighter video (white icon), where the video appears whiter when compared the actual scene. File Size Choose between 200MB or 400MB Auto Power Off Choose between 30 seconds or 2 minutes Built-in rechargeable 700mAH Li-ion battery needs about 3 hours for fully charged. 9 Screen Saver Using /button to adjust the setting, the setting can be changed from 0, 30, or 60 seconds. Setting “0” indicates the screen saver mode is switched off. The LCD will remain switched on, but to save power, the device will automatically reduce the brightness of the screen when the unit is idle for 3 minutes. When device is not connected to power source, after idling for 3 minutes the LCD will switch off automatically. Sound Recording Set the sound recording volume, from Off to level 4. The higher the level, the louder the recording sound. Auto Format On: If the memory card’s file system is faulty, the device will prompt to format the memory card. In the case where Auto Format is turned ON, the memory card will be automatically formatted, and device will return to recording mode. Recommended for normal users. Warning: all files will be erased when the memory card is formatted. If you would like to manually maintain all files in memory card, please turn Auto Format OFF. Off: If the memory card’s file system is faulty, the device will prompt to format the memory card. In the case where Auto Format is turned OFF, the memory card will NOT be automatically formatted, and device will NOT return to recording mode but continue display memory card error warning. Format You can select to have the data permanently deleted. The memory card will be formatted as FAT32 format. Recording Mode Full stop: Stop recording with “beep” warning sound when the memory 10 card is full. Overwrite (Continuous Recording): overwrite the oldest video file when memory card is full. Language Support multi-language. (Simplified Chinese / Traditional Chinese / English / Deutsch / Italian / Spanish / French / Turkish / Portuguese / Dutch / Japanese/ Russian / Korean) Auto File Lock Turn on or off the built-in G-sensor auto lock function. When a strong shock is detected, system will set that particular video file as “write-protect”, so to keep the file from being overwritten. The maximum capacity a memory card can keep locked file is set as 2GB. Remark: The right of the screen will show till the file is closed. Lock Sensitivity (If Auto File Lock is switched off, there is no function for Lock Sensitivity) There are 5 selection of sensitivity. The smaller the setting, the easier file will be locked. Frequency Select between 50Hz or 60Hz, depending on your local setting. This is to avoid recording the flickering of the traffic lights. Plate Number To set the plate number, figure 0~9, alphabet A~Z, ‘-‘, and ‘*’ are available, but ‘*’ stands for space. This is suitable for business-use owner to identify which car the video is shot from. Image Type The video displayed on the screen can present the watermark in accordance with the options you set. (1) ON:display FLEXMEDiA Logo, product name, recording date and 11 time (2) Date&Time:dispaly recording date and time only (3) Number Plate:display number plate, recording date and time. The logo is replaced by number plate. (4) OFF:no watermark Version Display the current firmware version of the device. Check www.flexmedia.com.tw to download the most updated firmware. Default(For V747W only) Select "Yes" to change all settings to factory default. 12 Installation of Holder Recommendation 1 Recommendation 2 13 Steps 1. Tear the plastic wrapping from the suction holder 4. Loosen “I” and adjust to the angle of “2” 2. Press the suction holder per the 5. Please install V737 in the suction direction of arrow, and then holder per the direction of arrow press the latch. Please remove the stain and oil from the surface of glass 3. Loosen the knob 14 USB Connection Connect the driver recorder and PC with the provided USB cable Double click the " My computer" icon, the operating system will display drive recorder as removable disk. You can then read, write, copy, delete and remove data on the PC. The file name is a 13 digit number given by month/date/hours/ minutes and file order. During file transfer in the PC mode, DO NOT: 1. Unplug the USB cable. 2. Remove memory card from the card slot. Otherwise, there may be a chance to lose or corrupt data. *Do not use USB ports repeated through peripherals (such as keyboards) or with un-powered USB hubs. 15 Recording Screenshot Battery Level 12:24:12 Resolution and Rec. Lock Sensitivity Rec indicator Rec time Mic indicator Quality (V747W) Press to manually lock current recording file Press ENTER to pause recording, if no action, recording will resume after 10 seconds Press MENU to enter Menu Press to show camera view guide lines as the cursor, press again to turn off (60sec after power on) *Warning: Do not remove microSD card during recording 16 Playback Screenshot Lock indicator Playing 8th file Folder name/Start Rec. time 100-1220 0008/0101 00:01:45 Date Time Press○ F button to go to playback mode Press button to go to previous file; Hold to rewind Press ENTER to pause playback Press MENU to select file to delete Press button to go to next file; Hold to fast forward Press○ F button again to return to recording mode 17 General Information For indoor usage, it is best to mount this device from 0 to 3 meter for better camera focus. For indoor usage, it is suggested to use another source of light in the dark areas to enhance images to enable the drive recorder to detect objects and improves the detection. It is possible and normal for the recording image to have noise in the low-light conditions. Keep the drive recorder away from direct sunlight, impacts, dust, moisture and sudden changes of temperatures. Bright light sources (moon, projectors or headlights) may cause recording quality to degrade or recording image to have horizontal black stripes. Poor atmospheric conditions such as fog, haze or extremely dark environments, will decrease the recording quality of the unit. Do not touch the lens with fingers. Do not keep car engine running in the garage or any enclosed space in order to have device active. The exhaust will permeate into a car, leading to the possibility of carbon monoxide poisoning. Always check the date and time of this device before using or after resetting. Do not remove the card until the red recording icon has disappeared from the screen. Please carefully insert and remove the memory card from slot . Do not drop, jar, bump, shock the unit, or expose to severe vibration while unit is recording. To reduce the risk of electronic shock, do not remove cover (or back ). To avoid any dangerous to the environment and to human health. Please do not dispose of the electronic device in a regular trash. Please have this device be collected at places of distribution. This product is not a lifesaving device; it does not replace the need to 18 operate the vehicle in a safe and responsible manner. Flexmedia and its product should have no obligation for any loss, cost, damage, injury or expense of any kind use caused by Flexmedia products. Frequently Asked Questions Problem The status indicator LED is not lit Lower frame rate than expected Solution It may be caused by faulty charger or hardware failure. It may be caused by microSD card with slow read/write speed or very low-light conditions. Faulty power adapter Check you are using power adapter provided Image too dark or too Camera incorrectly configured on your bright workstation The system does not Please press the reset button to reset react when buttons are the unit. If unit does not respond, call press. our technical support hot-line or write it to [email protected] Corrupt data, fail to Please backup the data and reformat open recorded files the memory card. 19 Contact Us Visit Flexmedia on the web Go to www.flexmedia.com.tw to download the latest firmware or the latest version of this manual. Contact Flexmedia To process a request for Technical Service, please mail the following information to [email protected] 1. Model Number: 2. Serial Number: 3. Firmware version: 4. Memory card capacity and brand: 5. A description of the problem: 6. Your dealer name or where the device was purchased: 20