1
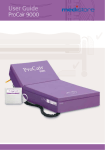
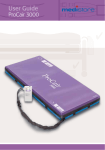
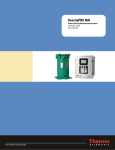
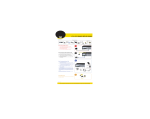
quick set up guide
1 Remove existing mattress and replace with
ProCair Mattress Replacement (printed top cover
upwards; air hoses towards bed base).
2 Secure to bed base using the adjustable straps.
Ensure there are no twists and tighten straps for
a firm fit. On profiling bed
secure straps around
moveable bed base
section.
The
Pressure Setting
indicators (Soft to Hard)
flash to indicate the system
is operational and inflating.
Allow up to 45 minutes
for complete inflation.
3 Hang the control unit using
the rear hanging hooks or
place on a stable surface (ie
floor beneath the bed).
When
inflation is complete,
the fourth indicator, together
with Alternating Mode
indicator will illuminate.
4 Attach air hoses to the
control unit. Straighten
any twists to ensure
uninterrupted air flow
between control unit and
overlay.
9 Once the mattress is inflated, bedding can be
replaced. Secure sheets loosely enough to ensure
they do not interfere with cell alternation.
10Lie patient face up
and test pressure settings
by performing a
‘bottoming out’ test:
5 Ensure the CPR tag sealing
connector is fully inserted
into air hoses (tag is located
on side, near head end).
a unzip one side of the top cover
bslide your hand underneath the patient, feeling
for a deflated cell under the patient’s lower
spine – your hand should easily slide between
patient and base
6 Feed the power cord
through retention loops
on side of mattress to
keep cord off the floor.
7 Insert the power cord into
control unit base, then plug
into power socket and switch
on mains power.
8 Press the Power button
for two (2) seconds to
switch on.
c f or optimal pressure: patient should be
immersed 30-50% into fully inflated cells
2
1
3
dif patient is not appropriately immersed, decrease
pressure setting and repeat test every 10-12
minutes, until optimal pressure is reached
freecall 1300 882 194
freefax 1300 882 197
www.medistore.com.au
May15
less pressure, more support
control unit operation
7
2
3
4
5
6
1
Five different alarm signals are identified by five
different Pressure Setting illumination sequences:
V is u al alarm
A u d i b le A larm
F A U LT
Power or
Fuse issue
Initial
failure
Pressure
too low
1 Power button
Press and hold for two (2) or more seconds to turn
on or off. Always turn off before unplugging unit
2 Mute
Alarm will continue to sound until fault is corrected.
Refer to trouble shooting guide to diagnose fault
3 Comfort controls
Increase or decrease based on patient weight.
Refer to comfort guide for correct settings
4 Mode selections
Press to switch between static or alternating mode.
Automatically returns to alternating after 20
minutes on static setting
5 Max inflate
Press for auto-set-up / rapid inflate to maximum
pressure
6 Lockout
Press and hold for five (5) seconds until beep is
heard to lock or unlock
7 Alarm indicator
Red light flashes and alarm sounds, to alert when
control unit or mattress fails.
Pressure
too high
Power
failure
Alternation mode
failure
Refer to Trouble Shooting Guide or User Manual for
further information on addressing faults
Transport Function
Press Mode button (4) to select static mode. Wait at
least 5 minutes for system to reach maximum
pressure. When fully inflated, turn off Control Unit (1);
switch off mains supply and unplug cord.
Remove the CPR handle from the Control Unit
and quickly seal using the attached handle cap.
Make sure all four connectors are fitted firmly.
The length of time air is retained depends on
weight / height of the individual patient.
T h e r ap e u ti c d e v i c e s h o u l d o n ly b e u s e d i n ac co r da n c e w it h m a n u fac t u r e r s i n st r u c tio n s & u n d e r t h e co n s e n t, s u p e r v isio n & m a n ag e m e n t
of a s u ita b ly q ua l ifi e d h e a lt h p r of e ssio n a l .
freecall 1300 882 194
freefax 1300 882 197
www.medistore.com.au
May15
less pressure, more support