1
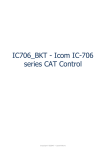
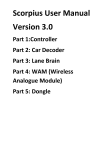
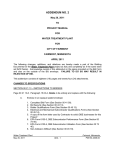
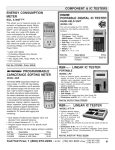
Scalextric Sport Digital Console
Created with the Standard Edition of HelpNDoc: Free CHM Help documentation generator
Introduction
Welcome to SSDC
Slot car racing brought to life!
Created with the Standard Edition of HelpNDoc: Free CHM Help documentation generator
Prerequisites
In order to install and use Scalextric Sport Digital Console (SSDC), you need to ensure that you have
the following items in your setup:
· a Scalextric Advanced Digital Powerbase (C7042) or PB-Pro (modified C7030 powerbase).
· a serial cable to connect this powerbase to your PCs USB or serial port. These cables are
available for purchase from the SSDC web site. Please note that different cables are required for
PB-Pro and the Advanced Powerbase, eventhough they might look the same!
Optionally, you can include any of the following:
· a Pit-Pro. This is a modified Scalextric pit lane game and provides pit lane sensing as well as a
race light array.
· a modified C7030 powerbase, which can also be used for pit lane sensing.
· wireless throttles. Bluetooth Throttle-Pro wireless throttles are supported, which provide adjustable
braking and a user definable function button for KERS, track calls or car lights. SSDC also
supports Scorpius and SCS wireless throttles.
· a RichG lap tower. No longer in production, but nevertheless a great addition to a race circuit if you
can get hold of one!
· track and race light circuitry, connected via the computer parallel port, Velleman K8055 prototyping
board or any type of Arduino board that can be connected via USB to a PC.
· upgraded InCar digital chips, which provide switchable lights and adjustable braking that are
controllable by the driver during a race.
· Scorpius Locator Pro track sensors, used to help with management of pit lanes or extend the start
finish line to multiple lanes.
Created with the Standard Edition of HelpNDoc: Free CHM Help documentation generator
Installation
The software can be downloaded from http://ssdc.jackaments.com. The installation files, and optional
libraries, can be found on the download page. When you click on the download link for the current
software version, a window will appear asking you to open or save the file.
Click on the Save button, and save the file onto your desktop (you will delete it later).
When the download is complete, you can repeat the process for the system library (io.dll). Download
this file into your C:\WINDOWS\SYSTEM32 directory using the same approach as described above.
Once this file is installed in this location, there is nothing more that you need to do with it. NOTE: You
only need to install io.dll if you want to use the parallel port to drive track light LEDs.
Having downloaded the software package onto your desktop, you now need to install it. Locate the ZIP
file on your desktop, and right unpack it using WinZip. You should end up with a folder containing the
following files.
Created with the Standard Edition of HelpNDoc: Free CHM Help documentation generator
To start the installation, double click with the mouse on the setup.exe program. The installation of the
software will start.
A message will be displayed, stating that the publisher of the software could not be verified, and
asking if you want to continue with the installation. Click on the
button as shown above. The
installation will complete, and SSDC will start automatically.
When you have installed this software for the first time, you will be prompted to register the software.
The following window will appear.
You can press the Evaluate button each time the program starts, and you will be able to use a fully
functional version of the software for the 30 day period, which starts from the day that you first run the
program.
When you are ready, you may purchase a license for the software from the SSDC website. You will be
issued with a license key that matches your email address, which will then remove this window at the
program start, and allow the program to continue running after the 30 day period has expired.
Created with the Standard Edition of HelpNDoc: Free CHM Help documentation generator
Getting started
This chapter will take you through the essentials, in order to get started quickly with SSDC. In depth
descriptions of program functions are available in later chapters.
The main steps to running your first race are:
· Setting up the connection to your powerbase
· Defining the type of pit lane you have, and if it has sensors
· Creating a database for drivers, cars, tracks, races and results
· Creating your first driver, car and track
· Defining your first race
· Programming cars
· Starting free practice to shake down car and driver settings
· Starting and running your first race
· Handling refueling, track calls and penalties
· Reviewing your race results
Powerbase setup
When you start SSDC for the first time, you need to define the type of powerbase you are using and
the serial port that is used for the powerbase connection. You should use the toolbar options in the
main window to set up the connection.
First, choose from the drop down menu (under the first chequered flag) which powerbase type you
have installed. This is either PB-Pro or C7042 (the new 6 car advanced powerbase). Next you should
select the powerbase serial port to use, using the "powerbase port" drop down list.
Created with the Standard Edition of HelpNDoc: Free CHM Help documentation generator
Usually, when using USB ports, the port names will start from COM4 and increase. Older style D-type
built-in serial ports will have numbers lower than this starting from COM1. Make sure that the
powerbase is connected to the computer using a serial cable, and a powerbase is switched on. Now
stop and restart SSDC. The powerbase port list is populated with all of the available serial ports at the
time SSDC starts. Ensure that the status bar is visible by selecting the option to display it in the "View
menu". Now simply work your way through this list selecting each option in turn.
As you select each option, keep an eye on the two LEDs in the bottom right-hand corner of the main
window. When the green LED lights it means that the serial port is open and SSDC is trying to
communicate with the powerbase. When the red LED lights, it means that the device on the other end
of the serial line is not responding in the way that that SSDC expects. This almost certainly means that
the currently selected serial line is not the right one. When the red LED goes out, and the green LED
remains lit, you can be sure that you are now connected successfully to the powerbase.
Troubleshooting
In the event that you still cannot get the responses above, after trying all the available settings, it may be
that there is another program using the serial ports, and SSDC cannot open them. Examples may
include Microsoft ActiveSync, which synchronises phones and PDAs with Outlook Email and Contacts.
There is a useful tool available at http://technet.microsoft.com/en-us/sysinternals/bb896644.aspx that
allows you to monitor the available ports on your PC to see which programs might be using them.
Pit lane setup
The next step is to tell SSDC what pit lane configuration you have. The chequered flag menu option to
the right of the pit lane port shows the available configurations. If you don't have any pit lane sensors,
but do have a pit lane then choose one of the "No Pit Monitor" options. If you have a pit entry sensor
only, then select one of the "Pit Entry Only" options. Finally if you are lucky enough to have a pit sensor
at both the pit entrance and pit exit, then select one of the "Pit Entry + Exit" options.
Created with the Standard Edition of HelpNDoc: Free CHM Help documentation generator
With the configuration above, the pit lane spans the powerbase. It begins before, and exits after, the
start line. Use one of the "Exit After Start" options. SSDC will ensure that a lap is added each time a
car exits the pit lane.
With this second configuration, the pit lane begins and ends before the start line. However, as the
powerbase is sufficiently close to the pit lane exit, you can use the powerbase as a pit exit sensor. In
this case you should use one of the "Exit Using Start" options.
Created with the Standard Edition of HelpNDoc: Free CHM Help documentation generator
With this final configuration the pit lane begins and ends either a long way before, or shortly after the
powerbase. As a result, it is not possible to use the powerbase as a pit exit sensor, as so you should
use one of the "Exit Before Start" options.
If you have pit lane sensors then you also need to define which type of sensors you have, and which
USB or Serial port the sensors are connected to. SSDC supports two types of sensors: those with a
Pit-Pro and also a modified C7030 powerbase. Articles are available in the slotforum.com web forum
describing how to modify a C7030 powerbase for sensing should you wish to do this (e.g.
http://www.slotforum.com/forums/index.php?showtopic=21968&st=0). Pit-Pro's can be bought by
contacting [email protected].
Connecting up your pit lane should be simple, as in most cases the serial port will simply be the other
available com port (i.e. not the powerbase one). For example, if the powerbase is on COM5 in the pit
lane will usually be on COM6. Check the port names available in the pit lane port list, and again work
through them if necessary. The easiest test to ensure that the pit lane is connected correctly is to
manually push a car over the pit lane sensor, while SSDC is running, and listen out for Murray Walker
saying "and into the pit lane".
Database creation
Before you can do very much with SSDC v5, you need to create a database. The SSDC database is
responsible for storing all information about cars, drivers, tracks, races and their results, and pace
cars. Data is read from, and saved to, the database automatically so there is no need to worry about
saving your changes as you use SSDC.
To create a new database simply select the "File, New" menu option.
Created with the Standard Edition of HelpNDoc: Free CHM Help documentation generator
You will be prompted for the location of the new database. By default the database will be created in
your "My Documents" folder using the filename ssdc.db3.
When you press the save button, the database will be created for you automatically.
In the bottom left-hand corner of the main window, it will show the database location once the database
is successfully created, opened and ready to use.
Drivers, cars and tracks
Before you can set up a race, you must first define your cars, drivers and tracks. Each of the Windows
Created with the Standard Edition of HelpNDoc: Free CHM Help documentation generator
that manages these provides a toolbar in the top left-hand corner that allows you to add, duplicate and
delete records.
An example of the buttons, from the tracks window, is shown above. When creating a new record,
press the add button to add the new record to the list. The new record will automatically be selected so
that you can edit the options associated with it on the right-hand part of the screen. These options are
described in the following sections (see section titled "Configuring options").
Race setup
Having setup your preferences and defined your cars, drivers and tracks, it is now time to race.
Navigate to the race manager window, and use the add button (highlighted below) to create a new
race series, a new race event, and finally a new race. You can use the hierarchy of series, events and
races to organise your race manager.
Once you have done this, you can change the race settings. The first thing is to define the mode of
racing and the duration, which can be done by editing the fields in the list, next to the race that you have
just created. In SSDC there are four race modes, which are:
Qualify: a time-limited race where the winner is the person with the fastest lap
Grand Prix: a lap limited race where the winner is the person who finishes the lapse in the shortest
time
Endurance: a time-limited race where the winner is the person who has completed most laps in the
available time
Pursuit: a variation of the endurance race, where you are able to set delays for each entrant so that
slower drivers can gain a head start
When setting the duration of the race, bear in mind that for Grand Prix this equates to the number of
laps, whereas for the other three race modes the duration is measured in minutes. You should also
define which track this race is to be run on. This is helpful so that the statistics can be recorded
appropriately, and in the case of pace cars, the right data used to replay variable throttles. if you only
have one track, it will be selected by default.
Created with the Standard Edition of HelpNDoc: Free CHM Help documentation generator
Once you have defined your race, the next step is to establish who is racing which cars. To do this you
can simply drag and drop cars and drivers from the respective windows into the appropriate slots on
the race manager window. The IDs correspond to the control IDs on the powerbase, with the colour
coding being identical to the colours on the powerbase itself.
Alternatively, you can click on a "*" in the race summary window to assign either a car or driver to a
specific slot.
Created with the Standard Edition of HelpNDoc: Free CHM Help documentation generator
Finally, you can define options for each entrant outlined below:
Starting Fuel - What starting fuel level to you want to have at the beginning of the race. This will allow
you to start fast and perhaps have an early pit stop
Delay - The number of seconds that this car will be held on the start line after the race start.
Grid - the grid position of the car at the start. This is usually determined during a qualification race, or
in free practice prior to the race itself.
Programming cars
Before you can race, you need to program the ID of each car. The car ID is stored in the digital chip
and will not change unless you use the powerbase to change it.
This documentation applies to the C7042 Advanced Powerbase. For PB-Pro and standard C7030
powerbase users, follow the steps documented in their associated user manuals.
If you have updated your powerbase to firmware version 1.09 you can program your cars very simply.
The steps are as follows:
Created with the Standard Edition of HelpNDoc: Free CHM Help documentation generator
1.
2.
3.
4.
5.
Remove all the cars from the track
Place the car that you want to program on the track
Press the coloured button on the race manager window that corresponds to the ID you wish to use
You should see the powerbase flash the ID that you have selected
Your car is successfully programmed and you can remove it from the track
Follow this process for each of the cars. Once you are done, you can place the cars on the track and
drive as normal.
If you haven't installed v1.09 firmware on the powerbase, it is still possible to program the cad IDs
without disconnecting the USB cable from the powerbase. Here are the steps:
1.
2.
3.
4.
5.
6.
7.
Press the "Disconnect" toolbar button in the main SSDC toolbar to disconnect SSDC from the
powerbase
Take all the cars off the track
Put the car that you want to program on the track
Press and hold the "Enter" button on the powerbase to enter programming mode
Press the brake button on the throttle that you want to associate this car with
Repeat steps 2-5 as appropriate
Press the "Connect" toolbar button in the main SSDC toolbar to reconnect SSDC to the
powerbase
Free practice
If you want to, you can run a free practice period. The free practice period is useful to shake down car
and driver settings and ensure that everybody is race ready. During the free practice pace cars will not
run, however all other settings are the same as they would be in a race, so drivers can practice
refueling, watching the leaderboard, and lane changing without being under race conditions. Also track
Created with the Standard Edition of HelpNDoc: Free CHM Help documentation generator
calls cannot be activated during free practice, so if a car leaves the track drivers are able to continue
driving at normal speeds.
You can load the currently selected race into free practice at any stage by using the free practice
button, shown above. This can even be done with races that have run. It provides a useful way to
quickly establish some known car and driver settings.
The free practice mode is effectively "toggled" on and off. Whilst it is on, SSDC is controlling the data
sent to the cars from the powerbase. This is how all racing and practice sessions are managed.
Should you wish to ID cars, simply turn the free practice session off. SSDC will release control of the
powerbase, and you can then ID cars by pressing and holding the "Enter" button on the powerbase,
and then pressing the brake button of the correct handset. This is the process outlined on page 13 of
the C7042 Advanced 6 Car Powerbase user manual.
The leaderboard in free practice mode shows the driver with the fastest lap at the top. This is the same
as it would be in a "Qualification" race, so for some, free practice may be sufficient to establish grid
positions.
Here is an example of the leaderboard.
From the left, the columns show:
·
·
·
·
·
The driver or car name or picture
The most recent lap time (larger at the top) with the fastest lap time (smaller at the bottom)
The current fuel level
LEDS and counters that vary for driven or pace cars. For driven cars, there is a pit lane
indicator at the top that is illuminated while the car is in the pit lane. For pace cars, there is a pit
lane indicator as before; and a speed variance indicator used to show how much faster the
pace car is going than the settings that were defined.
The race difference which shows how many seconds your car is behind the car in front of you.
During qualification, this shows the difference between fastest laps, and during racing, this
shows the race difference
Created with the Standard Edition of HelpNDoc: Free CHM Help documentation generator
·
The current lap count
Racing
Before starting a race you probably want to bring the leaderboard to the front of the display within
SSDC. You can do this by clicking on the title of the leaderboard window, or more easily by pressing
the left arrow button on the powerbase. The right arrow button will return you to the Race Manager
screen.
You can start a race at any stage from the powerbase, by pressing the Start button. Alternatively you
can start a race by using the start button in the race manager window.
The start lights will appear automatically, and the countdown sequence will begin. There are 5 red
lights, followed by a random period, and then the green lights will illuminate. Then you can start. The
green lights will remain on for the duration of the race, unless there is a track call. At the end of the
race, the 5 red lights will illuminate for a 10 second period, and then go out.
For time-limited race modes, which includes qualifying, endurance and pursuit, the timer window will
also show the race time counting down. This time indicates the number of minutes and seconds that
remain in the race.
During the race, the leaderboard will be continually updated to reflect the current situation. At the end
of the race, the results screen will be displayed to show you lap times, fuel usage and race difference.
These results are also saved into your database for future historical analysis.
When the race has completed, you need to press the
button on the powerbase to return to free
practice mode. Until you do this, the race will remain in an "Ended" state with the results visible on the
leaderboard.
Refuelling
During the race or in the free practice period you may need to refuel. This can be accomplished by
Created with the Standard Edition of HelpNDoc: Free CHM Help documentation generator
driving into your pit lane (or stopping on the track if you don't have a pit lane), releasing the trigger on
your controller so that you are at zero throttle, and pressing and holding the lane change button.
Refuelling will start 0.5 seconds after you have stopped and started pressing the lane change, and will
continue until you either start moving off, or release the lane change button. When the fuel tank is full,
you will hear the sound Go, Go, Go... and you can continue.
Obviously, there is no need to completely fill the tank. By moving off sooner, you will have a shorter pit
stop, and your car will perform better because it is lighter. Only take on the fuel that you need.
Track calls
During a race, if a car de-slots, a track call can be initiated either automatically by:
· SSDC, after recognising zero throttle positions for racing cars, when automatic track calls are
enabled
· a driver or a track marshal via the powerbase "Start" button
· a driver who presses the lane change and brake buttons together when their throttle is released
· or a track marshal via the pause button on the race manager screen
If your car de-slots, the easiest and fastest way to start a track call is to release your controller. SSDC
will do the rest for you.
You can resume the race by:
· a driver or a track marshal via the powerbase "Start" button
· a track marshal via the play button on the race manager screen
· or a driver who presses the lane change and brake buttons together when their throttle is released
Penalties
Results
When a race has completed, the results of the race are automatically saved to the database. In
addition the graphs in the race manager display are also updated. Here is an example of one of the
graphs, showing lap times in a 20 lap race with 2 pace cars.
Created with the Standard Edition of HelpNDoc: Free CHM Help documentation generator
It is possible to see from these graphs the variations in each cars performance as they both try and
approach the target lap time of 3.2 seconds.
Created with the Standard Edition of HelpNDoc: Free CHM Help documentation generator
By using the "Show Labels" button, highlighted above, it is possible to get exact figures for lap times,
fuel usage and averages that are displayed in the graphs.
Finally, should you wish to rerun a race for whatever reason, you can delete the race results by using
the "Delete Results" toolbar button highlighted below. This button will effectively reset the race to its
pre-run state, so that it may be run again.
Created with the Standard Edition of HelpNDoc: Free CHM Help documentation generator
Configuring options
The first thing that you need to do on starting SSDC is to configure the software preferences. The
preferences window can be accessed by using the
, Options menu item. Each of the
preferences pages is described in detail here.
Screen layout
When you start SSDC for the first time, you will be presented with a window layout similar to the picture
below.
One of the things you can do is to arrange window layout to your personal preference. By using the
view menu, you can hide or show any of the SSDC windows, and by dragging the window titles, you will
be able to place and dock the windows in a variety of ways. SSDC will remember the layout that you
create, and each time it starts it will restore this window layout.
Created with the Standard Edition of HelpNDoc: Free CHM Help documentation generator
The picture above shows how, when dragging the window to a new location, the user interface
provides you with feedback as to where you can place your window and what the window will look like
if it were placed in this location. Each of the square boxes that appear when dragging the window
represent a new potential location for that window, and by simply dropping your window onto one of
these boxes you end up with a new layout.
Main toolbar options
Created with the Standard Edition of HelpNDoc: Free CHM Help documentation generator
Timer
Program options
Most of the main race options are defined in a single window, which is accessed via the "Tools,
Options" dropdown menu. Each of the tabs in this window are described in the following pages.
Display
In this window you configure your main settings.
Created with the Standard Edition of HelpNDoc: Free CHM Help documentation generator
Leaderboard name: This option defines what information is displayed in the main leaderboard to
identify cars and drivers. You can choose either names or pictures of either the car or the driver.
Leaderboard colours: This option defines which colours will be used to identify cars on the
leaderboard. "System" means that an entry will use the defined system colours (the same as on the
powerbase itself). Alternatively, you can use the defined colours for cars or drivers. When a car is
racing, and the database details are not known, SSDC will default to the system colours.
System colours: In order to match the colour arrangement on your powerbase, or Pit-Pro, you can
change the order of the system colours in SSDC. Use the list boxes to specify which ID matches the
specific colour.
Race options
This screen allows you to define the rules to be used when a race is run. They include:
Created with the Standard Edition of HelpNDoc: Free CHM Help documentation generator
Track Call after: SSDC can automatically generate a track call (flashing ambers lights, and slowing
or stopping of cars) if it detects that the throttle of a racing car is at zero for a period of time. This
usually happens when a car comes off the track, and its driver drops the throttle in order to go and
rescue it. You can set the value from 0.5 to 5 seconds to enable the feature and define the period that
zero throttle must exceed before a track call occurs. In order to restart the race, you should ensure that
all drivers are ready and then press the start button on the powerbase. The flashing lights will stop, and
the race can continue.
Out of Fuel: This option defines what should happen when a car runs out of fuel. If SSDC does
nothing, then the car will continue to run normally. The "slow car" option will limit the car's speed to the
defined safety speed limit that is set up as a part of the car configuration. This will allow the car to drive
slowly to the pit lane, refuel and then continue with the race. The "disable car" option will simply stop
the car and prevent it from continuing in the race.
Refuelling: How quickly should cars refuel? If you define a car with a tank of 50 units, and the refuel
rate is 5 units per second, it will take 10 seconds to refuel from empty to full. This will actually be
delivered at a rate of 0.5 units every 1/10th of a second. The "Refuel After" option is used in cases
where no pit lane sensors are available. This option defines the amount of time that a car must be
stopped before it is considered to be in the pit lane and therefore allowed to refuel.
False start: should there be a check for false starts and penalise those who start early?
Start power: is the power cut at the start of a race or not? This can help with false starts.
End power: what happens to the power for each car as they cross the finish line? The power will be
cut for all cars at the race end.
Race end: in a lap limited race, what happens when the winner crosses the finish line? Do the tail
enders need to complete all laps or just their current lap?
Created with the Standard Edition of HelpNDoc: Free CHM Help documentation generator
Track call: when a track call occurs, are all cars stopped or just slowed?
Lights
This screen allows you to define any light interfaces that you may have. During the race, SSDC runs a
light display (which can be shown by selecting the View, Lights menu item). The status of these
software lights can be relayed to physical hardware lights through a number of interfaces. The most
common is a PC's parallel port (sometimes used for printers). The screen allows you to define which
pin numbers correspond to which lights, so that SSDC knows how to interact with the hardware lights.
Sounds
Created with the Standard Edition of HelpNDoc: Free CHM Help documentation generator
The sounds screen can be used to define which sounds you would like to play when particular events
occur during the race or qualification period. For each option, you can choose the default sound,
disable the sound by selecting None , or locate your own sound file (.mp3 or .wav files are both
supported) by selecting the custom option. The events are:
Start: the sound at the start can either be enabled or disabled. You cannot use a custom sound for this
due to the fact that it is specifically linked to the timing of the start sequence
Winner: the sound that is played when the winner crosses the finish line in a race
Lap Leading: the sound that is played when the leader of a race crosses the start/finish line
Lap Normal: the sound that is played when any other car crosses the start/finish line
Fastest Lap: the sound that is played when a new fastest lap is set in the qualification period
Fuel Warning: the sound that is played when the fuel level for a car goes below 25%
Pit lane Entry: the sound that is played when a car enters the pit lane
Pit lane Go: the sound that is played when a car's fuel tank reaches 100% full during refuelling
Out of Fuel: the sound that is played when a car runs out of fuel and exits the race
Qualification End: the sound that is played when the qualification period expires
It is worth noting that some of these sounds are more important that others, and there are rules in
SSDC to ensure that the high priority sounds are played and not interrupted by other less important
sounds.
Created with the Standard Edition of HelpNDoc: Free CHM Help documentation generator
Penalties
Other
Created with the Standard Edition of HelpNDoc: Free CHM Help documentation generator
Drivers
Picture: a picture of the driver that will be displayed on the leaderboard when this car is racing, and
when the preference settings are for driver pictures rather than driver names or car details.
Colour: the colour that the times and other information will be displayed in on the leaderboard when
this driver is racing. Bear in mind that the driver colour will only be used if the preference options are to
display either the driver picture or the driver name.
Created with the Standard Edition of HelpNDoc: Free CHM Help documentation generator
Name: a description of the driver that will be used to identify them in the race settings screen, and also
displayed on the leaderboard when this driver is racing. Again this depends on the preference
settings.
Pronounced As: this field provides you with an opportunity to refine the way in which the driver's
name is pronounced by the computer during racing. In many cases you can achieve better
pronunciation by misspelling the driver's name. Use the speaker button on the driver window toolbar to
test how the computer pronounces the current spelling.
Power Limit: the power limit defines how much power is available for this driver as a percentage of
the available top speed. You can refine this value to make cars more driveable on complex tracks, or
limit the power available to children to reduce the likelihood of crashes.
Dynamic brake: this option enables the automatic application brakes when a car's throttle reduces
below a low threshold. as a car approaches a corner, by re releasing the throttle the breaks will
automatically be applied and the car will stop much faster. Without dynamic brake the car will take
longer to slow down, however an experienced driver can use the brake button to decide when to brake.
Progressive braking: this option ensures that the defined brake settings become progressively
harder the longer the brake button remains held. As a result, the car will eventually be brought to a halt
even if the throttle level is maintained.
Brake strength: this option defines the amount of braking that a driver requires. The Hard setting
means that a brake signal is sent to the car in every transmission whilst the brake button is held in. The
"Soft" setting means that a brake signal is sent to the car once in every six transmissions. If the driver
maintains the throttle level whilst braking, it is possible to continue "driving through" the brakes, and as
such, the brakes only slow the car down, rather than stopping the car.
The next options relate to pace drivers only.
Pace driver: this option defines whether or not this driver is a pace driver, i.e. one which can be used
to automatically drive a car.
Lane change: this option defines whether or not the Pace driver changes lanes. At present the only
option available is random lane changing, which means that as the car drives around the track the lane
change option is set and unset at random. If the setting of the lane change coincides with the car
driving over a lane change sensor, the car change lanes.
Variable throttle: this option defines whether or not a page driver should make use of the variable
throttle data that is captured by SSDC. if the option is unset, the driver will maintain a constant speed
whilst driving around the track. If the option is set then the driver will use the recorded throttle data for
each car as appropriate in order to accelerate and decelerate as it drives around the track.
Target lap time: this value specifies the time that the driver should try and achieve for lap times. You
should set it at an achievable level, where the car does not have to be driven at the limit, and as a result
is more likely to remain on the track. SSDC will adjust the throttle as a race progresses in order to
achieve this target lap time. Simply put, there are three main rules that SSDC will apply. If a car is
driven faster than the target lap time, SSDC will slow it down. Secondly, if a car is driven slower than
the target lap time, SSDC will increase its speed. Finally, if a car misses the target lap time by more
than 50%, SSDC will assume that the car has left the track and been replaced. As a result in this last
case, SSDC will slow the car down in order that the car can remain on the track for the next lap.
Start speed: you can change the start speed by dragging the needle of the gauge around the scale.
The value defines the speed at which a pace driver will start the race. For constant throttle pace
drivers, this value will be used for the entirety of the first lap before it will be adjusted. For variable
Created with the Standard Edition of HelpNDoc: Free CHM Help documentation generator
throttle pace drivers, the start speed will only be used from the start of the race to the point where the
car crosses the powerbase for the first time. After this point the car will start to use the recorded
variable throttle data. In the event that a car performs a very slow lap, and a variable throttle data is not
available, the pace driver will revert to using the start speed again until the car crosses the powerbase.
NOTE: it is important to recognise that there is a strong link between the target lap time and pace
driver starts speed. If the start speed is not set at a high enough level, and the target lap time is
subsequently missed by more than 50%, SSDC will actually slow the pace car down rather than
speeding it up. As a result you need to practice with the settings to ensure that you have values that
work effectively together. In most cases, when the target lap time and start speed are approximately
right, SSDC will quickly adjust the car's speed and produce very consistent lap times for pace cars.
Cars
Created with the Standard Edition of HelpNDoc: Free CHM Help documentation generator
Picture: A picture of the car that will be displayed on the leaderboard when this car is racing, and
when the preference settings are for car pictures rather than car names or driver details.
Colour: The colour that the times and other information will be displayed in on the leaderboard when
this car is racing. Bear in mind that the car colour will only be used if the preference options are to
display either the car picture or the car name.
Name: A description of the car that will be used to identify it in the race screen or leaderboard
Description: A free text field that describes the car. Useful for keeping note of the various settings
that you may have tried.
Fuel Burn Rate: This defines how quickly a car burns fuel. The value ranges from 1 to 10, which
means that a car at full speed will burn this number of units of fuel every 10 seconds. The burn rate
Created with the Standard Edition of HelpNDoc: Free CHM Help documentation generator
varies with the square of the speed (i.e. speed2), which means that at lower speed values the amount
of fuel burnt is considerably less.
Fuel Tank Size: The size of the fuel tank on this car, which will determine how long it can run for. In
conjunction with the refuel rate, it also determines how long it takes to refuel.
Full Tank Speed: This value defines the percentage of speed, or power, that is available when the
car's fuel tank is completely full. In combination with the driver power settings, it means that a car's
maximum speed when full of fuel is equivalent to the full tank speed x the driver power. for example a
driver with a power setting of 50%, driving a car with a full tank speed of 80%, will have 40% power
available when the car is full of fuel.
Speed Limit: this value limits the speed of a car whilst it is in the pit lane, or during track calls. Ensure
that the value is set high enough that a car is able to move from a standing start and progress through
the pit lane without stopping on lane changers.
Tips for fuel levelling
The fuel usage is directly linked to the throttle usage. The more the throttle is squeezed, the more fuel
gets used. For some cars, more throttle is needed to achieve the same speed. This is where the fuel
burn rate comes in. The best way to "level" the fuel usage for two cars is to set the fuel burn rate to a
"slow" value. Then run the cars in qualification mode for approximately 10 laps and look at the fuel
usage results graph in the race manager screen. If the cars are not using the same amount of fuel,
increase the fuel burn rate for the car that uses the least fuel and go through the process again.
Once you have leveled the burn rates, use the tank size to determine how far the cars can run before
they run out of fuel.
Tracks
Created with the Standard Edition of HelpNDoc: Free CHM Help documentation generator
Name: A description of the track that will be used when defining races. It is also used by the pace car
throttle recording functions, to ensure that the right throttle data is used for the right track.
Minimum lap time: The lower limit of valid lap times for this track. Any lap times recorded which are
less than this value will be discounted and the driver will need to complete another full lap for a lap to
be recorded.
Minimum pit time: This is the minimum time a car should take to drive through the pits without
stopping and without breaking the pit lane speed limit. SSDC will use this time to determine if a car
has been speeding in the pit lane, and then use the penalty system to allocate a penalty as
appropriate.
Pit entrance min: This is the minimum time in seconds that a pace car will take from the start/finish
line to the entrance of the pit lane.
Pit entrance max: This is the maximum time in seconds that a pace car will take from the start/finish
line to the entrance of the pit lane. SSDC will automatically turn lane changing off between these two
times to ensure that a pace car does not accidentally enter the pit lane while other cars are refueling.
KERS capacity: This is the maximum number of seconds of KERS boost a car can hold at any time.
Any additional KERS storage will be discarded. The actual amount of KERS stored is shown on the
leaderboard, just to the left of the fuel gauge for each car.
KERS add per lap: This is the extra KERS storage a car gains each lap. The additional KERS
energy is added as the car passes the start/finish line.
Throttles
Created with the Standard Edition of HelpNDoc: Free CHM Help documentation generator
Next steps
Pace Cars
SSDC records the throttle positions for every car at every moment. In the event that race settings are
loaded either for racing or in free practice, and that a known car is running on a known track, SSDC is
able to compare the recorded data against data that it already holds for this car and track combination.
Should the car record a new fast lap time, the recording will be stored in the database for future use by
pace cars. SSDC holds the four fastest laps for every car and track combination, and this information
is being monitored and adjusted continuously. When you open the pace car editor window, you will
see the four fastest laps for the currently selected car and track combination. You can use the "Refresh
Chart" button to redraw this chart at any stage.
If you do not see anything in this chart, it either means that you have not selected both a car and a track
in their respective windows, or there is no recorded data for this combination. Bear in mind that SSDC
will only record the throttles for a car when it is being driven by a person. While a car is running as a
pace car, the throttle data will not be recorded.
The average of the four recordings is shown as a yellow line, and it is this that will be used for variable
throttle pace car replay.
Created with the Standard Edition of HelpNDoc: Free CHM Help documentation generator
In some cases, where the recorded data results in laps of significantly different durations, it is helpful to
normalise the data. By pressing the "normalise" button, you can extend the quicker laps and shorten
the slow laps so that they all have the same duration. The new duration will be the average of the four
lap times. In addition to shortening and lengthening the durations, the normalise function will also
modify the throttle positions to account for the fact that a slightly longer lap is probably the result of a
slightly slower car.
Should you, for whatever reason, be unhappy with the data that is held for a car and track combination,
you can delete it by pressing the "Clear Car Data" button. This will remove all data associated with this
car and track combination from the pace car data store. You are now free to re-record some laps and
repopulate this dataset.
Constant throttle
Variable throttle
Series, Events and Points
If you want to run a series of events and races, you can make use of the "Event Wizard" to help create
the right set of races for you quickly and the series point system to provide an overall scoring system
for the series.
Created with the Standard Edition of HelpNDoc: Free CHM Help documentation generator
Series points system
When you create a new series, it has a default point system for each of the race types that you might
run. You can edit this system to suit your own preference. Each series can have its own points system,
and it doesn't need to be the same as other series.
To edit the point system, select the series in the race list, and click on the "Point System" button on the
toolbar.
The point system window will appear, and you can set the points that a driver will gain for places 1-6
and each completed lap. Each race held as a part of this series will now contribute points to a driver's
overall standings using the new system. If you change the point system at any stage, the allocated
points will be recalculated, and the standings adjusted as appropriate.
Event wizard
To create a set of races and add them to an event quickly, you can use the event wizard. It uses a
simple "round robin" scheme to ensure that each driver drives each car, and creates the set of races
that achieve this. To invoke the wizard, first select the event in the race list and then press the event
wizard icon on the toolbar.
Created with the Standard Edition of HelpNDoc: Free CHM Help documentation generator
The event wizard screen will now be displayed. You can now select the drivers and cars that will be
taking part in the event, and the grid will show the sequence of races that will be created.
Finally, you can set the race mode, duration and track that will be used, before finally pressing the
"Create" button to create the races. The races will be added to the selected event. You can use the
event wizard multiple times with the same event, if required. Each time, the new races will be added to
the event, not overwriting the previously created races.
Points
Having set up your series, point system and events, you can now see the points leaderboard on the
main part of the race manager screen. The screen will show the points that have been allocated to
each driver for the different results as well as the total points. You can sort the grid by clicking on the
title of the column that you want to sort by. If you select the series in the race list, you will see the points
leaderboard for the entire series. If you select the event in the race list, you will only see the points
leaderboard for that event.
Created with the Standard Edition of HelpNDoc: Free CHM Help documentation generator
Results
Race analytics
Created with the Standard Edition of HelpNDoc: Free CHM Help documentation generator
Advanced topics
Keyboard hotkeys
There are a number of hotkeys available when running SSDC, which will normally be used by the main
race marshall. The keys are:
F1 to F6 - Add a penalty to the car ID 1 to 6 respectively
Shift F1 to Shift F6 - Remove a penalty from the car ID 1 to 6 respectively
F7 - Start or stop a race
F8 - Pause or resume a race
F9 - Switch between the race manager and leaderboard displays
Track lights
InCar chip upgrades
Scorpius
SSDC supports two Scorpius Wireless (http://www.scorpiuswireless.com/) products; throttles and
locator pros.
Throttle support
Created with the Standard Edition of HelpNDoc: Free CHM Help documentation generator
In the options screen you can specify which USB port has the Scorpius dongle used to receive throttle
data. You then specify which channel the throttles are configured to use. All throttles must use the
same channel (default is channel 1). Each throttle is then differentiated by the PIN, which is configured
using the throttle controls. Please refer to the Scorpius documentation for details of how to do this.
The PIN should be set as 0001 for Car ID #1, 0002 for Car ID #2 and so on.
Throttles have been tested with firmware version v9.9, and there is full support for:
1. Lane change button
2. Brake button, best used for brake or track call. It is possible to set SSDC settings to use the brake
button for KERS however it won't work as expected due to the fact that a Scorpius throttle zeroes
the throttle value when the brake button is pressed.
3. Menu button (momentary press) used as the "Throttle-Pro" button, which s best used for lights, track
call or KERS.
4. Variable brake setting using the brake dial
5. Throttle sensitivity also works, but be aware that this is overlaid ontop of the SSDC throttle curve
specified in the Car settings
Locator Pro support
Locator Pros, from Scorpius, can be placed around a track and used for sensing cars as they pass
over the track section. They send a signal to a USB dongle to indicate which car was identified and by
which sensor. SSDC is able to use this data to provide additional features.
At present, SSDC supports Locator Pros used for:
1. Pit entry and pit exit. By placing a Locator Pro at each end of the pit lane, SSDC is able to track pit
stops, refuelling, limit pit lane speeds and manage drive through and stop go penalties.
2. Start/Finish. By placing Locator Pros alongside the powerbase, SSDC is able to support 4,8 or
even 16 lane tracks.
In the SSDC options screen, specify which USB port is used for the Locator Pro receiver. Locator
Pros use a special channel in the Scorpius world, so there is no need to configure the channel number.
You do however need to use the Scorpius software to configure the ID of each Locator Pro. The ID
number starts from 0, and goes up to 31. In other words, Scorpius can support 32 Locator Pros on a
single circuit.
Once your Locator Pros are setup, use the SSDC Locators window to tell SSDC what Locator ID is to
be used for which purpose.
Created with the Standard Edition of HelpNDoc: Free CHM Help documentation generator
You can use the Add, Duplicate and Delete toolbar buttons to create and modify existing records. The
fields for each Locator record are:
Name:
Locator ID:
Locator Type:
A descriptive name for the locator
The ID that the locator has been programmed with
The function of the locator
Note: When using Locator Pros for pit lane sensing, set the pit lane port (in the main SSDC window
toolbar) to "NONE" and use the chequered flag pit lane menu to determine the pitlane configuration.
Choose either:
· "No Pit Sensors: Exit Before Start" to indicate a pitlane which does not span the start/finish line, or
· "No Pit Sensors: Exit After Start" to indicate a pitlane which spans the start/finish line
Created with the Standard Edition of HelpNDoc: Free CHM Help documentation generator
Updates
SSDC updates are available from the SSDC website at http:://ssdc.jackaments.com. You may
download and install these updates as described on the installation page, or alternatively use the
"Help" menu option "Check for updates...", which will automatically contact the SSDC website and
download updates should they exist.
Created with the Standard Edition of HelpNDoc: Free CHM Help documentation generator
Troubleshooting
In the event that you experience problems with this software, there are a number of places that you can
turn.
Use the Scalextric Sport Digital forum at http://www.slotforum.com/forums/index.php?showforum=63.
There is a huge amount of information relating to how people are using this software.
Email [email protected]. I will do my best to help, but please bear in mind that this is a hobby of
mine too.
When sending requests for help, it is always useful to attach a trace of the communication between
SSDC and the powerbase. This can almost always provide the reason for the problems that you are
experiencing. You can take a trace very simply by using the File, Trace connection... menu option.
You will be asked to specify the location of the trace file to create. Once the trace is running (indicated
by a check mark against the menu option) try and repeat the problem that you experienced. When
complete, close the trace file by selecting the File, Trace connection... menu option again. The menu
item check mark will disappear. Attach the text file that you just created to any email that you send. It
is always helpful.
Created with the Standard Edition of HelpNDoc: Free CHM Help documentation generator