1
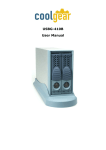
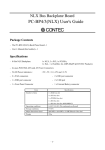
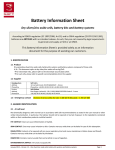
USB 2.0 10 / 20 Port Charge Hub
User’s Manual
USBG-10XU1 / USBG-20XU1
USBG-10XU1
USBG-20XU1
Introduction
USBG-10XU1 / USBG-20XU1 is 10 / 20-port USB Hub with Charger, a smart solution for charging or sync of several iPads,
iPhones iPods and USB charging devices operating simultaneously. This is a perfect tool to eliminate the jumble of wires
and chargers and also is ideal for large capacity USB station in-house for automated duplication tasks. Places such as
school’s class room, businesses conference or meeting in organizations.
Features
•
•
•
•
•
•
•
•
•
•
Charges or syncs up to 10 / 20 iPads, iPods, iPhones or other USB-charged in charge mode devices, providing
each USB port with the optimum charge level for each device.
Will also charge virtually any other device that can be charged through a powered USB port.
Supports High Speed 480Mbps, full speed 12Mbps and low speed 1.5Mbps operation
Fully compatible with all USB compliant device
Ten (10) or Twenty (20) Hi-Speed USB 2.0 downstream ports
Over-current detection and protection
Surge & ESD Protection
Extends up to optimum 40 USB devices by connecting cascade port with another USB 2.0 charge hub(s); to see
notes under specification.
Supports Windows OS : 98SE / ME / 2000 / XP / Vista / 7 / 8 / 8.1 , Mac OS 8.6 / 9.x / 10.x or higher
Rack mountable.
Specification
Model No.
Chip
USB Specification
Connector Upstream
Connector Downstream
Connector Cascade
LED Charge Mode
Power Mode
Power consumption
LED SYNC Mode
Cable Length
Speed
Current per Port
Dimension (L x W x H)
Housing
USBG-10XU1
USBG-20XU1
Terminus
USB 1.1 / 2.0 compliant
USB B Female
USB A Female x 10
USB A Female x 20
USB A Female
Red Color x 10
Red Color x 20
External power adapter
24VDC 6.25A
Orange Color x 10
Orange Color x 20
1.8m
480 / 12 / 1.5 Mbps
5VDC 2100 mA
5VDC 1100 mA
268 x 102 x 40 mm
Metal
Cautions
1. End user may extend another unit of USB 2.0 10 / 20 port charge hub. (It allows connecting or charging maximum up
to 20 / 40 USB devices simultaneously.)
2. The specific cable for iPad, tablet isn’t included in package accessory. Please check with your distributor regarding of
using appropriate cable.
3. Beware that iOS update cannot be performed simultaneously when the unit is charging for USB devices.
4. If user connects with two units, the 2nd unit may not be detected by some computers which have built in USB 3.0
hub.
Package Contents
1.
2.
3.
4.
5.
USB 2.0 Charge Hub
24VDC 6.25A Power adaptor with power cord
USB 2.0 A/M to B/M cable
Mounting brackets with screws
User manual
Physical Diagram
<Front View>
3 – LED Indicators
1 – USB Ports (Hub)
2 – Charger / SYNC Switch
<Rear view>
7 – USB Port for computer
6 – USB Port for extending 2nd unit
5 – Power Jack
4 – Power Switch
1. USB Ports (Hub) - Allows connecting iPad, tablet or USB devices
•
•
Beware that this unit does not require a host computer connected to the hub for it to charge compatible
devices.
This unit does not contain accessory set of cables for iPad, tablet. Please check with your distributor regarding of
using appropriate cable.
2. CHARGER / SYNC Switch
•
•
•
Allows to switch charging or sync mode under connecting with iPad, tablet.
Charging mode indicators light on): to charge the objective USB devices.
Sync mode indicators light off) : to synchronize data from computer to objective USB devices, but not allowed
charging.
In order to prevent from damaged data that may cause by unsuitable operation, beware of below issues when user is
switching from sync mode to charging mode:
•
•
User should not switch until the objective iPad or tablet OS is updated completely.
Do not switch until the objective USB connections are removed safely from host computer.
Please check the user manual of USB devices for appropriate removing method.
3. LED Indicators
•
•
LED lights up: indicates which tablet or USB device is connected successfully.
The LED may not light up when the unit is connecting with some specific USB devices, but it is still working on
charging or synchronizing.
4. Power switch
User may switch power to on / off.
5. Power jack
To use with power adaptor provided.
6. USB port for extending 2nd unit
It is available to connect with another unit for extending purpose.
7. USB port for computer
It is available to connect with host computer by USB cable.
Rack Mounting
To install, attach the mounting brackets to the unit’s side panels (one on each side) and secure them with the screws
provided.
(1) Use the mounting brackets and screws onto rack.
Screws (Accessory Set)
Mounting Brackets (Accessory Set)
Mounting Brackets (Accessory Set)
Screws (Accessory Set)
(2) User may install on the applicable cabinet, rack environments.
Screws (Accessory Set)
Screws (Accessory Set)
Rack mounting holes
Connection
(1) To turn off the power switch.
<Rear Panel>
Power Switch
(2) Plug the power adaptor to the unit’s power jack.
The power jack is threaded with nut, so user may put power DC plug into the power jack without loosing.
(3) Put the plug of power adaptor into the socket of wall mounted.
<Rear Panel>
Power Jack
Power adapter (Accessory Set)
(4) Turn on the power switch.
Power Switch
(5) Using the USB A to B cable provided and connects the USB B end on the unit.
(6) Using the USB A end and connects on your host computer.
USB port for computer
USB cable (Accessory Set)
To the computer
(7) In according to the previous instruction of connection with host computer, and connects host computer with the
unit.
<Rear Panel>
(8) To use USB cable and connects with tablet or USB devices to the USB ports (Front Panel).
<Front Panel>
Using the appropriate USB cable
Charging mode
Please follow below ways for charging USB devices.
(1) In according to the previous instruction of connection with host computer, and connects host computer with the
unit.
(2) Turn the switch of CHARGER / SYNC to [CHARGER], and LED lights up.
<Front Panel>
USB port
Charger / SYNC switch
(3) Connect your USB devices to the USB ports on the hub.
•
•
This unit does not contain accessory set of cables for iPad, tablet. Please check with your distributor regarding of
using appropriate cable.
The LED may not light up even the unit can charge the iPad, tablet that is discharged completely. User may
charge for a while and disconnect. Try to re-connect and charge again.
In order to prevent from damaged data that may cause by unsuitable operation, beware of below issues when user is
switching from sync mode to charging mode:
•
•
User should not switch until the objective iPad or tablet OS is updated completely.
Do not switch until the objective USB connections are removed safely from host computer.
Please check with user manual of USB devices for appropriate removing method.
Sync mode
Please follow below ways for synchronizing.
(1) In according to the previous instruction of connection with host computer, and connects host computer with the
unit.
(2) Turn the switch of CHARGER / SYNC to [ SYNC ] , and LED lights off.
<Front Panel>
USB Port
Charger / SYNC switch
[ For host computer configuring iTunes ]
•
•
Please create a library folder on host computer for synchronizing and transfers data to iPad.
Recommends automatic updates in your iTunes preferences (to avoid interference with automatic syncing).
Please check for updates manually to keep your software up to date.
[ For iPad, tablet configuring ]
•
•
Ensure each iPad, tablet has been charged completely at first if the objective iPad, tablet is new goods.
Please use the unit to synchronize iPad, tablet one after another, and configure at same way. (Login name, ID,
the data you want to synchronize etc.)
• The user may adjust the brightness of screen when you are using the unit to synchronize iPad.
• When the user may be requested by iTunes to configure manually, you will have to copy the configuration
manually for each iPad.
[ For host computer connection & sync ]
•
•
Connect iPad, tablet to the USB ports of front panel if each iPad, tablet is configured completely.
This unit does not contain accessory set of cables for iPad, tablet. It is especially important to use appropriate
cables (USB-A to device-specific connector) provided by the device manufacturer.
•
•
•
Get started synchronizing automatically once you connect the unit.
It may take a little while for this unit to recognize and sync. Please do not stop by the way once the unit starts
synchronizing.
This unit may not perform sync with charging simultaneously.
[ For iOS update ]
•
User may not perform the iPad update when iPad is connected. You must update iOS on iPad one after another.
Daisychain ( Cascade ) connection
This unit can extend another unit for daisychain ( Cascade ) connection , the 2nd unit can sync simultaneously as well.
•
•
Maximum 2 units can be connected. (It allows connecting or charging maximum up to 20/40 USB devices
simultaneously.)
If user connects with two units, the 2nd unit may not be detected by some computers which have built in USB
3.0 hub.
(1) In according to the previous instruction of connection with host computer, and connects host computer with the 1st
unit.
<Rear Panel>
(2) Turn off the power switch of the 2nd unit.
<Rear Panel>
Power Switch
(3) Plug the power adaptor to the power jack of the 2nd unit.
•
The power jack is threaded with nut, so user may fix power DC plug into the power jack without loosening.
(4) Put the plug of power adaptor into the socket of wall mounted.
<Rear Panel>
Into the socket
2nd Unit
Power Jack
Power adapter (accessory set)
(5) Turn on the power switch of the 2nd unit.
<Rear Panel>
Power Switch
(6) Use the USB cable provided and connects both USB ports of the 1st and 2nd units.
Rear Panel
Rear Panel
USB port for computer
USB port for extending 2nd unit
USB cable (Accessory set)
Note :
• Maximum 2 units can be connected.
• It allows connecting or charging maximum up to 20 / 40 USB devices simultaneously.
Regulatory Compliance
Disclaimer
Information in this document is subject to change without notice. The manufacturer does not make any representations
or warranties (implied or otherwise) regarding the accuracy and completeness of this document and shall in no event be
liable for any loss of profit or any other commercial damage, including but not limited to special, incidental,
consequential, or other damages.
No part of this document may be reproduced or transmitted in any form by any means, electronic or mechanical,
including photocopying, recording or information recording and retrieval systems without the express written
permission of the manufacturer.
All brand names and product names used in this document are trademarks, or registered trademarks of their respective
holders.