1
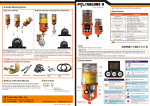
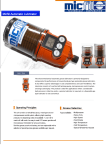
Streamliner
Grease Dispenser
STREAMLINER M USER MANUAL
TRICO MFG. CORP.
Page 1/11
Streamliner
Grease Dispenser
Thank you for your purchasing STREAMLINER M, the new and unique electro-mechanical single-point
automatic grease dispenser from Trico Mfg. Corp. To ensure the safe operation and proper installation of
the STREAMLINER M unit, we strongly recommend that you read the following information carefully before
use. If you require further information, please contact your local supplier.
COMPONENTS
A STREAMLINER M package contains:
SPRING
BATTERY PACK
SPRING HOLDER
LOCK
CONTROL PANEL
Main Unit
(Top view)
Main Unit
(Front view)
PRESSURE PLATE
Top Cover
Assembly
Page 2/11
STREAMLINER M
USER MANUAL
Unit Assembled
* SERVICE PACK
- 125cc
Grease Type
Date Installed
Date Expiry
GREASE POUCH
BATTERY
PACK
EXTERNAL
DUST COVER
STICKER
- 250cc
Grease Type
Date Installed
Date Expiry
GREASE POUCH
BATTERY
PACK
EXTERNAL
DUST COVER
STICKER
Page 3/11
RED LED (WARNING)
Starts to blink when any of
the following conditions is
encountered:
RESET unit back
to default setting
Low battery power
Motor is overloaded
Low grease level
Other abnormal condition
Please verify the cause of
malfunction or failure.
BUTTONS
SELECT DISPENSING PERIOD
- Six different dispensing rates are available (1M, 2M,
3M, 6M, 12M and Half Month). 1M means that the
contents of the pouch will empty over a period of 1
month (approx. 4.2cc/day for a 125cc pouch and
8.3cc/day for a 250cc pouch). 2M means the grease
pouch will empty over a period of 2 months (approx.
2.1cc/day for a 125cc pouch and 4.2cc/day for a 250cc
pouch) etc…
☞ See “Dispensing Recommendation” on page 9.
- The dispensing rate can also be changed during
operation.
Depress the button for 2 seconds to turn unit on and off.
The default dispensing period setting is 1 month@125cc.
SELECT GREASE VOLUME (125cc or 250cc)
- Select the volume of Grease pouch to be used.
- This button is also used for the TEST MODE.
Page 4/11
FEATURES – LCD DISPLAY
DISPENSING PERIOD SET
XX –01, 02, 03, 06, 12 or H month set
※ “H” denotes “Half”
DAYS TILL REPLACEMENT
Indicates the remaining days till replacement (days to expire)
DAYS AFTER MALFUNCTION
E-XX indicates the number of days since the unit stopped.
(All functions stopped except TEST MODE)
※ “E” denotes “Error”
DAYS AFTER DISPENSING COMPLETION (EXPIRE)
S-XX indicates the number of days since the lube cycle has been
completed or the grease pouch has become empty.
※ “S” denotes “Stop”
DISPENSING TEST MODE
Indicates test mode is activated.
※ “tst” denotes “Test”
LOW BATTERY POWER
Indicates low battery power
MOTOR OVERLOAD
Indicates motor overloaded and the unit has stopped functioning
LOW GREASE LEVEL
Indicates that the lube cycle has been completed or that the grease
pouch is empty
125cc
250cc
GREASE VOLUME SELECTION
Page 5/11
FEATURES – FUNCTION
FUNCTION
BUTTON
DESCRIPTION
SET DISPENSING
PERIOD
Select one of the six different dispensing rates (1M,
2M, 3M, 6M, 12M and Half Month)
The dispensing rate can be changed during
operation.
POWER ON/OFF
Depress the button for 2 seconds to turn unit on
and off.
Default setting is 1 Month using the 125cc pouch.
GREASE VOLUME
SELECTION
Select the volume of grease pouch (125cc/250cc).
The test function is provided to confirm that the unit
works prior to installation or after replacement of
service pack. In addition, the test function is provided
for troubleshooting purposes if the motor has been
overloaded.
TEST
MODE
RESET
IMPORTANT :
To activate TEST MODE, depress the button for 2
seconds. “tst” should start blinking and an audible
gear mesh sound will confirm unit operation and a
grease discharge should be observed. If the unit
does not operate in Test Mode, it should be returned
to your supplier.
To deactivate TEST MODE, depress the button. The
unit will then stop functioning in TEST MODE within 20
seconds. Otherwise, the unit will automatically stop
TEST MODE after 2 minutes and be back to previous
mode set.
RESET
Use when service pack is replaced.
Use to reset unit back to its default setting
following ;
- Abnormal display on LCD screen.
- A unit malfunction or when the Power ON/OFF
button is not available.
CAUTION!
Depressing RESET will eliminate all previous
settings and records.
WARNING LAMP
RED LED
For Low battery power, Motor overload, or Low grease
level, the red LED will blink periodically.
NOTE:
Whenever any function is selected, the red LED should blink once only.
Page 6/11
FIRST INSTALLATION
1. Before installation of the STREAMLINER M, the grease point (bearing and passage)
should be manually lubricated using a grease gun to ensure that the bearing can accept
grease. It is recommended that this procedure be conducted using either the same or a
compatible lubricant with what is contained in the grease pouch of the STREAMLINER M.
2. If any doubt exists, test the backpressure of the bearing with a grease gun connected to a
pressure gauge. Ensure that the break-off pressure is below 500 psi (approx. 35 kg-f/㎠:
34.5 bar). Note that it is always desirable to keep the constant delivery pressure as low as
possible.
3. Insert the BATTERY PACK into the battery compartment of main unit. (Make sure it is
locked after insertion.) Unscrew the cap of the GREASE POUCH. Fit the pouch outlet to
the pump suction inlet. Fit the top cover to main unit.
4. Turn the STREAMLINER M unit ON by depressing the POWER button for 2 seconds.
Confirm that the LCD is turned on by checking that the red LED blinks once. As long as the
LCD is displayed, the unit is working. To test that the unit is operational, simply follow the
TEST MODE procedure :
Depress TEST button, the unit displays “tst” and start to discharge grease. The unit
will continuously operate in purge mode until the TEST button is depressed.
To deactivate TEST MODE, depress the button. The unit will stop functioning in
TEST MODE within 20 seconds. Otherwise, the unit will automatically stop TEST
MODE after 2 minutes and be back to previous mode set.
5. To set a required dispensing rate, depress the MODE button. The dispensing rate
changes in ascending frequency i.e. 1☜ 2☜ 3☜ 6☜ 12☜ Half month.
6. Remove the grease nipple used for back pressure testing and fit an appropriate adaptor of
3/8” NPT or BSPT and make sure that the unit is well tightened to it. The 3/8” brass thread
of the unit ensures that fitting will not snap off even under severe vibration or shock load.
7. For installations that involve extreme vibration, excessive heat, or a service location
considered dangerous, use the remote mounting clamp assembly and a steel pipe or
copper tube of no less than 1/4” I.D. Remote installation over more than 1 meter may
reduce the ability of the unit to dispense against elevated backpressure.
IMPORTANT:
8.
Be sure to fill the steel pipe or copper tube with lubricant prior to
installation.
STREAMLINER M units have a shelf life of one-year with a one-year warranty from date
of delivery.
Page 7/11
CHANGE OF SERVICE PACK
When the dispensing period has expired, the red LED will start to blink and the LCD screen will
), Low Battery signal (
), and Days after expire (
).
display Low Grease Level (
When this occurs, change the STREAMLINER M SERVICE PACK, which consists of one each of
the following: A GREASE POUCH (125cc or 250cc), a BATTERY PACK (DC 4.5V), and a
disposable Dust Cover.
NOTE: The STREAMLINER M GREASE POUCH and BATTERY PACK MUST ALWAYS be
changed at the same time to ensure the reliable operation of the unit. The SERVICE PACK is
supplied as one kit and comes in boxes of 20 (for both 125 and 250cc).
SERVICE PROCEDURE
1. Remove external dust cover.
2. Turn the unit off.
3. Remove top cover (Caution: Cover is spring loaded)
4. Remove and dispose the used grease pouch, battery pack, and external dust cover in
accordance with local regulations.
5. Insert a new battery pack as per the installation procedures.
6. Fit a new grease pouch as per the installation procedures.
7. Refit the top cover.
8. Depress RESET button to eliminate all previous settings and records.
9. Run TEST MODE to confirm unit operation.
10. Depress the MODE button to set a required dispensing rate.
11. Refit the new external dust cover.
Page 8/11
TROUBLESHOOTING GUIDELINE
TROUBLE
CAUSE
REMEDY
LCD SCREEN DISPLAYS
FAULT OR RED LIGHT
BLINKING OR BLANK
SCREEN.
Possible electrical malfunction of
CPU or circuit.
UNIT WON’T OPERATE
BATTERY PACK missing, faulty or
incorrectly installed.
Old BATTERY PACK not replaced
during changeover
The BATTERY PACK must be
replaced with each
changeover.
Ensure BATTERY PACK is
correctly installed.
BATTERY PACK expired (Low
Battery)
An unusual storage condition may be
encountered (Temperature or Humidity)
Damaged BATTERY PACK
Extreme environment
(e.g. exceeds -15℃~ +60℃: 5 ~ 140℉)
Replace BATTERY PACK
Store BATTERY PACK in a
cool and dry place
Prevent impact damage
Ensure operating environment
meets requirements.
Over lubrication occurring
Grease blockage
Excessive back pressure
Extreme operating temperature
(e.g. exceeds -15℃~ +60℃: 5 ~ 140℉)
Confirm correct dispensing rate
Run TEST MODE for excessive
back pressure, determine cause
and rectify.
LOW BATTERY
INDICATION
MOTOR OVERLOADED
UNIT WON’T
GREASE
DISPENSE
GREASE POUCH incorrectly fitted
GREASE POUCH empty
Loose spring or pressure plate
Grease hardening due to cold
temperature or high oil bleeding.
Depress RESET button to Test unit.
Replace unit as necessary.
IMPORTANT:
If the RESET is activated
during the TEST MODE, the
unit will revert to its default
setting and eliminate all
previous settings and records.
Fit GREASE POUCH correctly
Replace GREASE POUCH
and BATTERY PACK
Refit spring or pressure plate
Use appropriate quality
grease for operating
environment
Page 9/11
DISPENSING RECOMMENDATIONS
In the chart below are some guidelines for bearing lubrication requirements.
Requirements may vary with individual bearing types or operating conditions.
Ball & Roller Bearings
Bearing Shaft Diameter
125cc
Dispensing
Equivalents
250cc
Half
month
Dispensing
Equivalents
121-305mm(4-3/4” ∼ 12”)
-
105-120mm(4-1/8” ~ 4-3/4”)
Half month
8.3cc/day
1 month
8.3cc/day
88-104mm(3-1/2” ~ 4-1/8”)
1 month
4.2cc/day
2 month
4.2cc/day
79-87mm(3-1/8”~3-1/2”)
2 month
2.1cc/day
3 month
2.8cc/day
63-78mm(2-1/2”~3”)
3 month
1.4cc/day
6 month
1.4cc/day
49-62mm(2”~2-1/2”)
6 month
0.7cc/day
12 month
0.7cc/day
25-48mm(1”~2”)
12 month
0.3cc/day
-
-
-
16.6cc/day
Page 10/11
PRECAUTIONS
DO NOT TAMPER with the STREAMLINER M or BATTERY PACK.
AVOID excessive shock loads.
AVOID excessive vibration (Suggest remote mounting if necessary)
AVOID temperatures outside of the recommended range (e.g. exceeds –15 ~ +60 ℃ : 5 ~
140 ℉).
DO NOT immerse or submerge STREAMLINER M.
DO NOT PLACE or INSTALL STREAMLINER M close to direct heat source (Avoid
temperatures of over 60℃ : 140℉)
NEVER use an UNAUTHORIZED BATTERY PACK.
HAVE to remove air pocket in the grease whenever you fill grease to empty pouch
AVOID corrosive or extreme environments such as strong acids, alkalis, gases etc.
SPECIFICATION
Grease pouch
:
125 or 250cc (replaceable)
Power supply
:
DC 4.5 V (replaceable)
Operating Pressure
:
upto 20kg-f(280 psi)
Operating Temperature
:
–15 - +60 °C (5 ∼ 140 ℉)
Suggest the use of appropriate quality grease for application where a constant cold
temperature exists.
Dispensing Rate
:
1,2,3,6, 12 and Half month
Lube cycle
:
approx. 20 seconds/stroke
Dispensing volume
:
0.33±0.01 gram/stroke @ 20°C
(equivalent to 0.350cc/stroke for a grease of specific gravity 0.90)
Dispensing Accuracy
Output thread
:
:
± 3%@20°C
3/8”(NPT or BSP)
NOTE: Technical information is subject to change without notice.
WARRANTY:
Trico Mfg. Corp. guarantees the product to be free of defects in material and workmanship for a
period of 12 months from date of delivery. Warranty is limited to replacement of the product. There
is no consequential loss covered by the Warranty. The Warranty will be void if the unit is
mistreated, tampered with, used in a hostile chemical environment, used under water, maliciously
damaged, used outside the specified ambient operating temperature range of –15 to 60 °C(5 to
140 ℉), used with other than from a service pack. Please contact your local supplier or the
manufacturer for the validity of the Warranty.
Trico Mfg. Corp.
Page 11/11