1
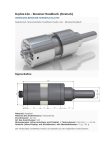
Manual
English
Ever ything stays different
Manual
Contents
1. Before use . . . . . . . . . . . . . . . . . . . 19
2. Application . . . . . . . . . . . . . . . . . . . 19
5.4 Installing coil
and wick . . . . . . . . . . . . . . . . 26
5.5 Filling the tank. . . . . . . . . . 28
3. Scope of delivery . . . . . . . . . . . 20
5.6 Airflow control . . . . . . . . . . 29
4. Specifications . . . . . . . . . . . . . . . 20
6. Modifications . . . . . . . . . . . . . . . . 30
4.1 Dimensions . . . . . . . . . . . . . 20
6.1 Kayfun 4s kit . . . . . . . . . . . 30
4.2 Materials used . . . . . . . . . 21
6.2 Connectors. . . . . . . . . . . . . 31
4.3 Features . . . . . . . . . . . . . . . . . 21
5. Instructions for use . . . . . . . . . 22
5.1 Cleaning. . . . . . . . . . . . . . . . . 22
5.2 Liquid Control . . . . . . . . . . 22
5.3 Changing tanks. . . . . . . . 24
5.3.1 Glass tank. . . . . . . . . . . . 24
5.3.2 M-tank . . . . . . . . . . . . . . . . 25
2
7. Warranty . . . . . . . . . . . . . . . . . . . . . . 33
8. Disclaimer . . . . . . . . . . . . . . . . . . . . 33
9. Warnings . . . . . . . . . . . . . . . . . . . . . 34
1. Before use
The SvoëMesto Kayfun V4 is a rebuildable tank atomizer specifically
designed using e-liquid for electronic cigarettes. Before use you must
install a coil made intended for usage in electronic cigarettes.
ATTENTION: Do not use oils or oil based fluids with the atomizer.
This manual is meant as a brief overview on the general functionality
of the SvoëMesto Kayfun V4. If you have no experience using a rebuildable atomizer or creating coils, please consult your local vendor.
English
Further information and detailed video footage on assembly steps is
available at www.svoemesto.de.
2. Application
The SvoëMesto Kayfun V4’s intended use is for coils with a minimum
resistance of 1 ohm and an electric input from 7 watts to maximum 20
watts. Please use the atomizer responsibly and the coils you’ve created at your own risk.
3
3. Scope of delivery
• 1 x SvoëMesto Kayfun V4 with installed full steel tank
• 1 x glass-tank-sleeve
• 1 x polycarbonate tank
• 1 x manual
• 1 x exploded assembly drawing
4. Specifications
22,0
, mm
23,3 mm
4
22,0
, mm
23,3 mm
46,5 mm
55,5 mm
71,5 mm
48,9 mm
57,9 mm
Tank capacity: ~4 ml
73,9 mm
48,5 mm
57,5 mm
73,5 mm
4.1 Dimensions
22,0 mm
4.2 Materials used
Component
Material
Stainless steel components
WNr. 1.4404 (X2CrNiMo17-12-2),
AISI 316L, (V4A)
Glass-tank-sleeve
Borosilicate glass
M-Tank
Polycarbonate
Insulators
POM-C
Bearing rings
PTFE
O-rings
NBR 70
Compression spring 2.1247
Cu Be 2 silver plated
English
We at SvoëMesto attach great importance in using only the best and
most appropriate materials. A list of the materials used for this product
can be found below. If you have known allergies to one or more of these materials, we do not encourage the use of this product.
4.3 Features
• Liquid Control
• Filling through the topcap
• Airflow Control
• Adjustable 510 connector
• Exchangeable connectors
5
• Any time access to the coil
• Exchangeable tanks (glass, polycarbonate, steel)
5. Instructions for use
5.1 Cleaning
The SvoëMesto Kayfun V4 is supplied clean of all manufacturing residues. Nevertheless, it is recommended to clean all parts that will be in
contact with e-liquid before first use and on a regular basis by rinsing
with warm water. Afterwards make sure to dry all parts thoroughly.
ATTENTION: Do not use the SvoëMesto Kayfun V4 when it is
wet. Water can cause a short circuit and/or malfunctions of the
atomizer.
5.2 Liquid Control
The SvoëMesto Kayfun V4 comes with Liquid Control, which is capable of shutting off the juice flow from the tank to the evaporation
chamber completely.
a. To open the Liquid Control, hold SvoëMesto Kayfun V4 with your left
hand at the connector [A3] and with your right hand at the airflow
ring [A5]. Turn the airflow ring [A5] clockwise together with the upper
6
English
part of the atomizer. Please stop this process as soon as you feel a
resistance.
b. To close the liquid control hold the atomizer as explained and turn
the airflow ring [A5] counterclockwise.
ATTENTION: No force for opening or closing the liquid control
should be required. It is recommended not to tighten the threads
more than finger-tight.
It is recommended to close the liquid control, when the atomizer is not
in use over a longer period of time and during transport.
7
5.3 Changing tanks
ATTENTION: To unscrew the tank [C] from the base [A], the liquid
control has to be completely open and the atomizer should be
turned upside down. For changing the tanks or tank sections, the
tank has to be empty.
5.3.1 Glass tank
a. Explained at the SvoëMesto Kayfun V4 as delivered.
b. Unscrew the topcap [D] from the tank [C].
c. Unscrew the counternut [C33] from the chimney and remove it
completely.
8
d. Remove the upper [C32] and middle [C30] tank sleeve.
e. Place the glass-tank-sleeve [C30] on top of the lower tank sleeve [C28]. Please pay attention that the o-ring [C29] is located in
its groove. Place the upper steel-tank-sleeve [C32] on top of the
glass-tank-sleeve [C30]. Please pay attention that the o-ring [C31]
is located in its groove.
f. Screw the counternut [C33] back onto the chimney and tighten it
finger-tightly.
g. Screw the topcap [D] onto the tank [C].
h. You have now assembled the SvoëMesto Kayfun V4 with a glasstank-sleeve.
English
5.3.2 M-tank
9
a. Explained at the SvoëMesto Kayfun V4 as delivered.
b. Unscrew the topcap [D] from the tank [C].
c. Unscrew the counternut [C33] from the chimney and remove it
completely.
d. Remove the upper [C32] and middle [C30] tank sleeve, then unscrew the lower steel-tank-sleeve [C28] and remove it completely.
e. Screw the M-Tank onto the evaporation chamber [C26].
f. Screw the topcap [D] onto the tank [C].
g. You have now assembled the SvoëMesto Kayfun V4 with an M-tank
5.4 Installing coil and wick
A coil is made of resistance wire, which is wrapped around the wick.
The ends of the wire are placed under the build screws (B21-24) and
then clamped underneath them. The SvoëMesto Kayfun V4 comes
with two build screws on each, the plus and minus terminal of the build
deck [C]. This provides a variety of possibilities for you to mount your
coil exactly and comfortably.
10
ATTENTION: For your own safety please note the following:
• The coil has to be connected with one end at the plus terminal,
with the other end at the minus terminal.
• The exceeding ends of the wire have to be cut flush with the
terminals and must not touch the evaporation chamber or the congestion ring [B25].
• The coil must not touch the deck itself.
11
English
The coil is placed diagonally between the build screws (B21 – 24) and
approx. 1.5 mm – 2 mm above the air outlet, so that air can smoothly
flow around the coil.
The overhanging ends of the wick should be placed in the empty
spaces beneath the terminals, so that they lay above the liquid channels. Before assembling the atomizer it is recommended to saturate
the wick with e-liquid.
5.5 Filling the tank
To fill the tank the SvoëMesto Kayfun V4 has to be assembled completely including a coil and wick.
a. Close the liquid control as explained in 5.2.
b. Now loosen the top nut [D38] and remove it from the top cap [D].
c. Fill the tank with e-liquid at the sides of the chimney. Don’t pour
e-liquid into the chimney. The tank is not meant to be filled further
than the lower edge of the threading for the top nut.
d. Seal the tank with the top nut [D38].
e. Open the liquid control.
12
ATTENTION: If you haven’t pre-saturated your wick in the rebuilding process, make a few puffs without firing to assure the wick
gets saturated before you start to vape.
5.6 Airflow control
a. Remove the atomizer from your APV or mod.
b. Remove the screw [A1] at the 510 connector.
c. Insert a flathead screwdriver into the hole at the 510 connector until
you hit the airflow control screw [B13], then raise the mouthpiece of
the atomizer on your lips.
d. For a stiffer draw, turn the screwdriver counterclockwise.
e. For a looser draw turn the screwdriver clockwise.
f. After you’ve adjusted the draw to your liking, screw 510 plus contact [A1] back in.
13
English
The SvoëMesto Kayfun V4 comes with an airflow control, which enables you to adapt the draw to your liking.
6. Modifications (available separately)
6.1 Kayfun 4s kit
The SvoëMesto Kayfun 4s Kit comes with a different airflow screw with
an even looser draw (2,7 mm), as well as a high temperature resistant
insulator made from Polyetheretherketon (PEEK). The SvoëMesto Kayfun 4s Kit does not come with adjustable airflow. To install SvoëMesto
Kayfun 4s Kit please follow the steps below.
a. Open the liquid completely.
b. Unscrew the tank [C] from the base [A].
c. Remove the congestion ring [B25].
14
English
d. Closing the liquid control will then lead the deck [B] to rise out of the
base. It can be removed after a few turns. Please pay attention not
to lose the spring [B12].
e. Grab the plus terminal [B20] with a pair of pliers. Remove the airflow
screw [B14] with a 6 mm Allen Bit.
f. Remove the plus terminal as well as the POM insulator [B19] from
the deck. Replace the POM insulator [B19] with the included PEEK
insulator.
g. Reassemble the deck in the opposite order, using the new Kayfun
4s airflow screw. Place the spring [B12] underneath the deck. Place
the deck on top of the base and turn the liquid control clockwise
seen from below. The deck [B] gets pulled into the base [A]. The
procedure is completed, when the deck [B] sits completely within
the base [A] again.
15
6.2 Connectors
The SvoëMesto Kayfun V4 is delivered as standard with a 510 connector. However, there are several connectors specifically for certain
APVs or mods being offered. To exchange connectors, please follow
the steps below.
a. Open the liquid control completely
b. Unscrew the tank [C] from the base [A].
c. Closing the liquid control will lead the deck [B] to rise out of the
base. It can be removed after a few turns. Please pay attention not
to lose the spring [B12].
d. Remove the positive contact screw at the 510 connector [A1].
e. Remove carefully the nut [A11] and the insulator [A10].
16
f. Underneath the insulator there is a flathead screw [A9], which locks
the connector. Please remove it carefully.
g. The connector can now be removed.
h. Replace it with the connector of your choice and reassemble the
base in opposite order.
i. Place the spring [B12] underneath the deck. Place the deck on top
of the base and turn the liquid control clockwise seen from below.
The deck [B] gets pulled into the base [A]. The procedure is completed, when the deck [B] sits completely within the base [A] again.
The manufacturer’s warranty is one year on all stainless steel parts.
Excluded from warranty are all plastic components such as tanks and
insulators, glass tanks and o-rings.
8. Disclaimer
With the SvoëMesto Kayfun 4, please use original SvoëMesto accessories only. The manufacturer accepts no liability for any third-party
accessories or issues which may have been caused or exacerbated
by their use.
17
English
7. Warranty
9. Warnings
• Before use please read the manual carefully!
• Please keep the atomizer dry!
• Do not use the atomizer for other purposes than intended!
• Connect the atomizer to a power source that is suitable for its
intended use!
• Using the atomizer on high voltages or without a fluid can damage
the atomizer. The manufacturer accepts no liability for atomizers
that were damaged during use.
• Using the atomizer incorrectly not only can lead to a defect of the
atomizer, but also cause fire.
• Keep the atomizer away from heat sources.
• Not suitable for children. Please keep the atomizer away from
children!
18
www.svoemesto.de
© 2014 SMTec GmbH