1
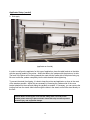
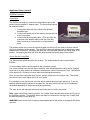
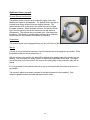
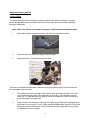
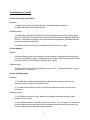
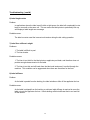
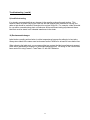
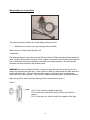
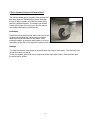
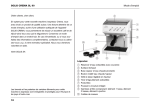
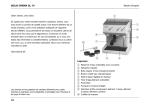
TABLE OF CONTENTS QUICK START 3 IMPORTANT SAFETY PRECAUTIONS 5 PRODUCT DESCRIPTION Applicator Specifications Options 6 7 8 SHIPMENT CONTENTS 9 SAFETY INSTRUCTIONS 10 SETUP / INSTALLATION Tools Required Setup 11 12 12 APPLICATOR SETUP Software Setup 17 23 FUNCTIONS Operation Label Synchronization 15 Pin Sub-D I/O Port Input / Output Description Signal Explanation 24 24 24 25 26 27 TROUBLESHOOTING Problems, Causes and Solutions Common Problems with Setup or Media 28 28 30 ACCESSORIES Warning Beacon Repositional Control Panel Lockable Casters 34 34 35 46 WARRANTY INFORMATION 36 1 Introduction The equipment described in this manual has been designed, manufactured and brought to market with the intent that it is to comply with the essential safety requirements of – Low Voltage Directive 73/23/EEC Electromagnetic Compatibility Directive 89/336/EEC A certificate of conformity / incorporation can be provided upon request to the manufacturer or to an authorized agent. Attention is drawn to the information contained within this manual and it is advised that this information should be read before attempting to install, operate or maintain the equipment described. It is recommended that only fully trained personnel should install, operate and maintain this equipment and that consideration should be given to the use of appropriate lifting, transportation and safety equipment which may be applicable to particular installation requirements. Contact the manufacturer or an authorized agent for installation, service and maintenance information and for details of approved parts. 2 Quick Start The PA500w Wipe on Applicator is easy to assemble and use. The following is a summary of the necessary steps to get the applicator up and running. If this is the first time you are setting up a PA500w, it is recommended that you read the entire manual for more detailed instructions and tips for trouble-free assembly. 1. T-base Stand A. B. 2. Printer A. B. C. 3. Attach power cord to the printer Plug power cord into a grounded outlet Configure Software A. 8. Load label stock in printer Load ribbon in printer Apply Power A. B. 7. Connect the control box to the printer and applicator Plug in the product sensor Mount the product sensor as appropriate Load Media A. B. 6. Mount the applicator to the table Install Control Box and Product sensor A. B. C. 5. Unpack the printer Attach the printer table clamp to the printer support plate Place the printer on printer support plate Applicator A. 4. Unpack the applicator’s T-base stand Assemble the T-base stand Create EASYLABEL format, or directly program the format as follows: - print mode = applicator - presentation position = 0 - label offset = .00 Send Label Job to Printer A. B. Download a job to the memory, or send a print job to the printer Select a job from the memory if the printer is in stand-alone mode 3 9. Print and Apply A. When the printer front panel displays “Receiving Data”, the system is ready to be triggered by a start signal. Turn on the conveyor and test the operation. Adjust the control box as necessary to place the label in the desired position on the product. 4 IMPORTANT SAFETY PRECAUTIONS Do allow only trained and qualified personnel to provide maintenance, adjustment, and servicing of this unit. Do keep long hair, loose clothing and jewelry away from moving parts while the unit is in operation. Do observe all printer safety precautions as described in the “printer’s user” manual. Do plug the printer into a grounded outlet to reduce the risk of electrical shock! Do consider the use of ear protection if prolonged or repeated exposure to the applicator is likely. Do install a “Kill Switch” when using this applicator to stop the conveyor in case a problem occurs. Do follow a regular preventative maintenance schedule for cleaning, inspecting and servicing the applicator. Do Not attempt to carry out any maintenance, adjustment, or servicing while the equipment is in operation. Do Not plug the printer power cord into the electrical / power unit until all internal cable connections have been properly attached and the installation process has been completed. Do Not reach into the area of any moving parts during operation. Do Not configure the applicator in an orientation that does not allow the T-base stand to provide adequate support and cause the unit to tip. Do Not use this equipment in a manner that is not consistent with the instructions given in this manual. 5 Product Description The PA500w Wipe on Applicator is an accessory manufactured specifically for use with the label printer for automatically applying a printed label to a product. Designed for moderate to high speed application, the PA500w can print and apply up to 100 labels per minute (depending on label size and application). With use of a fan box, the PA500w always has two or more printed labels ready to be applied at all times. A product sensor that is connected to the control box I/O port will initiate the print and apply cycle. The fan box holds one printed label out away from the peel beak. The product sensor is triggered and a start signal is sent to the control box. As the label on the fan box is being applied to the product, another one is simultaneously being printed. This causes another label to be fed out onto the fan box so the applicator is ready for the next product. After the label is applied, a brush on the front of the applicator sweeps across the label to secure it into place. This is especially useful on products that are not completely flat. 6 Product Description (cont’d) Applicator Specifications FRONT VIEW Minimum Size Label: Maximum Size Label: Speed: Weight: Stand Only: SIDE VIEW 3" x 1" (76 x 25mm) 4 1/2" x 6 1/2" (114.3 x 165mm) Up to 100 labels per minute Applicator with table: 9.5 KG 95 lbs. (43.0 KG) 7 Product Description (cont’d) Product Label Located on the back of the control box is the product label that contains the following information: Our name and addressTharo Systems, Inc. Brunswick, OH USA The model number of the applicator- PA500w The serial number of the applicator- 0000000 The date of manufacturerdesignated by the serial number in the following formatYY WW XXX YY = two digit year (00 = 2000) WW = week of the year XXX = a serialized number Options Warning Beacon: Informs operator of printer / applicator errors Please see Page 37 for a detailed description Lockable Casters: For easy mobility of applicator and stand Please see Page 39 for a detailed description Optional Stand-Alone Capability: The PA500w also features the ability to work with or without a computer attached, giving you much more flexibility in meeting all labeling requirements. This stand-alone feature eliminates the need for additional computers, is ideal for print and apply applications in remote locations, saves workspace, and is even perfect for use in harsh working environments! EASYLABEL® Label Design Software 8 Shipment Contents (For easy assembly, open boxes in numerical order starting with Box 1) BOX 1 Contents (A) Short (24”) rectangular bar with base clamp (B) Long (36”) rectangular bar BOX 2 Contents (C) Short (36”) round bar (yard arm) (D) Long (54”) round bar with side arm clamp (mast) or Hand Crank Height Adjustable mast (pictured) (E) Table clamp BOX 3 Contents (F) Printer support plate with locks and guide pins BOX 4 Contents (G) Applicator BOX 5 Contents (H) Printer with applicable accessories (Please refer to the shipment contents checklist in the “Printers Operators Manual”) BOX 6 Contents (I) (J) (K) (L) (M) (N) Manual (not pictured) Control box to printer and applicator cable Control box Core adaptor Product sensor Peel plate 9 Safety Instructions Warning! There is a danger of injury with this equipment. Do not reach into the area of any moving parts. Keep long hair, loose clothing and jewelry away from all moving parts. Observe all printer safety precautions as described in the “printer’s user” manual. Please note the weight of the unit when assembling and adjusting the printer and applicator. Several procedures will require two people. (e.g., when adjusting the position of the printer and applicator). Consider wearing safety footwear while transporting, assembling or maintaining this equipment. The printer and applicator must be placed on the T-base stand in a manner that will support the weight of the unit. This is accomplished by positioning the printer and applicator over one of the three legs of the stand. Observe the unit's center of gravity and configure it appropriately to prevent tipping. It is suggested that the stand be fastened to the conveyor or floor (remove the leveling feet from the stand in order to bolt it directly to the floor). This can help to prevent any vibration, accidental movement, or tipping from interrupting normal operation. Do not plug the printer power cord into the electrical / power unit until all cable connections have been properly attached and the installation process has been completed. Plugging in any of the device cables when electrical power is present can damage the electronics. Warning: Ensure that this equipment is connected to a grounded electrical supply to reduce the risk of electrical shock. Because you will be using the applicator in conjunction with a conveyor, we strongly suggest that a “Kill Switch” be installed to stop the conveyor instantly in case a problem occurs. Note: The sound level produced by this equipment has been measured at a height of approximately 1.5M and at a distance of approximately 2M to be below 70DB. If the PA500w needs service, contact Tharo Systems PA500w tech support at 330-273-4408 or contact us online at: [email protected]. 10 Safety Instructions (cont’d) Safe and consistent operation of the PA500w can be achieved by incorporating a regular preventative maintenance schedule. Depending on the amount of use and the environment in which the unit is operating, the following routine should be performed daily or weekly: 1. CLEANING Keep foreign materials, such as dirt, dust and liquids, out of the path of any moving parts, including the printer’s paper path and printhead, and off of any sensors. Vacuum or blow away any such build-up. 2. VISUAL INSPECTION Check for any loose or broken parts. If damage is detected, service the unit immediately! Because of the nature of this unit and the surrounding environment, the PA500w and the printer are often subjected to vibrations that can ultimately loosen mechanical fasteners. Although great care has been taken to avoid this, it is still recommended that screws and bolts be checked regularly to ensure safe and consistent operation. 3. FAN GUARD Keep the fan guard in place at all times. This is there for your own protection as well as keeping foreign objects from coming into contact with the fan. If the fan guard should become damaged it is important that you replace it immediately. 11 Setup / Installation Tools Required: • 5 mm Allen Wrench • 6 mm Allen Wrench • Two, 13 mm Combination Wrenches • 17 mm Combination Wrench • ½ Combination Wrench or Medium Crescent Wrench Setup 1. Remove 4 bolts from open end of short bar with base clamp (A) 2. Insert long bar (B) into opening in short bar (A) (DO NOT replace bolts yet) 12 Setup / Installation (cont’d) 3. Loosen 4 bolts on side of base clamp to insert main mast (D) 4. Insert main mast (D) into opening in base clamp 5. Tighten the 4 bolts in the base clamp evenly to secure main mast. (snug up one, then the diagonally opposite one, then the next two) 6. Insert 4 bolts into base clamp and tighten securely Bolt Washer Washer Lock Washer Nut 7. Insert yardarm (C) into side arm clamp and tighten securely 13 Setup / Installation (cont’d) 8. Remove the 4 bolts from table clamp (E) 9. Attach table clamp (E) to printer support plate with 4 bolts but do not tighten (The orientation of the table clamp on the support plate will vary depending on application… please see TAMP ORIENTATION) Please note: Nuts for the table clamp bolts sit in the recess in the table clamp (Use center bolt provided to attach bottom half of clamp directly to printer support plate) 10. Slide the printer support plate with table clamp attached onto the yardarm (C) and tighten the 4 bolts evenly. 11. Set angle of the printer and applicator by loosening cross clamp and rotating the yard arm. 14 12. Measuring from the bottom edge of the printer support plate, the back of the printer support plate should be 6 ¾ inches higher than the front of the printer support plate. 13. Place printer on support plate 17. Mount applicator slide arm to the slide key on the bottom of the printer support plate 15 16. Open the side cover of the printer and install the core adaptor as shown. 16 Applicator Setup 1. Top apply (applicator in upright position) In order to configure the applicator for this type of application, place the table bracket on the table with the opening perpendicular to the printer. Attach the table to the yardarm with the printer in an upright position and with the electronics side of the printer facing toward the mast. Be sure to slide the yardarm completely into the table bracket before tightening. To prevent the stand from tipping, it is best to keep the printer and applicator as close to the mast of the stand as possible. Adjust this as necessary by loosening the yardarm side of the cross bracket attached to the mast and sliding the yardarm as needed. If necessary, you can remove the leveling feet from the stand, slide bolts through the holes in the stand, and bolt the stand directly to the floor. Caution! When loosening the cross bracket, always have a second person hold the printer securely in place so that it cannot not fall or tip in order to prevent personal injury and equipment damage. 17 Applicator Setup (cont’d) 2. Side apply (applicator on its side) In order to configure the applicator for this type of application, place the table bracket on the table with the opening parallel to the printer. Attach the table to the yardarm with the printer on its side. The back of the printer will be facing towards the mast with the media side of the printer facing up. Be sure to slide the yardarm completely into the table bracket before tightening. To prevent the stand from tipping, it is best to keep the printer and applicator as close to the mast of the stand as possible. Adjust this as necessary by loosening the yardarm side of the cross bracket attached to the mast and sliding the yardarm as needed. If necessary, you can remove the leveling feet from the stand, slide bolts through the holes in the stand, and bolt the stand directly to the floor. Caution! When loosening the cross bracket, always have a second person hold the printer securely in place so that it cannot fall or tip in order to prevent personal injury and equipment damage. 18 Applicator Setup (cont’d) PA500w Controller Connections The PA500w controller is connected to the peripheral port of the printer with the supplied 3’ adaptor cable. The connections should be made as follows: 1. Connect the male end of the cable to the printers’ peripheral port. 2. Connect the female end of the cable to the right I/O port of the control box. 3. Connect the fan box power cable. (This runs from the male end of the adaptor cable to the top of the fan.) Make sure that you connect red to red and black to black. The product sensor can now be set up and plugged into the left I/O port (refer to Product sensor Set Up for placement of the sensor). The control box plays an important role in adjusting the label placement on the product. Increasing the delay will move the label towards the trailing edge of the product. Decreasing the delay will move the label towards the leading edge of the product. How to Set the Control Box The ‘delay/strobe’ switch should be set to delay. The strobe mode will not be used with the PA500w. To set the delay, flip the ‘run/set’ switch to the set position (down). The cursor will flash over the last digit of the delay value indicating that the value can be changed. Press the up or down buttons to increase or decrease the value in increments of one. Holding one of the buttons for 10 counts will cause rapid incrementing/decrementing. Once you are done setting the delay, flip the ‘run/set’ switch to the run position (up). The control box will not send a start signal when it is in set mode. It is important to note that the last set value will be retained and used upon power-up. If you are labeling different length products on the same line, the delay value may have to be increased or decreased depending on the product and label placement. The ‘feed’ button will manually advance a label when there is a job in the printer. Note: When connecting a warning beacon, the Y-cable should be connected to the left I/O port of the PA500w controller. The product sensor can then be connected to one leg of the Y-cable, and the warning beacon to the other leg. WARNING! Never connect the Y-cable to the peripheral port of the printer or damage to the printer will occur. 19 Applicator Setup (cont’d) Product Sensor Instructions The product sensor functions as an automatic trigger device that sends a start signal to the applicator. The product sensor senses its invisible beam when reflected from the supplied reflector. The yellow indicator LED on the back of the sensor will not be lit when the beam is sensed. When the beam is broken, the yellow LED will light. The start signal is sent to the control box that the sensor is connected to. The reflector can be mounted up to 9 feet away from the sensor. The sensor is not affected by ambient light or reflective surfaces that are not polarized (the reflector is polarized). Connections The product sensor can be plugged directly into the left I/O port of the PA500w controller. Set Up It is best to set up the product sensor as close to the peel beak of the applicator as possible. Place the polarized reflector directly across from it. With the sensor in this position, the label will be applied at the leading edge of the product you are labeling. Use the control box ‘delay’ function to fine-tune the placement of the label. The higher you set the delay on the control box, the closer to the trailing edge of the product the label will be placed. If it is not possible for the product sensor to be set up at the peel beak, then place it as close to it as possible. The conveyor speed must remain constant for the label placement to be consistent. If the conveyor speed fluctuates, the label placement will be erratic. 20 Applicator Setup (cont’d) Loading Media You may refer to the printer’s manual for general loading of the ribbon and labels. However, before the label backing can be attached to the internal rewind, the labels must be threaded through the applicator. Note: Make sure that the core adaptor is properly installed before loading the labels. 1. After loading labels through the printer, pull them out over the peel beak. 2. Wrap the label liner around the edge of the peel beak. 3. Attach label liner to the printers’ internal rewind. There are two adjustments that need to be made to get your labels properly in place before the print and apply cycle can begin. 1. The distance from the front edge of the fan box to the peel beak should be 1/10 of an inch shorter than the length of the label that you are using. For example, if you are using a 4” x 6” label then the front edge of the fan box should be 5 and 9/10 inches in front of the edge of the peel beak. 2. Adjust the slide arm forward or back until the trailing edge of the label is attached to the peel beak by no more than ¼ inch. While making this adjustment, press the Form Feed button on the printer periodically, this will keep the label liner tight and help you make the adjustment more accurately. 21 Once a print job is sent to the printer, you will want to feed out several printed labels. Continue discarding the blank labels until you have a printed label sitting on the fan box. For top apply, adjust the unit up or down until the edge of the fan box is just barely touching the top of the product that you are labeling. You want the label to “wipe” onto the product. If the applicator is too high, the label will not be applied. If the applicator is to low, the products will run into the fan box causing it to bounce and the label will not be applied accurately. (The angle on the bottom of the applicator slide arm is parallel to the conveyor) For side apply the angle on the bottom of the slide bar should be parallel to the conveyor. Then move the stand so that the fan box on the applicator is just touching the side of the product you are labeling. Again, it is important to make sure that the applicator is neither too close or too far away, so that the label is properly applied. Allen Head Screw For labels 3 inches in length or shorter you must have the small label guide installed. This is inserted and removed by loosening the allen head screw on the top of the cantilever arm. Small label guide 22 Applicator Setup (cont’d) Software Setup Formats used with the PA500w must be configured as follows for the applicator to work correctly: In EASYLABEL® Software Label offset = .00 Print mode = Applicator Presentation position = 0 Please refer to the EASYLABEL manual or online help for more detailed information on format changes and configuration. 23 Function Operation Printing and Applying Labels After the applicator has been setup, turn on the printer. When the printer displays ONLINE, the system is ready for operation. A print job must be sent to the printer. This print job can come from a computer connected to the printer’s serial or parallel port, or from memory in the printer. Please refer to your printer or software manual for further information on sending a job to the printer. At this point, a start signal can be sent to the printer. This can be done with a product sensor connected to the I/O Port. This will cause the first label of the job to be printed and fed out to the fan box. Label Synchronization It may be necessary to discard the first label if it was not fully printed or if it did not feed correctly. This problem can occur if the labels are not positioned in the exact spot under the printhead for printing to start in the correct place. In most cases, the labels can be properly positioned before sending a print job to the printer. This is accomplished by pressing the Feed button on the printer twice. If the label stock or ribbon is changed during the printing of a job, it may be necessary to discard the first label when printing is resumed. If power is removed from the printer after the labels have been correctly positioned, power can be later restored and the labels will print normally. 24 PA500w controller 15 Pin Sub-D I/O Port The 15 pin sub-D port, which is located on the left side of the PA500w controller, allows connection to sensors, lights, and PLCs. This port is used to control and monitor the applicator. Pin Assignment Pin 1 2 3 5 6 7 8 9 10 11 12 13 14 15 Signal Direction Function START+ input START signal positive n/a not defined n/a not defined n/a not defined +5V +5V <300mA n/a not defined GND ground START- (input) START signal negative n/a not defined n/a not defined n/a not defined n/a not defined RELAY_COMMON (output) +24V common for output +24V <1A 25 Input Description The start input is an optocoupler with a 750-ohm current limiting resistor in series with the input. Input requirements: START 35mA at 24V 7mA at 5V 26 Signal Explanation START+ and START- (pin 1 and 9) These pins are inputs for the following functions: Control of label printing/applying When a START signal is sent, and a job is present in the printer, a label will be printed, causing the label on the fan box to be applied. If no job is present in the printer, the START signal will be ignored. These pins can be wired in the following configurations: Internal 5V Power using a Microswitch START+(pin 1) connected to +5V (pin 6), and START- (pin 9) connected to GND (pin 8) This will send a START signal to the printer. Disconnecting either the +5V or the GND and then reconnecting will send another signal. For this reason, a nonpowered microswitch can be placed on either the +5V side (remove wire and connect switch to pin 1 and 6) or on the GND side (remove wire and connect switch to pin 8 and 9). Internal 24V Power using a Microswitch START+(pin 1) connected to +24V (pin 15), and START- (pin 9) connected to GND (pin 8) This will send a START signal to the printer. Disconnecting either the +24V or the GND and then reconnecting will send another signal. For this reason, a nonpowered microswitch can be placed on either the +24V side (remove wire and connect switch to pin 1 and 15) or on the GND side (remove wire and connect switch to pin 8 and 9). External High Trigger (5V to 24V) START+ (pin1) connected to an external high pulse ( 5 to 24V ), and START- (pin9) connected to GND (pin8, or external GND) When an external device, such as a product sensor or a PLC, sends a high to the START+ (pin1) and the START- is grounded, a valid START signal is sent to the printer. External Low Trigger START+ (pin1) connected to either 5V (pin6 or external 5V) or 24V (pin15 or external 24V), and START- (pin9) connected to an external low pulse ( GND, 0V ). When an external device, such as a product sensor or a PLC, sends a low to the START- (pin9) and the START+ is connected to 5 to 24V, a valid START signal is sent to the printer. 27 Troubleshooting Problems, Causes and Solutions The Labels are Not Reaching the end of the Fan box and / or You See Overlapping Fields This problem occurs when the labels are slipping on the drive roller. Probable cause: 1. The drive roller is dirty. Paper, dust, adhesive, and/or a label is on the drive roller. 2. The print speed is too high. Solutions: 1. Clean the drive roller. 2. Decrease the print speed to the slowest possible speed for the job. The Labels are Bagging from the front of the Printer This problem occurs when the labels are not able to move freely through the printer. Probable cause: 1. There is a label (or some foreign object) obstructing the label path. Solution: 1. Follow the path of the labels through the printer and applicator to make sure that there is nothing interfering with the flow of the labels. Clean out any foreign matter. Thin White Line Across the Format This problem occurs under one of the following conditions: 1. The label stock is not traveling at a constant rate. Probable causes: 1. The printer has buildup or wear on the drive roller. Solutions: 1. Service the printer. 28 Troubleshooting (cont’d) The Labels Are not applied to the Same Place on the Product This problem occurs under the following conditions: 1. The product is not traveling at a consistent speed. 2. The leading edge of the product triggers the sensor too soon. Probable causes: 1. The speed of the conveyor is not constant. 2. The size of the product varies. Solutions: 1. Regulate the speed of the conveyor so that it remains constant. 2. Keep in mind that the label will always be applied at the same distance from the leading edge of the product, so if different size products are used, the label will not always be applied to the middle of each product. Supply Problems Label stock can be viewed as a sandwich of individual components which consists of the following: * Liner or backing material * Liner release coating (silicone) * Adhesive * Label material * Label topcoat The ribbons consist of the following materials: * Silicone back coating * Polyester carrier * Wax and/or resin ink 29 Troubleshooting (cont’d) The most common supply problems are as follows: 1) Mismatch of supplies Problems involving thermal transfer printing: 1. Poor print quality. 2. Ink smearing. 3. Poor ink adhesion to label. Probable causes: 1. Wax based ribbons are being used on synthetic label stocks. 2. Resin-based ribbons used on paper label stock. 3. Labels were not developed for thermal transfer printers. Problems for thermal printers: 1. Poor print quality. 2. Failure. Probable causes: 1. The label stock requires a higher or lower heat setting in the printer, or the printhead is misaligned. 2. The label topcoat is too abrasive. 2) Die strikes Problem: The labels are difficult to peel off or are not being removed consistently from the backing. Probable cause: The gap between the cutting die and the anvil was set incorrectly on the press. The result can either be a die strike that is too deep or too shallow. A deep die strike breaks through the liner surface, thereby exposing the paper interior to the adhesive. The adhesive then grips the liner, which can make stripping difficult. To test for this, use a black felt-tipped marker to outline the die cutting area. If a solid black line appears along the die cut, the die strikes are too deep. A shallow die strike will not properly cut through the adhesive and could leave adhesive 'legs' that hold on to the label stock. 30 Troubleshooting (cont’d) 3) Incorrect release specification Problems: 1. Labels lift up or drop off as the label liner is pulled through the machine. 2. Labels are difficult or impossible to peel. Probable causes: 1. During label construction, the adhesive coater can adjust the amount of release agent (silicone) on the liner that will affect the amount of tension required to release a label from the liner. If the labels are lifting as they travel through the equipment, the release was set too low during label construction. 2. If labels are difficult to peel off, the release was most likely set too high. 4) Core diameter Problem: Problems arising with the core diameter are most common in applications that require the use of five inch labels or longer. Labels near the end of the roll have a permanent curl that will make it difficult for the fan box to hold the label in place. Probable cause: The label roll ID is too small, (the standard core size is 3"). Any label five inches or longer should use a 5" ID label core. 5) Label winding tension Problems: 1. The label liner or backing material sticks as the labels are unwound from the roll, adhesive buildup is visible on equipment rollers. 2. The label rolls are difficult to pick up and mount because the center core falls out or telescopes. Probable causes: 1. If the labels are wound too tight, adhesive can escape from under the label, which causes the liner to stick. 2 .If the labels are wound too loosely, the core can fall out. For this reason, it is crucial that the label supplier has the experience and knowledge required to specify and monitor the correct wind to avoid any potential tension problems. 31 Troubleshooting (cont’d) 6) Label length varies Problem: In applications where the label must fit within a tight space, the label will occasionally be too large or too small on the same roll. This can cause the label printer to periodically lock up and display a label length error message. Probable cause: The label converter used the incorrect web tension during the die cutting operation. 7) Label liner stiffness/ weight Problems: 1. The label is difficult to peel. 2. The liner breaks. Probable causes: 1. The liner is too thick for the label printer or applicator peel beak, and therefore does not provide enough release tension for the label. 2. The liner is too thin and will break from the label web tension as it is pulled through the machine. This condition can be aggravated when there are die strikes on the liner. 8) Label stiffness Problem: As the label is peeled from the backing, the label wrinkles or falls off the applicator fan box. Probable cause: As the label is stripped from the backing, a minimum label stiffness is required to move the label out onto the applicator fan box. Labels lacking sufficient stiffness tend to curl and fall off the fan box. 32 Troubleshooting (cont’d) 9) Insufficient testing It is strongly recommended that any changes in the supplies undergo thorough testing. This, however, does not mean carrying out a test run with the supplies on a machine for one day, but rather a test should be carried out throughout its required useful life. For example, a label intended for use within a manufacturing plant or warehouse will have different testing requirements than a label that must be stored in an unheated warehouse in the winter. 10) Environmental changes Label stocks normally perform better in colder temperatures because the adhesive is less tacky. Always store labels in the same room/environment as the PA500w for at least 24 hours before use. When choosing the label stock, we recommend that you contact the label manufacturer to request stock that is guaranteed to dispense on a standard tabletop printer. All testing on the PA500w has been carried out using Fasson TransTherm 1C with 2501 Adhesive. 33 Warning Beacon Instructions The warning beacon functions as a visual display for printer errors. • When there is a printer error, the warning beacon will flash. When the error is cleared the light will be off. Connections: The warning beacon is connected to the left I/O port of the PA 500w controller with the supplied Ycable. Be sure that the male connector of the Y-cable is connected to the I/O port of the controller. One of the female connectors should be connected to the warning beacon. The other female connector can be connected to the product sensor. WARNING! Be sure to remember that the Y-cable can allow the same pin of the I/O port to be used in two places at the same time. Never use the Y-cable in a manner that will allow devices to conflict with each other. This will blow the power supply in the printer, and can damage the devices as well as the applicator. Only use the Y-cable as described above to prevent problems. When wiring a PLC, take note of the warning beacon connections in figures 1. Figure 1 Pin 15 is 24v, which is supplied to the light. Pin 14 is the error reverse line, which is tied to pin 8 which is ground. Pin 13 is the error line, which is tied to the negative of the light. 34 3 Piece Locking Casters Set Instructions The locking casters are an upgrade to the leveling feet that came with your PA500w stand. When fitted with the set of locking casters, the PA500w can be easily rolled to a different location. The casters can then be locked with a press of the lock lever, and the stand is now solidly positioned for continued use. Installation Unbolt the leveling feet from the stand, and remove the nut from each leveling foot. Screw one nut on each caster then screw the casters on the stand. After leveling the stand, by screwing each caster in or out as necessary, tighten the nut up against the bottom of the stand to secure each caster in place. Settings To unlock the casters, press down on the small lever at the top of each caster. The wheel will now roll and the caster can swivel. To lock the casters, push down on the large lever at the top of each caster. Both the wheel and the swivel will be locked. 35 WARRANTY INFORMATION 1. Applicator Warranty THARO Applicators are warranted against defects in material or workmanship for a period of 12 months (365 days) or 1,000,000 cycles of use from the date of original shipment by THARO SYSTEMS, INC. This warranty does not cover normal wear and tear and shall be null and void if the equipment is modified, improperly installed or used, damaged by accident or neglect, or in the event any parts are improperly installed or replaced by the user. _______________________________________________________________________________ THARO SYSTEMS' SOLE OBLIGATION UNDER THIS WARRANTY SHALL BE TO FURNISH PARTS AND LABOR FOR THE REPAIR OR REPLACEMENT OF PRODUCTS FOUND TO BE DEFECTIVE IN MATERIAL OR WORKMANSHIP DURING THE WARRANTY PERIOD. _______________________________________________________________________________ As a condition of this warranty, the user must: (a) obtain a THARO Return Authorization for the applicator or subassembly (s); (b) ship the applicator or subassembly (s), transportation prepaid to the authorized service location; and (c) include with the Product or subassembly (s) a written description of the claimed defect. Unless THARO SYSTEMS authorizes return of the entire Product, the user shall return only the subassembly (s). Products returned shall be packaged in the original packing and shipping container or comparable container. In the event equipment is not so packaged or if shipping damage is evident, it will not be accepted for service under warranty. Surface transportation charges for the return of the applicator to the customer shall be paid by THARO SYSTEMS within the 48 contiguous states and the District of Columbia. Customer shall pay shipping costs, customs clearance, and other related charges outside the designated area. If THARO SYSTEMS determines that the Product returned to it for warranty service or replacement is not defective as herein defined, BUYER shall be subject to a minimal labor charge and all costs of handling and transportation. 2. Warranty Exclusions and Conditions The above warranties are in lieu of all other warranties, expressed or implied, oral or written, statutory or otherwise, including any implied warranty of merchant-ability or fitness for a particular purpose. THARO SYSTEMS shall not be responsible for the specific application to which any Products are applied, including but not limited to compatibility with other equipment. All statements, technical information and recommendations relating to THARO Products are based upon tests believed to be reliable but do not constitute a guarantee or warranty. _______________________________________________________________________________ THARO SYSTEMS SHALL NOT, UNDER ANY CIRCUMSTANCES WHATSOEVER, BE LIABLE TO BUYER OR ANY OTHER PARTY FOR LOST PROFITS, DIMINUTION OF GOODWILL OR ANY OTHER SPECIAL OR CONSEQUENTIAL DAMAGES WHATSOEVER WITH RESPECT TO ANY CLAIM HEREUNDER. IN ADDITION, THARO SYSTEMS' LIABILITY FOR WARRANTY CLAIMS SHALL NOT, IN ANY EVENT, EXCEED THE INVOICE PRICE OF THE PRODUCT CLAIMED DEFECTIVE, NOR SHALL THARO SYSTEMS BE LIABLE FOR DELAYS IN REPLACEMENT OR REPAIR OF PRODUCTS _______________________________________________________________________________ No salesperson, representative or agent of THARO SYSTEMS is authorized to make any guarantee, warranty, or representation in addition to the foregoing warranty. _______________________________________________________________________________ NO WAIVER, ALTERATION, ADDITION, OR MODIFICATION OF THE FOREGOING WARRANTIES SHALL BE VALID UNLESS MADE IN WRITING AND SIGNED BY AN EXECUTIVE OFFICER OF THARO SYSTEMS _______________________________________________________________________________ 36