1
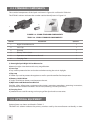
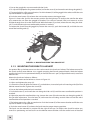
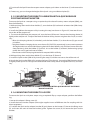
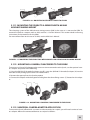
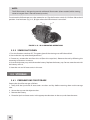
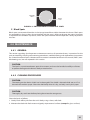
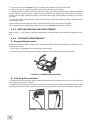
3. Put on the goggle kit, now mounted with the Spark.
4. To adjust the equipment for greater comfort, loosen the screw (A) and move the unit along the guide (C).
5. The goggle kit has a flip-up mechanism. Push the button (D) of the goggle kit bracket and lift the unit
up until it reaches its top position.
6. Push the same button (D) to lower the unit into the correct viewing position.
Figure 3-2 shows the Spark in the correct position for the right eye. To readjust the unit for the other
eye, remove the unit from the goggle kit bracket. Turn the unit around (180º) and mount it on the
bracket through the rail on the second side. With the button (E) pushed, move the unit along the sliderail (F) until the desired, most comfortable position is reached.
To remove the Spark from the goggle kit, loosen the screw (A), push the button (B), and slide the unit
out of the bracket guide (C).
F
E
d
B
A
C
Figure 3-2. Mounting Spark to A Goggle Kit
3.1.3 MOUNTING THE Spark TO A HELMET
An optional flip-up helmet mount can be used to attach the Spark to a helmet. The helmet mount fits
the Spark securely onto helmet via a rugged strapping device and grooved hooks. With the helmet
mount, the Spark can be positioned directly in front of the user’s eyes, or flipped backwards, out of the
field of view.
Mount the Spark to a helmet as follows:
1. Attach the mount to the helmet as shown in Figure 3-3.
2. Adjust and tighten the straps (A).
3. Loosen the screw (B). With the button (C) pushed down, insert the Spark rail into the guide (D) of the
helmet mount bracket. Tighten the screw (B).
4. Put on the helmet with the Spark attached.
5. Push the button (F) and move the unit along the slide-rail (G) until the most comfortable position is
reached.
6. Adjust the mount for comfortable using. Loosen the screw (B) and move the unit along the guide (D)
for eye relief adjustment. Turn the lever (H) and move the unit along vertical slide-rail until the most
comfortable vertical position is reached.
7. The helmet mount has a flip-up mechanism. Push the button (E) of the mount bracket and lift the unit
up until it reaches its top position.
8. Push the same button (E) to lower the Spark into the proper viewing position.
The Spark can be mounted in position for the right or left eye. To readjust the Spark for other eye,
reverse its positioning and reinstall it on the helmet mount bracket. Use the second unit rail located
18