1
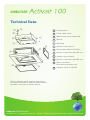
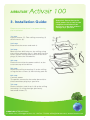
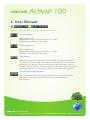
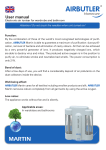
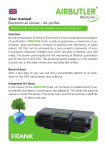
… more than just air
Installation Instructions and User Manual
AIRBUTLER
®
Technical Data:
1
Ceiling mount
2
Power cable outlet
3
Wood screw round head 5x50
4
Washer
5
Wall plug
6
Stainless steel chassis
7
Seating bolts M4x12 (Phillips)
8
Stainless steel filter 400x150 mm
9
4-button control panel
10
Stainless steel filter 395x395 mm
11
Rotary controller
for ozone generation time
12
Indicator lamp O³ ON/OFF
Please read this guide carefully and store it
for future reference in order to make the best
possible use of your Airbutler device.
AIRBUTLER INTERNATIONAL
A – 4020 Linz, Lüftenggerstrasse 12, +43-732-77 04 44, [email protected], www.airbutler.com
2
AIRBUTLER
®
1. Safety and General Notes:
The device may only be plugged into an isolated ground receptacle socket
which has been installed according to regulations. The socket should be
secured directly in the distribution box, if possible. The specifications can be
found inside the device, on the identification plate which is visible when the
stainless steel filter is removed.
Only use the device when the stainless steel filter is inserted.
Only remove the stainless steel filter when the device is turned off.
Installation and initial operation may only be performed by a trained specialist.
Before performing any cleaning or maintenance work, the device must be
unplugged and disconnected from the electrical power supply.
Regular maintenance ensures smooth operation and best performance.
All dirty areas should be cleaned regularly and all deposits should be removed.
The filters must be removed and cleaned at least every 14 days.
!!! Disconnect the device from the
power supply before opening it !!!
Do not operate device without filter!
The manufacturer does not accept responsibility for any problems caused by
non-adherence to the above guidelines.
AIRBUTLER INTERNATIONAL
A – 4020 Linz, Lüftenggerstrasse 12, +43-732-77 04 44, [email protected], www.airbutler.com
3
AIRBUTLER
®
Information on the ozone generator:
Ozone is a type of unstable air with a concentration of approx. 0.005 ppm, similar to
the air by the ocean, in the woods or next to waterfalls. It serves a cleansing purpose in
nature. If ozone is mixed with water, it causes a strong and fast reaction which cleanses
water of dirt particles, bad odours and colour, and which has a strong antibacterial
effect.
The chemical formula for ozone is O3, its molecular weight is 48 and it is unstable, blue
air. Ozone consists of three oxygen atoms. The third atom has the effect of constantly
breaking open the other two. During this process, it utilises the energy which is
created in that moment in order to create oxygen, which then has the natural effect of
destroying bacteria, neutralising odours, thinning poisons and bleaching agents etc.
Without contact with substances which cause this process, ozone turns back into
normal oxygen (O2) under the influence of air humidity.
Information on the Ioniser:
A high concentration of negative air ions can be found in mountain air, sea air and in
the air after an electrical storm, caused by UV radiation, thunderbolts and fine water
drops which react with air molecules.
Negative ions can only exist in the room in which they were created, regardless of
how powerful the Ioniser is. This can be explained by the fact that they only "live" for
approx. 30 seconds and are moved around the room by natural air current. The size
of the area for which the Ioniser can be used differs and usually depends on its size,
power and the quality of the electronic components.
By using Ionisers, rooms can have a similarly dynamic balance between negative
and positive ions as exists in undisturbed nature. Therefore, it is recommended to
operate ion generators continuously in closed rooms. The air in our apartments is
full of suspended particulates which afflict us. Dust (PM10) and smoke (e.g. from
cigarettes) are suspended particle carriers of germs, bacteria and viruses. Negative air
ions agglomerate these suspended particles electrically. They fall to the ground and
can be removed when cleaning the room.
AIRBUTLER INTERNATIONAL
A – 4020 Linz, Lüftenggerstrasse 12, +43-732-77 04 44, [email protected], www.airbutler.com
4
AIRBUTLER
®
2. Before Installation:
Please ensure that the device has not been damaged during transport.
If the device has been damaged, it must not be installed!
Please make sure that the installation and the electrical connections are
handled by a qualified specialist according to the specifications of the
manufacturer and the official regulations.
Please ensure that a three-conductor cable is included.
The following parts are included in the Airbutler ACTIVAIR 100 box:
included kit and cleaning set.
AIRBUTLER INTERNATIONAL
A – 4020 Linz, Lüftenggerstrasse 12, +43-732-77 04 44, [email protected], www.airbutler.com
5
AIRBUTLER
®
3. Installation Guide:
Please ensure that there is no power during
the installation.
Attention! Connection to the
230 V power line as well as the
complete installation of the
device has to be done without
voltage, by a specialist.
1st step:
Loosen screws (7). Take ceiling mounting (1)
off of chassis (6).
2nd step:
Determine the centre and mark it.
3rd step:
Mark the four drill holes on the ceiling using
the ceiling mounting (fig. 1). Now drill the four
holes into the ceiling and insert the four wall
plugs (5) from the included kit.
4th step:
Please ensure that the power cable is at the
centre on top of the device.
5th step:
Attach the ceiling mounting (1) to the ceiling
using the four screws (3) from the by-pack kit.
6th step:
Connect power.
The power connection has to be done with a
three conductor plug by a specialist.
7th step:
Screw stainless steel chassis (6) to the ceiling
mounting (1) using the eight previously
loosened screws (7).
AIRBUTLER INTERNATIONAL
A – 4020 Linz, Lüftenggerstrasse 12, +43-732-77 04 44, [email protected], www.airbutler.com
6
AIRBUTLER
®
4. User Manual:
4 button control with timer function with remote control
Turn on at level 1
Move to next level
Repeated pressing switches to levels 2, 3, and 4,
and then turns the device off again
Turn on at level 4
Move to back level
Repeated pressing switches to levels 3, 2, and 1,
and then turns the device off again
Timer button
After pressing the Timer button, the ACTIVAIR 100 operates another
10 minutes at the selected level and then automatically turns off. Each
pressing of this button increases the lag time by 10 minutes, up to a
maximum of 40 minutes. You can increase or decrease the device's level
during the lag time. Turning off the device also deletes the lag time.
Ozone generator button
Press this button to turn the ozone generator on or off. If the ozone
generator is active, the green LED next to the control panel is
illuminated.
AIRBUTLER INTERNATIONAL
A – 4020 Linz, Lüftenggerstrasse 12, +43-732-77 04 44, [email protected], www.airbutler.com
7
AIRBUTLER
®
5. Programming Instructions:
(if Remote Control does not work)
4-button control panel:
1.
Keep both buttons pressed
until the green LED in the control panel lights up
2. Release both buttons at once.
3.
Press this button on the hand-held transmitter
until the green LED next to the control panel lights up or turns off.
The new hand-held transmitter is now programmed for the AVCTIVAIR 100.
6. Control Knob:
for Ozone Generation Time (11)
The control knob (11) controls the ozone generation time as an interval.
You can select four different levels.
Level 1: 20 seconds on – 20 seconds off (default setting)
Level 2: 30 seconds on – 20 seconds off
Level 3: 40 seconds on – 20 seconds off
Level 4: 60 seconds on – 20 seconds off
This means: The ozone generator produces (e.g. at the default setting) ozone for 20
seconds, then switches to stand-by for 20 seconds.....
AIRBUTLER INTERNATIONAL
A – 4020 Linz, Lüftenggerstrasse 12, +43-732-77 04 44, [email protected], www.airbutler.com
8
AIRBUTLER
®
7. Cleaning – Maintenance – Filter:
Regular cleaning and sealing of the recirculation device
and the stainless steel filters increases the operating life
and ensures that you will be able to enjoy your
ACTIVAIR 100 for the longest possible time.
General principle:
Disconnect the device
from power before
each cleaning!
External cleaning of device:
Each device comes with a cleaning cloth drenched in cleaning fluid for cleaning and
maintenance. Apply the lotion to the device with gentle pressure, let it become dry to
the touch and then polish in the direction of brushing. Do not polish in circles or
against the brushing direction since this may cause scratches on the surface. After
this treatment, seal the surface again with the cleaning fluid (as described above).
Internal cleaning:
When cleaning the stainless steel filter, remove deposits from the parts of the casing
which can be reached. This ensures optimum performance of the device. Only clean
with a fat-dissolving fluid or with Flamil 50 Super and a wet cloth.
Stainless steel filter:
Attention! Deposits can impair the performance of the Airbutler.
Under normal operation, the stainless steel filter needs to be cleaned every 2 weeks.
The filter should be cleaned with the cleaning fluid supplied with the device.
However, cleaning the filter can also be done in the dishwasher or by hand.
Cleaning with Flamil 50: Please read the cleaning instructions on the bottle.
Cleaning by hand: Rinse the stainless steel filter thoroughly in soapy water several
times.
If you clean the stainless steel filter in your dishwater, do not include other dishes
and do not use rinse agent. After cleaning, the stainless steel filter must be sealed
using the stainless steel cleaning fluid.
The Airbutler is equipped with a micro switch which shuts off the power supply to
the device if the filter is removed.
The device can only be operated if the filters have been inserted correctly.
AIRBUTLER INTERNATIONAL
A – 4020 Linz, Lüftenggerstrasse 12, +43-732-77 04 44, [email protected], www.airbutler.com
9
AIRBUTLER
®
8. Customer Service:
Before requesting customer service, please check carefully using this user manual
whether your problem involves a manufacturing fault, otherwise all resulting
costs including travelling expenses are charged to the person requesting the
service.
ATTENTION! We do not provide any warranty regarding air-related and electrical
faults which are caused by operating an external motor.
If a fault has occurred, please call the customer service or request it via the
enclosed customer service request card:
When doing so, please provide the following:
ID number of the device (on the identification plate inside the device)
Exact model designation (on the identification plate inside the device)
Type of fault
Date of delivery
Your complete address and telephone number
Supplier
9. Spare Parts – Accessories:
Filter cleaning fluid "Flamil 50 Super", 200 ml, item no. 250203
Stainless steel cleaning cloths, 5 pieces, item no. 250204
Stainless steel cleaning cloths, 10 pieces, item no. 250205
Stainless steel filter 395x395 mm, item no. 502046
Stainless steel filter 400x155 mm, item no. 502047
AIRBUTLER INTERNATIONAL
A – 4020 Linz, Lüftenggerstrasse 12, +43-732-77 04 44, [email protected], www.airbutler.com
10
AIRBUTLER
®
10. Quality Control:
The devices are subjected to the following tests according to
VDE 0701 Part 1 according to EN60335:
Grounding test
High voltage test
Insulation test
Functional test and performance test Mechanical inspection
Furthermore, an inspection is performed to check the completeness of
the accessories. This product has been designed, built and marketed in
compliance with the safety requirements of the EG/73/23 "low voltage"
guideline and the safety requirements of the "EMC EG/336/89" guideline,
altered by guideline EG/68/93.
AIRBUTLER INTERNATIONAL
A – 4020 Linz, Lüftenggerstrasse 12, +43-732-77 04 44, [email protected], www.airbutler.com
11
AIRBUTLER
®
11. Warranty:
Valid within the European Union.
The following conditions which specify the requirements and scope of our warranty
conditions do not affect the seller's warranty obligation from the purchase contract
with the consumer.
According to the following condition, we will rectify free of charge any defects or
faults of the device which are verifiably caused by a factory error if they are reported
immediately after detection and within 24 months after delivery to the end user. The
warranty does not extend to easily breakable parts, such as e.g. glass or plastic or light
bulbs. A warranty obligation is not triggered by minor deviations from the nominal
condition which are insignificant in terms of the device's value and its fitness for use,
by damages due to chemical and electrochemical reactions to water and by abnormal
environmental conditions in general.
Fulfilment of the warranty is handled in such a way that we choose to either repair
defective parts or replace them with faultless parts, free of charge.
Repairs at the location where the device is installed can only be demanded for stationary
(fixed) large devices. The warranty expires if repairs or modifications are made by
persons who have not been authorised by us, or if our devices have been equipped
with additional or spare parts which are not approved for our devices.
The warranty period is 24 months. We fulfil the warranty without charging incidental
expenses (shipping and handling costs), warranty adjustments neither cause an
extension of the warranty period nor do they start a new warranty period. The warranty
period ends with the warranty period for the entire device.
Further or different claims, especially those regarding a reimbursement for damages
which occurred outside of the device – provided there is no statutory legal liability –
are excluded.
We offer customer service even after the end of the warranty period if you have no
access to other repair shops.
AIRBUTLER INTERNATIONAL
A – 4020 Linz, Lüftenggerstrasse 12, +43-732-77 04 44, [email protected], www.airbutler.com
12
AIRBUTLER
®
12. Correct Disposal
of the Product:
At the end of its lifecycle, the product must not be disposed of with general household
waste. Please bring the device to the collection points provided by urban administration
or to specialist shops offering a return service. EC Directive 2002/96/EG
13. ROHS-Richtlinien:
We, AIRBUTLER INTERNATIONAL, are confirming that all our products are conform to
the EU legislation regarding the RoHS directive.
14. Summary of Technical Data:
Product description
Recirculation system
with ionisation and ozone generator
Model
Airbutler ACTIVAIR 100
Specifications
Nominal voltage 230 V/50 Hz
Nominal power of ozone generator 6 W
Ozone output
100 mg max., clocked at 60/20 seconds
Effective 75 mg
Ioniser
4 x 10 W
neg. ions
4 x 3,56 x 106/cm³
Nominal power of ventilator
Internal 385 107 W
Air circulation level 1
ca. 108 m³
Air circulation level 2
ca. 177 m³
Air circulation level 3
ca. 245 m³
Air circulation level 4
ca. 418 m³
AIRBUTLER INTERNATIONAL
A – 4020 Linz, Lüftenggerstrasse 12, +43-732-77 04 44, [email protected], www.airbutler.com
13
… more than just air
AIRBUTLER
AIRBUTLER INTERNATIONAL
AUSTRIA, 4020 Linz
Lüfteneggerstrasse 12/1/7
E-MAIL Administration
[email protected]
Phone: +43-732-77 04 44
Fax:
+43-732-79 75 44
E-MAIL Sales department
[email protected]
E-MAIL Orders
[email protected]
www.airbutler.com
14
®