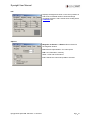
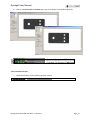
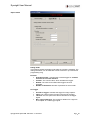
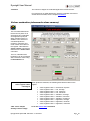
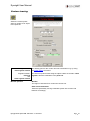
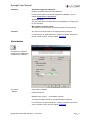
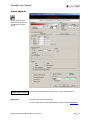
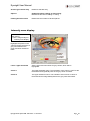
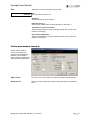
1
1 INTRO Eyesight User Manual 1 INTRO 1 1.1 EYESIGHT: THE SOFTWARE 1.2 PREPARING THE SOFTWARE AND THE CAMERA 6 6 2 7 THE USER INTERFACE 2.1 M AIN MENU 7 2.1.1 FILE ............................................................................................................................................................ 8 2.1.2 EDIT ............................................................................................................................................................ 9 2.1.3 VIEW ......................................................................................................................................................... 10 2.1.4 VIEW CONTINUED ..................................................................................................................................... 11 2.1.5 OPTIONS ................................................................................................................................................... 12 2.1.6 COMMAND ADMINSTRATION ..................................................................................................................... 12 2.1.7 W INDOW ................................................................................................................................................... 12 2.2 PROGRAM EDITOR 14 2.2.1 NO. (THE NUMBER –COLUMN) ................................................................................................................. 15 2.2.2 S (THE LOCK –COLUMN) .......................................................................................................................... 16 2.2.3 G (THE GRAPHICS –COLUMN) .................................................................................................................. 16 2.2.4 T (THE TEXT –COLUMN) ........................................................................................................................... 17 2.2.5 I (THE INVERT –COLUMN) ......................................................................................................................... 17 2.2.6 E (THE RESULT –COLUMN) ...................................................................................................................... 17 2.2.7 B (THE COMMAND –COLUMN) .................................................................................................................. 18 2.2.8 COMMENT ................................................................................................................................................. 18 2.2.9 IM (THE IMAGE MEMORY –COLUMN) ........................................................................................................ 19 2.2.10 PARAMETER –COLUMN........................................................................................................................... 19 2.3 CAMERA VIEWER 20 2.4 REGISTER VIEWER 24 3 DATA STRUCTURES 25 3.1 REGISTER 25 3.1.1 VALUES..................................................................................................................................................... 26 3.1.2 POINTS ..................................................................................................................................................... 27 3.1.3 STRAIGHT LINES ....................................................................................................................................... 27 3.1.4 CIRCLES ................................................................................................................................................... 27 3.2 POINT LIST 27 3.3 GLOBAL TEXT STRING 28 4 4.1 4.2 4.3 4.4 5 EXAMPLE INSPECTION PROGRAM 29 CREATING A NEW PROGRAM INSERTING COMMANDS PROGRAMMING THE COMPLETE INSPECTION PROGRAM 29 29 30 43 COMMANDS & TOOLS 44 5.1 QUICK COMMAND REFERENCE 44 5.1.1 IMAGE / CAMERA ................................................................................................................................. 44 5.1.2 PREPROCESSING ............................................................................................................................... 44 5.1.3 DETECTION ........................................................................................................................................... 44 5.1.4 MEASUREMENT ................................................................................................................................... 45 5.1.5 SAMPLE COMPARISON ...................................................................................................................... 45 5.1.6 PROGRAM CONTROL ......................................................................................................................... 46 Eyesight Vision-System EN - 068-14530 – 21.10.2013-01 Page 2 Eyesight User Manual 5.1.7 INPUT / OUTPUT................................................................................................................................... 46 5.1.8 COLOUR ................................................................................................................................................. 46 5.1.9 SCRIPTING ............................................................................................................................................ 46 A 47 ACCESS TO VARIABLES ANGLE AREA CHECK 47 50 51 B 52 BRIGHTNESS CONTROL ADJUSTMENT BRIGHTNESS ADJUSTMENT 52 53 C 54 CALIBRATION CALLIPER - HORIZONTAL / VERTICAL CAMERA CONTROL CAMERA OPTIONS CHECK INPUT CIRCLE CIRCLE COUNTER COLOUR EVALUATION (ADVANCED COLOUR CAMERA) COLOUR DEFINED AREA COLOUR FILTER (ADVANCED COLOUR CAMERA) CONTOUR CHECK CONTOUR TRACING CORRELATION COUNT OBJECTS CROSS-SECTION 54 55 57 59 61 62 64 65 66 67 69 70 71 72 75 D 76 DELETE BACKGROUND DETERMINE POINT OF CURVE DIGITAL I/O DISPLAY CONTOUR DISTANCE 76 77 78 79 80 E 81 EDGE COUNTER - STRAIGHT LINE EVALUATION EXECUTE SUB-PROGRAM 81 82 83 F 83 FILTER FILTER TOOL SET FREE CALLIPER 83 86 86 G 89 Eyesight Vision-System EN - 068-14530 – 21.10.2013-01 Page 3 Eyesight User Manual GLOBAL TOLERANCES 89 H 90 HISTOGRAM 90 I 91 IMAGE CAPTURE IMAGE INFORMATION IMAGE INSPECTOR IMAGE TRANSFER INI-FILE ACCESS INTENSITY ZONE DISPLAY INTERPRETER CONTROL 91 93 94 95 96 98 99 L 100 LINE PROFILE 100 M 101 MEASURE GAP WIDTH 101 P 102 POINT POINT LIST PROBE PARAMETERS TEACH-IN PROBE POINTS – RECTANGULAR PROBE POINTS – CIRCULAR PROBE POSITION TEACH-IN PSEUDO-COLOUR DISPLAY 102 105 107 111 112 115 116 R 117 REMOTE DEVICE CONFIGURATION REMOTE DEVICE CONTROL RIEHMANN-PROBE RS-232 (RS422) 117 121 123 124 S 126 SCRIPT INTERPRETER SELECT COLOUR CHANNEL SET OUTPUT STOP WATCH STRAIGHT LINE STRAIGHT LINE DISTANCE 126 128 128 130 131 133 T 135 TEXT TEXT STRING 135 137 Eyesight Vision-System EN - 068-14530 – 21.10.2013-01 Page 4 Eyesight User Manual TEXT TERMINAL TOLERANCE Eyesight Vision-System EN - 068-14530 – 21.10.2013-01 140 140 Page 5 Eyesight User Manual 1.1 Eyesight: THE SOFTWARE The Eyesight vision interpreter is a high-performance tool which enables integrators and ambitious end customers to efficiently and comprehensively solve visual measuring and inspection applications. Tried and tested solutions Many years of experience in the conversion of visual measuring, inspection, reading and sorting applications has provided an extremely wide-ranging and proven set of basic commands for the comprehensive solution of complex automation tasks. Graphic programming Eyesight is graphically programmed with inspection commands for the respective application by clicking on icons in the program editor via drag & drop. It is thus easily possible to carry out the most sophisticated image processing tasks without prior experience and after only a few hours training. Simple integration in the system environment An important user-aspect is the integration in a complete system. This includes integration in a machine process with the necessary trigger for sorting and recording possible production errors along with the respective images. Comprehensive configuration possibilities facilitate adaptation to your system environment. Adapted to the requirements of many image-processing solutions, Eyesight, both in the basic and advanced version, is the ideal solution for many applications from the following sectors: » Measurement » Inspection » Location » Counting 1.2 » Comparison Preparing the software and the camera For setting up the camera(s) and connecting for the first time, please refer to the instructions found on the Eyesight installation tutorial accompanied with the camera. If this is not available then please download a copy from the SensoPart Website www.sensopart.com Eyesight Vision-System EN - 068-14530 – 21.10.2013-01 Page 6 Eyesight User Manual 2 The user interface The main User Interface (UI) components of the Eyesight software consist of: Main menu 2.1 Commands Program editor Camera Viewer Register Viewer Main menu Eyesight Vision-System EN - 068-14530 – 21.10.2013-01 Page 7 Eyesight User Manual 2.1.1 File File > New program Opens a new inspection program in the “Program editor”. A list of the currently open programs can be seen by clicking this symbol on the “Program editor”: File > Open program File > Save program Opens an inspection program from a specified directory. If the inspection program file is saved in any other location than the “Eyesight\Devices\[YourCamera]\Programs”-directory, the inspection program will not be uploaded to the camera. File > Print program Prints a text representation of the inspection program. File > Close program Closes the currently active inspection program on the “Program editor”. File > Create Support file File > Load image File > Save image Creates a compressed ZIP-file with information about the state of the software. Loads an image on the “Camera viewer“ -window. BMP- and JPG- file formats are supported. Saves the current image on the “Camera viewer“ –window. Inspection programs can be edited independent of a camera by saving the captured images on a PC and using the “Load“ option of the “Capture image“command. File > Print image Prints the image displayed on the “Camera viewer“ with or without the inspection result graphics (lines, circles text etc.). Eyesight Vision-System EN - 068-14530 – 21.10.2013-01 Page 8 Eyesight User Manual File > Image in clipboard File > Quit Copies the image displayed on the “Camera viewer“ to the operating system clipboard. Quits Eyesight. 2.1.2 Edit Edit > Cut, Copy, Paste, Delete Edit > Empty command Cutting, copying, pasting and deleting of lines in the “Program editor”. Adds an empty line. Eyesight Vision-System EN - 068-14530 – 21.10.2013-01 Page 9 Eyesight User Manual 2.1.3 View View > Image analysis > Image Inspector Intensity zone display Displays detailed information about individual pixels inside a selected area. This tool is described in more detail in the chapter Image inspector under the section “Commands and Tools” Highlights the pixels on the “Camera viewer” that have a grey value between the upper and lower threshold limits. This tool is described in more detail in the chapter Intensity zone display under the section “Commands and Tools” Highlights the pixels of selected grey value ranges with 8 colours. Pseudo-colour display This tool is described in more detail in the chapter Pseudo-colour display under the section “Commands and Tools” An image analysis tool for displaying the contour lines in an image. Display Contour This tool is described in more detail in the chapter Display contour under the section “Commands and Tools” Displays the grey value profile (0..255) along a teached-in line. Line Profile This tool is described in more detail in the chapter Line profile under the section “Commands and Tools” Displays the relative amount of pixels of certain grey value inside an area. Histogram Saves the pixel grey values (0..255) as a table in a text file. Save Pixel value in INI file Eyesight Vision-System EN - 068-14530 – 21.10.2013-01 Page 10 Eyesight User Manual 2.1.4 View Continued View > Application parameters Application specific parameters for the Eyesight software. Operating parameters Image processing parameters for the Eyesight software. Global tolerances Opens a dialog window for setting the global tolerances. This dialog window is described in more detail in the chapter Global tolerances under the section “Commands and Tools” Register viewer Displays the contents of the register. This dialog window is described in more detail at the end of this section in the chapter Register Viewer. Text terminal Displays the command execution results in text mode. This dialog window is described in more detail in the chapter Text terminal under the section “Commands and Tools” Digital I/O Displays the digital input and output states. This dialog window is described in more detail in the chapter Digital I/O under the section “Commands and Tools” Camera options Dialog window for camera settings such as e.g. shutter and gain. This dialog window is described in more detail in the chapter Camera options under the section “Commands and Tools” Eyesight Vision-System EN - 068-14530 – 21.10.2013-01 Page 11 Eyesight User Manual 2.1.5 Options Options > Remote device control Dialog window for connecting and synchronizing between a PC and a camera. This dialog window is described in more detail in the chapter Remote device control under the section “Commands and Tools” Remote device configuration Dialog window for administration of one or multiple cameras (e.g. setting the IP-address, updating firmware). This dialog window is described in more detail in the chapter Remote device configuration under the section “Commands and Tools” Save point list Saves the contents of the Point list in a text file. You are able to save with and without consideration for any calibration that may be set Reset Variables Also the resetting of any variables with in the software Command set from camera This command reads the license file from the camera and activates the correct command set i.e. Advanced or Basic –command set. 2.1.6 Command adminstration Activate Command Set Dependent on the use different instruction sets can be used. In combination with a smart camera Eyesight.cst has to be used (this is the default setting, so normally you don’t have to change it). CommandSet From Camera Instructions which are not available on the used camera will be masked out in the Commands Window. Lizenzcode For some camera upgrades you have to insert an license code to activate new functions. 2.1.7 Window Eyesight Vision-System EN - 068-14530 – 21.10.2013-01 Page 12 Eyesight User Manual Window > Standard Setting Resizes the “Camera viewer” and “Program editor” to the last saved size, a save operation is done at the closure of the Eyesight program The individual windows can also be opened if they were closed. Eyesight Vision-System EN - 068-14530 – 21.10.2013-01 Page 13 Eyesight User Manual 2.2 Program editor The program editor is structured like a table where every command reserves one row. The commands are added to the Program editor – window by using “drag and drop” method. The command icon must be dropped on the column “B” on the Program editor. Alternate method is to right-clicking on the command column B and selecting the “Paste command” – a pop-up menu will display the list of all tools. 1. 2. 3. 4. Starts a New inspection program Open inspection program from a saved location Save inspection program Close inspection program 5. 6. 7. 8. 9. Prints the command list. Cuts the marked rows and copies them to the clipboard. Copies the selected rows to the clipboard. Pastes the contents of the clipboard. Deletes a row. 10. 11. 12. 13. 14. Run the program in a loop Stop the program Run the complete program once Run only the selected rows Run step-by-step 15. Program list: Displays a list of all currently opened inspection programs. Eyesight Vision-System EN - 068-14530 – 21.10.2013-01 Page 14 Eyesight User Manual 2.2.1 No. (The number –column) The No. column assigns a number to each command line. The context-menu of this column (right-click on column to open) offers more options. Cut , Copy, Paste, Delete are all as per normal windows control. Paste Empty line inserts an empty line at the point you have selected, and moves the rest of the program below down by 1 line. Delete Line(s) deletes the selected line or lines Insert more lines – Inserts a block of 25 empty lines at the end of the program. ( initial program length is default 50 lines.) Jump to a mark: Moves to a pre-defined mark in the program. These marks can be set by the command “Interpreter control”. Set break point (always): A break point stops the command execution when the corresponding line is reached. Set break point (IO): Stop the execution to this line if ALL the previous inspection results are OK (all the dots are green on the result column E). Set break point (NIO): Stop the execution to this line if ANY the previous inspection results is NOK (a red dot on the result column E). Delete all / Delete break point(s): Removes a previously set break point. Eyesight Vision-System EN - 068-14530 – 21.10.2013-01 Page 15 Eyesight User Manual 2.2.2 S (The lock –column) Right clicking on this column deactivates commands without removing them. Never disable command: The command will be executed normally. Disable in teach-in mode: The selected command line is not executed when program is being run on a PC but it will be executed normally when run on a camera. Disable command in process : The selected command line is not executed when program is being run on a camera but it will be executed normally when run on a PC. Always disable command: The command will be ignored. 2.2.3 G (The graphics –column) Right clicking on this column sets whether the result graphics (circles, points, lines etc.) are to be displayed on the camera viewer. Graphics at OK: displays only when the specific command has resulted OK (a green dot on the result column E). Graphics by failure: displays only when the specific command has resulted NOK (a red dot on the result column E). Always graphic: displays the graphics normally. Never graphic: Never displays the graphics. Eyesight Vision-System EN - 068-14530 – 21.10.2013-01 Page 16 Eyesight User Manual 2.2.4 T (The text –column) Right clicking on this column sets whether the result texts are to be displayed in the text terminal. Text at OK: Displays only when the specific command has resulted OK (a green dot on the result column E). Text at NOK: Displays only when the specific command has resulted NOK (a red dot on the result column E). Always text: Displays the text normally Never text: Never displays the text. 2.2.5 I (The invert –column) Right Clicking this column allows the inversion of the result of the command. This way OK becomes NOK and vice versa. Red dot on the symbol means the inversion is active. 2.2.6 E (The result –column) This column displays the command results with dots of three colours (This column cannot be manipulated by the user.) GREEN: Command completed successfully, result was inside the set tolerance limits RED: Command was not completed successfully OR result was outside the set tolerance limits YELLOW: Warning, result was outside the set warning limits Eyesight Vision-System EN - 068-14530 – 21.10.2013-01 Page 17 Eyesight User Manual 2.2.7 B (The command –column) A left mouse click on a command icon on this column opens the parameter dialog window and this will also cause the interpreter to execute the program until this command. A Right mouse click on a command icon or line allows the following; Quick edit: Opens the parameter dialog window without causing the interpreter to execute the program until to this command. Use last result: Opens a tolerance dialog window for a particular command filled with a value from the latest inspection. For more information see the chapter Tolerance under the section “Commands and Tools”. Paste Command: Insert a command to the selected line from the sub menu shown Cancel: Exits out of menu 2.2.8 Comment Text field that can be freely edited. Very useful for making the inspection program more readable and structured. Longer description memos can be inserted by right clicking on the column. Note! The memos are saved by pressing enter. Clicking outside of the window deletes the text. Eyesight Vision-System EN - 068-14530 – 21.10.2013-01 Page 18 Eyesight User Manual 2.2.9 IM (The image memory –column) The number of the frame buffer on which the corresponding command operates. The Default IMnumber is 0. 2.2.10 Parameter –column Displays the command parameters. This column cannot be manipulated by the user. The column expands by clicking on it and can be returned back by clicking in the “No.”-cell in the topleft corner of the table. Eyesight Vision-System EN - 068-14530 – 21.10.2013-01 Page 19 Eyesight User Manual 2.3 Camera viewer Displays the images, which are captured from the camera or loaded from the file system. As soon as the mouse arrow moves into the image area of the Camera Viewer, it shows as a reticule. The status row displays the actual pixel coordinates of the position and the pixel’s grey value, according to the mouse arrow’s present location. Display world-coordinates (Scaling factors of the Calibration) Pressing the [shift]-key while the reticule is in the camera viewer, the coordinates will be displayed in world-coordinates, taking consideration for the X,Y, rotational offsets, instead of the imagecoordinates. The world-coordinates are depending on the scaling factors which are defined at calibration table / within the tool for calibration. (set with the “Origin” -option of the Calibration). Display coordinates of the moved coordinate system Pressing the [ctrl]-key while the reticule is in the camera viewer, the coordinates will be displayed with reference to the calibration origin, but with out taking consideration for the angle offset (set with the “Origin” -option of the Calibration). Eyesight Vision-System EN - 068-14530 – 21.10.2013-01 Page 20 Eyesight User Manual Camera Viewer - Live image controls On: Captures and displays live images from the camera in an infinite loop. To save a captured image to the hard drive, the live image has to be turned off. Off: Displays the last captured image. Trig. : In this mode an image is captured and displayed only when the camera receives a trigger signal. with flash: Captures the images using flash. Zoom controls Off: The image is displayed in its actual size. Fit: Resizes the image to fit the camera viewer –window. The slide control: Zooms in and out. Localised Zoom Control It is possible to zoom to an area of interest on the image with in the Camera Viewer, by clicking and holding the left mouse button, and ‘drawing’ a box around the required area. Eyesight Vision-System EN - 068-14530 – 21.10.2013-01 Page 21 Eyesight User Manual Navigator Activating the check-box “show” opens the “Image Navigator”. Clicking and holding the left mouse on the “Camera viewer” –window and then moving the mouse functions as a zoom. The Navigator displays the complete image and the area of the magnification. Magnifier If this tab is selected, moving the mouse around will display the area magnified on the Navigator window Histogram Clicking and holding the left mouse on the “Camera viewer” –window and then moving the mouse draws a rectangular area. This area will be then analyzed for its grey value (0…255) pixel distribution. A number will be written above the profile, this single grey value has the biggest amount of pixels. For example: 119 pixels with a grey value of 37 is the biggest amount compared to the number of pixel of any other grey value. Min: The darkest pixel found on the analyzed image area. : The average grey value of the pixels on the analyzed image area. Max: The brightest pixel found on the analyzed image area. current grey: Displays the grey value on the histogram where the mouse pointer is currently located. number of: Displays the amount of pixels of one particular grey value. Eyesight Vision-System EN - 068-14530 – 21.10.2013-01 Page 22 Eyesight User Manual Info Displays the brightness value on the cursor position as well as the coordinate values of world and image coordinate systems. And is useful when working with a calibration tool. Options Magnifier: X-Section / Y-Section Size in Pixels for the magnifier window. Info: Selects representation for colour space HSI – Hue, Saturation, Intensity YUV - Luma and Chrominance LUT: Selects the colour lookup table to be used. Eyesight Vision-System EN - 068-14530 – 21.10.2013-01 Page 23 Eyesight User Manual 2.4 Register Viewer The Register viewer enables you to view and manually reset the contents of the register and the point list. The contents of the global text string are displayed under the field “SendString”. For more information on the Eyesight register, see the section The register Reset: Clear all values from the register and the point list. Delete graphics: Clear all graphics e.g. lines, points, text which are displayed on the overlay on the image in the camera viewer Update: Updates the register and point list values to current state relative to the last time the program sequence was run. Live: If the “live” checkbox is NOT activated, the values displayed by the register viewer do not get updated automatically < - (icon): Hide and display the contents of the point list. Eyesight Vision-System EN - 068-14530 – 21.10.2013-01 Page 24 Eyesight User Manual 3 Data structures The data structures of Eyesight, that represent geometric objects and values, are the basis of all commands that carry out measurements and communication to outside world. 3.1 Register A register is a circular buffer FIFO-memory (First-In-First-Out) where the objects are stored and read. An index number is assigned to each object when stored. When the value reaches position 19 on the register, the next time the register is loaded with a new value at position 0, then the data from position 19 will move out of the register and be lost. There are three types of registers in Eyesight: Value register Point register Straight line register The memory capacity (to display) of all register types is limited to the last 20 objects. (0 -19) Value-, point- and straight line -registers as seen through „Register viewer“. Value can be a positive or negative floating point number. Ie from a arithmetic operation, a radius, an angle, etc, etc Straight lines have a width of one pixel and are infinitely long. Straight lines are stored in the straight lines register as four values representing X/Y for the coordinates of a point (through which the line is drawn) and DX/DY are the co-ordinates or the slope of the line. Eyesight Vision-System EN - 068-14530 – 21.10.2013-01 Page 25 Eyesight User Manual Example from the value register Step 1. Initial state: Step 2. A value of 42 is added: Step 3. A value of 24 is added: value index 0: 0 value index 1: 0 value index 2: 0 … value index 17: 0 value index 18: 0 value index 19: 0 value index 0: 42 value index 1: 0 value index 2: 0 … value index 17: 0 value index 18: 0 value index 19: 0 value index 0: 24 value index 1: 42 value index 2: 0 … value index 17: 0 value index 18: 0 value index 19: 0 Step 4. Value 1 is added 9 times: Step 5. Value 100 is added 10 times: Step 6. Value 1000 is added 5 times: value index 0: 1 value index 1: 1 value index 2: 1 value index 3: 1 value index 4: 1 value index 5: 1 value index 6: 1 value index 7: 1 value index 8: 1 value index 9: 24 value index 10: 42 value index 11: 0 value index 12: 0 value index 13: 0 value index 14: 0 value index 15: 0 value index 16: 0 value index 17: 0 value index 18: 0 value index 19: 0 value index 0: 100 value index 1: 100 value index 2: 100 value index 3: 100 value index 4: 100 value index 5: 100 value index 6: 100 value index 7: 100 value index 8: 100 value index 9: 100 value index 10: 1 value index 11: 1 value index 12: 1 value index 13: 1 value index 14: 1 value index 15: 1 value index 16: 1 value index 17: 1 value index 18: 1 value index 19: 24 value index 0: 1000 value index 1: 1000 value index 2: 1000 value index 3: 1000 value index 4: 1000 value index 5: 100 value index 6: 100 value index 7: 100 value index 8: 100 value index 9: 100 value index 10: 100 value index 11: 100 value index 12: 100 value index 13: 100 value index 14: 100 value index 15: 1 value index 16: 1 value index 17: 1 value index 18: 1 value index 19: 1 . 3.1.1 Values Value is a positive or negative floating point number. Values are stored in the value register. Eyesight Vision-System EN - 068-14530 – 21.10.2013-01 Page 26 Eyesight User Manual 3.1.2 Points Straight line have a width of one pixel and are infinitely long. Straight lines are stored in the straight lines register as four values representing X/Y for the coordinates of a point (through which the line is drawn) and DX/DY are the co-ordinates or the slope of the line. 3.1.3 Straight lines Straight line have a width of one pixel and are infinitely long. Straight lines are stored in the straight lines register as four values representing X/Y for the coordinates of a point (through which the line is drawn) and DX/DY are the co-ordinates or the slope of the line. 3.1.4 Circles A Circle is formed by using a point for the centre and a value for the radius of the circle. Circle does not have a separate field in the register. Its radius is stored in the Values register and centre in the Points register. 3.2 Point list Point list is a structure similar to the point register, but used by the Eyesight as a temporary storage for a large amount of point data produced e.g. by the Probe points -tool. The individual points in the point list are stored as two values representing X- and Y-coordinates. Unlike in the register, new points will be written at the end of the point list. Eyesight Vision-System EN - 068-14530 – 21.10.2013-01 Page 27 Eyesight User Manual 3.3 Global text string There is only one global string variable in Eyesight, which is used by various commands for writing and sending. When executing any of the commands the contents of the string are displayed in “Register viewer”: Main menu > View > Register viewer. The global string can be reset with the command “Text string”. Eyesight Vision-System EN - 068-14530 – 21.10.2013-01 Page 28 Eyesight User Manual 4 Example inspection program In this chapter an inspection program is put together step-by-step. This example program uses images from the file system so no connecting with a camera is necessary (except for possibly uplifting the demo-mode). 4.1 Creating a new program To create a new program click on “Main menu > File > New program” or The other method is to use the icon “Program editor”. 4.2 on the Inserting commands The commands are added to the Program editor – window by using “the left click, drag and drop” method. The command icon must be dropped on the column “B” on the Program editor. When you have ‘dropped’ the icon into the Program editor the ‘teach in’ window will open to allow individual parameters to be set for the tool. Alternate method is to right-click on the command column B and selecting the “Paste command” – a pop-up menu will display the list of ALL tools. Eyesight Vision-System EN - 068-14530 – 21.10.2013-01 Page 29 Eyesight User Manual 4.3 Programming Change calibration icon Scaling factors-option converts the image coordinates into realworld coordinates. 1. Click on the field Xdirection: Manually and type in „0,1“. 2. Click on the field Ydirection: Manually and type in „0,1“. 3. Click OK. 1 Image capture icon This command loads an image from a defined source. 1. Set the Operation to Load image. 2. Click the folder symbol on the right side of the File-field and choose “Schulung.bmp”. 3. Click OK. 2 Eyesight Vision-System EN - 068-14530 – 21.10.2013-01 Page 30 Eyesight User Manual Adding a text comment in the programme Text comment Insertion ( No Icon) Text field that can be freely edited. This is very useful for making the inspection program more readable and structured. 1. Double-click on the Comment –field and type in a descriptive text for the next commands e.g. “Upper straight line”. 4 Point list Reset-option cleans up the ppoint list. This is needed to ensure that no previous points mix with the results of the next e.g. probe points –command. 1. Select the Reset-option and click OK. 5 Eyesight Vision-System EN - 068-14530 – 21.10.2013-01 Page 31 Eyesight User Manual Probe points icon This command is used for detecting the upper side of the plate and mark the edge coordinates to the point list. 1. Click on the Teach-in probe. 2. This will now allow you to change the probe size and direction as seen in the camera viewer image, when it is of a suitable size / position and click OK. 3. You will then return to the Teach in command dialog box 4. Click on the Probe parameters teach-in. 5. Select Result point as middle and probing method as Automatic brightness adaptation and click OK. 6 Eyesight Vision-System EN - 068-14530 – 21.10.2013-01 Page 32 Eyesight User Manual Straight line Icon This command draws a best-fit straight line through all points the previous probe points –command laid along the edge. 1. Choose the Best fit straight line –option and click OK. 7 Text comment insertion. 1. Optional description for the following program section. 9 Find centres of the holes Count objects Icon This command searches in an taught area for pixels in-between the defined brightness range. The geometrical centre point of the group of pixels (object) that have the grey value ranging from 229 to 255 is saved in the point register. 1. Click the Area teach-in window –button and draw a rectangle around the hole in the left. Click OK. 2. Select Drawing and set the Brightness range using right and left mouse buttons from 229 to 255. 3. Click Backup of objects, select Amount maximum, and activate the Point pickup check-box. Click OK. 4. Select the newly created line 10 and copypaste it (Edit > Copy/Paste) to the line 11. 5. Double click on the Count objects on the line 11 to open the dialog. Eyesight Vision-System EN - 068-14530 – 21.10.2013-01 Page 33 Eyesight User Manual 6. Click on the Area teach-in window and move the rectangle on the bottom-right hole. 10 11 Text comment Insertion 1. Optional description for the following program section. 12 Straight line through 2 points Eyesight Vision-System EN - 068-14530 – 21.10.2013-01 Page 34 Eyesight User Manual Straight line The two points created by the two Count objects –commands are used for defining a straight line through them. 1. Select the 2 points –option. 2. Click from pick-up list selection – button for the First point. 3. Select the line No. 2 (created by Count objects on the line10) and click OK. 4. Select line No. 3 (command, line 11) from the Second point pick-up list the same way and click OK. 5. Close the dialog by clicking OK. 13 Text comment 1. Optional description for the following program section. 15 Measure the angle Eyesight Vision-System EN - 068-14530 – 21.10.2013-01 Page 35 Eyesight User Manual Angle This command measures the angle between the two straight lines earlier in the program. inserted 1. Select the Straight line 2 – straight line 1 –option. 2. Select the No. 1 as the First straight line from the pick-up list. 3. Select the No. 2 as the Second straight line from the pick-up list. 4. Close the dialog by clicking OK. 16 Eyesight Vision-System EN - 068-14530 – 21.10.2013-01 Page 36 Eyesight User Manual Text This Text-command displays the result of the Angle-command in the Camera viewer –window.. 1. Choose the Value-option. 2. Select No. 12 Command “Angle” from the pick-up list. 3. Write in the Text-field e.g. “Angle: “. 4. Set the Colour-option to “Good”. 5. Set the Position-coordinates to e.g. 300x / 700y. 6. Set the Font size to 40 pixel. 7. Close the dialog by clicking OK. 17 Eyesight Vision-System EN - 068-14530 – 21.10.2013-01 Page 37 Eyesight User Manual Text comment Insertion. 1. Optional description for the following program section. Measure the diameter 19 Point list Reset-option sets all point list indexes to zero. This is needed to ensure that no previous points mix with the results of the next probe points –command. 1. Select the Reset-option and click OK. 20 Eyesight Vision-System EN - 068-14530 – 21.10.2013-01 Page 38 Eyesight User Manual Probe points (circular) The circular probe is used for marking the contour of the hole in the point list. It is similar to the rectangular Probe points –command. 1. Click on the Teach-in probe. 2. Change the probe size and direction as seen on the image and click OK. 3. Click on the Probe parameters teach-in. 4. Select Object colour as bright and probing method as Automatic brightness adaptation and click OK. 5. Select Direction as inwards. 6. Close the dialog by clicking OK. 21 Eyesight Vision-System EN - 068-14530 – 21.10.2013-01 Page 39 Eyesight User Manual Circle The Best fit circle draws a circle through the points the Probe points (circular) –command placed in the point list. 1. Select the Best fit circle –option. 2. Activate the Save diameter into register – check-box. 3. Close the dialog by clicking OK. 22 Text comment Insertion. 1. Optional description for the following program section. 25 Measure the width Eyesight Vision-System EN - 068-14530 – 21.10.2013-01 Page 40 Eyesight User Manual Straight line distance This Text-command displays the diameter of the circle in the Camera viewer –window. Angle-command. 1. Select No 1. Straight line for the Reference straight line. 2. Click on the Teach-in position. 3. Change the probe size and direction as seen on the image and click OK. 4. Click on the Teach-in parameters. 5. Select Result point as middle and probing method as Automatic brightness adaptation and click OK. 6. Close the dialog by clicking OK. 26 Eyesight Vision-System EN - 068-14530 – 21.10.2013-01 Page 41 Eyesight User Manual Text This Text-command displays the result of the Straight line distance-command in the Camera viewer –window.. 1. Choose the Value-option. 2. Select No. 18 Command “Straight line distance” from the pick-up list. 3. Write in the Text-field e.g. “Angle: “. 4. Set the Colour-option to “Good”. 5. Set the Position-coordinates to e.g. 300x / 750y. 6. Set the Font size to 40 pixel. 7. Close the dialog by clicking OK. 27 This is the last stage of our test program. Eyesight Vision-System EN - 068-14530 – 21.10.2013-01 Page 42 Eyesight User Manual 4.4 The complete inspection program The complete inspection program should look now something like this: The program can be run clicking the Run once –button in the program editor. Run once This should draw the following result graphics on the Camera viewer: Eyesight Vision-System EN - 068-14530 – 21.10.2013-01 Page 43 Eyesight User Manual 5 Commands & Tools 5.1 Quick command reference 5.1.1 IMAGE / CAMERA Image capture Captures, loads and saves images. Camera Control Allows adjustment of Shutter and Gain values. 5.1.2 PREPROCESSING Brightness adjustment Sharpens the image by reducing the spreading of the grey values. Delete background An image defined as a background is subtracted from the captured image. Calibration Conversion from image co-ordinates to real world units. Sets coordinate system origin and orientation. Adjusts scaling. Filter Various filter functions for a selected area. Filter Tool Set Various filter functions for the whole image. Colour defined area Paints a circle-shaped area with a selected grey hue. 5.1.3 DETECTION Rect probe (probe points) Rectangular probe that detects an edge and marks it with points. Circle Probe (probe points) Circular probe that detects an edge and marks it with points. Edge counter (straight line) Counts edges along a straight line. Riehmann-probe Counts the edges along the projection of a selected area. Circle counter Counts the edges along the circumference of a circle. Eyesight Vision-System EN - 068-14530 – 21.10.2013-01 Page 44 Eyesight User Manual 5.1.4 MEASUREMENT Image information Evaluates brightness and focus of a selected image area. Area check Counts the number of pixels with a specific intensity value. Point list Modifies resets saves and loads the point list. Point Creates a point. Straight line Creates a straight line. Circle Creates a circle. Distance Measures the distance between two points or a point and a straight line. Distance to a straight line Measures the distance between a detected edge and a straight line. Cross-section Measures the cross-section between two detected edges. Measure gap width Measure the gap between two detected edges. Calliper (hor./vert.) Measures the hor. and vert. distance between two detected edges. Free calliper Measures the distance between two detected edges. (Free orientation). Angle Measures the angle between two straight lines or three points. Determine point of curve Determines the bending of an object. 5.1.5 SAMPLE COMPARISON Count objects (blob) Counts objects with a defined area, brightness and distance from the center. Contour check Compares a list of points with a contour of an object. Contour tracing Saves the contour points along an outline of an object to the point list. Correlation Compares the captured image with a template and calculates the correlation. Eyesight Vision-System EN - 068-14530 – 21.10.2013-01 Page 45 Eyesight User Manual 5.1.6 PROGRAM CONTROL Stop watch Measures the time between marked rows in the inspection program. Interpreter control Controls the flow of the inspection program by using jumps, marks etc. Execute sub-program The selected (sub-) program will be executed. Access to variables Assigns values to variables and to the register. Executes arithmetic operations. Evaluation Evaluates a value against given tolerance limits. 5.1.7 INPUT / OUTPUT Check input Reads the camera‘s digital input and compares it with a set value. Set output Sets the camera‘s digital output INI-file access Writes to and reads from a file on the camera flash-memory. Text Writes text and/or values on the inspection image. RS232 Sends and receives text strings through the serial interface. Text string Creating and sending of text strings through serial or LAN interfaces. Image transfer Sending of images via UDP. 5.1.8 COLOUR Select colour channel Selects one of the three RGB-colour channels. Colour evaluation Determines the amount of pixels whose HSB-values lie within a defined range. Colour filter Similar to the „Colour evaluation“ but also calculates the min, max and average values. 5.1.9 SCRIPTING Script Interpreter Script programming in a syntax similar to Visual Basic. Eyesight Vision-System EN - 068-14530 – 21.10.2013-01 Page 46 Eyesight User Manual A Access to variables This command generates variables, assigns values to them, reads them out and executes basic arithmetic operations. It can also be used for placing values on the value register. Name Operation Create Name of the variable. (manually inputted) A variable out of the selected type of variables is created. You can use the option static variable to create static variables. Variable types: Value, Point, Straight line, Result, Window, String Static variable The variable is created as static. The variable will not be reset after a program restart. The value of the variable is the same as in the last run. The command returns NOK if the variable is already created. The execution of this command can be disabled after the first run. Eyesight Vision-System EN - 068-14530 – 21.10.2013-01 Page 47 Eyesight User Manual Operation Register into Variable Variable Type Assigns the selected register entry (0..9) of a chosen data type to a chosen variable. Registers read: Value register index X Registers read: Point register index X Registers read: Straight register index X Value Reads out index 0…9 of the value register and assigns it to the selected variable Point: Reads out index 0…9 of the point register index and assigns it to the selected variable. Straight Line: Reads the straight line register index 0...9 and assigns it to the selected variable. Result: Reads the current state of the inspection result (OK, NOK, Warning) and saves it as a value code: Operation Variable onto Register 0 for OK -1 for NOK 1 for Warning Variable Type Reads the content of a selected variable and place it on the register of a same type. Registers written: Value register index 0 Value: Reads a variable that has been assigned a value and places it on the value register 0. Registers written: Value register index 0 Point Reads a variable that has been assigned a point and places it on the point register 0 Registers written: Point register index 0 Straight line Reads a variable that has been assigned a straight line and places it on the straight line register 0. Circle Reads a variable that has been assigned a circle and places the center in the point register 0 and the radius on the value register 0. Result Reads a variable that has been assigned an inspection result and places it on the value register 0. The results are coded as follows: 0 for OK -1 for NOK 1 for Warning Eyesight Vision-System EN - 068-14530 – 21.10.2013-01 Page 48 Eyesight User Manual Operation Arithmetic This option opens a new dialog element where different mathematic operations can be selected. The program editor and the interpreter display no error report, if the variable type is differently entered than declared before. In case of incompatible types the command result is NOK (red point). Variable Type Variable type: Value When this type is selected, the possible operators are: Addition, Subtraction, Multiplication, Division, Exponentiation, Amount, Square root, Sine, Cosine, Tangent, Degree>Radian, Radian>Degree The result is placed on the value register in position 0. Registers read: Value register index X and/or Y Registers written: Value register index 0 Variable type: Point When this type is selected, the possible operators are: Addition, Subtraction, Multiplication, Division, Norm (length of a vector) The result is placed on the point register in position 0. Eyesight Vision-System EN - 068-14530 – 21.10.2013-01 Page 49 Eyesight User Manual Registers read: Value register index X and/or Y Element 1 and 2 These are the operands, which can be either register elements or variables. They can be selected from the register or from the pick-up list. Registers written: Value register index 0 Save result also in variable Saves the result of the operation into a selected variable, which needs to be declared beforehand. Put value on register Value Manually places a value on the value register index 0. Registers written: Value register index 0 Result Manually places a Result value on the register Put value in register Value Assigns a value to a variable. This variable must have been created prior to this. Angle Measures the angle between two straight lines or three points. Angle definition Registers read: Straight line register indexes X and Y Registers written: Value register index 0 The resulting angle in degrees is saved on the value register index 0. Straight line 1 – straight line 2 Depending on the alignment, the angle value is either the narrow (<180°) or the wide (>180°) angle between the two straight lines Straight line 2 – straight line 1 Like the previous option but vice-versa. Eyesight Vision-System EN - 068-14530 – 21.10.2013-01 Page 50 Eyesight User Manual Registers read: Point register indexes 0, 1 and 2 Three points Measures the angle between 3 points. Registers written: Value register index 0 Three points: Resulting angle The range can be set to either –180° … +180° or 360°. Registers read: Point register index 0 Vector (between 2 points) Measures the clockwise angle between a point and the origin. The point is read from the point register index 0. Registers written: Value register index 0 First straight line Specify the first line from register or from the pickup list. Second straight line Specify the second line from register or from the pickup list. Tolerance For instructions on global tolerances, dynamic evaluation and how to set the tolerance limits, see the chapter Tolerance. Area check Searches inside an area for pixels within a defined intensity value range and counts them. Eyesight Vision-System EN - 068-14530 – 21.10.2013-01 Page 51 Eyesight User Manual Registers written: Value register index 0 Brightness The amount of detected pixels is saved on the value register index 0. The grey value range for the pixels. For more information on this dialog element, see the chapter Brightness. Window Sets the rectangular area where the evaluation is performed. Configuration The coordinates can be typed in or drawn using the Window-button. Rotated A rotated window can be used (teach in by pressing the window button). Complete window Uses the whole image. Pick-up list Select a window in the pick-up list. World co-ord. save Takes the dynamically moving coordinate system into account and behaves accordingly. Tolerance The command returns an OK if the amount of pixels is within the range of tolerance setting and the execution has been error free, otherwise NOK is returned. For instructions on global tolerances, dynamic evaluation and how to set the tolerance limits, see the chapter Tolerance. B Brightness Control Adjustment (Used in Various Tools – such as Count Objects, etc) A section of the dialog element for selecting and displaying a grey value range for an area. The range The grey value range from 0 to 255 can be set with sliding while holding down right / left mouse button or by typing them into the fields. Drawing / No Drawing (colour the pixels) The pixels that have a grey value inside the current selected brightness range are highlighted with a colour. This colour can be selected by double-clicking the value fields. Pipette Icon (with size The button with a pipette-symbol can be used for picking the Eyesight Vision-System EN - 068-14530 – 21.10.2013-01 Page 52 Eyesight User Manual control) brightness value range directly from the image. The drop-down values are the size of the pipette. The ‘pick area’ starts at the tip of the pipette and enlarges to the right and below the tip. Brightness adjustment Alters the brightness of the image according to 2 areas of reference with in the image. Method Grey Scale Spreading. Allowed Deviation x grey values. This is the acceptable limit for changes in grey scale for the given areas. Reference Intensity> Dark Area > Bright Area > The area to be checked against the dark limits – Use ‘Window position to size and position the reference area. The area to be checked against the bright limits - Use ‘Window position to size and position the reference area. Determine intensities via histogram-analysis Instead of calculate the average of the grey values inside the selected area the reference intensity will be evaluated by the expectancy value and the standard deviation of an intensity distribution Expert Registers written: Value register index 0 This allows the manual setting of the ‘reference’ values for the grey scale values of both the Dark and the Light areas. Correction area Correct whole image The whole image will be adapted. If not selected, specify a window to be adapted. Eyesight Vision-System EN - 068-14530 – 21.10.2013-01 Page 53 Eyesight User Manual Use world coordinates Takes the dynamically moving coordinate system into account and behaves accordingly. C Calibration Dynamically adjusts origin, orientation and scaling. Converts between image and world coordinates. Coverts between a scale in pixels to real world units Origin Registers read: Point register index X X and Y position Sets the origin to a new position using the X- and Y-coordinates of a selected point., without alteration of the orientation only X position Sets the origin to a new position using only the X-coordinates of a selected point and keeping the Y-coordinate of the previous origin. only Y position Sets the origin to a new position using only the Y-coordinates of a selected point and keeping the X-coordinate of the previous origin. New origin The coordinate(s) of a point for the new origin can be selected from the point register or from the pick-up list. Scaling factors: X and/or Y direction Registers read: Value register indexes X and Y Without scaling (default setting) the measuring units for dimensions like length are in pixels i.e. the system uses image coordinates. To change the dimensions to reflect the actual real-world size, the scaling factors have to be adjusted. This can be done by capturing an image of an object with known dimensions and measuring it using Eyesight. The resulting value can now be adjusted in X and/or Y –directions to reflect the real world value. Eyesight Vision-System EN - 068-14530 – 21.10.2013-01 Page 54 Eyesight User Manual Scaling factors: Keep origin / rotary position Yes Keeps the current coordinate system origin and axis rotation. No Resets the coordinate system, i.e. sets the origin and axis rotation to that of image coordinate system. Origin and orientation Registers read: Point register indexes X and Y Moves the origin and the axial rotation by using two points. Rotational direction Counter-clockwise or clockwise. New origin The coordinates for the origin. Point on positive X-axis The point for determining the rotation of the coordinate system. Complete (3 Points) The calibration over 3 points is used not only when a new origin and rotation has to be defined, but also when an independent scaling becomes necessary. The command processes the following points on the point register: register 0: point 0 world register 1: point 0 image register 2: point 1 world register 3: point 1 image register 4: point 2 world register 5: point 2 image Calliper - horizontal / vertical Searches for edges inside a window and then measures the horizontal or vertical expansion of an dark or bright object Eyesight Vision-System EN - 068-14530 – 21.10.2013-01 Page 55 Eyesight User Manual Registers written: Point register indexes 0 through 3 and Value register index 0 The command calculates the 4 most distant points and places them on the point register. The distance will be compared with the nominal value and returns OK if the value is inside the tolerance, otherwise NOK. Point register index 0: top-most point Point register index 1: right-most point Point register index 2: bottom-most point Point register index 3: left-most point The distance is saved in the value register index 0. Settings Minimum size The minimum depth of the edge in pixels. This value is ignored when automatic brightness adaptation is activated. Automatic brightness adaptation This option uses relative contrast threshold for edge detection. This mode is less sensitive e.g. to changes in lighting conditions and therefore recommended in most cases. The parameters used by automatic brightness adaptation can be modified from: Main menu > View > Operating parameters > Image processing The threshold-parameter is ignored when automatic brightness adaptation is used. Threshold global Global threshold value. Threshold local Determines a fixed grey level value that has to be exceeded for detecting an bright edge or to be dropped over for an dark edge. Object colour Dark or bright. Direction Outputs the result of the horizontal or vertical extremities of the detected edges. Search area Configuration Sets the region of interest for detecting edges. Pick-up list Select a window from the pickup list. Save world coordinates Takes the dynamically moving coordinate system into account and behaves accordingly. Tolerance For instructions on global tolerances, dynamic evaluation and how to set the tolerance limits, see the chapter Tolerance. Eyesight Vision-System EN - 068-14530 – 21.10.2013-01 Page 56 Eyesight User Manual Camera Control Allows the modification of Gain and shutter values with in a program Gain The amplification of the pixel signals in the CCD image sensor. Gain does not typically have to be changed from its default value of 255. It is usually adjusted when a proper image brightness cannot be set by other means i.e. adjusting the shutter time and/or by changing the lighting conditions (flash, external lights, aperture in a C-Mount lens). Shutter Sets the camera shutter or exposure time. In a C-mount camera the shutter control is also affected by the aperture setting on the lens. White balance red Set, change or reads the value for the red channel. White balance green Set, change or reads the value for the green channel. White balance blue Set, change or reads the value for the blue channel. Action Set Value - Sets the camera shutter / exposure time, with relation to the location dialog box to the right Change Value – Modifies the camera shutter / gain values on the Read Value - Get the current camera setting Eyesight Vision-System EN - 068-14530 – 21.10.2013-01 Page 57 Eyesight User Manual Value from register from pick-up list manual Selection Slider – Enables the slider control to adjust the required shutter / gain value Free – Allows a manual input of the required value Tolerance For instructions on global tolerances, dynamic evaluation and how to set the tolerance limits, see the chapter Tolerance. Eyesight Vision-System EN - 068-14530 – 21.10.2013-01 Page 58 Eyesight User Manual Camera options Selected from: Main menu > View > Camera options A dialog window for setting the shutter and gain values. The white balance for a colour camera is also determined here. Before or during making any fine adjustment the mechanical camera focus should be set first or at the same time. Shutter Sets the camera shutter or exposure time. In a C-mount camera the shutter control is also affected by the aperture setting on the lens. Gain The amplification of the pixel signals in the CCD image sensor. Gain does not typically have to be changed from its default value of 1000. It is usually adjusted when a proper image brightness cannot be set by other means i.e. adjusting the shutter time and/or by changing the lighting conditions (flash, external lights, aperture in a C-Mount lens). White balance (only with colour camera) White balance is needed for the adjustment of the relative amounts of red, green, and blue primary colours so that the neutral colours in the image are reproduced correctly. Determine parameters The camera and lighting have to be installed in their final locations and brightness (shutter) adjusted before determining the white balance. By clicking the “Determine parameters”-button and holding a white paper in front of the camera the white balance can now be adjusted. The proper shutter value has been found when the value is coloured green and lies between 120 and 160. The parameters are saved by clicking the “Finished”-button. Eyesight Vision-System EN - 068-14530 – 21.10.2013-01 Page 59 Eyesight User Manual Expert mode Debug mode This option activates the debug mode after the camera is restarted. The debug information can be read with a telnet connection. (For advanced programming only) Encoder Activate encoder: Activates the encoded trigger for cameras that have an encoder interface. Counter: The counter value, which activates the trigger. Reload: The value to be loaded after trigger has been activated. Number of Positions: Number of positions for the encoder. I/O Trigger Use I/O as trigger: Activates the trigger for image capture. Input: The number of the I/O input to be used as a trigger. Timeout: The time period the camera will wait for the trigger signal. Min. signal endurance: The minimum duration for a signal to be accepted as a valid trigger signal. Eyesight Vision-System EN - 068-14530 – 21.10.2013-01 Page 60 Eyesight User Manual Check input Reads one of the camera's digital inputs and compares it with a set value. If the set value equals with the read value, the command returns an OK-result, otherwise NOK. This command has no influence on the register. Input Index - The number/index of an input to be read. Name - The input pin name to be read out. Mode There are 3 possible modes for controlling the digital I/O. level-triggered Returns OK if the level is equal the nominal value, otherwise NOK. edge-triggered Returns OK if the signal is changing to the nominal value at the point in time of command execution. wait for state The execution waits for the nominal value. If a timeout is specified, the command returns after that time. Nominal state This value is used to set the input state level on which a positive or negative inspection result is produced. E.g. if the “Nominal state”-field is set to “1” and the input signal is “0”, a NOK- (Not Ok) inspection result is produced. If the input signal is “1”, a OK-result is produced. level-triggered: Debounce-time: The debounce time determines the minimum time in which the signal has to be set before the state is accepted. Debounce time is needed to ensure that the receiving I/O-port has enough time to handle the signal transitions. E.g. if a sequence 1-0-1 is sent with a too short debounce time, the receiving I/O does not notice the transition and considers the signal state to have been at 1. Eyesight Vision-System EN - 068-14530 – 21.10.2013-01 Page 61 Eyesight User Manual Circle Determines a circle according to set option. Registers written: Point register index 0 and Value register indexes 0 and 1 The centre point of the circle is saved in the point register 0 and the radius in the value register indexes 0 and 1. File (save) diameter in(to) register If this check box is activated, the diameter will be saved on the value register index 0 and the radius on the value register index 1. This option also affects the circle pick-up list item to have the diameter as its value instead of radius. Best fit circle (least square method) Registers read: Point list This option reads the points in point list and calculates a best fit circle through them. Typically the points were written in the point register by the Probe points – circular -command. Dispersion filter Filters out all the points outside the given pixel value. Eyesight Vision-System EN - 068-14530 – 21.10.2013-01 Page 62 Eyesight User Manual Registers read: Point list Registers written: Point register indexes 0, 1 and 2 * and Value register indexes 0, 1 and 2 * Determine inner circle / perimeter and nearest and most distant point to centre. Goes through the point list and determines the most distant and the nearest point to the centre of the circle. The results are saved on the register as follows: Point register index 0: The centre of the circle Point register index 1: The nearest point to the circle centre Point register index 2: The most distant point to the circle centre Value register index 0: The radius of the circle Value register index 1: Distance from the nearest point to the circle centre Value register index 2: Distance from the most distant point to the circle centre * Point and value register indexes 3 through 19 are also written by this command. These values and coordinates are used internally by the software and do not have any special significance. Center and radius from register With this option the centre point of the circle is read from the point register index 0 and radius from the value register index 0. Registers read: Point register index 0 and Value register index 0 Circle through 3 points The Circle is defined by its circumference through three points that are read from the Point register indexes 0, 1 and 2. Registers read: Point register indexes 0 through 2 Eyesight Vision-System EN - 068-14530 – 21.10.2013-01 Page 63 Eyesight User Manual Circle counter Counts the edges along the circumference of a circle. Circle of interest Registers written: Value register index 0 and Point register index 0 and Point list The edge coordinates along the circumference are counted and then saved in the point list and the point register. Value register index 0: amount of detected edges. Point register index 1: coordinates of the first detected edge Point list: coordinates of all detected edges. This circle can be either taught or selected from a pick-up list. Configure parameters Parameters for object colour, size and threshold of the probe. For more information on this dialog element, see the chapter Probe parameters teach-in. Histogram Displays the relative amount of pixels of certain grey value inside the probe area. The height of the yellow bars are relative to the amount of pixels in that particular grey hue. For more information on this dialog element, see the chapter Histogram. Eyesight Vision-System EN - 068-14530 – 21.10.2013-01 Page 64 Eyesight User Manual Tolerance The number of edges are evaluated against the tolerance limits. For instructions on global tolerances, dynamic evaluation and how to set the tolerance limits, see the chapter Tolerance. Colour evaluation (advanced colour camera) This command determines the amount of pixels of an area whose hue, saturation and brightness (HSV) lie within a defined range. In addition to the amount of calculated pixels the minimum, maximum and mean values are written on the register. Otherwise the Colour control-command is identical to the Colour filtercommand. The hue, saturation and brightness can be compared with a tolerance value using the Evaluation-tool. Registers written: Value register index 0 through 9 Take colour sample directly from the image When pixels are detected, the following data will be written on the register: Value register index 0: Value register index 1: Value register index 2: Value register index 3: Value register index 4: Value register index 5: Value register index 6: Value register index 7: Value register index 8: Value register index 9: the amount of pixels. hue, average hue, minimum hue, maximum saturation, average saturation, minimum saturation, maximum brightness, average brightness, minimum brightness, maximum As in the Colour filter-command. Eyesight Vision-System EN - 068-14530 – 21.10.2013-01 Page 65 Eyesight User Manual Implementation The range of the numbers can be optimized for the used processor/camera. Floating point The range of Saturation and Brightness is from 0 to 1. Integer The range of Saturation and Brightness is from 0 to 255. Information Shows this information. It is recommended to use the Integer option because the execution is much faster. The teach-in colour palette As in the Colour filter-command. Window position As in the Colour filter-command. Tolerance The calculated amount of pixels is compared to the set tolerance value. If the amount ranges within the tolerance, the OK is set, otherwise NOK. For instructions on global tolerances, dynamic evaluation and how to set the tolerance limits, see the chapter Tolerance. Save world coordinates Takes the dynamically moving coordinate system into account and behaves accordingly. Colour pixel Highlights the detected pixels in the “Camera viewer” –window. Colour defined area This command paints a circle shaped area with a selected grey hue (including black and white colours). Eyesight Vision-System EN - 068-14530 – 21.10.2013-01 Page 66 Eyesight User Manual Circle Registers read: Value register index 0 and Point register index 0 from pickup-list Selects a previously defined circle from the list from register Draws the circle using radius from value register 0 and the centre from point register 0. Teach in Use the Teach-in-tool to manually draw the circle. Options Inside / Outside Colour the area in- or outside of the circle. Fill colour Grey hue from 0 (black) to 255 (white). Colour filter (advanced colour camera) This command determines the amount of pixels in an area whose hue, saturation and brightness (HSV) lie within a defined range. The amount of detected pixels is written on the register. Registers written: Value register index 0 The number of pixels will be written on the value register index 0. Eyesight Vision-System EN - 068-14530 – 21.10.2013-01 Page 67 Eyesight User Manual Take colour sample directly from the image This tool is used to take a colour sample directly from the image. Even when the sampled area is of one HSV-value, the software automatically adds some range to the values. Dropper size N x N The drop-down menu selects the size of the sample in N x N pixels. The teach-in colour palette (Button Hue range, Saturation range or Value range) Clicking any of the three buttons Colour range, Saturation range or Brightness range opens the following dialog window: The selected span of the ranges can be decreased by left mouse-click and increased by right mouse-click. Colour (also “hue”) is that aspect of a colour described with names such as "red", "yellow", “green” and so on. Saturation The intensity of the specific colour, “Colourfulness”. A highly saturated colour is vivid and intense, while a less saturated colour appears more muted, closer to grey. Brightness (also “lightness”, “value”) Brightness is a property of a colour that correlates with how bright or luminous a colour is. Colour selection Display how many pixels are currently within the selected HSV-value range. Implementation The range of the numbers can be optimized for the used processor/camera. Floating point The range of Saturation and Brightness is from 0 to 1. Integer The range of Saturation and Brightness is from 0 to 255. Information Shows this information. It is recommended to use the Integer option because the execution is much faster. Eyesight Vision-System EN - 068-14530 – 21.10.2013-01 Page 68 Eyesight User Manual Window position A tool for defining the area where the HSV-values will be measured. Tolerance The calculated amount of pixels is compared to the set tolerance value. If the amount ranges within the tolerance, the OK is set, otherwise NOK. For instructions on global tolerances, dynamic evaluation and how to set the tolerance limits, see the chapter Tolerance. Save world coordinates Takes the dynamically moving coordinate system into account and behaves accordingly. Colour pixel Highlights the detected pixels in the “Camera viewer” –window. Contour check Reads point coordinates from a file and compares them with a contour of an object. Registers written: Value register index 0 This command writes to the value register index 0 the amount of those points, for which no counterparts could be found. Contour file The file that contains the contour point coordinates. Brightness on inspection circle (0…255) Inspection circle radius The brightness range that a pixel has to have to be recognized. Tolerance For instructions on global tolerances, dynamic evaluation and how to set the tolerance limits, see the chapter Tolerance. Sets the radius for the inspection circles in pixels. These circles are placed on every point coordinate loaded from the contour file and inside these circles the brightness value is evaluated Eyesight Vision-System EN - 068-14530 – 21.10.2013-01 Page 69 Eyesight User Manual Contour tracing Saves the contour points along an outline of an object to the point list. Registers read: Point register index 0 The starting point for the contour line has to be defined e.g. by using the Probe points -command. Registers written: Point list and Value register index 0 The amount of points found along the object outline are saved in value register 0 and the coordinates in the point list. Window position Window The region of interests for a continuous contour line. Save world coordinates Takes the dynamically moving coordinate system into account and behaves accordingly. Eyesight Vision-System EN - 068-14530 – 21.10.2013-01 Page 70 Eyesight User Manual Parameter Automatic brightness adaptation Relative contrast threshold for edge detection. For More information on automatic brightness adaptation, see the chapter Probe teach-in parameters. Threshold value The grey value from 0 to 255 that will be interpreted as an edge pixel by the command. Max number of contour points The maximum amount of points that will be written on the point list. Tolerance The amount of points found are compared with the tolerance. For instructions on global tolerances, dynamic evaluation and how to set the tolerance limits, see the chapter Tolerance. Correlation Compares the captured image with a template and calculates the correlation. Procedure> Method Grey Scale Correlation Point Intensity List Multiple Image (HOT) - not available currently The amount of points found are compared with the tolerance. For instructions on global tolerances, dynamic evaluation and how to set the tolerance limits, see the chapter Tolerance. Eyesight Vision-System EN - 068-14530 – 21.10.2013-01 Page 71 Eyesight User Manual Count objects Counts objects with a defined area, brightness and distance from the centre. Registers written: Value register index 0 Brightness The amount of found objects is written in the value register index 0. The grey value range for the pixels. For more information on this dialog element, see the chapter Brightness. Eyesight Vision-System EN - 068-14530 – 21.10.2013-01 Page 72 Eyesight User Manual Area The area where the objects are searched. Configuration Searches only inside this window. Rotated Whole Searches only inside this (rotated) window. Whole image Searches the whole image. Pick-up list Select a window from the Pick-up list. Object filter Clicking this button expands the dialog and allows the command to ignore objects with selected dimensions. Hint: The object dimensions can be easily measured by activating the needed “Display” checkboxes and clicking the “Test”-button. Area Ignore all objects not within set area limits. Width Ignore all objects not within set width limits. Height Ignore all objects not within set height limits. Distance Ignore all objects not within set distance limits from the centre. Backup of objects (save object coordinates) Saves the point of balance coordinates of the found objects into the point register or the point list. Amount all Saves the coordinates all found objects. Amount maximum Sets the maximum amount of coordinates of the found objects to be saved. Registers written: Point list indexes 0 through X Save in point list Saves the point of balance coordinates of the found objects into the point list. Registers written: Point register indexes 0 through Y Save in point register Saves the point of balance coordinates of the found objects into the point register. Eyesight Vision-System EN - 068-14530 – 21.10.2013-01 Page 73 Eyesight User Manual Point pick-up Saves point of balance coordinates as separate items selectable from the pick-up list. Window pick-up Saves object border coordinates as separate items selectable from the pick-up list. Area in Pickup Saves the area in the pick-up list. Width, height in Pickup Saves the width and the height in the pick-up list. Sorting Affects the order by which the coordinates are saved in the register. Sort by The order by which the coordinates are saved in the point register/list depends on the … Area: …......area of the object. Width: ……width of the object. Height: …...height of the object. Distance: ...distance between the image centre and point of balance of the object. Order Descending: This option results in saving the largest, widest or tallest objects starting from the point register index 0. The coordinates in the point list are saved in a reverse order. Ascending: The previous option reversed. Display Various attributes of the detected objects can be embedded in the “Camera viewer”-display. Area Displays the area of the object. Height Displays the height of the object. Width Displays the width of the object. Distance Displays the distance between the image centre and point of balance of the object. Point of balance Displays the point of balance of the object. Object borders Displays the borders of the object. Output in same image memory Writes the result graphics in the same image memory as the “Count objects” –command is set (the IM-column on the “Program editor”window). Drawing in image memory Writes the result graphics to the chosen image memory. Eyesight Vision-System EN - 068-14530 – 21.10.2013-01 Page 74 Eyesight User Manual Ignore boundary objects Objects not completely within the taught area of interest are not counted if this option is activated even they would otherwise fit to the selection criteria. Save world coordinates Takes the dynamically moving coordinate system into account and behaves accordingly. Ext. features Angle and eccentricity can be additionally selected in the sections object filter and display. Tolerance For instructions on global tolerances, dynamic evaluation and how to set the tolerance limits, see the chapter Tolerance. Test The current settings can be tested with this button. Cross-section Measures the cross-section between two detected edges. Registers written: Value register index 0 and Point register indexes 0 and 1 Two points are written on the point register indexes 0 and 1 and the distance between them on the value register 0. Eyesight Vision-System EN - 068-14530 – 21.10.2013-01 Page 75 Eyesight User Manual Probe position: Teach-in search-line and dynamic position Opens the dialog window for teaching-in the probe. If the dynamic position option is activated the direction, length and width are set by using values from the register. For more information on this dialog element, see the chapter Probe position teach-in. Note: Regardless of the probe width, the detecting of the edge is done along the probe’s 1 pixel wide centre line. Probe parameters: Teach-in probe parameters Parameters for object colour, size and threshold of the probe. For more information on this dialog element, see the chapter Probe parameters teach-in. Histogram Displays the relative amount of pixels of certain grey value inside the probe area. The height of the yellow bars are relative to the amount of pixels in that particular grey hue. For more information on this dialog element, see the chapter Histogram. Tolerance For instructions on global tolerances, dynamic evaluation and how to set the tolerance limits, see the chapter Tolerance. D Delete background Subtracts a selected background image from the captured image. Background Image This is the reference image to compare the current image to. Take Image From Camera Viewer Uses the last image taken by the connected camera Eyesight Vision-System EN - 068-14530 – 21.10.2013-01 Page 76 Eyesight User Manual Window Window The region of interests for a learnt background. Use world coordinates Takes the dynamically moving coordinate system into account and behaves accordingly. Image Memory Buffer During the inspection process the reference image is loaded into a buffer 1 or 2 (limited to 2 on the camera) Replace with colour Replaces the different pixels with the selected grey scale value. Determine point of curve Determines the bending point from a straight line of an object. Rz-value The rate of deviation away from the straight line in pixels, ie. For a low value of Rz, a minor change away from the straight line in the teach area will cause the point to be generated. Repetition This value is generated automatically by the Eyesight software Teach-in Probe Parameter Parameters for object colour, size and threshold of the probe. For more information on this dialog element, see the chapter Probe parameters teach-in. Eyesight Vision-System EN - 068-14530 – 21.10.2013-01 Page 77 Eyesight User Manual Teach-in Reference Edge The first calliper serves to define the un-curved document reference edge Teach-in Search Area The second teach-in area is for the region to locate the beginning of the curve, with reference to the Rz value, and the un-curved document reference edge. Histogram Displays the relative amount of pixels of certain grey value inside the probe area. The height of the yellow bars are relative to the amount of pixels in that particular grey hue. For more information on this dialog element, see the chapter Histogram. Digital I/O Selected from: Main menu > View > Digital I/O This dialog displays the digital input and output states. The outputs can also be manually set on and off by clicking on the indicator dots. EXTREME CARE SHOULD BE TAKEN USING THIS CONTROL, with consideration to the connected devices and control to other sections of equipment. Simulation Enable this option to test setting and reading of the in- and outputs on the PC. Reset The state of the input and the output will be reset. Switch off Turns all outputs off. Save start state Is this option activated, a start state can be saved. This state will be enabled after power on. Eyesight Vision-System EN - 068-14530 – 21.10.2013-01 Page 78 Eyesight User Manual Display contour Selected from: Main menu > View > Image analysis > Display contour An image analysis tool for displaying the contour lines in an image. Threshold The grey value (0..255) threshold for the contour. Minimum object size The minimum object size (i.e. area) in pixels. Hint: The area of an object can be found out by using the “Count objects” with the option “Display area”. Maximum number of contour points The maximum number of points that will be used for surrounding the object. Run once Checks for the contour once. Run in loop Checks for the contour continuously. Eyesight Vision-System EN - 068-14530 – 21.10.2013-01 Page 79 Eyesight User Manual Distance This command measures the distance between two points or the shortest distance between a point and a straight line. This command is recommended for the measurement of longer distances. Registers written: Value register index 0 Point - Point distance determination Registers read: Point register indexes X and Y The distance is written in the value register index 0. The point option reads selected two points of the point register and measures the distance between them. In this mode three different types of distance can be calculated: Distance type: direct The distance between the two points will be measured. Distance type: axially parallel in X or Y The distance of lines parallel in X- or Y-axis drawn through the selected 2 points. Point - Straight line distance determination Registers read: Point register index X and Straight line register index Y This option measures the shortest distance between a point and a straight line. Result: Absolute value If this option is active, the measured distance result will be a positive number. If not active, the result will be negative if above the straight line and positive if below it. Result: Convert signs Converts the result signs. Tolerance The calculated distance compared to the set tolerance value. If the distance ranges within the tolerance, the OK is set, otherwise NOK. For instructions on global tolerances, dynamic evaluation and how to set the tolerance limits, see the chapter Tolerance. Eyesight Vision-System EN - 068-14530 – 21.10.2013-01 Page 80 Eyesight User Manual E Edge counter - straight line Counts edges along a straight line. Registers written: Value register index 0 and Point register 0 and Point list direction This command writes in the following registers: Value register index 0: amount of detected edges. Point register index 0: coordinates of the first detected edge Point list: coordinates of all detected edges. all Counts all the edges. only bright / dark Counts only edges with transition from bright to dark. only dark / bright Counts only edges with transition from dark to bright. Search straight line (Search for edges) towards probe (along the probe) Detects points along a teached-in probe. Eyesight Vision-System EN - 068-14530 – 21.10.2013-01 Page 81 Eyesight User Manual Probe Teach-in position and dynamic position Opens the dialog window for teaching-in the probe. If the dynamic position option is activated the direction, length and width are set by using values from the register. For more information on this dialog element, see the chapter Probe position teach-in. Note: Regardless of the probe width, the detecting of edges is done along the probe’s 1 pixel wide center line. Teach-in parameter Parameters for object colour, size and threshold of the probe. For more information on this dialog element, see the chapter Probe parameters teach-in. Tolerance For instructions on global tolerances, dynamic evaluation and how to set the tolerance limits, see the chapter Tolerance. Evaluation Compares a value against given tolerance limits and sets the inspection result accordingly. Variable type: Value When the source is set to “register” this command reads a selected value register index. Registers read: Value register index X Eyesight Vision-System EN - 068-14530 – 21.10.2013-01 Page 82 Eyesight User Manual Source Register The value is read from the selected value register index. Pick-up list The value is read from a variable or from a command, which writes its results to the value register. These commands are e.g. angle, distance, caliper, circle, .. Enter nominal value to pickup list Tolerance Writes the nominal value into the pickup list. For instructions on global tolerances, dynamic evaluation and how to set the tolerance limits, see the chapter Tolerance. Execute sub-program Inserts a jump to a subprogram. Name of sub-program Pressing the folder-button opens a dialog for selecting a program. Execute sub-program Specifies the conditions for execution. F Filter This command contains a library of different filter algorithms. Filter Type Drops a menu for the selection of the filter type to be used Eyesight Vision-System EN - 068-14530 – 21.10.2013-01 Page 83 Eyesight User Manual Area The area where the Filter tool is to be placed. From pick-up list - Uses point data from suitable tools with in the pick up list. Teach-in - Searches only inside this window. Use World Co-ordinates – moves the filter area in x,y with reference to the calibration data Complete image - Searches the whole image. Filter Types Binarisation - The filter area is binarised with the selected parameters and the result is re-entered in the original window. Inverting - The pixels in the filter area are replaced by their reverse / inverse values. An image existing only of black and white areas will be black in areas which have been white before and vice versa after applying the filter. Repetition Value – the number of times the filter is applied (default 1) The higher the value the long the processing time for the filter! Nominally it is not good practice to exceed a value 5 repetitions. Minimum nxn – Uses a grid of a specified size (default3) and reads the minimum value of intensity in the grid, and re writes all values of intensity in the grid with that value. So we dilate the dark areas of the filter area. Repetition - See above Maximum nxn – Uses a grid of a specified size (default 3) and reads the maximum value of intensity in the grid, and re writes all values of intensity in the grid with that value. So we erode the dark areas of the filter area. Repetition - See above Median nxn - Uses a grid of a specified size ( default 3) and reads the median value of the grid, and re-writes all values of intensity in the grid with that value. Can be used to help smooth grained images. Repetition - See above Median nxm - As per Median nxn but the grid can be given different values for the x and y sizes. Repetition - See above Contrast nxn – uses the level of contrast change with in the grid and changes the value of intensity according to the following logic, the lower the value of contrast change the lower the resulting intensity. Repetition - See above Eyesight Vision-System EN - 068-14530 – 21.10.2013-01 Page 84 Eyesight User Manual Cut Bits – Re-calculates the intensity level of each pixel with reference to the number of bits ‘cut’ starting with the LSB (least significant bit). i.e each pixel has a data word of 8bits originally and the cut bits removes ‘x’ data bits from its value. 8 bits removed = 0 bit grey scale image (black) 7 bits removed = 2 bit grey scale image 6 bits removed = 4 bit grey scale image 5 bits removed = 8 bit grey scale image 4 bits removed = 16 bit grey scale image 3 bits removed = 32 bit grey scale image 2 bits removed = 64 bit grey scale image 1 bits removed = 128 bit grey scale image Repetition – Has no influence. Filter Types Continued Contrast Spread – Re-calculates the intensity of the pixels over a new range; ie. Min Grey value (Source) = The grey scale value to be taken as black ( 0 intensity) Max Grey Value (Source) = The grey scale value to be taken as White (255 intensity) Min grey value (target) = The grey value for the pixels to be displayed in the filter area if ‘Clipping’ is activated. Max grey value (target) = The grey value for the pixels displayed in the image filter area if ‘Clipping’ is activated. Repetition – Has no influence. Duplicate Lines – Duplicates the odd lines of the image to match the even lines of the image, similar in principle to an interlacing operation Repetition – Has no influence. Stripe Filter – Working in either a Horizontal or Vertical (default) direction, each row / column of the selected area is interrogated for either its darkest or lightest (default) pixel intensity, then the entire row or column is given this value. Repetition – Has no influence. Ring-processing – This filter is used to ‘un-wrap’ a circular area of interest in to a rectangle. It has two sections the first is set using the ‘window’ control, the rectangular area is the area in which the result from the ring processing filter will be drawn. Eyesight Vision-System EN - 068-14530 – 21.10.2013-01 Page 85 Eyesight User Manual Filter Tool Set This command provides additional filter functions. Filter type Opens a dialog with a list of all selectable filters. Source memory Determines the source image buffer and optional a ROI. Destination memory Determines the destination image buffer. Parameters Different parameters, dependent on the used filter operation. Free calliper The free calliper is used for detection of two edges and Eyesight Vision-System EN - 068-14530 – 21.10.2013-01 Page 86 Eyesight User Manual measuring the distance between them. The difference between Free calliper and horizontal / vertical calliper is that its alignment can be chosen freely. Colour camera This command does not work with colour images. Use a corresponding filter before this command. Registers written: Value register index 0 The result of the measurement will be written on the value register index 0. Eyesight Vision-System EN - 068-14530 – 21.10.2013-01 Page 87 Eyesight User Manual Teach-in calliper After the “Teach-in calliper”-button is clicked the following window opens: The position of the calliper, the distance and size of its jaws can be changed by drag-and-dropping from the yellow points. Clicking and holding the yellow dot at the end of the calliper changes the angle. The angle can be changed in 45° steps if the CTRL-key is pressed and 5° steps if the ALT-key is pressed simultaneously. The jaws can be turned to point outwards by double-clicking on them. Angle The angle of the calliper. Clicking on the number opens a dialog window where the angle can be set. Distance The distance between the inside jaws. The Slide controls The edge detection area thickness (green rectangles at the jaws) can be set with these sliders. RESET Reset the calliper jaws and position. Align measurement slide on straight line The calliper is aligned using a selected straight line. Dynamic position from register Measures the distance between the last 2 points in the register. Eyesight Vision-System EN - 068-14530 – 21.10.2013-01 Page 88 Eyesight User Manual Probe parameters of both measurement jaws Parameters for object colour, size and threshold of the probe. For more information on this dialog element, see the chapter Probe parameters teach-in.. Parameters of both jaws Sets the same parameters for both jaws. The chain-symbol Sets whether the same or separate parameters are to be used for the two jaws. Parameters upper/lower jaws Sets separate parameters for the two jaws. Histogram Displays the relative amount of pixels of certain grey value inside the probe area. The height of the yellow bars are relative to the amount of pixels in that particular grey hue. For more information on this dialog element, see the chapter Histogram.. Tolerance For instructions on global tolerances, dynamic evaluation and how to set the tolerance limits, see the chapter Tolerance. G Global tolerances Selected from: Main menu > View > Global tolerances This dialog window is for setting the global tolerances. Description A short descriptive name for the tolerance. Nominal value The value from which the upper and lower tolerance limits are calculated. P-tol. / M-tol. Upper / lower tolerance limits. W-P-tol. / W-M-tol. Upper / lower warning limits. Sets the limits for a warning command result. When this limit is exceeded, the dot in the program editor column “E” turns yellow. Eyesight Vision-System EN - 068-14530 – 21.10.2013-01 Page 89 Eyesight User Manual H Histogram Displays the relative amount of pixels of certain grey value inside an area. The height of the yellow bars are relative to the amount of pixels in that particular grey hue. The red vertical line displays the current threshold value for edge detection which is also displayed under the teach-in-button. A letter “G” in front of the threshold value means a global value is being used. For example in this histogram image there are two peaks in pixel amount, which have grey values between 100 to 130 and 150 to 170. The threshold value is set to 170. The histogram will not be displayed if the automatic brightness adaptation has been activated. Eyesight Vision-System EN - 068-14530 – 21.10.2013-01 Page 90 Eyesight User Manual I Image capture Acquires an image from the camera or loads it from a JPG/BMP-file. The command can also be used for saving images in JPG/BMP-formats. An inspection process can be tested without a connected camera by first saving a number of files with the “cyclical”-option. The saved images can then be cyclically loaded from the inspection program. This enables modifications to the program and testing without a live image. Operation: Capture image from camera An image is captured by the camera and placed in the frame buffer. triggered If this flag is set and HW-triggered is not set, softtrigger is enabled. An input channel and a debounce time have to be defined. Trigger input: Sets the used I/O-port. Debounce time: The debounce time determines the minimum time in which the signal has to be set before the state is accepted Apply timeout Enables a timeout (input in milliseconds). After this time the command returns with the result NOK. HW-triggered: Enables the hardware trigger. Hardware trigger is to prefer. with flash Captures image using flash. Eyesight Vision-System EN - 068-14530 – 21.10.2013-01 Page 91 Eyesight User Manual Operation: Save image Saves a captured image on a PC hard drive in a BMP- or JPG-format file. with graphics The inspection result graphics are drawn on and saved with the image. fixed file Only one image is saved on the hard drive. progressive Saves images continuously on the hard drive adding a timestamp to the filename. Registers written: Value register index 0 Cyclic: Saves images cyclically saving over the first file after reaching the last file. The index number of the image is written on the value register index 0. Number of images: Number of images to be written when using cyclic saving. Reset Index: Resets the next index number at the end of the file name to 0. Text string as name: Uses the active text string for naming the file. The file type can also be set by using “bmp” or “jpg” as a file name suffix. File: Name and type (JPG or BMP) of the file(s) to be written on the hard drive. Operation: Load image Reads an image from a BMP- or JPG-file. fixed file - Loads a single image file from the hard drive. Delete after successful loading - Deletes the loaded image file. Registers written: Value register index 0 Cyclic - Loads series of image files cyclically. The index number of the image is written on the value register index 0. Selection X Images: Amount of image files to be loaded. from index X: Using the file name set in the field “File” as the prefix, starts loading images beginning from the index X. entire folder: Loads series of image files cyclically using the contents of an entire directory selected in the field “File”. Reset Index: Resets the internal index number counter i.e. starts loading files from the beginning of the selection. Text string as name - Uses the active text string for the file name. File: Name of the file or subdirectory to for loading. Display options Update image size: Resizes the image to fit the camera window. Eyesight Vision-System EN - 068-14530 – 21.10.2013-01 Page 92 Eyesight User Manual Image information Evaluates brightness, focus (sharpness) or resolution of a selected image area. Brightness (average) Registers written: Value register indexes 0, 1 and 2 This option writes the highest, lowest and the average grey value detected on the value register. Value register index 0: the average grey value Value register index 1: the lowest grey value Value register index 2: the highest grey value Grey value range The grey value range for the pixels. For more information on this dialog element, see the chapter Brightness. Focus value This value represents the sharpness of the window. The lower the value, the sharper the image. Registers written: Value register index 0 Image format (resolution) Registers written: Value register indexes 0 and 1 Window The image horizontal resolution is written on the value register 0 and the vertical on the 1. from pick-up list: Uses a window item for the evaluation area from the pick-up list. Window items can be created with the Count objects –command. Teach-in: Window position The area to be evaluated. Teach-in: Save world coordinates Takes the dynamically moving coordinate system into account and behaves accordingly. Whole image Evaluates the whole image. Tolerance For instructions on global tolerances, dynamic evaluation and how to set the tolerance limits, see the chapter Tolerance. Eyesight Vision-System EN - 068-14530 – 21.10.2013-01 Page 93 Eyesight User Manual Image inspector Selected from: Main menu > View > Image analysis > Image inspector Displays detailed information about individual pixels inside a selected area. Choosing this command opens an additional dialog next to the “Camera viewer” after which a rectangular area can be selected for analysis. Clicking “Ok” opens the next dialog window. Position Opens the Teach-in window dialog. Update The image can be updated if the live image capturing is enabled. Brightness (also “lightness”, “value”) Brightness is a property of a colour that correlates with how bright or luminous a colour is. Hue (also “colour”) is that aspect of a colour described with names such as "red", "yellow", “green” and so on. Saturation White to Black depending on the brightness. When an edge of an coloured object is viewed through the image inspector, the sharpness of an edge can be very sharp when seen e.g. through the green channel and fuzzy when seen through the red channel. The image can then be filtered to pass only red colour using the “Select colour channel” –command. Red, Green and Blue Because Probe points -command “sees” only one channel at a time, the wanted channel has to be selected before probing. The default colour channel for probing is blue. Eyesight Vision-System EN - 068-14530 – 21.10.2013-01 Page 94 Eyesight User Manual Image transfer Affords to send images to any IP-Address. Receiver Enter the IP-address and the port of the receiver. External condition of execution Chose if the image should be send in every cycle or only on demand. Image buffer to be send The image buffer according to the selected IM in the editor will be send. UDP Packet Retries If the sent UDP packages are not acknowledged by the receiver, the packages could be resend after an adjustable timeout. The number of retries can be defined. In combination with colour images it’s recommended to set the TimeOut to 15ms (default: 5ms). Image resolution Sets the resolution of the image to be sent (Original, Quarter or 1/16). A smaller resolution will lead to a smaller cycle time. Format The image can be send as greyvalue or colour image. This should be selected dependent on the used hardware. Time of sending Select if the image should be send immediately or should be provided for web server. Internal condition of execution Choose if all images should be sent or only if the result is OK or NOK. Region of interest (ROI) Complete Image Send the whole image. Static ROI The coordinates of the ROI can be typed in manually or selected with the mouse. Eyesight Vision-System EN - 068-14530 – 21.10.2013-01 Page 95 Eyesight User Manual Dynamic ROI It’s possible to use the values from the register or from the pickup list. World coordinates Consider world coordinates. Graphical Overlay Send the image optional with or without overlay. Image compression The image can be sent compressed or uncompressed (JPEGcompression). INI-file access Writes to and reads from an INI-file on the camera flashmemory or on the PC hard drive. File The file to be used for reading or writing. Section Section is a string of characters inside square brackets. Syntax example: [START] Global string Reads the global string and uses it as the section name. The string should be without square brackets. Entry The entries are of format KEY=VALUE. Syntax example: LAST_START_SUCCESSFULL=1 Global string Reads the global string and uses it as the entry name. The string should be without square brackets. Eyesight Vision-System EN - 068-14530 – 21.10.2013-01 Page 96 Eyesight User Manual Access type: Write Registers read: Value register index X Writes entry, section and selected data type on a file. Variable type: Value Writes a value from the selected source. Source Constant: The given constant value is used as the source. Register: The content of a given value register index is used as the source. Pick-up list: A pick-up list item is used as the source. Registers read: Point register index X Variable type: Point Writes a point coordinates from the selected source. Source Register: The coordinates of a given point register index is used as the source. Pick-up list: A pick-up list item is used as the source. read: Global text string Variable type: Global string Writes a string. manual Writes the manually typed text. Global string Writes the contents of the global text string. Access type: Read Registers written: Value register index 0 Reads entry, section and selected data type from a file. Variable type: Value Reads a selected INI-file section and entry and writes the value to the value register. Tolerance The value read from the INI-file can be compared with a tolerance value. For instructions on global tolerances, dynamic evaluation and how to set the tolerance limits, see the chapter Tolerance. Registers written: Point register index 0 written: Global text string Variable type: Point Reads a selected INI-file section and entry and writes the value to the point register. Global string Reads a selected INI-file section and entry and writes it in the global string. Overwrite Replaces the contents of the global string. Add Adds the contents to the en of the global string. Add: Separator The separator character added between original and new content. Access type: Delete file Deletes a selected INI-file. Access type: Delete section Deletes a selected section. Eyesight Vision-System EN - 068-14530 – 21.10.2013-01 Page 97 Eyesight User Manual Access type: Delete entry Deletes a selected entry. Options Update file before reading or after writing Reloads the file before reading or writing. Floating Point Precision Determines the number of decimal places. Intensity zone display Selected from: Main menu > View > Image analysis > Intensity zone display Highlights the pixels on the “Camera viewer” that have a grey value between the upper and lower threshold limits. Lower / upper threshold Set the upper and lower limits for grey values, which will be highlighted. Colour 1 The lower threshold colour. The saturation of this colour is 100% at the threshold and will gradually fade as the grey value increases. Colour 2 The upper threshold colour. The saturation of this colour is 100% at the threshold and will gradually fade as the grey value decreases. Eyesight Vision-System EN - 068-14530 – 21.10.2013-01 Page 98 Eyesight User Manual Interpreter control Controls the flow of the inspection program by using jumps, marks etc. It can create jumps (GOTO) and conditional jumps (IF ... THEN GOTO) to allow a nonlinear program execution. This command has no influence on the register. Set mark Sets a jump mark of chosen name. It is recommended to organize large inspection programs into sections by setting marks. Using the “Hide commands” on the command editor window and leaving only the set mark displayed may also help improve the readability of the program. Jump to mark This operation allows a non-conditional jump to a program line marked by “Set mark”-command. The mark name has to be entered in the input field. An error message will be displayed if the given mark does not exist. Jump to mark in case “OK” This operation jumps to the given mark if result of the selected command(s) is “OK“. You can combine this command with the evaluation command to jump over a section of a program e.g. when a diameter reaches a certain value. acc. to Total Result Jumps to the given mark when all the previously executed commands have resulted in “OK“. acc. to Command Jumps to the given mark when executed command selected from a list has resulted in “OK“. Jump to mark in case NOK As in the previous option, only for “NOK”. Jump to mark in case “Warning” As in the previous two options, only for “Warning” results (yellow point). Eyesight Vision-System EN - 068-14530 – 21.10.2013-01 Page 99 Eyesight User Manual Jump to mark X times This option makes it possible to repeat a selected section of a program X times (loop). E.g. A measurement can be made more precise by using this option to read the values 10 times and then use results to calculate a mean value. Set result: “OK” With this option the result can be manually set to “OK”. Set result: “NOK” With this option the result can be manually set to “NOK”. Set result: “Warning” With this option the result can be manually set to “Warning”. Update Display Update the image in the “camera viewer”-display. Delete result graphics Deletes all the graphics (dots, lines, circles, text etc.) on the “Camera viewer”-window. For (from) all image memories Deletes the graphics also from other image memories (memory number is displayed by the “IM”-column on the “Program editor”. End of program Using this option ends the program execution. Any commands after this line will not be executed. L Line profile Selected from: Main menu > View > Image analysis > Line profile Displays the grey value profile (0..255) along a teached-in line. Position Opens a dialog window for teaching-in the profile line. The line profile shown above is a brightness representation of the following teach-in line: Eyesight Vision-System EN - 068-14530 – 21.10.2013-01 Page 100 Eyesight User Manual Update Reloads the image. Dynamic The line profile is evaluated in a continuous loop. Static The line profile is evaluated once. M Measure gap width This command measures the minimum and maximum distances between points detected by two probes. Eyesight Vision-System EN - 068-14530 – 21.10.2013-01 Page 101 Eyesight User Manual Registers written: Value register indexes 0 and 1 and Point register indexes 0, 1, 2 and 3 and Point list This command writes on the following register indexes: Value register 0: The shortest distance between detected points Value register 1: The longest distance between detected points Point register 0: The nearest point detected by probe 1 Point register 1: The nearest point detected by probe 2 Point register 2: The most distant point detected by probe 1 Point register 3: The most distant point detected by probe 2 Point list: All detected points * Value 2 through 19 and point register indexes 4 through 19 are also written by this command. These values and coordinates are used internally by the software and do not have any special significance. Teach-in position and dynamic position Opens the dialog window for teaching-in the probe. If the dynamic position option is activated the direction, length and width are set by using values from the register. For more information on this dialog element, see the chapter Probe position teach-in. Teach-in parameter Parameters for object colour, size and threshold of the probe. For more information on this dialog element, see the chapter Probe parameters teach-in. Dispersion filter Filters out all the points outside the given pixel value. Histogram Displays the relative amount of pixels of certain grey value inside the probe area. The height of the yellow bars are relative to the amount of pixels in that particular grey hue. For more information on this dialog element, see the chapter Histogram. Alignment No The probes are independent of each other. Probe 1 The probes are aligned to probe 1. Probe 2 The probes are aligned to probe 2. Tolerance The minimum distance is compared with the tolerance. For instructions on global tolerances, dynamic evaluation and how to set the tolerance limits, see the chapter Tolerance. Test Tests the actual parameters. P Point Eyesight Vision-System EN - 068-14530 – 21.10.2013-01 Page 102 Eyesight User Manual Creates a point whose coordinates are either given manually, taken from the register or calculated e.g. from the interception of two lines. Registers written: Point register index 0 and Point list index X Create Registers read: Value register indexes X and Y Use position adjustment The point’s coordinates are always written on the point register index 0 and the last point list index. manual The position can either be typed as coordinates in the X- and Y-fields or by pointing and clicking through the ‘teach in’ window. Dynamic Reads the coordinates from the selected value registers. Takes the dynamically moving coordinate system into account and behaves accordingly. Interception of two straight Places a point at the interception of two straight lines. lines Registers read: Straight line register indexes X and Y Middle point between 2 P Calculates the coordinates for the midpoint between two points and places the resulting point in the point register. Registers read: Point register indexes X and Y Image centre Places a point in the centre of an image. Eyesight Vision-System EN - 068-14530 – 21.10.2013-01 Page 103 Eyesight User Manual Nearest point on straight line Goes through the point list and picks the point nearest to a selected straight line. Registers read: Point list and Straight line register index X Copy point on top of register Copies a selected point in point register to the top of the register i.e. point register index 0. Registers read: Point register index X From point list into point register Copies a selected index from the point list into point register 0. Transformation from image Writes the image coordinates of a point into the point register 0. into world coordinates Registers read: Point register index X Registers written: Point register index 0 Transformation from world into image coordinates Writes the world coordinates of a point into the point register 0. Registers read: Point register index X Registers written: Point register index 0 Window centre Places the point in the centre of a window item. Window items can be created with the Count objects –command. From point register into point list. Reads the selected point register indexes and saves them at the end of the point list. Registers read: Point register indexes X through Y Registers written: Point list indexes U through V Transform coordinates into Saves the selected point X-coordinate to the value register 0 and the values Y-coordinate to the value register 1. Registers read: Point register index 0 Registers written: Value register indexes 0 and 1 Eyesight Vision-System EN - 068-14530 – 21.10.2013-01 Page 104 Eyesight User Manual Point list Various point list manipulations. Modifies resets, saves and loads the point list. Reset Resets all the point list indexes to zero. Registers written: Point list Annulus-value Registers read: Point list and Point register index 0 Registers written: Value register index 0 Creates an annulus (a ring) and counts the amount of point list between its inner and outer radii. The amount of points found between the inner and outer rings is then counted and evaluated. The centre point of the annulus is read from the point register index 0. The result is written in the Value register index 0. Number of points in % Returns the amount of points found relative to the total amount of point list items. Absolute number of points Returns the absolute number of points found inside the annulus. Inner radius The radius of the annulus inner ring. Outer radius The radius of the annulus outer ring. Tolerance For instructions on global tolerances, dynamic evaluation and how to set the tolerance limits, see the chapter Tolerance. Eyesight Vision-System EN - 068-14530 – 21.10.2013-01 Page 105 Eyesight User Manual Object determination: position / rotation Registers read: Point list Registers written: Point register indexes 0 through 5 This command places four points as the corners of a rectangle around an object contour, one point in the geometrical point of balance and one point at the end of the longer axis. Points Command needs at least 5 points to be able to execute. More points make the result more precise but at the cost of more processing time. Point register 0 = Geometrical point of balance Point register 1 = the side of the rectangle Point register 2 = 1. corner of the rectangle Point register 3 = 2. corner of the rectangle Point register 4 = 3. corner of the rectangle Point register 5 = 4. corner of the rectangle Tolerance For instructions on global tolerances, dynamic evaluation and how to set the tolerance limits see the chapter Tolerance. Calculate distances Registers read: Point list Registers written: Value register indexes 0, 1 and 2 Sort List (1-Dimensional) Value register index 0: The average distance between point list items. Value register index 1: The shortest distance found between point list items. Value register index 2: The greatest distance found between point list items. Rearranges the point list by the selected options. Registers read: Point list Registers written: Point list Starting point The point list order is sorted … Left: horizontally from left to right. The leftmost item … Right: horizontally from right to left. The rightmost item … Top: vertically from top to bottom. The topmost item … Down: vertically from bottom to top. The under most item … … is moved to the point list index 0 and so on. geometrical centre point of point list Calculates the geometrical point of balance formed from all the point list items and saves the coordinates on the point register index 0. Registers read: Point list Registers written: Point register index 0 Load Reads a series of points from a file and places them in the Point list. Registers written: Point list File The name of the contour file. Transform to world coordinates Takes the dynamically moving coordinate system into account and behaves accordingly. Use position adjustment Takes the dynamically moving coordinate system into account and behaves accordingly. Eyesight Vision-System EN - 068-14530 – 21.10.2013-01 Page 106 Eyesight User Manual Save Saves the contents of the Point list into a file. Registers read: Point list File The name of the contour file. All points Saves all points from the Point list. Index (from x to y) Saves points starting from the Point list index x until index y. Transform to world coordinates Takes the dynamically moving coordinate system into account and behaves accordingly. Use position adjustment Takes the dynamically moving coordinate system into account and behaves accordingly. Probe parameters teach-in Dialog window used by various commands (e.g. Probe points, Straight line distance, Cross-section, Edge counter) for setting the edge detection parameters. Object colour Sets the colour of the object to be detected against the background. Minimum size Sets the minimum size of the edge in pixels that will be accepted as such. Eyesight Vision-System EN - 068-14530 – 21.10.2013-01 Page 107 Eyesight User Manual Result point The probe rectangle consists of a number of parallel search beams, which by finding an edge mark it in the point list. One of these points, the “result point”, will also be written into the point register 0. This point can be selected to be: First: the nearest point i.e. the point with the shortest search beam. Middle: the search ray with average length. Last: the most distant point i.e. the point with longest search beam. Number of points Sets the number of search beams inside the probe rectangle. Each beam marks a detected edge in the point list. The fewer the number of beams the faster the probe execution time. Probe method If neither of the check boxes are activated, the probe uses only the global threshold value for edge detection. The global settings can be modified from: View > Operating parameters > Image processing or locally by activating the expert check box. Example: The threshold is set to a grey value of 170 and object colour is set to bright. Edge not detected Pixel 1 2 3 4 5 6 7 8 9 10 11 Value 0 0 50 50 110 169 169 169 169 168 169 No edge is detected while no pixel grey value is over 170. The probing direction is from left to right. Edge detected pixel 1 2 3 4 5 6 7 8 9 10 11 value 0 0 50 50 110 169 169 170 169 168 169 An edge is detected in the pixel nr. 8 as its grey value reaches 170. Eyesight Vision-System EN - 068-14530 – 21.10.2013-01 Page 108 Eyesight User Manual Probe method > Automatic brightness adaptation This option uses relative contrast threshold for edge detection. This mode is less sensitive e.g. to changes in lighting conditions and therefore recommended in most cases. The parameters used by automatic brightness adaptation are minimum contrast pixel distance edge symmetry edge selection These parameters can be global values or set locally by activating the expert-option. The global values can be modified from: Main menu > View > Operating parameters > Image processing The threshold-parameter is ignored when automatic brightness adaptation is used. Example: When the automatic adaptation is activated, the probe uses the following values for edge detection: minimum contrast: 40 pixel distance: 3 edge symmetry: 67 This means that with these options the edge is detected when the probe finds a contrast difference of 40 over 3 pixels. Edge not detected pixel 1 2 3 4 5 6 7 8 9 10 11 value 0 0 0 30 31 39 40 60 70 71 80 No edge is detected while no grey value difference exceeds 40 over 3 pixels. The probing direction is from left to right. Edge detected pixel 1 2 3 4 5 6 7 8 9 10 11 value 0 0 0 30 31 40 40 60 70 71 80 An edge is detected in the pixel nr. 6 as the grey value difference (i.e. minimum contrast) between pixels 3 and 6 reaches 40. Eyesight Vision-System EN - 068-14530 – 21.10.2013-01 Page 109 Eyesight User Manual Probe method: Expert When active, allows parameters to be modified locally. Otherwise global parameter values are used. The global values can be modified from: View > Operating parameters > Image processing Threshold (0...255 grey value) Determines a fixed grey level value that has to be exceeded for detecting an bright edge or to fall short for an dark edge. Minimum contrast (0...255 grey value) Relative contrast threshold for edge detection. E.g. Value 40 means that a minimum grey value difference of 40 over a certain pixel distance is required for detecting an edge. Method is used only by the automatic brightness adaptation. Pixel distance (0…100 pixels) The least distance in pixels required for the minimum contrast. Method is used only by the automatic brightness adaptation. Edge symmetry (0…100 %) describes how many percent the contrast has to change before an edge is detected. Method is used only by the automatic brightness adaptation. Edge selection In case more than one edge is detected, the resulting point can be selected to be first, last, lightest or darkest. Eyesight Vision-System EN - 068-14530 – 21.10.2013-01 Page 110 Eyesight User Manual Probe points – rectangular Detects an edge where the contrast changes sharply and marks it with points. These points are saved to the point list and can be used e.g. for drawing a straight line. When using a colour camera: Because Probe pointscommand “sees” only one channel at a time, the wanted channel has to be selected before probing. The default colour channel for probing is blue. Registers written: Point list and Point register index 0 and Value register index 0 All the points detected are written in the point list. From those detected points one point is selected depending on probe’s parameters and written in the point register 0. This resulting point is the first, the last or the middle point seen from the start of the probing rectangle. The amount points written in the point list (i.e. the points detected) is written in the value register 0. Probe name A name for the probe. Probe position: Teach-in probe and dynamic position Opens the dialog window for teaching-in the probe. If the dynamic position option is activated the direction, length and width are set by using values from the register. For more information on this dialog element, see the chapter Probe position teach-in. Eyesight Vision-System EN - 068-14530 – 21.10.2013-01 Page 111 Eyesight User Manual Probe parameters teach-in Parameters for object colour, size and threshold of the probe. For more information on this dialog element, see the chapter Probe parameters teach-in. Histogram Displays the relative amount of pixels of certain grey value inside the probe area. The heights of the yellow bars are relative to the amount of pixels in that particular grey hue. For more information on this dialog element, see the chapter Histogram.. Tolerance The amount of points saved in the point list is compared with the tolerance and if this lies within the limits, the inspection result is set to OK, otherwise NOK. For instructions on global tolerances, dynamic evaluation and how to set the tolerance limits, see the chapter Tolerance. Probe points – circular A circular probe that detects an edge where the contrast changes sharply and marks it with points. These points are saved to the point list and can be used e.g. for drawing a circle. Similar to the Probe points rectangular –command. When using a colour camera Because Probe pointscommand “sees” only one channel at a time, the wanted channel has to be selected before probing. The default colour channel for probing is blue. Eyesight Vision-System EN - 068-14530 – 21.10.2013-01 Page 112 Eyesight User Manual Registers written: Point register index 0 and Value register index 0 and Point list All the points detected are written in the point list. From those detected points one point is selected depending on probe’s parameters and written in the point register 0. This resulting point is the first, the last or the middle point starting from the centre of the probing circle. The amount points written in the point list (i.e. the points detected) is written in the value register 0. Probe Name A describing name can be given to this command. Probe position: Opens a dialog where the size and direction of the probe can be set. This can be done using a mouse or by typing in the values. Teach-in probe New position: Centre position Resets and places the probe in the middle of the window. New position: Start value Resets probe’s position and size like they were before opening of the window. Zoom The image can be zoomed using the slide control. Zoom: Aspect ratio 1:1 Change the height-width ratio of the image to 1:1. Zoom: Reset Set the zoom to minimum. Probe position: Teach-in probe using a mouse By opening the dialog for the first time the probe can be seen as a blue ring in the middle of the window. The form and position of the probing ring can be adjusted by using “drag & drop”-method. Move When placed between the inner and outer circles, the mouse pointer takes this form. The probe can now be moved. Adjust the radius When placed on the circumference of the inner or the outer circle, the mouse pointer takes this form. The probe’s inner and outer radius can accordingly now be adjusted. Adjust the angle of the arc When placed on the blue radial line, the mouse pointer takes this form. The angle of the probe’s arc can now be adjusted. Eyesight Vision-System EN - 068-14530 – 21.10.2013-01 Page 113 Eyesight User Manual Probe position: Centre X, Y The coordinates for the centre point of the probe. Teach-in probe by typing in the values Outer / Inner radius The radius for the outer and inner radius. Width, Length Width and length of the probe. Angle start Start of the angle in degrees. Arc length Length of the angle in degrees. Probe position: dynamic position Registers read: Point register index 0 and Value register indexes 0, 1, 2 and 3 With this option geometric form of the circular probe is set by using values from the register. Centre point: point register index 0 Inner circle radius: value register indexes 0 Outer circle radius: value register indexes 1 Start angle: value register indexes 2 Arc length: value register indexes 3 Probe parameters Teach-in Parameters for object colour, size and threshold of the probe. For more information on this dialog element, see the chapter Probe parameters teach-in.. Histogram Displays the relative amount of pixels of certain grey value inside the probe area. The height of the yellow bars are relative to the amount of pixels in that particular grey hue. For more information on this dialog element, see the chapter Histogram.. Direction This option sets the direction into which the edge will be detected. outwards Starting from the centre of the inner circle towards the outer ring. inwards Starting from the outer ring towards the inner ring. math. positive The edges are detected counter-clockwise between the two rings. math. negative The edges are detected clockwise between the two rings. Tolerance The amount of points saved in the point list is compared with the tolerance and if this lies within the limits, the inspection result is set to OK, otherwise NOK. For instructions on global tolerances, dynamic evaluation and how to set the tolerance limits, see the chapter Tolerance. Eyesight Vision-System EN - 068-14530 – 21.10.2013-01 Page 114 Eyesight User Manual Probe position teach-in Opens a dialog where the size and direction of the probe can be set. This can be done using a mouse or by typing in the values. New position: Centre position Resets and places the probe in the middle of the window. New position: Start value Resets probe’s position and size like they were before opening of the window. Zoom The image can be zoomed using the slide control. Zoom: Aspect ratio 1:1 Change the height-width ratio of the image to 1:1. Zoom: Reset Set the zoom to minimum. Teach-in probe using a mouse By opening the dialog for the first time the probe can be seen as a thin blue arrow in the middle of the window. The form and direction of the probing rectangle can be adjusted by using “drag & drop”-method. Move When placed at the start of the probe’s shaft, the mouse pointer takes this form. The probe can now be moved. Adjust the length and direction When placed at the tip of the arrow, the mouse pointer takes this form. The probe’s length and direction can now be adjusted. Adjust the width When placed on the probe’s shaft, the mouse pointer takes this form. The probe’s width can now be adjusted. Direction: Free The probe can point into any direction. Direction: X fixed The direction of the probe can only be set horizontally. Direction: Y fixed The direction of the probe can only be set vertically. Eyesight Vision-System EN - 068-14530 – 21.10.2013-01 Page 115 Eyesight User Manual Teach-in probe by typing in Start X, Y the values The coordinates for the starting point of the probe. End X, Y The coordinates for the ending point of the probe. Width, Length Width and length of the probe. dynamic position Registers read: Point register indexes 0 and 1 and Value register index 0 Some commands have an option for dynamic probe position. With this option the direction, length and width are set by using values from the register. Start point: point register 0 End point: point register 1 Width: value register 0 Pseudo-colour display Selected from: Main menu > View > Image analysis > Pseudo-colour display Highlights the pixels of selected grey value ranges with 8 colours. The colours can be selected by clicking on the respective button. Eyesight Vision-System EN - 068-14530 – 21.10.2013-01 Page 116 Eyesight User Manual R Remote device configuration This dialog window is used for administration of one or multiple cameras. The most important functions of this dialog are setting the IP-addresses, activating the camera licenses i.e. lifting the demo mode and updating the camera firmware. Add Adds a new camera configuration. Remove Deletes the camera configuration currently selected in the drop-down list. Eyesight Vision-System EN - 068-14530 – 21.10.2013-01 Page 117 Eyesight User Manual Properties Opens a properties dialog window for the camera currently selected in the drop-down list. Eyesight Vision-System EN - 068-14530 – 21.10.2013-01 Page 118 Eyesight User Manual Name The name of the camera E.g. “Camera 4”. IP-address The IP-address for the camera. The cameras are shipped with a default IP-address of 192.168.100.100. If the firmware IP-address settings have been deleted, the camera operating system will reset the IP-address to 192.168.0.65. Port The TCP port address for the camera. Default value is 1996. Change IP Address on camera The camera has to be restarted in order to make the changes take effect. Eyesight is sending out a ‘RESET’ command. IP-address should always be written down whenever it has been changed from its default value. Change port on Camera The camera has to be restarted in order to make the changes take effect. This can be done by clicking the “Restart camera device”button. IP-address and port number should always be written down whenever it has been changed from its default value. Change name of camera Opens a dialog where the camera can be renamed. Restart camera device Soft reset of the camera. reset port The TCP port address on the camera for listening reset command requests. Default value is 1997. Version number Shows the version number of the camera firmware. The version on the camera should be the same as the Eyesight software or below. Show fingerprint Displays a fingerprint, which is used as a unique identification for every Eyesight-camera. Activate camera Uplifts the demo-mode of a camera. This command searches the “license”-directory for a license file which matches the camera fingerprint and uses them for activating the camera. If no license file is matching the camera fingerprint, a dialog window opens where another location for a valid license file can be selected. New license file Opens a dialog window where another location for the license file can be selected. Show version Displays the version number of camera firmware. Eyesight Vision-System EN - 068-14530 – 21.10.2013-01 Page 119 Eyesight User Manual Update camera / restore backup Opens up a dialog window where the camera firmware can be updated or a backup restored. Camera software: Updates only the camera firmware. If a backup is being restored, no inspection program will be uploaded on the camera. Eyesight Vision-System EN - 068-14530 – 21.10.2013-01 Page 120 Eyesight User Manual Remote device control This dialog window is used for connecting and synchronizing the inspection programs between a PC and a camera. The working directory depends on which camera is currently active. Example: When working locally (Local system selected), the inspection programs will be saved by default in this directory: Connect Connects to a camera which is selected at the drop-down menu on top. The actual inspection will be interrupted. Disconnect and start Disconnects and starts the currently selected inspection program. Sync -> local PC Downloads the inspection programs from the camera to the PC. The inspection program files are saved in a sub-directory of the specific camera folder called “Programs”. Example: The connection with the “Camera nr. 2” has been established. Clicking the “Sync -> local PC”-button will now download the inspection programs from the camera and save them under the sub-directory highlighted in the following figure: Eyesight Vision-System EN - 068-14530 – 21.10.2013-01 Page 121 Eyesight User Manual Sync -> Remote device Uploads the inspection programs from the PC to the camera. The inspection program files are read from a sub-directory of the specific camera folder called “Programs”. Example: The connection with the “Camera nr. 2” has been established. Clicking the “Sync -> Remote device”-button will now upload ALL the inspection programs under the sub-directory highlighted in the following figure to the camera: State Displays the status of the connection. Demo Mode - The red text “Demo Mode” indicates that the camera does not received a proper license file. The demo mode can be lifted from the “Main menu > Options > Remote device configuration”-dialog. Manage device files Opens up the Windows Explorer and jumps into the active camera subdirectory. Active check program (Active inspection program) Sets the inspection program which will be activated on the camera after a successful synchronisation. Sync and activate Uploads the inspection programs from the currently selected camera sub-directory to the camera and starts the inspection program (which is marked active). Eyesight Vision-System EN - 068-14530 – 21.10.2013-01 Page 122 Eyesight User Manual Riehmann-probe Counts the edges along the projection of a selected area. Probe position: Opens the dialog window for teaching-in the probe. Teach-in probe and dynamic position If the dynamic position option is activated the direction, length and width are set by using values from the register. For more information on this dialog element, see the chapter Probe position teach-in. Edge Detection > Defines the direction of contrast change for edge detection All – will produce a point for each transition from dark to light, AND from Light to dark Only bright/ dark – Only the transitions from bright areas to darks areas will be counted Only dark / Bright – Only the transitions from dark areas to bright areas will be counted Show Expert parameter Enables advanced tools for edge detection, based on contrast, averages / Min / Max/ Median calculations Filter Size – number of pixels to check for the change in contrast Min gradient – minimum gradient change over the ‘filter size’ to be Eyesight Vision-System EN - 068-14530 – 21.10.2013-01 Page 123 Eyesight User Manual detected as an edge. Min Grad difference – minimum difference above the gradient over next to next pixel to be detected as an edge. Draw projection on image The result of the summation is drawn in the image. Test Tests the actual parameters. RS-232 (RS422) In the main menu > View > Application parameters > Connection settings (COM), the hardware settings can be pre-set. With V10/V20 cameras can be chosen between RS-422 and RS-232 (starting with version 2.6.x). Sends and receives text strings through the serial interface. This command can be used for creating customized serial protocols. RS232: Receive Attempts to receive data from the interface. If no data arrives within the timeout, the command aborts. Received data will be copied into the global string. COM 1-5 With the combination smart camera and serial interface “COM 1” has to be selected. New input available? Returns OK if there are characters in the RS232 buffer available. Show received string Additionally display the received characters in the overlay. Wait for terminator Data will be received until the termination character arrives or the timeout is reached. Eyesight Vision-System EN - 068-14530 – 21.10.2013-01 Page 124 Eyesight User Manual RS232: Send Output of data via the serial interface. COM 1-5 With the combination smart camera and serial interface “COM 1” has to be selected. Send-Parameter Start-, separator- and terminator- characters can be defined. Send The string can be composed using free text, register values or pick-up lists. Send String includes the data, which was written in the global string via the “Text String” command. Furthermore, a character- and/or line delay can be specified. Eyesight Vision-System EN - 068-14530 – 21.10.2013-01 Page 125 Eyesight User Manual S Script interpreter Script programming in a syntax similar to Visual Basic. Instead of using the GUI, the image processing functions can be directly accessed using scripting. Import script Opens a script file. Script examples can be found in the directory “Eyesight\Devices\PC_Local\Data”. Export script Saves a script file. Enlarge Enlarges the font size of the program editor window. Downsize Downsizes the font size of the program editor window. Eyesight Vision-System EN - 068-14530 – 21.10.2013-01 Page 126 Eyesight User Manual Line number Numbers the rows of the program in the editor window. Automatic complete From the database of the external functions a appropriate function is selected. With the key combination Ctrl+Space the auto-complete command is activated directly. You will see a variety of functions. With the Enter button, the selected function is confirmed. Test script With the command Test Script the script in the editor window is executed and a syntax check is performed. In the window below the editor the error messages occur in case of an error. Opens the Expert window for generating codes for variable and pick-up list access. Type of variable Specify the type of variable. Selection Select the variable which should be read or be written. Action Data could be read or be written. Overview Shows informations about the selected variable. Generate Press the button to generate code for variable access. You can copy and paste this code to the script interpreter. Layout Editor Here the style of the syntax highlighting is defined (colour, font, etc.). Eyesight Vision-System EN - 068-14530 – 21.10.2013-01 Page 127 Eyesight User Manual Select colour channel This command selects one of the three colour channels (red, green or blue) and filters out the other two. After the channel has been selected, the edge detection tools (e.g. Probe points) will only “see” the brightness value of the corresponding colour channel. This command has no influence on the register. Set output Sets one of the camera's 4 digital outputs to a given state. This command has no influence on the register. EXTREME CARE SHOULD BE TAKEN USING THIS CONTROL, with consideration to the connected devices and control to other sections of equipment. Output Index The index number of the pin whose state is to be changed. Name The name of the pin whose state is to be changed. New state The new state of the digital I/O signal. Possible values are 1 and 0. Eyesight Vision-System EN - 068-14530 – 21.10.2013-01 Page 128 Eyesight User Manual Mode There are two possible modes for controlling the digital I/O. level-triggered In this mode only the signal level is of importance. E.g. if you set “1” and the output does already have a “1”-level the signal does not change. edge-triggered Using edge-controlled mode is necessary when the receiving I/O-port cannot store the signal states. This mode changes the signal for the set value and the actual value as follows: In the figure above can be seen that when the signal set value and actual value are the same, the signal is inverted for a brief debounce time. Debounce time (ms) (Pulse duration) The debounce time determines the minimum time in which the signal has to be set before the state is accepted. Debounce time is needed to ensure that the receiving I/O-port has enough time to handle the signal transitions. E.g. if a sequence 1-0-1 is sent with a too short debounce time, the receiving I/O does not notice the transition and considers the signal state to have been at 1. set output The setting of the output can be chosen to take place according to results from previous commands. If you want to change the output in any case you have to activate all 3 options at OK Set the output when result is “OK”. at NOK Set the output when result is “NOK”. at Warning Set the output when result is “Warning”. Eyesight Vision-System EN - 068-14530 – 21.10.2013-01 Page 129 Eyesight User Manual Stop watch Measures the time between marked rows in the inspection program. Can also be used for creating delays in the program execution. Wait (milliseconds) Halts the program execution for a time period defined in the field Time (ms). Wait (key) Halts the program execution until the enter-key is pressed or the “OK” in a dialog window is pressed. Reset stop watch Resets the stop watch and starts the countdown. Read stop watch Stops the countdown and writes the result in milliseconds to the value register index 0. Registers written: Value register index 0 Eyesight Vision-System EN - 068-14530 – 21.10.2013-01 Page 130 Eyesight User Manual Straight line Creates a straight line and saves it in the register. The line will also be displayed in the Camera viewer – window. Best fit straight line Registers read: Point list Registers written: Straight line register index 0 With this option the straight line is drawn as a best fit straight line through all the points in the point list. The resulting straight line is saved in the straight line register index 0. The best fit straight line is typically used together with Probe points – command to make a straight line run along a detected edge. Note: It should be remembered to clear the point list prior the edge detection using the reset-option of the Point list -command. If the point list is not cleared, the points written by previous commands cause the line to be drawn incorrectly. The straight line is calculated using the least square method. Dispersion filter Filters out all the points outside the given pixel value. And then recalculates a line of best fit with the remaining points 2 points Registers read: Point register indexes X and Y A straight line is drawn through two points which can be selected from the straight line register or from the pick-up list. In addition to straight line register, the two points are also written in the point register. Registers written: Straight line register index 0 and Point register indexes 0 and 1 Eyesight Vision-System EN - 068-14530 – 21.10.2013-01 Page 131 Eyesight User Manual Perpendicular line Registers read: Straight line register index X and Point register index Y This option draws a line through a point perpendicular (90°) to a selected straight line. The point and the straight line can be read from the register or selected from a pickup-list. Registers written: Straight line register index 0 Parallel straight line Registers read: Straight line register index X and Point register index Y This option draws a line through a point parallel to a selected straight line. The point and the straight line can be read from the register or selected from a pickup-list. Registers written: Straight line register index 0 Eyesight Vision-System EN - 068-14530 – 21.10.2013-01 Page 132 Eyesight User Manual Straight line distance Distance between points and a straight line. Uses a teach-in probe to detect an edge and then measure the distance between detected points and a pre-defined straight line. The command output can be selected to be the average, the minimum or the maximum distance of the detected points. Registers read: Straight line register index X and Point list A straight line is read from the register and all points from the point list. The resulting distance is written on the value register 0. Registers written: Value register index 0 Eyesight Vision-System EN - 068-14530 – 21.10.2013-01 Page 133 Eyesight User Manual Distance type Average value Measures the average distance between the detected points and a straight line. Minimum Measures the distance from the straight line to the nearest detected point. Maximum Measures the distance from the straight line to the furthermost detected point. Reference straight line The line can be selected from register or from pick-up list. Probe Teach-in position and dynamic position Opens the dialog window for teaching-in the probe. If the dynamic position option is activated the direction, length and width are set by using values from the register. For more information on this dialog element, see the chapter Probe position teach-in. Teach-in parameter Parameters for object colour, size and threshold of the probe. For more information on this dialog element, see the chapter Probe parameters teach-in. Probe: dispersion filter Filters out all the points outside the given pixel value. Histogram Displays the relative amount of pixels of a certain grey value inside the probe area. The height of the yellow bars are relative to the amount of pixels in that particular grey hue. For more information on this dialog element, see the chapter Histogram.. Tolerance The inspection result for this command is OK when the command is executed successfully and the result within the given tolerances, otherwise NOK. For instructions on global tolerances, dynamic evaluation and how to set the tolerance limits see the chapter Tolerance. Eyesight Vision-System EN - 068-14530 – 21.10.2013-01 Page 134 Eyesight User Manual T Text This command writes a text line, which will be displayed on the inspection image. The text can be typed in as static content, it can be dynamic content from the register (value, point etc.) or the global text string. Text only Typed-in static text. Value The command will display a value from a chosen value register index. Registers read: Value register index X Point Registers read: Point register index X Straight line Registers read: Straight line register index X Circle Registers read: Point register index X and Value register index X The command will display the coordinates of a chosen point register index. The command will display the straight line equation (X,Y,DX,DY) of a chosen straight line register index. The command will display the centre of a circle and its radius as coordinates of a point and a value chosen from the point and value registers accordingly. Eyesight Vision-System EN - 068-14530 – 21.10.2013-01 Page 135 Eyesight User Manual Text string The command will display the contents of the global text string. Write into status line Displays the text also in the bottom left corner of the Eyesight software. Text The static text part that will be displayed together with the dynamic content. Colour Standard - Purple text. Good - Green text. Warning - Yellow text. Bad - Red text. Acc. to result - Display the text colour according to all the previous inspection results. Green, when all results until this command have been OK. Red, if any result has been NOK. Yellow, if any result has been WARNING. Acc. to command - Display the text colour according to a selected inspection results. Green, when the result was OK. Red, when the result was NOK. Yellow, when the result was WARNING. Acc. to command: Command - The position of the command whose inspection result is wanted can be given as a value representing lines backwards on the Program editor. Acc. to command: Pick-up list - The command whose inspection result is wanted can selected from a pick-up list. Position The position for the beginning of the text. Can be given either as coordinates or by teach-in. Use position adjustment Takes the dynamically moving coordinate system into account and behaves accordingly. Font size The font size in pixels. Write text into overlay The text will be written on a separate layer and not on the image. Write text into image The text will be written directly on the image. White - Text colour white. Black - Text colour white. Inverted - Inverts the colour relative to the previous colour. Grey value - The grey hue can be given as a value from 0 to 255. Order Text, value - Display the static text before the dynamic content. Value, text -Display the dynamic content. before the static text Eyesight Vision-System EN - 068-14530 – 21.10.2013-01 Page 136 Eyesight User Manual Text string Resets, fills and sends the global text string through LAN and the serial interface. Can also be used for writing the global text string to a file. Reset Before the global text string can be used it has to be reset using this option. All characters in the string are deleted after this command. Enter Entering text (characters, values, point coordinates) to the global text string is always added to the end of the string. The string grows until it will be reset. Text Adds the given text at the end of the global string. Date / Time Adds the current date and time (format: YYMMDD_HHMMSS) at the end of the global string. Value Adds a value chosen from the register at the end of the global string. Registers read: Value register index X Integer The values are rounded up or down. E.g. 123.243 become 123. Floating Point Precision The decimal places can be set. Eyesight Vision-System EN - 068-14530 – 21.10.2013-01 Page 137 Eyesight User Manual Registers read: Point register index X Point Adds the coordinates of a point chosen from the register at the end of the global string. Point: Floating point precision / use own format Sets the decimal precision of the coordinates. Separator The character that separates the different global string elements. E.g. A comma is selected as the separator between text, date and value. Resulting text string: “Hello,080201_092122,246”. Separator also at start Adds the separator also at the beginning of the string. Resulting text string: “,Hello,080201_092122,246”. Send After the global text string has been filled with selected content, it can be sent through LAN or serial interface or be written in a file. In file Click on the folder icon opens a dialog which allows the selection of the name and the path of the file. It is recommended to save the file within the suggested path to enable the synchronisation-mechanism. String in quotes -Encloses the string with quotes COM-connection Sends the string through the serial interface. Use COM 1 in combination with a smart camera. Alternatively, the command RS232 can be used for sending data over the serial interface. Network (UDP) Sends the string through the LAN using the UDP-protocol. Therefore, the IP-address and the port of the receiver has to be specified. The data format can be switched between ASCII and Hexadecimal (HEX). The program „UDPTestServer.exe“ can be used for test purposes. It can be started using the windows start menu (submenu tools). In this case, the default port 4556 is used. Alternatively it can be started using the command line (subfolder Bin). Additional parameters can be specified here (see UDPTestServer.txt for more information). The send- and the receive- port have to be the same. The installed UDPTestServer is compiled for Windows. UDPTestServer.zip includes the source code in C++ and can be compiled on other operating systems Network (TCP) During communication, the camera can be the client or the server. Selection Server: The camera is the server. Only the port has to be specified. Selection Client: The IP address and the port of the server has to be specified. Timeout: Dependent on the timeout the command waits at this point. Close after communication: The communication can be permanent open or be closed after each run. Data format: ASCII or Hexadecimal (HEX) can be selected. Eyesight Vision-System EN - 068-14530 – 21.10.2013-01 Page 138 Eyesight User Manual Receive The program waits for a string via UDP or TCP. Network (UDP) Specify the IP address of the sender. The default port for UDP is 7777. Timeout: Dependent on the timeout the command waits at this point. Data format: ASCII or Hexadecimal (HEX) can be selected. Network (TCP) During communication, the camera can be the client or the server. Selection Server: The camera is the server. Only the port has to be specified. Selection Client: The IP address and the port of the server has to be specified. Timeout: Dependent on the timeout the command waits at this point. Close after communication: The communication can be permanent open or be closed after each run. Data format: ASCII or Hexadecimal (HEX) can be selected. Parse string The received string will be fragmented as specified in the Format-field. Format This field contains a great many of tokens, which determine the compound of the text string, e.g. “constant[CAPT] string value[3]” in the Format-field means that the text string is only excepted when it consists of three substrings, which are separated by separators. The first substring should then be “CAPT”, the second a user-defined character string and the third three-digit number. Separator A character or a character string, which is used to separate the substrings in the text string. Tip: separators inside substrings are not allowed. Remove separator at begin and end This option determines if the separators at the beginning and at the end should be eliminated prior to the separation. Output-Option As Output there are register, pickup-list, or a combination of both available. Eyesight Vision-System EN - 068-14530 – 21.10.2013-01 Page 139 Eyesight User Manual Text terminal Selected from: Main menu > View > Text terminal Displays the command execution results in text mode. Clear screen [The “X” symbol] Resets the terminal. Print [The printer symbol] Prints the contents of the terminal. Tolerance The tolerance may be specified in Eyesight as a maximum deviation from a nominal value. Tolerance value can be set individually for each command or globally. Nominal value The value from which the upper (+) and lower (-) tolerance limits are calculated. Example: Nominal value= 30 (+)= 0,5 (-)= 0,5 Therefore the range within the tolerance is 29,5 to 30,5 If the measured value is inside these limits, an OK inspection result is returned, otherwise NOK. By default the nominal value is set to zero. Eyesight Vision-System EN - 068-14530 – 21.10.2013-01 Page 140 Eyesight User Manual A result from a measurement can be picked by right-clicking on the program editor column “B” on the corresponding command and choosing “Use last result”. Warning limit Sets the limits for a warning command result. When this limit is exceeded, the dot in the program editor column “E” turns yellow. Global tolerances When activated, the tolerance limits are set globally. These values can be set in: Main menu > View > Global tolerances Eyesight Vision-System EN - 068-14530 – 21.10.2013-01 Page 141