1
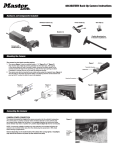
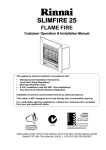
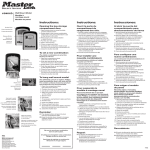
DigitalEye™ 7.2 RF White Flash & IR Camera Instruction Manual Copyright PixController, Inc., All rights reserved. http://www.pixcontroller.com Email: [email protected] Phone: (724) 733-0970 Fax: (724_ 733-0860 Getting Started Thank you for your purchase of the PixController, Inc. DigitalEye™ 7.2 Wireless RF camera system. This high-resolution digital game camera operates 24 hours a day, seven days a week, continually scouting game even when you’re not in the field. The advantage of the Wireless RF camera system is you can hide the camera system for example in an elevated position to prevent detection. The wireless PIR motion sensors will send a wireless command which will trigger the camera unit. You can use multiple wireless PIR motion sensor to trigger the camera unit, or you can use one/multiple wireless PIR motion sensors to trigger multiple camera units. Before using your camera charge up the Sony Li Ion battery and place it into the Sony 7.2 MegaPixel digital camera. THE POWER SWITCH USES 4 AA BATTERY THAT COMES ALREADY INSTALLED. This battery will only need replaced every 3 months. To stay on top of our product developments please visit: http://www.pixcontroller.com Packing List - DigitalEye™ 7.2 unit includes the following items: • • • • • • • • DigitalEye™ 7.2 RF Camera Unit in rugged waterproof camo enclosure Wireless PIR motion sensor Sony 7.2 Mega Pixel Digital Camera (installed in DigitalEye™ 7.2 unit) Li Ion Battery & Charger Sony Digital Camera USB & Video Cables Digital Camera accessories Complete instruction manual Visual Media Explorer PC Photo Browser Software Quick Start Tips 1. Please read the DigitalEye™ trail camera manual which is located on the enclosed CD. Simply install the CD into your computer and click on the DigitalEye™ manual link. The manual is in PDF format, but you may wish to print a hardcopy to your PC’s printer. Your DigitalEye™ trail camera is very simple to use. 2. You will need to charge the Sony Li Ion digital camera battery (battery/charger included) before you use the DigitalEye™. Once charged place it into the bottom of the Sony digital camera. 3. Please read through the DigitalEye™ Instruction manual before using your DigitalEye™. Key points to follow: Let the systems warm up for 1.5 minutes before trying to activate a photo. Do not turn the Sony digital camera on when turning on the DigitalEye™. If you remove the Sony digital camera from the DigitalEye™ do not twist the cable – pull the cable straight down. Be sure to place the Sony digital camera in Program Mode by turning the dial to “P”. Follow the camera setting at the end of the manual to ensure quickest trigger speeds. 4. We also recommend purchasing the Sony Memory Stick DUO cards from your local electronic/computer store. This is the type of media card the Sony digital camera can store photos to. 5. You can use either standard bungee chords or the MasterLock® Python™ cable for locking your DigitalEye™ to a tree or other secure object. We highly recommend locking your camera securely to deter theft. If you choose to install the Visual Media Explorer software photo browser found on your DigitalEye™ CD, the serial number for Visual Media Explorer is: KkQqMOAB03. DigitalEye™ 7.2 Overview Listed below are the components of your DigitalEye™ 7.2 unit. These items will be referred to throughout this manual. Please become familiar with these items. DigitalEye™ 7.2 RF Exterior DigitalEye™ 7.2 RF Interior Powering up the DigitalEye 7.2 Wireless RF Unit To power up the system turn the Power on/off switch to the "on" position. You will hear a short melody from the PixController RF board letting you know it's powered on. Next there will be a 30 second delay. After this time expires you will hear 4 quick beeps which let you know the system is going into a 1 minute auto walk test phase. If you walk past the Wireless PIR motion sensors at this point you will hear 1 beep for a "A" Sensor or trigger sensor, and 2 beeps for a "B" sensor or power up sensor. You may want to keep the case open so you can hear this from a distance. After this 1 minute walk test phase expires you will hear 4 quick beeps again letting you know the system is going "active". After this point the system is ready to take photos. Setting the DIP switch on the PixController DigitalEye 7.2 Wireless RF Unit Introduction The 8-Position DIP switch on the PixController RF board is used to setup how the board controls the attached cameras, functions in day only, night only, 24 hour mode, and many more features. Listed below are instructions on how to setup the DIP switch feature on the RF board. 8-Position DIP Switch Note: When changing switch setting you must re-boot your PixController board. When rebooting you must wait approximately 30 seconds before turning power on again. Setting the Address Code Switches 1, 2, and 3 controls the address code of the DigitalEye™ RF controller box. Both the SlimFire Remote Control or Wireless PIR Sensor, and DigitalEye™ RF controller box need to be set to the same address code in order for the unit to function properly. There are 8 unique address codes you can set the DigitalEye™ RF to respond to. The DigitalEye™ RF is compatible with the SlimFire remote and PIR wireless motion sensors. The address code here is the “house code” from A-P, however, the DigitalEye™ RF only will recognize “house codes” A-H. For more information about setting the house code on your SlimFire remote or Wireless PIR Motion Sensor. Out of the box both the SlimFire remote and Wireless PIR sensor will be defaulted to the “A” Address Code. Why set different address codes? There may be a situation when you want to have several DigitalEye™ RF units in a recording session. You may want to only have several DigitalEye™ RF units respond to SlimFire or Wireless PIR motion sensors. For this you have the ability to set the address between each of these devices. It is a good idea to use a marking pen and write the address code on your SlimFire remote or Wireless PIR motion sensor if not set in the default “A” address code. . Sensor Address A B C D E F G H Switch 1 Switch 2 Switch 3 Down/Off Down/Off Down/Off Down/Off Up/On Up/On Up/On Up/On Down/Off Down/Off Up/On Up/On Down/Off Down/Off Up/On Up/On Down/Off Up/On Down/Off Up/On Down/Off Up/On Down/Off Up/On PIR Delay Setting Switches 4, 5, and 6 control the delay between PIR events. This setting is used so you can limit or not limit the number of photos taken when a motion event. PIR Delay Digital Units Trail Mode 10 Seconds 30 Seconds 1 Minute 5 Minutes 10 Minutes 15 Minutes 20 Minutes Switch 1 Switch 2 Switch 3 Down/Off Down/Off Down/Off Down/Off Up/On Up/On Up/On Up/On Down/Off Down/Off Up/On Up/On Down/Off Down/Off Up/On Up/On Down/Off Up/On Down/Off Up/On Down/Off Up/On Down/Off Up/On Picture Mode Setting Switch 7 controls the operation of the attached camera. Here you can either setup your camera in digital still mode, or movie/double photo mode. If you want to take digital movies with your digital camera you must have your digital camera setup in movie mode. Picture Mode Still Photo Movie or Double Photo Switch 7 Down/Off Up/On Camera Mode Setting Switch 8 setup in "Movie Mode" then this switch setting is for 15 or 30 second movie clip, or the time delay between double photo mode. If you want to take digital movies with your digital camera you must have your digital camera setup in movie mode. Camera Mode 15 second digital movie clip 30 second digital movie clip Switch 8 Down/Off Up/On Introduction to the Wireless PIR Motion Sensor The PixController DigitalEye RF (Radio Frequency) is a wireless camera controller which works in conjunction with the wireless PIR motion sensor. The PixController RF boards "listens" for wireless commands sent from the wireless PIR motion sensor when the motion sensor is tripped. When the RF board receives a trigger event it will trigger the attached camera or camcorder to take a photo or record video. There are 2 AAA batteries that power the motion sensor which will last for a year of continuous use. To replace them just remove the battery door. Never touch the PIR lens as this could damage the PIR sensor Setting Wireless PIR Motion Sensor Addresses Each wireless PIR sensor can be setup to send out a unique address. Wireless PIR sensors are assigned an 'address', which consists of addresses between “A” to “P. To change the Address that the Wireless PIR transmits: First, remote the 4 screws from the back of the case and take off the cover as shown. Press and hold the Address button (under the battery compartment lid) the red LED flashes first and then blinks the current setting (once for A, twice for B, etc.). Release and immediately press the button the desired number of times for the House Code you want to set (once for A, twice for B, etc.) and hold the button on the last press. 3 seconds after the last press (while holding the button) the red LED blinks back the number of times for the code you set. Release the button. Mounting the Wireless PIR Motion Sensor To mount the Wireless PIR motion sensor first remove the battery door and remove the AAA batteries. You will see 2 screw holes in which you can mount a small mounting plate or screw it to the surface of the mounting area. Try to keep the sensors at 2’ to 3’ from the ground if you want to get the best detection of targets on the ground. The range of the PIR detection is 40’ to 80’ depending on air temperature and temperature of the target. The hotter the target the longer detection range you will have. For example a car can be seen at a greater distance. The RF wireless range back to the DigitalEye unit is about 100’ to 150’ depending on line of sight. Putting the DigitalEye™ 7.2 Out in the Field Before using your camera charge up the Sony Li Ion battery and place it into the Sony 7.2 MegaPixel digital camera. Be sure you do not turn on the Sony digital camera. If you do the trail camera will not function. You must also wait the full 1.5 minute warm up period before your DigitalEye is ready to take photos. Setting up the DigitalEye™ 7.2 1. Turn the unit power switch on. 2. Make sure the Digital Camera is turned off 3. You must wait 1.5 minutes before your DigitalEye™ 7.2 can start taking photos 4. Close the lid Locking your DigitalEye™ 7.2 Unit The DigitalEye™ 7.2 was designed such that it could be easily locked to any tree in the woods. To protect your investment we recommend using the Master Lock Python Cable locking system. To lock your DigitalEye™ 7.2 unit, follow the 5-Step process below. Step 1 Run the Master Lock Python Cable system through the DigitalEye™ 7.2 Eye-Bolts as shown. Step 2 Hold your DigitalEye™ 7.2 unit to the tree using your hip to hold it in place, and run the cable around the tree as shown. Step 3 Next insert the cable into the locking head and pull tight. Use the weight of your body to press the cable flat against the DigitalEye™ 7.2 unit. Step 4 Lock the Master Lock Python Cable to the tree and remove the key. Step 5 Your DigitalEye™ 7.2 camera system is now firmly locked to the tree and ready to take photos. Checking your DigitalEye™ 7.2 Unit When checking your DigitalEye™ 7.2 unit it’s a good idea to carry a spare set of AA camera batteries and a spare memory card for the digital camera. Approach the DigitalEye™ 7.2 unit from the rear unless you want your photo taken. Note: when you open the DigitalEye™ 7.2 lid a photo could be taken at this time before the unit power switch is turned off. The unit power switch was placed inside the DigitalEye™ 7.2 unit to prevent tampering with the unit. Unlock the DigitalEye™ 7.2 unit (if locked) and open the lid. Next, power down the DigitalEye™ 7.2 unit by turning the main power switch to the “off” position. Removing the Digital Camera Unplug the camera cable. Note: be sure the camera is turned off and the unit power switch is turned off before unplugging the camera cable. Note: Pull straight down, do not twist cable. Note: Pull straight down, do not twist cable. Checking photos in the field You can now remove the digital camera from the DigitalEye™ 7.2 unit. You can review any photos taken by the DigitalEye™ 7.2 on the digital camera’s TFT color display. Refer to your digital camera user manual for information on reviewing photos. DigitalEye™ Outdoor Use Setup Tips 1. When setting up your DigitalEye™, remove any twigs, brush, or tall grass within approx. 10-15 feet in front of your camera. These items may interfere with the PIR sensor and the camera’s ability to detect animals. Doing this will also produce better photos since your subjects will not be blocked from the camera. If using the white flash, the light will reflect off of anything that is directly in front of the camera like a leaf or twig resulting in washed out photos. 2. Never place your DigitalEye™ trail camera pointing towards the sun rising or setting (east or west). The sun can cause the PIR on the DigitalEye™ to take false photos. Pointing your system facing north is the ideal setup. 3. Never attach your DigitalEye™ to a tree that can move in the wind, this can set off the camera system. Attach your DigitalEye™ to a firm tree or pole for best results. If you don't have access to large tree in the area you can mount your unit to a metal or wooden stake. Mount the unit 2 1/2 to 3 feet off of the ground for best results. 4. The PIR sensor detects the difference between the air temperature and the animal’s body heat temperature. In colder temperatures the detection distance is much greater. However, in air temperatures above 85 deg. F the detection distance can be cut by more than 20 feet. Air temperatures below approx. 70 deg. F, your PIR detection range should be about 80 feet. During the summer months it is best to place your DigitalEye™ in shaded areas. 5. Using deer scents in front of your camera system can improve your chances of capturing photos and it will keep the animal in the area longer. Making mock scrapes in Autumn is an excellent way to bring many doe and buck in for a closer look. Putting deer scent in the trail to get the deer to stop and investigate works well with trial camera systems. If you want better photos of the racks on bucks, put the scent up on a limb to get the buck to show off his rack better. If you're after varmints like bobcats or foxes, tie a feather onto a limb with some string so it will flutter in the breeze. 6. If you want to capture photos of predator animals such as coyotes, foxes, or bobcats the use of predator urine, baits, and feathers works well. 7. If you plan to place your setup in front of a feeder, try to not place it directly in front of the feeder. Place your DigitalEye™ unit on the trails leading up to the feeder. The constant flash going off at night can disturb animals feeding. Also, you will have a more natural looking photo since you won't have the feeder in the background of all of your photos. 8. When checking your camera system, it is always smart to bring along a spare media card and batteries. This allows you to swap media cards and batteries (if needed), and keep your camera system out in the woods longer. 9. It is recommended that you use a Master Lock Python Cable (available at www.pixcontroller.com) to lock your DigitalEye™. It’s always better to be safe than sorry and protect your investment! Visual Media Explorer™ Photo Browsing Software Included on the DigitalEye™ 7.2 Installation CD is a copy of the powerful photo browsing software – Visual Media Explorer™. This software runs on any Win 95, 98, 2000, NT, and XP operating system. Visual Media Explorer™ will let you view your photos in an easy to use browser. Here you can edit your photos, add time/date stamps, email photos to your family and friends, and much more! Your DigitalEye™ 7.2 Installation CD includes an online manual and animated tutorials for Visual Media Explorer™. Visual Media Explorer™ Using a GPS with your DigitalEye™ 7.2 We recommend that you use a GPS unit to mark the location of your DigitalEye™ 7.2 unit. In the summer months especially you can easily lose your unit in the woods. Secondly, if you do use a GPS unit along with your DigitalEye™ 7.2 you can embed the GPS position into the photos taken by the unit with your copy of Visual Media Explorer™. With the Visual Media Explorer™ upgrade you can stamp the GPS position on to your photos along with the time/date, and phase of the moon. You can even download aerial photos and topo maps from Microsoft’s Terraserver. For Visual Media Explorer™ upgrades please visit: http://www.VisualMediaSoftware.com Stamp you photos with GPS, Date/Time and Moon Phase information! Save your DigitalEye™ 7.2 GPS Position. Get Aerial photos and Topo maps of your DigitalEye™ 7.2 GPS position. Using Digital Media Card Readers (not included) A nice addition to add to your DigitalEye™ 7.2 unit is a USB Digital Media card reader. Using a card reader will allow you to keep your DigitalEye™ 7.2 unit in the woods by just swapping media cards when checking the unit. Otherwise you must use the digital camera to transfer the photos to your computer via the included USB cable. Please refer to your digital camera manual for information about transferring your photos to your computer. Digital Camera Settings We suggest the following Sony 7.2 setting for maximum trail camera performance. Start off by putting the Sony 7.2 camera dial to the “P” setting for Program Setting • • • • • Red Eye Reduction: Off AF Illuminator: Off Auto Review: Off Beep: Off Set your Date/Time • • • • Focus: 3m to 7m ISO 1000 (brightest night photos) Picture Quality: Fine AF in Monitor Mode We suggest the additional setting for IR Cameras: • Color Mode: B&W • Focus: 3.0m or 1.0m depending on setup • Flash Level: + • Contrast: + • Sharpness: + Unit Specifications Size: 3-15/16 wide X 6-9/16” tall X 1-3/4” deep Camera: 7.2 Mega Pixel Sony Digital Camera Media Type: Sony Memory Stick PRO Duo Flash Range: 30-40 Feet PIR Detection Range: 40-80 Feet depending in air temperature Photo delay: ~1.8 seconds Photos per charge: ~300 (1/2 taken with flash) DigitalEye™ 7.2 Batteries: 4 AA alkaline battery (lasting about 4-8 months) & Li Ion batteries in the Sony 7.2 camera lasting 300+ photos Temperature range: 5ºF to 110ºF Copyright PixController, Inc., All rights reserved. http://www.pixcontroller.com [email protected] 724-733-0970