1
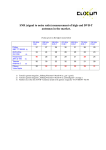
SAFETY INFORMATION
1.
2.
3.
4.
5.
6.
7.
Read these instructions.
Keep these instructions.
Heed all warnings.
Follow all instructions.
Do not use this item near water.
Clean only with dry cloth.
Do not block any of the ventilation openings. Install in accordance with the
manufacture’s instructions.
8. Do use near any heat sources such as radiators, heat registers, stoves or other items
(including amplifiers) that produce heat.
9. Protect the USB lead from being walked on or pinched particularly the at plug,
convenience receptacles, and point where they exit from the item.
10. Only use attachments/accessories specified by the manufacturer.
11. Use only with a cart, stand, tripod, bracket or table specified by the manufacturer, or sold
with the item. When a cart is used, use caution when moving the cart/item combination to
avoid injury.
12. Unplug this item during lighting storms or when unused for long periods of time.
13. Refer all servicing to qualified service personnel. Serving is required when the item has
been damaged in any way such as liquid has been spilled or objects have fallen into the
item, the item has been exposed to rain or moisture, does not operate normally, or has
been dropped (note: accidental or cosmetic damage is not covered by the items 12
month warranty)
14. Please keep the unit in a safe environment.
15. Do not store anything on top of the item.
The exclamation point within the equilateral triangle is intended to alert the user
to the presence of important operation and maintenance (servicing)
instructions in the literature accompanying this appliance.
1
INTRODUCTION
The DJBOX is an amazing 2 channel mixer which doubles up as a sound card for a computer or
laptop. Simple plug and play via the USB makes setting up extremely easy. The USB acts as both
an input and output, with two RCA inputs on each channel. This mixer can play from a variety of
music sources such as CD players, MP3 players etc. The 6.3mm microphone jack input has its own
channel with a volume control slider. With the USB OUT you can record your mix or create your very
own podcast. You can also use the DJBOX as a standard DJ mixer without the need of a computer,
adding a USB to DC power adapter 5V 500 mA (not included). Small in size, easy to transport and
easy to use.
LEGAL NOTICE
All information contained in this manual, including products and product specifications, represents
information on the product at the time of publication and is subject to change without notice.
Windows is a registered trademark of Microsoft Corporation in the United States and other countries
Mac and Mac OS are trademarks of Apple Inc., registered in the U.S. and other countries.
MAIN FEATURES
h
h
h
h
h
h
h
h
Ideal for Laptop Dj’s
4 x RCA inputs
1 x USB in/out
6.3mm jack microphone input with separate slider for volume
Master volume and channel volume sliders
2 x RCA output (master/record)
We recommend Audacity for use when recording with this product
Compatible with Windows: 2000/XP/Vista/7 and Mac OS X
ACCESSORIES
h1 x DJBOX unit
h1 x USB 2.0 Cable
h1 x User manual
2
PANEL SPECIFICATION
1
2
3
5
4
1. USB port
For Recording and Playback, it is also
could used for connecting the device to a
computer as an input to transfer audio
date from the computer to the mixer.
When connecting the mixer to a computer,
power is supplied via the USB port. When
operating the mixer without a computer, a
5V/500mA power adaptor supply with
USB Port is required as a standard Midi
DJ Mixer, so the USB Cable included in
the Delivery.
2. LINE outputs
On the left “REC” LINE output you can
connect a recording device such as a
cassette deck.
On the right “AMP” LINE output you can
connect an amplifer. The red cinch socket
is on the right; the white cinch socket is
the output on the left.
3. LINE/PHONO inputs
One each of these stereo cinch inputs can
be connected to CD players, MP3 players,
turntables with MM pick-up system or
other playback device with cinch level.
The red cinch socket is on the right; the
white cinch socket is on the left. The
LINE1 input is connected to channel CH1;
6
7
8
LINE2 input is connected to channel Ch2.
4. GND Screw
Connect the cord for the analog player's
ground. This terminal is exclusively for an
analog player and is not a safety earth.
5. Microphone socket
A microphone can be plugged into this 6.3 mm
jack.
6. Headphone volume control
This control is used to set the volume of the
connected headphones. To control volume
output of the monitor jack.
7. Headphone jack 1
A set of stereo headphones can be plugged
into this 3.5 mm jack.
8. Headphone jack 2
A set of stereo headphones can be plugged
into this 6.3 mm jack. Only use headphones
with a minimum impedance of 32 Ohm. The
signal for the headphones is independent of
the output signal for the connected amplifers.
During playback through channel 1 using the
amplifer, you can listen with headphones to
the signal from channel 2 simultaneously and
vice versa, for example.
3
PANEL SPECIFICATION
9
10
11
12
15
13
16
17
14
19
18
9.CH A Input selector
Use this selector switch to select the
audio input source for the respective
channel. Push the lever to the left in order
to select LINE. Push the lever to the right
in order to select a turntable or other
device connected to the PHONO input.
14.Channel B Fader Volume
Adjusts the volume for CH-B.
15.Channel A Fader Volume
Adjusts the volume for CH-A.
10.USB/LINE input select switch
Input select switch set this switch to
activate the USB data connector from you
computer or you line input
11.CH B Input selector
Use this selector switch to select the
audio input source for the respective
channel. Push the lever to the left in order
to select LINE. Push the lever to the right
in order to select a turntable or other
device connected to the PHONO input.
17.Master Level (Master Level Meter)
Displays the output level following master
volume adjustment held for 2 seconds.
Display range: -3dB to +3dB.
12.Power LED
Indicates That The Unit Is In "ON" Position
13.Master Fader Volume
Adjusts the master output sound level.
16.MIC Fader Volume
Adjusts the mic output sound level.
18. Cross fader control
This slider is used to cross-fade between the
channels CH1 and CH2, i.e. one channel is
faded out (becomes quieter) while the other
channel is faded in (becomes louder).
When the cross fader is in the middle position,
the channels CH1 and CH2 are played at the
same volume.
19. CUE for CH A / CH B
Selects which source will be live to that
channel for CH A and CH B.
4
LAPTOP or PC INSTALLATION ( Microsoft Windows operating system )
DJBOX is a Plug&Play USB device and the installation process on Windows operating system is
fully automatic. There is no need of any driver or third party software in order to have the unit
working on your laptop or PC.
DJBOX works with the following versions of Microsoft Windows operating systems :
Microsoft Windows XP
Microsoft Windows Vista
Microsoft Windows 7 32 bit
Microsoft Windows 7 64 bit
In order to have the unit ready to play your music follow these simple steps :
1. Plug the supplied USB cable in a free USB 2.0 port of your PC or laptop ( figure A )
fgure A
2. Wait for the operating system to check the new device and install the driver. This may require
from a few seconds to minutes depending on your laptop. No user intervention is required.
The figures ( B,C ) show this process on a laptop equipped with Microsoft Windows 7 64 bit ( IT
language version ). The installation process is similar in other Windows versions.
5
LAPTOP or PC INSTALLATION ( Microsoft Windows operating system )
3. Once the driver is correctly loaded , a tooltip window will appear on the right lower corner
of the desktop confirming the successful install of the software driver . At this point the installation
process ends and you are ready to use the DJBOX. The device is listed as USB Ear Headphone by
the operating system. You can check now the device to appear among the Audio device ( figure E ).
Adjust volumes for recording and playback if necessary. If you run additional others audio devices
on the same machine, please be sure that the DJBOX is selected. ( figure F )
fgure B
fgure C
6
LAPTOP or PC INSTALLATION ( Microsoft Windows operating system )
fgure E
fgure F
Troubleshooting
In case your DJBOX is not working after the installation process, check the following settings:
- the DJBOX is listed as USB Ear Headphone under Device Manager
- USB Ear Headphone is correctly selected in the tabs of Sound window ( under control panel )
- volumes are set to appropriate levels
- audio cables are correctly plugged on the DJBOX and on your loudspeakers
If the device is still non working after checking the above settings, you can try to install on a different
PC or laptop ( if you own more than one ) in order to assure that the problem is not related with the
DJBOX.
If even the test on another machine fails, please contact your dealer or SOUNDSATION tech
support ( see WARRANTY AND SERVICE page of this manual ).
7
MAC INSTALLATION ( MAC OS X operating system )
DJBOX is a Plug&Play USB device and the installation process on MAC OS X operating system
family is fully automatic. There is no need of any driver or third party software in order to have the
unit working on your Mac.
DJBOX works with the following versions of MAC OS X operating systems:
Apple Mac OS X Tiger v10.4 or higher
In order to have the unit ready to play your music follow this simple action:
- plug the supplied USB cable in a free USB 2.0 port of your iMac, Macbook or other Apple computer
The operating system will immediately locate the device and load the appropriate driver. No user
intervention is required.
You are now ready to use the DJBOX.
In order to check the successful installation of the device, proceed in this way:
1. click on the Apple icon on the top left corner of your desktop. ( figure A )
2. on the menu , select and click System preferences.
fgure A
8
MAC INSTALLATION ( MAC OS X operating system )
3. on System preferences window click on Audio icon ( fgure B )
Figure B
Figure C
The device is listed as USB Ear Headphone by the operating system. You can check now the device
to appear among the audio device ( figures C and D) in both Sound input and output tabs. Adjust
volumes for recording and playback if necessary. If you run more others audio devices on the same
machine , please be sure that the DJBOX is selected .
9
MAC INSTALLATION ( MAC OS X operating system )
fgure D
Troubleshooting
In case your DJBOX is not working after the installation process, check the following settings:
- the DJBOX is listed as USB Ear Headphone under System preferences --> Sound
- USB Ear Headphone is correctly selected in System preferences --> Sound (output and input tabs)
- volumes are set to appropriate levels
- audio cables are correctly plugged on the DJBOX and on your loudspeakers
If the device is still non working after checking the above settings, you can try to install in a different
machine ( if you own more than one ) in order to assure that the problem is not related with the
DJBOX.
If even the test on another machine fails, please contact your dealer or SOUNDSATION tech
support ( see WARRANTY AND SERVICE page on this manual ).
10
SPECIFICATION
Headphone Impedance
Frequency Response:
Distortion :
S/N Ration:
Channel Separation:
Phono Sensitivity:
Line Sensitivity:
MIC Sensitivity:
Line Output:
REC Output:
Power Supply:
Dimensions:
Weight:
32 Ohm
20Hz-20kHz
< 0.1 %
> 80 dB
55dB(1kHz)
20mV, 60kOhm
1V, 20kOhm
20mV 1kOhm
2.0V, 470 Ohm
2.0V, 470 Ohm
DC -5V 500 mVA
150(W) x 140(D) x 70(H)mm
0.7Kg
11
WARRANTY AND SERVICE
All SOUNDSATION products feature a limited two-year warranty. This two-year warranty
is specific to the date of purchase as shown on your purchase receipt.
The following cases/components are not covered from the above warranty :
- Any accessories supplied with the product
- Improper use
- Fault due to wear and tear
- Any modification of the product effected by the user or a third party
SOUNDSATION shall satisfy the warranty obligations by remedying any material or
manufacturing faults free of charge at SOUNDSATION’s discretion either by repair or by
exchanging individual parts or the entire appliance. Any defective parts removed from a
product during the course of a warranty claim shall become the property of
SOUNDSATION.
While under warranty period, defective products may be returned to your local
SOUNDSATION dealer together with original proof of purchase. To avoid any damages
in transit, please use the original packaging if available. Alternatively you can send the
product to SOUNDSATION SERVICE CENTER – Via Enzo Ferrari , 10 – 62017 Porto
Recanati - Italy . In order to send a product to service center you need an RMA number.
Shipping charges have to be covered by the owner of the product.
For further information please visit www.soundsationmusic.com
12
WEEE AND CE DISCLAIMERS
WARNING
PLEASE READ CAREFULLY – EU and EEA (Norway, Iceland and Liechtenstein) only
This symbol indicates that this product is not to be disposed of with your household waste,
according to the WEEE Directive ( 2202/96/EC) and your national law.
This product should be handed over to a designated collection point, e.g., on an authorized one-forone basis when you buy a new similar product or to an authorized collection site for recycling waste
electrical and electronic equipment (WEEE) .
Improper handling of this type of waste could have a possible negative impact on the environment
and human health due to potentially hazardous substances that are generally associated with
WEEE. At the same time , your cooperation in the correct disposal of this product will contribute to
the effective usage of natural resources.
For more information about where you can drop off your waste equipment for recycling , please
contact your local city office , waste authority , approved WEEE scheme or your household waste
disposal service.
This product is imported in EU by
FRENEXPORT SPA – Via Enzo Ferrari, 10 - 62017 Porto Recanati - Italy
SOUNDSATION is a registered trademark of
FRENEXPORT SPA – Via Enzo Ferrari, 10 - 62017 Porto Recanati - Italy
13
www.soundsationmusic.com