1
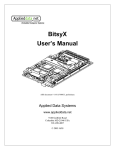
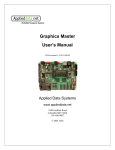
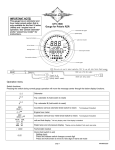
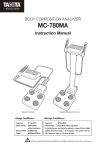
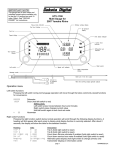
MERCURY 100 User Manual
Disclaimer ............................................................................................................................2
Warning ...............................................................................................................................3
About GPS...........................................................................................................................4
Thank You for Choosing the MERCURY 100.......................................................................5
Conditions for Use: ..............................................................................................................5
1. Introduction............................................................................................................6
1.1
1.2
1.3
1.4
Package Contents:......................................................................................6
Maintenance: ..............................................................................................6
Charging: ....................................................................................................6
Introduction to the Hardware.......................................................................7
2.
1.5
System Requirements.................................................................................7
1.6
Basic Specifications ....................................................................................8
1.7
Installing the device cradle..........................................................................9
USB Driver Installation ........................................................................................13
3.
Bundled Software Installation: .............................................................................15
4.
5.
6.
Bundled Software (MERCURY 100) Introduction: ...............................................16
LCD Icon Guide ...................................................................................................29
Instructions ..........................................................................................................32
6.1
Start ..........................................................................................................32
6.2
6.3
6.4
6.5
6.6
7.
Bike Mode.................................................................................................32
Waypoint Mode .........................................................................................35
Route Mode: .............................................................................................36
Other Functions: .......................................................................................38
Setup Mode: .............................................................................................39
6.6.1 Bike Mode Setup:..............................................................................39
6.6.2 Waypoint Mode Setup:......................................................................40
6.6.3 Route Mode Setup: ...........................................................................41
Troubleshooting...................................................................................................42
Disclaimer
MERCURY 100
User Manual
Version: V1.0
Compass Systems Corp.
E-mail: [email protected]
This user manual is only intended for the personal use of the purchaser. The purchaser
may not copy or otherwise publish any part of this user manual for any purpose, in any form
or through any method, be it electronic or mechanical, photographic records included,
except with the prior consent in writing of Compass Systems.
Compass Systems reserves the right to modify without notice any of the information
contained within this user manual. Compass Systems reserves the right to change, improve
or modify its product or its content at any time without having to notify any person or
organization.
© Copyright 2009, Compass Systems Corp.
All rights reserved.
2
Warning
The correct and safe use of the MERCURY 100 requires the user's familiarity with certain
items of knowledge. Please read through this user manual before operating the device.
The MERCURY 100 is only intended to be an auxiliary device and can't be held legally
liable for any accidents resulting from errors in measurement through the user's incorrect
operation or use of the MERCURY 100.
3
About GPS
GPS (Global Positioning System) is a satellite navigation system developed by the U.S.
Department of Defense. GPS consists of 32 satellites orbiting around 11,000 miles above
the surface of the Earth. These satellites travel at speeds that allow them to orbit the planet
twice a day and emit a low-powered radio signal. These signals are received and recorded
using five ground stations with extremely accurate clocks. By using these extremely
accurate clocks, the ground stations can determine with great precision the position of
every satellite in their orbit. Your GPS receiver is capable of "reading" the signals
transmitted by these satellites. By knowing the position and distance of al least 4 satellites,
it's possible to accurately calculate the receiver's current latitude, longitude and elevation.
WAAS enhances the accuracy of your GPS. WAAS stands for Wide Area Augmentation
System and was developed by the Federal Aviation Administration to augment the
accuracy of GPS for aviation use. It consists of additional ground stations that are placed at
specific locations where the exact coordinates are known. When used with a master station,
the accuracy of satellite positioning signals can be improved to almost three meters.
The MERCURY 100 must scan and detect signals from at least 3 such satellites in order to
calculate your current location and movement. The MERCURY 100 is designed for
recreational use only. Please do not use this product for industrial or professional
surveying.
4
Thank You for Choosing the MERCURY 100
The lightness, compactness and user-friendly interface make the Mercury 100 an excellent
auxiliary navigation aid when cycling. It can not only give you a better understanding of your
cycling activities but also effectively manage cycling routes.
The MERCURY 100 provides only the information you need and nothing else. It is suitable
for use by all cyclists and is designed to be the easiest to use cycling GPS in the world. Its
satellite receiver works all around the world and will provide you with many years of useful
service. This manual will introduce you to the use and features of the MERCURY 100 so
you can optimize performance and take care of the device as well. To ensure that you
achieve the best performance and service life from the MERCURY 100, please read
carefully through these instructions before use.
Conditions for Use:
The MERCURY 100 is not designed for indoor or underwater use. The device uses GPS
satellites to calculate distances and is designed to serve as an auxiliary navigation aid for
bicycles between the temperatures -10°C to +60°C. Using the MERCURY 100 for cycling
activities therefore allows the device to deliver optimum performance.
If you find that any of the standard accessories listed in this manual are missing or
damaged, please contact your local distributor or retailer.
5
1. Introduction
1.1 Package Contents:
Before using this product, please check that the following items were included within the
package. If there are any missing items, please contact the distributor you purchased this
product from immediately.
1.
2.
3.
4.
5.
MERCURY 100, internal rechargeable lithium battery.
AC charger.
User Manual
USB Cable.
Software CD-ROM
6.
7.
8.
Bicycle Mount.
Protective Cover.
Strap.
1.2 Maintenance:
1.
Do not attempt to disassemble the MERCURY 100.
2.
3.
This device contains no user-repairable parts.
Please store the MERCURY 100 out of direct sunlight or high temperatures.
1.
1.3 Charging:
Connect one end of the USB cable to the rubber covered port on the base and the
other end into the AC charger. Plug the AC charger into a power socket.
2.
The device can be on or off while charging. A battery icon will appear while charging
to show the current progress. The number of blocks will increase over time and when
3.
4.
fully charged, the icon will show three blocks.
It takes 4~5 hours to fully recharge the battery.
A fully charged MERCURY 100 can operate up to 20 hours with normal use and with
the backlight turned off. This, however, is still subject to usage and environmental
5.
conditions.
The battery does not need to be fully discharged before recharging. If there is no
satellite signal, do not leave the the battery to charge overnight.
6.
The best and the fastest way of recharging the device is to turn the power off before
charging.
7. Once the device is fully charged, please put away the USB cable and AC charger, then
close the rubber cover over the port so it is ready for use next time.
8. To be sure the data is secured, please do charge your battery when the battery indicate
in block 1 .
6
1.4 Introduction to the Hardware
Power/Mode
select button
Select/Adjust button
Start/Stop/Mark/Reset
USB Port
1.
Power/Mode select button: Use to turn power on(Hold on 1sec)/off(Hold on 3sec)
and switch between operating modes(Push).
2.
Select/Adjust button: Switch display functions / configure parameters(Push)and setup
mode(Hold on 3sec).
Start/Stop/Mark/Reset button: Turns the recorder(Push)/backlighton/off(Hold on
3sec), marks locations and resets parameter settings(Push).
3.
1.5 System Requirements
Please check that your computer meets the following system requirements before installing
the driver program and software bundled with this product.
1.
2.
Pentium III 8000MHz CPU or above
USB Interface
3.
4.
5.
6.
512MB RAM
CD-ROM drive
Windows Vista(service pack 1)/XP/2000 operating system
Network bandwidth download and upload upward 2M
7
1.6 Basic Specifications
Interface
Graphical Display
WayPoint
4
Route
1
Turn Point
99
Receiver Chip
High sensitivity receiver chip
Positioning Time
Hot Start
< 1 sec
Warm Start
< 38 sec
Cold Start
< 42 sec
Data Refresh Rate
Once every second
Positioning Accuracy
Single unit positioning
with no SA interference
<10M
Antenna
Internal
Power Supply
Battery Type
Rechargeable Lithium Battery (820mAh)
Endurance
20 hours under normal use with backlight off
Interface
USB Interface (can
connect to PC)
Yes
Size
91.1(L)x 46.1(W) x 23.9(D)mm
Mass
<100g
Display Size
32x38.25mm
Water Resistance
IPX7 (Waterproof at depths of up to 1m for up to 30
minutes)
-10°C to + 60°C
Operating Temperature
Range
8
1.7
Installing the device cradle
Part List:
Device cradle *1
Rubber pad* 1
Cable tie *2
Installing the device cradle on the horizontal bar
1. As shown in the figure, insert the device cradle into the rubber pad.
2.
As shown in the figure, insert the two cable ties into the device cradle.
9
3.
Fasten the cable ties around the horizontal bar of the bicycle.
4.
Cut off the extra cable ties.
5.
Upon completion, insert MERCURY 100 along the direction indicated by the arrow
in the figure.
10
Installing the device cradle on the vertical bar
1. As shown in the figure, insert the device cradle into the rubber pad.
2.
As shown in the figure, insert the two cable ties into the device cradle.
3.
Fasten the cable ties around the vertical bar of the bicycle.
11
4.
Cut off the extra cable ties.
5.
Upon completion, insert MERCURY 100 along the direction indicated by the arrow
in the figure.
12
2.
USB Driver Installation
Do not connect the MERCURY 100 to the PC
1. Start Windows OS.
2. Inset the Installation CD into CD ROM drive.
3.
The installation program will start automatically.
13
4.
Click “Driver 2000/XP”或”Driver Vista” and follow the program’s directives to finish
the procedure.
Connect the MERCURY 100 to the PC
(1) Connect one end of the USB cable to the USB port on the PC.
(2) Connect the other end of the USB cable to the port on the base of the MERCURY 100.
(3) Hold down the power button on the MERCURY 100 for 2 seconds until it turns on.
(4) The system will automatically detect and identify the MERCURY 100.
14
3.
Bundled Software Installation:
(1) Start Windows OS.
(2) Inset the Installation CD into CD ROM drive.
(3) The installation program will start automatically.
(4) Click” MERCURY 100”, the installation program will start automatically
(5) If it can’t install, please download the Windows Installer 4.5 from
www.microsoft.com and install MERCURY 100 after installed Windows Installer 4.5
15
4. Bundled Software (MERCURY 100) Introduction:
Attention: As this software needs to connect to Google Map, make sure that the network is
working smoothly before using. This will result in better Google Map performance.
1.
2.
Start the software: Start -> Programs -> MERCURY 100 -> MERCURY 100 Utility
Software startup screen:
3.
Device information and settings
(1) Firmware version
(2) Device serial number
(3) Travel time
(4) Travel distance
(8) Calories
(9) Datalog records
(10) Length unit
(11) Temperature unit
(14) Time zone
(15) Time zone reference
(16) Close the device
information window
(5) Odometer:
(6) Maximum velocity
(7) Average velocity
(12) Personal Weight
(13) Datalog interval
time(1~3600 secs)
(17) Update the settings
16
4. Setting up the POI (point of interest)
Startup screen
By default, four nav points A, B, C and D are shown on screen. The user can zoom in on the
Google Map, move the four nav points to where they want to go then upload the results to
the device.
Download the POI from the device to the map: click
the icon to download the POI saved
in the device to the map. Besides, you can save the POI to your desktop computer by
clicking the
icon for others to upload to another MERCURY 100.
Click the download icon
to download the POI of the device to the map.
17
Click the save icon
to save the POI on the map to the proper folder on your computer.
You may set the POI on the map by moving the POI icon (A~D) around the map and later
upload
the POI to the device.
Click the POIs (A~D) with your mouse and move them to your desired places.
18
Click the upload icon
You may open
to upload the POIs on the map to the device.
the POI files saved in your computer and upload
Click the open icon
them to the device.
to open a POI file saved in your computer.
19
Click the upload icon
to upload the POIs on the map to the device.
20
5.
Setting up the TurnPoint (Turn by Turn)
Using this function, the user can edit up to 99 turning points, meeting points or other
locations into their planned route. The nav points can also be organized into separate
routes, so 1~20 is for route 1, 22~30 is for route 2, and so on. These can then be
uploaded to the device and used for navigation.
The world's most well-known cycling routes can also be downloaded from
www.mybikegps.com to the user's computer. The data can be opened using this
software and loaded into Google Map. From there, it can be uploaded to the device.
All routes are provided by cyclists from around the world and provided for reference
only.
Startup screen
Download the TurnPoint from the device to the map: click
the icon to download the
TurnPoint saved in the device to the map. As well, you can save the TurnPoint to your
desktop computer by clicking the
icon for others to upload to another MERCURY 100.
21
Click the download
Click the save icon
icon to download the TurnPoint of the device to the map.
to save the TurnPoint on the map to a proper folder on your
computer.
You may edit the TurnPoints (1~99) on the map by adding
on the map and later upload
the TurnPoints to the device.
22
or deleting
TurnPoints
Click the add icon
to add new TurnPoints.
and click the Turnpoints you want to delete.
To remove TurnPoints, click the delete icon
23
Click the upload icon
You may open
to upload the TurnPoints on the map to the device.
the TurnPoint files saved in your computer and upload
them to the
device.
Click the open icon
to open a TurnPoint file saved in your computer.
24
Click the upload icon
Delete
to upload the TurnPoints on the map to the device.
all the TurnPoints
Click the clear all icons
to remove all the TurnPoints on the map.
25
When all the TurnPoints have been deleted, the screen shows the world map.
26
6.
Setting up the route
Click the download icon
to download the route saved on the device.
(1) Download all trace history on the device to the Mercury 100.
(2) Clear all trace history from the device.
(3) Clear downloaded trace history (remove single entry).
(4) Select a trace history for display on Google Map.
(5) Trace history details.
(6) Distance/speed analysis for each trace history.
To clear the route data saved on the device, click the clear icon
Click save icon
.
to save the route downloaded from the device to your desktop
PC.
27
7.
Miscellaneous
On all setup screens, click the icon
to enter the device information/setup screen.
On the map screen, click the map/satellite/mixed buttons to switch the map display mode.
When the network resources are not enough, map mode is suggested.
28
5.
LCD Icon Guide
1.
Battery: Divided into 3 blocks. During normal use, this shows the amount of
power remaining. When charging, the blocks cycle from the bottom up, going from
0 to 3 blocks. Once fully charged, the icon stays at 3 blocks.
2.
Satellite: Indicates the GPS positioning status. Blinking means no fix or
scanning for satellites. Constant means position acquired or still acquiring fix.
3.
4.
Time: Shows the cumulative riding time. When Reset to 00:00:00, it will start
counting riding time when the user starts riding (reaches 5km/hr). If riding time
exceeds 99:59:59, it hold to 99:59:59.
TOA: Time of Arrival. When switched to Waypoint and Route display mode, it
shows the estimated time of arrival.
5.
6.
7.
8.
9.
:Time display.
:Shows the time for the current region. Taiwan, for example, must be set to
UTC +8hr based on the GPS reference time. If GPS fix not acquired, then the time
display changes to --:--:--.
DTG: Distance to GO. When switched to Waypoint and Route display modes,
shows the estimated direct line distance.
ODO: Odometer. Shows the current distance traveled in MI (miles) or KM
(kilometers).
DST: Distance. Displayed in MI or KM. Resets to zero when device is turned on or
off.
10. AZM: Azimuth. Reads the current azimuth from the e-compass and displays it in
29
degrees (°) and as a direction on the compass icon
.
11. TMP: Temperature. Shows the current temperature in ℃ or ℉, This
temperature is the electronic detection, because of the chip
characteristic, under the temperature difference environment, needs
15~20 minute change current temperatures.
4 Digit Display.
12.
:Used to display current azimuth, AZM, SLP or TMP.
13.
:Switch between KM (Kilometer) or MI (Mile) for displaying the distance in
14.
Bike, Waypoint or Route mode.
15.
"Eight Direction" Compass: When showing the azimuth, each direction
has a range of ±22.5°. For example, the Northeast (45°) direction includes all
bearings between 22.5°~67.5°.
16. MAX: Maximum speed. Shows the maximum riding speed on record as mi/h or
km/h.
17. AVG: Average speed. Shows the average riding speed on record as mi/h or km/h.
18.
3 Digit Display.
Calorie Unit: The Calorie display shows Kcals. If less than Kcal, it switches to
19.
cal.
20.
Speed Unit: The unit speed is to be measured in. Switch instantaneously
between
21.
22.
.
Backlight indicator.
Recorder storage indicator: Divides the total number of entries into 6 parts.
Increments by 1 block for each sixth of total storage.
23.
Bike Mode: Switching to this mode will show information about current ride.
24.
WayPoint indicator: Press the Select button to cycle between
30
waypoints A, B, C and D.
25.
Route indicator: Shows the location of the next destination.
26.
Setup Mode indicator: Changes to Setup Mode when user enters setup mode.
27. If the data surpasses the maximum value which LCD may display, it display
the maximum value . The user may use MERCURY 100 Utility to get the
true information.
31
6. Instructions
6.1 Start
Hold the power button 1sec,the length of time required to acquire a GPS fix after starting
this device may vary:
Normal
Approx. 2 minutes A. First use after purchase (may need to update
Approx. 15~45
satellite information).
sec.
B. Frequent use in Taiwan.
Special
Approx. 5 minutes A. Device has not been used for over 3 months.
B. You are over 800km away from the location where
you last used this device.
Blinking icon means no fix or scanning. A constantly lit icon means fix acquired or
being acquired. When there is no GPS fix, time is displayed as --:--:--, distance as ---- and
speed as ---.
6.2 Bike Mode
This is the default mode upon startup. There are three main modes, these being Bike
Waypoint
and Route
,
. Pressing on the "Power/Mode" button cycles
between Bike, WayPoint and Route modes.
1.
By default, the device starts in
mode. The first page shows the following items:
(1) Current riding time, shown as Time.
(2) Total cumulative distance ridden, shown as ODO in
MI or KM.
(3) Current speed, shown as mi/h or km/h.
(4) Arrow pointing north.
32
2.
After pressing the Select button, the displayed items become:
(1) Current riding time, shown as Time.
(2) Distance ridden so far, shown as DST in MI or KM.
(3) Current speed, shown as mi/h or km/h.
(4) Arrow pointing north.
3.
After pressing the Select button a second time, the displayed items become:
(1) Current riding time, shown as Time.
(2) Distance ridden so far, shown as DST in MI or KM.
(3) Maximum speed, shown as mi/h or km/h.
(4) Arrow pointing north.
4.
After pressing the Select button a third time, the displayed items become:
(1) Current riding time, shown as Time.
(2) Distance ridden so far, shown as DST in MI or KM.
(3) Average speed, shown as mi/h or km/h.
(4) Arrow pointing north.
33
5.
After pressing the Select button a fourth time, the displayed items become:
(1) Current Time in 24-hour format: Shown as
.
(2) Current azimuth and arrow pointing north: Shown
as AZM and °.
(3) Current speed, shown as mi/h or km/h.
(4) Arrow pointing north.
6.
After pressing the Select button a fifth time, the displayed items become:
(1) Current riding time, shown as Time.
(2) Current temperature, shown as TMP in °C or °F.
(3) Current calories, shown as cal if under 1Kcal and
as Kcal otherwise.
(4) Arrow pointing north.
34
6.3 Waypoint Mode
In Bike mode, press the "Power" button switches to Waypoint mode. At startup, waypoint A
is displayed. Press the Select button to cycle through waypoints A~D. When the "Power"
button is pressed to exit or access this mode, it will remember which waypoint (A~D) was
last displayed.
(1) Estimated time of arrival shown as TOA.
(2) Estimated direct line distance shown as DTG in MI
or KM.
(3) Current speed, shown as mi/h or km/h.
(4) Arrow pointing towards the destination.
Set Waypoint
Holding down the "Select" button for 3 seconds, opens the
display and makes the
current waypoint blink. For example, if waypoint B is currently displayed, waypoint B along
distance display will start blinking. Pressing the
with DTG and
"Reset/Mark" button (i.e. "Start/Stop" button) resets the waypoint. The DTG for the newly
marked waypoint should be 0.00. Now hold down the "Select" button for 3 seconds to close
the Setup mode and
display. The waypoint has now been set and the next time you
wish to ride to waypoint B, it will direct you to the marked waypoint. Marking a new waypoint
will override the previously marked waypoint.
When the rider is within 50m of waypoint A, B, C or D, a buzzer will sound 5 times (lasting 1
second each time at 0.5 second intervals). The arrow will also blink each time the buzzer
sounds. The user can press any button to stop the buzzer or wait for it to finish and the
arrow will continue blinking. When within 10m of the waypoint, all eight points of the
compass icon will start blinking and only revert to normal when the rider is more than 10m
away from the waypoint.
This item can only be calculated or displayed when GPS coordinates are available. When
GPS fix has not been acquired, time is shown as --:--:--, distance as ---- and speed as ---. If
speed is less than 5km/hr, time is shown as --:--:--.
35
6.4 Route Mode:
Press the "Select" button to switch up waypoint from 01- 99 and press the “Start/Stop”
button to switch down waypoints from 99- 01.
When the rider approaches within 50m of the current destination ID, a buzzer will sound 5
times (lasting 1 second each time at 0.5 second intervals). The arrow will also blink each
time the buzzer sounds. The user can press any button to stop the buzzer or wait for it to
finish and the arrow will continue blinking. When within 10m of the destination, all eight
points of the compass icon will start blinking and the device will automatically move to the
next destination ID. If destination ID is 50, it will continue blinking just like Waypoint mode.
When leaving or entering Route mode, the device will remember the last destination ID
displayed.
Press both “Select” and “Start/Stop” button to switch to Route Backward Mode, press
“Select” and “Start/Stop” button again to Route Forward Mode.
If separate routes were created by the user (e.g. points 1~20 are for route 1, 22~30 are for
route 2), the device will guide the user to point 20 of route 1 and then stop. The user must
then press the Select button and skip to point 22 to enable navigation for route 2.
When GPS fix has not been acquired, time is shown as --:--:-- and distance as ----. If speed
is less than 5km/hr, time is shown as --:--:--
36
(1) Estimated time of arrival shown as TOA.
(2) Estimated direct line distance shown as DTG in MI
or KM.
(3) Current waypoint ID between 01~99.
(4) Arrow pointing towards the destination.
Mark Route
In Route mode (destinations 01~99), hold down the "Select" button for 3 seconds opens the
display. The current destination (01~99) will also start blinking. For example, if currently
set to destination ID 21, the number 21 will flash during Setup mode. The blinking items
include
, DTG and
distance reading. Pressing the "Reset/Mark" button
(i.e. "Start/Stop" button) the destination will be reset and its coordinates marked. The
calculated DTG should be 0.00. Use this method to mark all 99 waypoints.
37
6.5 Other Functions:
1.
Start or stop recorder
Pressing the "Start/Stop" button in user mode turns the
icon on or off. This also turns
the recorder on and off as well. The recording intervals can be configured through the
bundled software. For more information, please refer to the software instructions.
2.
Turn LCD backlight on or off
Holding down the "Start/Stop" button for 3 seconds in user mode turns the
off. This also turns the LCD backlight on or off as well.
38
icon on or
6.6 Setup Mode:
In Bike
mode, Waypoint
mode or Route
mode, holding down the
"Select" button for 3 seconds switches to Setup Mode.
Bike Mode: Time, DTG, MAX and AVG, Kcal, ODO Reset, Cycle Unit.
Waypoint Mode: Reset Waypoints A, B, C, D (Mark Waypoint), Cycle Unit.
Route Mode: Reset Destinations 01~99 (Mark Waypoint), Cycle Unit.
6.6.1 Bike Mode Setup:
Holding down the "Select" button for 3 seconds in this user mode opens the
Blinking items include:
, Time,
display.
time display, DST,
distance display, MAX, AVG,
speed display, Kcal.
In Setup Mode, pressing the "Reset/Mark" button (i.e. "Start/Stop" button) resets everything
to 0. The 4-digit display is set to 0.00 and 3-digit display is set to 0.0 as well while
continuing to blink. The items reset include:
(1) Time, Distance.
(2) Maximum and Average Speed.
(3) Calories.
1.
Pressing the "Select" button for the first time
Blinking items include: ODO and
distance display. Pressing the
"Reset/Mark" button (i.e. "Start/Stop" button) resets the odometer. After reset it continues to
blink and display the number 0.00.
39
2. Pressing the "Select" button for the second time
Blinking items include: MI or KM, mi/h or km/h. If MI is blinking then mi/h will be blinking as
well. If KM is blinking then km/h will be blinking. Pressing the "Reset/Mark" button (i.e.
"Start/Stop" button) switches between metric or imperial units and they will continue to blink.
If the unit of measurement is switched to imperial or metric, other functions' unit of
measurement will switch as well.
Pressing the "Select" button for a third time reverts back to the first blinking item.
Under any display mode, holding down "Select" for 3 seconds closes Setup mode and the
display then reverts back to user mode.
6.6.2 Waypoint Mode Setup:
In Waypoint modes A~D, hold down the "Select" button for 3 seconds opens the
display.
The current waypoint will also start blinking. For example, if currently set to Waypoint B, B
will flash during Setup mode. The blinking items include DTG
distance reading.
Pressing the "Reset/Mark" button (i.e. "Start/Stop" button) resets the waypoint and marks
the current coordinates. The calculated DTG should be 0.00. Once reset it will continue
blinking.
1. Pressing the "Select" button for the second time
Blinking items include: MI or KM, mi/h or km/h. If MI is blinking then mi/h will be blinking as
well. If KM is blinking then km/h will be blinking. Pressing the "Reset/Mark" button (i.e.
"Start/Stop" button) switches between metric or imperial units and they will continue to blink.
If the unit of measurement is switched to imperial or metric, other functions' unit of
measurement will switch as well.
2. Pressing the "Select" button for a third time reverts back to the first blinking item.
Under any display mode, holding down "Select" for 3 seconds closes Setup mode and the
display then reverts back to user mode.
40
6.6.3 Route Mode Setup:
In Route mode (destinations 01~99), holding down the "Select"
button for 3 seconds opens the
display. The current
destination (01~99) will also start blinking. For example, if
currently set to destination ID 21, the number 21 will flash
during Setup mode. The blinking items include
, DTG and
distance reading. By pressing the "Reset/Mark" button (i.e. "Start/Stop"
button), the destination will be reset and it’s coordinates marked. The calculated DTG
should be 0.00. Once reset, it will continue blinking.
Pressing the "Select" button a second time
Blinking items include: MI or KM, mi/h or km/h. If MI is blinking, then mi/h will be blinking as
well. If KM is blinking, then km/h will be blinking. Pressing the "Reset/Mark" button (i.e.
"Start/Stop" button) switches between metric or imperial units and they will continue to blink.
If the unit of measurement is switched to imperial or metric, other functions' unit of
measurement will switch as well.
Pressing the "Select" button a third time
Reverts to the first blinking item.
Under any setup mode, holding down the "Select" button for 3 seconds closes the setup
mode and
display then reverts back to user mode.
41
7. Troubleshooting
Problem
Possible Causes
Solution
No power
1. Battery low or
damaged.
2. Power button not
1. Charge battery
2. Hold down power button until device
powers up
held down for 3
seconds.
Satellite not
detected
Device can't
connect with PC
1. Not enough time to
scan for satellite signal
1. Check satellite icon to see if it is continuing
to blink. If it stops blinking, it has acquired fix
2. Device under cover
on satellites.
2. Keep the device in an open area, not
blocked by buildings.
1. Device not correctly
connected with USB
cable
1. Check that USB is correctly connected to
device or replace USB cable.
42