1
GSM Digital Telephony Card User Manual
www.allo.com
Version 2.0
1
GSM Digital Telephony Card User Manual
Copy Right
Copyright © 2014 allo.com. All rights reserved.
No part of this publication may be copied, distributed, transmitted, transcribed, stored in a
retrieval system, or translated into any human or computer language without the prior written
permission of Allo.com. This document has been prepared for use by professional and properly
trained personnel, and the customer assumes full responsibility when using it.
Proprietary Rights
The information in this document is Confidential to Allo.com and is legally privileged. The
information and this document are intended solely for the addressee. Use of this document by
anyone else for any other purpose is unauthorized. If
If you are not the intended recipient, any
disclosure, copying, or distribution of this information is prohibited and unlawful.
Disclaimer
Information in this document is subject to change without notice and should not be construed as a
commitment on the part of Allo.com. And does not assume any responsibility or make any
warranty against errors. It may appear in this document and disclaims any implied warranty of
merchantability or fitness for a particular purpose.
www.allo.com
Version 2.0
2
GSM Digital Telephony Card User Manual
About this manual
This manual describes the Allo product application and explains how to work and use it major
features. It serves as a means to describe the user interface and how to use it to accomplish common
tasks. This manual also describes the underlying assumptions and users make
make the underlying data
model.
Document Conventions
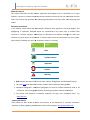
In this manual, certain words are represented in different fonts, typefaces, sizes, and weights. This
highlighting is systematic; different words are represented in the same style to indicate their
inclusion in a specific category. Additionally, this document has different strategies to draw User
attention to certain pieces of information. In order of how critical the information is to your system,
these items are marked as a note, tip, important, caution, or warning.
Icon
Purpose
Note
Tip/Best Practice
Important
Caution
Warning
Bold indicates the name of the menu items, options, dialog boxes, windows and functions.
The color blue with underline is used to indicate cross-references
cross references and hyperlinks.
Numbered Paragraphs - Numbered paragraphs are used to indicate tasks that need to be
carried out. Text in paragraphs without numbering represents ordinary information.
The Courier font indicates
dicates a command sequence, file type, URL, Folder/File name e.g.
www.allo.com
Support Information
Every effort has been made to ensure the accuracy of the document. If you have comments,
questions, or ideas regarding the document contact online support: http://support.allo.com
www.allo.com
Version 2.0
3
GSM Digital Telephony Card User Manual
Table of Contents
About this manual ................................................................................................
................................
............................................. 3
Document Conventions ................................................................................................
................................
..................................... 3
Overview................................................................
...............................................................................................
............................... 6
Features ................................................................
............................................................................................
............................ 6
GSM Card Installation................................
................................................................................................
............................................ 7
Unpacking the Card ................................................................................................
................................
........................................... 7
Shipment Inspection................................
................................................................................................
.......................................... 7
Hardware Installation: ................................................................................................
................................
....................................... 7
Slot compatibility: ................................................................................................
................................
............................................. 7
Power supply: .......................................................................................................................
................................
....................... 8
Indication LEDs:................................
.....................................................................................................................
..................... 9
GSM modules and SIM cards................................
...............................................................................................
............................... 10
Introduction of GSM Module: .............................................................................................
................................
............................. 11
Features: .........................................................................................................................
................................
......................... 11
Hardware Setup procedure ................................................................................................
................................
................................. 12
Software Installation ................................................................................................
................................
........................................... 13
Installation Test Environment considered................................................................
considered
........................................ 13
Hardware detection ................................................................................................
................................
........................................ 13
Dependencies installation ...............................................................................................
................................
............................... 15
Compiling & Installation of Asterisk.....................................................................................
Asterisk
..................... 16
GSM Driver Installation ................................................................................................
................................
....................................... 17
Sample Configuration................................
................................................................................................
.......................................... 22
Sample extensions.conf................................
................................................................................................
................................... 24
Sample sip.conf ................................................................................................
................................
............................................... 25
www.allo.com
Version 2.0
4
GSM Digital Telephony Card User Manual
SMS Sending and Receiving Options in Allo's GSM PCI cards for Asterisk.........................
Asterisk ......................... 25
Checking GSM modules& SIP peers using asterisk CLI......................................................
CLI
...................... 26
Limitations ................................................................
..........................................................................................
.......................... 28
Specifications ......................................................................................................................
................................
...................... 28
Hardware and Software Requirements................................................................
Requirements
............................................ 29
Reference................................................................
............................................................................................
............................ 29
Glossary and Acronyms ................................................................................................
................................
....................................... 30
www.allo.com
Version 2.0
5
GSM Digital Telephony Card User Manual
Overview
The GSM Series cards are PCI/PCIe base cards. The GSM Series cards are designed to handle the
GSM calls with Asterisk. These are act as Gateway card which will interface with GSM based PSTN
network with the Asterisk based IP network.
VoIP communication needs the capability to mediate between endpoints supporting different
Networks, but this requires Gateway functionality.
Asterisk, is capable of terminate the some type of calls with other calls, such
such as terminating the SIP
based IP calls with H323 based calls. But it is lacking the call terminating capability with the
PSTN/GSM network.
This GSM card will add Gateway capability and provides excellent voice quality, without affecting
latency or using up
p precious host CPU resources.
The GSM card comes with bundled software to make the product architecture independent.
The GSM Series cards are capable of handling up to 4 bi-directional
bi directional GSM terminating calls. All calls
are fully indemnified no additional licensing is required for their use.
Allo.com GSM card is a telephony PCI/PCIe card used for varies PBX software, e.g. Asterisk etc. with
compatible drivers,
Features
Capable of doing the gateway functionality.
Suitable for PCI/PCIe 1.0 slots
Simultaneous 4 calls can be terminated to the Gateway.
Supports alaw codec
www.allo.com
Version 2.0
6
GSM Digital Telephony Card User Manual
GSM Card Installation
Unpacking the Card
When you unpack your card, carefully inspect it for any damage if present please contact and report
to Allo.com support.
Shipment Inspection
The following items are included in the shipment of the GSM card:
GSM PCI/PCIe card.
Antennas
Hardware Installation:
There are some points should be paid attention to setup GSM card.
Slot compatibility:
GSM PCI/PCIe is compatible with 32-bit
32
5.0V PCI slot (slot2); And PCI_exp is compatible with PCI-E
PCI
×1 slot (slot1). You should confirm your slot type, and then insert GSM_PCI Card into a PCI slot. PCI
and PCI-EE slots are showed as follows
Figure 1: Slots
www.allo.com
Version 2.0
7
GSM Digital Telephony Card User Manual
Power supply:
Power Selection in Jumper Settings
Jumper (J 58) short 2&3
GSM Card gets power
ower comes from PCIe Bus
Jumper (J 58) short 1 & 2
GSM card gets the power from SMPS Power
supply. Connect the SMPS Power supply to Molex
connector of the card
By Default Jumper settings will be 2&3, which use the power supply from the PCIe Bus.
If GSM Modules are not registering properly to the network
network, if its recommend to use power
from the SMPS.
Figure 2: Power selection in Jumper Settings
www.allo.com
Version 2.0
8
GSM Digital Telephony Card User Manual
Indication LEDs:
There are 5 LEDs on the board and one LED for Power Indication. And 4 LED’s for network status of
Each SIM card. The detail explanations are as followings:
Figure 3: LED Indication
Reference
LED Status
Power Status
D3
ON
OFF
ON
OFF
Reference
LED Status
GSM Module Status
D22,D19,D17,D13
OFF
OFF
Permanent ON
ON; not registered on the network
Slow flash LED ON for 200
ms, OFF for 2 s
Quick flash LED ON for
200 ms, OFF for 600 ms
ON; registered on the network
Very quick flash LED ON
for 100ms, OFF for 200ms
ON; software downloaded is either
corrupted or non-compatible
compatible ("BAD
SOFTWARE")
www.allo.com
ON; registered on the network,
communication in progress
Version 2.0
9
GSM Digital Telephony Card User Manual
GSM modules and SIM cards
SIM cards work at the Quad-Band
Band EE-GSM/DCS/GSM850/PCS
GSM/DCS/GSM850/PCS GPRS/EGPRS 900/1800/850/1900. One
GSM module supports one SIM card and one antenna, please plug a SIM card into the back of a GSM
module and activate it. For more details, please refer to figure 3 &4.
Figure 4: GSM Modules
www.allo.com
Version 2.0
10
GSM Digital Telephony Card User Manual
Figure 5: SIM Card Placement
Introduction of GSM Module:
The Q2687 Refreshed Wireless CPU® is a self-contained
self
E-GSM/DCS/GSM850/PCS
GSM/DCS/GSM850/PCS-GPRS/EGPRS
900/1800/850/1900 quad-band
band Wireless CPU®. It supports a powerful open software platform
(Open AT®).
Features:
One SIM card per GSM module
DTMF detection
GSM data connections
DIGITAL audio quality
Monitors GSM signal strength by command and 4 LEDs.
Power consumption(MAX): 30W (4 channels)
Support external antenna
www.allo.com
Version 2.0
11
GSM Digital Telephony Card User Manual
Hardware Setup procedure
Power off your PC, remember unplug the AC power cable
Place SIM cards for GSM modules
Insert GSM card into a PCI/PCIe
/PCIe slot
Connect the power feeding connector of the card to SMPS power of the server/PC
Connect the power supply as previously stated.
Connect the antennas
Fix the board by a screw
Power on your PC
Figure 6: Hardware Setup
Do not forget to connect the SMPS power socket to Power feeding connector of the Card;
otherwise GSM modules don’t get activated.
During the above processes, an ESD (Electro Static Discharge) wrist strap is needed. Once
power is on, you must not attempt to install or take down the board. After hardware ssetup, it is
time to install software. Hot swapping of SIM cards can not be done when card is powered ON.
www.allo.com
Version 2.0
12
GSM Digital Telephony Card User Manual
Software Installation
Allo.com Digital cards hardware are only supported under Linux. It requires drivers and libraries
which are not integrated with the
he Linux kernel.
Recommended Linux distribution: CentOS or Ubuntu
Drivers and application software may be obtained from Allo.com’s download server provided in
sections:
For an introduction to Asterisk, including additional information on its configuration, setups, and
features, please refer to: http://www.asterisk.org
To install your GSM card, you will need:
Full Linux kernel 2.6.15 (or later) source code.
Development libraries and headers for ncurses
Development
elopment libraries and headers for zlib and openssl
Development libraries and headers for newt
GCC and standard software build tools
Installation Test Environment considered
OS
: CentOS 5.5 (32 bit)
Kernel version
: 2.6.18-194.el5
194.el5
Asterisk version
: Asterisk 1.4.43 / Asterisk 1.8.3
Hardware
: Allo- GSM Card
Card Driver
: ALLO DAHDI DRIVER
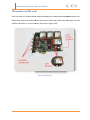
Hardware detection
After inserting the card into your PCIe slot, boot your machine to Linux and execute the following
command to list the devices detected by the PCI bus:
# Lspci -vvvvv
www.allo.com
Version 2.0
13
GSM Digital Telephony Card User Manual
Confirm the output lists a device with Allo.com’s PCIe vendor ID which is “d44f”. The ou
output will be
similar to the following:
PCI card
PCIe card
:
d44f is
www.allo.com
GSM PCIe card ID
Version 2.0
14
GSM Digital Telephony Card User Manual
The output of lspci may or may not state “Allo.com”. If it does not, this does not indicate a
problem.
The Allo.com card identifier should be listed as per the above screen shot provided. If a card identifier
is not listed, then your machine is not PCI 2.2 (or higher), and the card will not work.
If card is not recognized by the system, you have to power off and take out the card, then try to
insert it into another PCI slot and try again
Dependencies installation
To install asterisk in CentOS, we have to install the following prerequisite packages, along with the
kernel source.
bison
bison-devel
zlib
zlib-devel
openssl
openssl-devel
gnutls-devel
flex
gcc
gcc-c++
Execute the following command to install the above mentioned packages on cent os:
# Yum installs bison bison-devel
devel zlib zlib-devel
zlib
openssl openssl-devel gnutls-devel
devel flex gcc gcc
gcc-c++
www.allo.com
Version 2.0
15
GSM Digital Telephony Card User Manual
Compiling & Installation
ion of Asterisk
For using Asterisk for your application, follow the steps below.
1. Download the latest release version of Asterisk. Substitute the version of Asterisk for the
1.4.43 in the command below.
#wget
http://downloads.asterisk.org/pub/telephony/asterisk/releases/asteri
sk-1.4.43.tar.gz
For 1.8.3 Asterisk
#wget
http://downloads.asterisk.org/pub/telephony/asterisk/releases/asteri
sk-1.8.3.tar.gz
2. Expand the downloaded file, compile and install. Substitute the version of Asterisk for X.X
in the command lines below.
# tar -zxvf asterisk-X.X.X.tar.gz
X.X.X.tar.gz
# cd asterisk-X.X.X/
# ./configure
# make menuselect
www.allo.com
Version 2.0
16
GSM Digital Telephony Card User Manual
# make
# make install
# make samples
GSM Driver Installation
It is imperative that you read and fully understand the contents of the document before you
attempt to configure and run chan_allogsm.
Please view the Change Log, the file describes chan_allogsm support the version of asterisk and
Dahdi.
1. Download the ALLO GSM driver from www.allo.com website to /usr/src directory, the URL
link is http://www.allo.com/firmwaare/gsm-card/chan_allogsm-1.1.2_P2.tar.gz
# wget http://www.allo.com/firmw
ware/gsm-card/chan_allogsm-1.1.2_P2.tar.gzz
# tar –xvzf chan_allogsm-1.1.2_
2_P2.tar.gz
2. Enter the path, then execute the install.sh and install the drive, run the command:
# cd /usr/src/ chan_allogsm-1.1.2_
2_P2
#./install.sh
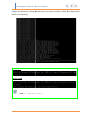
3. After running the above commands, the script will check whether the dependencies have been
installed, if not, you should type "y" to accept to install all the necessary dependencies until the
system detects all of them are "OK", then press "enter" key to operate the next step.
##################################################
##############################################################
AlloGSM Installation Script
#
#
v1.1.1_1
#
################################################
##############################################################
Checking for C development tools ...
[OK ]
Checking for C++ development tools ...
[OK ]
Checking for Make utility ...
[OK ]
www.allo.com
Version 2.0
17
GSM Digital Telephony Card User Manual
Checking for ncurses library ...
[ OK ]
Checking for libncurses-dev
dev library ...
[ OK ]
Checking for Perl development tools ...
[ OK ]
Checking for Patch ...
[ OK ]
Checking for bison...
[ OK ]
Checking for bison-devel...
devel...
[ OK ]
Checking for openssl...
[ OK ]
Checking for libssl-dev...
[ OK ]
Checking for libgnutls-dev...
dev...
[ OK ]
Checking for zlib1g..
[ OK ]
Checking for zlib1g-dev...
dev...
[ OK ]
Checking for kernel development packages... [ OK ]
Checking for libxml2-dev...
dev...
[ OK ]
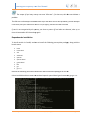
4. The software installation is indicated by some wizard options, you should select the right option
by your specific case. Now
ow let’s introduce how to install the driver by source code.
Please choose the system of you are using:
###############################################################
AlloGSM Installation Script
#
v1.1.1_1
.1_1
#
#
##############################################################
1) Source code install
2) Trixbox-dahdi install
3) Elastix-dahdi install
www.allo.com
Version 2.0
18
GSM Digital Telephony Card User Manual
q) Quit
Please enter your selection (1...3 or q) ->1
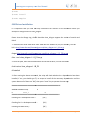
5. It is time to select the installation way after dependencies detection.
->1) Source code install
(CentOS in addition to ElastixTM and trixbox please choose "Source code install" option by typing
"1". After a few seconds or minutes, you will come to next option that the way you want to install
DAHDI)
Looking for Dahdi-Linux-complete
complete directory in /usr/
/usr/src...
1: /usr/src/dahdi-linux-complete-2.6.2+2.6.2
2.6.2+2.6.2
------------------------------------------
n : Download and install dahdi-linux
linux-complete-2.5.0+2.5.0.tar.gz
2.5.0+2.5.0.tar.gz [Default installation]
m : Enter dahdi-linux-complete
complete dir path manually
d : Download thee latest version of dahdi-linux-complete
dahdi
q : Skip the step
(ctrl-c to Exit)
Please select working dahdi-linux-complete
complete directory [1-1,
[1 n, m, d, q]: 1
-->1: /usr/src/dahdi-linux-complete
complete-XXX
(This option means the available DAHDI version which allows yyou
ou to type the corresponding
number to install. Here the default version dahdi-linux-complete-2.5.0
dahdi
2.5.0 +2.5.0 which are included in
the installation package. If there are any other versions, the system will automatically look for and
show the outcome.)
-->n: dahdi-linux-complete-2.5.0+2.5.0.tar.gz
2.5.0+2.5.0.tar.gz
[Default] (If you want the system to download and install the default version dahdi
dahdi-linux-complete2.5.0+2.5.0 automatically, you should type "n")
-->m:
>m: Enter dahdi_linux_complete dir path
www.allo.com
Version 2.0
19
GSM Digital Telephony Card User Manual
Manually (This option allows
llows you to type the full path of DAHDI source if you have installed DAHDI.
Also you can type the specific DAHDI version, the script will download the version you want of
DAHDI to /usr/src/, then you will see a new option as following if you type dahdi
dahdi-linux-completeXXX(please type the version number instead of XXX )
-->d:
>d: Download the latest dahdi_linux_complete
(This option will download and install the latest dahdi_linux_complete version, the latest version of
dahdi_linux_complete is not support now,
now please don’t choose this option)
-->q: skip the step
(Skipping DAHDI installation directly)
After selecting the way you want to install DAHDI, the system will install it automatically until other
options appear to install Asterisk.
Asterisk installation is similar with DAHDI:
Looking for Asterisk directory in /usr/src ...
1 : /usr/src/asterisk-1.6.1.1
2 : /usr/src/asterisk-1.4.29
3 : /usr/src/asterisk-1.8.23.1
-----------------------------------------n : Download and install asterisk-1.8-current.tar.gz
current.tar.gz [Default installation]
m : Enter Asterisk dir path manually
q : Skip the step
(ctl-c to Exit)
Please select working Asterisk directory [1-3,
[1 n, m, d, q]: 1
-->1: /usr/src/asterisk-XXXX
(This option means the available Asterisk
Asterisk version which allows you to type the corresponding
number to install. Besides the default version, there may be other versions your system has
installed.)
-->n: asterisk-1.6.2.11.tar.gz
1.6.2.11.tar.gz [Default]
(The system will download and install asterisk-1.6.2.11
asterisk
1 which is included in the installation package
automatically if selecting this option)
www.allo.com
Version 2.0
20
GSM Digital Telephony Card User Manual
-->m:
>m: Enter Asterisk directory path manually
(Choosing this option allows you to type the full path of Asterisk source if you have installed
Asterisk. Also you can type the full version name of Asterisk; the script will download the version of
Asterisk to /usr/src/.)
-->d1.6:
>d1.6: Download the Latest Asterisk 1.6.2
(This option will download and install the latest version of asterisk-1.6.2.
asterisk 1.6.2. While the version of
Asterisk has been updated to 1.8, so it is not recommended you to choose this option)
-->q: skip the step
(Skipping Asterisk installation directly)
Configuring chan_allogsm and run asterisk:
1. Refresh the hardware list by executing the command: depmod -a
2. Generate
rate configuration for dahdi channels by using the command: dahdi_genconf
3. start the dahdi service by executing : service dahdi start
Or /etc/init.d/dahdi start
4. Configures DAHDI kernel modules from /etc/dahdi/system.conf using the command:
dahdi_cfg -vv
5. You can check the GSM Module loading status using dmesg
You can find the similar dmesg logs, if the GSM modules installed properly
IRQ 21/allog4c: IRQF_DISABLED is not guaranteed on shared IRQs
Card 0 AlloG4C: Slot 0 is Installed
Card 0 AlloG4C: Slot 1 is Installed
Card 0 AlloG4C: Slot 2 is Installed
Card 0 AlloG4C: Slot 3 is Installed
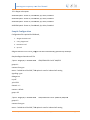
6. Run the asterisk (#asterisk -cvvvvvvv
cvvvvvvv),
), you can also run asterisk in silent mode (#asterisk).
7. Make sure the gsm is up and connected with network
www.allo.com
Version 2.0
21
GSM Digital Telephony Card User Manual
*CLI: allogsm show spans
ALLOGSM span 1: Power on, Provisioned, Up, Active, Standard
ALLOGSM span 2: Power on, Provisioned, Up, Active, Standard
ALLOGSM span 3: Power on, Provisioned, Up, Active, Standard
ALLOGSM span 4: Power on, Provisioned, Up, Active, Standard
Sample Configuration
Configuration file required for GSM card,
1. allogsm-channels.conf
2. chan_allogsm.conf
3. Extensions.conf
4. Sip.conf
allogsm-channels.conf
channels.conf & chan_allogsm.conf were automatically generated by the script.
Sample allogsm-channels.conf File:
; Span 1: allog4c/0/1 "AlloGSM A4G
GSM/CDMA PCI Card 0" AMI/CCS
group=11
context=from-gsm
exten= “mobile No of the SIM”; This option is must for inbound call routing
signalling = gsm
debugat=on
tty=off
;pin=1234
channel => 1
context = default
group = 63
; Span 2: allog4c/0/2 "AlloGSM A4G
GSM/CDMA PCI Card 0" (MASTER) AMI/CCS
group=12
context=from-gsm
exten= “mobile No of the SIM”; This option is must for inbound call routing
www.allo.com
Version 2.0
22
GSM Digital Telephony Card User Manual
signalling = gsm
debugat=on
tty=off
;pin=1234
channel => 3
context = default
group = 63
; Span 3: allog4c/0/3 "AlloGSM A4G
GSM/CDMA PCI Card 0" AMI/CCS
group=13
context=from-gsm1
exten= “mobile No of the SIM”; This option is must for inbound call routing
signalling = gsm
debugat=on
tty=off
;pin=1234
channel => 5
context = default
group = 63
; Span 4: allog4c/0/4 "AlloGSM A4G
GSM/CDMA PCI Card 0" AMI/CCS
group=14
context=from-gsm
exten= “mobile No of the SIM”; This option is must for inbound call routing
signalling = gsm
debugat=on
tty=off
;pin=1234
channel => 7
context = default
group = 63
www.allo.com
Version 2.0
23
GSM Digital Telephony Card User Manual
Add exten= input the respective mobile no in all the channels of the allogsm
allogsm-channels.congf
file.
For E.g.: if the SIM card number 9956145000 which is inserted in span1, add exten
exten= 9956145000
in the Span1 configuration of the allogsm
allogsm-channels.conf file
Extensions.conf and sip.conf will be generated by Asterisk installation where we have to modify the
dial plan to make outgoing and incoming calls.
Sample extensions.conf
Every span have two channels ,while writing dialplan you need to consider 1st channel of the
span so it will be 1 for span 1 and 3 for span 2 ,5 for span 3 and 7 for the span 4.
4
[out_gsm_gsmout]
exten => _11.,1, ,Dial(AGSM/1/${EXTEN:2})
GSM/1/${EXTEN:2})
exten => _11.,2,Hangup
exten => _12.,1, ,Dial(AGSM/3/${EXTEN:2})
/${EXTEN:2})
exten => _12.,2,Hangup
exten => _13.,1, Dial(AGSM/5/${EXTEN:2})
/${EXTEN:2})
exten => _13.,2,Hangup
exten => _14.,1, Dial(AGSM/7/${EXTEN:2})
/${EXTEN:2})
exten => _14.,2,Hangup
[gsm-incoming]
exten=s,1,Dial(SIP/4000,80,Ttr)
exten=s,n,Hangup()
www.allo.com
Version 2.0
24
GSM Digital Telephony Card User Manual
Sample sip.conf
[4000]
type=friend
nat=yes
host=dynamic
allow=all
SMS Sending and Receiving Options in Allo's GSM PCI cards for Asterisk
1. Sending SMS
There are two modes for sending SMS, PDU mode and text mode. PDU mode supports a few
languages’ characters for sending. Text mode currently supports only English characters.
To send SMS, chan_allogsm provides three methods:
i.
Sending SMS on the Asterisk console (only supports English characters).
Usage: allogsm send sms <span> <destination
<destinat number> <sms contents>
E.g. allogsm send sms 1 135xxxxxxxx “Hello World!”
ii.
Sending SMS over Linux Shell.
Usage: asterisk - rx “allogsm send sms <span> <destination number> <sms contents>”
e.g asterisk – rx “allogsm send sms 1 135xxxxxxxx \”Hello World!\””
iii.
Send SMS over dialplan.
Usage: SendSMS (<span>, destination number, sms content)
e.g SendSMS(1,135xxxxxxxx, “Hello World!”)
2. Receiving SMS
The sms will be saved in /var/log/asterisk/sms/receive_message when system receives. At
this moment, it will trigger corresponding contexts and sms priorities over dialplan.
www.allo.com
Version 2.0
25
GSM Digital Telephony Card User Manual
E.g. exten =>sms, 1, xxxxxxxxxxx (must use sms so that trigger sms receiving). It might be
different for each span.
3. Additionall Variable settings in Dialplan
Sending Side
i. Set (CHAR_CODING=encoding); set up encoding mode of sending sms. Currently
supported GSM for text mode and HEX for PDU.
E.g. Set (CHAR_CODING=GSM)
ii. Set (SMSC=sms centre
tre number); set up centre number of sms.
E.g. Set (SMSC=861380755500)
Receiving Side
i.
${SMSSRC}; sms sender number.
ii.
${SMSTXT}; sms contents.
iii.
${SMSPDU}; PDU codes of sms.
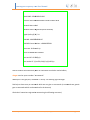
Checking GSM modules&
& SIP peers using asterisk CLI
After installing the chan_allogsm.so
gsm.so module, you can check the gsm modules which you have
enabled in the configuration. As shown in following command.
Usage: allogsm show span <span number>|all
number
uclibc*CLI> allogsm show span 2
D-channel: 4
Status: Power on, Provisioned, Up, Active, Standard
Type: CPE
Switchtype: Sierra WAVECOM Q2687RD
Manufacturer: Sierra Wireless
www.allo.com
Version 2.0
26
GSM Digital Telephony Card User Manual
Model Name: SL6087 Product
Model IMEI: 359193032151920
Revision: 01211260959.SL6087 621200 112612 09:59
Network Name: airtel
Network Status: Registered (Home network)
Signall Quality (0,31): 24
SIM IMSI: 404450518809147
SIM SMS Center Number: +919845087001
Last event: D-Channel
Channel Up
State: ALLOGSM STATE READY
Last send AT: AT+CSQ\r\n
AT+CSQ
Last receive AT: \rr\n+CSQ: 24,0\r\n\r\nOK\r\n
Similar to above command many other at commands can also be used as bellow,
allogsm send at <span number>> “<command>”
Where port is the gsm port, command is “at+csq” for checking signal strength.
Similarly we have many at commands which we can give as commands. (at commands are generic
gsm at commands which can be searched in the internet)
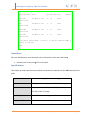
Check the IP extensions registration status using the following command,
www.allo.com
Version 2.0
27
GSM Digital Telephony Card User Manual
*CLI> sip show peers
Name/username
Host
Dyn Nat ACL Port
5002/5002
Unmonitored
192.168.0.139
D
N
5064
5001
Unmonitored
192.168.0.143
D
N
5065
5000/5000
Unmonitored
192.168.0.139
D
N
5062
4000/4000
Unmonitored
192.168.0.143
D
N
5062
Status
4 sip
ip peers [Monitored: 0 online, 0 offline Unmonitored: 4
online, 0 offline]
*CLI>
Limitations
Allo.com GSM Gateway card comes with some of limitations, which are listed below;
1. Gateway card are only using G711 a law codec.
Specifications
This chapter provides specifications, required environmental conditions for the GSM Gateway Series
cards.
Physical card dimension
Size : 63.5 mm (height) × 94.3 mm (Length)
Interfaces
PCI Express Bus - Compliant with PCI-EE X1 1.0 or greater.
Environment
Temperature: 0 to 50° C (32 to 122° F) operation -20
20 to
65° C (4 to 149° F) storage
Humidity
10 to 90% non-condensing
non
Supported Codecs
-law
law
www.allo.com
(a-law)
(a
Version 2.0
28
GSM Digital Telephony Card User Manual
Hardware and Software Requirements
400 Mhz Pentium III or better
512 MB RAM
Available PCI-E Slot (as described previously)
Linux 2.6 kernel
Reference
http://allo.com
http://www.asterisk.org
http://www.voip-info.org
www.allo.com
Version 2.0
29
GSM Digital Telephony Card User Manual
Glossary and Acronyms
Term
A-law
GSM
Definition
It is mainly
ainly used in European telephone networks for the conversion between
analog and digital signals in PCM applications. And similar
imilar to the N
North American
mu-law standard
The abbreviation is the Global System for Mobile Communications. It is a standard
set developed by the European Telecommunications Standards Institute (ETSI) to
describe technologies for second generation (or "2G")
"
digital cellular networks
networks.
Developed as a replacement for first generation analog cellular networks, the
GSM standard originally described a digital, circuit switched network optimized
for full duplex voice telephony.
PCI peripheral A standard bus used in most computers to connect peripheral devices.
component
interconnect
AT Commands
AT commands are used to control MODEMs. AT is the abbreviation for Attention.
These commands come from Hayes commands that were used by the Hayes
smart modems. The Hayes commands started with AT to indicate the attention
from the MODEM. The dial up and wireless MODEMs (devices that involve
machine to machine communication) need AT commands to interact with a
computer. These include the Hayes command set as a subset, along with other
extended AT commands.
Asterisk
Asterisk is an open source framework for building communications applications.
Asterisk turns an ordinary computer into a communications server. Asterisk
powers IP PBX systems, VoIP gateways, conference
confere
servers and more
more. It is used by
small businesses, large businesses, call centers, carriers and governments
worldwide. Asterisk is free and open source. Asterisk is sponsored by Digium
ESD
Electrostatic discharge is a serious issue in solid state electronics
electronics, such
as integrated circuits.
circuits Integrated circuits are made from semiconductor materials
such as silicon and insulating materials such as silicon dioxide.. Either of these
materials can suffer permanent damage when subjected
subjected to high voltages; as a
result, there are now a number of antistatic devices that help prevent static build
up.
www.allo.com
Version 2.0
30
GSM Digital Telephony Card User Manual
www.allo.com
Version 2.0
31