1
G.PULSE 12 FUNCTION HEART RATE MONITOR WITH NEW EXERCISE TECHNOLOGY
Read Me First
For accurate readings and best performance, please read the following suggestions.
z The skin types of people and their heart rate signals vary. You may need to take some time to become
familiar with the Transmitter Strap to achieve stable signals. So please be patient, especially during the
cold, dry winter months.
z Dry conductive rubber and skin contact will cause erroneous readings of “0” of heart rate display, so
please moisten the conductive rubber area by using water, saliva, ECG gel or other conductive liquids for
accurate and stable reading. DO NOT use Vaseline or oils which may insulate the Transmitter making it
unable to detect the heart rate signals or any electromagnetic devices such as television, computer, cell
phone, mechanical, watches…etc.
z Heart rate display may drop to “ 0”or jump to “250” when near high tension power lines and
transformers, or any electromagnetic devices such as television, computer, cell phone, mechanical
watches etc. Execute “MODE CLEAR” to clear all records and leave the area of interference to get
your actual heart rate displayed again.
z Dehydration and alcohol consumption can affect the detection and accuracy of the heart rate display. For
accurate readings, do not use the Transmitter and wait until your body is back to normal levels.
z Body hair can affect the detection and transmission of heart rate. If necessary, trim and shave the hair to
keep a smooth transmitter contact.
z Transmitter rubber contacts should be flat on your body when you adjust the chest strap.
For certain individuals, the computer will work better if the transmitter is worn either more to the left side,
a little higher, a little lower or possibly upside down.
z Always warm-up before exercise, use Heart Rate Monitor to keep within your target zone to exercise
efficiently and safely, and cool down for a few minutes at a low intensity before stopping.
Wear the transmitter against your bare skin to ensure best detection.
z However, if your skin type is allergic and wish to wear the transmitter over a thin shirt, moisten the shirt
well under two conductive pads area for better detection.
CONDITION UNDER WATER
1. The heart rate monitors are water resistant up to 30 meters. The buttons on the watch unit must not be
pressed when swimming or underwater to prevent water intake.
2. Due to the high conductivity of water heart rate measurement is not accurate and may cause erratic
reading on the watch unit.
3. Swimming pools have a high concentration of chlorine and sea water also is very acidic and conductive.
Signals are unable to transfer correctly in these environments.
1
WARNING
1. This heart rate monitor is designed to measure and display your heart rate during physical activity when
in a good state of health. It is not a medical device, nor is it intended for medical diagnostic purposes.
2. Please consult a doctor for an advice on exercise frequency and duration appropriate for your age, highest
and lowest heart rate limits etc. Please stop exercising if you feel uncomfortable, faint, or dizzy.
3. Do not put on the Heart Rate Transmitter if you are using any device to adjust or aid your heart rate (i.e.
Pace Maker)
4. The transmitter does not work in water. Please do not immerse this device in water.
5. The heart rate monitors are water resistant up to 30 meters. The buttons on the watch unit must not be
pressed when swimming or underwater to prevent water intake.
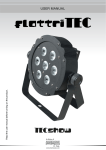
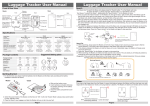
MAIN WATCH UNIT
of
[A] Current heart rate display
[B] High Limit of Target Zone/Total time over High
Target Zone
[C] Low Limit of Target Zone/Total time over Low Limit
Target Zone
[D] Function Mode symbol
[E] Function Mode display:
Clock display/ Stopwatch/ Exercise time countdown
[F] Weak battery symbol
(Heart rate symbol)
CARE AND MAINTENANCE
1. KEEP YOUR HEART RATE MONITOR DRY. Avoid storing your heart rate monitor in a wet and damp
environment which may produce condensation.
2. Avoid exposure to direct sunlight or extreme heart for a long period of time.
3. Watch battery:
The battery life of the CR2032 battery is between one and a half to two years. Extended use of the alarm
signals will lower the life of the battery.
2
12 FUNCTION AND OTHER FEATURES
1. Automatic Fat Burning Program according to age input.
2. Freely programmable Target Zone and exercise time
3. Three different steps audible alarms
A: Every 30 seconds one "beep" when current heart rate is over Low Limit of Target Zone
B: Every 30 seconds four "beep" when current heart rate is over High Limit of Target Zone
C: Every 10 seconds four short "beep" when current heart rate is over your age's Maximum Pulse Limit
(MPL: refer to Target Heart Chart).
4. Visual alarm
5. Current heart rate digits will flash when current heart rate is over your age's MPL
6. Preset exercise time countdown
7. Current heart rate display
35-250 Beats per minute
8. Total time over Low Limit of Target Zone
09:59 (Hour/Minute)
9. Total time over High Limit of Target Zone
09:59 (Hour/Minute)
10. Stopwatch 9: 59: 59 {Hour/Minute/Second)
12/24 Hour clock
11. Target Zone re-settable and re-checkable
12. Unique transmission LED indicator
z
z
z
z
z
Weak battery detection
Auto Power Saving
3 V Lithium batteries (CR2032) included
Batteries replaceable
Water resistant
ACCESSORIES & ATTACHMENT
Heart Rate Transmitter
Elastic strap
Battery Cover of Transmitter
Battery Rubber Pad of Transmitter (O-ring)
CR2032 3V Lithium battery of Transmitter
“C “Tube
3
WATCH BATTERY REPLACEMENT
The watch includes one 3V CR2016 lithium battery. When display of weak batter for replacement is on,
replace the battery with a new CR2016 battery or equivalent.
1.
2.
3.
4.
5.
6.
7.
Use a screw driver to loose the screws at the back cover, separate the back over apart from the front case.
Remove the clear plastic cover carefully.
Use a small screw driver to unlock the metal spring and to tilt out the old battery.
Slide a new CR2016 battery back to the location.
Press the metal spring back to the lock position to secure the new battery.
Place the plastic cover back and assemble the back cover on the front case.
Tighten the screws and promptly dispose of the ode battery.
Note: 1. Do not loss any O-ring and metal spring.
2. Removing the watch battery will erase all data recorded and reset the watch receiver.
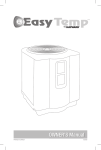
TRANSMITTER BATTERY INSTALLMENT
Insert a CR2032 3V Lithium battery, positioning it as illustrated below. Place the battery rubber pad (O-ring)
and battery cover properly into the case then close the cover, tightening it with a coin or similar object.
The rubber pad (O-ring) ensures water proof protection of the battery compartment.
4
IMPORTANT
Make sure to install the O-ring properly and close the battery cover very tightly as below illustrated to
prevent sweat and moisture from spoiling the battery composition.
NOTICE
★
Apply water or conductive gel to moisture the conductive rubbers which both must be in proper contact
with your chest skin to detect heart rate for best performance.
★
★
Keep the transmitter clean especially the two parts of conductive rubber.
Do not store the transmitter near high voltage power lines, televisions, cellular phones…etc. to avoid
electromagnetic interference from shortening the life of the battery.
MOUNTING WATCH ON BIKE HANDLEBAR
Attach “C” Tube on handlebar, then mount the watch onto “C” Tube and tighten it securely.
5
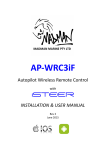
PUT ON HEART RATE TRANSMITTER
Please be sure that the LED flashing light indicator above logo.
This is the correct position for the most stable heart rate transmission.
Position the heart rate transmitter and adjust the elastic strap to fit your chest snugly as shown.
To check for proper operation, the
symbol on the watch will flash upon receiving a pulse signal. The
watch will then take a few seconds to display the initial current heart rate.
NOTE
1. If you get irregular pulses, please execute “RESET” to clear all records. Hole the S KEY and the M KEY
down simultaneously for 8 seconds.
2. Keep a distance not over 80 CM (30”) between the watch and Heart Rate Transmitter for good Wireless
reception as illustrated.
UNIQUE TRANSMISSION LED INDICATOR
A red transmitter LED will flash indicating the transmitter is in operation. Adjust the transmitter position to
keep the LED indicator flashing consistently for accurate readings.
NOTE: If the watch does not display heart rate readings when the Heart Rate symbol flashes for over two
minutes, please check the watch battery installation and execute a “RESET” to the watch.
6
FINDING YOUR TARGET HEART ZONE
Training in your Target Heart Zone is important and it is recommended that you consult your personal doctor
or physician. Recent research has indicated that optimal use of fat as energy occurs when your heart beats
per minute (BPM) is between 55% and 65% of your Maximum Pulse Limit (MPL).
Refer to the chart below to find your Target Heart Zone for your age.
1. FAT BURNING ZONE
Your heart rate during exercise should be at 55% to 65% of your Maximum Pulse Limit (MPL) if you are in
god health and either a beginner or intermediate exerciser (one who has done some prior aerobic activity)
2. CARDIOVASCULAR STRENGTH ZONE
Good aerobic condition/advanced exercisers can select a target heart zone at 65% to 85% of their Maximum
Pulse Limit (MPL).
TARGET HEART CHART
AGE
20 25 30 35 40 45 50 55 60 (BPM)
MPL
200 19 19 18 18 17 17 16 16
85%
170 16 16 15 15 14 14 14 13
65%
130 12 12 12 11 11 11 10 10
55%
110 10 10 10 99 96 94 91 88
7
1. RESET
Hold the S KEY and the M KEY down simultaneously for 8 seconds to clear all data, the whole display will
be shown and then enter AGE INPUT.
2. AGE INPUT
The computer preset age is "20", press the S KEY one time to advance age to 21, press and hold the S KEY
down and the numbers will increase rapidly-Ages range from 18 to 60. Press the S KEY until you get the age
that you want. Press the M KEY to confirm the age and enter F MODE to select the FAT BURNING
PROGRAM or FREE PROGRAM.
3. AUTOMATIC FAT BURNING PROGRAM
According to your age input, the computer will automatically set High/Low limits of Fat Burning Zone
(refer to Target Heart Chart) and exercise time of 25 minutes over Low Limit of Target Zone. Press the
M KEY to across through all the digits of High/Low Limits and preset exercise time and then enter the
CLOCK MODE.
8
4. FREELY PROGRAMMABLE TARGET ZONE & EXERCISE TIME
If your age is out of the range of 18-60 or you want to set your own Target Zone and exercise time, you can
freely set High/Low limits of Target Zone
and exercise time by changing the flashing digits.
Press the S KEY or hold the S KEY down (same method as Age Input) to increase numbers of 1st digit of
high limit, press the M KEY to
confirm and then shift to 2nd digit. All the other digits of high/low limits
and exercise time can be adjusted by the same method in order, and then enter the CLOCK MODE.
To remind you again, please consult your doctor for comments about exercise frequency and duration
appropriate for your age, highest and lowest heart rate limits etc.
NOTE
1. Low/High Limits of Target Zone Range: 35-250 BPM
2. Low Limit must be not higher than High Limit
3. Exercise time range: 0-9:59:59 (H/M/S)
5. CLOCK MODE
[A] Current heart rate display
[B] High Limit of Target Zone
[C] Low Limit of Target Zone
[D]
Clock Mode symbol
[E] Clock display
[F]
Weak battery symbol for replacement
6. CLOCK SETTING
Hold the S KEY first and press the M KEY down simultaneously for 4 seconds, the "minute" digits will
then be flashing. To advance the minutes, press the S KEY until you get the minutes that you want. Press and
hold the S KEY down and the numbers will increase rapidly. Press the M KEY and the "hour" digits will be
flashing, press the S KEY until you get the hours that you want. Press the M KEY and now, hours and
minutes will be flashing.
7. 12/24 HOUR FORMAT SHIFT
To shift clock display to 24 Hour format press the S KEY. Press the S KEY again and clock display to shift
back to the original 12 Hour format. Press the M KEY to finish clock setting and enter CLOCK MODE.
CLOCK RESETING
Press the M KEY to shift to the
Clock Mode, hold the S KEY first and press the M KEY (holding both
down) for 4 seconds. The "Minute" digits will then be flashing for resetting.
9
8. MODE SHIFT
Press the M KEY to enter next STOPWATCH MODE and the other modes.
MODE CLEAR
In every [T] [E] mode, hold the S KEY and press M KEY once, the records of [T] [E] modes will be
simultaneously cleared to ZERO or will return to preset value.
9. STOPWATCH MODE
Press the M KEY to shift to STOPWATCH MODE, the
symbol will not flash. Press the S KEY to
activate Stopwatch and the
symbol will flash, press the S KEY again to stop Stopwatch and the
symbol will stop flashing. Press the S KEY for continuous time count.
Hold the S KEY and press the M KEY one time to clear record. Stopwatch range:
00:00:00(Minute/Second/Second % )-9:59:59 (Hour/Minute/Second)
NOTE
In [T] STOPWATCH MODE, the watch will not enter the POWER SAVING MODE once Stopwatch is
activited. Stop STOPWATCH or shift to the other mode to enter Power Saving Mode.
[A] Current heart rate display
[B] High Limit of Target Zone
[C] Low Limit of Target Zone
[D]
Stopwatch Mode symbol
[E] Stopwatch display
[F]
Weak battery symbol for replacement
CHANGING AGE INPUT
Press the M KEY to shift to [E] Mode, press the S KEY only down over 8 seconds, the watch will return to F
Mode for changing AGE INPUT.
CHANGING PROGRAMS
Press the M KEY to shift to[T] Mode, press the S KEY only down over 8 seconds, the watch will return to F
Mode for changing training programs.
10
10. EFFICIENCY MODE
Press the M KEY to shift to [E] EFFICIENCY MODE, the
symbol will not flash. Press the S KEY to
activate EFFICIENCY MODE and the
symbol will flash, then press the S KEY again to stop
EFFICIENCY MODE. Hold the S KEY and press the M KEY once to clear all the [T] [E] modes records and
reload preset exercise time.
[A] Current heart rate display
[B] Total time over High Limit of Target Zone
[C] Total time over Low Limit of Target Zone
[D]
EFFICIENCY MODE symbol
[E] Preset Exercise Time countdown
=Preset Exercise Time-Total time over Low
Limit of Target Zone
[F]
Weak battery symbol for replacement
11. AUTO POWER SAVING
When the watch does not receive any signal or input for 2 minutes, the power will be automatically saved and
the watch will display the CLOCK time/symbol only.
The AUTO POWER SAVING Mode is automatically released when the S KEY or the M KEY is pressed.
NOTE
The watch will not enter Auto Power Saving Mode if the AGE INPUT or CLOCK SETTING does finish
setting or if STOPWATCH MODE is activated.
FREQUENTLY ASKED QUESTIONS
* Please check that the transmitter electrodes are clean of debris.
* Do not operate your heart rate monitor near highly electromagnetic fields, such as TV sets, cell phones,
computers, other watch units or other electronic devices that may cause signal interference.
* Check the strap unit for a tight fit across the chest area. Loose fit may cause poor signal transfer and
detection.
* Keep your transmitter and watch unit within the maximum distance range of 80cm(2 1/2 feet) for strong
signal transfer.
* Avoid being near another heart rate transmitter within the maximum distance range of 80cm you’re your
watch unit. The second transmitter may cause inaccurate readings on your watch unit.
* If at any time you experience irregular readings and or feel uncomfortable, consult a doctor to determine
your heart condition.
* If the unit does not start up or stops during operation please recheck the battery installation and if the
battery needs replacement. (Note: Check the contact plate in the battery case is not beat or damaged.)
* Sometimes when irregular data appears,execute "RESET" and try again to get the signal.
11
GUARANTEE
The following is not covered in the warranty:
▪
▪
▪
▪
▪
Battery
Misuse and abuse to the system
Improper maintenance
Cracked or broken casings
Plastic, rubber or fabric strap damage
DISCLAIMER
The specifications and descriptions in this user manual are subject to change without notice.
12