Transcript
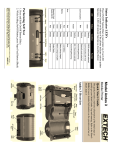
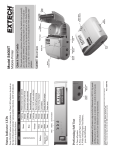
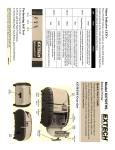
User Guide
Model 365528 Professional Stopwatch
Description
S1
S2
S3
Top
Display
Bottom
Display
Neck Strap
Lanyard
The default display is
the Calendar Clock.
The three pushbuttons
S1, S2, and S3 are
used to operate and
program the watch as
described throughout
this User Guide.
To reset the watch to
factory default
condition, press and
hold all three buttons
simultaneously until
the display blanks.
Calendar Clock Setting
The main display is the Calendar Clock. The top display
row shows the day of the week, the month and the date
(left to right). The lower display shows A (AM) or P (PM),
Hours, Minutes, and Seconds.
To change the date and time:
1. Press and hold the S2 (MODE) button until the
SECONDS begin to blink (2nd beep).
2. Press S1 to reset the seconds to ‘0’ allowing
synchronization with another device.
3. Press S3 to choose the MINUTES. Press S1 to
advance the minutes (hold S1 for fast scrolling).
4. Use S3 & S1 in similar fashion to program the
HOURS, AM/PM, YEAR, MONTH, and DATE.
5. To exit, press S2 momentarily when finished.
6. Press S3 to choose 12 or 24 hour clock. In 12 hour
mode, the ‘A’ and ‘P’ icons are active.
Alarm Operation and Settings
Press S2 momentarily to view the ALARM SETTING
TIME (bottom display) and the current time (top display).
The ‘AL’ icon will be displayed. To change the alarm
time:
1. Press and hold S2 until the MINUTES blink.
2. Use S1 to select the desired minutes.
3. Press S3 to advance to the HOURS.
4. Use S1 to select the desired hours.
5. Press S2 when complete.
Now, from the Calendar Clock main display, use S1 to
activate/deactivate the alarm. When activated, the Alarm
Bell symbol will appear. The alarm will sound at the
programmed time. To silence the alarm, press S1.
The
symbol will appear to let the user know that the
alarm had tripped.
Chronograph (Stopwatch) Functions
Basic Stopwatch Mode
From the Calendar Clock, press S2 three times. Use S3 to
Start and Stop the stopwatch. Press and hold S1 until all
zeroes are displayed to reset the watch.
Lap Timer Functions
Up to 10 lap memories may be stored in the watch.
With the stopwatch running, press S1 each time a lap time
is to be stored. The top display row will alternate between
the current lap time and the lap number. The bottom display
always shows the total time. Use S3 to stop the clock. With
the clock stopped, use S1 to scroll through the stored lap
times. Press and hold S1 to zero the clock.
Pace Mode
Use the Pace function as an audible metronome, a heart
rate/pulse comparator, or as a walk/run pace guide.
1. From the Calendar Clock, press S2 twice.
2. The pace value will appear on the lower display in BPM
(beats per minute).
3. Use the S1 button to start / stop the audible beats.
4. Press and hold the S2 button until the digits blink to start
editing the bpm value. Use the S1 button to change the
value in increments of 5 bpm.
5. Available settings range from 40 to 180 bpm.
6. Press S2 momentarily to complete the editing.
Count-Down Timer
From the Calender Clock, press S2 four times.
Total time will be shown on the top display and remaining
time on the bottom.
1. Press and hold S2 until the MINUTES blink.
2. Use S1 to select the desired minutes.
3. Press S3 to advance to the HOURS.
4. Use S1 to select the desired hours.
5. Press S2 when complete.
6. Press S3 to start/stop the countdown timer.
7. With timer stopped, press and hold S1 to reset timer.
8. The timer will continue counting while other functions
are viewed.
9. Beeps occur at 10 minute, 5 minute, and 1 minute
intervals and for each of the last 5 seconds with a
continuous beep at the end.
10. Press S2 to silence the beeps and reset the timer.
Dual Time Zone
In the DUAL mode another Time Zone can be
monitored. Choose a time zone and program the time of
that zone as follows:
1. From the Calendar Clock, press S2 five times.
DUAL will display on the top and the clock on the
bottom.
2. Press and hold S2 until the MINUTES blink.
3. Use S1 to select the desired minutes.
4. Press S3 to advance to the HOURS.
5. Use S1 to select the desired hours.
6. Press S2 when complete.
Battery Replacement
Battery life is approximately one year. Replace the
batteries when the display dims as follows:
1. Remove the six (6) rear Phillips head screws using a
metric #0 cross-point screw driver.
2. Remove the old battery and replace with a new
CR2016 button cell. Note that all stored
programming will be lost when the battery is
removed.
3. Ensure that the battery compartment gasket is
secured correctly when re-assembling the meter.
Master Reset
Press and hold the S1, S2, and S3 buttons
simultaneously until the display blanks to reset all of the
functions to their factory defaults.
Accuracy: ± 5 seconds per each 24 hour period
Lifetime Limited Warranty
EXTECH INSTRUMENTS CORPORATION warrants this instrument to be free of defects in
parts and workmanship for the useful life of the product. This excludes wear from normal
use and/or abuse. Proof of original purchase must accompany any claims. If it should
become necessary to return the instrument for service during or beyond the warranty period,
contact the Customer Service Department at (781) 890-7440 ext. 210 for authorization or
visit our website at www.extech.com (click on Contact Extech and go to Service Department
to request an RA number). A Return Authorization (RA) number must be issued before any
product is returned to Extech. The sender is responsible for shipping charges, freight,
insurance and proper packaging to prevent damage in transit. This warranty does not apply
to defects resulting from action of the user such as misuse, improper wiring, operation
outside of specification, improper maintenance or repair, or unauthorized modification.
Extech specifically disclaims any implied warranties or merchantability or fitness for a
specific purpose and will not be liable for any direct, indirect, incidental or consequential
damages. Extech's total liability is limited to repair or replacement of the product. The
warranty set forth above is inclusive and no other warranty, whether written or oral, is
expressed or implied.
Support line (781) 890-7440
Technical support: Extension 200; E-mail: [email protected]
Repair & Returns: Extension 210; E-mail: [email protected]
Product specifications subject to change without notice
For the latest version of this User’s Guide, Software updates, and other
up-to-the-minute product information, visit our website: www.extech.com
Extech Instruments Corporation, 285 Bear Hill Rd., Waltham, MA 02451
Copyright © 2007 Extech Instruments Corporation
All rights reserved including the right of reproduction
in whole or in part in any form.
365528 Version 3.0 4/07