1
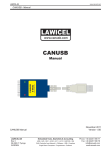
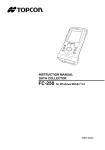
G-066ST USER MANUAL
FAILURE AND SOLUTION
Welcome to Use G-066ST/USB or G-066ST/A3
Please read carefully this User Manual in order to have a better understand of all functions of
Failure
Solutions
●
No Power
●
●
Principal Characteristics of this Unit
Check cells to confirm whether cells are properly installed;
The cell volume may be insufficient;
Cells may have been damaged. Change into new battery.
●
●
●
●
●
Poor receiving
signals
●
●
●
Unable to change
channels
●
●
Press Up key to increase Volume ;
The receiving signals may become weak or go beyond receiving range;
Hold the watch walkie to higher position,
In order to have the ideal effect,
In changing channels, press Menu key until the channel
numbers flash on the display screen;
Press Up key or Down key to change channels;
Cell volume may be insufficient.
●
●
●
●
●
●
●
●
●
●
●
Limited receiving
range
●
●
●
●
Distortion of
sound
●
●
●
two way watch talkers.
Cell volume may be insufficient;
In the case of any indication of insufficient cell volume,
please charge the rechargeable battery or replace new battery;
The effective receiving range is affected by terrain or environment;
The receiving range may be the greatest if it is in the open space.
tured buildings, or the corners of streets, or factory buildings,
or in cars, the receiving range will be seriously affected;
Check the position of the antenna. In order to have the ideal effect,
please place the antenna upwards.
In sending messages, your mouth must be 5cm away from
the microphone and talk in a normal voice;
In receiving signals, please regulate volume to an appropriate level;
Both talkers must keep apart by 2 meters at least or even farther;
The both sides may be too far away, or there is an obstacle that
hinders the sending of signals. If there is no obstacle between
the two sides, the talk range is up to 7 kilometers but no guarantte.
Watch type with adjustable watch band;
This radio was made in TXCO control and one-to-more radios communication;
FM Radio from 87.50MHz to 108MHz ;
With effective communicative distance up to 7 kilometers in open apace but no guarantee;
CTCSS and DCS 1-99 sub-channel encode & decode;
Voice scrambler get more privacy;
VOX, voice activate PTT with 1-3 level selection;
Clock alarm & SOS emergency alarm ;
12-hour/pm display.
Stop Watch and Keypad Lock Function
USB charging with battery protection circuit .
using 3.7V lithium battery in G-066ST/USB
using 3×AAA size battery in G-066ST/A3
Liquid Crystal Display Screen
1. Channel numbers (00) : Display the current channel
2. FM : FM Radio from 87.50MHz to 108MHz
3. CT : 1-38 CTCSS sub-channel
4. DCS : 39-99 DCS sub-channel
5. VOX : Voice activate PTT
6. SCRA : Voice scrambler
7. Transmission indicator : Indicator at the moment of transmission signal;
8. Receiving indicator : indicator at the moment of receiving signal;
9. Volume level bar : Display the current volume setup;
10. SOS : Emergency alarm call
11. Clock alarm ;
12. Battery capacity display
13. 12 hour/pm time display
14. Keypad Lock Function
Description of Structure
FCC & CE1313 & ROSH
1.POWER/MENU Key (Continue Press this key to select "Key Lock" & "POWER On/Off") :
When you press this key shortly, it give short music sound to start the menu list;
and press this key again to go th next different "Menu Mode"
2.PTT key (Press To Talk / Call alert) : Keep pressing
this key continue to send voice message. If shortly press the key twice to
activate "Call Alert" and send alert tone to another user;
3.UP key : Adjust volume (in the default state),Adjust channels and time
in the menu state;
4. DOWN key : Adjust volume (in the default state),Adjust channels and;
time in the menu state
5. SCAN key : Press this key to enter the channel scanning;
6. MIC : Built-in microphone;
7. Speaker : Built-in speaker;
8. Antenna : For TX/RX
Points for Attention
Menu Setting
This unit is in compliance with the communication control standards, so the following
rules and regulations must be observed:
POWER/MENU Key (Short Cut Setting) :
When you press this key shortly, it give short music sound to start the menu list;
1. While you use the unit, we do not guarantee that secrets will not be disclosed in
the 1st Press will go to Channel mode and 2nd Prss will go to CTCSS/DCS model;
communication ;
2. There must not be any harmful interference to be caused when you use this unit.
This unit must accept interference ;
3. Any unauthorized changes in or adjustment of the built-in setup such as changing
Please see the short cut introduction of different menu list at the below :
1st Press CHANNEL mode : Press Up/Down key to select your desired channel;
2nd Press CTCSS/DCS mode
3rd Press VOX mode
: 1-99 Tone Selection, press Up/Down key to select your sub-channel;
: Voice activate PTT, press Up/Down key to select ON/OFF with 1-3 VOX level selection
frequency, launching power, or extending antennas, etc beyond the specified range are
4th Press Hour Setting
illegal acts, or even lead to a breach of telecommunication management and control;
5th Press Minute Setting : 00-60 minute selection, "Blank"
4. Do not use this unit where there is danger, including gas stations, hospitals, airports
: 12 Hour/PM selection, "Blank"
alkaline-free or well-distributed soft cloth to clean batteries, etc;
6. You can have an ideal talking effect. Please put the antenna upward during the
communication and keep it 5cm distance from your face with talking normal voice; and
7.Although this radio has battery cell protection circuit, if you do not use it for long time,
is am morning time mode & "pm" is afternoon mode
6th Press Clock Alarm : Press Up/Down key to select your clock alarm ON-OFF. If you select ON
or any other gas or electric places without shield protection;
5. Do not use any detergent or thinner to wipe or clean this unit. Only use dry,
is am morning time mode & "pm" is afternoon mode
please continue press Menu button & go to set the clock alarm time.
7th Press Call alert : Press Up/Down key to select your call allert tone with 9 selection.
8th Press Voice Scrambler : Press Up/Down key to select voice scrambler ON-OFF.
8th Press Voice Scrambler : Press Up/Down key to select voice scrambler ON-OFF.
9th Press Stop Watch : Press Up/Down key to start the time counting & press any key to stop the counting.
10th Press SOS mode
: Press Up/Down key to select SOS emergency alarm ON-OFF with 3-5, 5-5
please take out the battery cells. Also, if you use rechargeable battery, you must use
10-5 alarm time selection. If you select ON with desired alarm time, then you see SOS
indicated USB cable to charge the rechargeable battery become fully charge before using again.
icon constant. When SOS mode is ON, press "DOWN" key 3 second until SOS icon become
flash to activate SOS alarm tone. When you need stop SOS alarm tone, press "DOWN" key
Battery Installation
Battery (attached with the unit) is applied to this talker. The installation
and replacement of cells are described as follows:
1. Press down the fixed button on the side of the battery cover of this unit to
open the battery cover;
2. In the time of installing the new battery, please place the batteries cell
into the cell compartment. In installation, please note the polarity within the
compartment and the cell itself; and
3. Put the cell compartment where it is and lock tightly the fixed button for the cell cover.
3 second until SOS icon become constant, the alarm tone will be stopped.
Special Key Setting
● POWER/MENU Key :
Press POWER/MENU Key : Continue press this key approx. 3 second, "Key Lock" will be activate.
Press this key approx. 5 second, the walkie will switch in turn ON or turn OFF. (Turn OFF is go to Time Mode only)
● FM RADIO mode :
Continue press UP key approx. 3 second, "FM Radio" will be activate, please press Up/ Down key to select
the radio channels
from 87.50t ~ 108.00MHz. Whe press UP button approx. 3 second again will QUIT from FM Radio.
Using Earphone
● Lift up the earphone/charger jack cover on the side of the unit;
● Insert the earphone plug into the earphone/charger jack and adjust the location of your earphone;
● Set the talker into the VOX mode. When the VOX function is set to ON, you do not have to keep pressing the
earphone/talk key for any talks. When the VOX function is set to OFF, keep pressing
the earphone talk key for talks; and
! Special Caution: Never inserting USB charging if this unit is not
installed with indicated rechargeable battery !!!
● When you use your earphone to hear the other side talk, press Up key or Down key to adjust
volume to an appropriate level.
This radio has (Option) USB charging cable, please see the charging procedure as the following :
1. Lift up the earphone /charger jack cover on the side of this unit;
2. Connect (Option) USB cable into charging device such as computer or USB AC adaptor.
Technical Specifications
3. Connect (Option) USB cable to the earphone/charger plug, In the charging process,
License free country: Europe/Hongkong/Japan/USA for your option
the battery icon become flashed when charging. After fully charge, the battery icon become constant.
Channels available: 8/20/21/22 channels for your option
Operating frequency: 446/409/422/462MHz
Note: For the first time charging, please charge the rechargeable battery for as long as 12 hours.
Power: 3.7V lithium battery
After completion charging, you must take out the USB cable to leave from the radio, it avoid radio
Output power: 0.5W maximum
become damaged.
Service life of cells: On the basis of services
Receiving range: up to 7km (in open space but no guarantee)
Low Battery Operation
USB charging: ~ 5V DC
When the battery is detected as low voltage, the battery icon bar will reduce and until empty battery bar.
TX power current: ~ 300 mA
When you heard low voltage alert tone, the battery must be charged otherwise it will work not properly.
RX power current: ~ 100 mA
When you still not charge the battery for certain time, the radio will auto-off (become time mode only)
Standby current: ~ 50 mA
It will quit from walkie talkie mode & please charge the battery at least 6 hours before you use it again.
Time mode current: ~ 5mA