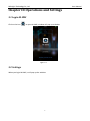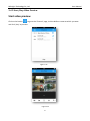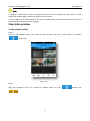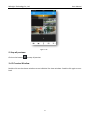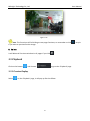
1
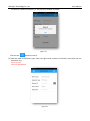
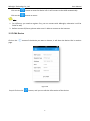
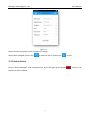
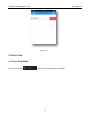
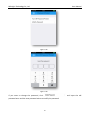
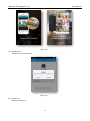
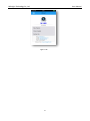
V2.01 Contents Chapter I Introduction .......................................................................................................................... 1 1.1 M-VMS Introduction ................................................................................................................ 1 1.2 Key Features ............................................................................................................................ 1 1.3 Performance Overview ............................................................................................................ 1 Chapter II Installation ........................................................................................................................... 2 2.1System Operating Environment ............................................................................................... 2 2.2 Installation Guide .................................................................................................................... 2 Chapter III Operations and Settings ..................................................................................................... 3 3.1 Login M-VMS ........................................................................................................................... 3 3.2 Settings .................................................................................................................................... 3 3.3 Device Manager ...................................................................................................................... 5 3.3.1 Add Device ..................................................................................................................... 5 3.3.2 Edit Device ..................................................................................................................... 8 3.3.3 Delete Device ................................................................................................................. 9 3.4 Live View................................................................................................................................ 10 3.4.1 Live View Mode ........................................................................................................... 10 3.4.2 Start/Stop Video Preview ............................................................................................ 12 3.4.3 Preview Window ......................................................................................................... 14 3.4.4 Preview Control ........................................................................................................... 15 3.5 Playback ................................................................................................................................ 19 3.5.1 Preview Replay ............................................................................................................ 19 3.5.2 Playback Control ......................................................................................................... 21 3.6 File Manager ......................................................................................................................... 21 3.6.1 Preview Files ................................................................................................................ 21 3.6.2 Delete Files .................................................................................................................. 23 3.7 Favorites ................................................................................................................................ 23 3.7.1 Add/Delete Group ....................................................................................................... 24 3.7.2 Add/Delete Group Member......................................................................................... 26 3.7.3 Preview the Favorites in Live View .............................................................................. 27 3.8 General .................................................................................................................................. 27 3.8.1 Password Protect......................................................................................................... 28 3.8.2 Help ............................................................................................................................. 31 3.8.3 About ........................................................................................................................... 32 Chapter IV Service .............................................................................................................................. 35 Milesight Technology Co.,Ltd. User Manual Chapter I Introduction 1.1 M-VMS Introduction The M-VMS app provides a powerful mobile surveillance tool that enhances security by providing administrators the flexibility to monitor the live video from the NVR via wireless network. It’s a video management system that works with the NVR to provide video monitoring. The interface is simple and intuitive, with easy access to the most common activities, such as viewing live video, recorded video playback. This manual describes how to use and manage the M-VMS in your networking environment. Some knowledge of networking environments would be beneficial to the reader. Should you require any technical assistance, please contract authorized service center. 1.2 Key Features Support up to 16 channels playing simultaneously Full screen for single or 4 channels playing synchronously Support digital zoom Multiple play status display Support image capture/video recording functions File management H.264 video compression Support dual-stream Support multiple PTZ control protocols Support IOS handheld device Support WIFI/3G/4G network 1.3 Performance Overview APP Stream Type 1st stream or 2nd stream Codec Type H.264 Frame Rate Up to the mobile device and the camera model Frame Size Up to the camera Bit Rate 16 Kbps -4096Kbps(up to the network environment) 1 Milesight Technology Co.,Ltd. User Manual Chapter II Installation 2.1System Operating Environment OS: IOS 6.0 or above 2.2 Installation Guide Download from the APP store and install directly. 2 Milesight Technology Co.,Ltd. User Manual Chapter III Operations and Settings 3.1 Login M-VMS Click on the icon ‘ ’ to open M-VMS, window will pop up as below. . Figure 3.1 3.2 Settings When you login M-VMS, it will pop up the window: 3 Milesight Technology Co.,Ltd. User Manual Figure 3.2 Click on the button ‘ ’ to pop the menu: Figure 3.3 You can choose the LiveView/Device Manager/Playback/File Manager/Favorites/General settings here. Details as follow: Icon Description 4 Milesight Technology Co.,Ltd. User Manual Live video preview Add/Delete/Edit the camera Playback the recorded videos on the HDDs of the NVR Manage the snapshots and recorded videos on the mobile device Quick way to preview specific video channel Password Protect Set passwords to protect this APP from being used by others help Details to use this app about New feature New Feature in the new version Check update Check the new version on-line and update Contact us Ways to contact us 3.3 Device Manager 3.3.1 Add Device Click ‘ ’ to add a NVR. The register type can be chosen as IP/Domain or IP/Server, details as follow: 5 Milesight Technology Co.,Ltd. User Manual Figure 3.4 (1) Add the NVR via IP/Domain type. Enter the NVR name, IP address, username, password and the server port. E.g.: Name: Device 1 Address: 192.168.5.168 Port:1100 Figure 3.5 Click on the ‘ ’ button to save the device info. It will connect to the NVR automatically. If 6 Milesight Technology Co.,Ltd. the device is added successfully, it will pop up a window as below. User Manual Figure 3.6 Click on the ‘ ’ button to return. (2) Add the NVR via IP/Server type. Enter the right serial number of the NVR, username and the password. E.g.: Name: Device1 Device ID: 5004110054 Figure 3.7 7 Milesight Technology Co.,Ltd. User Manual Click on the ‘ ’ button to save the device info. It will connect to the NVR automatically. Click on the ‘ ’ button to return. Note: 1. For IP/Server, you need to register first, you can contact with Milesight, otherwise it will be failed to add; 2. Before connect IP/Server, please make sure it’s able to connect to the Internet. 3.3.2 Edit Device Click on the ‘ ’ button of the device you want to choose, it will show the device info in another page. Figure 3.8 Step1: Click on the ‘ ’ button, and you can edit the information of the device. 8 Milesight Technology Co.,Ltd. User Manual Figure 3.9 Step2: Choose the column which you want to change. Step3: After changed, click on the ‘ ’ to save the info or click on the ‘ ’ to quit. 3.3.3 Delete Device On the ‘Device Manager’, slide the device left, and it will pop up the button‘ the device will be deleted 9 ’, touch it and Milesight Technology Co.,Ltd. User Manual Figure 3.10 3.4 Live View 3.4.1 Live View Mode Click on the column‘ ’ to get the live video, details as follow: 10 Milesight Technology Co.,Ltd. User Manual Figure 3.11 Option Description Expend/Pack up the menu Device List/Return to the preview Snapshot Disable/Enable PTZ Image adjustment Off/On Disable/Enable Video Record Stop all preview/restart all preview Turn off/on audio Turn off/on audio speaker Enable/Unable Digital Zoom 11 Milesight Technology Co.,Ltd. User Manual 3.4.2 Start/Stop Video Preview Start video preview Click on the button ‘ ’ to go to the ‘Channel’ page, tick the NVRs or cameras which you want and click ‘play’ to preview. Figure 3.12 Figure 3.13 12 Milesight Technology Co.,Ltd. User Manual Note: 1. Support 4 channels live view synchronously, when the total channels are more than 4, it will divide into another page, slide left or right to preview more; 2. Only support up to 16 channels for live view. If adding more than 16 cameras on the list, it will only show 16 camera live view in 4 pages. Stop video preview 1. Stop single preview. Step1: Press on the window which you want to stop preview, and then it will appear the button ‘ ’ on the top Figure 3.14 Step2: Drag the window to the top, release to delete when the icon ‘ ‘ ’. 13 ’change into Milesight Technology Co.,Ltd. User Manual Figure 3.15 2. Stop all previews. Click on the button ‘ ’ to stop all preview. 3.4.3 Preview Window Double-click on the chosen window to see individual live view windows. Double-click again to turn back. 14 Milesight Technology Co.,Ltd. User Manual Figure 3.16 3.4.4 Preview Control Under the live view mode, lateral reversing the mobile device, it will change into the full screen mode. Double-click on one of the windows. It will change into single view in full screen too. Slide left or right to go to the previous or next page. All the operations are similar to vertical screen mode. Figure 3.17 15 Milesight Technology Co.,Ltd. User Manual Figure 3.18 Details about the icons: 1. Snapshot Choose one of the window, click on the button ‘ ’, the image will be saved in your mobile devices. You can manage them on column ‘File Manager’. 2. Record Touch the ‘ ’ to start recording. You will see ‘ ’ in the live view window. Click the ‘ ’ again to stop, and the video will be saved in your mobile devices too, you can find it in ‘File Manager’. 3. PTZ If the camera supports PTZ, click on the button ‘ ’, it will turn into ‘ ’.Then you are able to remote control the direction of camera by sliding on the image. Icons’ meaning described as below: 16 Milesight Technology Co.,Ltd. User Manual Figure 3.19 Option Description Option Description Auto PTZ Stop auto PTZ Zoom + Zoom - Focus+ Focus- IRIS- IRIS+ Go to preset Save preset Delete preset Preset (1-10) 4. Image quality Click on the button ‘ ’, it’s able to adjust the image quality, primary stream or secondary stream, by manual, according to different network environment. Note: You are able to play the main stream or the second stream, but it’s up to the network environment and the hardware configuration of the mobile device. Main stream provide a perfect image but requires a better network environment, while second stream requires the opposite. 17 Milesight Technology Co.,Ltd. User Manual Figure 3.20 5. Audio Click the button ‘ ’ to enable the audio, the icon will change into ‘ ’. 6. Speaker Click the button ‘ ’ to open the audio, the icon will change into ‘ ’. 7. Digital Zoom Choose one channel, click on the button ‘ ’, then the icon will change into ‘ fingers to zoom in and zoom out. Figure 3.21 18 ’ and use two Milesight Technology Co.,Ltd. User Manual Figure 3.22 Note: This functions will fail sliding to next page functions, so remember to click ‘ if you want to preview further image. 8. Delete It will delete all live view windows in all pages if you click‘ ’. 3.5 Playback Click on the button ‘ ’ and choose ‘ ’ to go to the ‘Playback’ page. 3.5.1 Preview Replay Select ‘ ’ on the ‘Playback’ page, it will pop up like the follow: 19 ’ to quit Milesight Technology Co.,Ltd. User Manual Figure 3.23 (1) Choose one channel from the list; (2) Slide up or down to choose the Start time and the Stop time; (3) Click on the ‘Play’ button to replay. Figure 3.24 Note:The time between the Begin time and End time can’t be more than 3 days. On the time line, you can slide any point to begin replay. 20 Milesight Technology Co.,Ltd. User Manual 3.5.2 Playback Control Figure 3.25 The details about the control icons: Option Description Option Description Snapshot Open/Close audio Pause/Resume Enable/Disable record Slow down/Speed up Enable/Disable digital zoom Slide time on the time line Stop playback 3.6 File Manager 3.6.1 Preview Files Click on the button ‘ ’ and choose ‘ bellow. Select one to preview. ’ to go to the ‘File Manager’ page as 21 Milesight Technology Co.,Ltd. User Manual Figure 3.26 Figure 3.27 You can click ‘ ’ to return to the previous page or click ‘ now 22 ’ to delete the image or video right Milesight Technology Co.,Ltd. User Manual 3.6.2 Delete Files 1. Click‘ ’ and select someone you want to edit then choose‘ 2. If you want to delete all files, select the ‘ ’ and then click ‘ ’ to delete. ’. 3. If you have already chosen someone but you didn’t want to delete, just click ‘ ’ to cancel the operation. Figure 3.28 3.7 Favorites Click on the button ‘ ’ and choose ‘ ’ to go to the ‘Favorites’ page as bellow. 23 Milesight Technology Co.,Ltd. User Manual Figure 3.29 You can add several groups in this column as to provide a convenient way to preview specific devices. 3.7.1 Add/Delete Group 1. Add Groups. Click on ‘ ’ to add a group, it will pop up like the following. Input a group name and touch ‘OK’ to confirm the operation. 24 Milesight Technology Co.,Ltd. User Manual Figure 3.30 2. Delete groups. Slide left on the group you want delete and the selected column will turn up a signal’ to delete the group. Figure 3.31 25 ’,touch it Milesight Technology Co.,Ltd. User Manual 3.7.2 Add/Delete Group Member 1. Add group member Tap on the group to enter the group’s page. Click ‘ ‘ ’ to save the change. Figure 3.32 Figure 3.33 26 ’ to tick members for this group and click Milesight Technology Co.,Ltd. 2. Delete group member User Manual Tap on the group to enter the group’s page. Click ‘ ‘ ’ to cancel the ticks of the devices and click ’ to save the change. 3.7.3 Preview the Favorites in Live View Step 1: Select ‘ ’ in the page of live view. It will turn to the page as below. Figure 3.34 Select a group that you set before and click ‘Play’. You will preview some channels and switch to other channels in a more convenient way. 3.8 General Here are some futures about M-VMS. 27 Milesight Technology Co.,Ltd. User Manual Figure 3.35 3.8.1 Password Protect Click the button of Password Protect, and turn to the page as below. Figure 3.36 Choose to turn on Password Protect, then set a password and input it again to confirm the password. 28 Milesight Technology Co.,Ltd. User Manual Figure 3.37 Figure 3.38 Once you set a password, you need to input it every time when you want to log in M-VMS. If you want to turn off it, click ‘ ’ and input the password to turn it off. 29 Milesight Technology Co.,Ltd. User Manual Figure 3.39 Figure 3.40 If you want to change the password, click ‘ password once and the new password twice to modify the password. 30 ’ and input the old Milesight Technology Co.,Ltd. User Manual Figure 3.41 3.8.2 Help You can get the version of this software and the brief way to use the application. Figure 3.42 31 Milesight Technology Co.,Ltd. User Manual 3.8.3 About Tap on the button of ‘About’, you can see the page below. Figure 3.43 (1) New Feature New features in this version: 32 Milesight Technology Co.,Ltd. User Manual Figure 3.44 (2) Update Now Detect for the new version: Figure 3.45 (3) Contact Us Ways to contact us: 33 Milesight Technology Co.,Ltd. User Manual Figure 3.46 34 Milesight Technology Co.,Ltd. User Manual Chapter IV Service Milesight Technology Co., Ltd provides customers with timely and comprehensive technical support services. End-users can contact your local dealer to obtain technical support. Distributors and resellers can contact directly with Milesight for technical support. Technical Support Mailbox: [email protected] Web: http://www.milesight.com Online Problem Submission System: http://www.milesight.com/service/feedback.asp Address: No.23Wanghai Road,2nd Software Park,Xiamen,China Zip Code: 361006 TEL: +86-592-5922772 FAX: +86-592-5922775 Milesight More in Sight 35