1
ACSM1
Firmware Manual
ACSM1 Speed and Torque Control Program
ACSM1 Speed and Torque Control Program
Firmware Manual
3AFE68848261 REV D
EN
EFFECTIVE: 12.11.2007
© 2007 ABB Oy. All Rights Reserved.
5
Table of contents
Table of contents
Introduction to the manual
What this chapter contains . . . . . . . . . . . . . . . . . . . . . . . . . . . . . . . . . . . . . . . . . . . . . . . . . . . . . . .
Compatibility . . . . . . . . . . . . . . . . . . . . . . . . . . . . . . . . . . . . . . . . . . . . . . . . . . . . . . . . . . . . . . . . . .
Safety instructions . . . . . . . . . . . . . . . . . . . . . . . . . . . . . . . . . . . . . . . . . . . . . . . . . . . . . . . . . . . . . .
Reader . . . . . . . . . . . . . . . . . . . . . . . . . . . . . . . . . . . . . . . . . . . . . . . . . . . . . . . . . . . . . . . . . . . . . . .
Contents . . . . . . . . . . . . . . . . . . . . . . . . . . . . . . . . . . . . . . . . . . . . . . . . . . . . . . . . . . . . . . . . . . . . .
Product and service inquiries . . . . . . . . . . . . . . . . . . . . . . . . . . . . . . . . . . . . . . . . . . . . . . . . . . . . .
Product training . . . . . . . . . . . . . . . . . . . . . . . . . . . . . . . . . . . . . . . . . . . . . . . . . . . . . . . . . . . . . . . .
Providing feedback on ABB Drives manuals . . . . . . . . . . . . . . . . . . . . . . . . . . . . . . . . . . . . . . . . . .
13
13
13
13
14
14
14
14
Start-up
What this chapter contains . . . . . . . . . . . . . . . . . . . . . . . . . . . . . . . . . . . . . . . . . . . . . . . . . . . . . . . 15
How to start up the drive . . . . . . . . . . . . . . . . . . . . . . . . . . . . . . . . . . . . . . . . . . . . . . . . . . . . . . . . . 15
How to control the drive through the I/O interface . . . . . . . . . . . . . . . . . . . . . . . . . . . . . . . . . . . . . . 28
Drive programming via PC tool
What this chapter contains . . . . . . . . . . . . . . . . . . . . . . . . . . . . . . . . . . . . . . . . . . . . . . . . . . . . . . .
General . . . . . . . . . . . . . . . . . . . . . . . . . . . . . . . . . . . . . . . . . . . . . . . . . . . . . . . . . . . . . . . . . . . . . .
Programming via parameters . . . . . . . . . . . . . . . . . . . . . . . . . . . . . . . . . . . . . . . . . . . . . . . . . . . . .
Solution programming . . . . . . . . . . . . . . . . . . . . . . . . . . . . . . . . . . . . . . . . . . . . . . . . . . . . . . . . . . .
Function blocks . . . . . . . . . . . . . . . . . . . . . . . . . . . . . . . . . . . . . . . . . . . . . . . . . . . . . . . . . . . . . .
Program execution . . . . . . . . . . . . . . . . . . . . . . . . . . . . . . . . . . . . . . . . . . . . . . . . . . . . . . . . . . .
Operation modes . . . . . . . . . . . . . . . . . . . . . . . . . . . . . . . . . . . . . . . . . . . . . . . . . . . . . . . . . . . .
29
29
30
30
31
31
32
Control locations and operating modes
What this chapter contains . . . . . . . . . . . . . . . . . . . . . . . . . . . . . . . . . . . . . . . . . . . . . . . . . . . . . . .
Local control vs. external control . . . . . . . . . . . . . . . . . . . . . . . . . . . . . . . . . . . . . . . . . . . . . . . . . . .
Operating modes of the drive . . . . . . . . . . . . . . . . . . . . . . . . . . . . . . . . . . . . . . . . . . . . . . . . . . . . .
Speed control mode . . . . . . . . . . . . . . . . . . . . . . . . . . . . . . . . . . . . . . . . . . . . . . . . . . . . . . . . . .
Torque control mode . . . . . . . . . . . . . . . . . . . . . . . . . . . . . . . . . . . . . . . . . . . . . . . . . . . . . . . . .
Special control modes . . . . . . . . . . . . . . . . . . . . . . . . . . . . . . . . . . . . . . . . . . . . . . . . . . . . . . . .
Drive control chain for speed and torque control . . . . . . . . . . . . . . . . . . . . . . . . . . . . . . . . . . . .
33
33
34
34
34
34
35
Default connections of the control unit
What this chapter contains . . . . . . . . . . . . . . . . . . . . . . . . . . . . . . . . . . . . . . . . . . . . . . . . . . . . . . . 37
Table of contents
6
Firmware functions, parameters and signals
What this chapter contains . . . . . . . . . . . . . . . . . . . . . . . . . . . . . . . . . . . . . . . . . . . . . . . . . . . . . . .
Firmware block layout . . . . . . . . . . . . . . . . . . . . . . . . . . . . . . . . . . . . . . . . . . . . . . . . . . . . . . . .
Actual signals . . . . . . . . . . . . . . . . . . . . . . . . . . . . . . . . . . . . . . . . . . . . . . . . . . . . . . . . . . . . . . .
Parameters . . . . . . . . . . . . . . . . . . . . . . . . . . . . . . . . . . . . . . . . . . . . . . . . . . . . . . . . . . . . . . . .
ACTUAL VALUES . . . . . . . . . . . . . . . . . . . . . . . . . . . . . . . . . . . . . . . . . . . . . . . . . . . . . . . . . . . . .
Description . . . . . . . . . . . . . . . . . . . . . . . . . . . . . . . . . . . . . . . . . . . . . . . . . . . . . . . . . . . . . . . . .
Outputs . . . . . . . . . . . . . . . . . . . . . . . . . . . . . . . . . . . . . . . . . . . . . . . . . . . . . . . . . . . . . . . . . . .
SYSTEM INFO . . . . . . . . . . . . . . . . . . . . . . . . . . . . . . . . . . . . . . . . . . . . . . . . . . . . . . . . . . . . . . . .
Description . . . . . . . . . . . . . . . . . . . . . . . . . . . . . . . . . . . . . . . . . . . . . . . . . . . . . . . . . . . . . . . . .
Signals . . . . . . . . . . . . . . . . . . . . . . . . . . . . . . . . . . . . . . . . . . . . . . . . . . . . . . . . . . . . . . . . . . . .
START-UP DATA . . . . . . . . . . . . . . . . . . . . . . . . . . . . . . . . . . . . . . . . . . . . . . . . . . . . . . . . . . . . . .
Description . . . . . . . . . . . . . . . . . . . . . . . . . . . . . . . . . . . . . . . . . . . . . . . . . . . . . . . . . . . . . . . . .
Inputs . . . . . . . . . . . . . . . . . . . . . . . . . . . . . . . . . . . . . . . . . . . . . . . . . . . . . . . . . . . . . . . . . . . . .
DI . . . . . . . . . . . . . . . . . . . . . . . . . . . . . . . . . . . . . . . . . . . . . . . . . . . . . . . . . . . . . . . . . . . . . . . . . .
Description . . . . . . . . . . . . . . . . . . . . . . . . . . . . . . . . . . . . . . . . . . . . . . . . . . . . . . . . . . . . . . . . .
Inputs . . . . . . . . . . . . . . . . . . . . . . . . . . . . . . . . . . . . . . . . . . . . . . . . . . . . . . . . . . . . . . . . . . . . .
Outputs . . . . . . . . . . . . . . . . . . . . . . . . . . . . . . . . . . . . . . . . . . . . . . . . . . . . . . . . . . . . . . . . . . .
DIO1 . . . . . . . . . . . . . . . . . . . . . . . . . . . . . . . . . . . . . . . . . . . . . . . . . . . . . . . . . . . . . . . . . . . . . . . .
Description . . . . . . . . . . . . . . . . . . . . . . . . . . . . . . . . . . . . . . . . . . . . . . . . . . . . . . . . . . . . . . . . .
Inputs . . . . . . . . . . . . . . . . . . . . . . . . . . . . . . . . . . . . . . . . . . . . . . . . . . . . . . . . . . . . . . . . . . . . .
Outputs . . . . . . . . . . . . . . . . . . . . . . . . . . . . . . . . . . . . . . . . . . . . . . . . . . . . . . . . . . . . . . . . . . .
DIO2 . . . . . . . . . . . . . . . . . . . . . . . . . . . . . . . . . . . . . . . . . . . . . . . . . . . . . . . . . . . . . . . . . . . . . . . .
Description . . . . . . . . . . . . . . . . . . . . . . . . . . . . . . . . . . . . . . . . . . . . . . . . . . . . . . . . . . . . . . . . .
Inputs . . . . . . . . . . . . . . . . . . . . . . . . . . . . . . . . . . . . . . . . . . . . . . . . . . . . . . . . . . . . . . . . . . . . .
Outputs . . . . . . . . . . . . . . . . . . . . . . . . . . . . . . . . . . . . . . . . . . . . . . . . . . . . . . . . . . . . . . . . . . .
DIO3 . . . . . . . . . . . . . . . . . . . . . . . . . . . . . . . . . . . . . . . . . . . . . . . . . . . . . . . . . . . . . . . . . . . . . . . .
Description . . . . . . . . . . . . . . . . . . . . . . . . . . . . . . . . . . . . . . . . . . . . . . . . . . . . . . . . . . . . . . . . .
Inputs . . . . . . . . . . . . . . . . . . . . . . . . . . . . . . . . . . . . . . . . . . . . . . . . . . . . . . . . . . . . . . . . . . . . .
Outputs . . . . . . . . . . . . . . . . . . . . . . . . . . . . . . . . . . . . . . . . . . . . . . . . . . . . . . . . . . . . . . . . . . .
RO . . . . . . . . . . . . . . . . . . . . . . . . . . . . . . . . . . . . . . . . . . . . . . . . . . . . . . . . . . . . . . . . . . . . . . . . .
Description . . . . . . . . . . . . . . . . . . . . . . . . . . . . . . . . . . . . . . . . . . . . . . . . . . . . . . . . . . . . . . . . .
Inputs . . . . . . . . . . . . . . . . . . . . . . . . . . . . . . . . . . . . . . . . . . . . . . . . . . . . . . . . . . . . . . . . . . . . .
Outputs . . . . . . . . . . . . . . . . . . . . . . . . . . . . . . . . . . . . . . . . . . . . . . . . . . . . . . . . . . . . . . . . . . .
AI1 . . . . . . . . . . . . . . . . . . . . . . . . . . . . . . . . . . . . . . . . . . . . . . . . . . . . . . . . . . . . . . . . . . . . . . . . .
Description . . . . . . . . . . . . . . . . . . . . . . . . . . . . . . . . . . . . . . . . . . . . . . . . . . . . . . . . . . . . . . . . .
Inputs . . . . . . . . . . . . . . . . . . . . . . . . . . . . . . . . . . . . . . . . . . . . . . . . . . . . . . . . . . . . . . . . . . . . .
Outputs . . . . . . . . . . . . . . . . . . . . . . . . . . . . . . . . . . . . . . . . . . . . . . . . . . . . . . . . . . . . . . . . . . .
AI2 . . . . . . . . . . . . . . . . . . . . . . . . . . . . . . . . . . . . . . . . . . . . . . . . . . . . . . . . . . . . . . . . . . . . . . . . .
Description . . . . . . . . . . . . . . . . . . . . . . . . . . . . . . . . . . . . . . . . . . . . . . . . . . . . . . . . . . . . . . . . .
Inputs . . . . . . . . . . . . . . . . . . . . . . . . . . . . . . . . . . . . . . . . . . . . . . . . . . . . . . . . . . . . . . . . . . . . .
Outputs . . . . . . . . . . . . . . . . . . . . . . . . . . . . . . . . . . . . . . . . . . . . . . . . . . . . . . . . . . . . . . . . . . .
AO1 . . . . . . . . . . . . . . . . . . . . . . . . . . . . . . . . . . . . . . . . . . . . . . . . . . . . . . . . . . . . . . . . . . . . . . . .
Description . . . . . . . . . . . . . . . . . . . . . . . . . . . . . . . . . . . . . . . . . . . . . . . . . . . . . . . . . . . . . . . . .
Inputs . . . . . . . . . . . . . . . . . . . . . . . . . . . . . . . . . . . . . . . . . . . . . . . . . . . . . . . . . . . . . . . . . . . . .
Outputs . . . . . . . . . . . . . . . . . . . . . . . . . . . . . . . . . . . . . . . . . . . . . . . . . . . . . . . . . . . . . . . . . . .
AO2 . . . . . . . . . . . . . . . . . . . . . . . . . . . . . . . . . . . . . . . . . . . . . . . . . . . . . . . . . . . . . . . . . . . . . . . .
Description . . . . . . . . . . . . . . . . . . . . . . . . . . . . . . . . . . . . . . . . . . . . . . . . . . . . . . . . . . . . . . . . .
Inputs . . . . . . . . . . . . . . . . . . . . . . . . . . . . . . . . . . . . . . . . . . . . . . . . . . . . . . . . . . . . . . . . . . . . .
Table of contents
39
39
40
40
41
41
41
43
43
43
44
44
44
49
49
49
49
50
50
50
50
51
51
51
51
52
52
52
53
54
54
54
54
55
55
55
57
58
58
58
59
60
60
60
61
62
62
62
7
Outputs . . . . . . . . . . . . . . . . . . . . . . . . . . . . . . . . . . . . . . . . . . . . . . . . . . . . . . . . . . . . . . . . . . . . 63
DRIVE LOGIC . . . . . . . . . . . . . . . . . . . . . . . . . . . . . . . . . . . . . . . . . . . . . . . . . . . . . . . . . . . . . . . . . 64
Description . . . . . . . . . . . . . . . . . . . . . . . . . . . . . . . . . . . . . . . . . . . . . . . . . . . . . . . . . . . . . . . . . 64
Inputs . . . . . . . . . . . . . . . . . . . . . . . . . . . . . . . . . . . . . . . . . . . . . . . . . . . . . . . . . . . . . . . . . . . . . 66
Outputs . . . . . . . . . . . . . . . . . . . . . . . . . . . . . . . . . . . . . . . . . . . . . . . . . . . . . . . . . . . . . . . . . . . . 69
START/STOP MODE . . . . . . . . . . . . . . . . . . . . . . . . . . . . . . . . . . . . . . . . . . . . . . . . . . . . . . . . . . . 77
Description . . . . . . . . . . . . . . . . . . . . . . . . . . . . . . . . . . . . . . . . . . . . . . . . . . . . . . . . . . . . . . . . . 77
Inputs . . . . . . . . . . . . . . . . . . . . . . . . . . . . . . . . . . . . . . . . . . . . . . . . . . . . . . . . . . . . . . . . . . . . . 78
SYSTEM . . . . . . . . . . . . . . . . . . . . . . . . . . . . . . . . . . . . . . . . . . . . . . . . . . . . . . . . . . . . . . . . . . . . . 80
Description . . . . . . . . . . . . . . . . . . . . . . . . . . . . . . . . . . . . . . . . . . . . . . . . . . . . . . . . . . . . . . . . . 80
Parameters . . . . . . . . . . . . . . . . . . . . . . . . . . . . . . . . . . . . . . . . . . . . . . . . . . . . . . . . . . . . . . . . . 80
PANEL DISPLAY . . . . . . . . . . . . . . . . . . . . . . . . . . . . . . . . . . . . . . . . . . . . . . . . . . . . . . . . . . . . . . 82
Description . . . . . . . . . . . . . . . . . . . . . . . . . . . . . . . . . . . . . . . . . . . . . . . . . . . . . . . . . . . . . . . . . 82
Parameters . . . . . . . . . . . . . . . . . . . . . . . . . . . . . . . . . . . . . . . . . . . . . . . . . . . . . . . . . . . . . . . . . 82
LIMITS . . . . . . . . . . . . . . . . . . . . . . . . . . . . . . . . . . . . . . . . . . . . . . . . . . . . . . . . . . . . . . . . . . . . . . . 83
Description . . . . . . . . . . . . . . . . . . . . . . . . . . . . . . . . . . . . . . . . . . . . . . . . . . . . . . . . . . . . . . . . . 83
Inputs . . . . . . . . . . . . . . . . . . . . . . . . . . . . . . . . . . . . . . . . . . . . . . . . . . . . . . . . . . . . . . . . . . . . . 83
SPEED FEEDBACK . . . . . . . . . . . . . . . . . . . . . . . . . . . . . . . . . . . . . . . . . . . . . . . . . . . . . . . . . . . . 86
Block diagram . . . . . . . . . . . . . . . . . . . . . . . . . . . . . . . . . . . . . . . . . . . . . . . . . . . . . . . . . . . . . . 86
Description . . . . . . . . . . . . . . . . . . . . . . . . . . . . . . . . . . . . . . . . . . . . . . . . . . . . . . . . . . . . . . . . . 87
Inputs . . . . . . . . . . . . . . . . . . . . . . . . . . . . . . . . . . . . . . . . . . . . . . . . . . . . . . . . . . . . . . . . . . . . . 88
Outputs . . . . . . . . . . . . . . . . . . . . . . . . . . . . . . . . . . . . . . . . . . . . . . . . . . . . . . . . . . . . . . . . . . . . 90
SPEED REF SEL . . . . . . . . . . . . . . . . . . . . . . . . . . . . . . . . . . . . . . . . . . . . . . . . . . . . . . . . . . . . . . 91
Block diagram . . . . . . . . . . . . . . . . . . . . . . . . . . . . . . . . . . . . . . . . . . . . . . . . . . . . . . . . . . . . . . 91
Description . . . . . . . . . . . . . . . . . . . . . . . . . . . . . . . . . . . . . . . . . . . . . . . . . . . . . . . . . . . . . . . . . 91
Inputs . . . . . . . . . . . . . . . . . . . . . . . . . . . . . . . . . . . . . . . . . . . . . . . . . . . . . . . . . . . . . . . . . . . . . 92
Outputs . . . . . . . . . . . . . . . . . . . . . . . . . . . . . . . . . . . . . . . . . . . . . . . . . . . . . . . . . . . . . . . . . . . . 92
SPEED REF MOD . . . . . . . . . . . . . . . . . . . . . . . . . . . . . . . . . . . . . . . . . . . . . . . . . . . . . . . . . . . . . . 93
Block diagram . . . . . . . . . . . . . . . . . . . . . . . . . . . . . . . . . . . . . . . . . . . . . . . . . . . . . . . . . . . . . . 93
Description . . . . . . . . . . . . . . . . . . . . . . . . . . . . . . . . . . . . . . . . . . . . . . . . . . . . . . . . . . . . . . . . . 94
Inputs . . . . . . . . . . . . . . . . . . . . . . . . . . . . . . . . . . . . . . . . . . . . . . . . . . . . . . . . . . . . . . . . . . . . . 94
Outputs . . . . . . . . . . . . . . . . . . . . . . . . . . . . . . . . . . . . . . . . . . . . . . . . . . . . . . . . . . . . . . . . . . . . 96
SPEED REF RAMP . . . . . . . . . . . . . . . . . . . . . . . . . . . . . . . . . . . . . . . . . . . . . . . . . . . . . . . . . . . . . 97
Block diagram . . . . . . . . . . . . . . . . . . . . . . . . . . . . . . . . . . . . . . . . . . . . . . . . . . . . . . . . . . . . . . 97
Description . . . . . . . . . . . . . . . . . . . . . . . . . . . . . . . . . . . . . . . . . . . . . . . . . . . . . . . . . . . . . . . . . 98
Inputs . . . . . . . . . . . . . . . . . . . . . . . . . . . . . . . . . . . . . . . . . . . . . . . . . . . . . . . . . . . . . . . . . . . . . 98
Outputs . . . . . . . . . . . . . . . . . . . . . . . . . . . . . . . . . . . . . . . . . . . . . . . . . . . . . . . . . . . . . . . . . . . 100
SPEED ERROR . . . . . . . . . . . . . . . . . . . . . . . . . . . . . . . . . . . . . . . . . . . . . . . . . . . . . . . . . . . . . . 101
Block diagram . . . . . . . . . . . . . . . . . . . . . . . . . . . . . . . . . . . . . . . . . . . . . . . . . . . . . . . . . . . . . 101
Description . . . . . . . . . . . . . . . . . . . . . . . . . . . . . . . . . . . . . . . . . . . . . . . . . . . . . . . . . . . . . . . . 101
Inputs . . . . . . . . . . . . . . . . . . . . . . . . . . . . . . . . . . . . . . . . . . . . . . . . . . . . . . . . . . . . . . . . . . . . 102
Outputs . . . . . . . . . . . . . . . . . . . . . . . . . . . . . . . . . . . . . . . . . . . . . . . . . . . . . . . . . . . . . . . . . . . 103
SPEED CONTROL . . . . . . . . . . . . . . . . . . . . . . . . . . . . . . . . . . . . . . . . . . . . . . . . . . . . . . . . . . . . 104
Block diagram . . . . . . . . . . . . . . . . . . . . . . . . . . . . . . . . . . . . . . . . . . . . . . . . . . . . . . . . . . . . . 104
Description . . . . . . . . . . . . . . . . . . . . . . . . . . . . . . . . . . . . . . . . . . . . . . . . . . . . . . . . . . . . . . . . 105
Inputs . . . . . . . . . . . . . . . . . . . . . . . . . . . . . . . . . . . . . . . . . . . . . . . . . . . . . . . . . . . . . . . . . . . . 105
Outputs . . . . . . . . . . . . . . . . . . . . . . . . . . . . . . . . . . . . . . . . . . . . . . . . . . . . . . . . . . . . . . . . . . . 108
TORQ REF SEL . . . . . . . . . . . . . . . . . . . . . . . . . . . . . . . . . . . . . . . . . . . . . . . . . . . . . . . . . . . . . . 109
Block diagram . . . . . . . . . . . . . . . . . . . . . . . . . . . . . . . . . . . . . . . . . . . . . . . . . . . . . . . . . . . . . 109
Description . . . . . . . . . . . . . . . . . . . . . . . . . . . . . . . . . . . . . . . . . . . . . . . . . . . . . . . . . . . . . . . . 109
Table of contents
8
Inputs . . . . . . . . . . . . . . . . . . . . . . . . . . . . . . . . . . . . . . . . . . . . . . . . . . . . . . . . . . . . . . . . . . . .
Outputs . . . . . . . . . . . . . . . . . . . . . . . . . . . . . . . . . . . . . . . . . . . . . . . . . . . . . . . . . . . . . . . . . .
TORQ REF MOD . . . . . . . . . . . . . . . . . . . . . . . . . . . . . . . . . . . . . . . . . . . . . . . . . . . . . . . . . . . . .
Block diagram . . . . . . . . . . . . . . . . . . . . . . . . . . . . . . . . . . . . . . . . . . . . . . . . . . . . . . . . . . . . .
Description . . . . . . . . . . . . . . . . . . . . . . . . . . . . . . . . . . . . . . . . . . . . . . . . . . . . . . . . . . . . . . . .
Inputs . . . . . . . . . . . . . . . . . . . . . . . . . . . . . . . . . . . . . . . . . . . . . . . . . . . . . . . . . . . . . . . . . . . .
Outputs . . . . . . . . . . . . . . . . . . . . . . . . . . . . . . . . . . . . . . . . . . . . . . . . . . . . . . . . . . . . . . . . . .
REFERENCE CTRL . . . . . . . . . . . . . . . . . . . . . . . . . . . . . . . . . . . . . . . . . . . . . . . . . . . . . . . . . . .
Block diagram . . . . . . . . . . . . . . . . . . . . . . . . . . . . . . . . . . . . . . . . . . . . . . . . . . . . . . . . . . . . .
Description . . . . . . . . . . . . . . . . . . . . . . . . . . . . . . . . . . . . . . . . . . . . . . . . . . . . . . . . . . . . . . . .
Inputs . . . . . . . . . . . . . . . . . . . . . . . . . . . . . . . . . . . . . . . . . . . . . . . . . . . . . . . . . . . . . . . . . . . .
Outputs . . . . . . . . . . . . . . . . . . . . . . . . . . . . . . . . . . . . . . . . . . . . . . . . . . . . . . . . . . . . . . . . . .
MECH BRAKE CTRL . . . . . . . . . . . . . . . . . . . . . . . . . . . . . . . . . . . . . . . . . . . . . . . . . . . . . . . . . .
Description . . . . . . . . . . . . . . . . . . . . . . . . . . . . . . . . . . . . . . . . . . . . . . . . . . . . . . . . . . . . . . . .
Inputs . . . . . . . . . . . . . . . . . . . . . . . . . . . . . . . . . . . . . . . . . . . . . . . . . . . . . . . . . . . . . . . . . . . .
Outputs . . . . . . . . . . . . . . . . . . . . . . . . . . . . . . . . . . . . . . . . . . . . . . . . . . . . . . . . . . . . . . . . . .
MOTOR CONTROL . . . . . . . . . . . . . . . . . . . . . . . . . . . . . . . . . . . . . . . . . . . . . . . . . . . . . . . . . . .
Description . . . . . . . . . . . . . . . . . . . . . . . . . . . . . . . . . . . . . . . . . . . . . . . . . . . . . . . . . . . . . . . .
Inputs . . . . . . . . . . . . . . . . . . . . . . . . . . . . . . . . . . . . . . . . . . . . . . . . . . . . . . . . . . . . . . . . . . . .
Outputs . . . . . . . . . . . . . . . . . . . . . . . . . . . . . . . . . . . . . . . . . . . . . . . . . . . . . . . . . . . . . . . . . .
MOT THERM PROT . . . . . . . . . . . . . . . . . . . . . . . . . . . . . . . . . . . . . . . . . . . . . . . . . . . . . . . . . . .
Description . . . . . . . . . . . . . . . . . . . . . . . . . . . . . . . . . . . . . . . . . . . . . . . . . . . . . . . . . . . . . . . .
Inputs . . . . . . . . . . . . . . . . . . . . . . . . . . . . . . . . . . . . . . . . . . . . . . . . . . . . . . . . . . . . . . . . . . . .
Outputs . . . . . . . . . . . . . . . . . . . . . . . . . . . . . . . . . . . . . . . . . . . . . . . . . . . . . . . . . . . . . . . . . .
FAULT FUNCTIONS . . . . . . . . . . . . . . . . . . . . . . . . . . . . . . . . . . . . . . . . . . . . . . . . . . . . . . . . . .
Description . . . . . . . . . . . . . . . . . . . . . . . . . . . . . . . . . . . . . . . . . . . . . . . . . . . . . . . . . . . . . . . .
Inputs . . . . . . . . . . . . . . . . . . . . . . . . . . . . . . . . . . . . . . . . . . . . . . . . . . . . . . . . . . . . . . . . . . . .
Outputs . . . . . . . . . . . . . . . . . . . . . . . . . . . . . . . . . . . . . . . . . . . . . . . . . . . . . . . . . . . . . . . . . .
VOLTAGE CTRL . . . . . . . . . . . . . . . . . . . . . . . . . . . . . . . . . . . . . . . . . . . . . . . . . . . . . . . . . . . . .
Description . . . . . . . . . . . . . . . . . . . . . . . . . . . . . . . . . . . . . . . . . . . . . . . . . . . . . . . . . . . . . . . .
Inputs . . . . . . . . . . . . . . . . . . . . . . . . . . . . . . . . . . . . . . . . . . . . . . . . . . . . . . . . . . . . . . . . . . . .
Outputs . . . . . . . . . . . . . . . . . . . . . . . . . . . . . . . . . . . . . . . . . . . . . . . . . . . . . . . . . . . . . . . . . .
BRAKE CHOPPER . . . . . . . . . . . . . . . . . . . . . . . . . . . . . . . . . . . . . . . . . . . . . . . . . . . . . . . . . . .
Description . . . . . . . . . . . . . . . . . . . . . . . . . . . . . . . . . . . . . . . . . . . . . . . . . . . . . . . . . . . . . . . .
Inputs . . . . . . . . . . . . . . . . . . . . . . . . . . . . . . . . . . . . . . . . . . . . . . . . . . . . . . . . . . . . . . . . . . . .
FIELDBUS . . . . . . . . . . . . . . . . . . . . . . . . . . . . . . . . . . . . . . . . . . . . . . . . . . . . . . . . . . . . . . . . . .
Description . . . . . . . . . . . . . . . . . . . . . . . . . . . . . . . . . . . . . . . . . . . . . . . . . . . . . . . . . . . . . . . .
Inputs . . . . . . . . . . . . . . . . . . . . . . . . . . . . . . . . . . . . . . . . . . . . . . . . . . . . . . . . . . . . . . . . . . .
Outputs . . . . . . . . . . . . . . . . . . . . . . . . . . . . . . . . . . . . . . . . . . . . . . . . . . . . . . . . . . . . . . . . . .
FBA SETTINGS . . . . . . . . . . . . . . . . . . . . . . . . . . . . . . . . . . . . . . . . . . . . . . . . . . . . . . . . . . . . . .
Description . . . . . . . . . . . . . . . . . . . . . . . . . . . . . . . . . . . . . . . . . . . . . . . . . . . . . . . . . . . . . . . .
Parameters . . . . . . . . . . . . . . . . . . . . . . . . . . . . . . . . . . . . . . . . . . . . . . . . . . . . . . . . . . . . . . .
FBA DATA IN . . . . . . . . . . . . . . . . . . . . . . . . . . . . . . . . . . . . . . . . . . . . . . . . . . . . . . . . . . . . . . . .
Description . . . . . . . . . . . . . . . . . . . . . . . . . . . . . . . . . . . . . . . . . . . . . . . . . . . . . . . . . . . . . . . .
Parameters . . . . . . . . . . . . . . . . . . . . . . . . . . . . . . . . . . . . . . . . . . . . . . . . . . . . . . . . . . . . . . .
FBA DATA OUT . . . . . . . . . . . . . . . . . . . . . . . . . . . . . . . . . . . . . . . . . . . . . . . . . . . . . . . . . . . . . .
Description . . . . . . . . . . . . . . . . . . . . . . . . . . . . . . . . . . . . . . . . . . . . . . . . . . . . . . . . . . . . . . . .
Inputs . . . . . . . . . . . . . . . . . . . . . . . . . . . . . . . . . . . . . . . . . . . . . . . . . . . . . . . . . . . . . . . . . . . .
D2D COMMUNICATION . . . . . . . . . . . . . . . . . . . . . . . . . . . . . . . . . . . . . . . . . . . . . . . . . . . . . . .
Description . . . . . . . . . . . . . . . . . . . . . . . . . . . . . . . . . . . . . . . . . . . . . . . . . . . . . . . . . . . . . . . .
Table of contents
109
110
111
111
111
112
112
113
114
115
115
117
118
118
121
123
124
124
124
125
126
126
128
131
132
132
132
134
136
136
138
139
140
140
140
142
143
149
151
156
156
156
158
158
158
159
159
159
160
160
9
Inputs . . . . . . . . . . . . . . . . . . . . . . . . . . . . . . . . . . . . . . . . . . . . . . . . . . . . . . . . . . . . . . . . . . . .
Outputs . . . . . . . . . . . . . . . . . . . . . . . . . . . . . . . . . . . . . . . . . . . . . . . . . . . . . . . . . . . . . . . . . . .
Drive-to-drive link wiring . . . . . . . . . . . . . . . . . . . . . . . . . . . . . . . . . . . . . . . . . . . . . . . . . . . . . .
ENCODER . . . . . . . . . . . . . . . . . . . . . . . . . . . . . . . . . . . . . . . . . . . . . . . . . . . . . . . . . . . . . . . . . .
Description . . . . . . . . . . . . . . . . . . . . . . . . . . . . . . . . . . . . . . . . . . . . . . . . . . . . . . . . . . . . . . . .
Inputs . . . . . . . . . . . . . . . . . . . . . . . . . . . . . . . . . . . . . . . . . . . . . . . . . . . . . . . . . . . . . . . . . . . .
Outputs . . . . . . . . . . . . . . . . . . . . . . . . . . . . . . . . . . . . . . . . . . . . . . . . . . . . . . . . . . . . . . . . . . .
ABSOL ENC CONF . . . . . . . . . . . . . . . . . . . . . . . . . . . . . . . . . . . . . . . . . . . . . . . . . . . . . . . . . . . .
Description . . . . . . . . . . . . . . . . . . . . . . . . . . . . . . . . . . . . . . . . . . . . . . . . . . . . . . . . . . . . . . . .
Inputs . . . . . . . . . . . . . . . . . . . . . . . . . . . . . . . . . . . . . . . . . . . . . . . . . . . . . . . . . . . . . . . . . . . .
RESOLVER CONF . . . . . . . . . . . . . . . . . . . . . . . . . . . . . . . . . . . . . . . . . . . . . . . . . . . . . . . . . . . .
Description . . . . . . . . . . . . . . . . . . . . . . . . . . . . . . . . . . . . . . . . . . . . . . . . . . . . . . . . . . . . . . . .
Inputs . . . . . . . . . . . . . . . . . . . . . . . . . . . . . . . . . . . . . . . . . . . . . . . . . . . . . . . . . . . . . . . . . . . .
PULSE ENC CONF . . . . . . . . . . . . . . . . . . . . . . . . . . . . . . . . . . . . . . . . . . . . . . . . . . . . . . . . . . . .
Description . . . . . . . . . . . . . . . . . . . . . . . . . . . . . . . . . . . . . . . . . . . . . . . . . . . . . . . . . . . . . . . .
Inputs . . . . . . . . . . . . . . . . . . . . . . . . . . . . . . . . . . . . . . . . . . . . . . . . . . . . . . . . . . . . . . . . . . . .
HW CONFIGURATION . . . . . . . . . . . . . . . . . . . . . . . . . . . . . . . . . . . . . . . . . . . . . . . . . . . . . . . . .
Description . . . . . . . . . . . . . . . . . . . . . . . . . . . . . . . . . . . . . . . . . . . . . . . . . . . . . . . . . . . . . . . .
Parameters . . . . . . . . . . . . . . . . . . . . . . . . . . . . . . . . . . . . . . . . . . . . . . . . . . . . . . . . . . . . . . . .
USER MOTOR PAR . . . . . . . . . . . . . . . . . . . . . . . . . . . . . . . . . . . . . . . . . . . . . . . . . . . . . . . . . . .
Description . . . . . . . . . . . . . . . . . . . . . . . . . . . . . . . . . . . . . . . . . . . . . . . . . . . . . . . . . . . . . . . .
Parameters . . . . . . . . . . . . . . . . . . . . . . . . . . . . . . . . . . . . . . . . . . . . . . . . . . . . . . . . . . . . . . . .
MOTOR CALC VALUES . . . . . . . . . . . . . . . . . . . . . . . . . . . . . . . . . . . . . . . . . . . . . . . . . . . . . . . .
Description . . . . . . . . . . . . . . . . . . . . . . . . . . . . . . . . . . . . . . . . . . . . . . . . . . . . . . . . . . . . . . . .
Parameters . . . . . . . . . . . . . . . . . . . . . . . . . . . . . . . . . . . . . . . . . . . . . . . . . . . . . . . . . . . . . . . .
161
162
163
164
164
165
167
169
169
170
174
174
174
176
176
177
179
179
179
180
180
180
182
182
182
Parameter and signal data
What this chapter contains . . . . . . . . . . . . . . . . . . . . . . . . . . . . . . . . . . . . . . . . . . . . . . . . . . . . . .
Terms . . . . . . . . . . . . . . . . . . . . . . . . . . . . . . . . . . . . . . . . . . . . . . . . . . . . . . . . . . . . . . . . . . . . . .
Fieldbus equivalent . . . . . . . . . . . . . . . . . . . . . . . . . . . . . . . . . . . . . . . . . . . . . . . . . . . . . . . . . . . .
Fieldbus addresses . . . . . . . . . . . . . . . . . . . . . . . . . . . . . . . . . . . . . . . . . . . . . . . . . . . . . . . . . . . .
Pointer parameter format in fieldbus communication . . . . . . . . . . . . . . . . . . . . . . . . . . . . . . . . . .
32-bit integer value pointers . . . . . . . . . . . . . . . . . . . . . . . . . . . . . . . . . . . . . . . . . . . . . . . . . . .
32-bit integer bit pointers . . . . . . . . . . . . . . . . . . . . . . . . . . . . . . . . . . . . . . . . . . . . . . . . . . . . .
Actual signals . . . . . . . . . . . . . . . . . . . . . . . . . . . . . . . . . . . . . . . . . . . . . . . . . . . . . . . . . . . . . . . .
Parameters . . . . . . . . . . . . . . . . . . . . . . . . . . . . . . . . . . . . . . . . . . . . . . . . . . . . . . . . . . . . . . . . . .
183
183
184
184
184
184
185
186
188
Fault tracing
What this chapter contains . . . . . . . . . . . . . . . . . . . . . . . . . . . . . . . . . . . . . . . . . . . . . . . . . . . . . .
Safety . . . . . . . . . . . . . . . . . . . . . . . . . . . . . . . . . . . . . . . . . . . . . . . . . . . . . . . . . . . . . . . . . . . . . .
Alarm and fault indications . . . . . . . . . . . . . . . . . . . . . . . . . . . . . . . . . . . . . . . . . . . . . . . . . . . . . .
How to reset . . . . . . . . . . . . . . . . . . . . . . . . . . . . . . . . . . . . . . . . . . . . . . . . . . . . . . . . . . . . . . . . .
Fault history . . . . . . . . . . . . . . . . . . . . . . . . . . . . . . . . . . . . . . . . . . . . . . . . . . . . . . . . . . . . . . . . . .
Alarm messages generated by the drive . . . . . . . . . . . . . . . . . . . . . . . . . . . . . . . . . . . . . . . . . . . .
Fault messages generated by the drive . . . . . . . . . . . . . . . . . . . . . . . . . . . . . . . . . . . . . . . . . . . .
197
197
197
197
198
199
205
Table of contents
10
Standard function blocks
What this chapter contains . . . . . . . . . . . . . . . . . . . . . . . . . . . . . . . . . . . . . . . . . . . . . . . . . . . . . .
Terms . . . . . . . . . . . . . . . . . . . . . . . . . . . . . . . . . . . . . . . . . . . . . . . . . . . . . . . . . . . . . . . . . . . . . .
ABS . . . . . . . . . . . . . . . . . . . . . . . . . . . . . . . . . . . . . . . . . . . . . . . . . . . . . . . . . . . . . . . . . . . . . . .
ADD . . . . . . . . . . . . . . . . . . . . . . . . . . . . . . . . . . . . . . . . . . . . . . . . . . . . . . . . . . . . . . . . . . . . . . .
AND . . . . . . . . . . . . . . . . . . . . . . . . . . . . . . . . . . . . . . . . . . . . . . . . . . . . . . . . . . . . . . . . . . . . . . .
BGET . . . . . . . . . . . . . . . . . . . . . . . . . . . . . . . . . . . . . . . . . . . . . . . . . . . . . . . . . . . . . . . . . . . . . .
BITAND . . . . . . . . . . . . . . . . . . . . . . . . . . . . . . . . . . . . . . . . . . . . . . . . . . . . . . . . . . . . . . . . . . . .
BITOR . . . . . . . . . . . . . . . . . . . . . . . . . . . . . . . . . . . . . . . . . . . . . . . . . . . . . . . . . . . . . . . . . . . . .
BOOL_TO_DINT . . . . . . . . . . . . . . . . . . . . . . . . . . . . . . . . . . . . . . . . . . . . . . . . . . . . . . . . . . . . .
BOOL_TO_INT . . . . . . . . . . . . . . . . . . . . . . . . . . . . . . . . . . . . . . . . . . . . . . . . . . . . . . . . . . . . . . .
BSET . . . . . . . . . . . . . . . . . . . . . . . . . . . . . . . . . . . . . . . . . . . . . . . . . . . . . . . . . . . . . . . . . . . . . .
CRITSPEED . . . . . . . . . . . . . . . . . . . . . . . . . . . . . . . . . . . . . . . . . . . . . . . . . . . . . . . . . . . . . . . . .
CTD . . . . . . . . . . . . . . . . . . . . . . . . . . . . . . . . . . . . . . . . . . . . . . . . . . . . . . . . . . . . . . . . . . . . . . .
CTD_DINT . . . . . . . . . . . . . . . . . . . . . . . . . . . . . . . . . . . . . . . . . . . . . . . . . . . . . . . . . . . . . . . . . .
CTU . . . . . . . . . . . . . . . . . . . . . . . . . . . . . . . . . . . . . . . . . . . . . . . . . . . . . . . . . . . . . . . . . . . . . . .
CTU_DINT . . . . . . . . . . . . . . . . . . . . . . . . . . . . . . . . . . . . . . . . . . . . . . . . . . . . . . . . . . . . . . . . . .
CTUD . . . . . . . . . . . . . . . . . . . . . . . . . . . . . . . . . . . . . . . . . . . . . . . . . . . . . . . . . . . . . . . . . . . . . .
CTUD_DINT . . . . . . . . . . . . . . . . . . . . . . . . . . . . . . . . . . . . . . . . . . . . . . . . . . . . . . . . . . . . . . . . .
CYCLET . . . . . . . . . . . . . . . . . . . . . . . . . . . . . . . . . . . . . . . . . . . . . . . . . . . . . . . . . . . . . . . . . . . .
DATA CONTAINER . . . . . . . . . . . . . . . . . . . . . . . . . . . . . . . . . . . . . . . . . . . . . . . . . . . . . . . . . . .
DEMUX-I . . . . . . . . . . . . . . . . . . . . . . . . . . . . . . . . . . . . . . . . . . . . . . . . . . . . . . . . . . . . . . . . . . .
DEMUX-MI . . . . . . . . . . . . . . . . . . . . . . . . . . . . . . . . . . . . . . . . . . . . . . . . . . . . . . . . . . . . . . . . . .
DINT_TO_BOOL . . . . . . . . . . . . . . . . . . . . . . . . . . . . . . . . . . . . . . . . . . . . . . . . . . . . . . . . . . . . .
DINT_TO_INT . . . . . . . . . . . . . . . . . . . . . . . . . . . . . . . . . . . . . . . . . . . . . . . . . . . . . . . . . . . . . . .
DINT_TO_REALn . . . . . . . . . . . . . . . . . . . . . . . . . . . . . . . . . . . . . . . . . . . . . . . . . . . . . . . . . . . . .
DINT_TO_REALn_SIMP . . . . . . . . . . . . . . . . . . . . . . . . . . . . . . . . . . . . . . . . . . . . . . . . . . . . . . .
DIV . . . . . . . . . . . . . . . . . . . . . . . . . . . . . . . . . . . . . . . . . . . . . . . . . . . . . . . . . . . . . . . . . . . . . . . .
EQ . . . . . . . . . . . . . . . . . . . . . . . . . . . . . . . . . . . . . . . . . . . . . . . . . . . . . . . . . . . . . . . . . . . . . . . .
EXPT . . . . . . . . . . . . . . . . . . . . . . . . . . . . . . . . . . . . . . . . . . . . . . . . . . . . . . . . . . . . . . . . . . . . . .
FILT1 . . . . . . . . . . . . . . . . . . . . . . . . . . . . . . . . . . . . . . . . . . . . . . . . . . . . . . . . . . . . . . . . . . . . . .
FILT2 . . . . . . . . . . . . . . . . . . . . . . . . . . . . . . . . . . . . . . . . . . . . . . . . . . . . . . . . . . . . . . . . . . . . . .
FIO_01_slot1 . . . . . . . . . . . . . . . . . . . . . . . . . . . . . . . . . . . . . . . . . . . . . . . . . . . . . . . . . . . . . . . .
FIO_01_slot2 . . . . . . . . . . . . . . . . . . . . . . . . . . . . . . . . . . . . . . . . . . . . . . . . . . . . . . . . . . . . . . . .
FIO_11_AI_slot1 . . . . . . . . . . . . . . . . . . . . . . . . . . . . . . . . . . . . . . . . . . . . . . . . . . . . . . . . . . . . .
FIO_11_AI_slot2 . . . . . . . . . . . . . . . . . . . . . . . . . . . . . . . . . . . . . . . . . . . . . . . . . . . . . . . . . . . . .
FIO_11_AO_slot1 . . . . . . . . . . . . . . . . . . . . . . . . . . . . . . . . . . . . . . . . . . . . . . . . . . . . . . . . . . . . .
FIO_11_AO_slot2 . . . . . . . . . . . . . . . . . . . . . . . . . . . . . . . . . . . . . . . . . . . . . . . . . . . . . . . . . . . . .
FIO_11_DIO_slot1 . . . . . . . . . . . . . . . . . . . . . . . . . . . . . . . . . . . . . . . . . . . . . . . . . . . . . . . . . . . .
FIO_11_DIO_slot2 . . . . . . . . . . . . . . . . . . . . . . . . . . . . . . . . . . . . . . . . . . . . . . . . . . . . . . . . . . . .
FTRIG . . . . . . . . . . . . . . . . . . . . . . . . . . . . . . . . . . . . . . . . . . . . . . . . . . . . . . . . . . . . . . . . . . . . . .
FUNG-1V . . . . . . . . . . . . . . . . . . . . . . . . . . . . . . . . . . . . . . . . . . . . . . . . . . . . . . . . . . . . . . . . . . .
GE . . . . . . . . . . . . . . . . . . . . . . . . . . . . . . . . . . . . . . . . . . . . . . . . . . . . . . . . . . . . . . . . . . . . . . . .
GT . . . . . . . . . . . . . . . . . . . . . . . . . . . . . . . . . . . . . . . . . . . . . . . . . . . . . . . . . . . . . . . . . . . . . . . .
INT . . . . . . . . . . . . . . . . . . . . . . . . . . . . . . . . . . . . . . . . . . . . . . . . . . . . . . . . . . . . . . . . . . . . . . . .
INT_TO_BOOL . . . . . . . . . . . . . . . . . . . . . . . . . . . . . . . . . . . . . . . . . . . . . . . . . . . . . . . . . . . . . . .
INT_TO_DINT . . . . . . . . . . . . . . . . . . . . . . . . . . . . . . . . . . . . . . . . . . . . . . . . . . . . . . . . . . . . . . .
LE . . . . . . . . . . . . . . . . . . . . . . . . . . . . . . . . . . . . . . . . . . . . . . . . . . . . . . . . . . . . . . . . . . . . . . . . .
LEAD/LAG . . . . . . . . . . . . . . . . . . . . . . . . . . . . . . . . . . . . . . . . . . . . . . . . . . . . . . . . . . . . . . . . . .
Table of contents
215
215
216
216
217
217
218
218
219
220
221
221
223
224
225
226
226
228
229
229
230
231
232
233
233
234
235
235
236
236
237
239
240
241
243
245
247
249
250
251
251
253
253
254
255
256
256
257
11
LIMIT . . . . . . . . . . . . . . . . . . . . . . . . . . . . . . . . . . . . . . . . . . . . . . . . . . . . . . . . . . . . . . . . . . . . . .
LT . . . . . . . . . . . . . . . . . . . . . . . . . . . . . . . . . . . . . . . . . . . . . . . . . . . . . . . . . . . . . . . . . . . . . . . .
MAX . . . . . . . . . . . . . . . . . . . . . . . . . . . . . . . . . . . . . . . . . . . . . . . . . . . . . . . . . . . . . . . . . . . . . . .
MIN . . . . . . . . . . . . . . . . . . . . . . . . . . . . . . . . . . . . . . . . . . . . . . . . . . . . . . . . . . . . . . . . . . . . . . .
MOD . . . . . . . . . . . . . . . . . . . . . . . . . . . . . . . . . . . . . . . . . . . . . . . . . . . . . . . . . . . . . . . . . . . . . .
MONO . . . . . . . . . . . . . . . . . . . . . . . . . . . . . . . . . . . . . . . . . . . . . . . . . . . . . . . . . . . . . . . . . . . . .
MOTPOT . . . . . . . . . . . . . . . . . . . . . . . . . . . . . . . . . . . . . . . . . . . . . . . . . . . . . . . . . . . . . . . . . . .
MOVE . . . . . . . . . . . . . . . . . . . . . . . . . . . . . . . . . . . . . . . . . . . . . . . . . . . . . . . . . . . . . . . . . . . . .
MUL . . . . . . . . . . . . . . . . . . . . . . . . . . . . . . . . . . . . . . . . . . . . . . . . . . . . . . . . . . . . . . . . . . . . . . .
MULDIV . . . . . . . . . . . . . . . . . . . . . . . . . . . . . . . . . . . . . . . . . . . . . . . . . . . . . . . . . . . . . . . . . . . .
MUX . . . . . . . . . . . . . . . . . . . . . . . . . . . . . . . . . . . . . . . . . . . . . . . . . . . . . . . . . . . . . . . . . . . . . .
NE . . . . . . . . . . . . . . . . . . . . . . . . . . . . . . . . . . . . . . . . . . . . . . . . . . . . . . . . . . . . . . . . . . . . . . . .
NOT . . . . . . . . . . . . . . . . . . . . . . . . . . . . . . . . . . . . . . . . . . . . . . . . . . . . . . . . . . . . . . . . . . . . . . .
OR . . . . . . . . . . . . . . . . . . . . . . . . . . . . . . . . . . . . . . . . . . . . . . . . . . . . . . . . . . . . . . . . . . . . . . . .
PARRD . . . . . . . . . . . . . . . . . . . . . . . . . . . . . . . . . . . . . . . . . . . . . . . . . . . . . . . . . . . . . . . . . . . .
PARWR . . . . . . . . . . . . . . . . . . . . . . . . . . . . . . . . . . . . . . . . . . . . . . . . . . . . . . . . . . . . . . . . . . . .
PID . . . . . . . . . . . . . . . . . . . . . . . . . . . . . . . . . . . . . . . . . . . . . . . . . . . . . . . . . . . . . . . . . . . . . . .
RAMP . . . . . . . . . . . . . . . . . . . . . . . . . . . . . . . . . . . . . . . . . . . . . . . . . . . . . . . . . . . . . . . . . . . . .
REAL_TO_REAL24 . . . . . . . . . . . . . . . . . . . . . . . . . . . . . . . . . . . . . . . . . . . . . . . . . . . . . . . . . . .
REAL24_TO_REAL . . . . . . . . . . . . . . . . . . . . . . . . . . . . . . . . . . . . . . . . . . . . . . . . . . . . . . . . . . .
REALn_TO_DINT . . . . . . . . . . . . . . . . . . . . . . . . . . . . . . . . . . . . . . . . . . . . . . . . . . . . . . . . . . . .
REALn_TO_DINT_SIMP . . . . . . . . . . . . . . . . . . . . . . . . . . . . . . . . . . . . . . . . . . . . . . . . . . . . . . .
REG . . . . . . . . . . . . . . . . . . . . . . . . . . . . . . . . . . . . . . . . . . . . . . . . . . . . . . . . . . . . . . . . . . . . . . .
ROL . . . . . . . . . . . . . . . . . . . . . . . . . . . . . . . . . . . . . . . . . . . . . . . . . . . . . . . . . . . . . . . . . . . . . . .
ROR . . . . . . . . . . . . . . . . . . . . . . . . . . . . . . . . . . . . . . . . . . . . . . . . . . . . . . . . . . . . . . . . . . . . . .
RS . . . . . . . . . . . . . . . . . . . . . . . . . . . . . . . . . . . . . . . . . . . . . . . . . . . . . . . . . . . . . . . . . . . . . . . .
RTRIG . . . . . . . . . . . . . . . . . . . . . . . . . . . . . . . . . . . . . . . . . . . . . . . . . . . . . . . . . . . . . . . . . . . . .
SEL . . . . . . . . . . . . . . . . . . . . . . . . . . . . . . . . . . . . . . . . . . . . . . . . . . . . . . . . . . . . . . . . . . . . . . .
SHL . . . . . . . . . . . . . . . . . . . . . . . . . . . . . . . . . . . . . . . . . . . . . . . . . . . . . . . . . . . . . . . . . . . . . . .
SHR . . . . . . . . . . . . . . . . . . . . . . . . . . . . . . . . . . . . . . . . . . . . . . . . . . . . . . . . . . . . . . . . . . . . . . .
SQRT . . . . . . . . . . . . . . . . . . . . . . . . . . . . . . . . . . . . . . . . . . . . . . . . . . . . . . . . . . . . . . . . . . . . .
SR . . . . . . . . . . . . . . . . . . . . . . . . . . . . . . . . . . . . . . . . . . . . . . . . . . . . . . . . . . . . . . . . . . . . . . . .
SR-D . . . . . . . . . . . . . . . . . . . . . . . . . . . . . . . . . . . . . . . . . . . . . . . . . . . . . . . . . . . . . . . . . . . . . .
SUB . . . . . . . . . . . . . . . . . . . . . . . . . . . . . . . . . . . . . . . . . . . . . . . . . . . . . . . . . . . . . . . . . . . . . . .
SWITCH . . . . . . . . . . . . . . . . . . . . . . . . . . . . . . . . . . . . . . . . . . . . . . . . . . . . . . . . . . . . . . . . . . .
SWITCHC . . . . . . . . . . . . . . . . . . . . . . . . . . . . . . . . . . . . . . . . . . . . . . . . . . . . . . . . . . . . . . . . . .
TOF . . . . . . . . . . . . . . . . . . . . . . . . . . . . . . . . . . . . . . . . . . . . . . . . . . . . . . . . . . . . . . . . . . . . . . .
TON . . . . . . . . . . . . . . . . . . . . . . . . . . . . . . . . . . . . . . . . . . . . . . . . . . . . . . . . . . . . . . . . . . . . . . .
TP . . . . . . . . . . . . . . . . . . . . . . . . . . . . . . . . . . . . . . . . . . . . . . . . . . . . . . . . . . . . . . . . . . . . . . . .
XOR . . . . . . . . . . . . . . . . . . . . . . . . . . . . . . . . . . . . . . . . . . . . . . . . . . . . . . . . . . . . . . . . . . . . . . .
257
258
258
259
259
260
261
262
262
263
263
264
264
265
265
266
267
270
271
271
272
272
273
274
275
276
277
277
278
279
279
280
280
282
282
283
284
285
286
287
Control block diagrams
What this chapter contains . . . . . . . . . . . . . . . . . . . . . . . . . . . . . . . . . . . . . . . . . . . . . . . . . . . . . . 289
Table of contents
12
Table of contents
13
Introduction to the manual
What this chapter contains
The chapter includes a description of the contents of the manual. In addition it
contains information about the compatibility, safety and intended audience.
Compatibility
The manual is compatible with ACSM1 Speed and Torque Control program version
UMFI 1210 and later versions. See signal 9.04 FIRMWARE VER or PC tool (View Properties).
Safety instructions
Follow all safety instructions delivered with the drive.
• Read the complete safety instructions before you install, commission, or use the
drive. The complete safety instructions are given at the beginning of the Hardware
Manual.
• Read the software function specific warnings and notes before changing the
default settings of the function. For each function, the warnings and notes are given
in this manual in the section describing the related user-adjustable parameters.
Reader
The reader of the manual is expected to know the standard electrical wiring
practices, electronic components, and electrical schematic symbols.
Introduction to the manual
14
Contents
The manual consists of the following chapters:
• Start-up instructs in setting up the Speed and Torque Control program and how to
control the drive through the I/O interface.
• Drive programming via PC tool introduces programming via PC tool (DriveStudio
and Solution Program Composer).
• Control locations and operating modes describes the control locations and
operation modes of the drive.
• Default connections of the control unit presents the default connections of the
JCU Control Unit.
• Firmware functions, parameters and signals describes the firmware function
blocks and the associated input parameters and output signals.
• Parameter and signal data contains more information on the input parameters
and output signals of the firmware blocks.
• Fault tracing lists the warning and fault messages with the possible causes and
remedies.
• Standard function blocks
• Control block diagrams
Product and service inquiries
Address any inquiries about the product to your local ABB representative, quoting
the type code and serial number of the unit in question. A listing of ABB sales,
support and service contacts can be found by navigating to www.abb.com/drives and
selecting Drives – Sales, Support and Service network.
Product training
For information on ABB product training, navigate to www.abb.com/drives and select
Drives – Training courses.
Providing feedback on ABB Drives manuals
Your comments on our manuals are welcome. Go to www.abb.com/drives and select
Document Library – Manuals feedback form (LV AC drives).
Introduction to the manual
15
Start-up
What this chapter contains
This chapter describes the basic start-up procedure of the drive and instructs in how
to control the drive through the I/O interface.
How to start up the drive
The drive can be operated:
• locally from PC tool or control panel
• externally via I/O connections or fieldbus interface.
The start-up procedure presented uses the DriveStudio PC tool program. Drive
references and signals can be monitored with DriveStudio (Data Logger or Monitor
Window). For instructions on how to use the DriveStudio, see DriveStudio User
Manual [3AFE68749026 (English)].
The start-up procedure includes actions which need to be performed only when the
drive is powered up for the first time (e.g. entering the motor data). After the first
start-up, the drive can be powered up without using these start-up functions. The
start-up procedure can be repeated later if start-up data needs to be changed.
In addition to the PC tool commissioning and drive power-up, the start-up procedure
includes the following steps:
• entering the motor data and performing the motor identification run
• setting up the encoder/resolver communication
• checking the emergency stop and Safe Torque Off circuits
• setting up the voltage control
• setting the drive limits
• setting up the motor overtemperature protection
• tuning the speed controller
• setting up the fieldbus control.
If an alarm or a fault is generated during the start-up, see chapter Fault tracing for
the possible causes and remedies. If problems continue, disconnect the main power
and wait 5 minutes for the intermediate circuit capacitors to discharge and check the
drive and motor connections.
Before you start, ensure you have the motor nameplate and encoder data (if
needed) at your hand.
Start-up
16
Safety
The start-up may only be carried out by a qualified electrician.
The safety instructions must be followed during the start-up procedure. See the safety
instructions on the first pages of the appropriate hardware manual.
Check the installation. See the installation checklist in the appropriate hardware manual.
Check that the starting of the motor does not cause any danger.
De-couple the driven machine if
- there is a risk of damage in case of an incorrect direction of rotation, or
- a normal ID run (99.13 = NORMAL) is required during the drive start-up, when the load
torque is higher than 20% or the machinery is not able to withstand the nominal torque
transient during the ID run.
PC tool
Install the DriveStudio PC tool to the PC. For instruction, see DriveStudio User Manual
[3AFE68749026 (English)].
Connect the drive to the PC:
Connect the other end of the communication cable (OPCA-02, code: 68239745) to the panel
link of the drive. Connect the other end of the communication cable via USB adapter or
directly to the PC serial port.
Power up
Switch the power on.
7-segment display:
->
Start the DriveStudio program by clicking the DriveStudio icon on the
PC desktop.
Check whether a solution program exists. Select Solution Program
Composer from the DriveStudio View-menu.
If a solution program already exists, NOTE that some of the drive
functions may have been disabled. ENSURE, that the solution
program is suitable for your drive application.
Switch to local control to ensure that external control is disabled by
clicking the Take/Release button of the PC tool control panel.
Start-up
17
Motor data entering
Open the parameter and signal list by selecting the Parameter
Browser of the appropriate drive.
Select the language. Note: Language selection is not supported yet.
Only English is available.
Parameters are set as follows:
Select the parameter group (in this case 99 START-UP DATA) by
double-clicking it. Select the appropriate parameter by double-clicking
it and set the new value.
99.01 LANGUAGE
Motor data can be entered either by selecting a specific motor catalogue by parameter 99.02
MOTOR CATALOGUE or manually by setting motor parameters 99.04…99.12.
Motor data from catalogue
Note: Motor catalogue feature is not supported yet.
Select the appropriate motor catalogue.
99.02 MOTOR
CATALOGUE
Select the appropriate motor.
99.03 MOTOR
SELECTION
Manual motor data entering
Select the motor type: asynchronous or permanent magnet motor.
99.04 MOTOR TYPE
Select the motor control mode. DTC is suitable for most cases. For
information on scalar control, see parameter 99.05 MOTOR CTRL
MODE description.
Note: Control mode selection is not supported yet. Direct Torque
Control is always used.
99.05 MOTOR CTRL
MODE
Start-up
18
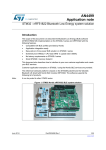
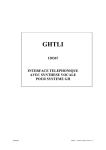
Enter the motor data from the motor nameplate.
Asynchronous motor nameplate example:
ABB Motors
3
motor
V
690 Y
400 D
660 Y
380 D
415 D
440 D
Cat. no
M2AA 200 MLA 4
IEC 200 M/L 55
No
Ins.cl. F
IP 55
kW
r/min
A
cos
IA/IN t E/s
30
1475 32.5 0.83
56
0.83
1475
30
0.83
34
1470
30
0.83
30
59
1470
0.83
54
1475
30
0.83
35 1770
59
Hz
50
50
50
50
50
60
3GAA 202 001 - ADA
6312/C3
6210/C3
380 V
mains
voltage
Note: Set the motor data
to exactly the same value
as on the motor
nameplate. For example,
if the motor nominal
speed is 1470 rpm on the
nameplate, setting the
value of parameter 99.09
MOT NOM SPEED to
1500 rpm results in
wrong operation of the
drive.
180
IEC 34-1
Permanent magnet motor nameplate example:
With DTC control (99.05 = DTC) at least parameters 99.06…99.10
must be set. Better control accuracy can be achieved by setting also
parameters 99.11…99.12.
- motor nominal current
Allowed range: approximately 1/6 · I2n … 2 · I2n of the drive (0…2 · I2nd if parameter
99.05 MOTOR CTRL MODE = SCALAR). With multimotor drives, see section
Multimotor drives on page 19.
- motor nominal voltage
Allowed range: 1/6 · UN … 2 · UN of the drive. (UN refers to the highest voltage in each
of the nominal voltage range, i.e. 480 V AC for ACSM1-04).
With permanent magnet motors: The nominal voltage is the BackEMF voltage (at
motor nominal speed). If the voltage is given as voltage per rpm, e.g. 60 V per
1000 rpm, the voltage for 3000 rpm nominal speed is 3 × 60 V = 180 V.
Note that the nominal voltage is not equal to the equivalent DC motor voltage
(E.D.C.M.) value given by some motor manufactures. The nominal voltage can be
calculated by dividing the E.D.C.M. voltage by 1.7 (= square root of 3).
Start-up
99.06 MOT NOM
CURRENT
99.07 MOT NOM
VOLTAGE
19
- motor nominal frequency
99.08 MOT NOM FREQ
Range: 5…500 Hz. With multimotor drives, see section Multimotor drives on page 19.
With permanent magnet motor: If the frequency is not given on the motor nameplate, it
has to be calculated with the following formula:
f = n × p / 60
where p = number of pole pairs, n = motor nominal speed.
- motor nominal speed
99.09 MOT NOM SPEED
Range: 0…10000 rpm. With multimotor drives, see section Multimotor drives on
page 19.
- motor nominal power
Range: 0…10000 kW. With multimotor drives, see section Multimotor drives on
page 19.
- motor nominal cosϕ (not applicable for permanent magnet motors).
This value can be set for better DTC control accuracy. If value is not
given by the motor manufacturer, use value 0 (i.e. default value).
99.10 MOT NOM
POWER
99.11 MOT NOM COSFII
Range: 0…1.
- motor nominal shaft torque. This value can be set for better DTC
control accuracy. If value is not given by the motor manufacturer, use
value 0 (i.e. default value).
99.12 MOT NOM
TORQUE
Range: 0…2147483.647 Nm.
After the motor parameters have been set, alarm ID-RUN is generated Alarm:
ID-RUN
to inform that the ID run needs to be performed.
Multimotor drives
I.e. more than one motor is connected to one drive.
Check that the motors have the same relative slip (only for
asynchronous motors), nominal voltage and number of poles. If the
manufacturer motor data is insufficient, use the following formulas to
calculate the slip and the number of poles:
fN ⋅ 60
p = Int ⎛ ----------------⎞
⎝ nN ⎠
f N ⋅ 60
n s = --------------p
nS – n N
s = ------------------- ⋅ 100%
nS
where
p = number of pole pairs (= motor pole number / 2)
fN = motor nominal frequency [Hz]
nN = motor nominal speed [rpm]
s = motor slip [%]
nS = motor synchronous speed [rpm].
Start-up
20
Set the sum of the motor nominal currents.
99.06 MOT NOM
CURRENT
Set the nominal motor frequencies. Frequencies must be the same.
99.08 MOT NOM FREQ
99.10 MOT NOM
Set the sum of the motor nominal powers.
POWER
If the motor powers are close to each other or the same but the
nominal speeds vary slightly, parameter 99.09 MOT NOM SPEED can 99.09 MOT NOM SPEED
be set to an average value of the motor speeds.
Motor overtemperature protection (1)
Select how the drive reacts when motor overtemperature is detected.
45.01 MOT TEMP PROT
Select the motor temperature protection: motor thermal model or
motor temperature measurement. For motor temperature
measurement connections, see section Temperature sensors on
page 127.
45.02 MOT TEMP
SOURCE
ID RUN (motor identification run)
WARNING! With Normal or Reduced ID run the motor will run at up to approximately
50…100% of the nominal speed during the ID run. ENSURE THAT IT IS SAFE TO
RUN THE MOTOR BEFORE PERFORMING THE ID RUN!
Note: Ensure that possible Safe Torque Off and emergency stop circuits are closed during the ID
run.
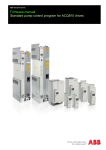
Check the direction of rotation of the motor before starting the ID run.
During the run (Normal or Reduced), the motor will rotate in the
forward direction.
When drive output
phases U2, V2 and
W2 are connected to
the corresponding
motor terminals:
forward
direction
reverse
direction
Start-up
21
Select the motor identification method by parameter 99.13 IDRUN
MODE. During the Motor ID run, the drive will identify the
characteristics of the motor for optimum motor control. The ID run is
performed at the next start of the drive.
99.13 IDRUN MODE
11.07 AUTOPHASING
MODE
Note: The motor shaft must NOT be locked and the load torque must be < 10% during
Normal or Reduced ID run. With permanent magnet motor this restriction applies also
when Standstill ID run is selected.
Note: The ID run cannot be performed if par. 99.05 MOTOR CTRL MODE = SCALAR.
NORMAL ID run should be selected when ever it is possible.
Note: The driven machinery must be de-coupled from the motor with Normal ID run:
- if the load torque is higher than 20%.
- if the machinery is not able to withstand the nominal torque transient during the ID
run.
The REDUCED ID run should be selected instead of the Normal ID
run if the mechanical losses are higher than 20%, i.e. the motor
cannot be de-coupled from the driven equipment, or full flux is
required to keep the motor brake open (conical motor).
The STANDSTILL ID run should be selected only if the Normal or
Reduced ID run is not possible due to the restrictions caused by the
connected mechanics (e.g. with lift or crane applications).
AUTOPHASING can only be selected after the Normal/Reduced/
Standstill ID run has been performed once. Autophasing is used when
an absolute encoder has been added/changed to a permanent
magnet motor, but there is no need to perform the Normal/Reduced/
Standstill ID run again. See parameter 11.07 on page 79 for
information on autophasing modes.
Check the drive limits. The following must apply for all ID run methods:
- 20.05 MAXIMUM CURRENT > 99.06 MOT NOM CURRENT
In addition, the following must apply for Reduced and Normal ID run:
- 20.01 MAXIMUM SPEED > 55% of 99.09 MOT NOM SPEED
- 20.02 MINIMUM SPEED < 0
- supply voltage must be > 65% of 99.07 MOT NOM VOLTAGE
- 20.06 MAXIMUM TORQUE > 100% (only for Normal ID run).
When the ID run has been successfully completed, set the limit values
as required by the application.
Start-up
22
Start the motor to activate the ID run.
Note: RUN ENABLE must be active.
10.09 RUN ENABLE
ID run is indicated by alarm ID-RUN and by a rotating display on the
7-segment display.
Alarm: ID-RUN
7-segment display:
rotating display
If the ID run is not successfully completed, fault ID-RUN FAULT is
generated.
Fault
ID-RUN FAULT
Speed measurement with encoder/resolver
An encoder/resolver feedback can be used for more accurate motor control.
Follow these instructions when encoder/resolver interface module FEN-xx is installed in drive
option Slot 1 or 2. Note: Two encoder interface modules of the same type are not allowed.
Select the used encoder/resolver. For more information, see firmware
block ENCODER on page 164.
90.01 ENCODER 1 SEL /
Set other necessary encoder/resolver parameters.
91.01…91.31 /
- Absolute encoder parameters are in group 91.
- Resolver parameters are in group 92.
- Pulse encoder parameters are in group 93.
93.01…93.22
90.02 ENCODER 2 SEL
92.01…92.03 /
For more information, see firmware blocks ABSOL ENC CONF on
page 169, RESOLVER CONF on page 174 and PULSE ENC CONF
on page 176.
Save new parameters settings into the permanent memory by setting
parameter 16.07 PARAM SAVE to value SAVE.
16.07 PARAM SAVE
90.10 ENC PAR
Set parameter 90.10 ENC PAR REFRESH o 1 (or switch the drive
power off and on again) so that the new parameter settings take effect. REFRESH
Checking the encoder/resolver connection
Follow these instructions when encoder/resolver interface module FEN-xx is installed in drive
option Slot 1 or 2. Note: Two encoder interface modules of the same type are not allowed.
Set parameter 22.01 SPEED FB SEL to ESTIMATED.
Enter a small speed reference value (for example 3% of the nominal
motor speed).
Start the motor.
Start-up
22.01 SPEED FB SEL
23
Check that the estimated (1.14 SPEED ESTIMATED) and actual
speed (1.08/1.10 ENCODER 1/2 SPEED) are equal. If the values
differ, check the encoder/resolver parameter settings.
Hint: If the actual speed (with absolute or pulse encoder) differs form the
reference value by a factor of 2, check the pulse number setting (91.01 SINE
COSINE NR / 93.01/93.11 ENC1/2 PULSE NR).
If the direction of rotation is selected as forward, check that the actual
speed (1.08/1.10 ENCODER 1/2 SPEED) is positive:
- If the actual direction of the rotation is forward and the actual speed
negative, the phasing of the pulse encoder wires is reversed.
- If the actual direction of the rotation is reverse and the actual speed
negative, the motor cables are incorrectly connected.
1.14 SPEED
ESTIMATED
1.08 ENCODER 1
SPEED /
1.10 ENCODER 2
SPEED
1.08 ENCODER 1
SPEED /
1.10 ENCODER 2
SPEED
Changing the connection:
Disconnect the main power, and wait for 5 minutes for the intermediate circuit
capacitors to discharge. Do the necessary changes. Switch the power on and start the
motor again. Check that the estimated and actual speed values are correct.
If the direction of rotation is selected as reverse, the actual speed
must be negative.
Note: Resolver autotuning routines should always be performed after
resolver cable connection has been modified. Autotuning routines can
be activated by setting parameter 92.02 EXC SIGNAL AMPL or 92.03
EXC SIGNAL FREQ, and then setting parameter 90.10 ENC PAR
REFRESH to 1. If the resolver is used with a permanent magnet
motor, an AUTOPHASING ID run should be performed as well.
Stop the motor.
Set parameter 22.01 SPEED FB SEL to ENC1 SPEED or ENC2
SPEED.
If the speed feedback cannot be used in motor control: In special
applications parameter 40.06 FORCE OPEN LOOP must be set to
TRUE.
22.01 SPEED FB SEL
Note: Speed filtering needs to be adjusted especially when the
encoder pulse number is small. See section Speed filtering on page
25.
Emergency stop circuit
If there is an emergency stop circuit in use, check that the circuit
functions (emergency stop signal is connected to the digital input
which is selected as the source for the emergency stop activation).
10.10 EMERGENCY
STOP OFF3 or
10.11 EMERGENCY
STOP OFF1
(emergency stop control
through fieldbus 2.12
FBA MAIN CW bits 2…4)
Start-up
24
Safe Torque Off
The Safe Torque Off function disables the control voltage of the power semiconductors of the drive
output stage, thus preventing the inverter from generating the voltage required to rotate the motor.
For Safe Torque Off wiring, see the appropriate hardware manual.
If there is a Safe Torque Off circuit in use, check that the circuit
functions.
Selects how the drive reacts when the Safe Torque Off function is
active (i.e. when the control voltage of the power semiconductors of
the drive output stage is disabled).
46.07 STO DIAGNOSTIC
Voltage control
If the DC voltage drops due to input power cut off, the undervoltage controller will automatically
decrease the motor torque in order to keep the voltage above the lower limit.
To prevent the DC voltage from exceeding the overvoltage control limit, the overvoltage controller
automatically decreases the generating torque when the limit is reached.
When the overvoltage controller is limiting the generating torque, quick deceleration of the motor is
not possible. Thus electrical braking (brake chopper and brake resistor) is needed in some
applications to allow the drive to dissipate regenerative energy. The chopper connects the brake
resistor to the intermediate circuit of the drive whenever the DC voltage exceeds the maximum limit.
Check that the overvoltage and undervoltage controllers are active.
47.01 OVERVOLTAGE
CTRL
47.02 UNDERVOLTAGE
CTRL
If the application requires a brake resistor (the drive has a built-in
brake chopper):
- Set the brake chopper and resistor settings.
Note: When a brake chopper and resistor are used, the overvoltage
controller must be deactivated by parameter 47.01 OVERVOLTAGE
CTRL.
- Check that the connection functions.
For more information on the brake resistor connection, see the
appropriate hardware manual.
48.01…48.07
47.01 OVERVOLTAGE
CTRL.
Start function
Select the start function.
Setting 11.01 START MODE to AUTOMATIC selects a generalpurpose start function. This setting also makes flying start (starting to
a rotating motor) possible.
The highest possible starting torque is achieved when 11.01 START
MODE is set to FAST (automatic optimised DC magnetising) or
CONST TIME (constant DC magnetising with user-defined
magnetising time).
Note: When 11.01 START MODE setting is FAST or CONST TIME,
flying start (start to a rotating motor) is not possible.
Start-up
11.01 START MODE
25
Limits
Set the operation limits according to the process requirements.
Note: If load torque is suddenly lost when the drive is operating in
torque control mode, the drive will rush to the defined negative or
positive maximum speed. For safe operation, ensure the set limits are
suitable for your application.
20.01…20.07
Motor overtemperature protection (2)
Set the alarm and fault limits for the motor overtemperature protection. 45.03 MOT TEMP ALM
LIM
45.04 MOT TEMP FLT
LIM
Set the typical ambient temperature of the motor.
45.05 AMBIENT TEMP
When 45.02 MOT TEMP SOURCE setting is ESTIMATED, the motor
thermal protection model must be configured as follows:
- Set the maximum allowed operating load of the motor.
- Set the zero speed load. A higher value can be used if the motor has
an external motor fan to boost the cooling.
- Set the break point frequency of the motor load curve.
- Set the motor nominal temperature rise.
- Set the time inside which the temperature has reached 63% of the
nominal temperature.
45.06 MOT LOAD
CURVE
45.07 ZERO SPEED
LOAD
45.08 BREAK POINT
45.09
MOTNOMTEMPRISE
45.10 MOT THERM
TIME
If possible, perform the motor ID run again at this point (see page 20). 99.13 IDRUN MODE
Speed filtering
The measured speed always has a small ripple because of electrical and mechanical interferences,
couplings and encoder resolution (i.e. small pulse number). A small ripple is acceptable as long as
it does not affect the speed control chain. The interferences in the speed measurement can be
filtered with a speed error filter or with an actual speed filter.
Reducing the ripple with filters may cause speed controller tuning problems. A long filter time
constant and fast acceleration time contradict one another. A very long filter time results in unstable
control.
If the used speed reference changes rapidly (servo application), use
the speed error filter to filter the possible interferences in the speed
measurement. In this case the speed error filter is more suitable than
the actual speed filter:
- Set the filter time constant.
26.06 SPD ERROR FILT
TIM
Start-up
26
If the used speed reference remains constant, use the actual speed
filter to filter the possible interferences in the speed measurement. In
this case the actual speed filter is more suitable than the speed error
filter:
- Set the filter time constant.
If there are substantial interferences in the speed measurement, the
filter time constant should be proportional to the total inertia of the load
and motor, i.e. approximately 10…30% of the mechanical time
constant
tmech = (nnom / Tnom) × Jtot × 2π / 60, where
Jtot = total inertia of the load and motor (the gear ratio between the
load and the motor must be taken into account)
nnom = motor nominal speed
Tnom = motor nominal torque
22.02 SPEED ACT
FTIME
Manual speed controller tuning
Select the following signals to be monitored with the DriveStudio Data
Logger or Monitoring Window:
- 1.01 SPEED ACT, filtered actual speed
- 1.06 TORQUE, motor torque.
Start the motor with a small speed reference.
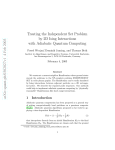
Give a speed reference step and monitor the response. Repeat the test for few speed reference
steps across the whole speed range:
Set the speed ramp time to a suitable value (according to the used
application).
25.03 ACC TIME
Set a suitable speed step (according to the used application): 10% or
20% of the maximum speed of the drive. Accept the new value by
pressing the Set new reference button.
Optimise the P-part of the speed controller: Set the integration time to
0 to change the PI (proportional integral) controller into a P controller:
28.03 INTEGRATION
TIME
Give a step change up, for example 10% (of the maximum speed of
the drive). When the speed is stabilised, give a step change down, for
example -10% (of the maximum speed of the drive).
Increase the proportional gain until the response is sufficient:
01.01 SPEED
ACT
Gain too low
Start-up
Gain too high
Gain optimal
28.02 PROPORT GAIN
27
Reduce the integration time (TI) until an overshoot is observed in the 28.03 INTEGRATION
TIME
response.
Adjust the integration time so that there is no overshoot or only a slight
overshoot (depending on the drive application). The integral part is
used to correct the error between the reference and actual value
(which is caused by the proportional control) as quickly as possible.
If the drive is stable and allows a high proportional gain,
an overcompensated step response is obtained if the integration time
is set short.
01.01 SPEED
ACT
TI too long
TI too short
TI optimal
Acceleration (deceleration) compensation can be used to improve the 26.08 ACC COMP
speed control dynamic reference change (when the speed ramp times DERTIME
> 0). In order to compensate inertia during acceleration, a derivative of
the speed reference is added to the output of the speed controller.
- Set the derivation time for acceleration (deceleration) compensation.
The value should be proportional to the total inertia of the load and
motor, i.e. approximately 10…30% of the mechanical time constant
(tmech). See the mechanical time constant equation in section Speed
filtering on page 25.
Fieldbus control
Follow these instructions when the drive is controlled from a fieldbus control system via fieldbus
adapter Fxxx. The adapter is installed in drive Slot 3.
Enable the communication between the drive and fieldbus adapter.
50.01 FBA ENABLE
Connect the fieldbus control system to the fieldbus adapter module.
Set the communication and adapter module parameters: See section
Setting up communication through a fieldbus adapter module on page
144.
Test that the communication functions.
Start-up
28
How to control the drive through the I/O interface
The table below instructs how to operate the drive through the digital and analogue
inputs, when the default parameter settings are valid.
PRELIMINARY SETTINGS
Ensure the original parameter settings (default) are valid.
16.04 PAR FACTORY
RESTORE
Ensure the control connections are wired according to the connection
diagram given in chapter Default connections of the control unit.
Switch to external control by clicking the Take/Release button of the PC
tool control panel.
STARTING AND CONTROLLING THE SPEED OF THE MOTOR
Start the drive by switching digital input DI1 on. Digital input status can be
monitored with signal 2.01 DI STATUS.
Check that analogue input AI1 is used as a voltage input (selected by
jumper J1).
2.01 DI STATUS
Voltage:
J1
Regulate the speed by adjusting the voltage of analogue input AI1.
Check analogue input AI1 signal scaling. AI1 values can be monitored
with signals 2.04 AI1 and 2.05 AI1 SCALED.
When AI1 is used as a voltage input, the input is differential and the
negative value corresponds to the negative speed and the positive value
to the positive speed.
13.02…13.04
2.04 AI1
2.05 AI1 SCALED
STOPPING THE MOTOR
Stop the drive by switching digital input DI1 off.
Start-up
2.01 DI STATUS
29
Drive programming via PC tool
What this chapter contains
This chapter introduces the drive programming via PC tool. The PC tool consists of
DriveStudio and Solution Program Composer (SPC).
For more information, see DriveStudio User Manual [3AFE68749026 (English)] and
Solution Program Composer User Manual [3AFE68836590 (English)].
General
The drive control program is divided into two parts:
• firmware program
• solution program.
The firmware program performs the main control functions, including speed and
torque control, drive logic (start/stop), I/O, feedback, communication and protection
functions. Firmware functions are configured and programmed with parameters. The
functions of the firmware program can be extended with solution programming.
Solution programs are built out of function blocks.
The drive supports two different programming methods:
• parameter programming
• solution programming with function blocks (the blocks are based on the
IEC-61131 standard).
Drive control program
Firmware
Solution program
Function block program
Standard
block library
Technology
block library
Firmware
blocks
(parameter
and signal
interface)
Speed control
Torque control
Drive logic
I/O interface
Fieldbus interface
Protections
Communication
M
E
Drive programming via PC tool
30
The following picture presents a view from the Solution Program Composer.
SPEED REF SEL
TL2 250 µ sec
Firmware
function blocks
3
(1)
3.01 SPEED REF1
3.02 SPEED REF2
1
24.01 SPEED REF1 SEL
0
24.02 SPEED REF2 SEL
SPEED REF MOD
TL3 250 µsec
4
(1)
3.03 SPEEDREF RAMP IN
MOTPOT
TL9 10 m sec
TRUE
O U TPU T(44)
(6 / 44)
SP E E D RE F 2
(6 / 3. 02)
FA LS E
44
(1 )
FA LS E
E NA BLE
O U TPU T
D I S TA TUS .4
1.000
O U TP UT(44)
UP
(2 / 2.01. DI 5)
D I S TA TUS .5
(2 / 2.01. DI 6)
10
D O WN
RAM P TIME
1000
MA XV AL
0
MI NV A L
0
0
rpm
FA LS E
0
rpm
0
rpm
0
rpm
< 24.03 SPEED REF1 IN
< 24.04 SPEED REF2 IN
< 24.05 SPD REF 1/2 SEL
24.06 SPEED SHARE
< 24.07 SPD REF NEG ENA
24.08 CONST SPEED
< 24.09 CONST SPEED ENA
24.10 SPEED REF JOG1
24.11 SPEED REF JOG2
24.12 SPEED REFMIN ABS
SPEED REF RAMP
RE SE TV AL
F ALS E
RE SE T
TL7 500 µsec
31
(18)
3.04 SPEEDREF RAMPED
S P E E D RE F RA M P IN
(6 / 3. 03)
15 00
rpm
1. 000
s
1. 000
Standard
function block
25.04 DEC TIME
25.05 SHAPE TIME ACC1
25.06 SHAPE TIME ACC2
s
0. 000
s
0. 000
25.07 SHAPE TIME DEC1
25.08 SHAPE TIME DEC2
s
0. 000
s
0. 000
s
1. 000
s
0. 000
rpm
F A LS E
Based on
C ustomer
C ust. Doc. No.
D ate
25.02 SPEED SCALING
25.03 ACC TIME
s
0. 000
s
0. 000
P age 6 S peed Re f
F irmw are Library ID = 1, v er = 1. 0
S tandard Library I D = 10000, v er = 1.0
< 25.01 SPEED RAMP IN
25.09 ACC TIME JOGGING
25.10 DEC TIME JOGGING
25.11 EM STOP TIME
25.12 SPEEDREF BAL
< 25.13 SPEEDREF BAL ENA
Prepare d
Approv ed
Project name
Title
Doc. de s.
Re sp. dept.
Doc. N o.
Programming via parameters
Parameters can be set via DriveStudio, drive control panel (keypad) or the fieldbus
interface. All parameter settings are stored automatically to the permanent memory
of the drive. (Exception: Parameters set via the fieldbus interface must be saved by
par. 16.07 PARAM SAVE). Values are restored after the power switch-off. Default
values can be restored by a parameter (16.04 PAR FACTORY RESTORE).
Because parameters are used as firmware function block inputs, parameter values
can also be modified via the Solution Program Composer.
Solution programming
Solution programs are created with the Solution Program Composer (SPC) of the
PC tool.
The normal delivery of the drive does not include a solution program. The user can
create a solution program with the standard and firmware function blocks. ABB also
offers customised solution programs and technology function blocks for specific
applications. For more information, contact your local ABB representative.
Drive programming via PC tool
31
Function blocks
The solution program uses three types of function blocks: firmware function blocks,
standard function blocks and technology function blocks.
Firmware function blocks
Most of the firmware functions are represented as function blocks in the Solution
Program Composer. Firmware function blocks are part of the drive control firmware,
and used as an interface between the solution and firmware programs. Drive
parameters (groups 10…99) are used as function block inputs and drive signals
(groups 1…9) as function block outputs. Firmware function blocks are presented in
chapter Firmware functions, parameters and signals.
Standard function blocks (library)
Standard function blocks (e.g. ADD, AND) are used to create an executable solution
program. Blocks are based on the IEC-61131 standard. Standard function blocks are
presented in chapter Standard function blocks.
Standard function block library is always included in the drive delivery.
Technology function blocks
Several technology function block libraries are available for different types of
applications. One technology library can be used at a time. Technology blocks are
used in a similar way as the standard blocks.
Program execution
Solution program is loaded to the permanent memory (non-volatile) of the memory
unit (JMU). The execution of the downloaded program starts after the next reset of
the drive control board. The program is executed in real time on the same Central
Processing Unit (CPU of the drive control board) as the drive firmware. The program
is executed with two cyclical tasks. The time level for these tasks can be defined by
the programmer (> 1ms).
Note: Because the firmware and solution programs use the same CPU, the
programmer must ensure that the drive CPU is not overloaded. For information on
how to determine the solution program load, see Solution Program Composer User
Manual [3AFE68836590 (English)].
Drive programming via PC tool
32
Operation modes
The Solution Program Composer offers the following operation modes:
Off-line
When the off-line mode is used without a drive connection, the user can
• open a solution program file (if exists).
• modify and save the solution program.
• print the program pages.
When the off-line mode is used with a drive(s) connection, the user can
• connect the selected drive to the SPC.
• upload a solution program from the connected drive (an empty template which
includes only the firmware blocks is available as default.)
• download the configured solution program to the drive and start the program
execution. The downloaded program contains the function block program and the
parameter values set in the SPC.
• remove the program from the connected drive.
On-line
In the on-line mode, the user can
• modify firmware parameters (changes are stored directly to the drive memory).
• modify solution program parameters (i.e. parameters created in the SPC).
• monitor the actual values of all function blocks in real time.
Solution program examples for typical applications will be added to this manual later.
Drive programming via PC tool
33
Control locations and operating modes
What this chapter contains
This chapter describes the control locations and operation modes of the drive, and
presents the drive control chain in block diagram form.
Local control vs. external control
The drive has two main control locations: external and local. The control location is
selected with the PC tool (Take/Release button) or with the LOC/REM key on the
control panel.
ACSM1
2) 3)
External control
I/O 1) 3)
Local control
Drive to drive link
PC tool (DriveStudio and SPC)
or
Control panel (optional)
PLC
(= Programmable
Logic Controller)
Fieldbus adapter
Fxxx in Slot 3
M
3~
MOTOR
Encoder
1) Extra inputs/outputs can be added by installing optional I/O extension modules (FIO-01, FIO-11) in drive Slot 1/2.
2) Incremental or absolute encoder, or resolver interface module (FEN-01, FEN-11 or FEN-21) installed in drive Slot 1/2
3) Two encoder/resolver interface modules or two I/O extension modules of the same type are not allowed.
Local control
The control commands are given from a PC equipped with DriveStudio and Solution
Program Composer (SPC) or from the control panel keypad when the drive is in local
control. Speed and torque control modes are available for local control.
Control locations and operating modes
34
Local control is mainly used during commissioning and maintenance. The control
panel always overrides the external control signal sources when used in local
control. Changing the control location to local can be disabled by parameter 16.01
LOCAL LOCK.
The user can select by a parameter (46.03 LOCAL CTRL LOSS) how the drive
reacts to a control panel or PC tool communication break.
External control
When the drive is in external control, control commands are given through the
fieldbus interface (via an optional fieldbus adapter module), the I/O terminals (digital
and analogue inputs), optional I/O extension modules or the drive-to-drive link.
External references are given through the fieldbus interface, analogue inputs, drive
to drive link and encoder inputs.
Two external control location, EXT1 and EXT2, are available. The user can select
control signals (e.g. start and stop) and control modes for both external control
locations. Depending on the user selection, either EXT1 or EXT2 is active at a time.
Selection between EXT1/EXT2 is done via digital inputs or fieldbus control word.
Operating modes of the drive
The drive can operate in speed and torque control modes. A block diagram of the
drive control chain is presented further below.
Speed control mode
Motor rotates at a speed proportional to the speed reference given to the drive. This
mode can be used either with estimated speed used as feedback, or with an
encoder or resolver for better speed accuracy.
Speed control mode is available in both local and external control.
Torque control mode
Motor torque is proportional to the torque reference given to the drive. This mode
can be used either with estimated speed used as feedback, or with an encoder or
resolver for more accurate and dynamic motor control.
Torque control mode is available in both local and external control.
Special control modes
In addition to the speed and torque control modes, the following special control
modes are available:
• Emergency Stop modes OFF1 and OFF3: Drive stops along the defined
deceleration ramp and drive modulation stops.
• Jogging mode: Drive starts and accelerates to the defined speed when the
jogging signal is activated.
For more information, see firmware block DRIVE LOGIC on page 64.
Control locations and operating modes
*US
$2
$2
$,
$,
''&200
*US
),(/'%86
*US
3RV6SHHG5HI
$1$/2*,13876
*US
$1$/2*
2873876
63(('
5()5$03
*US
72545()$''
3RV6SHHG):'
',
',252
63(('
5()02'
*US
63(('
5()6(/
*US
$,
$,
)%
''
(1&
(1&
',*,7$/,2
*US
7254
5()02'
*US
7254
5()6(/
*US
$,
$,
)%
''
-RJJLQJ
*US 0HFKEUDNH
*US )DXOWUHVHW
(PVWRSV
'5,9(/2*,&
VWDUWVWRS
*US $&&&203
*US
(5525
63(('
'5,9(&21752/
9ROWDJHFWUOJUS
%UDNHFKRSSHUJUS
'5,9(02725
3527(&7,216
*USDQG
3,'
63(('
&21752/
*US
*US 02'(6
*US
&21752/
/,0,76
&75/
*US 02725
5()
Drive control chain for speed and torque control
(1&
*US
63(('
)(('%$&.
(1&
(
0
35
Control locations and operating modes
36
Control locations and operating modes
37
Default connections of the control unit
What this chapter contains
This chapter shows the default control connections of the JCU Control Unit.
More information on the connectivity of the JCU is given in the Hardware Manual of
the drive.
Default connections of the control unit
38
The figure below shows the default external control connections for the speed and
torque control.
Notes:
*Total maximum current: 200
mA
1) Selected by parameter
12.01 DIO1 CONF.
2) Selected by parameter
12.02 DIO2 CONF.
3) Selected by parameter
12.03 DIO3 CONF.
4) Selected by jumper J1.
5) Selected by jumper J2.
Current:
J1/2
Voltage:
J1/2
External power input
24 V DC, 1.6 A
+24VI
GND
Relay output: Brake close/open
250 V AC / 30 V DC
2A
NO
COM
NC
+24 V DC*
Digital I/O ground
Digital input 1: Stop/start (par. 10.02 and 10.05)
Digital input 2: EXT1/EXT2 (par. 34.01)
+24 V DC*
Digital I/O ground
Digital input 3: Fault reset (par. 10.08)
Digital input 4: Not connected
+24 V DC*
Digital I/O ground
Digital input 5: Not connected
Digital input 6: Not connected
+24 V DC*
Digital I/O ground
Digital input/output 1 1): Ready
Digital input/output 2 2): Running
+24 V DC*
Digital I/O ground
Digital input/output 3 3): Fault
+24VD
DGND
DI1
DI2
+24VD
DGND
DI3
DI4
+24VD
DGND
DI5
DI6
+24VD
DGND
DIO1
DIO2
+24VD
DGND
DIO3
Reference voltage (+)
Reference voltage (–)
Ground
Analogue input 1 (mA or V) 4): Speed reference
(par. 24.01)
Analogue input 2 (mA or V) 5): Torque reference
(par. 32.01)
AI1 current/voltage selection
AI2 current/voltage selection
Thermistor input
Ground
Analogue output 1 (mA): Output current
Analogue output 2 (V): Actual speed
Ground
+VREF
–VREF
AGND
AI1+
AI1–
AI2+
AI2–
TH
AGND
AO1 (I)
AO2 (U)
AGND
Drive-to-drive link termination
Drive-to-drive link
B
A
BGND
Safe Torque Off. Both circuits must be closed for
the drive to start. See the appropriate drive
hardware manual.
OUT1
OUT2
IN1
IN2
Control panel connection
Default connections of the control unit
X1
1
2
X2
1
2
3
X3
1
2
3
4
5
6
7
8
9
10
11
12
13
14
15
16
17
18
19
X4
1
2
3
4
5
6
7
J1
J2
8
9
10
11
12
X5
J3
1
2
3
X6
1
2
3
4
X7
39
Firmware functions, parameters and signals
What this chapter contains
This chapter describes the firmware function blocks and the associated input
parameters and output signals.
The number in brackets in the firmware block heading is the block ID number.
Firmware block layout
63(('(5525
6
7/)VHF
8
63(('5()86('
1
63(('(5525),/7
3
$&&&2037254
4
5
7
63(('$&7
63(('5()5$03('
63(('5()326
63((')(('):'
'ULYHYDOXH
63(('$&71&75/
63(('5()1&75/
2
63(('5()3&75/
63((')(('3&75/
63(('67(3
'ULYHYDOXH
63(('(55)7,0(
'ULYHYDOXH
63((':,1'2:
'ULYHYDOXH
$&&&203'(57,0(
'ULYHYDOXH
$&&&203)7,0(
1
Input parameters
2
Output signals
3
Input parameter values
4
Pointer parameter indicator “<“
5
Parameter 26.01 is set to value P.1.1, i.e. signal 1.01 SPEED ACT. The SPEED ACT
signal can be found on page 7 of the Solution Program Composer.
6
ID of the time level (TL4) and time level (250 µs). Time level, i.e. update cycle, is
application-specific. See the time level of the block in the Solution Program Composer.
7
Firmware block ID number
8
Firmware block execution order for the selected update cycle ID
Firmware functions, parameters and signals
40
Actual signals
Actual signals (parameter groups 1…9) are signals measured or calculated by the
drive. They are normally used for monitoring and diagnostics, and cannot be
adjusted by the user. For additional actual signal data, e.g. update cycle and fieldbus
equivalent, see chapter Parameter and signal data.
Parameters
Parameters are user-adjustable operation instructions of the drive (groups 10…99).
There are three different types of parameters: Value parameters, value pointer
parameters and bit pointer parameters.
Value parameter
A value parameter has a fixed set of choices or a setting range.
Example 1: Motor phase loss supervision is activated by selecting FAULT from the
selection list of parameter 46.06 MOT PHASE LOSS.
Example 2: The motor nominal power (kW) is set by writing the appropriate value to
parameter 99.10 MOT NOM POWER, e.g. 10.
Value pointer parameter
A value pointer parameter points to the value of another parameter/signal. The
source parameter is given in format P.xx.yy, where xx = Parameter group;
yy = parameter index.
Example: Motor current signal, 1.05 CURRENT PERC, is connected to analogue
output AO1 by setting parameter 15.01 AO1 PTR to value P.01.05.
Bit pointer parameter
A bit pointer parameter points to the value of a bit in another signal, or can be fixed
to 0 (FALSE) or 1 (TRUE).
When adjusting a bit pointer parameter on the optional control panel, CONST is
selected in order to fix the value to 0 (displayed as “C.FALSE”) or 1 (“C.TRUE”).
POINTER is selected to define a source from another signal.
A pointer value is given in format P.xx.yy.zz, where xx = Parameter group;
yy = Parameter index, zz = Bit number.
Example: Digital input DI5 status, 2.01 DI STATUS bit 4, is used for brake
supervision by setting parameter 35.02 BRAKE ACKNOWL to value P.02.01.04.
Note: Pointing to a nonexisting bit will be interpreted as 0 (FALSE).
For additional parameter data, e.g. update cycle and fieldbus equivalent, see
chapter Parameter and signal data.
Firmware functions, parameters and signals
41
ACTUAL VALUES
(14)
$&78$/9$/8(6
7/)PVHF
63(('$&73(5&
)5(48(1&<
&855(17
&855(173(5&
72548(
'&92/7$*(
63(('(67,0$7('
7(03,19(57(5
7(03%&
%5$.(5(6/2$'
Description
The ACTUAL VALUE block shows actual signals measured or calculated by the
drive. Values are only for monitoring, i.e. they cannot be set by user. See also
signals 1.01, 1.08, 1.09, 1.10, 1.11, 1.17, 1.18 and 9.01….9.22.
Outputs
1.02 SPEED ACT PERC
Actual speed in percent of the motor synchronous speed
1.03 FREQUENCY
Estimated drive output frequency in Hz
1.04 CURRENT
Measured motor current in A
1.05 CURRENT PERC
Motor current in percent of the nominal motor current
1.06 TORQUE
Motor torque in percent of the motor nominal torque
1.07 DC-VOLTAGE
Measured intermediate circuit voltage in V
1.14 SPEED ESTIMATED
Estimated motor speed in rpm
1.15 TEMP INVERTER
Measured temperature of the heatsink in Celsius
Firmware functions, parameters and signals
42
1.16 TEMP BC
Brake chopper IGBT temperature in Celsius
1.20 BRAKE RES LOAD
Estimated temperature of the braking resistor. The value is given in percent of the temperature the
resistor reaches when loaded with the power defined by parameter 48.04 BR POWER MAX.
1.21 CPU USAGE
Microprocessor load in percent.
Firmware functions, parameters and signals
43
SYSTEM INFO
Note: The SYSTEM INFO signals do not belong to any firmware block, i.e. they are
only available via the optional control panel or the PC tool Parameter Browser.
Description
The SYSTEM INFO signals display the application type, the firmware type, name
and version and the optional module type in drive option Slot 1/2/3.
Signals
9.01 DRIVE TYPE
Displays the drive application type.
1 = ACSM1 SPEED: Speed and torque control application
2 = ACSM1 MOTION: Motion control application.
9.02 DRIVE RATING ID
Displays the inverter type of the drive: 1= ACSM1-02A5-4, 2 = ACSM1-03A0-4,3 = ACSM1-04A0-4,
4 = ACSM1-05A0-4, 5 = ACSM1-07A0-4, 6 = ACSM1-09A5-4, 7 = ACSM1-012A-4,
8 = ACSM1-016A-4, 9 = ACSM1-024A-4, 10 = ACSM1-031A-4, 11 = ACSM1-040A-4,
12 = ACSM1-046A-4, 13 = ACSM1-060A-4, 14 = ACSM1-073A-4, 15 = ACSM1-090A-4.
9.03 FIRMWARE ID
Displays the firmware name. E.g. UMFI.
9.04 FIRMWARE VER
Displays the version of the firmware package in the drive (in hexadecimal format), e.g. 0x1210.
9.20 OPTION SLOT 1
Displays the type of the optional module in option Slot 1. 0 = NO OPTION, 1 = NO COMM, 2 =
UNKNOWN, 3 = FEN-01, 4 = FEN-11, 5 = FEN-21, 6 = FIO-01, 7 = FIO-11, 8 = FPBA-01, 9 = FPBA02, 10 = FCAN-01, 11 = FDNA-01, 12 = FENA-01, 13 = FENA-02, 14 = FLON-01, 15 = FRSA-00, 16 =
FMBA-01, 17 = FFOA-01, 18 = FFOA-02.
9.21 OPTION SLOT 2
Displays the type of the optional module in option Slot 2. See signal 9.20 OPTION SLOT 1.
9.22 OPTION SLOT 3
Displays the type of the optional module in option Slot 3. See signal 9.20 OPTION SLOT 1.
Firmware functions, parameters and signals
44
START-UP DATA
(2)
Note: The START-UP DATA parameters do not belong to any firmware block, i.e.
they can only be accessed via the optional control panel or the PC tool Parameter
Browser.
Description
With the START-UP DATA block the user can select the language and enter the
motor data. Motor data can be entered either by selecting a specific motor catalogue
by parameter 99.02 MOTOR CATALOGUE or manually by setting motor parameters
99.04…99.12.
Note: Motor catalogue feature is not supported yet.
The motor nominal values must be set before the drive is started. For detailed
instructions, see chapter Start-up.
Inputs
When motor catalogue (99.02) is not used for the entering the motor data:
- With scalar control, the following parameters must be set: 99.06…99.08.
- With DTC control, the following parameters must be set: 99.06…99.10. Better
control accuracy is achieved by also setting parameters 99.11…99.12.
99.01 LANGUAGE
Note: Language selection is not supported yet.
Selects the language.
ENGLISH
DEUTCH
ITALIANO
99.02 MOTOR CATALOGUE
Note: Motor catalogue is not supported yet.
Selects the motor catalogue.
99.03 MOTOR SELECTION
Note: Motor catalogue is not supported yet.
Selects the motor from the catalogue selected by parameter 99.02 MOTOR CATALOGUE.
99.04 MOTOR TYPE
Selects the motor type.
Note: This parameter cannot be changed while the drive is running.
0 = AM: Asynchronous motor. Three phase AC voltage supplied induction motor with squirrel cage
rotor.
1 = PMSM: Permanent magnet motor. Three phase AC voltage supplied synchronous motor with
permanent magnet rotor and sinusoidal BackEMF voltage.
Firmware functions, parameters and signals
45
99.05 MOTOR CTRL MODE
Note: Control mode selection is not supported yet. Direct Torque Control is always used.
Selects the motor control mode.
0 = DTC: Direct Torque Control mode is suitable for most applications.
1 = SCALAR: Scalar control is suitable in special cases where the DTC cannot be applied. In Scalar
Control, the drive is controlled with a frequency reference. The outstanding motor control accuracy of
the DTC cannot be achieved in scalar control. There are some standard features that are disabled in
the scalar control mode, for example motor identification run (99.13), torque limits (LIMITS), DC hold
and DC magnetising (11.04…11.06, 11.01).
Note: Correct motor run requires that the magnetising current of the motor does not exceed 90 percent
of the nominal current of the inverter.
Note: Scalar control mode must be used
- with multimotor applications with variable number of motors
- if the nominal current of the motor is less than 1/6 of the nominal output current of the drive.
It is recommended to activate the scalar control mode in the following special applications:
- In multimotor drives: 1) if the load is not equally shared between the motors, 2) if the motors are of
different sizes, or 3) if the motors are going to be changed after the motor identification.
- If the drive is used with no motor connected (e.g. for test purposes).
99.06 MOT NOM CURRENT
Defines the nominal motor current. Must be equal to the value on the motor rating plate. If several
motors are connected to the inverter, enter the total current of the motors.
Note: Correct motor run requires that the magnetising current of the motor does not exceed 90 percent
of the nominal current of the inverter.
Note: This parameter cannot be changed while the drive is running.
Range: 0…6400 A
Allowed range: 1/6…2 · I2N of drive (parameter 99.05 MOTOR CTRL MODE = DTC).
Allowed range: 0…2 · I2N of drive (parameter 99.05 MOTOR CTRL MODE = SCALAR).
99.07 MOT NOM VOLTAGE
Defines the nominal motor voltage. Nominal voltage is a fundamental phase to phase rms voltage,
which is supplied to the motor at the nominal operating point. This parameter value must be equal to
the value on the asynchronous motor name plate.
Note: With permanent magnet motors, the nominal voltage is the BackEMF voltage (at motor nominal
speed). If the voltage is given as voltage per rpm, e.g. 60 V per 1000 rpm, the voltage for 3000 rpm
nominal speed is 3 × 60 V = 180 V. Note that the nominal voltage is not equal to the equivalent DC
motor voltage (E.D.C.M.) value given by some motor manufactures. The nominal voltage can be
calculated by dividing the E.D.C.M. voltage by 1.7 (= square root of 3).
Note: The stress on the motor insulations is always dependent on the drive supply voltage. This also
applies to the case where the motor voltage rating is lower than the rating of the drive and the supply of
the drive.
Note: This parameter cannot be changed while the drive is running.
Range: 80…960 V. Allowed range is 1/6…2 · UN of the drive.
99.08 MOT NOM FREQ
Defines the nominal motor frequency.
Note: This parameter cannot be changed while the drive is running.
Range: 5…500 Hz
Firmware functions, parameters and signals
46
99.09 MOT NOM SPEED
Defines the nominal motor speed. Must be equal to the value on the motor rating plate. When
parameter value is changed, check the speed limits in function block LIMITS on page 83.
Note: This parameter cannot be changed while the drive is running.
Range: 0…10000 rpm
99.10 MOT NOM POWER
Defines the nominal motor power. Must be equal to the value on the motor rating plate. If several
motors are connected to the inverter, enter the total power of the motors. Set also parameter 99.11
MOT NOM COSFII.
Note: This parameter cannot be changed while the drive is running.
Range: 0…10000 kW
99.11 MOT NOM COSFII
Defines the cosϕ (not applicable to permanent magnet motors) for a more accurate motor model. Not
obligatory; if set, should be equal to the value on the motor rating plate.
Note: This parameter cannot be changed while the drive is running.
Range: 0…1. By setting the value to 0, the parameter is disabled.
99.12 MOT NOM TORQUE
Defines the nominal motor shaft torque for a more accurate motor model. Not obligatory.
Note: This parameter cannot be changed while the drive is running.
Range: 0…2147483 Nm
Firmware functions, parameters and signals
47
99.13 IDRUN MODE
Selects the type of the motor identification performed at the next start of the drive (for Direct Torque
Control). During the identification, the drive will identify the characteristics of the motor for optimum
motor control. After the ID run, the drive is stopped. Note: This parameter cannot be changed while the
drive is running.
Once the ID run is activated, it can be cancelled by stopping the drive: If ID run has already been
performed once, parameter is automatically set to NO. If no ID run has been performed yet, parameter
is automatically set to STANDSTILL. In this case, the ID run must be performed.
Note: ID run can only be performed in local control (i.e. when drive is controlled via PC tool or control
panel).
Note: ID run cannot be performed if parameter 99.05 MOTOR CTRL MODE = SCALAR.
Note: ID run must be performed every time any of the motor parameters (99.04, 99.06…99.12) have
been changed. Parameter is automatically set to STANDSTILL after the motor parameters have been
set.
Note: With permanent magnet motor, the motor shaft must NOT be locked and the load torque must
be < 10% during the ID run (Normal/Reduced/Standstill).
Note: Ensure that possible Safe Torque Off and emergency stop circuits are closed during ID run.
0 = NO: No motor ID run is requested. This mode can be selected only if the ID run (Normal/Reduced/
Standstill) has already been performed once.
1 = NORMAL: Normal ID run. Guarantees the best possible control accuracy. The ID run takes about
90 seconds. This mode should be selected whenever it is possible. Note: The driven machinery must
be de-coupled from the motor with Normal ID run:
- if the load torque is higher than 20%.
- if the machinery is not able to withstand the nominal torque transient during the ID run.
Note: Check the direction of rotation of the motor before starting the ID run. During the run, the motor
will rotate in the forward direction.
**WARNING! The motor will run at up to approximately 50…100% of the nominal speed during
the ID run. ENSURE THAT IT IS SAFE TO RUN THE MOTOR BEFORE PERFORMING THE
ID RUN!
2 = REDUCED: Reduced ID Run. This mode should be selected instead of the Normal ID Run:
- if mechanical losses are higher than 20% (i.e. the motor cannot be de-coupled from the driven
equipment)
- if flux reduction is not allowed while the motor is running (i.e. in case of a motor with an integrated
brake supplied from the motor terminals).
With Reduced ID run, the control in the field weakening area or at high torques is not necessarily as
accurate as with the Normal ID run. Reduced ID run is completed faster than the Normal ID Run (< 90
seconds).
Note: Check the direction of rotation of the motor before starting the ID run. During the run, the motor
will rotate in the forward direction.
**WARNING! The motor will run at up to approximately 50…100% of the nominal speed during
the ID run. ENSURE THAT IT IS SAFE TO RUN THE MOTOR BEFORE PERFORMING THE
ID RUN!
Firmware functions, parameters and signals
48
3 = STANDSTILL: Standstill ID run. The motor is injected with DC current. With asynchronous motor,
the motor shaft is not rotating (with permanent magnet motor the shaft can rotate < 0.5 revolution).
Note: This mode should be selected only if the Normal or Reduced ID run is not possible due to the
restrictions caused by the connected mechanics (e.g. with lift or crane applications).
4 = AUTOPHASING: During autophasing, the start angle of the motor is determined. Note that other
motor model values are not updated. See also parameter 11.07.
Note: Autophasing can only be selected after the Normal/Reduced/Standstill ID run has been
performed once. Autophasing is used when an absolute encoder has been added/changed to
a permanent magnet motor and there is no need to perform the Normal/Reduced/Standstill ID run
again.
Note: During Autophasing the motor shaft must NOT be locked and the load torque must be < 5%.
5 = CUR MEAS CAL: Current offset and gain measurement calibration. The calibration will be
performed at next start.
Firmware functions, parameters and signals
49
DI
(16)
',
7/)PVHF
',67$786
>@
',,19(570$6.
Description
The DI block shows the DI status.
The drive offers six basic digital inputs DI1…DI6. The hardware filter time constant of
the digital inputs is approximately 0.25 ms.
Inputs
12.13 DI INVERT MASK
Inverts status of digital inputs as reported by 2.01 DI STATUS. For example, a value of 0b000100
inverts the status of DI3 on the output.
Outputs
2.01 DI STATUS
Status word of the digital inputs. Example: 000001 = DI1 is on, DI2 to DI6 are off.
Firmware functions, parameters and signals
50
DIO1
(18)
',2
7/)PVHF
',267$786
>2XWSXW@
',2&21)
>67$786:25'@
',2287375
5($'<5(/$<
Description
With the DIO1 block the user can select whether DIO1 is used as a digital input or as
a digital output and connect an actual signal to digital output 1. The block also shows
the DIO status.
Inputs
12.01 DIO1 CONF
Selects whether DIO1 is used as a digital input or as a digital output.
0 = OUTPUT: Digital output
1 = INPUT: Digital input
12.04 DIO1 OUT PTR
Selects a drive signal to be connected to digital output DIO1 (when 12.01 DIO1 CONF is set to
OUTPUT).
Bit pointer: Group, index and bit
Outputs
2.03 DIO STATUS
Status word of digital inputs/outputs DIO1…3. Example: 001 = DIO1 is on, DIO2 and DIO3 are off.
Firmware functions, parameters and signals
51
DIO2
(19)
',2
7/)PVHF
',267$786
',2)5(4,1
>2XWSXW@
',2&21)
>67$786:25'@
',2287375
02'8/$7,1*
Description
With the DIO2 block the user can select whether DIO2 is used as a digital or
frequency input or as a digital output and connect an actual signal to digital output 2.
The block also shows the DIO status.
Frequency input can be scaled with standard function blocks. See chapter Standard
function blocks.
Inputs
12.02 DIO2 CONF
Selects whether DIO2 is used as a digital input, as a digital output or as a frequency input.
0 = OUTPUT: Digital output
1 = INPUT: Digital input
2 = FREQ INPUT: Frequency input
12.05 DIO2 OUT PTR
Selects a drive signal to be connected to digital output DIO2 (when 12.02 DIO2 CONF is set to
OUTPUT).
Bit pointer: Group, index and bit
Outputs
2.03 DIO STATUS
Status word of digital inputs/outputs DIO1…3. Example: 001 = DIO1 is on, DIO2 and DIO3 are off.
2.10 DIO2 FREQ IN
Frequency input value in Hz when DIO2 is used as frequency input (12.02 DIO2 CONF is set to FREQ
INPUT).
Firmware functions, parameters and signals
52
DIO3
(20)
',2
7/)PVHF
',267$786
',2)5(4287
>2XWSXW@
',2&21)
>67$786:25'@
)$8/7
63(('$&7
',2287375
>+]@
',2)287375
',2)0$;
>+]@
',2)0,1
>@
',2)0$;6&$/(
>@
',2)0,16&$/(
Description
With the DIO3 block the user can select whether DIO3 is used as a digital input or as
a digital/frequency output, connect an actual signal to the digital/frequency output
and scale the frequency output. The block also shows the DIO status.
Inputs
12.03 DIO3 CONF
Selects whether DIO3 is used as a digital input, as a digital output or as a frequency output.
0 = OUTPUT: Digital output
1 = INPUT: Digital input
3 = FREQ OUTPUT: Frequency output
12.06 DIO3 OUT PTR
Selects a drive signal to be connected to digital output DIO3 (when 12.03 DIO3 CONF is set to
OUTPUT).
Bit pointer: Group, index and bit
12.07 DIO3 F OUT PTR
Selects a drive signal to be connected to frequency output (when 12.03 DIO3 CONF is set to FREQ
OUTPUT).
Value pointer: Group and index
12.08 DIO3 F MAX
Defines the maximum value for frequency output (when 12.03 DIO3 CONF is set to FREQ OUTPUT).
Range: 3…32768 Hz
12.09 DIO3 F MIN
Defines the minimum value for frequency output (when 12.03 DIO3 CONF is set to FREQ OUTPUT).
Range: 3…32768 Hz
Firmware functions, parameters and signals
53
12.10 DIO3 F MAX SCALE
Defines the real value that corresponds to the maximum frequency output value defined by
parameter 12.08 DIO3 F MAX.
DIO3 (Hz)
DIO3 (Hz)
12.08
12.08
12.09
DIO3 (real)
12.09
12.11
12.10
DIO3 (real)
12.10
12.11
Range: 0…32768
12.11 DIO3 F MIN SCALE
Defines the real value that corresponds to the minimum frequency output value defined by
parameter 12.09 DIO3 F MIN.. See parameter 12.10 DIO3 F MAX SCALE.
Range: 0…32768
Outputs
2.03 DIO STATUS
Status word of digital inputs/outputs DIO1…3. Example: 001 = DIO1 is on, DIO2 and DIO3 are off.
2.11 DIO3 FREQ OUT
Frequency output value in Hz when DIO3 is used as frequency output (12.03 DIO3 CONF is set to
FREQ OUTPUT).
Firmware functions, parameters and signals
54
RO
(17)
52
7/)PVHF
5267$786
>%5$.(&200$1'@
52287375
Description
With the RO block the user can connect an actual signal to the relay output. The
block also shows the relay output status.
Inputs
12.12 RO1 OUT PTR
Selects a drive signal to be connected to relay output RO1.
Bit pointer: Group, index and bit
Outputs
2.02 RO STATUS
Status of relay output. 1 = RO is energized.
Firmware functions, parameters and signals
55
AI1
(23)
$,
7/)PVHF
$,
$,6&$/('
>V@
$,),/77,0(
>9@
$,0$;
>9@
$,0,1
>@
$,0$;6&$/(
>@
$,0,16&$/(
Description
With the AI1 block the user can filter and scale the analogue input 1 signal and
select the AI1 supervision. The block also shows analogue input 1 value.
The drive offers two programmable analogue inputs, AI1 and AI2. Both inputs can be
used either as a voltage or a current input (-11…11 V or -22…22 mA). The input type
is selected with jumper J1 on the JCU Control Unit.
The inaccuracy of the analogue inputs is 1% of the full scale range and the
resolution is 11 bits (+ sign). The hardware filter time constant is approximately
0.25 ms.
Analogue input can be used as the source for speed and torque reference.
Analogue input supervision can be added with standard function blocks. See chapter
Standard function blocks.
Inputs
13.01 AI1 FILT TIME
Defines the filter time constant for analogue input AI1.
%
Unfiltered signal
O = I · (1 - e-t/T)
100
63
I = filter input (step)
O = filter output
t = time
T = filter time constant
Filtered signal
T
t
Note: The signal is also filtered due to the signal interface hardware (approximately 0,25 ms time
constant). This cannot be changed by any parameter.
Range: 0…30 s
13.02 AI1 MAX
Defines the maximum value for analogue input AI1. The type is selected with jumper J1 on the JCU
Control Unit.
Range: -11…11 V / -22…22 mA
Firmware functions, parameters and signals
56
13.03 AI1 MIN
Defines the minimum value for analogue input AI1. The type is selected with jumper J1 on the JCU
Control Unit.
Range: -11…11 V / -22…22 mA
13.04 AI1 MAX SCALE
Defines the real value that corresponds to the maximum analogue input value defined by parameter
13.02 AI1 MAX.
AI (mA / V)
13.02
AI (real)
13.05
13.04
13.03
Range: -32768…32767
13.05 AI1 MIN SCALE
Defines the real value that corresponds to the minimum analogue input value defined by parameter
13.03 AI1 MIN. See parameter 13.04 AI1 MAX SCALE.
Range: -32768…32767
13.11 AITUNE
Triggers the AI tuning function.
Note: This parameter can only be accessed via the PC tool Parameter Browser.
Connect the signal to the input and select the appropriate tuning function.
0 = NO ACTION: AI tune is not activated.
1 = AI1 MIN TUNE: Current analogue input AI1 signal value is set as minimum value for AI1,
parameter 13.03 AI1 MIN. The value reverts back to NO ACTION automatically.
2 = AI1 MAX TUNE: Current analogue input AI1 signal value is set as maximum value for AI1,
parameter 13.02 AI1 MAX. The value reverts back to NO ACTION automatically.
3 = AI2 MIN TUNE: Current analogue input AI2 signal value is set as minimum value for AI2,
parameter 13.08 AI2 MIN. The value reverts back to NO ACTION automatically
4 = AI2 MAX TUNE: Current analogue input AI2 signal value is set as maximum value for AI2,
parameter 13.07 AI2 MAX. The value reverts back to NO ACTION automatically.
Firmware functions, parameters and signals
57
13.12 AI SUPERVISION
Selects how the drive reacts when analogue input signal limit is reached. The limit is selected by
parameter 13.13 AI SUPERVIS ACT.
Note: This parameter can only be accessed via the PC tool Parameter Browser.
0 = NO: Inactive
1 = FAULT: The drive trips on fault AI SUPERVISION.
2 = SPD REF SAFE: The drive generates alarm AI SUPERVISION and sets the speed to the speed
defined by parameter 46.02 SPEED REF SAFE.
WARNING! Make sure that it is safe to continue operation in case of a communication break.
3 = LAST SPEED: The drive generates alarm AI SUPERVISION and freezes the speed to the level
the drive was operating at. The speed is determined by the average speed over the previous 10
seconds.
WARNING! Make sure that it is safe to continue operation in case of a communication break.
13.13 AI SUPERVIS ACT
Selects the analogue input signal supervision limit.
Note: This parameter can only be accessed via the PC tool Parameter Browser.
Bit
Supervision selected by parameter 13.12 AI SUPERVISION is activated if
0
AI1<min
AI1 signal value falls below the value defined by equation:
par. 13.03 AI1 MIN - 0.5 mA or V
1
AI1>max
AI1 signal value exceeds the value defined by equation:
par. 13.02 AI1 MAX + 0.5 mA or V
2
AI2<min
AI2 signal value falls below the value defined by equation:
par. 13.08 AI2 MIN - 0.5 mA or V
3
AI2>min
AI1 signal value exceeds the value defined by equation:
par. 13.07 AI2 MAX + 0.5 mA or V
Example: If parameter value is set to 0010 (bin), bit 1 AI1>max is selected.
Outputs
2.04 AI1
Analogue input AI1 value in V or mA. The type is selected with jumper J1 on the JCU Control Unit.
2.05 AI1 SCALED
Scaled value of analogue input AI1. See parameters 13.04 AI1 MAX SCALE and 13.05 AI1 MIN
SCALE.
Firmware functions, parameters and signals
58
AI2
(24)
$,
7/)PVHF
$,
$,6&$/('
>V@
$,),/77,0(
>9@
$,0$;
>9@
$,0,1
>@
$,0$;6&$/(
>@
$,0,16&$/(
Description
With the AI2 block the user can filter and scale the analogue input 2 signal and
select the AI2 supervision. The block also shows analogue input 2 value.
See also description in firmware block AI1 on page 55.
Inputs
13.06 AI2 FILT TIME
Defines the filter time constant for analogue input AI2. See parameter 13.01 AI1 FILT TIME.
Range: 0…30 s
13.07 AI2 MAX
Defines the maximum value for analogue input AI2. The type is selected with jumper J2 on the JCU
Control Unit.
Range: -22…22 mA / -11…11 V
13.08 AI2 MIN
Defines the minimum value for analogue input AI2. The type is selected with jumper J2 on the JCU
Control Unit.
Range: -22…22 mA / -11…11 V
Firmware functions, parameters and signals
59
13.09 AI2 MAX SCALE
Defines the real value that corresponds to the maximum analogue input value defined by parameter
13.07 AI2 MAX.
AI (mA / V)
13.07
AI (real)
13.10
13.09
13.08
Range: -32768…32767
13.10 AI2 MIN SCALE
Defines the real value that corresponds to the minimum analogue input value defined by parameter
13.08 AI2 MIN. See parameter 13.09 AI2 MAX SCALE.
Range: -32768…32767
13.11 AITUNE
Triggers the AI tuning function. For selections, see firmware block AI1 on page 55.
Note: This parameter can only be accessed via the PC tool Parameter Browser.
13.12 AI SUPERVISION
Selects how the drive reacts when analogue input signal limit is reached. The limit is selected by
parameter 13.13 AI SUPERVIS ACT. For selections, see firmware block AI1 on page 55.
Note: This parameter can only be accessed via the PC tool Parameter Browser.
13.13 AI SUPERVIS ACT
Selects the analogue input signal supervision limit. For selections, see firmware block AI1 on page 55.
Note: This parameter can only be accessed via the PC tool Parameter Browser.
Outputs
2.06 AI2
Analogue input AI2 value in V or mA. The type is selected with jumper J2 on the JCU Control Unit.
2.07 AI2 SCALED
Scaled value of analogue input AI2. See parameters 13.09 AI2 MAX SCALE and 13.10 AI2 MIN
SCALE.
Firmware functions, parameters and signals
60
AO1
(25)
$2
7/)PVHF
$2
&855(173(5&
$2375
>V@
$2),/77,0(
>P$@
$20$;
>P$@
$20,1
>@
$20$;6&$/(
>@
$20,16&$/(
Description
With the AO1 block the user can connect an actual signal to analogue output 1 and
filter and scale the output signal. The block also shows analogue output 1 value.
The drive offers two programmable analogue outputs: one current output AO1
(0…20 mA) and one voltage output AO2 (-10…10 V).
The resolution of the analogue outputs is 11 bits (+ sign) and the inaccuracy is 2% of
the full scale range.
The analogue output signals can be proportional to motor speed, process speed
(scaled motor speed), output frequency, output current, motor torque, motor power,
etc. It is possible to write a value to an analogue output through a serial
communication link (e.g. fieldbus link).
Inputs
15.01 AO1 PTR
Selects a drive signal to be connected to analogue output AO1.
Value pointer: Group and index
15.02 AO1 FILT TIME
Defines the filtering time constant for analogue output AO1.
%
Unfiltered signal
O = I · (1 - e-t/T)
100
63
Filtered signal
T
t
I = filter input (step)
O = filter output
t = time
T = filter time constant
Note: The signal is also filtered due to the signal interface hardware (approximately 0,5 ms time
constant). This cannot be changed by any parameter.
Range: 0…30 s
Firmware functions, parameters and signals
61
15.03 AO1 MAX
Defines the maximum value for analogue output AO1.
Range: 0…22.7 mA
15.04 AO1 MIN
Defines the minimum value for analogue output AO1.
Range: 0…22.7 mA
15.05 AO1 MAX SCALE
Defines the real value that corresponds to the maximum analogue output value defined by
parameter 15.03 AO1 MAX.
AO (mA)
AO (mA)
15.03
15.03
15.04
AO (real)
15.06
15.05
15.04
AO (real)
15.05
15.06
Range: -32768…32767
15.06 AO1 MIN SCALE
Defines the real value that corresponds to the minimum analogue output value defined by
parameter 15.04 AO1 MIN. See parameter 15.05 AO1 MAX SCALE.
Range: -32768…32767
Outputs
2.08 AO1
Analogue output AO1 value in mA
Firmware functions, parameters and signals
62
AO2
(26)
$2
7/)PVHF
$2
63(('$&73(5&
>V@
$2375
>9@
$20$;
>9@
$20,1
>@
$20$;6&$/(
>@
$20,16&$/(
$2),/77,0(
Description
With the AO2 block the user can connect an actual signal to analogue output 2 and
filter and scale the output signal. The block also shows analogue output 1 value.
See also description in firmware block AO1 on page 60.
Inputs
15.07 AO2 PTR
Selects a drive signal to be connected to analogue output AO2.
Value pointer: Group and index
15.08 AO2 FILT TIME
Defines the filtering time constant for analogue output AO1. See parameter 15.02 AO1 FILT TIME.
Range: 0…30 s
15.09 AO2 MAX
Defines the maximum value for analogue output AO2.
Range: -10…10 V
15.10 AO2 MIN
Defines the minimum value for analogue output AO2.
Range: -10…10 V
Firmware functions, parameters and signals
63
15.11 AO2 MAX SCALE
Defines the real value that corresponds to the maximum analogue output value defined by
parameter 15.09 AO2 MAX.
AO (V)
AO (V)
15.09
15.09
15.10
AO (real)
15.12
15.11
15.10
AO (real)
15.12
15.11
Range: -32768…32767
15.12 AO2 MIN SCALE
Defines the real value that corresponds to the minimum analogue output value defined by
parameter 15.10 AO2 MIN. See parameter 15.11 AO2 MAX SCALE.
Range: -32768…32767
Outputs
2.09 AO2
Analogue output AO12 value in V
Firmware functions, parameters and signals
64
DRIVE LOGIC
(21)
'5,9(/2*,&
7/)PVHF
'')2//2:(5&:
67$786:25'
67$786:25'
63(('&75/67$7
/,0,7:25'
7254/,067$786
326&75/67$786
326&75/67$786
326&25567$786
>,Q@
(;767$57)81&
>',67$786@
(;767$57,1
',
>)$/6(@
(;767$57,1
>,Q@
(;767$57)81&
>',67$786@
(;767$57,1
',
>)$/6(@
(;767$57,1
>)$/6(@
-2*67$57
>',67$786@
)$8/75(6(76(/
',
>758(@
581(1$%/(
>758(@
(067232))
>758(@
(067232))
>'LVDEOHG@
67$57,1+,%,7
)%$0$,1&:
)%&:86('
>)$/6(@
>)$/6(@
-2*67$57
-2*(1$%/(
Description
With the DRIVE LOGIC block the user can
• select the source for the start and stop commands in external control location
EXT1/2.
• select the sources for external fault reset and run enable signals.
• select the source for the emergency stop (OFF1 and OFF3).
• select the source for the jogging function activation signal.
• enable the start inhibit function.
Note: The run enable signal must be active for the drive to start.
The block also shows the status and limit words of the drive.
Jogging
Two jogging functions (1 or 2) are available. When a jogging function is activated,
the drive starts and accelerates to the defined jogging speed along the defined
jogging acceleration ramp. When the function is deactivated, the drive decelerates to
a stop along the defined jogging deceleration ramp. One push button can be used to
Firmware functions, parameters and signals
65
start and stop the drive during jogging. The jogging function is typically used during
servicing or commissioning to control the machinery locally.
Jogging functions 1 and 2 are activated by a parameter or through fieldbus. For
activation through fieldbus, see 2.12 FBA MAIN CW.
The figure and table below describe the operation of the drive during jogging. (Note
that they cannot be directly applied to jogging commands through fieldbus as those
require no enable signal; see parameter 10.15 JOG ENABLE.) They also represent
how the drive shifts to normal operation (= jogging inactive) when the drive start
command is switched on. Jog cmd = State of the jogging input; Jog enable = Jogging
enabled by the source set by parameter 10.15 JOG ENABLE; Start cmd = State of
the drive start command.
Speed
1
2
Jogging example
3
4
5
6
7
8
9
10 11
12 13 14 15 16 Time
Phase Jog
Jog Start Description
cmd enable cmd
1-2
1
1
0
Drive accelerates to the jogging speed along the acceleration ramp of the jogging function.
2-3
1
1
0
Drive runs at the jogging speed.
3-4
0
1
0
Drive decelerates to zero speed along the deceleration ramp of the jogging function.
4-5
0
1
0
Drive is stopped.
5-6
1
1
0
Drive accelerates to the jogging speed along the acceleration ramp of the jogging function.
6-7
1
1
0
Drive runs at the jogging speed.
7-8
x
0
1
Jog enable is not active; normal operation continues.
8-9
x
0
1
Normal operation overrides the jogging. Drive follows the speed reference.
9-10
x
0
0
Drive decelerates to zero speed along the active deceleration ramp.
10-11
x
0
0
Drive is stopped.
11-12
x
0
1
Normal operation overrides the jogging. Drive accelerates to the speed reference along
the active acceleration ramp.
12-13
1
1
1
Start command overrides the jog enable signal.
13-14
1
1
0
Drive decelerates to the jogging speed along the deceleration ramp of the jogging function.
14-15
1
1
0
Drive runs at the jogging speed.
15-16
x
0
0
Drive decelerates to zero speed along the deceleration ramp of the jogging function.
Note: Jogging is not operational when:
• the drive start command is on, or
• the drive is in local control.
Note: The ramp shape time is set to zero during jogging.
Firmware functions, parameters and signals
66
Emergency stop
Note: The user is responsible for installing the emergency stop devices and all the
additional devices needed for the emergency stop to fulfil the required emergency
stop category classes. For more information, contact your local ABB representative.
The emergency stop signal is connected to the digital input which is selected as the
source for the emergency stop activation (par. 10.10 EM STOP OFF3 or 10.11 EM
STOP OFF1). Emergency stop can also be activated through fieldbus (2.12 FBA
MAIN CW).
Note: When an emergency stop signal is detected, the emergency stop function
cannot be cancelled even though the signal is cancelled.
Inputs
10.01 EXT1 START FUNC
Selects the source for the start and stop control in external control location 1 (EXT1).
Note: This parameter cannot be changed while the drive is running.
1 = IN1: Source of the start and stop commands are selected by parameter 10.02 EXT1 START IN1.
The start/stop is controlled as follows:
Par. 10.02
0 -> 1
1 -> 0
Command
Start
Stop
2 = 3-WIRE: Source of the start and stop commands are selected by parameters 10.02 EXT1 START
IN1 and 10.03 EXT1 START IN2. The start/stop is controlled as follows:
Par. 10.02
0 -> 1
Any
Any
Par. 10.03
1
1 -> 0
0
Command
Start
Stop
Stop
3 = FBA: Start and stop control from the source selected by parameter 10.13 FB CW USED.
4 = D2D: Start and stop control from another drive via D2D Control Word.
10.02 EXT1 START IN1
Selects the source 1 for the start and stop commands in external control location EXT1. See
parameter 10.01 EXT1 START FUNC selections IN1 and 3-WIRE.
Note: This parameter cannot be changed while the drive is running.
Bit pointer: Group, index and bit
10.03 EXT1 START IN2
Selects the source 2 for the start and stop commands in external control location EXT1. See
parameter 10.01 EXT1 START FUNC selection 3-WIRE.
Note: This parameter cannot be changed while the drive is running.
Bit pointer: Group, index and bit
Firmware functions, parameters and signals
67
10.04 EXT2 START FUNC
Selects the source for the start and stop control in external control location 2 (EXT2).
Note: This parameter cannot be changed while the drive is running.
1 = IN1: Source of the start and stop commands are selected by parameter 10.05 EXT2 START IN1.
The start/stop is controlled as follows:
Par. 10.05
0 -> 1
1 -> 0
Command
Start
Stop
2 = 3-WIRE: Source of the start and stop commands are selected by parameters 10.05 EXT2 START
IN1 and 10.06 EXT2 START IN2. The start/stop is controlled as follows:
Par. 10.05
0 -> 1
Any
Any
Par. 10.06
1
1 -> 0
0
Command
Start
Stop
Stop
3 = FBA: Start and stop control from the source selected by parameter 10.13 FB CW USED.
4 = D2D: Start and stop control from another drive via D2D Control Word.
10.05 EXT2 START IN1
Selects the source 1 for the start and stop commands in external control location EXT2. See
parameter 10.04 EXT2 START FUNC selections IN1 and 3-WIRE.
Note: This parameter cannot be changed while the drive is running.
Bit pointer: Group, index and bit
10.06 EXT2 START IN2
Selects the source 2 for the start and stop commands in external control location EXT2. See
parameter 10.04 EXT2 START FUNC selection 3-WIRE.
Note: This parameter cannot be changed while the drive is running.
Bit pointer: Group, index and bit
10.07 JOG1 START
If enabled by parameter 10.15 JOG ENABLE, selects the source for the activation of jogging function
1. 1 = Active. (Jogging function 1 can also be activated through fieldbus regardless of parameter
10.15.)
See also other jogging function parameters: 10.14 JOG2 START, 10.15 JOG ENABLE, 24.03
SPEED REF1 IN / 24.04 SPEED REF2 IN, 24.10 SPEED REF JOG1, 24.11 SPEED REF JOG2,
25.09 ACC TIME JOGGING, 25.10 DEC TIME JOGGING and 22.06 ZERO SPEED DELAY.
Note: This parameter cannot be changed while the drive is running.
Bit pointer: Group, index and bit
10.08 FAULT RESET SEL
Selects the source for the external fault reset signal. The signal resets the drive after a fault trip if the
cause of the fault no longer exists. 1 = Fault reset.
Bit pointer: Group, index and bit
Firmware functions, parameters and signals
68
10.09 RUN ENABLE
Selects the source for the external run enable signal. If run enable signal is switched off, the drive will
not start or stops if the drive is running. 1 = Run enable.
Note: This parameter cannot be changed while the drive is running.
Bit pointer: Group, index and bit
10.10 EM STOP OFF3
Selects the source for the emergency stop OFF3. 0 = OFF3 active: The drive is stopped along the
emergency stop ramp time, 25.11 EM STOP TIME.
Emergency stop can also be activated through fieldbus (2.12 FBA MAIN CW).
Note: This parameter cannot be changed while the drive is running.
Bit pointer: Group, index and bit
10.11 EM STOP OFF1
Selects the source for the emergency stop OFF1. 0 = OFF1 active: The drive is stopped with the
active deceleration time.
Emergency stop can also be activated through fieldbus (2.12 FBA MAIN CW).
Note: This parameter cannot be changed while the drive is running.
Bit pointer: Group, index and bit
10.12 START INHIBIT
Enables the start inhibit function. The start inhibit function prevents drive restart (i.e. protects against
unexpected start) if
- drive trips on a fault and fault is reset.
- run enable signal activates while the start command is active. See parameter 10.09 RUN ENABLE.
- control changes from local to remote.
- external control switches from EXT1 to EXT2 or from EXT2 to EXT1.
An active start inhibit can be reset with a stop command.
Note that in certain applications it is necessary to allow the drive to restart.
0 = DISABLED
1 = ENABLED
10.13 FB CW USED
Selects the source for the control word when fieldbus (FBA) is selected as the external start and stop
control location (see parameters 10.01 and 10.04). By default, the source is parameter 2.12 FBA
MAIN CW.
Note: This parameter cannot be changed while the drive is running.
Value pointer: Group and index
10.14 JOG2 START
If enabled by parameter 10.15 JOG ENABLE, selects the source for the activation of jogging function
2. 1 = Active. (Jogging function 2 can also be activated through fieldbus regardless of parameter
10.15.)
Note: This parameter cannot be changed while the drive is running.
Bit pointer: Group, index and bit
Firmware functions, parameters and signals
69
10.15 JOG ENABLE
Selects the source for enabling parameters 10.07 JOG1 START and 10.14 JOG2 START.
Note: Jogging can be enabled using this parameter only when no start command from an external
control location is active. On the other hand, if jogging is already enabled, the drive cannot be started
from an external control location apart from jog commands through fieldbus.
Bit pointer: Group, index and bit
Outputs
2.18 D2D FOLLOWER CW
Drive-to-drive control word sent to the followers by default. See also firmware block D2D
COMMUNICATION on page 160.
Bit
0
1
2…6
7
8
9…14
15
Information
Stop.
Start.
Reserved.
Run enable.
Reset.
Reserved.
EXT1/EXT2 selection. 0 = EXT1 active, 1 = EXT2 active.
Firmware functions, parameters and signals
70
6.01 STATUS WORD 1
Status Word 1
Bit
0
Name
READY
1
ENABLED
2
STARTED
3
RUNNING
4
EM OFF (OFF2)
5
EM STOP
(OFF3)
6
ACK STARTINH
7
ALARM
8
EXT2 ACT
9
LOCAL FB
10
FAULT
11
LOCAL PANEL
12
…
15
Not in use
Val.
1
0
1
0
1
0
1
0
1
0
1
0
1
0
1
0
1
0
1
0
1
0
1
0
Firmware functions, parameters and signals
Information
Drive is ready to receive start command.
Drive is not ready.
External run enable signal is received.
No external run enable signal is received.
Drive has received start command.
Drive has not received start command.
Drive is modulating.
Drive is not modulating.
Emergency OFF2 is active.
Emergency OFF2 is inactive.
Emergency stop OFF3 (ramp stop) is active.
Emergency OFF3 is inactive.
Start inhibit is active.
Start inhibit is inactive.
Alarm is active. See chapter Fault tracing.
No alarm
External control EXT2 is active.
External control EXT1 is active.
Fieldbus local control is active.
Fieldbus local control is inactive.
Fault is active. See chapter Fault tracing.
No fault
Local control is active, i.e. drive is controlled form PC tool or control
panel.
Local control is inactive.
71
6.02 STATUS WORD 2
Status Word 2.
Bit
0
Name
START ACT
1
STOP ACT
2
READY RELAY
3
MODULATING
4
REF RUNNING
5
JOGGING
6
OFF1
7
START INH
MASK
8
START INH
NOMASK
9
CHRG REL
CLOSED
10
STO ACT
11
12
Not in use
RAMP IN 0
13
RAMP HOLD
14
RAMP OUT 0
15
Not in use
Val.
Information
1
Drive start command is active.
0
Drive start command is inactive.
1
Drive stop command is active.
0
Drive stop command is inactive.
1
Ready to function: run enable signal on, no fault, emergency stop
signal off, no ID run inhibition. Connected as default to DIO1 by par.
12.04 DIO1 OUT PTR. (Can be freely connected anywhere.)
0
Not ready to function
1
Modulating: IGBTs are controlled, i.e. the drive is RUNNING.
0
No modulation: IGBTs are not controlled.
1
Normal operation is enabled. Running. Drive follows the given
reference.
0
Normal operation is disabled, Drive is not following the given
reference (e.g. in magnetisation phase drive is modulating).
1
Jogging function 1 or 2 is active.
0
Jogging function is inactive.
1
Emergency stop OFF1 is active.
0
Emergency stop OFF1 is inactive.
1
Maskable (by par. 10.12 START INHIBIT) start inhibit is active.
0
No start inhibit (maskable)
1
Non-maskable start inhibit is active.
0
No start inhibit (non-maskable)
1
Charging relay is closed.
0
Charging relay is open.
1
Safe Torque Off function is active. See parameter 46.07 STO
DIAGNOSTIC.
0
Safe Torque Off function is inactive.
1
0
1
0
1
0
Ramp Function Generator input is forced to zero.
Normal operation
Ramp Function Generator output is held.
Normal operation
Ramp Function Generator output is forced to zero.
Normal operation
Firmware functions, parameters and signals
72
6.03 SPEED CTRL STAT
Speed control status word
Bit
0
Val.
1
Actual speed is negative.
1
Name
SPEED ACT
NEG
ZERO SPEED
2
ABOVE LIMIT
1
3
AT SETPOINT
1
4
BAL ACTIVE
1
1
Information
Actual speed has reached the zero speed limit (22.05 ZERO
SPEED LIMIT).
Actual speed has exceeded the supervision (22.07 ABOVE SPEED
LIM).
The difference between the actual speed and the unramped speed
reference is within the speed window (26.07 SPEED WINDOW).
Speed controller output balancing is active (28.09 SPEEDCTRL BAL
EN).
6.05 LIMIT WORD 1
Limit Word 1
Bit
0
1
2
3
4
5
6
Name
TORQ LIM
Val.
Information
1
Drive torque is being limited by the motor control (undervoltage
control, overvoltage control, current control, load angle control or
pull-out control), or by parameter 20.06 MAXIMUM TORQUE or
20.07 MINIMUM TORQUE.
SPD CTL TLIM
1
Speed controller output minimum torque limit is active. The limit is
MIN
defined by parameter 28.10 MIN TORQ SP CTRL.
SPD CTL TLIM
1
Speed controller output maximum torque limit is active. The limit is
MAX
defined by parameter 28.11 MAX TORQ SP CTRL.
TORQ REF MAX 1
Torque reference (3.09 TORQ REF1) maximum limit is active. The
limit is defined by parameter 32.04 MAXIMUM TORQ REF.
TORQ REF MIN 1
Torque reference (3.09 TORQ REF1) minimum limit is active. The
limit is defined by parameter 32.05 MINIMUM TORQ REF.
1
Torque reference maximum value is limited by the rush control,
TLIM MAX
SPEED
because of maximum speed limit 20.01 MAXIMUM SPEED.
TLIM MIN
1
Torque reference minimum value is limited by the rush control,
SPEED
because of minimum speed limit 20.02 MINIMUM SPEED.
Firmware functions, parameters and signals
73
6.07 TORQ LIM STATUS
Torque controller limitation status word
Bit
0
1
2
Name
UNDERVOLTAGE
OVERVOLTAGE
MINIMUM TORQUE
3
MAXIMUM TORQUE
4
INTERNAL CURRENT
5
LOAD ANGLE
6
MOTOR PULLOUT
7
8
Reserved
SOA CURRENT
Val.
Information
Intermediate circuit DC undervoltage
1
Intermediate circuit DC overvoltage
1
Torque reference minimum limit is active. The limit is defined
1
by parameter 20.07 MINIMUM TORQUE.
Torque reference maximum limit is active. The limit is defined
1
by parameter 20.06 MAXIMUM TORQUE.
Inverter
output current limit is active. Bit 8/9/10 shows which
1
current limit is active.*
For permanent magnet motor only: Load angle limit is active,
1
i.e. the motor cannot produce more torque.
For asynchronous motor only: Motor pull-out limit is active, i.e.
1
the motor cannot produce more torque.
Internal Safe Operating Area current limit is active (limits the
drive output current). *
Maximum inverter output current limit is active. The limit is
9
USER CURRENT
1
defined by parameter 20.05 MAXIMUM CURRENT.*
Calculated thermal current value limits the inverter output
10 INVERTER THERMAL 1
current. Thermal current limitation is enabled by parameter
20.08 THERM CURR LIM.*
* Bit 8…10: The smallest limit value is selected, thus one of the bits 8…10 is always active. If bit 4
value is 0, there is no inverter output current limitation, even though bit 8/9/10 value is 1.
1
Firmware functions, parameters and signals
74
6.09 POS CTRL STATUS
Position control status word. Note: This signal is only for positioning applications.
Bit
0
1
2
Name
Val.
IN POSITION 1
0
IN POS WIN 1
0
POS START 1
3
POS ENABLED
4
MOVING
5
TRAVERSE
ACK
6
IP MODE
ACT
7
FOLLOW
ERR
0
1
0
1
0
1
0
1
0
1
0
8
ABOVE MAX 1
9
BELOW MIN
10
ABOVE
THRES
11
12
Not in use
PREF SPD
LIM
13
PREF ACC
LIM
14
PREF DEC
LIM
15
Reserved
0
1
0
01
0
1
0
1
0
1
0
Firmware functions, parameters and signals
Information
Position reference generator has reached the used position reference.
Position reference generator is calculating the position reference.
Position is within the defined position window, 66.04 POS WIN.
Position reference is outside the defined position window.
Positioning start command is active. Source for the start signal is
selected by parameter 65.03 POS START 1 / 65.11 POS START 2.
Position start command is inactive.
Position control is enabled by parameter 66.05 POS ENABLE or by
fieldbus control word 2.12 FBA MAIN CW bit 21.
Position control is not enabled.
Positioning task is active. Drive speed is < > 0.
Positioning task is completed or drive is at standstill.
New positioning task or setpoint is accepted.
No operation
Position reference generator is active.
Position reference generator is inactive.
The difference between the reference and the actual position is within
the defined following error window 71.09 FOLLOW ERR WIN.
The difference between the reference and the actual position is outside
the defined following error window.
Actual position (1.12 POS ACT) exceeds the defined maximum
position, 60.13 MAXIMUM POS.
Actual position does not exceed the maximum value.
Actual position (1.12 POS ACT) exceeds the defined minimum position,
60.14 MINIMUM POS.
Actual position does not exceed the minimum value.
Actual position (1.12 POS ACT) exceeds the position threshold
supervision limit. The limit is defined by parameter 60.15 POS
THRESHOLD.
Actual position does not exceed the position threshold supervision limit.
Position reference speed is limited to the value defined by parameter
70.04 POS SPEED LIM.
Position reference speed is not limited.
Position reference acceleration is limited to the value defined by
parameter 70.05 POS ACCEL LIM.
Position reference acceleration is not limited.
Position reference deceleration is limited to the value defined by
parameter 70.06 POS DECEL LIM.
Position reference deceleration is not limited.
75
6.10 POS CTRL STATUS2
Additional position control status word. Note: This signal is only for positioning applications.
Bit
0
Name
IN SYNC
POS
1
IN SYNC
2
END SPEED
ACTIVE
3
…
15
Reserved
…
Reserved
Val.
Information
1
Position profile generator distance to target is below the absolute value
of the synchron error limit, i.e. value of actual signal 4.14 is smaller than
value of parameter 70.07.
0
Distance to target is greater than synchron error limit.
1
The difference of synchronous speed and drive load speed (4.02
SPEED ACT LOAD) is below the defined velocity window (70.08 SYNC
VEL WINDOW).
0
The system is not in synchron as defined by the synchron velocity window (70.08 SYNC VEL WINDOW).
1
Positioning end speed (defined by parameter 65.10 or 65.18 depending
on selected position reference set) has been reached.
0
Positioning end speed has not been reached or end speed is defined as
zero.
Firmware functions, parameters and signals
76
6.11 POS CORR STATUS
Position correction status word. Note: This signal is only for positioning applications.
Bit
0
1
2
3
4
5
6
7
8
9
10
11
12
13
…
15
Name
Val.
Information
HOMING START 1
Homing start is active. Source for the homing start is selected by
parameter 62.03 HOMING START.
0
Homing start is inactive.
HOMING DONE 1
Homing has been performed.
0
Homing has not been performed (if bit 2 = 0) or homing is being
executed.
HOM DONE
1
Homing has been performed at least once.
ONCE
0
Homing has not been performed after power up or there is an error
with the actual position encoder.
COR DONE
1
Cyclic correction has been performed at least once (62.14 CYCLIC
ONCE
CORR MODE).
0
Cyclic correction has not been performed after power up or there is
an error with the actual position encoder.
POS LIM POS
1
Positive limit switch is active (source selected by parameter 62.06
POS LIM SWITCH).
0
Positive limit switch is inactive.
POS LIM NEG
1
Negative limit switch is active (source selected by parameter 62.05
NEG LIM SWITCH).
0
Negative limit switch is inactive.
LATCH1 STAT
1
Position latch signal 1 is active (source selected by parameter 62.15
TRIG PROBE1).
0
Position latch signal 1 is inactive.
LATCH2 STAT
1
Position latch signal 2 is active (source selected by parameter 62.17
TRIG PROBE2).
0
Position latch signal 2 is inactive.
LATCH1 DONE 1
Position has been latched according to parameter 62.15 TRIG
PROBE1 setting.
0
No position latch has occurred.
LATCH2 DONE 1
Position has been latched according to parameter 62.17 TRIG
PROBE2 setting
0
No position latch has occurred.
Reserved
Reserved
CYC CORR
1
Cyclic correction is active.
ACTIV
0
Cyclic correction is inactive.
Reserved
…
Reserved
Firmware functions, parameters and signals
77
START/STOP MODE
(22)
67$57672302'(
7/)PVHF
>&RQVWWLPH@
67$5702'(
>PV@
'&0$*17,0(
>5DPS@
672302'(
>USP@
'&+2/'63(('
>@
'&+2/'&855()
>'LVDEOHG@
'&+2/'
>6WDQGVWLOO@
$8723+$6,1*02'(
Description
With the START/STOP MODE block the user can select the start and stop functions,
define the DC magnetising time of the motor and configure the DC hold function.
Automatic start
Since the drive can detect the state of the motor within a few milliseconds, the
starting is immediate under all conditions. There is no restart delay. E.g. the starting
of high inertia applications is easy. Automatic start is especially suitable for restarting
a rotating machine.
DC Magnetising
When DC Magnetising is activated, the drive automatically magnetises the motor
before starting. This feature guarantees the highest possible breakaway torque, up
to 200% of the motor nominal torque depending on the existing current limit settings.
By adjusting the premagnetising time, it is possible to synchronise the motor start
and e.g. a mechanical brake release. The automatic start feature and DC
magnetising cannot be activated at the same time.
DC hold
By activating the motor DC hold feature it is possible to lock the rotor at zero speed.
When both the reference and the motor speed fall below the preset DC hold speed,
the drive stops the motor and starts to inject DC into the motor. When the reference
speed again exceeds the DC hold speed, the normal drive operation resumes.
DC hold can be activated only in the speed control mode.
Firmware functions, parameters and signals
78
Inputs
11.01 START MODE
Selects the motor start function.
Note: Selections FAST and CONST TIME are ignored if parameter 99.05 MOTOR CTRL MODE =
SCALAR.
Note: Starting to a rotating machine is not possible when DC magnetising is selected (FAST or
CONST TIME).
Note: With permanent magnet motors, automatic start must be used.
0 = FAST: DC magnetising should be selected if a high break-away torque is required. The drive premagnetises the motor before the start. The pre-magnetising time is determined automatically, being
typically 200 ms to 2 s depending on the motor size.
Note: This parameter cannot be changed while the drive is running.
1 = CONST TIME: Constant DC magnetising should be selected instead of DC magnetising if
constant pre-magnetising time is required (e.g. if the motor start must be simultaneous with
a mechanical brake release). This selection also guarantees the highest possible break-away torque
when the pre-magnetising time is set long enough. The pre-magnetising time is defined by parameter
11.02 DC MAGN TIME.
WARNING! The drive will start after the set magnetising time has passed although the motor
magnetisation is not completed. Ensure always in applications where a full break-away
torque is essential, that the constant magnetising time is long enough to allow generation of
full magnetisation and torque.
2 = AUTOMATIC: Automatic start guarantees optimal motor start in most cases. It includes the flying
start function (starting to a rotating machine) and the automatic restart function (stopped motor can be
restarted immediately without waiting the motor flux to die away). The drive motor control program
identifies the flux as well as the mechanical state of the motor and starts the motor instantly under all
conditions. Note: If parameter 99.05 MOTOR CTRL MODE = SCALAR, no flying start or automatic
restart is possible by default.
11.02 DC MAGN TIME
Defines the constant DC magnetising time. See parameter 11.01 START MODE. After the start
command, the drive automatically premagnetises the motor the set time.
To ensure full magnetising, set this value to the same value as or higher than the rotor time constant.
If not known, use the rule-of-thumb value given in the table below:
Motor rated power
Constant magnetising time
< 1 kW
> 50 to 100 ms
1 to 10 kW
> 100 to 200 ms
10 to 200 kW
> 200 to 1000 ms
200 to 1000 kW
> 1000 to 2000 ms
Note: This parameter cannot be changed while the drive is running.
Range: 0…10000 ms
Firmware functions, parameters and signals
79
11.03 STOP MODE
Selects the motor stop function.
1 = COAST: Stop by cutting of the motor power supply. The motor coasts to a stop.
WARNING! If the mechanical brake is used, ensure it is safe to stop the drive by coasting.
For more information on mechanical brake function, see firmware block MECH BRAKE
CTRL on page 118.
2 = RAMP: Stop along ramp. See firmware block SPEED REF RAMP on page 97.
11.04 DC HOLD SPEED
Defines the DC hold speed. See parameter 11.06 DC HOLD.
Range: 0…1000 rpm
11.05 DC HOLD CUR REF
Defines the DC hold current in percent of the motor nominal current. See parameter 11.06 DC HOLD.
Range: 0…100%
11.06 DC HOLD
Enables the DC hold function. DC hold is not possible if par. 99.05 MOTOR CTRL MODE is set to
SCALAR. When both the reference and the speed drop below the value of parameter 11.04 DC
HOLD SPEED, the drive will stop generating sinusoidal current and start to inject DC into the motor.
The current is set by parameter 11.05 DC HOLD CUR REF. When the reference speed exceeds
parameter 11.04 DC HOLD SPEED, normal drive operation continues.
SPEEDmotor
DC Hold
t
Ref.
DC HOLD SPEED
(par. 11.04)
t
Note: DC Hold has no effect if the start signal is switched off.
Note: Injecting DC current into the motor causes the motor to heat up. In applications where long DC
hold times are required, externally ventilated motors should be used. If the DC hold period is long, the
DC hold cannot prevent the motor shaft from rotating if a constant load is applied to the motor.
0 = DISABLED
1 = ENABLED
11.07 AUTOPHASING MODE
Selects the way autophasing is performed during the ID run.
0 = TURNING: This mode gives the most accurate autophasing result. This mode can be used, and is
recommended, if it is allowed for the motor to rotate during the ID run and the start-up is not timecritical. Note: This mode will cause the motor to rotate during the ID run.
1 = STANDSTILL 1: Faster than the TURNING mode, but not as accurate. The motor will not rotate.
2 = STANDSTILL 2: An alternative standstill autophasing mode that can be used if the TURNING
mode cannot be used, and the STANDSTILL 1 mode gives erratic results. However, this mode is
considerably slower than STANDSTILL 1.
Firmware functions, parameters and signals
80
SYSTEM
Note: The SYSTEM parameters do not belong to any firmware block, i.e. they can
only be accessed via the optional control panel or the PC tool Parameter Browser.
Description
With the SYSTEM parameters the user can disable local control and parameter
changing, restore parameter default values and save parameters into permanent
memory.
Parameters
16.01 LOCAL LOCK
Selects the source for disabling local control (Take/Release button on the PC tool, LOC/REM key of
the panel). 1 = Local control disabled. 0 = Local control enabled.
WARNING! Before activating, ensure that the control panel is not needed for stopping the
drive!
Bit pointer: Group, index and bit
16.02 PARAMETER LOCK
Selects the state of the parameter lock. The lock prevents parameter changing.
Note: This parameter can only be adjusted after the correct pass code has been entered at
parameter 16.03 PASS CODE.
0 = LOCKED: Locked. Parameter values cannot be changed from the control panel.
1 = OPEN: The lock is open. Parameter values can be changed.
2 = NOT SAVED: The lock is open. Parameter values can be changed, but the changes will not be
stored at power switch off.
16.03 PASS CODE
After entering 358 at this parameter, parameter 16.02 PARAMETER LOCK can be adjusted.
The value reverts back to 0 automatically.
16.04 PARAM RESTORE
Restores the original settings of the application, i.e. parameter factory default values.
Note: This parameter cannot be changed while the drive is running.
0 = DONE: Restoring is completed.
1 = RESTORE DEFS: All parameter values are restored to default values, except motor data, ID run
results and fieldbus and encoder configuration data.
2 = CLEAR ALL: All parameter values are restored to default values, including motor data, ID run
results and fieldbus and encoder configuration data. PC tool communication is interrupted during the
restoring. Drive CPU is re-booted after the restoring is completed.
Firmware functions, parameters and signals
81
16.07 PARAM SAVE
Saves the valid parameter values to the permanent memory. Note: A new parameter value is saved
automatically when changed from the PC tool or panel but not when altered through a fieldbus
connection.
0 = DONE: Saving completed.
1 = SAVE: Saving in progress.
16.09 USER SET SEL
Enables the saving and restoring of up to four custom sets of parameter settings.
The set that was in use before powering down the drive is in use after the next power-up.
Note: Any parameter changes made after loading a set are not automatically stored – they must be
saved using this parameter.
1 = NO REQUEST: Load or save operation complete; normal operation.
2 = LOAD SET 1: Load user parameter set 1.
3 = LOAD SET 2: Load user parameter set 2.
4 = LOAD SET 3: Load user parameter set 3.
5 = LOAD SET 4: Load user parameter set 4.
6 = SAVE SET 1: Save user parameter set 1.
7 = SAVE SET 2: Save user parameter set 2.
8 = SAVE SET 3: Save user parameter set 3.
9 = SAVE SET 4: Save user parameter set 4.
10 = IO MODE: Load user parameter set using parameters 16.11 and 16.12.
16.10 USER SET LOG
Shows the status of the user parameter sets (see parameter 16.09). Read-only.
N/A: No user sets have been saved.
FAULTED: Invalid or empty parameter set.
SETx PAR ACT: User parameter set x has been loaded using parameter 16.09.
SETx IO ACT: User parameter set x has been selected by parameters 16.11 and 16.12.
16.11 USER IO SET LO
Together with parameter 16.12, selects the user parameter set when parameter 16.12 is set to IO
MODE. The status of the source defined by this parameter and parameter 16.12 select the user
parameter set as follows:
Status of source
Status of source
defined by par. 16.11 defined by par. 16.12
User parameter set
selected
FALSE
FALSE
Set 1
TRUE
FALSE
Set 2
FALSE
TRUE
Set 3
TRUE
TRUE
Set 4
Bit pointer: Group, index and bit
16.12 USER IO SET HI
See parameter 16.11.
Bit pointer: Group, index and bit
Firmware functions, parameters and signals
82
PANEL DISPLAY
Note: The PANEL DISPLAY parameters do not belong to any firmware block, i.e.
they can only be accessed via the optional control panel or the PC tool Parameter
Browser.
Description
With the PANEL DISPLAY parameters the user can select the three signals to be
displayed on the control panel.
Parameters
17.01 SIGNAL1 PARAM
Selects the first signal to be displayed on the control panel. The default signal is 1.03 FREQUENCY.
Value pointer: Group and index
17.02 SIGNAL2 PARAM
Selects the second signal to be displayed on the control panel. The default signal is 1.04 CURRENT.
Value pointer: Group and index
17.03 SIGNAL3 PARAM
Selects the third signal to be displayed on the control panel. The default signal is 1.06 TORQUE.
Value pointer: Group and index
Firmware functions, parameters and signals
83
LIMITS
(27)
/,0,76
7/)PVHF
>USP@
0$;,08063(('
>USP@
0,1,08063(('
>758(@
32663(('(1$
>758(@
1(*63(('(1$
>$@
0$;,080&855(17
>@
0$;,08072548(
>@
0,1,08072548(
Description
With the LIMITS block the user can adjust the drive speed, current and torque limits,
select the source for the positive/negative speed reference enable command and
enable the thermal current limitation.
Inputs
20.01 MAXIMUM SPEED
Defines the allowed maximum speed.
Range: 0…30000 rpm
20.02 MINIMUM SPEED
Defines the allowed minimum speed.
Range: -30000…0 rpm
Firmware functions, parameters and signals
84
20.03 POS SPEED ENA
Selects the source of the positive speed reference enable command.
1 = Positive speed reference is enabled.
0 = Positive speed reference is interpreted as zero speed reference (In the figure below 3.03
SPEEDREF RAMP IN is set to zero after the positive speed enable signal has cleared). Actions in
different control modes:
Speed control: Speed reference is set to zero and the motor is stopped along the currently active
deceleration ramp.
Torque control: Torque limit is set to zero and the rush controller stops the motor.
Position and synchron control: Dynamic limiter sets the positioning speed reference to zero and the
motor is stopped according to 70.06 POS DECEL LIM.
Homing and profile velocity mode control: Dynamic limiter sets the speed reference to zero and the
motor is stopped according to 70.06 POS DECEL LIM.
20.03 POS SPEED ENA
20.04 NEG SPEED ENA
3.03 SPEEDREF RAMP IN
107 ENCODER 1 SPEED
Example: The motor is rotating in the forward direction. To stop the motor, the positive speed enable
signal is deactivated by a hardware limit switch (e.g. via digital input). If the positive speed enable
signal remains deactivated and the negative speed enable signal is active, only reverse rotation of the
motor is allowed.
Bit pointer: Group, index and bit
20.04 NEG SPEED ENA
Selects the source of the negative speed reference enable command. See parameter 20.03 POS
SPEED ENA.
Bit pointer: Group, index and bit
20.05 MAXIMUM CURRENT
Defines the allowed maximum motor current.
Range: 0…30000 A
20.06 MAXIMUM TORQUE
Defines the maximum torque limit for the drive (in percent of the motor nominal torque).
Range: 0…1600%
20.07 MINIMUM TORQUE
Defines the minimum torque limit for the drive (in percent of the motor nominal torque).
Range: -1600…0%
Firmware functions, parameters and signals
85
20.08 THERM CURR LIM
Enables the thermal current limitation. Thermal current limit is calculated by the inverter thermal
protection function.
0 = ENABLE: The calculated thermal current value limits the inverter output current (i.e. motor
current).
1 = DISABLE: The calculated thermal limit is not used. If the inverter output current is excessive, alarm
IGBT OVERTEMP is generated and eventually the drive trips on fault IGBT OVERTEMP.
Firmware functions, parameters and signals
86
SPEED FEEDBACK
(5)
63((')(('%$&.
7/)VHF
63(('$&7
>(VWLPDWHG@
63((')%6(/
>PV@
63(('$&7)7,0(
>@
02725*($508/
>@
02725*($5',9
>USP@
=(5263(('/,0,7
>PV@
=(5263((''(/$<
>USP@
$%29(63(('/,0
>USP@
63(('75,30$5*,1
Block diagram
D
63((':,1'2:
63(('5()5$03,1
$%6
D
$%29(63(('/,0
$%6
63(('(67,0$7('
E
02725*($508/
(1&2'(563(('
E
D
63(('$&7)7,0(
(1&2'(563(('
E
D!E
D E
DE
63(('&75/67$7
ELW$76(732,17
63(('&75/67$7
D!E
D E
DE
ELW$%29(/,0,7
D!E
D E
DE
63(('&75/67$7
ELW63(('$&71(*
[
\
63(('$&7
63((')%6(/
02725*($5',9
=(5263(('/,0,7
=(5263((''(/$<
Firmware functions, parameters and signals
$%6
D
E
D!E
D E
DE
W
63(('&75/67$7
ELW=(5263(('
87
Description
With the SPEED FEEDBACK block the user can
• select the speed feedback used in drive control: a calculated value based on the
motor model or a value measured with an encoder.
• filter the disturbances in the measured speed.
• define the motor encoder gear function.
• define the zero speed limit for the stop function.
• set the delay for the Zero Speed Delay function (used for smooth and quick
restarting).
• define the limits for actual speed supervision.
The block also shows the filtered actual speed value.
Motor encoder gear function
Note: If the motor gear ratio is not 1, the motor model uses the estimated speed
instead of the speed feedback value.
The drive provides motor encoder gear function for compensating of mechanical
gears between the motor shaft, the encoder and the load.
Motor encoder gear application example:
Speed control uses the motor
speed. If no encoder is
mounted on the motor shaft,
the motor encoder gear
function must be applied in
order to calculate the actual
motor speed on the basis of the
measured load speed.
M
3~
MOTOR
GEAR
LOAD
ENCODER
The motor encoder gear parameters 22.03 MOTOR GEAR MUL and 22.04 MOTOR
GEAR DIV are set as follows:
22.03 MOTOR GEAR MUL
22.04 MOTOR GEAR DIV
=
Actual speed
Encoder 1/2 speed or Estimated speed
Firmware functions, parameters and signals
88
Inputs
22.01 SPEED FB SEL
Selects the speed feedback value used in control.
0 = ESTIMATED: Calculated speed estimate
1 = ENC1 SPEED: Actual speed measured with encoder 1. The encoder is selected by parameter
90.01 ENCODER 1 SEL.
2 = ENC2 SPEED: Actual speed measured with encoder 2. The encoder is selected by parameter
90.02 ENCODER 2 SEL.
22.02 SPEED ACT FTIME
Defines the time constant of the actual speed filter, i.e. time within the actual speed has reached 63%
of the nominal speed (filtered speed = 1.01 SPEED ACT).
If the used speed reference remains constant, the possible interferences in the speed measurement
can be filtered with the actual speed filter. Reducing the ripple with filter may cause speed controller
tuning problems. A long filter time constant and fast acceleration time contradict one another. A very
long filter time results in unstable control.
If there are substantial interferences in the speed measurement, the filter time constant should be
proportional to the total inertia of the load and motor, in this case 10…30% of the mechanical time
constant
tmech = (nnom / Tnom) × Jtot × 2π / 60, where
Jtot = total inertia of the load and motor (the gear ratio between the load and motor must be taken into
account)
nnom = motor nominal speed
Tnom = motor nominal torque
See also parameter 26.06 SPD ERR FTIME.
Range: 0…10000 ms
22.03 MOTOR GEAR MUL
Defines the motor gear numerator for the motor encoder gear function.
22.03 MOTOR GEAR MUL
Actual speed
------------------------------------------------------------------------ = ---------------------------------22.04 MOTOR GEAR DIV
Input speed
where input speed is encoder 1/2 speed (1.08/1.10 ENCODER 1/2 SPEED) or speed estimate (1.14
SPEED ESTIMATED).
Range: -231… 231 -1
Note: A setting of 0 is changed internally to 1.
22.04 MOTOR GEAR DIV
Defines the motor gear denominator for the motor encoder gear function. See parameter 22.03
MOTOR GEAR MUL.
Range: 1 … 231 -1
22.05 ZERO SPEED LIMIT
Defines the zero speed limit. The motor is stopped along a speed ramp until the defined zero speed
limit is reached. After the limit, the motor coasts to stop.
Range: 0…30000 rpm
Firmware functions, parameters and signals
89
22.06 ZERO SPEED DELAY
Defines the delay for the zero speed delay function. The function is useful in applications where
a smooth and quick restarting is essential. During the delay the drive knows accurately the rotor
position.
No Zero Speed Delay
Speed
Speed controller
switched off: Motor
coasts to stop.
With Zero Speed Delay
Speed
Speed controller
remains live. Motor
is decelerated to
true 0 speed.
Zero Speed (22.05)
Zero Speed
Time
Delay Time
No Zero Speed Delay
The drive receives a stop command and decelerates along a ramp. When the motor actual speed
falls below an internal limit (called Zero Speed), the speed controller is switched off. The inverter
modulation is stopped and the motor coasts to standstill.
With Zero Speed Delay
The drive receives a stop command and decelerates along a ramp. When the actual motor speed
falls below an internal limit (called Zero Speed), the zero speed delay function activates. During the
delay the function keeps the speed controller live: the inverter modulates, motor is magnetised and
the drive is ready for a quick restart. Zero speed delay can be used e.g. with the jogging function.
Range: 0…30000 ms
22.07 ABOVE SPEED LIM
Defines the supervision limit for the actual speed.
Range: 0…30000 rpm
22.08 SPEED TRIPMARGIN
Defines together with 20.01 MAXIMUM SPEED and 20.02 MINIMUM SPEED the maximum allowed
speed of the motor (overspeed protection). If the actual speed (1.01 SPEED ACT) exceeds the speed
limit defined by parameter 20.01 or 20.02 by more than 22.08 SPEED TRIPMARGIN, the drive trips
on fault OVERSPEED.
Example: If the maximum speed is 1420 rpm and speed trip margin is 300 rpm, the drive trips at
1720 rpm.
Speed
Speed trip margin
Maximum speed
t
Minimum speed
Speed trip margin
Range: 0…10000 rpm
Firmware functions, parameters and signals
90
Outputs
1.01 SPEED ACT
Filtered actual speed in rpm. Used speed feedback is defined by parameter 22.01 SPEED FB SEL.
Filter time constant can be adjusted by parameter 22.02 SPEED ACT FTIME.
Firmware functions, parameters and signals
91
SPEED REF SEL
(3)
63(('5()6(/
7/)VHF
63(('5()
63(('5()
>$,@
63(('5()6(/
>=(52@
63(('5()6(/
Block diagram
=(52
$,
$,
)%5()
)%5()
''5()
''5()
(1&63(('
(1&63(('
63(('5()
63(('5()6(/
=(52
$,
$,
)%5()
)%5()
''5()
''5()
(1&63(('
(1&63(('
63(('5()
63(('5()6(/
Description
With the SPEED REF SEL block the user can select the sources for two speed
references, REF1 or REF2, from a parameter selection list. The block also shows
speed reference 1/2 value.
The user can also select the speed reference source with a value pointer parameter.
See firmware block SPEED REF MOD on page 93.
Depending on the user selection, either speed reference or speed reference 2 is
active at a time.
Firmware functions, parameters and signals
92
Inputs
24.01 SPEED REF1 SEL
Selects the source for speed reference 1 (3.01 SPEED REF1).
0 = ZERO: Zero reference
1 = AI1: Analogue input AI1
2 = AI2: Analogue input AI2
3 = FBA REF1: Fieldbus reference 1
4 = FBA REF2: Fieldbus reference 2
5 = D2D REF1: Drive to drive reference 1.
6 = D2D REF2: Drive to drive reference 2.
7 = ENC1 SPEED: Encoder 1 (1.08 ENCODER 1 SPEED)
8 = ENC2 SPEED: Encoder 2 (1.10 ENCODER 2 SPEED)
Source for the speed reference 1/2 can also be selected by a value pointer parameter 24.03 SPEED
REF1 IN / 24.04 SPEED REF2 IN.
24.02 SPEED REF2 SEL
Selects the source for speed reference 2 (3.02 SPEED REF2).
See parameter 24.01 SPEED REF1 SEL.
Outputs
3.01 SPEED REF1
Speed reference 1 in rpm
3.02 SPEED REF2
Speed reference 2 in rpm
Firmware functions, parameters and signals
93
SPEED REF MOD
(4)
63(('5()02'
7/)VHF
63(('5()5$03,1
63(('5()
63(('5(),1
63(('5()
63(('5(),1
>)$/6(@
63(('5()6(/
>@
63(('6+$5(
>)$/6(@
63(('5()1(*(1$
>USP@
&216763(('
>)$/6(@
&216763(('(1$
>USP@
63(('5()-2*
>USP@
63(('5()-2*
>USP@
63(('5()0,1$%6
Block diagram
32663(('(1$
0$;,08063(('
&216763(('(1$
67$786:25'
ELW/2&$/)%
&216763(('
63(('5(),1
[
63(('5(),1
)%$0$,15()
63(('5()6(/
63(('6+$5(
[
/RFDOVSHHGUHIHUHQFH
63(('5()6$)(
6$)(63(('&200$1'
63(('5()1(*(1$
63(('5()0,1$%6
63(('5()-2*
63(('5()-2*
)%&:86('ELW
67$786:25'
ELW-2**,1*
67$786:25'
ELW/2&$/3$1(/
63(('5()
5$03,1
0,1,08063(('
1(*63(('(1$
67$786:25'
ELW5$03,1
Firmware functions, parameters and signals
94
Description
With the SPEED REF MOD block the user can
• select the sources for two speed references, REF1 or REF2.
• scale and invert the speed reference.
• define the constant speed reference.
• define jogging function 1/2 speed reference.
• define the speed reference absolute minimum limit.
The source for the speed reference REF1 or REF2 can also be selected from
a parameter selection list. See firmware block SPEED REF SEL on page 91.
Depending on the user selection, either speed reference 1 or speed reference 2 is
active at a time.
Speed reference can be any of the following (in priority order)
• fault speed reference (in a control panel or PC tool communication break)
• local speed reference (from panel)
• fieldbus local reference
• jogging reference 1/2
• constant speed reference 1/2
• external speed reference.
Note: Constant speed overrides external speed reference.
Speed reference is limited according to the set minimum and maximum speed
values and ramped and shaped according to the defined acceleration and
deceleration values. See firmware block SPEED REF RAMP on page 97.
Inputs
24.03 SPEED REF1 IN
Selects the source for speed reference 1 (overrides parameter 24.01 SPEED REF1 SEL setting).
The default value is P.3.1, i.e. 3.01 SPEED REF1, which is the output of the SPEED REF RAMP
block.
Value pointer: Group and index
24.04 SPEED REF2 IN
Selects the source for speed reference 2 (overrides parameter 24.02 SPEED REF2 SEL setting).
The default value is P.3.2, i.e. 3.02 SPEED REF2, which is the output of the SPEED REF RAMP
block.
Value pointer: Group and index
24.05 SPEED REF 1/2SEL
Selects between speed reference 1 or 2. Reference 1/2 source is defined by parameter 24.03 SPEED
REF1 IN / 24.04 SPEED REF2 IN. 0 = Speed reference 1.
Bit pointer: Group, index and bit
Firmware functions, parameters and signals
95
24.06 SPEED SHARE
Defines the scaling factor for speed reference 1/2 (speed reference 1 or 2 is multiplied by the defined
value). Speed reference 1 or 2 is selected by parameter 24.05 SPEED REF 1/2SEL.
Range: -8…8
24.07 SPEEDREF NEG ENA
Selects the source for the speed reference inversion. 1 = Sign of the speed reference is changed
(inversion active).
Bit pointer: Group, index and bit
24.08 CONST SPEED
Defines the constant speed.
Range: -30000…30000 rpm
24.09 CONST SPEED ENA
Selects the source for enabling the use of the constant speed reference define by parameter 24.08
CONST SPEED. 1 = Enable.
Bit pointer: Group, index and bit
24.10 SPEED REF JOG1
Defines the speed reference for jogging function 1. For more information on jogging, see section
Jogging on page 64.
Range: -30000…30000 rpm
24.11 SPEED REF JOG2
Defines the speed reference for jogging function 2. For more information on jogging, see section
Jogging on page 64.
Range: -30000…30000 rpm
24.12 SPEED REFMIN ABS
Defines the absolute minimum limit for the speed reference.
MAXIMUM SPEED
(20.01)
SPEED REFMIN ABS
(24.12)
Limited speed reference
Speed reference
SPEED REFMIN ABS
(-24.12)
MINIMUM SPEED
(20.02)
Range: 0…30000 rpm
Firmware functions, parameters and signals
96
Outputs
3.03 SPEEDREF RAMP IN
Used speed reference ramp input in rpm
Firmware functions, parameters and signals
97
SPEED REF RAMP
(28)
63(('5()5$03
7/)PVHF
63(('5()5$03('
63(('5()5$03,1
>USP@
63(('5$03,1
>V@
$&&7,0(
>V@
'(&7,0(
>V@
6+$3(7,0($&&
>V@
6+$3(7,0($&&
>V@
6+$3(7,0('(&
>V@
6+$3(7,0('(&
>V@
$&&7,0(-2**,1*
>V@
'(&7,0(-2**,1*
>V@
(067237,0(
>USP@
63(('5()%$/
>)$/6(@
63(('5()%$/(1$
63(('6&$/,1*
Block diagram
67$786:25'
ELW5$03287
63(('5()%$/(1$
5DPS6KDSH
67$786:25'
ELW5$03+2/'
63(('5()5$03,1
63(('5()%$/
63(('5()
5$03('
63(('6&$/,1*
[
\
$&&7,0(
[
\
$&&7,0(-2**,1*
[
\
'(&7,0(
[
\
'(&7,0(-2**,1*
67$786:25'
ELW-2**,1*
(067237,0(
67$786:25'
ELW(06723
25
6+$3(7,0($&&
6+$3(7,0($&&
6+$3(7,0('(&
6+$3(7,0('(&
Firmware functions, parameters and signals
98
Description
With the SPEEDREF RAMP block the user can
• select the source for the speed ramp input.
• adjust the acceleration and deceleration times (also for the jogging function).
• adjust the acceleration and deceleration ramp shapes.
• adjust the emergency stop OFF3 ramp time.
• force the output of the speed reference ramp block to a defined value with the
speed reference ramp balancing function.
The block also shows the ramped and shaped speed reference value.
Note: Emergency stop OFF1 uses the active ramp time.
Acceleration and deceleration ramps
Speed reference is ramped and shaped according the to the defined acceleration
and deceleration values. The available ramp shape alternatives are Linear and
S-curve.
Linear: Suitable for drives requiring steady or slow acceleration/deceleration.
S-curve: Ideal for lifting applications.
Note: When jogging or emergency ramp stop is active, acceleration and
deceleration shape times are forced to zero.
Inputs
25.01 SPEED RAMP IN
Shows the source of the speed ramp input. The default value is P.3.3 i.e. signal 3.03 SPEEDREF
RAMP IN, which is the output of the SPEED REF MOD firmware block.
Note: This parameter cannot be set by the user.
Value pointer: Group and index
25.02 SPEED SCALING
Defines the speed value used in acceleration and deceleration (parameters 25.03/25.09 and 25.04/
25.10/25.11).
Range: 0…30000 rpm
25.03 ACC TIME
Defines the acceleration time i.e. the time required for the speed to change from zero to the speed
value defined by parameter 25.02 SPEED SCALING.
- If the speed reference increases faster than the set acceleration rate, the motor speed will follow the
acceleration rate.
- If the speed reference increases slower than the set acceleration rate, the motor speed will follow
the reference signal.
- If the acceleration time is set too short, the drive will automatically prolong the acceleration in order
not to exceed the drive torque limits.
Range 0…1800 s
Firmware functions, parameters and signals
99
25.04 DEC TIME
Defines the deceleration time i.e. the time required for the speed to change from the speed value
defined by parameter 25.02 SPEED SCALING to zero.
- If the speed reference decreases slower than the set deceleration rate, the motor speed will follow
the reference signal.
- If the reference changes faster than the set deceleration rate, the motor speed will follow the
deceleration rate.
- If the deceleration time is set too short, the drive will automatically prolong the deceleration in order
not to exceed drive torque limits. If there is any doubt about the deceleration time being too short,
ensure that the DC overvoltage control is on (parameter 47.01 OVERVOLTAGE CTRL).
Note: If a short deceleration time is needed for a high inertia application, the drive should be
equipped with an electric braking option e.g. with a brake chopper (built-in) and a brake resistor.
Range: 0…1800 s
25.05 SHAPE TIME ACC1
Selects the shape of the acceleration ramp at the beginning of the acceleration.
0.00 s: Linear ramp. Suitable for steady acceleration or deceleration and for slow ramps.
0.01…1000.00 s: S-curve ramp. S-curve ramps are ideal for lifting applications. The S-curve consists
of symmetrical curves at both ends of the ramp and a linear part in between.
Speed
Linear ramp:
Par. 25.06 = 0 s
Speed
Linear ramp:
Par. 25.07 = 0 s
Linear ramp:
Par. 25.05 = 0 s
Linear ramp:
Par. 25.08 = 0 s
S-curve ramp:
Par. 25.06 > 0 s
S-curve ramp:
Par. 25.07 > 0 s
S-curve ramp:
Par. 25.05 > 0 s
S-curve ramp:
Par. 25.08 > 0 s
time
time
Range: 0…1000 s
25.06 SHAPE TIME ACC2
Selects the shape of the acceleration ramp at the end of the acceleration. See parameter 25.05
SHAPE TIME ACC1.
Range: 0…1000 s
25.07 SHAPE TIME DEC1
Selects the shape of the deceleration ramp at the beginning of the deceleration. See parameter
25.05 SHAPE TIME ACC1.
Range: 0…1000 s
25.08 SHAPE TIME DEC2
Selects the shape of the deceleration ramp at the end of the deceleration.
Range: 0…1000 s
See parameter 25.05 SHAPE TIME ACC1.
Firmware functions, parameters and signals
100
25.09 ACC TIME JOGGING
Defines the acceleration time for the jogging function i.e. the time required for the speed to change
from zero to the speed value defined by parameter 25.02 SPEED SCALING.
Range: 0…1800 s
25.10 DEC TIME JOGGING
Defines the deceleration time for the jogging function i.e. the time required for the speed to change
from the speed value defined by parameter 25.02 SPEED SCALING to zero.
Range: 0…1800 s
25.11 EM STOP TIME
Defines the time inside which the drive is stopped if an emergency stop OFF3 is activated (i.e. the
time required for the speed to change from the speed value defined by parameter 25.02 SPEED
SCALING to zero). Emergency stop activation source is selected by parameter 10.10 EM STOP
OFF3. Emergency stop can also be activated through fieldbus (2.12 FBA MAIN CW).
Emergency stop OFF1 uses the active ramp time.
Range: 0…1800 s
25.12 SPEEDREF BAL
Defines the reference for the speed ramp balancing, i.e. the output of the speed reference ramp
firmware block is forced to a defined value.
The source for the balancing enable signal is selected by parameter 25.13 SPEEDREF BAL.
Range: -30000…30000 rpm
25.13 SPEEDREF BAL ENA
Selects the source for enabling the speed ramp balancing. See parameter 25.12 SPEEDREF BAL.
1 = Speed ramp balancing enabled.
Bit pointer: Group, index and bit
Outputs
3.04 SPEEDREF RAMPED
Ramped and shaped speed reference in rpm
Firmware functions, parameters and signals
101
SPEED ERROR
(6)
63(('(5525
7/)VHF
63(('5()86('
63(('(5525),/7
$&&&2037254
63(('$&7
63(('$&71&75/
63(('5()5$03('
63(('5()1&75/
63(('5()326
63(('5()3&75/
63((')(('):'
63((')(('3&75/
>USP@
63(('67(3
>PV@
63(('(55)7,0(
>USP@
63((':,1'2:
>V@
$&&&203'(57,0(
>PV@
$&&&203)7,0(
Block diagram
$&&&203'(57,0(
$&&&203)7,0(
G
GW
7$FF&RP
$&&&2037254
0$;,08063(('
63(('5()1&75/
0,1,08063(('
63(('(5525
),/7
63(('67(3
67$786:25'
ELW5$03287
67$786:25'
ELW5$03,1
63(('$&71&75/
63'(55)7,0(
Description
With the SPEED ERROR block the user can
• select the source for the speed error calculation (speed reference - actual speed)
in different control modes.
• select the sources for the speed reference and speed reference feedforward (only
for positioning applications).
• filter the speed error.
• add an additional speed step to the speed error.
• supervise the speed error with the speed window function.
Firmware functions, parameters and signals
102
• compensate inertia during acceleration (with the acceleration compensation).
The block also shows the used speed reference, filtered speed error and the output
of the acceleration compensation.
Inputs
26.01 SPEED ACT NCTRL
Selects the source for the actual speed in the speed control mode.
Note: This parameter has been locked, i.e. no user setting is possible.
Value pointer: Group and index
26.02 SPEED REF NCTRL
Selects the source for the speed reference in the speed control mode.
Note: This parameter has been locked, i.e. no user setting is possible.
Value pointer: Group and index
26.03 SPEED REF PCTRL
Selects the source for the speed reference in position and synchron control modes.
Note: This parameter is only for positioning applications.
Value pointer: Group and index
26.04 SPEED FEED PCTRL
Selects the source for the speed reference feedforward in position and synchron control modes.
Selects the source for the speed reference in homing and profile velocity modes.
Note: This parameter is only for positioning applications.
Value pointer: Group and index
26.05 SPEED STEP
Defines an additional speed step given to the input of the speed controller (added to the speed error
value).
Range: -30000…30000 rpm
26.06 SPD ERR FTIME
Defines the time constant of the speed error low pass filter.
If the used speed reference changes rapidly (servo application), the possible interferences in the
speed measurement can be filtered with the speed error filter. Reducing the ripple with filter may
cause speed controller tuning problems. A long filter time constant and fast acceleration time
contradict one another. A very long filter time results in unstable control.
See also parameter 22.02 SPEED ACT FTIME.
Range: 0…1000 ms. If parameter value is set to zero, the filter is disabled.
Firmware functions, parameters and signals
103
26.07 SPEED WINDOW
Defines the absolute value for the motor speed window supervision, i.e. the absolute value for the
difference between the actual speed and the unramped speed reference (1.01 SPEED ACT - 3.03
SPEEDREF RAMP IN). When the motor speed is within the limits defined by this parameter, signal
2.13 bit 8 (AT_SETPOINT) value is 1. If the motor speed is not within the defined limits, bit 8 value
is 0.
Range: 0…30000 rpm
26.08 ACC COMP DERTIME
Defines the derivation time for acceleration (deceleration) compensation. Used to improve the speed
control dynamic reference change.
In order to compensate inertia during acceleration, a derivative of the speed reference is added to
the output of the speed controller. The principle of a derivative action is described for parameter
28.04 DERIVATION TIME.
Note: The parameter value should be proportional to the total inertia of the load and motor,
i.e. approximately 10…30% of the mechanical time constant (tmech). See the mechanical time
constant equation in parameter 22.02 SPEED ACT FTIME.
If parameter value is set to zero, the function is deactivated.
The figure below shows the speed responses when a high inertia load is accelerated along a ramp.
No acceleration compensation
%
Acceleration compensation
%
Speed reference
Actual speed
t
t
See also parameter 26.09 ACC COMP FTIME.
The source for the acceleration compensation torque can also be selected by parameter 28.06 ACC
COMPENSATION. See firmware block SPEED CONTROL on page 104.
Range: 0…600 s
26.09 ACC COMP FTIME
Defines the filter time for the acceleration compensation.
Range: 0…1000 ms. If parameter value is set to zero, the filter is disabled.
Outputs
3.05 SPEEDREF USED
Used speed reference in rpm (reference before the speed error calculation)
3.06 SPEED ERROR FILT
Filtered speed error value in rpm
3.07 ACC COMP TORQ
Output of the acceleration compensation (torque in %)
Firmware functions, parameters and signals
104
SPEED CONTROL
(7)
63(('&21752/
7/)VHF
72545()63&75/
63(('(5525),/7
>@
63(('(551&75/
>V@
,17(*5$7,217,0(
>V@
'(5,9$7,217,0(
>PV@
'(5,9),/77,0(
$&&&2037254
$&&&203(16$7,21
3523257*$,1
>@
'5223,1*5$7(
>@
%$/5()(5(1&(
>)$/6(@
63(('&75/%$/(1
>@
0,1725463&75/
>@
0$;725463&75/
Block diagram
0$;725463&75/
$&&&203(16$7,21
'(5,9$7,217,0(
'(5,9),/77,0(
G
GW
3523257*$,1
63(('(551&75/
7G
.S
³ GW
7L
,17(5*$57,217,0(
.S
'5223,1*5$7(
%$/5()(5(1&(
63(('&75/%$/(1
0,1725463&75/
Firmware functions, parameters and signals
[
72545()6
&75/
105
Description
With the SPEED CONTROL block the user can
• select the source for the speed error.
• adjust the PID-type speed controller variables.
• limit the speed controller output torque.
• select the source for the acceleration compensation torque.
• force an external value to the output of the speed controller (with the balancing
function).
• adjust the load sharing in a Master/Follower application run by several drives
(with the drooping function).
The block also shows the limited speed controller output torque value.
The speed controller includes an anti-windup function (i.e. controller I-term is frozen
during torque reference limitation).
In torque control mode the speed controller output is frozen.
For manual speed controller tuning, see section Manual speed controller tuning on
page 26.
Inputs
28.01 SPEED ERR NCTRL
Selects the source for the speed error (reference - actual). The default value is P.3.6 i.e. signal 3.06
SPEED ERROR FILT, which is the output of the SPEED ERROR firmware block.
Note: This parameter has been locked, i.e. no user setting is possible.
Value pointer: Group and index
28.02 PROPORT GAIN
Defines the proportional gain (Kp) of the speed controller. Too great gain may cause speed oscillation.
The figure below shows the speed controller output after an error step when the error remains
constant.
%
Gain = Kp = 1
TI = Integration time = 0
TD= Derivation time = 0
Error value
Controller output
Controller
output = Kp · e
e = Error value
t
If gain is set to 1, a 10% change in error value (reference - actual value) causes the speed controller
output to change by 10%.
Range: 0…200
Firmware functions, parameters and signals
106
28.03 INTEGRATION TIME
Defines the integration time of the speed controller. The integration time defines the rate at which the
controller output changes when the error value is constant and the proportional gain of the speed
controller is 1. The shorter the integration time, the faster the continuous error value is corrected. Too
short integration time makes the control unstable.
If parameter value is set to zero, the I-part of the controller is disabled.
Anti-windup stops the integrator if the controller output is limited. See 6.05 LIMIT WORD 1.
The figure below shows the speed controller output after an error step when the error remains
constant.
%
Controller output
Gain = Kp = 1
TI = Integration time > 0
TD= Derivation time = 0
Kp · e
e = Error value
Kp · e
t
TI
Range: 0…600 s
28.04 DERIVATION TIME
Defines the derivation time of the speed controller. Derivative action boosts the controller output if the
error value changes. The longer the derivation time, the more the speed controller output is boosted
during the change. If the derivation time is set to zero, the controller works as a PI controller,
otherwise as a PID controller. The derivation makes the control more responsive for disturbances.
The speed error derivative must be filtered with a low pass filter to eliminate disturbances.
The figure below shows the speed controller output after an error step when the error remains
constant.
Gain = Kp = 1
TI = Integration time > 0
TD= Derivation time > 0
Ts= Sample time period = 250 µs
%
Δe = Error value change between two samples
De
Kp · TD ·
Ts
Controller output
Kp · e
Error value
e = Error value
Kp · e
TI
t
Note: Changing this parameter value is recommended only if a pulse encoder is used.
Range: 0…10 s
Firmware functions, parameters and signals
107
28.05 DERIV FILT TIME
Defines the derivation filter time constant.
Range: 0…1000 ms
28.06 ACC COMPENSATION
Selects the source for the acceleration compensation torque.
The default value is P.3.7, i.e signal 3.07 ACC COMP TORQ, which is the output of the SPEED
ERROR firmware block.
Note: This parameter has been locked, i.e. no user setting is possible.
Value pointer: Group and index
28.07 DROOPING RATE
Defines the droop rate (in percent of the motor nominal speed). The drooping slightly decreases the
drive speed as the drive load increases. The actual speed decrease at a certain operating point
depends on the droop rate setting and the drive load (= torque reference / speed controller output). At
100% speed controller output, drooping is at its nominal level, i.e. equal to the value of the
DROOPING RATE. The drooping effect decreases linearly to zero along with the decreasing load.
Drooping rate can be used e.g. to adjust the load sharing in a Master/Follower application run by
several drives. In a Master/Follower application the motor shafts are coupled to each other.
The correct droop rate for a process must be found out case by case in practice.
Speed decrease = Speed controller output · Drooping · Max. speed
Example: Speed controller output is 50%, drooping rate is 1%, maximum speed of the drive
is 1500 rpm. Speed decrease = 0.50 · 0.01 · 1500 rpm = 7.5 rpm.
Motor
speed
% of
nominal
100%
No drooping
} 28.09 DROOPING RATE
drooping
Speed controller Drive
output / %
load
100%
Range: 0…100%
28.08 BAL REFERENCE
Defines the reference used in the speed control output balancing, i.e. an external value to be forced to
the output of the speed controller. In order to guarantee smooth operation during output balancing, the
speed controller D-part is disabled and the acceleration compensation term is set to zero.
The source for the balancing enable signal is selected by parameter 28.09 SPEEDCTRL BAL EN.
Range: -1600…1600%
28.09 SPEEDCTRL BAL EN
Selects the source for the speed control output balancing enable signal. See parameter 28.08 BAL
REFERENCE. 1 = Enabled. 0 = Disabled.
Bit pointer: Group, index and bit
Firmware functions, parameters and signals
108
28.10 MIN TORQ SP CTRL
Defines the minimum speed controller output torque.
Range: -1600…1600%
28.11 MAX TORQ SP CTRL
Defines the maximum speed controller output torque.
Range: -1600…1600%
Outputs
3.08 TORQ REF SP CTRL
Limited speed controller output torque in %
Firmware functions, parameters and signals
109
TORQ REF SEL
(1)
72545()6(/
7/)VHF
72545()
72548(5()$''
>$,@
72545()6(/
>=(52@
72545()$''6(/
Block diagram
=(52
$,
$,
)%5()
)%5()
''5()
''5()
72545()
72545()6(/
=(52
$,
$,
)%5()
)%5()
''5()
''5()
72548(5()$''
72545()$''6(/
Description
With the TORQ REF SEL block the user can select the source for torque reference 1
(from a parameter selection list) and the source for torque reference addition (used
e.g. for compensating mechanical interferences).
This block also shows the torque reference and reference addition values.
The user can also select the torque reference source with a value pointer parameter.
See firmware block TORQ REF MOD on page 111.
Inputs
32.01 TORQ REF1 SEL
Selects the source for torque reference 1.
0 = ZERO: Zero reference
1 = AI1: Analogue input AI1
2 = AI2: Analogue input AI2
3 = FBA REF1: Fieldbus reference 1
4 = FBA REF2: Fieldbus reference 2
5 = D2D REF1: Drive to drive reference 1.
6 = D2D REF2: Drive to drive reference 2.
Firmware functions, parameters and signals
110
32.02 TORQ REF ADD SEL
Selects the source for the torque reference addition, 3.12 TORQUE REF ADD. Parameter 34.10
TORQ REF ADD SRC is connected to signal 3.12 TORQUE REF ADD as default.
Because the reference is added after the torque reference selection, this parameter can be used in
speed and torque control modes. See block diagram in firmware block REFERENCE CTRL on page
113.
0 = ZERO: Zero reference
1 = AI1: Analogue input AI1
2 = AI2: Analogue input AI2
3 = FBA REF1: Fieldbus reference 1
4 = FBA REF2: Fieldbus reference 2
5 = D2D REF1: Drive to drive reference 1.
6 = D2D REF2: Drive to drive reference 2.
Outputs
3.09 TORQ REF1
Torque reference 1 in %
3.12 TORQUE REF ADD
Torque reference additive in %.
Firmware functions, parameters and signals
111
TORQ REF MOD
(2)
72545()02'
7/)VHF
72545()5$03('
72545()586+/,0
72545()
72545(),1
>@
0$;,08072545()
>@
0,1,08072545()
>@
/2$'6+$5(
>V@
72545$0383
>V@
72545$03'2:1
Block diagram
63(('75,30$5*,1
63(('$&7
72545$0383
0$;,08072545()
/2$'6+$5(
72545(),1
[
586+&75/
72545()586+/,0
/2&$/&21752/5()
/2&$/&21752/
0,1,08072545()
72545$03'2:1
0$;,08063(('
0,1,08063(('
Description
With the TORQ REF MOD block the user can
• select the source for the torque reference.
• scale the input torque reference according to the defined load share factor.
• limit the torque reference according to the defined minimum and maximum limits.
• ramp the torque reference according to the defined ramp times.
The block also shows the ramped torque reference value and the torque reference
value limited by the rush control.
If local torque reference is used, no load share scaling is applied.
Firmware functions, parameters and signals
112
In torque control, the drive speed is limited between the defined minimum and
maximum limits. Speed-related torque limits are calculated and the input torque
reference is limited according to these limits. An OVERSPEED fault is generated if
the maximum allowed speed is exceeded.
Inputs
32.03 TORQ REF IN
Selects the source for the torque reference input for the torque ramp function. The default value is
P.3.9, i.e. signal 3.09 TORQ REF1, which is the output of the TORQ REF SEL firmware block.
Value pointer: Group and index
32.04 MAXIMUM TORQ REF
Defines the maximum torque reference.
Range: 0…1000%
32.05 MINIMUM TORQ REF
Defines the minimum torque reference.
Range: -1000…0%
32.06 LOAD SHARE
Scales the external torque reference to a required level (external torque reference is multiplied by the
selected value).
Range: -8…8
32.07 TORQ RAMP UP
Defines the torque reference ramp up time, i.e. the time for the reference to increase from zero to the
nominal motor torque.
Range: 0…60 s
32.08 TORQ RAMP DOWN
Defines the torque reference ramp down time, i.e. the time for the reference to decrease from the
nominal motor torque to zero.
Range: 0…60 s
Outputs
3.10 TORQ REF RAMPED
Ramped torque reference in %
3.11 TORQ REF RUSHLIM
Torque reference limited by the rush control (value in %). Torque is limited to ensure that the speed is
between the defined minimum and maximum speed limits (parameters 20.01 MAXIMUM SPEED and
20.02 MINIMUM SPEED).
Firmware functions, parameters and signals
113
REFERENCE CTRL
(29)
5()(5(1&(&75/
7/)PVHF
72545()727&
2302'($&.
>',67$786@
',
>',67$786@
',
>6SHHG@
(;7(;76(/
(;702'(6(/
(;7&75/02'(
>+RPLQJ@
(;7&75/02'(
>3RVLWLRQ@
(;7&75/02'(
>6SHHG@
/2&$/&75/02'(
72545()63&75/
75()63(('65&
72545()586+/,0
72548(5()$''
75()725465&
72545()$''65&
Firmware functions, parameters and signals
114
Block diagram
/2&$/&75/02'(
63(('
72548(
326,7,21
(;702'(6(/
(;7&75/02'(
(;7&75/02'(
63(('
72548(
0,1
0$;
$''
,1
:,5(
)%$
''
/RFDOILHOGEXV
-RJJLQJ
(;767$57)81&
/RFDO
(;7&75/02'(
(;7(;7
63(('
72548(
0,1
0$;
$''
,1
:,5(
)%$
''
(;767$57)81&
(;7(;76(/
Firmware functions, parameters and signals
115
72545()$''65&
2302'($&.
75()725465&
75()63(('65&
0,1
72545()
727&
0$;
02725&75/02'(
Description
With the REFERENCE CTRL block the user can
• select whether external control location EXT1 or EXT2 is used. Either one is
active at a time.
• select the control mode (SPEED/TORQUE/MIN/MAX/ADD) and the used torque
reference in local and external control.
The block also shows the torque reference (for torque control) and the used control
mode.
For more information on control locations and control modes, see chapter Control
locations and operating modes.
For start/stop control in different control locations, see firmware block DRIVE LOGIC
on page 64.
Inputs
34.01 EXT1/EXT2 SEL
Selects the source for external control location EXT1/EXT2 selection. 0 = EXT1. 1 = EXT2.
Bit pointer: Group, index and bit
34.02 EXT1 MODE 1/2SEL
Selects the source for EXT1 control mode 1/2 selection. 1 = mode 2. 0 = mode 1.
Control mode 1/2 is selected by parameter 34.03/34.04 EXT1 CTRL MODE1/2.
Bit pointer: Group, index and bit
Firmware functions, parameters and signals
116
34.03 EXT1 CTRL MODE1
Selects the control mode 1 for external control location EXT1.
1 = SPEED: Speed control. Torque reference is 3.08 TORQ REF SP CTRL, which is the output of the
SPEED CONTROL firmware block. Torque reference source can be changed by parameter 34.08
TREF SPEED SRC.
2 = TORQUE: Torque control. Torque reference is 3.11 TORQ REF RUSHLIM, which is the output of
the TORQ REF MOD firmware block. Torque reference source can be changed by parameter 34.08
TREF SPEED SRC.
3 = MIN: Combination of selections SPEED and TORQUE: Torque selector compares the torque
reference and the speed controller output and the smaller of them is used.
4 = MAX: Combination of selections SPEED and TORQUE: Torque selector compares the torque
reference and the speed controller output and the greater of them is used.
5 = ADD: Combination of selections SPEED and TORQUE: Torque selector adds the speed controller
output to the torque reference.
Note: Selections 6 to 9 are only for positioning applications.
6 = POSITION: Position control. Torque reference is 3.08 TORQ REF SP CTRL, which is the output of
the SPEED CONTROL firmware block. Speed reference is 4.01 SPEED REF POS, which is the
output of the POS CONTROL firmware block. Speed reference source can be changed by parameter
26.03 SPEED REF PCTRL.
7 = SYNCHRON: Synchron control. Torque reference is 3.08 TORQ REF SP CTRL, which is the
output of the SPEED CONTROL firmware block. Speed reference is 4.01 SPEED REF POS, which is
the output of the POS CONTROL firmware block. Speed reference source can be changed by
parameter 26.03 SPEED REF PCTRL.
8 = HOMING: Homing control. Torque reference is 3.08 TORQ REF SP CTRL, which is the output of
the SPEED CONTROL firmware block. Speed reference is 4.20 SPEED FEED FWD, which is the
output of the POS CONTROL firmware block. Speed reference source can be changed by parameter
26.04 SPEED FEED PCTRL.
9 = PROF VEL: Profile velocity control. Used e.g. with CANOpen profile. Torque reference is 3.08
TORQ REF SP CTRL, which is the output of the SPEED CONTROL firmware block. Speed reference
is 4.20 SPEED FEED FWD, which is the output of the POS CONTROL firmware block. Speed
reference source can be changed by parameter 26.04 SPEED FEED PCTRL.
34.04 EXT1 CTRL MODE2
Selects the control mode 2 for external control location EXT1.
For selections, see parameter 34.03 EXT1 CTRL MODE1.
34.05 EXT2 CTRL MODE1
Selects the control mode for external control location EXT2.
For selections, see parameter 34.03 EXT1 CTRL MODE1.
Firmware functions, parameters and signals
117
34.07 LOCAL CTRL MODE
Selects the control mode for local control.
Note: This parameter cannot be changed while the drive is running.
1 = SPEED: Speed control. Torque reference is 3.08 TORQ REF SP CTRL, which is the output of the
SPEED CONTROL firmware block. Torque reference source can be changed by parameter 34.08
TREF SPEED SRC.
2 = TORQUE: Torque control. Torque reference is 3.11 TORQ REF RUSHLIM, which is the output of
the TORQ REF MOD firmware block. Torque reference source can be changed by parameter 34.08
TREF SPEED SRC.
Note: Selection 6 is only for positioning applications.
6 = POSITION: Position control. Torque reference is 3.08 TORQ REF SP CTRL, which is the output of
the SPEED CONTROL firmware block. Speed reference is 4.01 SPEED REF POS, which is the
output of the POS CONTROL firmware block. Speed reference source can be changed by parameter
26.03 SPEED REF PCTRL.
34.08 TREF SPEED SRC
Selects the source for the torque reference (from the speed controller). Default value is P.3.8, i.e. 3.08
TORQ REF SP CTRL, which is the output of the SPEED CONTROL firmware block.
Note: This parameter has been locked, i.e. no user setting is possible.
Value pointer: Group and index
34.09 TREF TORQ SRC
Selects the source for the torque reference (from the torque reference chain). Default value is P.3.11,
i.e. 3.11 TORQ REF RUSHLIM, which is the output of the TORQ REF MOD firmware block.
Note: This parameter has been locked, i.e. no user setting is possible.
Value pointer: Group and index
34.10 TORQ REF ADD SRC
Selects the source for the torque reference added to the torque value after the torque selection.
Default value is P.3.12, i.e. 3.12 TORQUE REF ADD, which is the output of the TORQ REF SEL
firmware block.
Note: This parameter has been locked, i.e. no user setting is possible.
Value pointer: Group and index
Outputs
3.13 TORQ REF TO TC
Torque reference in % for the torque control. When 99.05 MOTOR CTRL MODE = SCALAR, this
value is forced to 0.
6.12 OP MODE ACK
Operation mode acknowledge: 0 = STOPPED, 1 = SPEED, 2 = TORQUE, 3 = MIN, 4 = MAX,
5 = ADD, 6 = POSITION, 7 = SYNCHRON, 8 = HOMING, 9 = PROF VEL, 10 = SCALAR,
11 = FORCED MAGN (i.e. DC Hold).
Firmware functions, parameters and signals
118
MECH BRAKE CTRL
(30)
0(&+%5$.(&75/
7/)PVHF
%5$.(72540(0
%5$.(&200$1'
>12@
%5$.(&21752/
>)$/6(@
%5$.($&.12:/
>V@
%5$.(23(1'(/$<
>V@
%5$.(&/26('/<
>USP@
%5$.(&/26(63'
>@
%5$.(23(17254
>)$/6(@
%5$.(&/26(5(4
>)$/6(@
%5$.(23(1+2/'
>)$8/7@
%5$.()$8/7)81&
Description
With the MECH BRAKE CTRL block the user can adjust the mechanical brake
control and brake supervision.
This block also shows the torque value stored when the brake close command is
issued and the value of the brake command.
The mechanical brake is used for holding the motor and driven machinery at zero
speed when the drive is stopped, or not powered.
Example
The figure below shows a brake control application example.
WARNING! Make sure that the machinery into which the drive with brake control
function is integrated fulfils the personnel safety regulations. Note that the frequency
converter (a Complete Drive Module or a Basic Drive Module, as defined in IEC
61800-2), is not considered as a safety device mentioned in the European
Machinery Directive and related harmonised standards. Thus, the personnel safety
of the complete machinery must not be based on a specific frequency converter
feature (such as the brake control function), but it has to be implemented as defined
in the application specific regulations.
Firmware functions, parameters and signals
119
The brake on/off is controlled via signal 3.15 BRAKE COMMAND. The source for the brake
supervision is selected by parameter 35.02 BRAKE ACKNOWL.
The brake control hardware and wirings need to be done by the user.
- Brake on/off control through selected relay/digital output.
- Brake supervision through selected digital input.
- Emergency brake switch in the brake control circuit.
- Brake on/off control through relay output (i.e. parameter 12.12 RO1 OUT PTR setting is P.3.15 =
3.15 BRAKE COMMAND).
- Brake supervision through digital input DI5 (i.e. parameter 35.02 BRAKE ACKNOWL setting is
P.2.1.4 = 2.01 DI STATUS bit 4)
Brake control
hardware
230 VAC
Emergency
brake
JCU unit
X2
1
RO1
2
RO1
3
RO1
X3
11 DI5
13 +24 V
M
Motor
Mechanical brake
Firmware functions, parameters and signals
120
From any state
1)
BSM STOPPED
9)
2)
Fault/Alarm*
BRAKE NOT CLOSED
BSM = Brake State
Machine
BSM
START
10)
* Depends on parameter
35.09 BRAKE FAULT
FUNC setting.
0/0/1/1
0/1/1/1
3)
OPEN
BRAKE
Fault/Alarm*
BRAKE START TORQUE
1/1/1/1
4)
RELEASE
RAMP
11)
1/1/0/0
5)
6)
12)
CLOSE
BRAKE
13)
Fault/Alarm*
BRAKE NOT OPEN
State (Symbol
NN
7)
0/1/1/0
8)
Fault/Alarm*
BRAKE NOT CLOSED
W/X/Y/Z )
- NN: State name
- W/X/Y/Z: State outputs/operations
W: 1 = Brake open command is active. 0 = Brake close command is active. (Controlled through selected digital/relay
output with signal 3.15 BRAKE COMMAND.)
X: 1 = Forced start (inverter is modulating). The function keeps the internal Start on until the brake is closed in spite of
the status of the external Stop. Effective only when ramp stop has been selected as the stop mode (11.03 STOP
MODE). Run enable and faults override the forced start. 0 = No forced start (normal operation).
Y: 1 = Drive control mode is forced to speed/scalar.
Z: 1 = Ramp generator output is forced to zero. 0 = Ramp generator output is enabled (normal operation).
State change conditions (Symbol
)
1)
Brake control is active (35.01 BRAKE CONTROL = 1/2) OR modulation of the drive is requested to stop. The
drive control mode is forced to speed/scalar.
2)
External start command is on AND brake open request is on (35.07 BRAKE CLOSE REQ = 0).
3)
Starting torque required at brake release is reached (35.06 BRAKE OPEN TORQ) AND brake hold is not active
(35.08 BRAKE OPEN HOLD). Note: With scalar control, the defined starting torque has no effect.
4)
Brake is open (acknowledgement = 1, selected by par. 35.02 BRAKE ACKNOWL) AND the brake open delay has
passed (35.03 BRAKE OPEN DELAY). Start = 1.
5) 6) Start = 0 OR brake close command is active AND actual motor speed < brake close speed (35.05 BRAKE
CLOSE SPD).
7)
Brake is closed (acknowledgement = 0) AND brake close delay has passed (35.04 BRAKE CLOSE DLY).
Start = 0.
8)
Start = 1.
9)
Brake is open (acknowledgement = 1) AND brake close delay has passed.
10) Defined starting torque at brake release is not reached.
11) Brake is closed (acknowledgement = 0) AND brake open delay has passed.
12) Brake is closed (acknowledgement = 0).
13) Brake is open (acknowledgement = 1) AND brake close delay has passed.
Firmware functions, parameters and signals
121
Operation time scheme
The time scheme below illustrates the operation of the brake control function
(simplified).
Start cmd
Ramp input
Modulating
Ref_Running
Brake open cmd
Ramp output
ncs
Torque ref
Tmem
Ts
1 tmd 2
3 tod
4
5
6
tcd
Ts
Start torque at brake release (parameter 35.06 BRAKE OPEN TORQ)
Tmem
Stored torque value at brake close (signal 3.14 BRAKE TORQ MEM)
tmd
Motor magnetising delay
tod
Brake open delay (parameter 35.03 BRAKE OPEN DELAY)
ncs
Brake close speed (parameter 35.05 BRAKE CLOSE SPD)
tcd
Brake close delay (parameter 35.04 BRAKE CLOSE DLY)
7
time
Inputs
35.01 BRAKE CONTROL
Activates the brake control function with or without supervision.
Note: This parameter cannot be changed while the drive is running.
0 = NOT USED: Inactive
1 = WITH ACK: Brake control with supervision (supervision is activated by par. 35.02 BRAKE
ACKNOWL).
2 = NO ACK: Brake control without supervision
Firmware functions, parameters and signals
122
35.02 BRAKE ACKNOWL
Selects the source for the external brake on/off supervision activation (when par. 35.01 BRAKE
CONTROL = WITH ACK). The use of the external on/off supervision signal is optional. 1 = The brake
is open. 0 = The brake is closed.
Brake supervision is usually controlled with a digital input. It can also be controlled with an external
control system, e.g. fieldbus.
When brake control error is detected the drive reacts as defined by parameter 35.09 BRAKE FAULT
FUNC.
Note: This parameter cannot be changed while the drive is running.
Bit pointer: Group, index and bit
35.03 BRAKE OPEN DELAY
Defines the brake open delay (= the delay between the internal open brake command and the release
of the motor speed control). The delay counter starts when the drive has magnetised the motor and
risen the motor torque to the level required at the brake release (parameter 35.06 BRAKE OPEN
TORQ). Simultaneously with the counter start, the brake function energises the relay output
controlling the brake and the brake starts opening.
Set the delay the same as the mechanical opening delay of the brake specified by the brake
manufacturer.
Range: 0…5 s
35.04 BRAKE CLOSE DLY
Defines the brake close delay. The delay counter starts when the motor actual speed has fallen below
the set level (parameter 35.05 BRAKE CLOSE SPD) after the drive has received the stop command.
Simultaneously with the counter start, the brake control function de-energises the relay output
controlling the brake and the brake starts closing. During the delay, the brake function keeps the motor
live preventing the motor speed from falling below zero.
Set the delay time to the same value as the mechanical make-up time of the brake (= operating delay
when closing) specified by the brake manufacturer.
Range: 0…60 s
35.05 BRAKE CLOSE SPD
Defines the brake close speed (an absolute value). See parameter 35.04 BRAKE CLOSE DLY.
Range: 0…1000 rpm
35.06 BRAKE OPEN TORQ
Defines the motor starting torque at brake release (in percent of the motor nominal torque).
Range: 0…1000%
35.07 BRAKE CLOSE REQ
Selects the source for the brake close (open) request. 1 = Brake close request. 0 = Brake open
request.
Note: This parameter cannot be changed while the drive is running.
Bit pointer: Group, index and bit
Firmware functions, parameters and signals
123
35.08 BRAKE OPEN HOLD
Selects the source for the activation of the brake open command hold. 1 = Hold active. 0 = Normal
operation.
Note: This parameter cannot be changed while the drive is running.
Bit pointer: Group, index and bit
35.09 BRAKE FAULT FUNC
Defines how the drive reacts in case of mechanical brake control error. If brake control supervision
has not been activated by parameter 35.01 BRAKE CONTROL, this parameter is disabled.
0 = FAULT: The drive trips on fault BRAKE NOT CLOSED / BRAKE NOT OPEN if the status of the
optional external brake acknowledgement signal does not meet the status presumed by the brake
control function. The drive trips on fault BRAKE START TORQUE if the required motor starting torque
at brake release is not achieved.
1 = ALARM: The drive generates alarm BRAKE NOT CLOSED / BRAKE NOT OPEN if the status of
the optional external brake acknowledgement signal does not meet the status presumed by the brake
control function. The drive generates alarm BRAKE START TORQUE if the required motor starting
torque at brake release is not achieved.
2 = OPEN FLT: The drive trips on fault BRAKE NOT CLOSED / BRAKE NOT OPEN if the status of the
optional external brake acknowledgement signal does not meet the status presumed by the brake
control function during the opening of the brake. Other brake function errors generate alarm BRAKE
NOT CLOSED / BRAKE NOT OPEN.
Outputs
3.14 BRAKE TORQ MEM
Torque value (in %) stored when the mechanical brake close command is issued.
3.15 BRAKE COMMAND
Brake on/off command. 0 = Close. 1 = Open. For brake on/off control, connect this signal to a relay
output (can also be connected to a digital output). See the Example on page 118.
Firmware functions, parameters and signals
124
MOTOR CONTROL
(31)
02725&21752/
7/)PVHF
)/8;5()86('
>@
)/8;5()
>N+]@
6)5()
>@
6/,3*$,1
>@
92/7$*(5(6(59(
>)$/6(@
)25&(23(1/223
Description
With the MOTOR CONTROL block the user can adjust the following motor control
variables:
• flux reference
• drive switching frequency
• motor slip compensation
• voltage reserve
• flux optimisation (not supported yet).
This block also shows the used flux reference value.
Flux optimisation
Note: Flux optimisation is not supported yet.
Flux optimisation reduces the total energy consumption and motor noise level when
the drive operates below the nominal load. The total efficiency (motor and drive) can
be improved by 1% to 10%, depending on the load torque and speed.
Note: Flux optimisation limits the dynamic control performance of the drive because
with a small flux reference the drive torque cannot be increased fast.
Inputs
40.01 FLUX REF
Defines the flux reference.
Range: 0…200%
40.02 SF REF
Defines the switching frequency of the drive.
When switching frequency exceeds 4 kHz, the allowed drive output current is limited. See switching
frequency derating in the appropriate hardware manual.
Range: 1/2/3/4/5/8/16 kHz
Firmware functions, parameters and signals
125
40.03 SLIP GAIN
Defines the slip gain which is used to improve the estimated motor slip. 100% means full slip gain; 0%
means no slip gain. The default value is 100%. Other values can be used if a static speed error is
detected despite of the full slip gain.
Example (with nominal load and nominal slip of 40 rpm): A 1000 rpm constant speed reference is
given to the drive. Despite of the full slip gain (= 100%), a manual tachometer measurement from the
motor axis gives a speed value of 998 rpm. The static speed error is 1000 rpm - 998 rpm = 2 rpm. To
compensate the error, the slip gain should be increased. At the 105% gain value, no static speed error
exists (2 rpm / 40 rpm = 5%).
Range: 0…200%
40.04 VOLTAGE RESERVE
Defines the minimum allowed voltage reserve. When the voltage reserve has decreased to the set
value, the drive enters the field weakening area.
If the intermediate circuit DC voltage Udc = 550 V and the voltage reserve is 5%, the RMS value of the
maximum output voltage in steady-state operation is
0.95 × 550 V / sqrt(2) = 369 V
The dynamic performance of the motor control in the field weakening area can be improved by
increasing the voltage reserve value, but the drive enters the field weakening area earlier.
Range: x…x V/%
40.05 FLUX OPTIMIZATION
Note: Flux optimisation is not supported yet.
Activates the flux optimisation function. Optimises the motor flux by minimising the motor losses and
reducing motor noise. Flux optimisation is used in drives that usually operate below nominal load.
1 = Active
0 = Inactive
40.06 FORCE OPEN LOOP
Defines the speed/position information used by the motor model.
0 = FALSE: Motor model uses the speed feedback selected by parameter 22.01 SPEED FB SEL.
1 = TRUE: Motor model uses the internal speed estimate (even when parameter 22.01 SPEED FB
SEL setting is ENC1 SPEED / ENC2 SPEED).
Outputs
3.16 FLUX REF USED
Used flux reference in percent
Firmware functions, parameters and signals
126
MOT THERM PROT
(32)
0277+(503527
7/)PVHF
027257(03
027257(03(67
>1R@
0277(033527
>(67,0$7('@
0277(036285&(
>&@
0277(03$/0/,0
>&@
0277(03)/7/,0
>&@
$0%,(177(03
>@
027/2$'&859(
>@
=(5263(('/2$'
>+]@
%5($.32,17
>&@
0271207(035,6(
>V@
0277+(507,0(
Description
With the MOT THERM PROT block the user can set up the motor overtemperature
protection and configure motor temperature measurement (if present). This block
also shows the estimated and measured motor temperature.
The motor can be protected against overheating by
• the motor thermal protection model
• measuring the motor temperature with PTC or KTY84 sensors. This will result in a
more accurate motor model.
Motor thermal protection model
The drive calculates the temperature of the motor on the basis of the following
assumptions:
1) When power is applied to the drive for the first time, the motor is at ambient
temperature (defined by parameter 45.05 AMBIENT TEMP). After this, when power
is applied to the drive, the motor is assumed to be at the estimated temperature
(value of 1.18 MOTOR TEMP EST saved at power switch off).
2) Motor temperature is calculated using the user-adjustable motor thermal time and
motor load curve. The load curve should be adjusted in case the ambient
temperature exceeds 30 °C.
It is possible to adjust the motor temperature supervision limits and select how the
drive reacts when overtemperature is detected.
Note: The motor thermal model can be used when only one motor is connected to
the inverter.
Firmware functions, parameters and signals
127
Temperature sensors
It is possible to detect motor overtemperature by connecting a motor temperature
sensor to thermistor input TH of the drive or to optional encoder interface module
FEN-xx.
Constant current is fed through the sensor. The resistance of the sensor increases
as the motor temperature rises over the sensor reference temperature Tref, as does
the voltage over the resistor. The temperature measurement function reads the
voltage and converts it into ohms.
The figure below shows typical PTC sensor resistance values as a function of the
motor operating temperature.
Ohm
4000
1330
Temperature
PTC resistance
Normal
0…1.5 kohm
Excessive
> 4 kohm
550
100
T
The figure below shows typical KTY84 sensor resistance values as a function of the
motor operating temperature.
ohm
3000
2000
KTY84 scaling
90 °C = 936 ohm
110 °C = 1063 ohm
130 °C = 1197 ohm
150 °C = 1340 ohm
1000
0
-100
T (°C)
0
100
200
300
It is possible to adjust the motor temperature supervision limits and select how the
drive reacts when overtemperature is detected.
WARNING! As the thermistor input on the JCU Control Unit is not insulated
according to IEC 60664, the connection of the motor temperature sensor requires
double or reinforced insulation between motor live parts and the sensor. If the
assembly does not fulfil the requirement,
- the I/O board terminals must be protected against contact and must not be
Firmware functions, parameters and signals
128
connected to other equipment
or
- the temperature sensor must be isolated from the I/O terminals.
The figure below shows a motor temperature measurement when thermistor input
TH is used.
One PTC or KTY84 sensor
JCU Control Unit
TH
Motor
AGND
T
10 nF
JCU Control Unit
Three PTC sensors
TH
Motor
T
T
AGND
T
10 nF
For encoder interface module FEN-xx connection, see the User’s Manual of the
appropriate encoder interface module.
Inputs
45.01 MOT TEMP PROT
Selects how the drive reacts when motor overtemperature is detected.
0 = NO: Inactive
1 = ALARM: The drive generates alarm MOTOR TEMPERATURE when the temperature exceeds the
alarm level defined by parameter 45.03 MOT TEMP ALM LIM.
2 = FAULT: The drive generates alarm MOTOR TEMPERATURE or trips on fault MOTOR
OVERTEMP when the temperature exceeds the alarm/fault level defined by parameter 45.03 MOT
TEMP ALM LIM / 45.04 MOT TEMP FLT LIM.
Firmware functions, parameters and signals
129
45.02 MOT TEMP SOURCE
Selects the motor temperature protection. When overtemperature is detected the drive reacts as
defined by parameter 45.01 MOT TEMP PROT.
0 = ESTIMATED: The temperature is supervised based on the motor thermal protection model, which
uses the motor thermal time constant (parameter 45.10 MOT THERM TIME) and the motor load curve
(parameters 45.06…45.08). User tuning is typically needed only if the ambient temperature differs
from the normal operating temperature specified for the motor.
The motor temperature increases if it operates in the region above the motor load curve. The motor
temperature decreases if it operates in the region below the motor load curve (if the motor is
overheated).
WARNING! The model does not protect the motor if it does not cool properly due to dust and
dirt.
1 = KTY JCU: The temperature is supervised using a KTY84 sensor connected to drive thermistor
input TH.
2 = KTY 1st FEN: The temperature is supervised using a KTY84 sensor connected to encoder
interface module FEN-xx installed in drive Slot 1/2. If two encoder interface modules are used,
encoder module connected to Slot 1 is used for the temperature supervision. Note: This selection
does not apply for FEN-01. *
3 = KTY 2nd FEN: The temperature is supervised using a KTY84 sensor connected to encoder
interface module FEN-xx installed in drive Slot 1/2. If two encoder interface modules are used,
encoder module connected to Slot 2 is used for the temperature supervision. Note: This selection
does not apply for FEN-01. *
4 = PTC JCU: The temperature is supervised using 1…3 PTC sensors connected to drive thermistor
input TH.
5 = PTC 1st FEN: The temperature is supervised using a PTC sensor connected to encoder interface
module FEN-xx installed in drive Slot 1/2. If two encoder interface modules are used, encoder module
connected to Slot 1 is used for the temperature supervision. *
6 = PTC 2nd FEN: The temperature is supervised using a PTC sensor connected to encoder interface
module FEN-xx installed in drive Slot 1/2. If two encoder interface modules are used, encoder module
connected to Slot 2 is used for the temperature supervision. *
*Note: If one FEN-xx module is used, parameter setting must be either KTY 1st FEN or PTC 1st FEN.
The FEN-xx module can be in either Slot 1 or Slot 2.
45.03 MOT TEMP ALM LIM
Defines the alarm limit for the motor overtemperature protection (when par. 45.01 MOT TEMP PROT
= ALARM/FAULT).
Range: 0…200 °C
45.04 MOT TEMP FLT LIM
Defines the fault limit for the motor overtemperature protection (when par. 45.01 MOT TEMP PROT =
FAULT).
Range: 0…200 °C
Firmware functions, parameters and signals
130
45.05 AMBIENT TEMP
Defines the ambient temperature for the thermal protection mode.
Range: -60…100 °C
45.06 MOT LOAD CURVE
Defines the load curve together with parameters 45.07 ZERO SPEED LOAD and 45.08 BREAK
POINT.
When parameter is set to 100%, the maximum load is equal to the value of the parameter 99.06 MOT
NOM CURRENT (higher loads heat up the motor). The load curve level should be adjusted if the
ambient temperature differs from the nominal value.
I/IN
I = Motor current
(%)
IN = Nominal motor current
150
45.06
100
50
45.07
45.08
Drive output frequency
The load curve is used by the motor thermal protection model when parameter 45.02 MOT TEMP
SOURCE setting is ESTIMATED.
Range: 50…150% (in percent of the nominal motor current)
45.07 ZERO SPEED LOAD
Defines the load curve together with parameters 45.06 MOT LOAD CURVE and 45.08 BREAK
POINT. Defines the maximum motor load at zero speed of the load curve. A higher value can be used
if the motor has an external motor fan to boost the cooling. See the motor manufacturer's
recommendations.
The load curve is used by the motor thermal protection model when parameter 45.02 MOT TEMP
SOURCE setting is ESTIMATED.
Range: 50…150% (in percent of the nominal motor current)
45.08 BREAK POINT
Defines the load curve together with parameters 45.06 MOT LOAD CURVE and 45.07 ZERO SPEED
LOAD. Defines the break point frequency of the load curve i.e. the point at which the motor load curve
begins to decrease from the value of parameter 45.06 MOT LOAD CURVE to the value of parameter
45.07 ZERO SPEED LOAD.
The load curve is used by the motor thermal protection model when parameter 45.02 MOT TEMP
SOURCE setting is ESTIMATED.
Range: 0.01…500 Hz
Firmware functions, parameters and signals
131
45.09 MOTNOMTEMPRISE
Defines the temperature rise of the motor when the motor is loaded with nominal current. See the
motor manufacturer's recommendations.
The temperature rise value is used by the motor thermal protection model when parameter 45.02
MOT TEMP SOURCE setting is ESTIMATED.
Temperature
Motor
nominal
temperature
rise
Ambient temperature
t
Range: 0…300 °C
45.10 MOT THERM TIME
Defines the thermal time constant for the motor thermal protection model (i.e. time inside which the
temperature has reached 63% of the nominal temperature). See the motor manufacturer's
recommendations.
The motor thermal protection model is used when parameter 45.02 MOT TEMP SOURCE setting is
ESTIMATED.
Motor
load
100%
Temp.
rise
t
100%
63%
Motor thermal time
t
Range: 100…10000 s
Outputs
1.17 MOTOR TEMP
Measured motor temperature in Celsius
1.18 MOTOR TEMP EST
Estimated motor temperature in Celsius
Firmware functions, parameters and signals
132
FAULT FUNCTIONS
(33)
)$8/7)81&7,216
7/)PVHF
$&7,9()$8/7
/$67)$8/7
)$8/77,0(+,
)$8/77,0(/2
$/$50:25'
$/$50:25'
$/$50:25'
>758(@
(;7(51$/)$8/7
>USP@
63(('5()6$)(
>)DXOW@
/2&$/&75//266
>)DXOW@
0273+$6(/266
>)DXOW@
($57+)$8/7
>)DXOW@
6833/3+6/266
>)DXOW@
672',$*1267,&
>)DXOW@
&5266&211(&7,21
Description
With the FAULT FUNCTIONS block the user can
• supervise external faults by defining e.g. a digital input as a source for external
fault indication signal
• select the reaction of the drive (alarm; fault; continuation at safe speed in some
cases) upon situations like local control communication break, motor/supply
phase loss, earth fault, or Safe Torque Off function activation.
The block also shows the codes of the latest faults, the time at which the active fault
occurred and the 16-bit alarm words.
An alarm or a fault message indicates abnormal drive status. For the possible
causes and remedies, see chapter Fault tracing.
Inputs
46.01 EXTERNAL FAULT
Selects an interface for an external fault signal. 0 = External fault trip. 1 = No external fault.
Bit pointer: Group, index and bit
46.02 SPEED REF SAFE
Defines the fault speed. Used as a speed reference when an alarm occurs when parameter 13.12 AI
SUPERVISION / 46.03 LOCAL CTRL LOSS / 50.02 COMM LOSS FUNC setting is SPD REF SAFE.
Range: -30000…30000 rpm
Firmware functions, parameters and signals
133
46.03 LOCAL CTRL LOSS
Selects how the drive reacts to a control panel or PC tool communication break.
0 = NO: Inactive
1 = FAULT: Drive trips on fault LOCAL CTRL LOSS.
2 = SPD REF SAFE: The drive generates alarm LOCAL CTRL LOSS and sets the speed to the speed
defined by parameter 46.02 SPEED REF SAFE.
WARNING! Make sure that it is safe to continue operation in case of a communication break.
3 = LAST SPEED: The drive generates alarm LOCAL CTRL LOSS and freezes the speed to the level
the drive was operating at. The speed is determined by the average speed over the previous 10
seconds.
WARNING! Make sure that it is safe to continue operation in case of a communication break.
46.04 MOT PHASE LOSS
Selects how the drive reacts when a motor phase loss is detected.
0 = NO: Inactive
1 = FAULT: The drive trips on fault MOTOR PHASE.
46.05 EARTH FAULT
Selects how the drive reacts when an earth fault or current unbalance is detected in the motor or the
motor cable.
0 = NO: Inactive.
1 = WARNING: The drive generates alarm EARTH FAULT.
2 = FAULT: The drive trips on fault EARTH FAULT.
46.06 SUPPL PHS LOSS
Selects how the drive reacts when a supply phase loss is detected.
0 = NO: Inactive
1 = FAULT: The drive trips on fault SUPPLY PHASE.
46.07 STO DIAGNOSTIC
Selects how the drive reacts when the drive detects that the Safe Torque Off function is active while
the drive is stopped. The Safe Torque Off function disables the control voltage of the power
semiconductors of the drive output stage, thus preventing the inverter from generating the voltage
required to rotate the motor. For Safe torque Off wiring, see the appropriate hardware manual.
Note: This parameter is only for supervision. The Safe Torque Off function can activate, even when
this parameter selection is NO.
Note: Fault STO 1 LOST / STO 2 LOST is activated if safety circuit signal 1/2 is lost when the drive is
at stopped state and parameter 46.07 STO DIAGNOSTIC setting is ALARM or NO.
1 = FAULT: Drive trips on fault SAFE TORQUE OFF.
2 = ALARM: Drive generates alarm SAFE TORQUE OFF.
3 = NO: Inactive.
Firmware functions, parameters and signals
134
46.08 CROSS CONNECTION
Selects how the drive reacts to incorrect input power and motor cable connection (i.e. input power
cable is connected to drive motor connection).
0 = NO: Inactive.
1 = FAULT: Drive trips on fault CABLE CROSS CON.
Outputs
8.01 ACTIVE FAULT
Fault code of the latest (active) fault
8.02 LAST FAULT
Fault code of the 2nd latest fault
8.03 FAULT TIME HI
Time (real time or power-on time) at which the active fault occurred in format dd.mm.yy
(=day.month.year)
8.04 FAULT TIME LO
Time (real time or power-on time) at which the active fault occurred in format hh.mm.ss
(hours.minutes.seconds)
8.05 ALARM WORD 1
Alarm word 1. For possible causes and remedies, see chapter Fault tracing.
Bit
0
1
2
3
4
5
6
7
8
9
10
11
12
13
14
15
Alarm
BRAKE START TORQUE
BRAKE NOT CLOSED
BRAKE NOT OPEN
SAFE TORQUE OFF
STO MODE CHANGE
MOTOR TEMPERATURE
EMERGENCY OFF
RUN ENABLE
ID-RUN
EMERGENCY STOP
POSITION SCALING
BR OVERHEAT
BC OVERHEAT
DEVICE OVERTEMP
INTBOARD OVERTEMP
BC MOD OVERTEMP
Firmware functions, parameters and signals
135
8.06 ALARM WORD 2
Alarm word 2. For possible causes and remedies, see chapter Fault tracing.
Bit
0
1
2
3
3…15
Alarm
IGBT OVERTEMP
FIELDBUS COMM
LOCAL CTRL LOSS
AI SUPERVISION
Reserved
8.07 ALARM WORD 3
Alarm word 3. For possible causes and remedies, see chapter Fault tracing.
Bit
0…15
Alarm
Reserved
Firmware functions, parameters and signals
136
VOLTAGE CTRL
(34)
92/7$*(&75/
7/)PVHF
86('6833/<92/7
>(QDEOH@
29(592/7$*(&75/
>(QDEOH@
81'(592/7&75/
>(QDEOH@
6833/92/7$872,'
>9@
6833/<92/7$*(
Description
With the VOLTAGE CTRL block the user can activate the overvoltage and
undervoltage controllers, enable the auto-identification of the supply voltage and
define the nominal supply voltage.
This block also shows the supply voltage used by the charging control of the drive.
Overvoltage control
Overvoltage control of the intermediate DC link is needed with two-quadrant
line-side converters when the motor operates within the generating quadrant.
To prevent the DC voltage from exceeding the overvoltage control limit, the
overvoltage controller automatically decreases the generating torque when the limit
is reached.
Undervoltage control
If the incoming supply voltage is cut off, the drive will continue to operate by utilising
the kinetic energy of the rotating motor. The drive will be fully operational as long as
the motor rotates and generates energy to the drive. The drive can continue the
operation after the break if the main contactor remained closed.
Note: Units equipped with main contactor option must be equipped with a hold
circuit (e.g. UPS) which keeps the contactor control circuit closed during a short
supply break.
Firmware functions, parameters and signals
137
TM
fout
UDC
(Nm)
(Hz)
(VDC)
160
80
520
120
60
390
80
40
260
40
20
130
Umains
UDC
fout
TM
1.6
4.8
8
11.2
14.4
UDC= intermediate circuit voltage of the drive, fout = output frequency of the drive,
TM = motor torque
t(s)
Loss of supply voltage at nominal load (fout = 40 Hz). The intermediate circuit DC voltage drops to the
minimum limit. The controller keeps the voltage steady as long as the mains is switched off. The drive
runs the motor in generator mode. The motor speed falls but the drive is operational as long as the
motor has enough kinetic energy.
Undervoltage and overvoltage control limits
The undervoltage limit depends on the supply voltage as defined by parameters
47.04 SUPPLY VOLTAGE and 47.03 SUPPLVOLTAUTO-ID.
Overvoltage trip level
Overvoltage trip level - 70 V
1.07 DC-VOLTAGE
0.7 × 1.35 × 1.19 USED SUPPLY VOLT
50 V min
Undervoltage trip level
Firmware functions, parameters and signals
138
Auto-identification
The intermediate DC circuit charging is based on the measured DC voltage. If the
measured voltage falls below the control limit, the intermediate circuit is charged.
If the measured voltage exceeds the control limit, the intermediate circuit is
discharged.
The control limit is either a user-defined limit (47.04 SUPPLY VOLTAGE) or it is
determined by the voltage auto-identification (47.03 SUPPLVOLTAUTO-ID). In
voltage auto-identification the nominal input line voltage is determined from the
actual DC bus level. The function is useful in avoiding excessive inrush currents after
a voltage dip.
The control limit used currently used by the drive is shown by signal 1.19 USED
SUPPLY VOLT.
Inputs
47.01 OVERVOLTAGE CTRL
Enables the overvoltage control of the intermediate DC link. Fast braking of a high inertia load causes
the voltage to rise to the overvoltage control limit. To prevent the DC voltage from exceeding the limit,
the overvoltage controller automatically decreases the braking torque.
Note: If a brake chopper and resistor or a regenerative supply section are included in the drive, the
controller must be deactivated.
0 = DISABLE
1 = ENABLE
47.02 UNDERVOLT CTRL
Enables the undervoltage control of the intermediate DC link. If the DC voltage drops due to input
power cut off, the undervoltage controller will automatically decrease the motor torque in order to
keep the voltage above the lower limit. By decreasing the motor torque, the inertia of the load will
cause regeneration back to the drive, keeping the DC link charged and preventing an undervoltage
trip until the motor coasts to stop. This will act as a power-loss ride-through functionality in systems
with high inertia, such as a centrifuge or a fan.
0 = DISABLE
1 = ENABLE
47.03 SUPPLVOLTAUTO-ID
Enables the auto-identification of the supply voltage.
0 = DISABLE
1 = ENABLE
47.04 SUPPLY VOLTAGE
Defines the nominal supply voltage. Used if auto-identification of the supply voltage is not enabled by
parameter 47.03 SUPPLVOLTAUTO-ID.
Range: 0…1000 V
Firmware functions, parameters and signals
139
Outputs
1.19 USED SUPPLY VOLT
Either the nominal supply voltage defined by parameter 47.04 SUPPLY VOLTAGE, or the
automatically determined supply voltage if auto-identification is enabled by parameter 47.03
SUPPLVOLTAUTO-ID.
Firmware functions, parameters and signals
140
BRAKE CHOPPER
(35)
%5$.(&+233(5
7/)PVHF
>'LVDEOH@
%&(1$%/(
>758(@
%&5817,0((1$
>V@
%57+(507,0(&2167
>N:@
%532:(50$;&17
>2KP@
5%5
>@
%57(03)$8/7/,0
>@
%57(03$/$50/,0
Description
With the BRAKE CHOPPER BLOCK the user can adjust the brake chopper control
and supervision.
Inputs
48.01 BC ENABLE
Enables the brake chopper control.
0 = DISABLE
1 = ENABLE. Note: Ensure the brake resistor is installed and the overvoltage control is switched off
(parameter 47.01 OVERVOLTAGE CTRL). The drive has a built-in brake chopper.
48.02 BC RUN-TIME ENA
Selects the source for quick run-time brake chopper control. 0 = Brake chopper IGBT pulses are cut
off. 1 = Normal brake chopper IGBT modulation. The overvoltage control is automatically switched
off.
This parameter can be used to program the chopper control to function only when the drive is
operating in the generator mode.
Bit pointer: Group, index and bit
48.03 BRTHERMTIMECONST
Defines the thermal time constant of the brake resistor. The value is used in the overload protection.
Range: 0…10000 s
48.04 BR POWER MAX CNT
Defines the maximum continuous braking power which will raise the resistor temperature to the
maximum allowed value. The value is used in the overload protection.
Range: 0…10000 kW
48.05 R BR
Defines the resistance value of the brake resistor. The value is used for brake chopper protection.
Range: 0.1…1000 ohm
Firmware functions, parameters and signals
141
48.06 BR TEMP FAULTLIM
Selects the fault limit for the brake resistor temperature supervision. The value is given in percent of
the temperature the resistor reaches when loaded with the power defined by parameter 48.04 BR
POWER MAX.
When the limit is exceeded the drive trips on fault BR OVERHEAT.
Range: 0…150%
48.07 BR TEMP ALARMLIM
Selects the alarm limit for the brake resistor temperature supervision. The value is given in percent of
the temperature the resistor reaches when loaded with the power defined by parameter 48.04 BR
POWER MAX.
When limit is exceeded the drive generates alarm BR OVERHEAT.
Range: 0…150%
Firmware functions, parameters and signals
142
FIELDBUS
(36)
),(/'%86
7/)PVHF
)%$0$,1&:
)%$0$,16:
)%$0$,15()
)%$0$,15()
>'LVDEOH@
)%$(1$%/(
>1R@
&200/266)81&
>V@
&200/2667287
>6SHHG@
)%$5()02'(6(/
>3RVLWLRQ@
)%$5()02'(6(/
63(('$&7
)%$$&77565&
72548(
>)$/6(@
)%$$&77565&
)%$6:%65&
>)$/6(@
)%$6:%65&
>)$/6(@
)%$6:%65&
>)$/6(@
)%$6:%65&
Firmware functions, parameters and signals
143
Description
With the FIELDBUS block the user can initialise the fieldbus communication and
select the used communication supervision.
The block also shows the fieldbus status and control words and fieldbus references
1 and 2.
The following description introduces the fieldbus communication and instructs in
setting up the fieldbus communication.
Fieldbus communication
The drive can be connected to a fieldbus controller via a fieldbus adapter module.
The adapter module is connected to drive Slot 3.
ACSM1
Fieldbus
controller
Fieldbus
Other
devices
Slot 3
Fieldbus
adapter
Fxxx
Data Flow
Control Word (CW)
References
Process I/O (cyclic)
Status Word (SW)
Actual values
Parameter R/W requests/responses
Process I/O (cyclic) or
Service messages (acyclic)
The drive can be set to receive all of its control information through the fieldbus
interface, or the control can be distributed between the fieldbus interface and other
available sources, for example digital and analogue inputs.
The drive can communicate with fieldbus controller via fieldbus adapter using one of
the following serial communication protocols:
– PROFIBUS-DP® (FPBA-01 adapter)
– CANopen® (FCAN-01 adapter)
– DeviceNet® (FDNA-01 adapter).
Firmware functions, parameters and signals
144
Setting up communication through a fieldbus adapter module
Before configuring the drive for fieldbus control, the adapter module must be
mechanically and electrically installed according to the instructions given in the
User’s Manual of the appropriate fieldbus adapter module.
The communication between the drive and the fieldbus adapter module is activated
by setting parameter 50.01 FBA ENABLE to ENABLE. The adapter-specific
parameters must also be set. See the table below.
Parameter
Setting for
fieldbus control
Function/Information
COMMUNICATION INITIALISATION AND SUPERVISION (firmware block FIELDBUS)
50.01 FBA ENABLE
(1) ENABLE
Initialises communication between drive and fieldbus adapter module.
50.02 COMM LOSS
FUNC
(0) NO
(1) FAULT
(2) SPD REF SAFE
(3) LAST SPEED
Selects how the drive reacts in a fieldbus communication break.
50.03 COMM LOSS T
OUT
0.3…6553.5 s
Defines the time between communication break detection and the
action selected with parameter 50.02 COMM LOSS FUNC.
50.04 FBA REF1
MODESEL and 50.05
FBA REF2 MODESEL
(0) RAW DATA
(1) TORQUE
(2) SPEED
(3) POSITION
(4) VELOCITY
Defines the fieldbus reference scaling.
When RAW DATA is selected, see also parameters 50.06…50.11.
Selections POSITION and VELOCITY are for positioning applications
only.
ADAPTER MODULE CONFIGURATION (firmware block FBA SETTINGS)
51.01 FBA TYPE
–
51.02 FBA PAR 2
These parameters are adapter module-specific. For more information, see the User’s Manual
of the fieldbus adapter module. Note that not all of these parameters are necessarily used.
•••
Displays the type of the fieldbus adapter module.
51.26 FBA PAR 26
51.27 FBA PAR
REFRESH
(0) DONE
(1) REFRESH
Validates any changed adapter module configuration parameter
settings.
51.28 PAR TABLE
VER
–
Displays the parameter table revision of the fieldbus adapter module
mapping file stored in the memory of the drive.
51.29 DRIVE TYPE
CODE
–
Displays the drive type code of the fieldbus adapter module mapping
file stored in the memory of the drive.
51.30 MAPPING FILE
VER
–
Displays the fieldbus adapter module mapping file revision stored in the
memory of the drive.
51.31 D2FBA COMM
STA
–
Displays the status of the fieldbus adapter module communication.
51.32 FBA COMM SW
VER
–
Displays the common program revision of the adapter module.
51.33 FBA APPL SW
VER
–
Displays the application program revision of the adapter module.
Note: In the User’s Manual of the fieldbus adapter module the parameter group number is 1 for parameters
51.01…51.26.
Firmware functions, parameters and signals
145
Parameter
Setting for
fieldbus control
Function/Information
TRANSMITTED DATA SELECTION (firmware blocks FBA DATA IN and FBA DATA OUT)
52.01…52.12 FBA
DATA IN1…12
0
1…6
11…16
101…9999
Defines the data transmitted from drive to fieldbus controller.
53.01…53.12 FBA
DATA OUT1…12
0
1…3
11…13
1001…9999
Defines the data transmitted from fieldbus controller to drive.
Note: If the selected data is 32 bits long, two parameters are reserved
for the transmission.
Note: If the selected data is 32 bits long, two parameters are reserved
for the transmission.
Note: In the User’s Manual of the fieldbus adapter module the parameter group number is 3 for parameters
52.01…52.12 and 2 for parameters 53.01…53.12.
After the module configuration parameters have been set, the drive control
parameters (see section Drive control parameters) must be checked and adjusted
when necessary.
The new settings will take effect when the drive is powered up again, or when
parameter 51.27 FBA PAR REFRESH is activated.
Drive control parameters
The Setting for fieldbus control column gives the value to use when the fieldbus
interface is the desired source or destination for that particular signal. The Function/
Information column gives a description of the parameter.
Parameter
Setting for
fieldbus control
Function/Information
CONTROL COMMAND SOURCE SELECTION
10.01 EXT1 START
FUNC
(3) FBA
Selects fieldbus as the source for the start and stop commands when
EXT1 is selected as the active control location.
10.04 EXT2 START
FUNC
(3) FBA
Selects fieldbus as the source for the start and stop commands when
EXT2 is selected as the active control location.
24.01 SPEED REF1 SEL
(3) FBA REF1
(4) FBA REF2
Fieldbus reference REF1 or REF2 is used as speed reference 1.
24.02 SPEED REF2 SEL
(3) FBA REF1
(4) FBA REF2
Fieldbus reference REF1 or REF2 is used as speed reference 2.
32.01 TORQ REF1 SEL
(3) FBA REF1
(4) FBA REF2
Fieldbus reference REF1 or REF2 is used as torque reference 1.
32.02 TORQ REF ADD
SEL
(3) FBA REF1
(4) FBA REF2
Fieldbus reference REF1 or REF2 is used for torque reference
addition.
SYSTEM CONTROL INPUTS
16.07 PARAM SAVE
(0) DONE
(1) SAVE
Saves parameter value changes (including those made through
fieldbus control) to permanent memory.
Firmware functions, parameters and signals
146
The fieldbus control interface
The communication between a fieldbus system and the drive consists of 16/32-bit
input and output data words. The drive supports at the maximum the use of 12 data
words (16-bit) in each direction.
Data transmitted from the drive to the fieldbus controller is defined by parameters
52.01…52.12 (FBA DATA IN) and data transmitted from the fieldbus controller to the
drive is defined by parameters 53.01…53.12 (FBA DATA OUT).
Fieldbus network
1)
Fieldbus module
Fieldbus
specific
interface
EXT1/EXT2
Start Func
DATA
OUT 2)
4)
1
2
3
…
12
Profile
select
DATA
IN 2)
5)
1
2
3
…
12
Profile
select
FBA profile
4)
DATA OUT
select
FBA MAIN CW
FBA REF1
FBA REF2
3)
Par. 10.01…99.13
10.01
/10.04
Speed/Torque
REF1 Sel
53.01/…/53.12
5)
DATA IN
select
FBA MAIN SW
FBA ACT1
FBA ACT2
3)
Par. 01.01…99.13
24.01/32.01
/32.02
Speed/Torque
REF2 Sel
52.01/…/52.12
1) See also other parameters which can be controlled by the fieldbus.
2) The maximum number of used data words is protocol-dependent.
3) Profile/instance selection parameters. Fieldbus module specific parameters. For more
information, see the User’s Manual of the appropriate fieldbus adapter module.
4) With DeviceNet the control part is transmitted directly.
5) With DeviceNet the actual value part is transmitted directly.
24.02/32.01
/32.02
Parameter
table
The Control Word and the Status Word
The Control Word (CW) is the principal means of controlling the drive from a fieldbus
system. The Control Word is sent by the fieldbus controller to the drive. The drive
switches between its states according to the bit-coded instructions of the Control
Word.
The Status Word (SW) is a word containing status information, sent by the drive to
the fieldbus controller.
Actual Values
Actual Values (ACT) are 16/32-bit words containing information on selected
operations of the drive.
Firmware functions, parameters and signals
147
FBA communication profile
The FBA communication profile is a state machine model which describes the
general states and state transitions of the drive. The State diagram on page 148
presents the most important states (including the FBA profile state names). The FBA
Control Word commands the transitions between these states and the FBA Status
Word indicates the status of the drive.
Fieldbus adapter module profile (selected by adapter module parameter) defines
how the control word and status word are transmitted in a system which consists of
fieldbus controller, fieldbus adapter module and drive. With transparent modes,
control word and status word are transmitted without any conversion between the
fieldbus controller and the drive. With other profiles (e.g. PROFIdrive for FPBA-01,
AC/DC drive for FDNA-01, DS-402 for FCAN-01 and ABB Drives profile for all
fieldbus adapter modules) fieldbus adapter module converts the fieldbus-specific
control word to the FBA communication profile and status word from FBA
communication profile to the fieldbus-specific status word.
For descriptions of other profiles, see the User’s Manual of the appropriate fieldbus
adapter module.
Fieldbus references
References (FBA REF) are 16/32-bit signed integers. A negative reference
(indicating reversed direction of rotation) is formed by calculating the two’s
complement from the corresponding positive reference value. The contents of each
reference word can be used as torque or speed reference.
When torque or speed reference scaling is selected (by parameter 50.04 FBA REF1
MODESEL / 50.05 FBA REF2 MODESEL), the fieldbus references are 32-bit
integers. The value consists of a 16-bit integer value and a 16-bit fractional value.
The speed/torque reference scaling is as follows:
Reference
Scaling
Notes
Torque reference
FBA REF / 65536
(value in %)
Final reference is limited by parameters 20.06 MAXIMUM
TORQUE and 20.07 MINIMUM TORQUE.
Speed reference
FBA REF / 65536
(value in rpm)
Final reference is limited by parameters 20.01 MAXIMUM
SPEED, 20.02 MINIMUM SPEED and 24.12 SPEED
REFMIN ABS.
Position reference
Velocity reference
(In position applications only.). See the firmware block POS FEEDBACK.
Firmware functions, parameters and signals
148
State diagram
The following presents the state diagram for the FBA communication profile. For
other profiles, see the User’s Manual of the appropriate fieldbus adapter module.
FBA
Communication
Profile
from any state
from any state
(FBA CW Bit 7 = 1)
Fault
(FBA SW Bit 16 = 1)
FAULT
RUN
DISABLE
(FBA SW Bit 1 = 0)
(FBA CW Bit 7 = 0)
(FBA CW Bit 8 = 1)
Par. 10.12 = 1
FBA CW = Fieldbus Control Word
FBA SW = Fieldbus Status Word
n = Speed
I = Input Current
RFG = Ramp Function Generator
f = Frequency
E
(FBA CW Bit 16 = 1)
Par. 10.12 = 0
START
INHIBITED
(FBA SW Bit 6 = 1)
(FBA CW Bit 0 = 1)
MAINS OFF
from any state
Emergency OFF
OFF2 (FBA CW Bit 2 = 1
and FBA CW Bit 0 = 1)
Power ON
OFF2
ACTIVE
READY TO
START
E
B C D
(FBA SW Bit 4 = 1)
(FBA SW Bit 0 = 1)
(FBA CW = xxxx xxxx xxxx xxx0 xxxx 1xxx 0xxx xx10)
(FBA CW Bit 16 = 0.
FBA CW Bit 7 = 0 and
FBA SW Bit 1 = 1)
from any state
Emergency Stop
OFF3 (FBA CW Bit 3 = 1
and FBA CW Bit 0 = 1)
(FBA CW Bit 12 = 1)
RUNNING
C D
(FBA SW Bit 3 = 1)
A
(FBA CW Bit 13 = 1)
(FBA CW = xxxx xxxx xxxx xxx0 xxx0 1xxx 0xxx xx10)
OFF3
ACTIVE
(FBA SW Bit 5 = 1)
n(f)=0 / I=0
RFG: OUTPUT
ENABLED
D
B
(FBA CW Bit 14 = 1)
(FBA CW = xxxx xxxx xxxx xxx0 xx00 1xxx 0xxx xx10)
from any state
OFF1 (FBA CW Bit 4 = 1
and FBA CW Bit 0 = 1)
RFG: ACCELERATOR
ENABLED
C
(FBA CW = xxxx xxxx xxxx xxx0 x000 1xxx 0xxx xx10)
OPERATING
D
Firmware functions, parameters and signals
(FBA SW Bit 8 = 1)
OFF1
ACTIVE
n(f)=0 / I=0
149
Inputs
50.01 FBA ENABLE
Enables communication between the drive and fieldbus adapter.
0 = DISABLE: No communication.
1 = ENABLE: The communication between drive and fieldbus adapter is enabled.
50.02 COMM LOSS FUNC
Selects how the drive reacts in a fieldbus communication break. The time delay is defined by
parameter 50.03 COMM LOSS T OUT.
0 = NO: Protection is not active.
1 = FAULT: Protection is active. The drive trips on fault FIELDBUS COMM and coasts to stop.
2 = SPD REF SAFE: Protection is active. The drive generates alarm FIELDBUS COMM and sets the
speed to the value defined by parameter 46.02 SPEED REF SAFE.
WARNING! Make sure that it is safe to continue operation in case of a communication break.
3 = LAST SPEED: Protection is active. The drive generates alarm FIELDBUS COMM and freezes the
speed to the level the drive was operating at. The speed is determined by the average speed over the
previous 10 seconds.
WARNING! Make sure that it is safe to continue operation in case of a communication break.
50.03 COMM LOSS T OUT
Defines the time delay before the action defined by parameter 50.02 COMM LOSS FUNC is taken.
Time count starts when the link fails to update the message.
Range: 0.3…6553.5 s
50.04 FBA REF1 MODESEL
Selects the fieldbus reference FBA REF1 scaling and the actual value, which is sent to the fieldbus
(FBA ACT1).
0 = RAW DATA: No scaling (i.e. data is transmitted without scaling). Source for the actual value, which
is sent to the fieldbus, is selected by parameter 50.06 FBA ACT TR SRC.
1 = TORQUE: Fieldbus adapter module uses torque reference scaling. Torque reference scaling is
defined by the used fieldbus profile (e.g. with ABB Drives Profile integer value 10000 corresponds to
100% torque value). Signal 1.06 TORQUE is sent to the fieldbus as an actual value. See the User’s
Manual of the appropriate fieldbus adapter module.
2 = SPEED: Fieldbus adapter module uses speed reference scaling. Speed reference scaling is
defined by the used fieldbus profile (e.g. with ABB Drives Profile integer value 20000 corresponds to
parameter 25.02 SPEED SCALING value). Signal 1.01 SPEED ACT is sent to the fieldbus as an
actual value. See the User’s Manual of the appropriate fieldbus adapter module.
Note: Selections 3 and 4 are only for positioning applications.
3 = POSITION: Fieldbus adapter module uses position reference scaling. Position reference scaling
is defined by parameters 60.05 POS UNIT and 60.08 POS2INT SCALE. Signal 1.12 POS ACT is sent
to the fieldbus as an actual value.
4 = VELOCITY: Fieldbus adapter module uses position speed scaling. Position speed scaling is
defined by parameters 60.10 POS SPEED UNIT and 60.11 POS SPEED2INT. Signal 4.02 SPEED
ACT LOAD is sent to the fieldbus as an actual value.
Firmware functions, parameters and signals
150
50.05 FBA REF2 MODESEL
Selects the fieldbus reference FBA REF2 scaling.
See parameter 50.05 FBA REF1 MODESEL
50.06 FBA ACT1 TR SRC
Selects the source for fieldbus actual value 1 when parameter 50.04/50.05 FBA REF1/2 MODESEL
setting is RAW DATA.
Value pointer: Group and index
50.07 FBA ACT2 TR SRC
Selects the source for fieldbus actual value 2 when parameter 50.04/50.05 FBA REF1/2 MODESEL
setting is RAW DATA.
Value pointer: Group and index
50.08 FBA SW B12 SRC
Selects the source for freely programmable fieldbus status word bit 28 (2.13 FBA MAIN SW bit 28 SW
B1212).
Bit pointer: Group, index and bit
50.09 FBA SW B13 SRC
Selects the source for freely programmable fieldbus status word bit 29 (2.13 FBA MAIN SW bit 29 SW
B13).
Bit pointer: Group, index and bit
50.10 FB ASW B14 SRC
Selects the source for freely programmable fieldbus status word bit 30 (2.13 FBA MAIN SW bit 30 SW
B14).
Bit pointer: Group, index and bit
50.11 FBA SW B15 SRC
Selects the source for freely programmable fieldbus status word bit 31 (2.13 FBA MAIN SW bit 31 SW
B15).
Bit pointer: Group, index and bit
Firmware functions, parameters and signals
151
Outputs
2.12 FBA MAIN CW
Control Word for fieldbus communication.
Log. = Logical combination (i.e. Bit AND/OR Selection parameter). Par. = Selection parameter. See
State diagram on page 148.
Bit
0
Name
STOP*
Val.
1
1
START
0
1
0
Information
Stop according to the stop mode selected by 11.03
STOP MODE or according to the requested stop
mode (bits 2…6). Note: Simultaneous STOP and
START commands result in a stop command.
No operation
Start. Note: Simultaneous STOP and START
commands result in a stop command.
No operation
Log.
OR
Par.
10.02,
10.03,
10.05,
10.06
OR
10.02,
10.03,
10.05,
10.06
-
AND
Emergency OFF2 (bit 0 must be 1): Drive is
stopped by cutting off the motor power supply (the
inverter IGBTs are blocked). The motor coasts to
stop. The drive will restart only with the next rising
edge of the start signal when the run enable signal
is on.
0
No operation
3
STPMODE
1
Emergency stop OFF3 (bit 0 must be 1): Stop within AND
10.10
EM STOP*
the time defined by 25.11 EM STOP TIME.
0
No operation
4
STPMODE
1
Emergency stop OFF1 (bit 0 must be 1): Stop along AND
10.11
OFF1*
the currently active deceleration ramp.
0
No operation
5
STPMODE
1
Stop along the currently active deceleration ramp. 11.03
RAMP*
0
No operation
6
STPMODE
1
Coast to stop.
11.03
COAST*
0
No operation
7
RUN
1
Activate run enable.
AND
10.09
ENABLE
0
Activate run disable.
8
RESET
0->1 Fault reset if an active fault exists.
OR
10.08
other No operation
* If all stop mode bits 2…6 are 0, stop mode is selected by 11.03 STOP MODE. Coast stop (bit 6)
overrides the emergence stop (bit 2/3/4). Emergency stop overrides the normal ramp stop (bit 5).
2
STPMODE
EM OFF*
1
Firmware functions, parameters and signals
152
Bit
9
Name
JOGGING 1
Val.
1
10
JOGGING 2
0
1
11
REMOTE
CMD
12
RAMP OUT
0
13
0
1
0
1
0
RAMP HOLD 1
14
RAMP IN 0
15
EXT1/EXT2
16
REQ
STARTINH
17
LOCAL CTL
0
1
0
1
0
1
0
1
18
FBLOCAL
REF
0
1
0
Firmware functions, parameters and signals
Information
Activate jogging function 1. See section Jogging on
page 64.
Jogging function 1 disabled
Activate jogging function 2. See section Jogging on
page 64.
Jogging function 2 disabled
Fieldbus control enabled
Fieldbus control disabled
Force Ramp Function Generator output to 0. Drive
ramps to a stop (current and DC voltage limits in
force).
No operation
Halt ramping (Ramp Function Generator output
held).
No operation
Force Ramp Function Generator input to zero.
No operation
Switch to external control location EXT2.
Switch to external control location EXT1.
Activate start inhibit.
No start inhibit
Request local control for Control Word. Used when
the drive is controlled via PC tool or panel or
through local fieldbus.
- Local fieldbus: Transfer to fieldbus local control
(control via fieldbus control word or reference).
Fieldbus steals the control.
- Panel or PC tool: Transfer to local control.
Request external control.
Request fieldbus local control.
No fieldbus local control
Log.
OR
Par.
10.07
-
-
-
-
-
-
-
-
-
-
OR
34.01
-
-
-
-
-
-
153
Note: Bits 19 to 26 are only for positioning applications.
Bit
19
Name
ABS POSIT
20
POS START 1
MODE
0
21
POSITIONING ENA
22
23
24
Val.
1
0
1
0
PO REF LIM 1
ENA
0
Not in use
CHG SET
IMMED
1
0
25
POS START 1
26
START
HOMING
27
28
29
30
31
Not in use
CW B28
CW B29
CW B30
CW B31
Information
Use absolute positioning.
Use relative positioning.
Log.
Par.
OR
65.09,
65.17
bit 4
OR
65.24
Select pulse start for positioning: Start by rising
edge of a pulse.
Select normal start for positioning: Start by signal
rising edge. The signal has to stay TRUE during the
positioning task.
Enable position control.
OR
Disable position control.
Enable position reference.
OR
Disable position reference. Position reference
speed limit is set to zero. Positioning task is
rejected.
Interrupt actual positioning and start next
positioning.
Finish actual positioning and then start next
positioning.
Activate positioning start. Operation depends on
selected start mode (bit 20 POS START MODE).
66.05
70.03
-
-
OR
65.03,
65.11
0
Deactivate positioning start.
1
0
Start homing.
Normal operation.
OR
62.03
Freely programmable control bits. See parameters
50.08…50.11 and the user manual of the fieldbus
adapter.
-
-
Firmware functions, parameters and signals
154
2.13 FBA MAIN SW
Status Word for fieldbus communication. See State diagram on page 148.
Bit
Name
0 READY
1
ENABLED
2
STARTED
3
RUNNING
4
EM OFF
(OFF2)
5
EM STOP
(OFF3)
6
ACK
STARTINH
7
ALARM
8
AT SETPOINT
9
LIMIT
10 ABOVE LIMIT
11
EXT2 ACT
12 LOCAL FB
13 ZERO SPEED
14 REV ACT
Value
1
0
1
0
1
0
1
0
1
0
1
0
1
0
1
0
1
0
1
0
1
0
1
0
1
0
1
0
1
0
15 Not in use
16 FAULT
1
0
17 LOCAL PANEL 1
0
Firmware functions, parameters and signals
Description
Drive is ready to receive start command.
Drive is not ready.
External run enable signal is received.
No external run enable signal is received.
Drive has received start command.
Drive has not received start command.
Drive is modulating.
Drive is not modulating.
Emergency OFF2 is active.
Emergency OFF2 is inactive.
Emergency stop OFF3 (ramp stop) is active.
Emergency OFF3 is inactive.
Start inhibit is active.
Start inhibit is inactive.
An alarm is active. See chapter Fault tracing.
No alarm
Drive is at setpoint. Actual value equals reference value (i.e. the
difference between the actual speed and the speed reference is within
the speed window defined by 26.07 SPEED WINDOW).
Drive has not reached setpoint.
Operation is limited by torque limit (any torque limit).
Operation is within torque limits.
Actual speed exceeds the defined limit, 22.07 ABOVE SPEED LIM.
Actual speed is within the defined limits.
External control EXT2 is active.
External control EXT1 is active.
Fieldbus local control is active.
Fieldbus local control is inactive.
Drive speed is below limit set by par. 22.05 ZERO SPEED LIMIT.
Drive has not reached zero speed limit.
Drive is running in reverse direction.
Drive is running in forward direction.
Fault is active. See chapter Fault tracing.
No fault
Local control is active, i.e. drive is controlled form PC tool or control
panel.
Local control is inactive.
155
Note: Bits 18 to 26 are only for positioning applications.
Bit
18
19
20
21
22
23
24
25
26
27
28
29
30
31
Name
Value
Description
FOLLOWING ERROR 1
The difference between the reference and the actual
position is within the defined following error window
71.09 FOLLOW ERR WIN.
0
The difference between the reference and the actual
position is outside the defined following error window.
TGT REACHED
1
Target position is reached.
0
Target position is not reached.
HOMING DONE
1
Homing sequence is completed.
0
Homing sequence is not completed.
TRAV TASK ACK
1
New positioning task or setpoint is accepted.
0
No operation
MOVING
1
Positioning task is active. Drive speed is < > 0.
0
Positioning task is completed or drive is at standstill.
IP MODE ACTIVE
1
Position reference generator is active.
0
Position reference generator is inactive.
REG LEVEL
1
Position latch signal 1 is active (source selected by
parameter 62.15 TRIG PROBE1).
0
Position latch signal 1 is inactive.
POSITIVE LIMIT
1
Positive limit switch is active (source selected by
parameter 62.06 POS LIM SWITCH).
0
Positive limit switch is inactive.
NEGATIVE LIMIT
1
Negative limit switch is active (source selected by
parameter 62.05 NEG LIM SWITCH).
0
Negative limit switch is inactive.
REQUEST CTL
1
Control word is requested from fieldbus.
0
Control word is not requested from fieldbus.
SW B28
Programmable status bits (unless fixed by the used
profile). See parameters 50.08…50.11 and the user
SW B29
manual of the fieldbus adapter.
SW B30
SW B31
2.14 FBA MAIN REF1
Scaled fieldbus reference 1. See parameter 50.04 FBA REF1 MODESEL.
2.15 FBA MAIN REF2
Scaled fieldbus reference 2. See parameter 50.05 FBA REF2 MODESEL.
Firmware functions, parameters and signals
156
FBA SETTINGS
Note: The FBA SETTINGS parameters do not belong to any firmware block, i.e. they
can only be accessed via the optional control panel or the PC tool Parameter
Browser.
Description
With the FBA SETTINGS parameters the user can configure the fieldbus adapter
module and validate changed adapter module parameter settings. FBA SETTINGS
also shows fieldbus adapter module information.
Fieldbus parameters need to be adjusted only when a fieldbus adapter module
(optional) is installed and activated by parameter 50.01 FBA ENABLE.
For information in setting up the fieldbus communication, see firmware block
FIELDBUS on page 142.
Parameters
For more parameter information, see the User’s Manual of the fieldbus adapter
module.
Notes:
• In the User’s Manual, the parameter group number is 1.
• Any changes take effect only after the fieldbus interface is powered up for the
next time, or after a parameter refresh command (parameter 51.27) is given.
51.01 FBA TYPE
Displays the type of the connected fieldbus adapter module.
NOT DEFINED: Fieldbus module is not found, or it is not properly connected, or parameter 50.01
FBA ENABLE setting is DISABLE.
1 = PROFIBUS-DP adapter module
2 = CANopen adapter module
3 = DeviceNet adapter module
51.02 FBA PAR2
Parameters 51.02…51.26 are adapter module-specific. For more information, see the User’s Manual
of the fieldbus adapter module. Note that not all of these parameters are necessarily visible.
… ….
….
51.26 FBA PAR26
Parameters 51.02…51.26 are adapter module-specific. For more information, see the User’s Manual
of the fieldbus adapter module. Note that not all of these parameters are necessarily visible.
Firmware functions, parameters and signals
157
51.27 FBA PAR REFRESH
Validates any changed adapter module configuration parameter settings. After refreshing, the value
reverts automatically to DONE.
Note: This parameter cannot be changed while the drive is running.
0 = DONE: Refreshing done
1 = REFRESH: Refreshing
51.28 PAR TABLE VER
Displays the parameter table revision of the fieldbus adapter module mapping file stored in the
memory of the drive.
In format xyz, where x = major revision number; y = minor revision number; z = correction number.
51.29 DRIVE TYPE CODE
Displays the drive type code of the fieldbus adapter module mapping file stored in the memory of the
drive.
Example: 520 = ACSM1 Speed and Torque Control Program.
51.30 MAPPING FILE VER
Displays the fieldbus adapter module mapping file revision stored in the memory of the drive.
In decimal format. Example: 1 = revision 1.
51.31 D2FBA COMM STA
Displays the status of the fieldbus adapter module communication.
(0) IDLE
(1) EXEC. INIT
(2) TIME OUT
(3) CONFIG
ERROR
(4) OFF-LINE
(5) ON-LINE
(6) RESET
Adapter is not configured.
Adapter is initialising.
A timeout has occurred in the communication between the adapter and the
drive.
Adapter configuration error: The major or minor revision code of the common
program revision in the fieldbus adapter module is not the revision required
by the module (see par. 51.32) or mapping file upload has failed more than
three times.
Adapter is off-line.
Adapter is on-line
Adapter is performing a hardware reset.
51.32 FBA COMM SW VER
Displays the common program revision of the adapter module.
In format axyz, where a = major revision number, xy = minor revision numbers. z = correction letter.
Example: 190A = revision 1.90A.
51.33 FBA APPL SW VER
Displays the application program revision of the adapter module.
In format axyz, where: a = major revision number, xy = minor revision numbers, z = correction letter.
Example: 190A = revision 1.90A.
Firmware functions, parameters and signals
158
FBA DATA IN
Note: The FBA DAT IN parameters do not belong to any firmware block, i.e. they
can only be accessed via the optional control panel or the PC tool Parameter
Browser.
Description
With the FBA DATA IN parameters the user can select the data to be transmitted
from the drive to the fieldbus controller by the input data words (16/32-bit).
The maximum number of used data words is protocol-dependent.
Fieldbus parameters need to be adjusted only when a fieldbus adapter module
(optional) is installed and activated by parameter 50.01 FBA ENABLE.
For information in setting up the fieldbus communication, see firmware block
FIELDBUS on page 142.
Parameters
For more parameter information, see the User’s Manual of the fieldbus adapter
module.
Notes:
• In the User’s Manual, the parameter group number is 3.
• Any changes take effect only after the fieldbus interface is powered up for the
next time, or after a parameter refresh command (parameter 51.27) is given.
52.01 FBA DATA IN1
Selects data to be transferred from the drive to the fieldbus controller.
0: Not in use
1…6
11…16
52.01 setting
4
5
6
14
15
16
Data word
Status Word (16 bits)
Actual value 1 (16 bits)
Actual value 2 (16 bits)
Status Word (32 bits)
Actual value 1 (32 bits)
Actual value 2 (32 bits)
101…9999: Parameter index
52.02 FBA DATA IN2
See 52.01 FBA DATA IN1.
….
52.12 FBA DATA IN12
See 52.01 FBA DATA IN1.
Firmware functions, parameters and signals
159
FBA DATA OUT
Note: The FBA DATA OUT parameters do not belong to any firmware block, i.e. they
can only be accessed via the optional control panel or the PC tool Parameter
Browser.
Description
With the FBA DATA OUT parameters the user can select the data to be transmitted
from the fieldbus controller to the drive by the output data words (16/32-bit).
The maximum number of used data words is protocol-dependent.
Fieldbus parameters need to be adjusted only when a fieldbus adapter module
(optional) is installed and activated by parameter 50.01 FBA ENABLE.
For information in setting up the fieldbus communication, see firmware block
FIELDBUS on page 142.
Inputs
For more parameter information, see the User’s Manual of the fieldbus adapter
module.
Notes:
• In the User’s Manual, the parameter group number is 2.
• Any changes take effect only after the fieldbus interface is powered up for the
next time, or after a parameter refresh command (parameter 51.27) is given.
53.01 FBA DATA OUT1
Selects data to be transferred from the fieldbus controller to the drive.
0: Not in use
0
1…3
11…13
53.01 setting
1
2
3
11
12
13
Data word
Control Word (16 bits)
REF1 (16 bits)
REF2 (16 bits)
Control Word (32 bits)
REF1 (32 bits)
REF2 (32 bits)
1001…9999: Drive parameter
53.02 FBA DATA OUT2
See 53.01 FBA DATA OUT1.
…
53.12 FBA DATA OUT12
See 53.01 FBA DATA OUT1.
Firmware functions, parameters and signals
160
D2D COMMUNICATION
(44)
''&20081,&$7,21
7/)PVHF
''0$,1&:
''5()
''5()
>'LVDEOHG@
/,1.02'(
>$ODUP@
&200/266)81&
>@
12'($'5(66
>@
)2//2:(50$6.
>@
)2//2:(50$6.
63(('5()5$03('
5()65&
72545()727&
'')2//2:(5&:
5()65&
)2//2:(5&:65&
Description
With the D2D COMMUNICATION block, the user can set up the drive-to-drive
communication link between multiple drives. The drive firmware supports up to 63
nodes. See page 163 for wiring details.
The drive firmware supports basic master/follower communication with one master
drive and multiple followers. By default, the master provides control commands as
well as speed and torque references for the followers. In positioning applications, the
master can also be configured to send a position reference as either target position
or synchronization reference.
The contents of the standard communication dataset (16-bit control word + two
32-bit references) can be configured freely with pointer parameters and/or solution
programming with the SPC tool. Depending on the drive control mode, the followers
can be configured to use the drive-to-drive commands and references with the
following parameters:
Control data
Parameter
Setting for drive-to-drive
communication
Start/Stop commands
10.01 EXT1 START FUNC
10.04 EXT2 START FUNC
4: D2D
Speed reference
24.01 SPEED REF1 SEL
24.02 SPEED REF2 SEL
5: D2D REF1 or
6: D2D REF2
Torque reference
32.01 TORQ REF1 SEL
32.02 TORQ REF ADD SEL
5: D2D REF1 or
6: D2D REF2
Position reference*
65.04 POS REF 1 SEL
65.12 POS REF 2 SEL
5: D2D REF1 or
6: D2D REF2
Position reference in synchron
control operating mode*
67.01 SYNC REF SEL
67.02 SPEED REF VIRT M
5: D2D REF1 or
6: D2D REF2
*Only for positioning applications
The communication status of the followers is supervised by a periodic supervision
message from the master to the individual followers.
Firmware functions, parameters and signals
161
Drive-to-drive function blocks can be used in the SPC tool to enable additional
communication methods and to modify the use of datasets between the drives. (Not
available at the time of printing.)
Inputs
57.01 LINK MODE
Activates the drive-to-drive connection.
0 = DISABLED: Drive-to-drive connection disabled.
1 = FOLLOWER: The drive is a follower on the drive-to-drive link.
2 = MASTER: The drive is the master on the drive-to-drive link. Only one drive can be the master at a
time.
57.02 COMM LOSS FUNC
Selects how the drive acts when an erroneous drive-to-drive configuration or a communication break
is detected.
0 = NO: Protection is not active.
1 = ALARM: The drive generates an alarm.
2 = FAULT: The drive trips on a fault.
57.03 NODE ADRESS
Sets the node address for a follower drive. Each follower must have a dedicated node address.
Note: If the drive is set to be the master on the drive-to-drive link, this parameter has no effect (the
master is automatically assigned node address 0).
57.04 FOLLOWER MASK 1
On the master drive, selects the followers to be polled. If no response is received from a polled
follower, the action selected by parameter 57.02 COMM LOSS FUNC is taken.
The least significant bit represents follower with node address 1, while the most significant bit
represents follower 31. When a bit is set to 1, the corresponding node address is polled. For example,
followers 1 and 2 are polled when this parameter is set to the value of 0x3.
57.05 FOLLOWER MASK 2
On the master drive, selects the followers to be polled. If no response is received from a polled
follower, the action selected by parameter 57.02 COMM LOSS FUNC is taken.
The least significant bit represents follower with node address 32, while the most significant bit
represents follower 62. When a bit is set to 1, the corresponding node address is polled. For example,
followers 32 and 33 are polled when this parameter is set to the value of 0x3.
57.06 REF 1 SRC
On the master drive, selects the source of D2D reference 1 sent to the followers.
Value pointer: Group and index. The default value is P.03.04, i.e. 3.04 SPEEDREF RAMPED.
57.07 REF 2 SRC
On the master drive, selects the source of D2D reference 2 sent to the followers.
Value pointer: Group and index. The default value is P.03.13, i.e. 3.13 TORQ REF TO TC.
Firmware functions, parameters and signals
162
57.08 FOLLOWER CW SRC
On the master drive, selects the source of the D2D control word sent to the followers.
Value pointer: Group and index. The default value is P.02.18, i.e. 2.18 D2D FOLLOWER CW.
57.09 KERNEL SYNC MODE
Enables the synchronisation of firmware time levels between drives, or between a PLC or a drive.
0 = NOSYNC: No synchronisation.
1 = D2DSYNC: If the drive is a master on a drive-to-drive link, it broadcasts a synchronisation signal
to the follower(s). If the drive is a follower, it synchronises its firmware time levels to the signal
received from the master.
2 = FBSYNC: The drive synchronises its firmware time levels to synchronisation signal received
through a fieldbus adapter.
3 = FBTOD2DSYNC: If the drive is the master on a drive-to-drive link, it synchronises its firmware
time levels to synchronisation signal received from a fieldbus adapter, and broadcasts the signal on
the drive-to-drive link. If the drive is a follower, synchronisation is disabled.
57.10 KERNEL SYNC OFFS
Defines an offset between the master and the followers on the drive-to-drive link. A positive value will
cause the followers to lag; with a negative value, the followers will lead.
Range: -4999…5000
Outputs
2.17 D2D MAIN CW
Drive-to-drive control word received from the master. See also actual signal 2.18 on page 69.
Bit
0
1
2
3
4
5
6
7
8
9
10
11
12
13
14
15
Information
Stop.
Start.
Reserved.
Reserved.
Reserved.
Reserved.
Reserved.
Run enable. By default, not connected in a follower drive.
Reset. By default, not connected in a follower drive.
Freely assignable through bit pointer parameters.
Freely assignable through bit pointer parameters.
Freely assignable through bit pointer parameters.
Freely assignable through bit pointer parameters.
Freely assignable through bit pointer parameters.
Freely assignable through bit pointer parameters.
EXT1/EXT2 selection. 0 = EXT1 active, 1 = EXT2 active. By default, not connected in a
follower drive.
2.19 D2D REF1
Drive-to-drive reference 1 received from the master.
Firmware functions, parameters and signals
163
2.20 D2D REF2
Drive-to-drive reference 2 received from the master.
Drive-to-drive link wiring
The drive-to-drive link is a daisy-chained RS-485 transmission line, constructed by
connecting the X5 terminal blocks of the JCU Control Units of several drives.
Shielded twisted-pair cable (~100 ohm, e.g. PROFIBUS-compatible cable) must be
used for the wiring. The maximum length of the link is 50 metres (164 ft).
The JCU Control Unit has a jumper (J3, “T”) next to the X5 terminal block for bus
termination. Termination must be ON on the drives at the ends of the drive-to-drive
link; on intermediate drives, termination must be OFF.
For best immunity, high quality cable is recommended. The cable should be kept as
short as possible. Unnecessary loops and running the cable near power cables
(such as motor cables) must be avoided.
Note: The cable shields are to be grounded to the control cable clamp plate on the
drive. Follow the instructions given in the Hardware Manual of the drive.
Termination ON
JCU
Drive 1
Termination OFF
JCU
Drive 2
BGND 3
A 2
X5:D2D
J3
...
B 1
T
BGND 3
A 2
X5:D2D
J3
J3
X5:D2D
B 1
T
BGND 3
A 2
B 1
T
The following diagram shows the wiring of the drive-to-drive link.
Termination ON
JCU
Drive n
Firmware functions, parameters and signals
164
ENCODER
(15)
(1&2'(5
7/)PVHF
(1&2'(563(('
(1&2'(5326
(1&2'(563(('
(1&2'(5326
)(1',67$786
>1RQH@
(1&2'(56(/
>1RQH@
(1&2'(56(/
>'LVDEOHG@
(08/02'(6(/
>'LVDEOHG@
77/(&+26(/
>)DXOW@
(1&&$%/()$8/7
>'RQH@
(1&3$55()5(6+
>@
(08/38/6(15
3265()/,0,7('
(08/3265()
Description
With the ENCODER block the user can activate the communication to encoder
interface 1/2 and enable the encoder emulation/echo. The block also shows encoder
1/2 speed and actual position.
Encoder/Resolver
The firmware offers support for two encoders (or resolvers), encoder 1 and 2. Multi
turn encoders are supported only as encoder 1. Three optional interface modules
are available:
• TTL Encoder Interface Module FEN-01: two TTL inputs, TTL output (for encoder
emulation and echo) and two digital inputs for position latching
• Absolute Encoder Interface FEN-11: absolute encoder input, TTL input, TTL
output (for encoder emulation and echo) and two digital inputs for position
latching
• Resolver Interface Module FEN-21: resolver input, TTL input, TTL output (for
encoder emulation echo) and two digital inputs for position latching.
The interface module is connected to drive option Slot 1 or 2. Note: Two encoder
interface modules of the same type are not allowed.
For encoder/resolver configuration, see firmware blocks ABSOL ENC CONF on
page 169, RESOLVER CONF on page 174 and PULSE ENC CONF on page 176.
Firmware functions, parameters and signals
165
Inputs
90.01 ENCODER 1 SEL
Activates the communication to optional encoder/resolver interface 1.
0 = NONE: Inactive
1 = FEN-01 TTL+: Communication active. Module type: FEN-01 TTL Encoder interface Module. Input:
TTL encoder input with commutation support (X32). See firmware block PULSE ENC CONF on page
176.
2 = FEN-01 TTL: Communication active. Module type: FEN-01 TTL Encoder interface Module. Input:
TTL encoder input (X31). See firmware block PULSE ENC CONF on page 176.
3 = FEN-11 ABS: Communication active. Module type: FEN-11 Absolute Encoder Interface. Input:
Absolute encoder input (X42). See firmware block ABSOL ENC CONF on page 169.
4 = FEN-11 TTL: Communication active. Module type: FEN-11 Absolute Encoder Interface. Input: TTL
encoder input (X41). See firmware block PULSE ENC CONF on page 176.
5 = FEN-21 RES: Communication active. Module type: FEN-21 Resolver Interface. Input: Resolver
input (X52). See firmware block RESOLVER CONF on page 174.
6 = FEN-21 TTL: Communication active. Module type: FEN-21 Resolver Interface. Input: TTL encoder
input (X51). See firmware block PULSE ENC CONF on page 176.
Note: It is recommended that encoder interface 1 is used whenever possible since the data received
through that interface is fresher than the data received through interface 2. On the other hand, when
position values used in emulation are determined by the drive software, the use of encoder interface 2
is recommended as the values are transmitted earlier through interface 2 than through interface 1.
90.02 ENCODER 2 SEL
Activates the communication to the optional encoder/resolver interface 2.
For selections, see parameter 90.01 ENCODER 1 SEL.
Note: The counting of shaft revolutions is not supported for encoder 2.
Firmware functions, parameters and signals
166
90.03 EMUL MODE SEL
Enables the encoder emulation and selects the position value and the TTL encoder output used in the
emulation process.
In encoder emulation a calculated position difference is transformed to a corresponding number of
TTL pulses to be transmitted via encoder TTL output. The position difference is the difference
between the latest and the previous position values.
The position value used in emulation can be either a position determined by the drive software or
a position measured by an encoder. If drive software position is used, the source for the used position
is selected by parameter 93.22 EMUL POS REF (in firmware block PULSE ENC CONF on page 176).
Because the software causes a delay, it is recommended that actual position is always taken from an
encoder. Drive software is recommended to be used only with position reference emulation.
Encoder emulation can be used to increase or decrease the pulse number when TTL encoder data is
transmitted via the TTL output e.g. to another drive. If the pulse number requires no alternation, use
encoder echo for data transformation. See parameter 90.04 TTL ECHO SEL. Note: If encoder
emulation and echo are enabled for the same FEN-xx TTL output, the emulation overrides the echo.
The TTL encoder pulse number used in emulation must be defined by parameter 93.21 EMUL PULSE
NR. See firmware block PULSE ENC CONF on page 176.
0 = DISABLED
1 = FEN-01 SWREF: Module type: FEN-01 TTL Encoder interface Module. Emulation: Drive software
position (source selected by par. 93.22 EMUL POS REF) is emulated to FEN-01 TTL output.
2 = FEN-01 TTL+: Module type: FEN-01 TTL Encoder interface Module. Emulation: FEN-01 TTL
encoder input (X32) position is emulated to FEN-01 TTL encoder output.
3 = FEN-01 TTL: Module type: FEN-01 TTL Encoder interface Module. Emulation: FEN-01 TTL
encoder input (X31) position is emulated to FEN-01 TTL encoder output.
4 = FEN-11 SWREF: Module type: FEN-11 Absolute Encoder Interface. Emulation: Drive software
position (source selected by par. 93.22 EMUL POS REF) is emulated to FEN-11 TTL output.
5 = FEN-11 ABS: Module type: FEN-11 Absolute Encoder Interface. Emulation: FEN-11 absolute
encoder input (X42) position is emulated to FEN-11 TTL encoder output.
6 = FEN-11 TTL: Module type: FEN-11 Absolute Encoder Interface. Emulation: FEN-11 TTL encoder
input (X41) position is emulated to FEN-11:n TTL encoder output.
7 = FEN-21 SWREF: Module type: FEN-21 Resolver Interface. Emulation: Drive software position
(source selected by par. 93.22 EMUL POS REF) is emulated to FEN-21 TTL output.
8 = FEN-21 RES: Module type: FEN-21 Resolver Interface. Emulation: FEN-21 resolver input (X52)
position is emulated to FEN-11 TTL encoder output.
9 = FEN-21 TTL: Module type: FEN-21 Resolver Interface. Emulation: FEN-21 TTL encoder input
(X51) position is emulated to FEN-21 TTL encoder output.
90.04 TTL ECHO SEL
Enables and selects the interface for the TTL encoder signal echo.
Note: If encoder emulation and echo are enabled for the same FEN-xx TTL output, the emulation
overrides the echo.
0 = DISABLED
1 = FEN-01 TTL+: Module type: FEN-01 TTL Encoder interface Module. Echo: TTL encoder input
(X32) pulses are echoed to the TTL encoder output.
2 = FEN-01 TTL: Module type: FEN-01 TTL Encoder interface Module. Echo: TTL encoder input
(X31) pulses are echoed to the TTL encoder output.
3 = FEN-11 TTL: Module type: FEN-11 Absolute Encoder Interface. Echo: TTL encoder input (X41)
pulses are echoed to the TTL encoder output.
4 = FEN-21 TTL: Module type: FEN-21 Resolver Interface. Echo: TTL encoder input (X51) pulses are
echoed to the TTL encoder output.
Firmware functions, parameters and signals
167
90.05 ENC CABLE FAULT
Selects the action in case an encoder cable fault is detected by the FEN-xx encoder interface.
Note: At the time of printing, this functionality is only available with the absolute encoder input of the
FEN-11 based on sine/cosine incremental signals.
0 = NO: Cable fault detection inactive.
1 = FAULT (default): The drive trips on an ENCODER 1/2 CABLE fault.
2 = WARNING: The drive generates an ENCODER 1/2 CABLE warning. This is the recommended
setting if the maximum pulse frequency of sine/cosine incremental signals exceeds 100 kHz; at high
frequencies, the signals may attenuate enough to invoke the function. The maximum pulse frequency
can be calculated as follows:
Pulses per revolution (par. 91.01) × Maximum speed in rpm
Maximum pulse frequency = ------------------------------------------------------------------------------------------------------------------------------------------------------------60
90.10 ENC PAR REFRESH
Setting this parameter to 1 forces a reconfiguration of the FEN-xx interfaces, which is needed for any
parameter changes in groups 90…93 to take effect.
The parameter is read-only when the drive is running.
0 = DONE
1 = CONFIGURE. The value will automatically revert to 0.
93.21 EMUL PULSE NR
Defines the number of TTL pulses used in encoder emulation.
Encoder emulation is enabled by parameter 90.03 EMUL MODE SEL. See firmware block ENCODER
on page 164.
Range: 0…65535 pulses per revolution
93.22 EMUL POS REF
Selects the source for the position value used in encoder emulation when parameter 90.03 EMUL
MODE SEL setting is FEN-01 SWREF, FEN-11 SWREF or FEN-21 SWREF. See firmware block
ENCODER on page 164.
The source can be any actual or reference position value (except 1.09 ENCODER 1 POS and 1.11
ENCODER 2 POS).
Value pointer: Group and index. The default value is P.4.17, i.e. 4.17 POS REF LIMITED (used in
positioning applications).
Outputs
1.08 ENCODER 1 SPEED
Encoder 1 speed in rpm
1.09 ENCODER 1 POS
Actual position of encoder 2 within one revolution
1.10 ENCODER 2 SPEED
Encoder 2 speed in rpm
Firmware functions, parameters and signals
168
1.11 ENCODER 2 POS
Actual position of encoder 2 within one revolution
2.16 FEN DI STATUS
Status of digital inputs of FEN-xx encoder interfaces in drive option Slots 1 and 2. Examples:
000001
000010
010000
100000
(01h) =
(02h) =
(10h) =
(20h) =
DI1 of FEN-xx in Slot 1 is ON, all others are OFF.
DI2 of FEN-xx in Slot 1 is ON, all others are OFF.
DI1 of FEN-xx in Slot 2 is ON, all others are OFF.
DI2 of FEN-xx in Slot 2 is ON, all others are OFF.
Firmware functions, parameters and signals
169
ABSOL ENC CONF
(42)
$%62/(1&&21)
7/)PVHF
>@
6,1(&26,1(15
>1RQH@
$%6(1&,17(5)
>@
5(9&2817%,76
>@
326'$7$%,76
>)$/6(@
5()0$5.(1$
>2GG@
+,3(5)$&(3$5,7<
>@
+,3(5)%$8'5$7(
>@
+,3(5)12'($''5
>@
66,&/2&.&<&/(6
>@
66,326,7,2106%
>@
66,5(92/06%
>ELQDU\@
66,'$7$)250$7
>NELWV@
66,%$8'5$7(
>,QLWLDOSRV@
66,02'(
>XV@
66,75$160,7&<&
>GHJ@
66,=(523+$6(
>,QLWLDOSRV@
(1'$702'(
>PV@
(1'$70$;&$/&
Description
With the ABSOL ENC CONF block the user can configure the absolute encoder
connection.
The optional FEN-11 Absolute Encoder Interface module supports the following
absolute encoders:
• Incremental sin/cos encoders with or without zero pulse and with or without
sin/cos commutation signals
• Endat 2.1/2.2 with incremental sin/cos signals (partially without sin/cos
incremental signals*)
• Hiperface encoders with incremental sin/cos signals
• SSI (Synchronous Serial Interface) with incremental sin/cos signals (partially
without sin/cos incremental signals*).
* EnDat and SSI encoders without incremental sin/cos signals are partially
supported only as encoder 1: Speed is not available and the time instant of the
position data (delay) depends on the encoder.
For more information, see Absolute Encoder Interface FEN-11 User’s Manual
[3AFE68784841 (English)].
Firmware functions, parameters and signals
170
Inputs
Used when parameter 90.01/90.02 ENCODER 1/2 SEL setting is FEN-11 ABS.
Note: Configuration data is written into the logic registers of the adapter once after
the power-up. If parameter values are changed, save values into the permanent
memory by parameter 16.07 PARAM SAVE. The new settings will take effect when
the drive is powered up again, or after re-configuration is forced by parameter 90.10
ENC PAR REFRESH.
91.01 SINE COSINE NR
Defines the number of sine/cosine wave cycles within one revolution.
Note: This parameter does not need to be set when EnDat or SSI encoders are used in continuous
mode. See parameter 91.25 SSI MODE / 91.30 ENDAT MODE.
Range: 0…65535
91.02 ABS ENC INTERF
Selects the source for the encoder position (zero position).
0 = NONE: Not selected
1 = COMMUT SIG: Commutation signals
2 = ENDAT: Serial interface: EnDat encoder
3 = HIPERFACE: Serial interface: HIPERFACE encoder
4 = SSI: Serial interface: SSI encoder
5 = TAMAG. 17/33B: Serial interface: Tamagawa 17/33-bit encoder
91.03 REV COUNT BITS
Defines the number of bits used in revolution count (for multi turn encoders). Used with serial
interfaces, i.e. when parameter 91.02 ABS ENC INTERF setting is ENDAT, HIPERFACE or SSI.
Range: 0…32. E.g. 4096 revolutions => 12 bits.
91.04 POS DATA BITS
Defines the number of bits used within one revolution. Used with serial interfaces, i.e. when
parameter 91.02 ABS ENC INTERF setting is ENDAT, HIPERFACE or SSI.
Range: 0…32. E.g. 32768 positions per revolution => 15 bits.
91.05 REFMARK ENA
Enables the encoder zero pulse (if exists). Zero pulse can be used for position latching.
Note: With serial interfaces (i.e. when parameter 91.02 ABS ENC INTERF setting is ENDAT,
HIPERFACE or SSI), the zero pulse must be disabled.
0 = FALSE: Disabled
1 = TRUE: Enabled
91.10 HIPERFACE PARITY
Defines the use of parity and stop bit(s) for HIPERFACE encoder (i.e. when parameter 91.02 ABS
ENC INTERF setting is HIPERFACE).
Typically this parameter does not need to be set.
0 = ODD: Odd parity indication bit, one stop bit
1 = EVEN: Even parity indication bit, one stop bit
Firmware functions, parameters and signals
171
91.11 HIPERF BAUDRATE
Defines the transfer rate of the link for HIPERFACE encoder (i.e. when parameter 91.02 ABS ENC
INTERF setting is HIPERFACE).
Typically this parameter does not need to be set.
0 = 4800: 4800 bits/s
1 = 9600: 9600 bits/s
2 = 19200: 19200 bits/s
3 = 38400: 38400 bits/s
91.12 HIPERF NODE ADDR
Defines the node address for HIPERFACE encoder (i.e. when parameter 91.02 ABS ENC INTERF
setting is HIPERFACE).
Typically this parameter does not need to be set.
Range: 0…255
91.20 SSI CLOCK CYCLES
Defines the length of the SSI message. The length is defined as the number of clock cycles. The
number of cycles can be calculated by adding 1 to the number of the bits in a SSI message frame.
Used with SSI encoders, i.e. when parameter 91.02 ABS ENC INTERF setting is SSI.
Range: 2…127
91.21 SSI POSITION MSB
Defines the location of the MSB (main significant bit) of the position data within a SSI message. Used
with SSI encoders, i.e. when parameter 91.02 ABS ENC INTERF setting is SSI.
Range: Bit number 1…126
91.22 SSI REVOL MSB
Defines the location of the MSB (main significant bit) of the revolution count within a SSI message.
Used with SSI encoders, i.e. when parameter 91.02 ABS ENC INTERF setting is SSI.
Range: Bit number 1…126
91.23 SSI DATA FORMAT
Selects the data format for SSI encoder (i.e. when parameter 91.02 ABS ENC INTERF setting is
SSI).
0 = Binary
1 = Gray
91.24 SSI BAUD RATE
Selects the baud rate for SSI encoder (i.e. when parameter 91.02 ABS ENC INTERF setting is SSI).
0 = 10 kbit/s
1 = 50 kbit/s
2 = 100 kbit/s
3 = 200 kbit/s
4 = 500 kbit/s
5 = 1000 kbit/s
Firmware functions, parameters and signals
172
91.25 SSI MODE
Selects the SSI encoder mode.
Note: Parameter needs to be set only when an SSI encoder is used in continuous mode, i.e. SSI
encoder without incremental sin/cos signals (supported only as encoder 1). SSI encoder is selected
by setting parameter 91.02 ABS ENC INTERF to SSI.
0 = INITIAL POS: Single position transfer mode (initial position)
1 = CONTINUOUS: Continuous position transfer mode
91.26 SSI TRANSMIT CYC
Selects the transmission cycle for SSI encoder.
Note: This parameter needs to be set only when an SSI encoder is used in continuous mode, i.e. SSI
encoder without incremental sin/cos signals (supported only as encoder 1). SSI encoder is selected
by setting parameter 91.02 ABS ENC INTERF to SSI.
0 = 50 µs
1 = 100 µs
2 = 200 µs
3 = 500 µs
4 = 1 ms
5 = 2 ms
91.27 SSI ZERO PHASE
Defines the phase angle within one sine/cosine signal period that corresponds to the value of zero on
the SSI serial link data. The parameter is used to adjust the synchronization of the SSI position data
and the position based on sine/cosine incremental signals. Incorrect synchronization may cause an
error of ±1 incremental period.
Note: This parameter needs to be set only when an SSI encoder with sine/cosine incremental signals
is used in initial position mode.
0 = 315–45 deg
1 = 45–135 deg
2 = 135–225 deg
3 = 225–315 deg
91.30 ENDAT MODE
Selects the EnDat encoder mode.
Note: This parameter needs to be set only when an EnDat encoder is used in continuous mode, i.e.
EnDat encoder without incremental sin/cos signals (supported only as encoder 1). EnDat encoder is
selected by setting parameter 91.02 ABS ENC INTERF to ENDAT.
0 = INITIAL POS: Single position data transfer (initial position)
1 = CONTINUOUS: Continuous position data transfer mode
Firmware functions, parameters and signals
173
91.31 ENDAT MAX CALC
Selects the maximum encoder calculation time for EnDat encoder.
Note: This parameter needs to be set only when an EnDat encoder is used in continuous mode, i.e.
EnDat encoder without incremental sin/cos signals (supported only as encoder 1). EnDat encoder is
selected by setting parameter 91.02 ABS ENC INTERF to ENDAT.
0 = 10 µs
1 = 100 µs
2 = 1 ms
3 = 50 ms
Firmware functions, parameters and signals
174
RESOLVER CONF
(40)
5(62/9(5&21)
7/)PVHF
>@
5(62/932/(3$,56
>9UPV@
(;&6,*1$/$03/
>N+]@
(;&6,*1$/)5(4
Description
With the RESOLVER CONF the user can configure the resolver connection.
The optional FEN-21 Resolver Interface module is compatible with resolvers, which
are excited by sinusoidal voltage (to the rotor winding), and which generate sine and
cosine signals proportional to the rotor angle (to stator windings).
For more information, see Resolver Interface Module FEN-21 User’s Manual
[3AFE68784859 (English)].
Inputs
Used when parameter 90.01/90.02 ENCODER 1/2 SEL setting is FEN-21 RES.
Note: Configuration data is written into the logic registers of the adapter once after
the power-up. If parameter values are changed, save values into the permanent
memory by parameter 16.07 PARAM SAVE. The new settings will take effect when
the drive is powered up again, or after re-configuration is forced by parameter 90.10
ENC PAR REFRESH.
Resolver autotuning is performed automatically whenever the resolver input is
activated after changes to parameters 92.02 EXC SIGNAL AMPL or 92.03 EXC
SIGNAL FREQ. Autotuning must be forced after any changes in the resolver cable
connection. This can be done by setting either parameter 92.02 EXC SIGNAL AMPL
or parameter 92.03 EXC SIGNAL FREQ to its already existing value, and then
setting parameter 90.10 ENC PAR REFRESH to 1.
If the resolver (or absolute encoder) is used for feedback from a permanent magnet
motor, an AUTOPHASING ID run (see parameter 99.13 IDRUN MODE) should be
performed after replacement or any parameter changes as well. The ID run detects
the difference between the actual pole axis angle and the 0° position indicated by the
resolver.
92.01 RESOLV POLEPAIRS
Selects the number of pole pairs.
Range: 1…32
92.02 EXC SIGNAL AMPL
Defines the amplitude of the excitation signal.
Range: 4…12 Vrms (in steps of 0.1 Vrms)
Firmware functions, parameters and signals
175
92.03 EXC SIGNAL FREQ
Defines the frequency of the excitation signal.
Range: 1…20 kHz (in steps of 1 kHz)
Firmware functions, parameters and signals
176
PULSE ENC CONF
(43)
38/6((1&&21)
7/)PVHF
>@
(1&38/6(15
>4XDGUDWXUH@
(1&7<3(
>DXWRULVLQJ@
(1&63&$/&02'(
>758(@
(1&326(67(1$
>)$/6(@
(1&63(67(1$
>+]@
(1&26&/,0
>@
(1&38/6(15
>4XDGUDWXUH@
(1&7<3(
>DXWRULVLQJ@
(1&63&$/&02'(
>758(@
(1&326(67(1$
>)$/6(@
(1&63(67(1$
>+]@
(1&26&/,0
Description
With the PULSE ENC CONF block the user can configure the TTL encoder
connection. TTL interface is offered by the optional FEN-01, FEN-11 and FEN-21
Interface modules.
FEN-01 TTL Encoder interface module has two TTL inputs: TTL+ and TTL. The
TTL+ input supports commutation signals. The FEN-01 is compatible with the
following TTL encoders:
• TTL incremental encoder with or without zero pulse, with or without commutation
signals
FEN-11 Absolute Encoder Interface module has one TTL input. FEN-11 is
compatible with the following TTL encoders:
• TTL incremental encoder with or without zero pulse
FEN-21 Resolver Interface module has one TTL input. FEN-21 is compatible with
the following TTL encoders:
• TTL incremental encoders with or without zero pulse
For more information, see TTL Encoder Interface Module FEN-01 User’s Manual
[3AFE68784603 (English)], Resolver Interface Module FEN-21 User’s Manual
[3AFE68784859 (English)] or Absolute Encoder Interface FEN-11 User’s Manual
[3AFE68784841 (English)].
Firmware functions, parameters and signals
177
Inputs
Parameters 93.01…93.06 are used when TTL encoder is used as encoder 1
(i.e. when parameter 90.01 ENCODER 1 SEL setting is FEN-01 TTL+, FEN-01 TTL,
FEN-11 TTL or FEN-21 TTL).
Parameters 93.11…93.16 are used when TTL encoder is used as encoder 2
(i.e. when parameter 90.02 ENCODER 2 SEL setting is FEN-01 TTL+, FEN-01 TTL,
FEN-11 TTL or FEN-21 TTL).
In normal operation, only parameter 93.01/93.11 needs to be set for TTL encoders.
Note: Configuration data is written into the logic registers of the adapter once after
the power-up. If parameter values are changed, save values into the permanent
memory by parameter 16.07 PARAM SAVE. The new settings will take effect when
the drive is powered up again, or after re-configuration is forced by parameter 90.10
ENC PAR REFRESH.
93.01 ENC1 PULSE NR
Defines the pulse number per revolution for encoder 1.
Range: 0…65535
93.02 ENC1 TYPE
Selects the type of the encoder 1.
0 = QUADRATURE: Quadrature encoder (has two TTL channels, channels A and B)
1 = SINGLE TRACK: Single track encoder (has one TTL channel, channel A)
93.03 ENC1 SP CALCMODE
Selects the speed calculation mode for encoder 1.
0 = A&B ALL: Channels A and B: Rising and falling edges are used for speed calculation. Channel B:
Defines the direction of rotation. (*
Note: When single track mode has been selected by parameter 93.02 ENC1 TYPE, setting 0 acts like
setting 1.
1 = A ALL: Channel A: Rising and falling edges are used for speed calculation. Channel B: Defines the
direction of rotation. (*
2 = A RISING: Channel A: Rising edges are used for speed calculation. Channel B: Defines the
direction of rotation. (*
3 = A FALLING: Channel A: Falling edges are used for speed calculation. Channel B: Defines the
direction of rotation. (*
4 = AUTO RISING or 5 = AUTO FALLING: Used mode (1, 2 or 3) is changed automatically depending
on the TTL pulse frequency according to the following table:
99.03 = 4 99.03 = 5
Used mode
0
0
1
1
2
3
Pulse frequency of the channel(s)
< 2442 Hz
2442…4884 Hz
> 4884 Hz
(*
Note: When single track mode has been selected by parameter 93.02 ENC1 TYPE, the speed is
always positive.
Firmware functions, parameters and signals
178
93.04 ENC1 POS EST ENA
Selects whether measured and estimated position is used with encoder 1.
0 = FALSE: Measured position (Resolution: 4 x pulses per revolution for quadrature encoders, 2 x
pulses per revolution for single track encoders.)
1 = TRUE: Estimated position (Uses position extrapolation. Extrapolated at the time of data request.)
93.05 ENC1 SP EST ENA
Selects whether calculated or estimated speed is used with encoder 1.
0 = FALSE: Last calculated speed (calculation interval is 62.5 µs…4 ms)
1 = TRUE: Estimated speed (estimated at the time of data request) Estimation increases the speed
ripple in steady state operation, but improves the dynamics.
93.06 ENC1 OSC LIM
Selects the maximum pulse frequency for the changing of the direction of rotation (used with
encoder 1). Pulses that occur at pulse frequencies above the selected value, are ignored.
0 = 4880 Hz
1 = 2440 Hz
2 = 1220 Hz
3 = DISABLED
93.11 ENC2 PULSE NR
Defines the pulse number per revolution for encoder 2.
Range: 0…65535
93.12 ENC2 TYPE
Selects the type of the encoder 2.
For selections, see parameter 93.02 ENC1 TYPE
93.13 ENC2 SP CALCMODE
Selects the speed calculation mode for encoder 2.
For selections, see parameter 93.03 ENC1 SP CALC MODE.
93.14 ENC2 POS EST ENA
Selects whether measured and estimated position is used with encoder 2.
For selections, see parameter 93.04 ENC1 POS EST ENA.
93.15 ENC2 SP EST ENA
Selects whether calculated or estimated speed is used with encoder 2.
For selections, see parameter 93.05 ENC1 SP EST ENA.
93.16 ENC2 OSC LIM
Selects the maximum pulse frequency for the changing of the direction of rotation (used with
encoder 2).
For selections, see parameter 93.06 ENC1 OSC LIM.
Firmware functions, parameters and signals
179
HW CONFIGURATION
Note: The HW CONFIGURATION parameters do not belong to any firmware block,
i.e. they can only be accessed via the optional control panel or the PC tool
Parameter Browser.
Description
The HW CONFIGURATION parameters include miscellaneous hardware-related
settings.
Parameters
95.01 CTRL UNIT SUPPLY
0 = INTERNAL 24V: The drive control unit is powered from the drive power unit it is mounted on
(default)
1 = EXTERNAL 24V: The drive control unit is powered from an external power supply.
95.02 EXTERNAL CHOKE
Defines if the drive is equipped with an AC choke or not.
0 = NO: The drive is not equipped with an AC choke.
1 = YES: The drive is equipped with an AC choke.
Firmware functions, parameters and signals
180
USER MOTOR PAR
Note: The USER MOTOR PAR parameters do not belong to any firmware block, i.e.
they can only be accessed via the optional control panel or the PC tool Parameter
Browser.
Description
With the USER MOTOR PAR parameters the user can change the motor model
values estimated during the ID run.
Most of the values can be input as either “per unit” or SI values.
Parameters
97.01 USE GIVEN PARAMS
Activates the motor model parameters 97.02…97.14.
Note: This parameter cannot be changed while the drive is running.
0 = NO: Inactive
1 = USE GIVEN: The values of parameters 97.02…97.14 or parameters are used in the motor
model.
Parameter value is automatically set to zero when ID run is selected by parameter 99.13 IDRUN
MODE. The values of parameters 97.02…97.14 values are updated according to the motor
characteristics identified during the ID run.
97.02 RS USER
Defines the stator resistance RS of the motor model.
Range: 0…0.5 p.u. (per unit).
97.03 RR USER
Defines the rotor resistance RR of the motor model.
Note: This parameter is valid only for asynchronous motors.
Range: 0…0.5 p.u. (per unit).
97.04 LM USER
Defines the main inductance LM of the motor model.
Note: This parameter is valid only for asynchronous motors.
Range: 0…10 p.u. (per unit).
97.05 SIGMAL USER
Defines the leakage inductance σLS.
Note: This parameter is valid only for asynchronous motors.
Range: 0…1 p.u. (per unit).
97.06 LD USER
Defines the direct axis (synchronous) inductance.
Note: This parameter is valid only for permanent magnet motors.
Range: 0…10 p.u. (per unit).
Firmware functions, parameters and signals
181
97.07 LQ USER
Defines the quadrature axis (synchronous) inductance.
Note: This parameter is valid only for permanent magnet motors.
Range: 0…10 p.u. (per unit).
97.08 PM FLUX USER
Defines the permanent magnet flux.
Note: This parameter is valid only for permanent magnet motors.
Range: 0…2 p.u. (per unit).
97.09 RS USER SI
Defines the stator resistance RS of the motor model.
Range: 0.00000…100.00000 ohm.
97.10 RR USER SI
Defines the rotor resistance RR of the motor model.
Note: This parameter is valid only for asynchronous motors.
Range: 0.00000…100.00000 ohm.
97.11 LM USER SI
Defines the main inductance LM of the motor model.
Note: This parameter is valid only for asynchronous motors.
Range: 0.00…100000.00 mH.
97.12 SIGL USER SI
Defines the leakage inductance
σLS.
Note: This parameter is valid only for asynchronous motors.
Range: 0.00…100000.00 mH.
97.13 LD USER SI
Defines the direct axis (synchronous) inductance.
Note: This parameter is valid only for permanent magnet motors.
Range: 0.00…100000.00 mH.
97.14 LQ USER SI
Defines the quadrature axis (synchronous) inductance.
Note: This parameter is valid only for permanent magnet motors.
Range: 0.00…100000.00 mH.
Firmware functions, parameters and signals
182
MOTOR CALC VALUES
Note: The MOTOR CALC VALUES do not belong to any firmware block, i.e. they
can only be accessed via the optional control panel or the PC tool Parameter
Browser.
Description
The MOTOR CALC VALUES shows calculated motor values.
Parameters
98.01 TORQ NOM SCALE
Nominal torque in Nm which corresponds to 100%.
Note: This parameter is copied from parameter 99.12 if given. Otherwise the value is calculated.
Range: 0…2147483 Nm
98.02 POLEPAIRS
Calculated number of motor pole pairs.
Note: This parameter cannot be set by the user.
Range: 0…1000
Firmware functions, parameters and signals
183
Parameter and signal data
What this chapter contains
This chapter lists the actual signals and parameters with some additional data. For
the signal and parameter descriptions, see chapter Firmware functions, parameters
and signals.
Terms
Term
Definition
Actual signal
Signal measured or calculated by the drive. Can be monitored by the user.
No user setting is possible.
Def
Default value
enum
Enumerated list, i.e. selection list
FbEq
Fieldbus equivalent: The scaling between the value shown on the panel
and the integer used in serial communication.
Page no.
Page number for more information
INT32
32-bit integer value (31 bits + sign)
Bit pointer
Bit pointer. A bit pointer points to the bit value of another signal.
Val pointer
Value pointer. A value pointer points to the value of another parameter/
signal.
Parameter
A user-adjustable operation instruction of the drive
Pb
Packed boolean
PT
Parameter protection type. See WP and WPD.
REAL
16-bit value 16-bit value (31 bits + sign)
= integer value
REAL24
= fractional value
8-bit value 24-bit value (31 bits + sign)
= integer value = fractional value
Type
Data type. See enum, INT32, Bit pointer, Val pointer, Pb, REAL, REAL24,
UINT32.
UINT32
32-bit unsigned integer value
WP
Write protected parameter (i.e. read only)
WPD
Write protected parameter while drive is running
Parameter and signal data
184
Fieldbus equivalent
Serial communication data between fieldbus adapter and drive is transferred in
integer format. Thus the drive actual and reference signal values must be scaled to
16/32-bit integer values. Fieldbus equivalent defines the scaling between the signal
value and the integer used in serial communication.
All the read and sent values are limited to 16/32 bits.
Example: If 32.04 MAXIMUM TORQ REF is set from external control system,
an integer value of 10 corresponds to 1%.
Fieldbus addresses
For FPBA-01 Profibus Adapter, FDNA-01 DeviceNet Adapter and FCAN-01
CANopen Adapter, see the User’s Manual of the fieldbus adapter module.
Pointer parameter format in fieldbus communication
Value and bit pointer parameters are transferred between the fieldbus adapter and
drive as 32-bit integer values.
32-bit integer value pointers
When value pointer parameter is connected to the value of another parameter or
signal, the format is as follows:
Bit
30…31
16…29
8…15
0…7
Group
Index
Name
Source type
Value
1
-
1…255
1…255
Value pointer is
connected to
parameter/signal.
-
Group of source
parameter
Index of source
parameter
Description
When value pointer parameter is connected to a solution program, the format is as
follows:
Bit
30…31
24…29
0…23
Name
Source type
Not in use
Address
Value
2
-
0…223
Value pointer is
connected to solution
program.
-
Relative address of
solution program variable
Description
Note: Value pointer parameters, which are connected to a solution program, cannot
be set via fieldbus (i.e. read access only).
Parameter and signal data
185
32-bit integer bit pointers
When bit pointer parameter is connected to value 0 or 1, the format is as follows:
Bit
30…31
16…29
0
Name
Source type
Not in use
Value
Value
0
-
0…1
Bit pointer is connected
to 0/1.
-
0 = False, 1 = True
Description
When bit pointer is connected to a bit value of another signal, the format is as
follows:
Bit
30…31
24…29
16…23
8…15
0…7
Name
Source type
Not in use
Bit sel
Group
Index
Value
1
-
0…31
2…255
1…255
Bit pointer is
connected to
signal bit
value.
-
Bit selection
Group of
source
parameter
Index of
source
parameter
Description
When bit pointer parameter is connected to a solution program, the format is as
follows:
Bit
30…31
24…29
0…23
Name
Source type
Bit sel
Address
Value
2
0…31
0…223
Bit pointer is connected
to solution program.
Bit selection
Relative address of
solution program variable
Description
Note: Bit pointer parameters which are connected to a solution program, cannot be
set via fieldbus (i.e. read access only).
Parameter and signal data
186
Actual signals
Index
01
Name
Type
Range
Unit
FbEq
Update
time
Page
no.
Data
length
PT
ACTUAL VALUES
1.01
SPEED ACT
REAL
-30000…30000
rpm
1 = 100
250 µs
90
32
WP
1.02
SPEED ACT PERC
REAL
-1000…1000
%
1 = 100
2 ms
41
32
WP
1.03
FREQUENCY
REAL
-30000…30000
Hz
1 = 100
2 ms
41
32
WP
1.04
CURRENT
REAL
0…30000
A
1 = 100
10 ms
41
32
WP
1.05
CURRENT PERC
REAL
0…1000
%
1 = 10
2 ms
41
16
WP
1.06
TORQUE
REAL
-1600…1600
%
1 = 10
2 ms
41
16
WP
1.07
DC-VOLTAGE
REAL
-
V
1 = 100
2 ms
41
32
WP
1.08
ENCODER 1 SPEED
REAL
-
rpm
1 = 100
250 µs
167
32
WP
REAL24
-
rev
1=100000000
250 µs
167
32
WP
REAL
-
rpm
1 = 100
250 µs
167
32
WP
1.09
ENCODER 1 POS
1.10
ENCODER 2 SPEED
1.11
ENCODER 2 POS
1.14
SPEED ESTIMATED
REAL24
-
rev
1=100000000
250 µs
168
32
WP
REAL
-30000…30000
rpm
1 = 100
2 ms
41
32
WP
1.15
TEMP INVERTER
REAL24
-40…160
°C
1 = 100
2 ms
41
16
WP
1.16
TEMP BC
REAL24
-40…160
°C
1=1
2 ms
42
16
WP
1.17
MOTOR TEMP
REAL
-10…250
°C
1 = 10
10 ms
131
16
WP
1.18
MOTOR TEMP EST
INT32
-60…1000
°C
1=1
-
131
16
WP
1.19
USED SUPPLY VOLT
REAL
0…1000
V
1 = 10
10 ms
139
16
WP
1.20
BRAKE RES LOAD
REAL24
0…1000
%
1 = 100
50 ms
42
16
WP
1.21
CPU USAGE
UINT32
0…100
%
1=1
-
42
16
WP
02
I/O
2.01
DI STATUS
Pb
0…0x3F
-
1=1
250 µs
49
16
WP
2.02
RO STATUS
Pb
-
-
1=1
250 µs
54
16
WP
2.03
DIO STATUS
Pb
-
-
1=1
250 µs
50, 51,
53
16
WP
2.04
AI1
REAL
-
V or mA
1 = 1000
2 ms
57
16
WP
2.05
AI1 SCALED
REAL
-
-
1 = 1000
250 µs
57
32
WP
2.06
AI2
REAL
-
V or mA
1 = 1000
2 ms
59
16
WP
2.07
AI2 SCALED
REAL
-
-
1 = 1000
250 µs
59
32
WP
2.08
AO1
REAL
-
mA
1 = 1000
2 ms
61
16
WP
2.09
AO2
REAL
-
V
1 = 1000
2 ms
63
16
WP
2.10
DIO2 FREQ IN
REAL
0…32767
Hz
1 = 1000
250 µs
51
32
WP
2.11
DIO3 FREQ OUT
REAL
0…32767
Hz
1 = 1000
250 µs
53
32
WP
2.12
FBA MAIN CW
Pb
-231…232 - 1
-
1=1
500 µs
151
32
WP
2.13
FBA MAIN SW
Pb
-231…232 - 1
-
1=1
-
154
32
WP
31…231
2.14
FBA MAIN REF1
INT32
-2
-1
-
1=1
500 µs
155
32
WP
2.15
FBA MAIN REF2
INT32
-231…231 - 1
-
1=1
500 µs
155
32
WP
2.16
FEN DI STATUS
Pb
0…0x33
-
1=1
500 µs
168
16
WP
2.17
D2D MAIN CW
Pb
0…0xFFFF
-
1=1
500 µs
162
16
WP
2.18
D2D FOLLOWER CW
2.19
D2D REF1
2.20
D2D REF2
Parameter and signal data
Pb
0…0xFFFF
-
1=1
2 ms
69
16
WP
REAL
-231…231 - 1
-
1=1
500 µs
162
32
WP
-
1=1
500 µs
163
32
WP
REAL
-2
31…231
-1
187
Index
03
Name
Type
Range
Unit
FbEq
Update
time
Page
no.
Data
length
PT
CONTROL VALUES
3.01
SPEED REF1
REAL
-30000…30000
rpm
1 = 100
250 µs
92
32
WP
3.02
SPEED REF2
REAL
-30000…30000
rpm
1 = 100
250 µs
92
32
WP
3.03
SPEEDREF RAMP IN
REAL
-30000…30000
rpm
1 = 100
250 µs
96
32
WP
3.04
SPEEDREF RAMPED
REAL
-30000…30000
rpm
1 = 100
250 µs
100
32
WP
3.05
SPEEDREF USED
REAL
-30000…30000
rpm
1 = 100
250 µs
103
32
WP
3.06
SPEED ERROR FILT
REAL
-30000…30000
rpm
1 = 100
250 µs
103
32
WP
3.07
ACC COMP TORQ
REAL
-1600…1600
%
1 = 10
250 µs
103
16
WP
3.08
TORQ REF SP CTRL
REAL
-1600…1600
%
1 = 10
250 µs
108
16
WP
3.09
TORQ REF1
REAL
-1000…1000
%
1 = 10
250 µs
110
16
WP
3.10
TORQ REF RAMPED
REAL
-1000…1000
%
1 = 10
250 µs
112
16
WP
3.11
TORQ REF RUSHLIM
REAL
-1000…1000
%
1 = 10
250 µs
112
16
WP
3.12
TORQUE REF ADD
REAL
-1000…1000
%
1 = 10
250 µs
110
16
WP
3.13
TORQ REF TO TC
REAL
-1600…1600
%
1 = 10
250 µs
117
16
WP
3.14
BRAKE TORQ MEM
REAL
-1000…1000
%
1 = 10
2 ms
123
16
WP
3.15
BRAKE COMMAND
3.16
FLUX REF USED
enum
0…1
-
1=1
2 ms
123
16
WP
REAL24
0…200
%
1=1
2 ms
125
16
WP
2 ms
70
16
WP
06
DRIVE STATUS
6.01
STATUS WORD 1
Pb
0…65535
-
1=1
6.02
STATUS WORD 2
Pb
0…65535
-
1=1
2 ms
71
16
WP
6.03
SPEED CTRL STAT
Pb
0…31
-
1=1
250 µs
72
16
WP
6.05
LIMIT WORD 1
Pb
0…255
-
1=1
250 µs
72
16
WP
6.07
TORQ LIM STATUS
Pb
0…65535
-
1=1
250 µs
73
16
WP
6.12
OP MODE ACK
enum
0…11
-
1=1
2 ms
117
16
WP
08
ALARMS & FAULTS
8.01
ACTIVE FAULT
enum
0…65535
-
1=1
-
134
16
WP
8.02
LAST FAULT
enum
0…65535
-
1=1
-
134
16
WP
31…231
8.03
FAULT TIME HI
INT32
-2
-1
days
1=1
-
134
32
WP
8.04
FAULT TIME LO
INT32
-231…231 - 1
time
1=1
-
134
32
WP
8.05
ALARM WORD 1
UINT32
-
-
1=1
2 ms
134
16
WP
8.06
ALARM WORD 2
UINT32
-
-
1=1
2 ms
135
16
WP
8.07
ALARM WORD 3
UINT32
-
-
1=1
2 ms
135
16
WP
09
SYSTEM INFO
9.01
DRIVE TYPE
INT32
0…65535
-
1=1
-
43
16
WP
9.02
DRIVE RATING ID
INT32
0…65535
-
1=1
-
43
16
WP
9.03
FIRMWARE ID
Pb
-
-
1=1
-
43
16
WP
9.04
FIRMWARE VER
Pb
-
-
1=1
-
43
16
WP
9.20
OPTION SLOT 1
INT32
0…18
-
1=1
-
43
16
WP
9.21
OPTION SLOT 2
INT32
0…18
-
1=1
-
43
16
WP
9.22
OPTION SLOT 3
INT32
0…18
-
1=1
-
43
16
WP
Parameter and signal data
188
Parameters
Index
10
Parameter
Type
Range
enum
0…4
Unit
FbEq
-
-
Update
time
Page
no.
Data
len.
Def
PT
1
WPD
START/STOP
10.01 EXT1 START FUNC
10.02 EXT1 START IN1
Bit pointer
10.03 EXT1 START IN2
Bit pointer
10.04 EXT2 START FUNC
enum
0…4
-
-
2 ms
66
16
2 ms
66
32
P.02.01.00 WPD
2 ms
66
32
C.False
WPD
2 ms
67
16
1
WPD
10.05 EXT2 START IN1
Bit pointer
-
2 ms
67
32
10.06 EXT2 START IN2
Bit pointer
-
2 ms
67
32
10.07 JOG1 START
Bit pointer
-
2 ms
67
10.08 FAULT RESET SEL
Bit pointer
-
2 ms
67
P.02.01.00 WPD
C.False
WPD
32
C.False
WPD
32
P.02.01.02
10.09 RUN ENABLE
Bit pointer
-
2 ms
68
32
C.True
WPD
10.10 EM STOP OFF3
Bit pointer
-
2 ms
68
32
C.True
WPD
10.11 EM STOP OFF1
Bit pointer
WPD
10.12 START INHIBIT
enum
0…1
-
1=1
2 ms
68
32
C.True
2 ms
68
16
0
10.13 FB CW USED
Val pointer
-
2 ms
68
32
P.02.12
WPD
10.14 JOG2 START
Bit pointer
-
2 ms
68
32
C.False
WPD
10.15 JOG ENABLE
Bit pointer
-
2 ms
69
32
C.False
WPD
11
START/STOP MODE
11.01 START MODE
11.02 DC MAGN TIME
enum
0…2
-
1=1
-
78
16
1
WPD
UINT32
0…10000
ms
1=1
-
78
16
500
WPD
11.03 STOP MODE
enum
1…2
-
1=1
2 ms
79
16
2
11.04 DC HOLD SPEED
REAL
0…1000
rpm
1 = 10
2 ms
79
16
5
UINT32
0…100
%
1=1
2 ms
79
16
30
11.06 DC HOLD
11.05 DC HOLD CUR REF
enum
0…1
-
1=1
2 ms
79
16
0
11.07 AUTOPHASING
MODE
enum
0…2
-
1=1
-
79
16
1
enum
0…1
-
1=1
10 ms
50
16
0
12
DIGITAL IO
12.01 DIO1 CONF
12.02 DIO2 CONF
enum
0…2
-
1=1
10 ms
51
16
0
12.03 DIO3 CONF
enum
0…3
-
1=1
10 ms
52
16
0
12.04 DIO1 OUT PTR
Bit pointer
-
10 ms
50
32
P.06.02.02
12.05 DIO2 OUT PTR
Bit pointer
-
10 ms
51
32
P.06.02.03
12.06 DIO3 OUT PTR
Bit pointer
-
10 ms
52
32
P.06.01.10
12.07 DIO3 F OUT PTR
Val pointer
-
10 ms
52
32
P.01.01
12.08 DIO3 F MAX
REAL
3…32768
Hz
1=1
10 ms
52
16
1000
12.09 DIO3 F MIN
REAL
3…32768
Hz
1=1
10 ms
52
16
3
12.10 DIO3 F MAX SCALE
REAL
0…32768
-
1=1
10 ms
53
16
1500
12.11 DIO3 F MIN SCALE
REAL
0…32768
-
1=1
10 ms
53
16
0
10 ms
54
32
P.03.15.00
UINT32
0…63
-
1=1
10 ms
49
16
0
13.01 AI1 FILT TIME
REAL
0…30
s
1 = 1000
10 ms
55
16
0
13.02 AI1 MAX
REAL
-11…11/
-22…22
V or
mA
1 = 1000
10 ms
55
16
10
12.12 RO1 OUT PTR
12.13 DI INVERT MASK
13
Bit pointer
-
ANALOGUE INPUTS
Parameter and signal data
189
Index
Parameter
Type
Range
Unit
FbEq
Update
time
Page
no.
Data
len.
Def
13.03 AI1 MIN
REAL
-11…11/
-22…22
V or
mA
1 = 1000
10 ms
56
16
-10
13.04 AI1 MAX SCALE
REAL
-32768…
32767
-
1 = 1000
10 ms
56
32
1500
13.05 AI1 MIN SCALE
REAL
-32768…
32767
-
1 = 1000
10 ms
56
32
-1500
13.06 AI2 FILT TIME
REAL
0…30
s
1 = 1000
10 ms
58
16
0
13.07 AI2 MAX
REAL
-11…11/
-22…22
V or
mA
1 = 1000
10 ms
58
16
10
13.08 AI2 MIN
REAL
-11…11/
-22…22
V or
mA
1 = 1000
10 ms
58
16
-10
13.09 AI2 MAX SCALE
REAL
-32768…
32767
-
1 = 1000
10 ms
59
32
100
13.10 AI2 MIN SCALE
REAL
-32768…
32767
-
1 = 1000
10 ms
59
32
-100
13.11
enum
0…4
-
1=1
10 ms
56
16
0
AITUNE
13.12 AI SUPERVISION
enum
0…3
-
1=1
2 ms
57
16
0
13.13 AI SUPERVIS ACT
UINT32
0000…
1111
-
1=1
2 ms
57
32
0
15
ANALOGUE
OUTPUTS
15.01 AO1 PTR
-
60
32
P.01.05
15.02 AO1 FILT TIME
REAL
0…30
s
1 = 1000
10 ms
60
16
0.1
15.03 AO1 MAX
REAL
0…22.7
mA
1 = 1000
10 ms
61
16
20
15.04 AO1 MIN
REAL
0…22.7
mA
1 = 1000
10 ms
61
16
4
15.05 AO1 MAX SCALE
REAL
-32768…
32767
-
1 = 1000
10 ms
61
32
100
15.06 AO1 MIN SCALE
REAL
-32768…
32767
-
1 = 1000
10 ms
61
32
0
-
62
32
P.01.02
15.07 AO2 PTR
Val pointer
-
Val pointer
-
15.08 AO2 FILT TIME
REAL
0…30
s
1 = 1000
10 ms
62
16
0.1
15.09 AO2 MAX
REAL
-10…10
V
1 = 1000
10 ms
62
16
10
15.10 AO2 MIN
REAL
-10…10
V
1 = 1000
10 ms
62
16
-10
15.11
REAL
-32768…
32767
-
1 = 1000
10 ms
63
32
100
REAL
-32768…
32767
-
1 = 1000
10 ms
63
32
-100
2 ms
80
32
C.False
AO2 MAX SCALE
15.12 AO2 MIN SCALE
16
PT
SYSTEM
16.01 LOCAL LOCK
Bit pointer
-
16.02 PARAMETER LOCK
enum
0…2
-
1=1
2 ms
80
16
1
16.03 PASS CODE
INT32
0…231 -1
-
1=1
-
80
32
0
16.04 PARAM RESTORE
enum
0…2
-
1=1
-
80
16
0
16.07 PARAM SAVE
enum
0…1
-
1=1
-
81
16
0
16.09 USER SET SEL
enum
1…10
-
1=1
-
81
32
1
WPD
16.10 USER SET LOG
Pb
0…0x7FF
-
1=1
-
81
32
0
WP
16.11
USER IO SET LO
16.12 USER IO SET HI
Bit pointer
-
-
81
32
C.False
Bit pointer
-
-
81
32
C.False
WPD
Parameter and signal data
190
Index
Type
Range
Unit
FbEq
17.01 SIGNAL1 PARAM
INT32
00.00…
255.255
-
17.02 SIGNAL2 PARAM
INT32
00.00…
255.255
17.03 SIGNAL3 PARAM
INT32
17
20
Parameter
Update
time
Page
no.
Data
len.
Def
1=1
82
16
01.03
-
1=1
82
16
01.04
00.00…
255.255
-
1=1
82
16
01.06
PANEL DISPLAY
LIMITS
20.01 MAXIMUM SPEED
REAL
0…30000
rpm
1=1
2 ms
83
32
1500
20.02 MINIMUM SPEED
REAL
-30000…0
rpm
1=1
2 ms
83
32
-1500
20.03 POS SPEED ENA
Bit pointer
-
2 ms
84
32
C.True
20.04 NEG SPEED ENA
Bit pointer
-
2 ms
84
32
C.True
20.05 MAXIMUM CURRENT
REAL
0…30000
A
1 = 100
10 ms
84
32
-
20.06 MAXIMUM TORQUE
REAL
0…1600
%
1 = 10
2 ms
84
16
300
20.07 MINIMUM TORQUE
REAL
-1600…0
%
1 = 10
2 ms
84
16
-300
20.08 THERM CURR LIM
enum
0…1
-
1=1
-
85
16
1
enum
0…2
-
1=1
10 ms
88
16
0
22
SPEED FEEDBACK
22.01 SPEED FB SEL
22.02 SPEED ACT FTIME
REAL
0…10000
ms
1 = 1000
10 ms
88
32
3
22.03 MOTOR GEAR MUL
INT32
-231…231 -1
-
1=1
10 ms
88
32
1
31
UINT32
REAL
0…30000
22.06 ZERO SPEED DELAY
1…2
-1
22.04 MOTOR GEAR DIV
22.05 ZERO SPEED LIMIT
-
1=1
10 ms
88
32
1
rpm
1 = 1000
2 ms
88
32
30
UINT32
0…30000
ms
1=1
2 ms
89
16
0
22.07 ABOVE SPEED LIM
REAL
0…30000
rpm
1=1
2 ms
89
16
0
22.08 SPEED TRIPMARGIN
REAL
0…10000
rpm
1 = 10
2 ms
89
32
500
24
SPEED REF MOD
24.01 SPEED REF1 SEL
enum
0…8
-
1=1
10 ms
92
16
1
24.02 SPEED REF2 SEL
enum
0…8
-
1=1
10 ms
92
16
0
24.03 SPEED REF1 IN
Val pointer
-
10 ms
94
32
P.03.01
24.04 SPEED REF2 IN
Val pointer
-
10 ms
94
32
P.03.02
24.05 SPEED REF 1/2SEL
Bit pointer
24.06 SPEED SHARE
REAL
24.07 SPEEDREF NEG
ENA
-8…8
Bit pointer
24.08 CONST SPEED
REAL
24.09 CONST SPEED ENA
-
1 = 1000
-30000….
30000
Bit pointer
rpm
1=1
-
2 ms
94
32
C.False
2 ms
95
16
1
2 ms
95
32
C.False
2 ms
95
16
0
2 ms
95
32
C.False
24.10 SPEED REF JOG1
REAL
-30000….
30000
rpm
1=1
2 ms
95
16
0
24.11 SPEED REF JOG2
REAL
-30000….
30000
rpm
1=1
2 ms
95
16
0
24.12 SPEED REFMIN ABS
REAL
0…30000
rpm
1=1
2 ms
95
16
0
10 ms
98
32
P.03.03
25
PT
SPEED REF RAMP
25.01 SPEED RAMP IN
Val pointer
-
25.02 SPEED SCALING
REAL
0…30000
rpm
1=1
10 ms
98
16
1500
25.03 ACC TIME
REAL
0…1800
s
1 = 1000
10 ms
98
32
1
Parameter and signal data
WP
191
Index
Parameter
Type
Range
Unit
FbEq
Update
time
Page
no.
Data
len.
Def
25.04 DEC TIME
REAL
0…1800
s
1 = 1000
10 ms
99
32
1
25.05 SHAPE TIME ACC1
REAL
0…1000
s
1 = 1000
10 ms
99
32
0
25.06 SHAPE TIME ACC2
REAL
0…1000
s
1 = 1000
10 ms
99
32
0
25.07 SHAPE TIME DEC1
REAL
0…1000
s
1 = 1000
10 ms
99
32
0
25.08 SHAPE TIME DEC2
REAL
0…1000
s
1 = 1000
10 ms
99
32
0
25.09 ACC TIME JOGGING
REAL
0…1800
s
1 = 1000
10 ms
100
32
0
25.10 DEC TIME JOGGING
REAL
0…1800
s
1 = 1000
10 ms
100
32
0
25.11
REAL
0…1800
s
1 = 1000
10 ms
100
32
1
REAL
-30000…
30000
rpm
1 = 1000
2 ms
100
32
0
-
2 ms
100
32
C.False
EM STOP TIME
25.12 SPEEDREF BAL
25.13 SPEEDREF BAL ENA Bit pointer
26
PT
SPEED ERROR
26.01 SPEED ACT NCTRL
Val pointer
-
2 ms
102
32
P.01.01
WP
26.02 SPEED REF NCTRL
Val pointer
-
2 ms
102
32
P.03.04
WP
26.03 SPEED REF PCTRL
Val pointer
-
2 ms
102
32
P.04.01
2 ms
102
32
P.04.20
2 ms
102
32
0
26.04 SPEED FEED PCTRL Val pointer
26.05 SPEED STEP
REAL
26.06 SPD ERR FTIME
REAL
26.07 SPEED WINDOW
REAL
26.08 ACC COMP
DERTIME
REAL
26.09 ACC COMP FTIME
REAL
28
-30000…
30000
rpm
1 = 100
0…1000
ms
1 = 10
2 ms
102
16
0
0…30000
rpm
1=1
250 µs
103
16
100
0…600
s
1 = 100
2 ms
103
32
0
0…1000
ms
1 = 10
2 ms
103
16
8
SPEED CONTROL
28.01 SPEED ERR NCTRL
Val pointer
-
2 ms
105
32
P.03.06
1 = 100
2 ms
105
16
10
s
1 = 100
2 ms
106
32
0.5
s
1 = 1000
2 ms
106
16
0
ms
1 = 10
28.02 PROPORT GAIN
REAL
0…200
-
28.03 INTEGRATION TIME
REAL
0…600
28.04 DERIVATION TIME
REAL
0…10
28.05 DERIV FILT TIME
REAL
0…1000
28.06 ACC
COMPENSATION
Val pointer
28.07 DROOPING RATE
REAL
0…100
%
28.08 BAL REFERENCE
REAL
-1600…
1600
%
2 ms
107
16
8
2 ms
107
32
P.03.07
1 = 100
2 ms
107
16
0
1 = 10
2 ms
107
16
0
2 ms
107
32
C.False
-
28.09 SPEEDCTRL BAL EN Bit pointer
-
28.10 MIN TORQ SP CTRL
REAL
-1600…
1600
%
1 = 10
2 ms
108
16
-300
28.11
MAX TORQ SP CTRL
REAL
-1600…
1600
%
1 = 10
2 ms
108
16
300
32
TORQUE
REFERENCE
32.01 TORQ REF1 SEL
enum
0…4
-
1=1
10 ms
109
16
2
32.02 TORQ REF ADD SEL
enum
0…4
-
1=1
10 ms
110
16
0
250 µs
112
32
P.03.09
0…1000
%
1 = 10
250 µs
112
16
300
32.03 TORQ REF IN
32.04 MAXIMUM TORQ
REF
Val pointer
REAL
-
WP
WP
Parameter and signal data
192
Index
Parameter
32.05 MINIMUM TORQ REF
32.06 LOAD SHARE
Type
Range
Unit
FbEq
Update
time
Page
no.
Data
len.
Def
REAL
-1000…0
%
1 = 10
250 µs
112
16
-300
REAL
-8…8
-
1 = 1000
250 µs
112
16
1
32.07 TORQ RAMP UP
UINT32
0…60
s
1 = 1000
10 ms
112
32
0
32.08 TORQ RAMP DOWN
UINT32
0…60
s
1 = 1000
10 ms
112
32
0
34
PT
REFERENCE CTRL
34.01 EXT1/EXT2 SEL
Bit pointer
-
2 ms
115
32
P.02.01.01
34.02 EXT1 MODE 1/2SEL
Bit pointer
-
2 ms
115
32
C.False
(P.02.01.05
for pos.
appl.)
34.03 EXT1 CTRL MODE1
enum
1…5 (1…9
for pos.
appl.)
-
1=1
2 ms
116
16
1
34.04 EXT1 CTRL MODE2
enum
1…5 (1…9
for pos.
appl.)
-
1=1
2 ms
116
16
2 (8 for
pos. appl.)
34.05 EXT2 CTRL MODE1
enum
1…5 (1…9
for pos.
appl.)
-
1=1
2 ms
116
16
2 (6 for
pos. appl.)
34.07 LOCAL CTRL MODE
enum
1…2 (1…6
for pos.
appl.)
-
1=1
2 ms
117
16
1
WPD
34.08 TREF SPEED SRC
Val pointer
-
250 µs
117
32
P.03.08
WP
34.09 TREF TORQ SRC
Val pointer
-
250 µs
117
32
P.03.11
WP
34.10 TORQ REF ADD SRC Val pointer
-
250 µs
117
32
P.03.12
WP
35
MECH BRAKE CTRL
35.01 BRAKE CONTROL
enum
35.02 BRAKE ACKNOWL
Bit pointer
0…2
-
1=1
-
2 ms
121
16
0
WPD
2 ms
122
32
C.False
WPD
35.03 BRAKE OPEN DELAY
UINT32
0…5
s
1 = 100
2 ms
122
16
0
35.04 BRAKE CLOSE DLY
UINT32
0…60
s
1 = 100
2 ms
122
16
0
35.05 BRAKE CLOSE SPD
REAL
0…1000
rpm
1 = 10
2 ms
122
16
100
35.06 BRAKE OPEN TORQ
REAL
0…1000
%
1 = 10
2 ms
122
16
0
35.07 BRAKE CLOSE REQ
Bit pointer
-
2 ms
122
32
C.False
WPD
35.08 BRAKE OPEN HOLD
Bit pointer
-
2 ms
123
32
C.False
WPD
35.09 BRAKE FAULT FUNC
enum
0…2
1=1
2 ms
123
16
0
40
-
MOTOR CONTROL
40.01 FLUX REF
REAL
0…200
%
1=1
10 ms
124
16
100
40.02 SF REF
enum
0…16
kHz
1=1
-
124
16
4
0…200
40.03 SLIP GAIN
REAL
40.04 VOLTAGE RESERVE
REAL
40.05 FLUX OPTIMIZATION
enum
40.06 FORCE OPEN LOOP
enum
enum
45
%
1=1
-
125
100
V/%
1=1
-
125
-
0…1
-
1=1
-
125
0…1
-
1=1
250 µs
125
16
0
0…2
-
1=1
10 ms
128
16
0
-
MOT THERM PROT
45.01 MOT TEMP PROT
45.02 MOT TEMP SOURCE
enum
0…6
-
1=1
10 ms
129
16
0
45.03 MOT TEMP ALM LIM
INT32
0…200
°C
1=1
-
129
16
90
Parameter and signal data
193
Index
Parameter
Type
Range
Unit
FbEq
Update
time
Page
no.
Data
len.
Def
45.04 MOT TEMP FLT LIM
INT32
0…200
°C
1=1
-
129
16
110
45.05 AMBIENT TEMP
INT32
-60…100
°C
1=1
-
130
16
20
45.06 MOT LOAD CURVE
INT32
50…150
%
1=1
-
130
16
100
45.07 ZERO SPEED LOAD
INT32
50…150
%
1=1
-
130
16
100
45.08 BREAK POINT
INT32
0.01…500
Hz
1 = 100
-
130
16
45
45.09 MOTNOMTEMPRISE
INT32
0…300
°C
1=1
-
131
16
80
45.10 MOT THERM TIME
INT32
100…10000
s
1=1
-
131
16
256
2 ms
132
32
C.True
2 ms
132
16
0
46
FAULT FUNCTIONS
46.01 EXTERNAL FAULT
Bit pointer
46.02 SPEED REF SAFE
REAL
-30000…
30000
rpm
1=1
46.03 LOCAL CTRL LOSS
enum
0…3
-
1=1
-
133
16
1
46.04 MOT PHASE LOSS
enum
0…1
-
1=1
2 ms
133
16
1
46.05 EARTH FAULT
enum
0…2
-
1=1
-
133
16
2
46.06 SUPPL PHS LOSS
enum
0…1
-
1=1
2 ms
133
16
1
-
46.07 STO DIAGNOSTIC
enum
1…3
-
1=1
10 ms
133
16
1
46.08 CROSS
CONNECTION
enum
0…1
-
1=1
-
134
16
1
47.01 OVERVOLTAGE
CTRL
enum
0…1
-
1=1
10 ms
138
16
1
47.02 UNDERVOLT CTRL
enum
0…1
-
1=1
10 ms
138
16
1
47
VOLTAGE CTRL
47.03 SUPPLVOLTAUTO-ID
enum
0…1
-
1=1
10 ms
138
16
1
47.04 SUPPLY VOLTAGE
REAL
0…1000
V
1 = 10
2 ms
138
16
400
enum
0…1
-
1=1
-
140
16
0
48
BRAKE CHOPPER
48.01 BC ENABLE
48.02 BC RUN-TIME ENA
2 ms
140
32
C.True
48.03 BRTHERMTIMECON
ST
REAL24
0…10000
s
100 = 1
-
140
32
0
48.04 BR POWER MAX
CNT
REAL24
0…10000
kW
1 = 1000
-
140
32
0
48.05 R BR
REAL24
0.1…1000
ohm
1 = 1000
-
140
32
-
48.06 BR TEMP FAULTLIM
REAL24
0…150
%
1=1
-
141
16
105
48.07 BR TEMP ALARMLIM
REAL24
0…150
%
1=1
-
141
16
95
50
PT
Bit pointer
-
FIELDBUS
50.01 FBA ENABLE
enum
0…1
-
1=1
-
149
16
0
50.02 COMM LOSS FUNC
enum
0…3
-
1=1
-
149
16
0
50.03 COMM LOSS T OUT
UINT32
0.3…6553.5
s
1 = 10
-
149
16
0.3
50.04 FBA REF1 MODESEL
enum
0…2 (0…4
for pos.
appl.)
-
1=1
10 ms
149
16
2
50.05 FBA REF2 MODESEL
enum
0…2 (0…4
for pos.
appl.)
-
1=1
10 ms
150
16
3
50.06 FBA ACT1 TR SRC
Val pointer
-
10 ms
150
32
P.01.01
50.07 FBA ACT2 TR SRC
Val pointer
-
10 ms
150
32
P.01.06
Parameter and signal data
194
Index
Parameter
Type
50.08 FBA SW B12 SRC
Range
Bit pointer
Unit
FbEq
-
Update
time
Page
no.
Data
len.
Def
500 µs
150
32
C.False
50.09 FBA SW B13 SRC
Bit pointer
-
500 µs
150
32
C.False
50.10 FBA SW B14 SRC
Bit pointer
-
500 µs
150
32
C.False
50.11 FBA SW B15 SRC
Bit pointer
-
500 µs
150
32
C.False
51
FBA SETTINGS
51.01 FBA TYPE
UINT32
0…65536
-
1=1
156
16
0
51.02 FBA PAR2
UINT32
0…65536
-
1=1
156
16
0
….
…
16
0
…
PT
…
…
…
…
51.26 FBA PAR26
…
UINT32
0…65536
-
1=1
51.27 FBA PAR REFRESH
UINT32
0…1
-
1=1
157
16
0
51.28 PAR TABLE VER
UINT32
0…65536
-
1=1
157
16
0
156
51.29 DRIVE TYPE CODE
UINT32
0…65536
-
1=1
157
16
0
51.30 MAPPING FILE VER
UINT32
0…65536
-
1=1
157
16
0
WPD
51.31 D2FBA COMM STA
UINT32
0…6
-
1=1
157
16
0
51.32 FBA COMM SW VER
UINT32
0…65536
-
1=1
157
16
0
51.33 FBA APPL SW VER
UINT32
0…65536
-
1=1
157
16
0
UINT32
0…9999
-
1=1
158
16
0
…
…
…
…
-
…
…
UINT32
0…9999
-
1=1
158
16
0
UINT32
0…9999
-
1=1
159
16
0
…
…
…
…
…
…
UINT32
0…9999
-
1=1
159
16
0
57.01 LINK MODE
UINT32
0…2
-
1=1
10 ms
161
16
0
57.02 COMM LOSS FUNC
UINT32
0…2
-
1=1
10 ms
161
16
1
57.03 NODE ADRESS
UINT32
1…62
-
1=1
10 ms
161
16
1
WPD
57.04 FOLLOWER MASK 1
UINT32
0…2
31
-
1=1
10 ms
161
32
0
WPD
57.05 FOLLOWER MASK 2
UINT32
0…231
-
1=1
10 ms
161
32
0
WPD
52
FBA DATA IN
52.01 FBA DATA IN1
…
…
52.12 FBA DATA IN12
53
FBA DATA OUT
53.01 FBA DATA OUT1
…
…
53.12 FBA DATA OUT12
57
D2D
COMMUNICATION
57.06 REF 1 SRC
Val pointer
-
10 ms
161
32
P.03.04
57.07 REF 2 SRC
Val pointer
-
10 ms
161
32
P.03.13
57.08 FOLLOWER CW SRC Val pointer
10 ms
162
32
P.02.18
57.09 KERNEL SYNC
MODE
enum
0…3
-
1=1
10 ms
162
16
0
WPD
57.10 KERNEL SYNC OFFS
REAL
-4999…
5000
ms
1=1
10 ms
162
16
0
WPD
enum
0…6
-
1=1
165
16
0
90
-
WPD
ENC MODULE SEL
90.01 ENCODER 1 SEL
90.02 ENCODER 2 SEL
enum
0…6
-
1=1
165
16
0
90.03 EMUL MODE SEL
enum
0…9
-
1=1
166
16
0
enum
0…4
-
1=1
166
16
0
90.05 ENC CABLE FAULT
90.04 TTL ECHO SEL
UINT32
0…2
-
1=1
167
16
1
90.10 ENC PAR REFRESH
UINT32
0…1
-
1=1
167
16
0
Parameter and signal data
WPD
195
Index
Type
Range
91.01 SINE COSINE NR
UINT32
0…65535
-
91.02 ABS ENC INTERF
UINT32
0…4
-
91
Parameter
Unit
FbEq
Update
time
Page
no.
Data
len.
Def
1=1
170
16
0
1=1
170
16
0
ABSOL ENC CONF
91.03 REV COUNT BITS
UINT32
0…32
-
1=1
170
16
0
91.04 POS DATA BITS
UINT32
0…32
-
1=1
170
16
0
91.05 REFMARK ENA
UINT32
0…1
-
1=1
170
16
0
91.10 HIPERFACE PARITY
UINT32
0…1
-
1=1
170
16
0
91.11
UINT32
0…3
-
1=1
171
16
1
UINT32
0…255
-
1=1
171
16
64
HIPERF BAUDRATE
91.12 HIPERF NODE ADDR
91.20 SSI CLOCK CYCLES
UINT32
2…127
-
1=1
171
16
2
91.21 SSI POSITION MSB
UINT32
1…126
-
1=1
171
16
1
91.22 SSI REVOL MSB
UINT32
1…126
-
1=1
171
16
1
91.23 SSI DATA FORMAT
UINT32
0…1
-
1=1
171
16
0
91.24 SSI BAUD RATE
UINT32
0…5
-
1=1
171
16
2
91.25 SSI MODE
UINT32
0…1
-
1=1
172
16
0
91.26 SSI TRANSMIT CYC
UINT32
0…5
-
1=1
172
16
1
91.27 SSI ZERO PHASE
UINT32
0…3
-
1=1
172
16
0
91.30 ENDAT MODE
UINT32
0…1
-
1=1
172
16
0
91.31 ENDAT MAX CALC
UINT32
0…3
-
1=1
173
16
3
UINT32
1…32
-
1=1
174
16
1
92
RESOLVER CONF
92.01 RESOLV POLEPAIRS
92.02 EXC SIGNAL AMPL
UINT32
4…12
Vrms
1 = 10
174
16
4
92.03 EXC SIGNAL FREQ
UINT32
1…20
kHz
1=1
175
16
1
UINT32
0…65535
-
1=1
177
16
0
93
PULSE ENC CONF
93.01 ENC1 PULSE NR
93.02 ENC1 TYPE
enum
0…1
-
1=1
177
16
0
93.03 ENC1 SP
CALCMODE
enum
0….5
-
1=1
177
16
4
93.04 ENC1 POS EST ENA
enum
0…1
-
1=1
178
16
1
93.05 ENC1 SP EST ENA
enum
0…1
-
1=1
178
16
0
93.06 ENC1 OSC LIM
enum
0…3
-
1=1
178
16
0
93.11
UINT32
0…65535
-
1=1
178
16
0
93.12 ENC2 TYPE
enum
0…1
-
1=1
178
16
0
93.13 ENC2 SP
CALCMODE
enum
0….5
-
1=1
178
16
4
93.14 ENC2 POS EST ENA
enum
0…1
-
1=1
178
16
1
ENC2 PULSE NR
93.15 ENC2 SP EST ENA
enum
0…1
-
1=1
178
16
0
93.16 ENC2 OSC LIM
enum
0…3
-
1=1
178
16
0
93.21 EMUL PULSE NR
UINT32
0…65535
-
1=1
167
16
0
93.22 EMUL POS REF
Val pointer
167
32
P.01.12
(P.04.17 for
pos. appl.)
179
16
0
95
PT
-
HW
CONFIGURATION
95.01 CTRL UNIT SUPPLY
enum
0…1
-
1=1
Parameter and signal data
196
Index
Parameter
Type
Range
Unit
FbEq
enum
0…1
-
enum
0…1
97.02 RS USER
REAL24
97.03 RR USER
REAL24
97.04 LM USER
REAL24
97.05 SIGMAL USER
REAL24
95.02 EXTERNAL CHOKE
97
Update
time
Page
no.
Data
len.
Def
1=1
179
16
0
-
1=1
180
16
0
0…0.5
p.u.
1 = 100000
180
32
0
0…0.5
p.u.
1 = 100000
180
32
0
0…10
p.u.
1 = 100000
180
32
0
0…1
p.u.
1 = 100000
180
32
0
PT
USER MOTOR PAR
97.01 USE GIVEN PARAMS
97.06 LD USER
REAL24
0…10
p.u.
1 = 100000
180
32
0
97.07 LQ USER
REAL24
0…10
p.u.
1 = 100000
181
32
0
97.08 PM FLUX USER
REAL24
0…2
p.u.
1 = 100000
181
32
0
97.09 RS USER SI
REAL24
0…100
ohm
1 = 100000
181
32
0
97.10 RR USER SI
REAL24
0…100
ohm
1 = 100000
181
32
0
97.11 LM USER SI
REAL24
0…100000
mH
1 = 100000
181
32
0
WPD
97.12 SIGL USER SI
REAL24
0…100000
mH
1 = 100000
181
32
0
97.13 LD USER SI
REAL24
0…100000
mH
1 = 100000
181
32
0
97.14 LQ USER SI
REAL24
0…100000
mH
1 = 100000
181
32
0
98.01 TORQ NOM SCALE
UINT32
0…2147483
Nm
1 = 1000
182
32
0
WP
98.02 POLEPAIRS
UINT32
0…1000
-
1=1
182
16
0
WP
0
WPD
98
99
MOTOR CALC
VALUES
START-UP DATA
enum
-
1=1
44
16
99.02 MOTOR CATALOGUE
99.01 LANGUAGE
UINT32
-
1=1
44
16
99.03 MOTOR SELECTION
UINT32
99.04 MOTOR TYPE
enum
0…1
-
1=1
44
16
-
1=1
44
16
99.05 MOTOR CTRL MODE
enum
0…1
-
1=1
45
16
0
99.06 MOT NOM CURRENT
REAL
0…6400
A
1 = 10
45
32
0
99.07 MOT NOM VOLTAGE
REAL
120…960
V
1 = 10
45
32
0
WPD
99.08 MOT NOM FREQ
REAL
0…500
Hz
1 = 10
45
32
0
WPD
WPD
99.09 MOT NOM SPEED
REAL
0…10000
rpm
1=1
46
32
0
WPD
99.10 MOT NOM POWER
REAL
0…10000
kW
1 = 100
46
32
0
WPD
99.11 MOT NOM COSFII
REAL24
0…1
-
1 = 100
46
32
0
WPD
99.12 MOT NOM TORQUE
INT32
0…2147483
Nm
1 = 1000
46
32
0
WPD
99.13 IDRUN MODE
enum
0…5
-
1=1
47
16
0
WPD
Parameter and signal data
197
Fault tracing
What this chapter contains
The chapter lists all alarm and fault messages including the possible cause and
corrective actions.
Safety
WARNING! Only qualified electricians are allowed to maintain the drive. The Safety
Instructions on the first pages of the appropriate hardware manual must be read
before you start working with the drive.
Alarm and fault indications
An alarm or a fault message indicates abnormal drive status. Most alarm and fault
causes can be identified and corrected using this information. If not, an ABB
representative should be contacted.
The four-digit code number in brackets after the message is for the fieldbus
communication.
The alarm/fault code is displayed on the 7-segment display of the drive. The
following table describes the indications given by the 7-segment display.
Display
Meaning
“E” followed by
error code
System error. See appropriate drive hardware manual.
“A” followed by
error code
Alarm. See section Alarm messages generated by the drive on page 199.
“F” followed by
error code
Fault. See section Fault messages generated by the drive on page 205.
How to reset
The drive can be reset either by pressing the reset key on the PC tool ( ) or control
panel (RESET) or switching the supply voltage off for a while. When the fault has
been removed, the motor can be restarted.
A fault can also be reset from an external source by parameter 10.08 FAULT RESET
SEL.
Fault tracing
198
Fault history
When fault is detected, it is stored in the fault logger with a time stamp. The fault
history stores information on the 16 latest faults of the drive. Three of the latest faults
are stored at the beginning of a power switch off.
Signals 8.01 ACTIVE FAULT and 8.02 LAST store the fault codes of the most recent
faults.
Alarms can be monitored via alarm words 8.05…8.07 ALARM WORD 1…3. Alarm
information is lost at power switch off or fault reset.
Fault tracing
199
Alarm messages generated by the drive
Code
Alarm
(fieldbus code)
Cause
What to do
2000
BRAKE START TORQUE
Mechanical brake alarm. Alarm
is activated if required motor
starting torque, 35.06 BRAKE
OPEN TORQ, is not achieved.
Check brake open torque setting, parameter
35.06.
Mechanical brake control alarm.
Alarm is activated e.g. if brake
acknowledgement is not as
expected during brake closing.
Check mechanical brake connection.
(0x7185)
Programmable fault: 35.09
BRAKE FAULT FUNC
2001
BRAKE NOT CLOSED
(0x7186)
Programmable fault: 35.09
BRAKE FAULT FUNC
2002
BRAKE NOT OPEN
(0x7187)
Programmable fault: 35.09
BRAKE FAULT FUNC
2003
SAFE TORQUE OFF
(0xFF7A)
Programmable fault: 46.07
STO DIAGNOSTIC
2004
STO MODE CHANGE
(0xFF7A)
2005
MOTOR TEMPERATURE
(0x4310)
Programmable fault: 45.01
MOT TEMP PROT
Mechanical brake control alarm.
Alarm is activated e.g. if brake
acknowledgement is not as
expected during brake opening.
Check drive torque and current limits. See
firmware block LIMITS on page 83.
Check mechanical brake settings, parameters
35.01…35.09.
To determine whether problem is with
acknowledgement signal or brake: Check if
brake is closed or open.
Check mechanical brake connection.
Check mechanical brake settings, parameters
35.01…35.08.
To determine whether problem is with
acknowledgement signal or brake: Check if
brake is closed or open.
Safe Torque Off function is
active, i.e. safety circuit
signal(s) connected to
connector X6 is lost while drive
is stopped and parameter 46.07
STO DIAGNOSTIC setting is
ALARM.
Check safety circuit connections. For more
information, see appropriate drive hardware
manual.
Error in changing Safe Torque
Off supervision, i.e. parameter
46.07 STO DIAGNOSTIC
setting could not be changed to
value ALARM.
Contact your local ABB representative.
Estimated motor temperature
(based on motor thermal model)
has exceeded alarm limit
defined by parameter 45.03
MOT TEMP ALM LIM.
Check motor ratings and load.
Let motor cool down. Ensure proper motor
cooling: Check cooling fan, clean cooling
surfaces, etc.
Check value of alarm limit.
Check motor thermal model settings,
parameters 45.06…45.08 and 45.10 MOT
THERM TIME.
Measured motor temperature
has exceeded alarm limit
defined by parameter 45.03
MOT TEMP ALM LIM.
Check that actual number of sensors
corresponds to value set by parameter 45.02
MOT TEMP SOURCE.
Check motor ratings and load.
Let motor cool down. Ensure proper motor
cooling: Check cooling fan, clean cooling
surfaces, etc.
Check value of alarm limit.
Fault tracing
200
Code
Alarm
(fieldbus code)
Cause
What to do
2006
EMERGENCY OFF
Drive has received emergency
OFF2 command.
To restart drive, activate RUN ENABLE signal
(source selected by parameter 10.09 RUN
ENABLE) and start drive.
(0xFF54)
No Run enable signal is
received.
Check setting of parameter 10.09 RUN
ENABLE. Switch signal on (e.g. in the
fieldbus Control Word) or check wiring of
selected source.
ID-RUN
Motor identification run is on.
This alarm belongs to normal start-up
procedure. Wait until drive indicates that
motor identification is completed.
Motor identification is required.
This alarm belongs to normal start-up
procedure.
(0xF083)
2007
2008
RUN ENABLE
(0xFF84)
Select how motor identification should be
performed, parameter 99.13 ID RUN MODE.
Start identification routines by pressing Start
key.
2009
EMERGENCY STOP
(0xF081)
Drive has received emergency
stop command (OFF1/OFF3).
Check that it is safe to continue operation.
Return emergency stop push button to normal
position (or adjust the fieldbus Control Word
accordingly).
Restart drive.
2011
BR OVERHEAT
(0x7112)
Brake resistor temperature has
exceeded alarm limit defined by
parameter 48.07 BR TEMP
ALARMLIM.
Stop drive. Let resistor cool down.
Check resistor overload protection function
settings, parameters 48.03…48.05.
Check alarm limit setting, parameter 48.07.
Check that braking cycle meets allowed
limits.
2012
BC OVERHEAT
(0x7181)
Brake chopper IGBT
temperature has exceeded
internal alarm limit.
Let chopper cool down.
Check resistor overload protection function
settings, parameters 48.03…48.05.
Check that braking cycle meets allowed
limits.
Check that drive supply AC voltage is not
excessive.
2013
DEVICE OVERTEMP
(0x4210)
Measured drive temperature
has exceeded internal alarm
limit.
Check ambient conditions.
Check air flow and fan operation.
Check heatsink fins for dust pick-up.
Check motor power against unit power.
2014
INTBOARD OVERTEMP
(0x7182)
2015
BC MOD OVERTEMP
(0x7183)
Fault tracing
Interface board (between power
unit and control unit)
temperature has exceeded
internal alarm limit.
Let drive cool down.
Input bridge or brake chopper
temperature has exceeded
internal alarm limit.
Let drive cool down.
201
Code
Alarm
(fieldbus code)
Cause
What to do
2016
IGBT OVERTEMP
Drive temperature based on
thermal model has exceeded
internal alarm limit.
Check ambient conditions.
(0x7184)
Check air flow and fan operation.
Check heatsink fins for dust pick-up.
Check motor power against unit power.
2017
FIELDBUS COMM
(0x7510)
Programmable fault: 50.02
COMM LOSS FUNC
Cyclical communication
between drive and fieldbus
adapter module or between
PLC and fieldbus adapter
module is lost.
Check status of fieldbus communication. See
appropriate User’s Manual of fieldbus adapter
module.
Check fieldbus parameter settings. See
firmware block FIELDBUS on page 142.
Check cable connections.
Check if communication master can
communicate.
2018
LOCAL CTRL LOSS
(0x5300)
Programmable fault: 46.03
LOCAL CTRL LOSS
2019
AI SUPERVISION
(0x8110)
Programmable fault: 13.12
AI SUPRVISION
2020
FB PAR CONF
(0x6320)
2021
NO MOTOR DATA
(0x6381)
2022
ENCODER 1 FAILURE
(0x7301)
Control panel or PC tool
selected as active control
location for drive has ceased
communicating.
Check PC tool or control panel connection.
Analogue input AI1 or AI2 signal
has reached limit defined by
parameter 13.13 AI SUPERVIS
ACT.
Check analogue input AI1/2 source and
connections.
The drive does not have a
functionality requested by PLC,
or requested functionality has
not been activated.
Check PLC programming.
Parameters in group 99 have
not been set.
Check that all the required parameters in
group 99 have been set.
Encoder 1 has been activated
by parameter but the encoder
interface (FEN-xx) cannot be
found.
Check parameter 90.01 ENCODER 1 SEL
setting corresponds to encoder interface 1
(FEN-xx) installed in drive Slot 1/2 (signal
9.20 OPTION SLOT 1 / 9.21 OPTION
SLOT 2).
Check control panel connector.
Replace control panel in mounting platform.
Check analogue input AI1/2 minimum and
maximum limit settings, parameters 13.02
and 13.03 / 13.07 and 13.08.
Check fieldbus parameter settings. See
firmware block FIELDBUS on page 142.
Note: The new setting will only take effect
after parameter 90.10 ENC PAR REFRESH is
used or after the JCU control unit is powered
up the next time.
Fault tracing
202
Code
Alarm
(fieldbus code)
Cause
What to do
2023
ENCODER 2 FAILURE
(0x7381)
Encoder 2 has been activated
by parameter but the encoder
interface (FEN-xx) cannot be
found.
Check parameter 90.02 ENCODER 2 SEL
setting corresponds to encoder interface 2
(FEN-xx) installed in drive Slot 1/2 (signal
9.20 OPTION SLOT 1 / 9.21 OPTION
SLOT 2).
Note: The new setting will only take effect
after parameter 90.10 ENC PAR REFRESH is
used or after the JCU control unit is powered
up the next time.
EnDat or SSI encoder is used in
continuous mode as encoder 2.
[I.e. 90.02 ENCODER 2 SEL =
FEN-11 ABS
and 91.02 ABS ENC INTERF =
EnDat (or 91.02 ABS ENC
INTERF = SSI)
and 91.30 ENDAT MODE =
CONTINUOUS (or 91.25 SSI
MODE = CONTINUOUS).]
If possible, use single position transfer
instead of continuous position transfer (i.e. if
encoder has incremental sin/cos signals):
- Change parameter 91.25 SSI MODE / 91.30
ENDAT MODE to value INITIAL POS.
Otherwise use Endat/SSI encoder as
encoder 1:
- Change parameter 90.01 ENCODER 1 SEL
to value FEN-11 ABS and parameter 90.02
ENCODER 2 SEL to value NONE.
Note: The new setting will only take effect
after parameter 90.10 ENC PAR REFRESH is
used or after the JCU control unit is powered
up the next time.
2026
ENC EMULATION
FAILURE (0x7384)
Encoder emulation error
If position value used in emulation is
measured by encoder:
- Check that FEN-xx encoder used in
emulation (90.03 EMUL MODE SEL)
corresponds to FEN-xx encoder interface 1 or
(and) 2 activated by parameter 90.01/90.02
ENCODER 1/2. (Parameter 90.01/90.02
activates the position calculation of the used
FEN-xx input).
If position value used in emulation is
determined by drive software:
- Check that FEN-xx encoder used in
emulation (90.03 EMUL MODE SEL)
corresponds to FEN-xx encoder interface 1 or
(and) 2 activated by parameter 90.01/90.02
ENCODER 1/2 (because position data used
in emulation is written to FEN-xx during
encoder data request). Encoder interface 2 is
recommended.
Note: The new setting will only take effect
after parameter 90.10 ENC PAR REFRESH is
used or after the JCU control unit is powered
up the next time.
Fault tracing
203
Code
Alarm
(fieldbus code)
Cause
What to do
2027
FEN TEMP MEAS
FAILURE (0x7385)
Error in temperature
measurement when
temperature sensor (KTY or
PTC) connected to encoder
interface FEN-xx is used.
Check that parameter 45.02 MOT TEMP
SOURCE settings correspond to encoder
interface installation (9.20 OPTION SLOT 1 /
9.21 OPTION SLOT 2):
If one FEN-xx module is used:
- Parameter 45.02 MOT TEMP SOURCE
setting must be either KTY 1st FEN or PTC
1st FEN. FEN-xx module can be in either
Slot 1 or Slot 2.
If two FEN-xx modules are used:
- When parameter 45.02 MOT TEMP
SOURCE setting is KTY 1st FEN or PTC 1st
FEN, the encoder installed in drive Slot 1 is
used.
- When parameter 45.02 MOT TEMP
SOURCE setting is KTY 2nd FEN or PTC 2nd
FEN, the encoder installed in drive Slot 2 is
used.
2028
ENC EMUL MAX FREQ
(0x7386)
Error in temperature
measurement when KTY
sensor connected to encoder
interface FEN-01 is used.
FEN-01 does not support temperature
measurement with KTY sensor. Use PTC
sensor or other encoder interface module.
TTL pulse frequency used in
encoder emulation.exceeds
maximum allowed limit
(500 kHz).
Decrease parameter 93.21 EMUL PULSE NR
value.
Note: The new setting will only take effect
after parameter 90.10 ENC PAR REFRESH is
used or after the JCU control unit is powered
up the next time.
2029
ENC EMUL REF ERROR
(0x7387)
Encoder emulation has failed
due to failure in writing new
(position) reference for
emulation.
Contact your local ABB representative.
2030
RESOLVER AUTOTUNE
ERR (0x7388)
Resolver autotuning routines,
which are automatically started
when resolver input is activated
for the first time, have failed.
Check cable between resolver and resolver
interface module (FEN-21) and order of
connector signal wires at both ends of cable.
Check resolver parameter settings.
For resolver parameters and information, see
firmware block RESOLVER CONF on page
174.
Note: Resolver autotuning routines should
always be performed after resolver cable
connection has been modified. Autotuning
routines can be activated by setting
parameter 92.02 EXC SIGNAL AMPL or
92.03 EXC SIGNAL FREQ, and then setting
parameter 90.10 ENC PAR REFRESH to 1.
Fault tracing
204
Code
Alarm
(fieldbus code)
Cause
What to do
2031
ENCODER 1 CABLE
Encoder 1 cable fault detected.
Check cable between FEN-xx interface and
encoder 1. After any modifications in cabling,
re-configure interface by switching drive
power off and on, or by activating parameter
90.10 ENC PAR REFRESH.
Encoder 2 cable fault detected.
Check cable between FEN-xx interface and
encoder 2. After any modifications in cabling,
re-configure interface by switching drive
power off and on, or by activating parameter
90.10 ENC PAR REFRESH.
Drive-to-drive communication
break detected.
Check the drive-to-drive cabling.
Communication errors detected
between the JCU Control Unit
and the power unit of the drive.
Check the connections between the JCU
Control Unit and the power unit.
Restore of backed-up
parameters failed.
Contact your local ABB representative.
Current measurement
calibration will occur at next
start.
Informative alarm.
Autophasing will occur at next
start.
Informative alarm.
Drive has detected load
unbalance typically due to earth
fault in motor or motor cable.
Check there are no power factor correction
capacitors or surge absorbers in motor cable.
(0x7389)
2032
ENCODER 2 CABLE
(0x738A)
2033
D2D COMMUNICATION
(0x7520)
Programmable fault: 57.02
COMM LOSS FUNC
2035
PS COMM
(0x5480)
2036
RESTORE
(0x6300)
2037
CUR MEAS
CALIBRATION
(0x2280)
2038
AUTOPHASING
(0x3187)
2039
EARTH FAULT
(0x2330)
Programmable fault: 46.05
EARTH FAULT
Check that there is no earth fault in motor or
motor cables:
- measure insulation resistances of motor and
motor cable.
If no earth fault can be detected, contact your
local ABB representative.
Fault tracing
205
Fault messages generated by the drive
Code
Fault
(fieldbus code)
Cause
What to do
0001
OVERCURRENT
Output current has exceeded
internal fault limit.
Check motor load.
(0x2310)
Check acceleration time. See firmware block
SPEED REF RAMP on page 97.
Check motor and motor cable (including
phasing and delta/star connection).
Check that the start-up data in parameter
group 99 corresponds to the motor rating
plate.
Check that there are no power factor
correction capacitors or surge absorbers in
motor cable.
Check encoder cable (including phasing).
0002
DC OVERVOLTAGE
(0x3210)
Excessive intermediate circuit
DC voltage
Check that overvoltage controller is on,
parameter 47.01 OVERVOLTAGE CTRL.
Check mains for static or transient
overvoltage.
Check brake chopper and resistor (if used).
Check deceleration time.
Use coast-to-stop function (if applicable).
Retrofit frequency converter with brake
chopper and brake resistor.
0003
DEVICE OVERTEMP
(0x4210)
Measured drive temperature
has exceeded internal fault limit.
Check ambient conditions.
Check air flow and fan operation.
Check heatsink fins for dust pick-up.
Check motor power against unit power.
0004
SHORT CIRCUIT
(0x2340)
0005
DC UNDERVOLTAGE
(0x3220)
0006
EARTH FAULT
(0x2330)
Programmable fault: 46.05
EARTH FAULT
Short-circuit in motor cable(s) or
motor
Check motor and motor cable.
Intermediate circuit DC voltage
is not sufficient due to missing
mains phase, blown fuse or
rectifier bridge internal fault.
Check mains supply and fuses.
Drive has detected load
unbalance typically due to earth
fault in motor or motor cable.
Check there are no power factor correction
capacitors or surge absorbers in motor cable.
Check there are no power factor correction
capacitors or surge absorbers in motor cable.
Check that there is no earth fault in motor or
motor cables:
- measure insulation resistances of motor and
motor cable.
If no earth fault can be detected, contact your
local ABB representative.
0007
FAN FAULT
(0xFF83)
Fan is not able to rotate freely or
fan is disconnected. Fan
operation is monitored by
measuring fan current.
Check fan operation and connection.
Fault tracing
206
Code
Fault
(fieldbus code)
Cause
What to do
0008
IGBT OVERTEMP
Drive temperature based on
thermal model has exceeded
internal fault limit.
Check ambient conditions.
(0x7184)
Check air flow and fan operation.
Check heatsink fins for dust pick-up.
Check motor power against unit power.
0009
BC WIRING
(0x7111)
Brake resistor short circuit or
brake chopper control fault
Check brake chopper and brake resistor
connection.
Ensure brake resistor is not damaged.
0010
BC SHORT CIRCUIT
(0x7113)
0011
BC OVERHEAT
(0x7181)
Short circuit in brake chopper
IGBT
Replace brake chopper.
Brake chopper IGBT
temperature has exceeded
internal fault limit.
Let chopper cool down.
Ensure brake resistor is connected and not
damaged.
Check resistor overload protection function
settings, parameters 48.03…48.05.
Check that braking cycle meets allowed
limits.
Check that drive supply AC voltage is not
excessive.
0012
BR OVERHEAT
(0x7112)
Brake resistor temperature has
exceeded fault limit defined by
parameter 48.06 BR TEMP
FAULTLIM.
Stop drive. Let resistor cool down.
Check resistor overload protection function
settings, parameters 48.03…48.05.
Check fault limit setting, parameter 48.06.
Check that braking cycle meets allowed
limits.
0013
CURR MEAS GAIN
(0x3183)
0014
CABLE CROSS CON
(0x3181)
Programmable fault: 46.08
CROSS CONNECTION
0015
SUPPLY PHASE
(0x3130)
Programmable fault: 46.06
SUPPL PHS LOSS.
0016
MOTOR PHASE
(0x3182)
Programmable fault: 46.04
MOT PHASE LOSS
Fault tracing
Difference between output
phase U2 and W2 current
measurement gain is too great.
Contact your local ABB representative.
Incorrect input power and motor
cable connection (i.e. input
power cable is connected to
drive motor connection).
Check input power connections.
Intermediate circuit DC voltage
is oscillating due to missing
input power line phase or blown
fuse.
Check input power line fuses.
Motor circuit fault due to
missing motor connection (all
three phases are not
connected).
Connect motor cable.
Check for input power supply imbalance.
207
Code
Fault
(fieldbus code)
Cause
What to do
0017
ID-RUN FAULT
Motor ID Run is not completed
successfully.
Check motor settings, parameters
99.04…99.13.
(0xFF84)
Check that no limits prevent ID run. Following
must apply:
20.05 MAXIMUM CURRENT > 99.06 MOT NOM
CURRENT
for Reduced and Normal ID run:
- 20.01 MAXIMUM SPEED > 55% of 99.09 MOT
NOM SPEED
- 20.02 MINIMUM SPEED < 0
- supply voltage must be > 65% of 99.07 MOT NOM
VOLTAGE
- 20.06 MAXIMUM TORQUE > 100% (only for
Normal ID run).
Retry.
0018
CURR U2 MEAS
(0x3184)
0019
CURR V2 MEAS
(0x3185)
0020
CURR W2 MEAS
(0x3186)
0021
STO1 LOST
(0x8182)
0022
STO2 LOST
(0x8183)
0023
STO MODE CHANGE
(0xFF7A)
Measured offset error of U2
output phase current
measurement is too great.
(Offset value is updated during
current calibration.)
Contact your local ABB representative.
Measured offset error of V2
output phase current
measurement is too great.
(Offset value is updated during
current calibration.)
Contact your local ABB representative.
Measured offset error of W2
output phase current
measurement is too great.
(Offset value is updated during
current calibration.)
Contact your local ABB representative.
Safe Torque Off function is
active, i.e. safety circuit signal 1
connected between X6:1 and
X6:3 is lost while drive is at
stopped state and parameter
46.07 STO DIAGNOSTIC
setting is ALARM or NO.
Check safety circuit connections. For more
information, see appropriate drive hardware
manual.
Safe Torque Off function is
active, i.e. safety circuit signal 2
connected between X6:2 and
X6:4 is lost while drive is at
stopped state and parameter
46.07 STO DIAGNOSTIC
setting is ALARM or NO.
Check safety circuit connections. For more
information, see appropriate drive hardware
manual.
Error in changing Safe Torque
Off supervision, i.e. parameter
46.07 STO DIAGNOSTIC
setting could not be changed to
value FAULT.
Contact your local ABB representative.
Fault tracing
208
Code
Fault
(fieldbus code)
Cause
What to do
0024
INTBOARD OVERTEMP
Interface board (between power
unit and control unit)
temperature has exceeded
internal fault limit.
Let drive cool down.
Input bridge or brake chopper
temperature has exceeded
internal fault limit.
Let drive cool down.
Connection between the JCU
Control Unit and the power unit
of the drive is lost.
Check the connections between the JCU
Control Unit and the power unit.
Communication errors detected
between the JCU Control Unit
and the power unit of the drive.
Check the connections between the JCU
Control Unit and the power unit.
Fault in external device. (This
information is configured
through one of programmable
digital inputs.)
Check external devices for faults.
Safe Torque Off function is
active, i.e. safety circuit
signal(s) connected to
connector X6 is lost
Check safety circuit connections. For more
information, see appropriate drive hardware
manual.
(0x7182)
0025
BC MOD OVERTEMP
(0x7183)
0027
PU LOST
(0x5400)
0028
PS COMM
(0x5480)
0030
EXTERNAL
(0x9000)
0031
SAFE TORQUE OFF
(0xFF7A)
Programmable fault: 46.07
STO DIAGNOSTIC
Check parameter 46.01 EXTERNAL FAULT
setting.
- during drive start or drive run
or
- while drive is stopped and
parameter 46.07 STO
DIAGNOSTIC setting is FAULT.
0032
OVERSPEED
(0x7310)
0033
BRAKE START TORQUE
(0x7185)
Programmable fault: 35.09
BRAKE FAULT FUNC
0034
BRAKE NOT CLOSED
(0x7186)
Programmable fault: 35.09
BRAKE FAULT FUNC
Fault tracing
Motor is turning faster than
highest allowed speed due to
incorrectly set minimum/
maximum speed, insufficient
braking torque or changes in
load when using torque
reference.
Check minimum/maximum speed settings,
parameters 20.01 MAXIMUM SPEED and
20.02 MINIMUM SPEED.
Mechanical brake fault. Fault is
activated if required motor
starting torque, 35.06 BRAKE
OPEN TORQ, is not achieved.
Check brake open torque setting, parameter
35.06.
Mechanical brake control fault.
Fault is activated if brake
acknowledgement is not as
expected during brake closing.
Check mechanical brake connection.
Check adequacy of motor braking torque.
Check applicability of torque control.
Check need for brake chopper and
resistor(s).
Check drive torque and current limits. See
firmware block LIMITS on page 83.
Check mechanical brake settings, parameters
35.01…35.09.
To determine whether problem is with
acknowledgement signal or brake: Check if
brake is closed or open.
209
Code
Fault
(fieldbus code)
Cause
What to do
0035
BRAKE NOT OPEN
Mechanical brake control fault.
Fault is activated if brake
acknowledgement is not as
expected during brake opening.
Check mechanical brake connection.
(0x7187)
Programmable fault: 35.09
BRAKE FAULT FUNC
0036
Check PC tool or control panel connection.
NVMEMCORRUPTED
Drive internal fault
Contact your local ABB representative.
(0x6320)
Note: This fault cannot be
reset.
OPTION COMM LOSS
Communication between drive
and option module (FEN-xx
and/or FIO-xx) is lost.
Programmable fault: 46.03
LOCAL CTRL LOSS
0038
To determine whether problem is with
acknowledgement signal or brake: Check if
brake is closed or open.
Control panel or PC tool
selected as active control
location for drive has ceased
communicating.
LOCAL CTRL LOSS
(0x5300)
0037
Check mechanical brake settings, parameters
35.01…35.08.
(0x7000)
Check control panel connector.
Replace control panel in mounting platform.
Check that option modules are properly
connected to Slot 1 and (or) Slot 2.
Check that option modules or Slot 1/2
connectors are not damaged. To determine
whether module or connector is damaged:
Test each module individually in Slot 1 and
Slot 2.
Fault tracing
210
Code
Fault
(fieldbus code)
Cause
What to do
0039
ENCODER1
Encoder 1 feedback fault
If fault appears during first start-up before
encoder feedback is used:
(0x7301)
- Check cable between encoder and encoder
interface module (FEN-xx) and order of
connector signal wires at both ends of cable.
If absolute encoder, EnDat/Hiperface/SSI,
with incremental sin/cos pulses is used,
incorrect wiring can be located as follows:
Disable serial link (zero position) by setting
parameter 91.02 to 0 and test encoder
operation:
- If encoder fault is not activated, check serial
link data wiring. Note that zero position is not
taken into account when serial link is
disabled.
- If encoder fault is activated, check serial link
and sin/cos signal wiring.
Note: Because only zero position is
requested through serial link and during run,
position is updated according to sin/cos
pulses.
- Check encoder parameter settings.
If fault appears after encoder feedback has
already been used or during drive run:
- Check that encoder connection wiring or
encoder is not damaged.
- Check that encoder interface module (FENxx) connection or module is not damaged.
- Check earthings (when disturbances are
detected in communication between encoder
interface module and encoder).
For more information on encoders, see
firmware blocks ENCODER (on page 164),
ABSOL ENC CONF (on page 169),
RESOLVER CONF (on page 174)and PULSE
ENC CONF (on page 176.).
Fault tracing
211
Code
Fault
(fieldbus code)
Cause
What to do
0040
ENCODER2
Encoder 2 feedback fault
See fault ENCODER1.
EnDat or SSI encoder is used in
continuous mode as encoder 2.
If possible, use single position transfer
instead of continuous position transfer (i.e. if
encoder has incremental sin/cos signals):
(0x7381)
[I.e. 90.02 ENCODER 2 SEL =
FEN-11 ABS
and 91.02 ABS ENC INTERF =
EnDat (or 91.02 ABS ENC
INTERF = SSI)
and 91.30 ENDAT MODE =
CONTINUOUS (or 91.25 SSI
MODE = CONTINUOUS).]
- Change parameter 91.25 SSI MODE / 91.30
ENDAT MODE to value INITIAL POS.
Otherwise use Endat/SSI encoder as
encoder 1:
- Change parameter 90.01 ENCODER 1 SEL
to value FEN-11 ABS and parameter 90.02
ENCODER 2 SEL to value NONE.
Note: The new setting will only take effect
after parameter 90.10 ENC PAR REFRESH is
used or after the JCU control unit is powered
up the next time.
0045
FIELDBUS COMM
(0x7510)
Programmable fault: 50.02
COMM LOSS FUNC
Cyclical communication
between drive and fieldbus
adapter module or between
PLC and fieldbus adapter
module is lost.
Check status of fieldbus communication. See
appropriate User’s Manual of fieldbus adapter
module.
Check fieldbus parameter settings. See
firmware block FIELDBUS on page 142.
Check cable connections.
Check if communication master can
communicate.
0046
FB MAPPING FILE
Drive internal fault
Contact your local ABB representative.
Estimated motor temperature
(based on motor thermal model)
has exceeded fault limit defined
by parameter 45.04 MOT TEMP
FLT LIM.
Check motor ratings and load.
(0x6306)
0047
MOTOR OVERTEMP
(0x4310)
Programmable fault: 45.01
MOT TEMP PROT
Let motor cool down. Ensure proper motor
cooling: Check cooling fan, clean cooling
surfaces, etc.
Check value of fault limit.
Check motor thermal model settings,
parameters 45.06…45.08 and 45.10 MOT
THERM TIME.
Measured motor temperature
has exceeded fault limit defined
by parameter 45.04 MOT TEMP
FLT LIM.
Check that actual number of sensors
corresponds to value set by parameter 45.02
MOT TEMP SOURCE.
Check motor ratings and load.
Let motor cool down. Ensure proper motor
cooling: Check cooling fan, clean cooling
surfaces, etc.
Check value of fault limit.
Fault tracing
212
Code
Fault
(fieldbus code)
Cause
What to do
0049
AI SUPERVISION
Analogue input AI1 or AI2 signal
has reached limit defined by
parameter 13.13 AI SUPERVIS
ACT.
Check analogue input AI1/2 source and
connections.
Encoder 1 cable fault detected.
Check cable between FEN-xx interface and
encoder 1. After any modifications in cabling,
re-configure interface by switching drive
power off and on, or by activating parameter
90.10 ENC PAR REFRESH.
Encoder 2 cable fault detected.
Check cable between FEN-xx interface and
encoder 2. After any modifications in cabling,
re-configure interface by switching drive
power off and on, or by activating parameter
90.10 ENC PAR REFRESH.
The drive-to-drive link
configuration detected by the
master drive does not match the
polling parameters.
Check that all drives that are polled by the
master (parameters 57.04 and 57.05) on the
drive-to-drive link are powered, properly
connected to the link, and have the correct
node address.
Drive-to-drive communication
break detected.
Check the drive-to-drive cabling.
Resettable fault generated by a
technology library.
Refer to the documentation of the technology
library.
Permanent fault generated by a
technology library.
Refer to the documentation of the technology
library.
Generic Drive Communication
Profile trip command.
Check PLC status.
Check PLC programming.
(0x6320)
The drive does not have a
functionality requested by PLC,
or requested functionality has
not been activated.
T2 OVERLOAD
Firmware time level 2 overload
Contact your local ABB representative.
(0x0201)
Note: This fault cannot be
reset.
T3 OVERLOAD
Firmware time level 3 overload
(0x6100)
Note: This fault cannot be
reset.
T4 OVERLOAD
Firmware time level 4 overload
(0x6100)
Note: This fault cannot be
reset.
(0x8110)
Programmable fault: 13.12
AI SUPERVISION
0050
ENCODER 1 CABLE
(0x7389)
Programmable fault: 90.05
ENC CABLE FAULT
0051
ENCODER 2 CABLE
(0x738A)
Programmable fault: 90.05
ENC CABLE FAULT
0052
D2D CONFIG
(0x7583)
Programmable fault: 57.02
COMM LOSS FUNC
0053
D2D COMMUNICATION
(0x7520)
Check analogue input AI1/2 minimum and
maximum limit settings, parameters 13.02
and 13.03 / 13.07 and 13.08.
Programmable fault: 57.02
COMM LOSS FUNC
0055
TECH LIB
(0x6382)
0056
TECH LIB CRITICAL
(0x6382)
0057
FORCED TRIP
(0xFF90)
0058
0201
0202
0203
FIELDBUS PAR ERROR
Fault tracing
Check fieldbus parameter settings. See
firmware block FIELDBUS on page 142.
Contact your local ABB representative.
Contact your local ABB representative.
213
Code
Fault
(fieldbus code)
Cause
What to do
0204
T5 OVERLOAD
Firmware time level 5 overload
Contact your local ABB representative.
(0x6100)
Note: This fault cannot be
reset.
A1 OVERLOAD
Application time level 1 fault
(0x6100)
Note: This fault cannot be
reset.
A2 OVERLOAD
Application time level 2 fault
(0x6100)
Note: This fault cannot be
reset.
A1 INIT FAULT
Application task creation fault
(0x6100)
Note: This fault cannot be
reset.
A2 INIT FAULT
Application task creation fault
(0x6100)
Note: This fault cannot be
reset.
STACK ERROR
Drive internal fault
(0x6100)
Note: This fault cannot be
reset.
FPGA ERROR
Drive internal fault
(0xFF61)
Note: This fault cannot be
reset.
UFF FILE READ
File read error
(0x6300)
Note: This fault cannot be
reset.
APPL DIR CREATION
Drive internal fault
(0x6100)
Note: This fault cannot be
reset.
FPGA CONFIG DIR
Drive internal fault
(0x6100)
Note: This fault cannot be
reset.
PU RATING ID
Drive internal fault
(0x5483)
Note: This fault cannot be
reset.
RATING DATABASE
Drive internal fault
(0x6100)
Note: This fault cannot be
reset.
LICENSING
Drive internal fault
(0x6100)
Note: This fault cannot be
reset.
DEFAULT FILE
Drive internal fault
(0x6100)
Note: This fault cannot be
reset.
0205
0206
0207
0208
0209
0210
0301
0302
0303
0304
0305
0306
0307
Contact your local ABB representative.
Contact your local ABB representative.
Contact your local ABB representative.
Contact your local ABB representative.
Contact your local ABB representative.
Contact your local ABB representative.
Contact your local ABB representative.
Contact your local ABB representative.
Contact your local ABB representative.
Contact your local ABB representative.
Contact your local ABB representative.
Contact your local ABB representative.
Contact your local ABB representative.
Fault tracing
214
Code
Fault
(fieldbus code)
Cause
What to do
0308
APPL FILE PAR CONF
Corrupted application file
Reload application.
(0x6300)
Note: This fault cannot be
reset.
If fault is still active, contact your local ABB
representative.
APPL LOADING
Corrupted application file
Reload application.
(0x6300)
Note: This fault cannot be
reset.
If fault is still active, contact your local ABB
representative.
USERSET LOAD
Loading of user set is not
successfully completed
because:
Reload.
0309
0310
(0xFF69)
- requested user set does not
exist
- user set is not compatible with
drive program
- drive has been switched off
during loading.
0311
0312
USERSET SAVE
(0xFF69)
User set is not saved because
of memory corruption.
Check the setting of parameter 95.01.
UFF OVERSIZE
UFF file is too big.
Contact your local ABB representative.
UFF file structure failure
Delete faulty file or contact your local ABB
representative.
TECH LIB INTERFACE
Incompatible firmware interface
Contact your local ABB representative.
(0x6100)
Note: This fault cannot be
reset.
RESTORE FILE
Restore of backed-up
parameters failed.
Contact your local ABB representative.
Mismatch between JCU Control
Unit firmware and power unit
logic versions.
Contact your local ABB representative.
If the fault still occurs, contact your local ABB
representative.
(0x6300)
0313
UFF EOF
(0x6300)
0314
0315
(0x630D)
0316
DAPS MISMATCH
(0x5484)
Fault tracing
215
Standard function blocks
What this chapter contains
This chapter describes the standard function blocks.
The number in brackets in the standard block heading is the block number.
Note: The given execution times can vary depending on the used drive application.
Terms
Data type
Description
Boolean
Boolean
DINT
32-bit integer value (31 bits + sign)
-2147483648…2147483647
INT
16-bit integer value (15 bits + sign)
-32768…32767
REAL
16-bit value 16-bit value (31 bits + sign)
-32768,99998…32767,9998
= integer value
REAL24
Range
= fractional value
8-bit value 24-bit value (31 bits + sign)
-128,0…127,999
= integer value = fractional value
Standard function blocks
216
ABS
(10001)
Type
Arithmetic
Illustration
',17
$%6
7/PVHF
,1
287
287
Execution time
0.53 µs
Operation
The output (OUT) is the absolute value of the input (IN).
OUT = | IN |
Inputs
The input data type is selected by the user.
Input (IN): DINT, INT, REAL or REAL24
Outputs
Output (OUT): DINT, INT, REAL or REAL24
Type
Arithmetic
ADD
(10000)
Illustration
',17
$''
7/PVHF
,1
287
287
,1
,1
,1
Execution time
3.36 µs (when two inputs are used) + 0.52 µs (for every additional input). When all
inputs are used, the execution time is 18.87 µs.
Operation
The output (OUT) is the sum of the inputs (IN1…IN32).
OUT = IN1 + IN2 + … + IN32
The output value is limited to the maximum and minimum values defined by the selected
data type range.
Inputs
The input data type and the number of the inputs (2…23) are selected by the user.
Input (IN1…IN32): DINT, INT, REAL or REAL24
Outputs
Standard function blocks
Output (OUT): DINT, INT, REAL or REAL24
217
AND
(10010)
Type
Bit string
Illustration
$1'
7/PVHF
,1
287
287
,1
,1
,1
Execution time
1.55 µs (when two inputs are used) + 0.60 µs (for every additional input). When all
inputs are used, the execution time is 19.55 µs.
Operation
The output (OUT) is 1 if all the connected inputs (IN1…IN32) are 1. Otherwise the
output is 0.
Truth table:
IN1
IN2
OUT
0
0
0
0
1
0
1
0
0
1
1
1
The inputs can be inverted.
Inputs
The number of inputs is selected by the user.
Input (IN1…IN32): Boolean
Outputs
Output (OUT): Boolean
Type
Bitwise
BGET
(10034)
Illustration
',17
%*(7
7/PVHF
%,715
2
2
,
Execution time
0.88 µs
Operation
The output (O) is the value of the selected bit (BITNR) of the input (I).
BITNR: Bit number (0 = bit number 0, 31 = bit number 31)
If bit number is not in the range of 0…31 (for DINT) or 0…15 (for INT), the output is 0.
Inputs
The input data type is selected by the user.
Number of the bit (BITNR): DINT
Input (I): DINT, INT
Outputs
Output (O): Boolean
Standard function blocks
218
BITAND
(10035)
Type
Bitwise
Illustration
%,7$1'
7/PVHF
,
2
2
,
Execution time
0.32 µs
Operation
The output (O) bit value is 1 if the corresponding bit values of the inputs (I1 and I2)
are 1. Otherwise the output bit value is 0.
Example:
I1
1 1 1 0 0 0 0 0 1 1 1 0 0 1 0 1 1 1 0 1 0 0 1 1 0 0 1 1 0 1 0 1
I2
0 0 0 0 0 1 1 1 0 0 1 0 1 1 1 0 1 0 0 1 1 0 0 1 1 0 1 0 1 1 1 1
O
0 0 0 0 0 0 0 0 0 0 1 0 0 1 0 0 1 0 0 1 0 0 0 1 0 0 1 0 0 1 0 1
Inputs
Input (I1, I2): DINT
Outputs
Output (O): DINT
Type
Bitwise
BITOR
(10036)
Illustration
%,725
7/PVHF
,
2
2
,
Execution time
0.32 µs
Operation
The output (O) bit value is 1 if the corresponding bit value of any of the inputs (I1 or I2)
is 1. Otherwise the output bit value is 0.
Example:
I1
1 1 1 0 0 0 0 0 1 1 1 0 0 1 0 1 1 1 0 1 0 0 1 1 0 0 1 1 0 1 0 1
I2
0 0 0 0 0 1 1 1 0 0 1 0 1 1 1 0 1 0 0 1 1 0 0 1 1 0 1 0 1 1 1 1
O
1 1 1 0 0 1 1 1 1 1 1 0 1 1 1 1 1 1 0 1 1 0 1 1 1 0 1 1 1 1 1 1
Input
Input (I1, I2): DINT
Output
Output (O): DINT
Standard function blocks
219
BOOL_TO_DINT
(10018)
Type
Conversion
Illustration
%22/B72B',17
7/PVHF
6,*1
287
287
,1
,1
,1
,1
,1
,1
,1
,1
,1
,1
,1
,1
,1
,1
,1
,1
,1
,1
,1
,1
,1
,1
,1
,1
,1
,1
,1
,1
,1
,1
,1
Execution time
13.47 µs
Standard function blocks
220
Operation
The output (OUT) value is a 32-bit integer value formed from the boolean integer input
(IN1…IN31 and SIGN) values. IN1 = bit 0 and IN31 = bit 30.
Example:
IN1 = 1, IN2 = 0, IN3…IN31 = 1, SIGN = 1
OUT = 1111 1111 1111 1111 1111 1111 1111 1101
SIGN
Input
IN31…IN1
Sign input (SIGN): Boolean
Input (IN1…IN31): Boolean
Output
Output (OUT): DINT (31 bits + sign)
BOOL_TO_INT
(10019)
Type
Conversion
Illustration
%22/B72B,17
7/PVHF
,1
287
287
,1
,1
,1
,1
,1
,1
,1
,1
,1
,1
,1
,1
,1
,1
6,*1
Execution time
5.00 µs
Operation
The output (OUT) value is a 16-bit integer value formed from the boolean integer input
(IN1…IN1 and SIGN) values. IN1 = bit 0 and IN15 = bit 14.
Example:
IN1…IN15 = 1, SIGN = 0
OUT = 0111 1111 1111 1111
SIGN
Inputs
IN15…IN1
Input (IN1…IN15): Boolean
Sign input (SIGN): Boolean
Outputs
Standard function blocks
Output (OUT): DINT (15 bits + sign)
221
BSET
(10037)
Type
Bitwise
Illustration
',17
%6(7
7/PVHF
(1
2
2
%,715
%,7
,
Execution time
1.36 µs
Operation
The value of a selected bit (BITNR) of the input (I) is set as defined by the bit value input
(BIT). The function must be enabled by the enable input (EN).
BITNR: Bit number (0 = bit number 0, 31 = bit number 31)
If BITNR is not in the range of 0…31 (for DINT) or 0…15 (for INT) or if EN is reset to
zero, the input value is stored to the output as it is (i.e. no bit setting occurs).
Example:
EN = 1, BITNR = 3, BIT = 0
IN = 0000 0000 1111 1111
O = 0000 0000 1111 0111
Inputs
The input data type is selected by the user.
Enable input (EN): Boolean
Number of the bit (BITNR): DINT
Bit value input (BIT): Boolean
Input (I): INT, DINT
Outputs
Output (O): INT, DINT
CRITSPEED
(10068)
Type
Feedback & algorithms
Illustration
&5,763(('
7/PVHF
&5,763(('6(/
5()287387
&5,763(('/2
28767$7(
&5,763(('+,
287$&7,9(
&5,763(('/2
5()287387
28767$7(
287$&7,9(
&5,763(('+,
&5,763(('/2
&5,763(('+,
0$;
0,1
5(),1387
Standard function blocks
222
Execution time
4.50 µs
Operation
A critical speeds function block is available for applications where it is necessary to
avoid certain motor speeds or speed bands because of e.g. mechanical resonance
problems. The user can define three critical speeds or speed bands.
Example: An application has vibrations in the range of 540 to 690 rpm and 1380 to
1560 rpm. To make the drive made to jump over the vibration speed ranges:
- activate the critical speeds function (CRITSPEEDSEL = 1),
- set the critical speed ranges as in the figure below.
Motor speed
(rpm)
1
CRITSPEED1LO = 540 rpm
2
CRITSPEED1HI = 690 rpm
1560
3
CRITSPEED2LO = 1380 rpm
1380
4
CRITSPEED2HI = 1560 rpm
690
540
1
2
3
4
Drive speed reference (rpm)
Output OUTACTIVE is set to 1 when the output reference (REFOUTPUT) is different
from the input reference (REFINPUT).
The output is limited by the defined minimum and maximum limits (MIN and MAX).
Output OUTSTATE indicates in which critical speed range the operation point is.
Inputs
Critical speed activation input (CRITSPEEDSEL): Boolean
Reference input (REFINPUT): REAL
Minimum/maximum critical speed range input (CRITSPEEDNLO / CRITSPEEDNHI):
REAL
Minimum/maximum input (MIN/MAX): REAL
Outputs
Reference output (REFOUTPUT): REAL
Output state (OUTSTATE): REAL
Output active (OUTACTIVE): Boolean
Standard function blocks
223
CTD
(10047)
Type
Counter
Illustration
&7'
7/PVHF
/'
&9
&9
!&'
4
4
39
Execution time
0.92 µs
Operation
The counter output (CV) value is decreased by 1 if the counter input (CD) value
changes from 0 -> 1 and the load input (LD) value is 0. If the load input value is 1, the
preset input (PV) value is stored as the counter output (CV) value. If the counter output
has reached its minimum value -32768, the counter output remains unchanged.
The status output (Q) is 1 if the counter output (CV) value < 0.
Example:
LD
CD
PV
Q
CVprev
CV
0
1 -> 0
10
0
5
5
0
0 -> 1
10
0
5
5-1=4
1
1 -> 0
-2
1
4
-2
1
0 -> 1
1
0
-2
1
0
0 -> 1
5
1
1
1 -1 = 0
1
1 -> 0
-32768
1
0
-32768
0
0 -> 1
10
1
-32768
-32768
CVprev is the previous cycle counter output value.
Inputs
Counter input (CD): Boolean
Load input (LD): Boolean
Preset input (PV): INT
Outputs
Status output (Q): Boolean
Counter output (CV): INT
Standard function blocks
224
CTD_DINT
(10046)
Type
Counter
Illustration
&7'B',17
7/PVHF
/'
&9
&9
!&'
4
4
39
Execution time
0.92 µs
Operation
The counter output (CV) value is decreased by 1 if the counter input (CD) value
changes from 0 -> 1 and the load input (LD) value is 0. If the load input (LD) value is 1,
the preset input (PV) value is stored as the counter output (CV) value. If the counter
output has reached its minimum value -2147483648, the counter output remains
unchanged.
The status output (Q) is 1 if the counter output (CV) value < 0.
Example:
LD
CD
PV
Q
CVprev
CV
0
1 -> 0
10
0
5
5
0
0 -> 1
10
0
5
5-1=4
1
1 -> 0
-2
1
4
-2
1
0 -> 1
1
0
-2
1
0
0 -> 1
5
1
1
1 -1 = 0
1
1 -> 0
-2147483648
1
0
-2147483648
0
0 -> 1
10
1
-2147483648 -2147483648
CVprev is the previous cycle counter output value.
Inputs
Counter input (CD): Boolean
Load input (LD): Boolean
Preset input (PV): DINT
Outputs
Status output (Q): Boolean
Counter output (CV): DINT
Standard function blocks
225
CTU
(10049)
Type
Counter
Illustration
&78
7/PVHF
!&8
&9
&9
5
4
4
39
Execution time
0.92 µs
Operation
The counter output (CV) value is increased by 1 if the counter input (CU) value changes
from 0 -> 1 and the reset input (R) value is 0. If the counter output has reached its
maximum value 32767, the counter output remains unchanged.
The counter output (CV) is reset to 0 if the reset input (R) is 1.
The status output (Q) is 1 if the counter output (CV) value > preset input (PV) value.
Example:
R
CU
PV
Q
CVprev
CV
0
1 -> 0
20
0
10
10
0
0 -> 1
11
1
10
10 + 1 = 11
1
1 -> 0
20
0
11
0
1
0 -> 1
5
0
0
0
0
0 -> 1
20
0
0
0+1=1
0
0 -> 1
30
1
32767
32767
CVprev is the previous cycle counter output value.
Inputs
Counter input (CU): Boolean
Reset input (R): Boolean
Preset input (PV): INT
Outputs
Status output (Q): Boolean
Counter output (CV): INT
Standard function blocks
226
CTU_DINT
(10048)
Type
Counter
Illustration
&78B',17
7/PVHF
!&8
&9
&9
5
4
4
39
Execution time
0.92 µs
Operation
The counter output (CV) value is increased by 1 if the counter input (CU) value changes
from 0 -> 1 and the reset input (R) value is 0. If the counter output has reached its
maximum value 2147483647, the counter output remains unchanged.
The counter output (CV) is reset to 0 if the reset input (R) is 1.
The status output (Q) is 1 if the counter output (CV) value > preset input (PV) value.
Example:
R
CU
PV
Q
CVprev
CV
0
1 -> 0
20
0
10
10
0
0 -> 1
11
1
10
10 + 1 = 11
1
1 -> 0
20
0
11
0
1
0 -> 1
5
0
0
0
0
0 -> 1
20
0
0
0+1=1
0
0 -> 1
30
1
2147483647
2147483647
CVprev is the previous cycle counter output value.
Inputs
Counter input (CU): Boolean
Reset input (R): Boolean
Preset input (PV): DINT
Outputs
Status output (Q): Boolean
Counter output (CV): DINT
CTUD
(10051)
Type
Counter
Illustration
&78'
7/PVHF
!&8
&9
!&'
48
5
4'
/'
39
Standard function blocks
&9
48
4'
227
Execution time
1.40 µs
Operation
The counter output (CV) value is increased by 1 if the counter input (CU) value changes
from 0 -> 1 and the reset input (R) value is 0.
The counter output (CV) value is decreased by 1 if the counter input (CD) value
changes from 0 -> 1 and the load input (LD) value is 0.
If the load input (LD) value is 1, the preset input (PV) value is stored as the counter
output (CV) value.
The counter output (CV) is reset to 0 if the reset input (R) is 1.
If the counter output has reached its minimum or maximum value, -32768 or +32767,
the counter output remains unchanged until it is reset (R) or until the load input (LD) is
set to 1.
The up counter status output (QU) is 1 if the counter output (CV) value > preset input
(PV) value.
The down counter status output (QD) is 1 if the counter output (CV) value < 0.
Example:
CU
CD
R
LD
PV
QU
QD
CVprev
CV
0 -> 0
0 -> 0
0
0
2
0
1
0
0
0 -> 0
0 -> 0
0
1
2
1
0
0
2
0 -> 0
0 -> 0
1
0
2
0
1
2
0
0 -> 0
0 -> 0
1
1
2
0
1
0
0
0 -> 0
0 -> 1
0
0
2
0
1
0
0 - 1 = -1
0 -> 0
1 -> 1
0
1
2
1
0
-1
2
0 -> 0
1 -> 1
1
0
2
0
1
2
0
0 -> 0
1 -> 1
1
1
2
0
1
0
0
0 -> 1
1 -> 0
0
0
2
0
0
0
0+1=1
1 -> 1
0 -> 0
0
1
2
1
0
1
2
1 -> 1
0 -> 0
1
0
2
0
1
2
0
1 -> 1
0 -> 0
1
1
2
0
1
0
0
1 -> 1
0 -> 1
0
0
2
0
1
0
0 - 1 = -1
1 -> 1
1 -> 1
0
1
2
1
0
-1
2
1 -> 1
1 -> 1
1
0
2
0
1
2
0
1 -> 1
1 -> 1
1
1
2
0
1
0
0
CVprev is the previous cycle counter output value.
Inputs
Down counter input (CD): Boolean
Up counter input (CU): Boolean
Load input (LD): Boolean
Reset input (R): Boolean
Preset input (PV): INT
Outputs
Down counter status output (QD): Boolean
Up counter status output (QU): Boolean
Counter output (CV): INT
Standard function blocks
228
CTUD_DINT
(10050)
Type
Counter
Illustration
&78'B',17
7/PVHF
!&8
&9
&9
!&'
48
48
5
4'
4'
/'
39
Execution time
1.40 µs
Operation
The counter output (CV) value is increased by 1 if the counter input (CU) value changes
from 0 -> 1 and the reset input (R) value is 0.
The counter output (CV) value is decreased by 1 if the counter input (CD) value
changes from 0 -> 1 and the load input (LD) value is 0.
If the counter output has reached its minimum or maximum value, -2147483648 or
+2147483647, the counter output remains unchanged until it is reset (R) or until the load
input (LD) is set.
If the load input (LD) value is 1, the preset input (PV) value is stored as the counter
output (CV) value.
The counter output (CV) is reset to 0 if the reset input (R) is 1.
The up counter status output (QU) is 1 if the counter output (CV) value > preset input
(PV) value.
The down counter status output (QD) is 1 if the counter output (CV) value < 0.
Example:
CU
CD
R
LD
PV
QU
QD
CVprev
CV
0 -> 0
0 -> 0
0
0
2
0
1
0
0
0 -> 0
0 -> 0
0
1
2
1
0
0
2
0 -> 0
0 -> 0
1
0
2
0
1
2
0
0 -> 0
0 -> 0
1
1
2
0
1
0
0
0 -> 0
0 -> 1
0
0
2
0
1
0
0 - 1 = -1
0 -> 0
1 -> 1
0
1
2
1
0
-1
2
0 -> 0
1 -> 1
1
0
2
0
1
2
0
0 -> 0
1 -> 1
1
1
2
0
1
0
0
0 -> 1
1 -> 0
0
0
2
0
0
0
0+1=1
1 -> 1
0 -> 0
0
1
2
1
0
1
2
1 -> 1
0 -> 0
1
0
2
0
1
2
0
1 -> 1
0 -> 0
1
1
2
0
1
0
0
1 -> 1
0 -> 1
0
0
2
0
1
0
0 - 1 = -1
1 -> 1
1 -> 1
0
1
2
1
0
-1
2
1 -> 1
1 -> 1
1
0
2
0
1
2
0
1 -> 1
1 -> 1
1
1
2
0
1
0
0
CVprev is the previous cycle counter output value.
Standard function blocks
229
Inputs
Down counter input (CD): Boolean
Up counter input (CU): Boolean
Load input (LD): Boolean
Reset input (R): Boolean
Preset input (PV): DINT
Outputs
Down counter status output (QD): Boolean
Up counter status output (QU): Boolean
Counter output (CV): DINT
CYCLET
(10074)
Type
Feedback & algorithms
Illustration
&<&/(7
7/PVHF
287
287
Execution time
0.00 µs
Operation
Output (OUT) is the execution time of the selected function block.
Inputs
-
Outputs
Output (OUT): DINT. 1 = 1 µs
DATA CONTAINER
(10073)
Type
Data container
Illustration
'$7$&217$,1(5
5($/
7/PVHF
287
287
Execution time
0.00 µs
Operation
Output (OUT) is the array data used by the XTAB and YTAB tables in block FUNG-1V
(on page 251). Note that the array is defined with the output pin.
Inputs
-
Outputs
The output data type and the number of coordinate pairs are selected by the user.
Output (OUT): DINT, INT, REAL or REAL24
Standard function blocks
230
DEMUX-I
(10061)
Type
Switch & demux
Illustration
'(08;,
%22/
7/PVHF
$
2$
,
2$
2$
2$
2$
2$
Execution time
1.38 µs (when two inputs are used) + 0.30 µs (for every additional input). When all
inputs are used, the execution time is 10.38 µs.
Operation
Input (I) value is stored to the output (OA1…OA32) selected by the address input (A).
All other outputs are 0.
If the address input is 0, negative or exceeds the number of the outputs, all outputs are
0.
Inputs
The input data type is selected by the user.
Address input (A): DINT
Input (I): INT, DINT, Boolean, REAL, REAL24
Outputs
The number of the output channels (2…32) is selected by the user.
Output (OA1…OA32): INT, DINT, REAL, REAL24, Boolean
Standard function blocks
231
DEMUX-MI
(10062)
Type
Switch & demux
Illustration
'(08;0,
',17
7/PVHF
$
2$
2$
5
2$
2$
/
2$
2$
6
,
Execution time
0.99 µs (when two inputs are used) + 0.25 µs (for every additional input). When all
inputs are used, the execution time is 8.4 µs.
Operation
The input (I) value is stored to the output (OA1…OA32) selected by the address input
(A) if the load input (L) or the set input (S) is 1. When the load input is set to 1, the input
(I) value is stored to the output only once. When the set input is set to 1, the input (I)
value is stored to the output every time the block is executed. The set input overrides
the load input.
If the reset input (R) is 1, all connected outputs are 0.
If the address input is 0, negative or exceeds the number of the outputs, all outputs
are 0.
Example:
Inputs
S
L
R
A
I
OA1
OA2
OA3
OA4
1
0
0
2
150
0
150
0
0
0
0
0
2
120
0
150
0
0
0
1
0
3
100
0
150
100
0
1
0
0
1
200
200
150
100
0
1
1
0
4
250
200
150
100
250
1
1
1
2
300
0
0
0
0
The input data type is selected by the user.
Set input (S): Boolean
Load input (L): Boolean
Reset input (R): Boolean
Address input (A): DINT
Input (I): DINT, INT, REAL, REAL24, Boolean
Outputs
The number of the output channels (2…32) is selected by the user.
Output (OA1…OA32): DINT, INT, REAL, REAL24, Boolean
Standard function blocks
232
DINT_TO_BOOL
(10020)
Type
Conversion
Illustration
',17B72B%22/
7/PVHF
,1
287
287
287
287
287
287
287
287
287
287
287
287
287
287
287
287
287
287
287
287
287
287
287
287
287
287
287
287
287
287
287
287
6,*1
287
287
287
287
287
287
287
287
287
287
287
287
287
287
287
287
287
287
287
287
287
287
287
287
287
287
287
287
287
287
287
287
6,*1
Execution time
11.98 µs
Operation
The boolean output (OUT1…32) values are formed from the 32-bit integer input (IN)
value.
Example:
IN = 0 111 1111 1111 1111 1111 1111 1111 1100
SIGN
Inputs
Standard function blocks
Input (IN): DINT
OUT32…OUT1
233
Outputs
Output (OUT1…OUT32): Boolean
Sign output (SIGN): Boolean
DINT_TO_INT
(10021)
Type
Conversion
Illustration
',17B72B,17
7/PVHF
,
2
2
Execution time
0.53 µs
Operation
The output (O) value is a 16-bit integer value of the 32-bit integer input (I) value.
Examples:
I (31 bits + sign)
O (15 bits + sign)
2147483647
32767
-2147483648
-32767
0
0
Inputs
Input (I): DINT
Outputs
Output (O): INT
DINT_TO_REALn
(10023)
Type
Conversion
Illustration
',17B72B5($/Q
5($/
7/PVHF
,1
287
287
,1
Execution time
7.25 µs
Operation
The output (OUT) is the REAL/REAL24 equivalent of the input (IN). Input IN1 is the
integer value and input IN2 is the fractional value.
If one (or both) of the input values is negative, the output value is negative.
Example (from DINT to REAL):
When IN1 = 2 and IN2 = 3276, OUT = 2.04999.
The output value is limited to the maximum value of the selected data type range.
Inputs
Input (IN1, IN2): DINT
Outputs
The output data type is selected by the user.
Output (OUT): REAL, REAL24
Standard function blocks
234
DINT_TO_REALn_SIMP
(10022)
Type
Conversion
Illustration
',17B72B5($/QB6,03
5($/
7/PVHF
,
2
6&$/(
(55&
2
(55&
Execution time
6.53 µs
Operation
The output (O) is the REAL/REAL24 equivalent of the input (I) divided by the scale input
(SCALE).
Error codes indicated at the error output (ERRC) are as follows:
Error code
Description
0
No error
1001
The calculated REAL/REAL24 value exceeds the minimum value of
the selected data type range. The output is set to the minimum value.
1002
The calculated REAL/REAL24 value exceeds the maximum value of
the selected data type range. The output is set to the maximum
value.
1003
The SCALE input is 0. The output is set to 0.
1004
Incorrect SCALE input, i.e. the scale input is < 0 or is not a factor of
10.
Example (from DINT to REAL24):
When I = 205 and SCALE = 100, I/SCALE = 205 /100 = 2.05 and O = 2.04999.
Inputs
Input (I): DINT
Scale input (SCALE): DINT
Outputs
The output data type is selected by the user.
Output (O): REAL, REAL24
Error output (ERRC): DINT
Standard function blocks
235
DIV
(10002)
Type
Arithmetic
Illustration
,17
',9
7/PVHF
,1
287
287
,1
Execution time
2.55 µs
Operation
The output (OUT) is input IN1 divided by input IN2.
OUT = IN1/IN2
The output value is limited to the maximum and minimum values defined by the selected
data type range.
If the divider (IN2) is 0, the output is 0.
Inputs
The input data type is selected by the user.
Input (IN1, IN2): INT, DINT, REAL, REAL24
Outputs
Output (OUT): INT, DINT, REAL, REAL24
Type
Comparison
EQ
(10040)
Illustration
',17
(4
7/PVHF
,1
287
287
,1
,1
,1
Execution time
0.89 µs (when two inputs are used) + 0.43 µs (for every additional input). When all
inputs are used, the execution time is 13.87 µs.
Operation
The output (OUT) is 1 if all the connected input values are equal (IN1 = IN2 = … =
IN32). Otherwise the output is 0.
Inputs
The input data type and the number of inputs (2…32) are selected by the user.
Input (IN1…IN32): INT, DINT, REAL, REAL24
Outputs
Output (OUT): Boolean
Standard function blocks
236
EXPT
(10003)
Type
Arithmetic
Illustration
5($/
(;37
7/PVHF
,1
287
287
,1
Execution time
81.90 µs
Operation
The output (OUT) is input IN1 raised to the power of the input IN2:
OUT = IN1IN2
If input IN1 is 0, the output is 0.
The output value is limited to the maximum value defined by the selected data type
range.
Note: The execution of the EXPT function is slow.
Inputs
The input data type is selected by the user.
Input (IN1): REAL, REAL24
Input (IN2): REAL
Outputs
Output (OUT): REAL, REAL24
Type
Filter
FILT1
(10069)
Illustration
),/7
7/PVHF
,
2
2
7
Execution time
7.59 µs
Operation
The output (O) is the filtered value of the input (I) value and the previous output value
(Oprev). The FILT1 block acts as 1st order low pass filter.
Note: Filter time constant (T1) must be selected so that T1/Ts < 32767. If the ratio
exceeds 32767, it is considered as 32767. Ts is the cycle time of the program in ms.
If T1 < Ts, the output value is the input value.
The step response for a single pole low pass filter is:
O (t) = I(t) × (1 - e-t/T1)
The transfer function for a single pole low pass filter is:
G(s) = 1/ (1 + sT1)
Inputs
Input (I): REAL
Filter time constant input (T1): DINT, 1 = 1 ms
Outputs
Standard function blocks
Output (O): REAL
237
FILT2
(10070)
Type
Filter
Illustration
),/7
;
<
<
)54
5(6(7
Execution time
6.30 µs
Operation
The output (Y) is the filtered value of the input (X). The FILT2 block acts as a 2nd order
low pass filter.
When the RESET input value is set to 1, the input is connected to the output without
filtering.
Notes:
• The -3 dB cutoff frequency (FRQ) is limited to its maximum value (16383 Hz).
• The frequency of the input signal must be less than half of sampling frequency (fs) –
any higher frequencies are aliased to the allowable range. The sampling frequency is
defined by the time level of the block; for example, 1 ms corresponds to a sampling
frequency of 1000 Hz.
The following diagrams show the frequency responses for 1, 2, 5 and 10 ms time levels.
The -3 dB cutoff level is represented as the horizontal line at 0.7 gain.
Standard function blocks
238
Inputs
Input (X): REAL
-3 dB cutoff frequency input (FRQ): DINT (0…16383 Hz)
Reset input (RESET): Boolean
Outputs
Standard function blocks
Output (Y): REAL
239
FIO_01_slot1
(10084)
Type
Extensions
Illustration
),2BBVORW
7/$PVHF
',2FRQI
',
',2FRQI
',
',2FRQI
',
',2FRQI
',
'2
(UURU
',
',
',
',
(UURU
'2
'2
'2
52
52
Execution time
8.6 µs
Operation
The block controls the four digital inputs/outputs (DIO1…DIO4) and two relay outputs
(RO1, RO2) of a FIO-01 Digital I/O Extension mounted on slot 1 of the drive control unit.
The state of a DIOx conf input of the block determines whether the corresponding DIO
on the FIO-01 is an input or an output (0 = input, 1 = output). If the DIO is an output, the
DOx input of the block defines its state.
The RO1 and RO2 inputs define the state of the relay outputs of the FIO-01 (0 = not
energised, 1 = energised).
The DIx outputs show the state of the DIOs.
Inputs
Digital input/output mode selection (DIO1 conf … DIO4 conf): Boolean
Digital output state selection (DO1…DO4): Boolean
Relay output state selection (RO1, RO2): Boolean
Outputs
Digital input/output state (DI1…DI4): Boolean
Error output (Error): DINT (0 = No error; 1 = Solution program memory full)
Standard function blocks
240
FIO_01_slot2
(10085)
Type
Extensions
Illustration
),2BBVORW
7/$PVHF
',2FRQI
',
',2FRQI
',
',2FRQI
',
',2FRQI
',
'2
(UURU
',
',
',
',
(UURU
'2
'2
'2
52
52
Execution time
8.6 µs
Operation
The block controls the four digital inputs/outputs (DIO1…DIO4) and two relay outputs
(RO1, RO2) of a FIO-01 Digital I/O Extension mounted on slot 2 of the drive control unit.
The state of a DIOx conf input of the block determines whether the corresponding DIO
on the FIO-01 is an input or an output (0 = input, 1 = output). If the DIO is an output, the
DOx input of the block defines its state.
The RO1 and RO2 inputs define the state of the relay outputs of the FIO-01 (0 = not
energised, 1 = energised).
The DIx outputs show the state of the DIOs.
Inputs
Digital input/output mode selection (DIO1 conf … DIO4 conf): Boolean
Digital output state selection (DO1…DO4): Boolean
Relay output state selection (RO1, RO2): Boolean
Outputs
Digital input/output state (DI1…DI4): Boolean
Error output (Error): DINT (0 = No error; 1 = Solution program memory full)
Standard function blocks
241
FIO_11_AI_slot1
(10088)
Type
Extensions
Illustration
),2BB$,BVORW
7/$PVHF
$,ILOWJDLQ
$,PRGH
$,PRGH
$,0LQ
$,
$,
$,0D[
$,VFDOHG
$,VFDOHG
$,0LQVFDOH
$,PRGH
$,PRGH
$,0D[VFDOH
$,
$,
$,ILOWJDLQ
$,VFDOHG
$,VFDOHG
$,0LQ
$,PRGH
$,PRGH
$,0D[
$,
$,
$,0LQVFDOH
$,VFDOHG
$,VFDOHG
$,0D[VFDOH
(UURU
(UURU
$,ILOWJDLQ
$,0LQ
$,0D[
$,0LQVFDOH
$,0D[VFDOH
Execution time
11.1 µs
Operation
The block controls the three analogue inputs (AI1…AI3) of a FIO-11 Analog I/O
Extension mounted on slot 1 of the drive control unit.
The block outputs both the unscaled (AIx) and scaled (AIx scaled) actual values of each
analogue input. The scaling is based on the relationship between the ranges
AIx min … AIx max and AIx min scale … AIx max scale.
AIx Min must be smaller than AIx Max; AIx Max Scale can be greater or smaller than AIx
Min Scale.
AIx Min Scale < AIx Max Scale
AIx scaled
32768
AIx Max Scale
AIx Min
-11 V or
-22 mA
AIx Max
11 V or
22 mA
AIx [V or mA]
AIx Min Scale
-32768
Standard function blocks
242
AIx Min Scale > AIx Max Scale
AIx scaled
32768
AIx Min Scale
AIx Max
AIx Min
-11 V or
-22 mA
11 V or
22 mA
AIx [V or mA]
AIx Max Scale
-32768
The AIx filt gain inputs determine a filtering time for each input as follows:
AIx filt gain
Filtering time
0
No filtering
1
125 µs
2
250 µs
3
500 µs
4
1 ms
5
2 ms
6
4 ms
7
7.9375 ms
Notes
Recommended setting
The AIx mode outputs show whether the corresponding input is voltage (0) or current
(1). The voltage/current selection is made using the hardware switches on the FIO-11.
Inputs
Analogue input filter gain selection (AI1 filt gain … AI3 filt gain): INT
Minimum value of input signal (AI1 Min … AI3 Min): REAL (> -11 V or -22 mA)
Maximum value of input signal (AI1 Max … AI3 Max): REAL (< 11 V or 22 mA)
Minimum value of scaled output signal (AI1 Min scale … AI3 Min scale): REAL
Maximum value of scaled output signal (AI1 Max scale … AI3 Max scale): REAL
Outputs
Analogue input mode (voltage or current) (AI1 mode … AI3 mode): Boolean
Value of analogue input (AI1 … AI3): REAL
Scaled value of analogue input (AI1 scaled … AI3 scaled): REAL
Error output (Error): DINT (0 = No error; 1 = Solution program memory full)
Standard function blocks
243
FIO_11_AI_slot2
(10089)
Type
Extensions
Illustration
),2BB$,BVORW
7/$PVHF
$,ILOWJDLQ
$,PRGH
$,PRGH
$,0LQ
$,
$,
$,0D[
$,VFDOHG
$,VFDOHG
$,0LQVFDOH
$,PRGH
$,PRGH
$,0D[VFDOH
$,
$,
$,ILOWJDLQ
$,VFDOHG
$,VFDOHG
$,0LQ
$,PRGH
$,PRGH
$,0D[
$,
$,
$,0LQVFDOH
$,VFDOHG
$,VFDOHG
$,0D[VFDOH
(UURU
(UURU
$,ILOWJDLQ
$,0LQ
$,0D[
$,0LQVFDOH
$,0D[VFDOH
Execution time
11.1 µs
Operation
The block controls the three analogue inputs (AI1…AI3) of a FIO-11 Analog I/O
Extension mounted on slot 2 of the drive control unit.
The block outputs both the unscaled (AIx) and scaled (AIx scaled) actual values of each
analogue input. The scaling is based on the relationship between the ranges
AIx min … AIx max and AIx min scale … AIx max scale.
AIx Min must be smaller than AIx Max; AIx Max Scale can be greater or smaller than AIx
Min Scale.
AIx Min Scale < AIx Max Scale
AIx scaled
32768
AIx Max Scale
AIx Min
-11 V or
-22 mA
AIx Max
11 V or
22 mA
AIx [V or mA]
AIx Min Scale
-32768
Standard function blocks
244
AIx Min Scale > AIx Max Scale
AIx scaled
32768
AIx Min Scale
AIx Max
AIx Min
-11 V or
-22 mA
11 V or
22 mA
AIx [V or mA]
AIx Max Scale
-32768
The AIx filt gain inputs determine a filtering time for each input as follows:
AIx filt gain
Filtering time
0
No filtering
1
125 µs
2
250 µs
3
500 µs
4
1 ms
5
2 ms
6
4 ms
7
7.9375 ms
Notes
Recommended setting
The AIx mode outputs show whether the corresponding input is voltage (0) or current
(1). The voltage/current selection is made using the hardware switches on the FIO-11.
Inputs
Analogue input filter gain selection (AI1 filt gain … AI3 filt gain): INT
Minimum value of input signal (AI1 Min … AI3 Min): REAL (> -11 V or -22 mA)
Maximum value of input signal (AI1 Max … AI3 Max): REAL (< 11 V or 22 mA)
Minimum value of scaled output signal (AI1 Min scale … AI3 Min scale): REAL
Maximum value of scaled output signal (AI1 Max scale … AI3 Max scale): REAL
Outputs
Analogue input mode (voltage or current) (AI1 mode … AI3 mode): Boolean
Value of analogue input (AI1 … AI3): REAL
Scaled value of analogue input (AI1 scaled … AI3 scaled): REAL
Error output (Error): DINT (0 = No error; 1 = Solution program memory full)
Standard function blocks
245
FIO_11_AO_slot1
(10090)
Type
Extensions
Illustration
),2BB$2BVORW
7/$PVHF
$20LQ
$2
$2
$20D[
(UURU
(UURU
$20LQ6FDOH
$20D[6FDOH
$2VFDOHG
Execution time
4.9 µs
Operation
The block controls the analogue output (AO1) of a FIO-11 Analog I/O Extension
mounted on slot 1 of the drive control unit.
The block converts the input signal (AO scaled) to a 0…20 mA signal (AO) that drives
the analogue output; the input range AO Min Scale … AO Max Scale corresponds to
the current signal range of AO Min … AO Max.
AO Min Scale must be smaller than AO Max Scale; AO Max can be greater or smaller
than AO Min.
AO Min < AO Max
AO [mA]
20
AO Max
AO Min
0
0
AO Max Scale
AO Min Scale
-32768
32768
AO scaled
Standard function blocks
246
AO Min > AO Max
AO [mA]
20
AO Min
AO Max
0
AO Max Scale
Inputs
0
AO Min Scale
-32768
32768
Minimum current signal (AO Min): REAL (0…20 mA)
Maximum current signal (AO Max): REAL (0…20 mA)
Minimum input signal (AO Min Scale): REAL
Maximum input signal (AO Max Scale): REAL
Input signal (AO scaled): REAL
Outputs
Analogue output current value (AO): REAL
Error output (Error): DINT (0 = No error; 1 = Solution program memory full)
Standard function blocks
AO scaled
247
FIO_11_AO_slot2
(10091)
Type
Extensions
Illustration
),2BB$2BVORW
7/$PVHF
$20LQ
$2
$2
$20D[
(UURU
(UURU
$20LQ6FDOH
$20D[6FDOH
$2VFDOHG
Execution time
4.9 µs
Operation
The block controls the analogue output (AO1) of a FIO-11 Analog I/O Extension
mounted on slot 2 of the drive control unit.
The block converts the input signal (AO scaled) to a 0…20 mA signal (AO) that drives
the analogue output; the input range AO Min Scale … AO Max Scale corresponds to
the current signal range of AO Min … AO Max.
AO Min Scale must be smaller than AO Max Scale; AO Max can be greater or smaller
than AO Min.
AO Min < AO Max
AO [mA]
20
AO Max
AO Min
0
0
AO Max Scale
AO Min Scale
-32768
32768
AO scaled
Standard function blocks
248
AO Min > AO Max
AO [mA]
20
AO Min
AO Max
0
AO Max Scale
Inputs
0
AO Min Scale
-32768
32768
Minimum current signal (AO Min): REAL (0…20 mA)
Maximum current signal (AO Max): REAL (0…20 mA)
Minimum input signal (AO Min Scale): REAL
Maximum input signal (AO Max Scale): REAL
Input signal (AO scaled): REAL
Outputs
Analogue output current value (AO): REAL
Error output (Error): DINT (0 = No error; 1 = Solution program memory full)
Standard function blocks
AO scaled
249
FIO_11_DIO_slot1
(10086)
Type
Extensions
Illustration
),2BB',2BVORW
7/$PVHF
',2FRQI
',
',2FRQI
',
'2
(UURU
',
',
(UURU
'2
',ILOWJDLQ
',ILOWJDLQ
Execution time
6.0 µs
Operation
The block controls the two digital inputs/outputs (DIO1, DIO2) of a FIO-11 Digital I/O
Extension mounted on slot 1 of the drive control unit.
The state of a DIOx conf input of the block determines whether the corresponding DIO
on the FIO-11 is an input or an output (0 = input, 1 = output). If the DIO is an output, the
DOx input of the block defines its state.
The DIx outputs show the state of the DIOs.
The DIx filt gain inputs determine a filtering time for each input as follows:
Inputs
DIx filt gain
Filtering time
0
7.5 µs
1
195 µs
2
780 µs
3
4.680 ms
Digital input/output mode selection (DIO1 conf, DIO2 conf): Boolean
Digital output state selection (DO1, DO2): Boolean
Digital input filter gain selection (DI1 filt gain, DI2 filt gain): INT
Outputs
Digital input/output state (DI1, DI2): Boolean
Error output (Error): DINT (0 = No error; 1 = Solution program memory full)
Standard function blocks
250
FIO_11_DIO_slot2
(10087)
Type
Extensions
Illustration
),2BB',2BVORW
7/$PVHF
',2FRQI
',
',2FRQI
',
'2
(UURU
',
',
(UURU
'2
',ILOWJDLQ
',ILOWJDLQ
Execution time
6.0 µs
Operation
The block controls the two digital inputs/outputs (DIO1, DIO2) of a FIO-11 Digital I/O
Extension mounted on slot 2 of the drive control unit.
The state of a DIOx conf input of the block determines whether the corresponding DIO
on the FIO-11 is an input or an output (0 = input, 1 = output). If the DIO is an output, the
DOx input of the block defines its state.
The DIx outputs show the state of the DIOs.
The DIx filt gain inputs determine a filtering time for each input as follows:
Inputs
DIx filt gain
Filtering time
0
7.5 µs
1
195 µs
2
780 µs
3
4.680 ms
Digital input/output mode selection (DIO1 conf, DIO2 conf): Boolean
Digital output state selection (DO1, DO2): Boolean
Digital input filter gain selection (DI1 filt gain, DI2 filt gain): INT
Outputs
Digital input/output state (DI1, DI2): Boolean
Error output (Error): DINT (0 = No error; 1 = Solution program memory full)
Standard function blocks
251
FTRIG
(10030)
Type
Edge & bistable
Illustration
)75,*
7/PVHF
!&/.
4
4
Execution time
0.38 µs
Operation
The output (Q) is set to 1 when the clock input (CLK) changes from 1 to 0. The output is
set back to 0 with the next execution of the block. Otherwise the output is 0.
CLKprevious
CLK
Q
0
0
0
0
1
0
1
0
1 (for one execution cycle time, returns to 0 at the
next execution)
1
1
0
CLKprevious is the previous cycle output value.
Note: The output (Q) is 0 after cold restart and after the first execution of the block.
Otherwise the output is 1, when the clock input (CLK) is 1.
Inputs
Clock input (CLK): Boolean
Outputs
Output (Q): Boolean
FUNG-1V
(10072)
Type
Data container
Illustration
)81*9
',17
7/PVHF
%$/
<
%$/5()
%$/5()2
;
(5525
<
%$/5()2
(5525
;7$%
<7$%
Execution time
9.29 µs
Standard function blocks
252
Operation
The output (Y) at the value of the input (X) is calculated with linear interpolation from
a piecewise linear function.
Y = Yk + (X - Xk)(Yk+1 - Yk) / (Xk+1 - Xk)
The piecewise linear function is defined by the X and Y vector tables (XTAB and YTAB).
For each X-value in the XTAB table, there is a corresponding Y-value in the YTAB table.
The values in XTAB and YTAB must be in ascending order (i.e. from low to high).
XTAB and YTAB values are defined with the SPC tool (SPC = Solution Program
Composer).
Y4
Y3
Interpolated Y
Y2
Y1
X1
X2
X3
X4
X table
Y table
(XTAB)
X1
X2
X3
…
X9
(YTAB)
Y1
Y2
Y3
…
Y9
X
The balancing function (BAL) permits the output signal to track an external reference
and gives a smooth return to the normal operation. If BAL is set to 1, output Y is set to
the value of the balance reference input (BALREF). The X value which corresponds to
this Y value is calculated with linear interpolation and it is indicated by the balance
reference output (BALREFO).
If the X input is outside the range defined by the XTAB table, the output Y is set to the
highest or lowest value in the YTAB table and the ERROR output is set to 1.
If BALREF is outside the range defined by the YTAB table when balancing is activated
(BAL: 0 -> 1), the output Y is set to the value of the BALREF input and BALREFO output
is set to the highest or lowest value in the XTAB table. (ERROR output is 0).
ERROR output is set to 1 when the number of the XTAB and YTAB inputs are different.
When ERROR is 1, the FUNG-1V block will not function. XTAB and YTAB tables are
defined in the DATA CONTAINER block (on page 229).
Inputs
The input data type is selected by the user.
X value input (X): DINT, INT, REAL, REAL24
Balance input (BAL): Boolean
Balance reference input (BALREF): DINT, INT, REAL, REAL24.
X table input (XTAB): DINT, INT, REAL, REAL24
Y table input (YTAB): DINT, INT, REAL, REAL24
Outputs
Y value output (Y): DINT, INT, REAL, REAL24
Balance reference output (BALREFO): DINT, INT, REAL, REAL24
Error output (ERROR): Boolean
Standard function blocks
253
GE
>=
(10041)
Type
Comparison
Illustration
5($/
*(
7/PVHF
,1
287
287
,1
,1
Execution time
0.89 µs (when two inputs are used) + 0.43 µs (for every additional input). When all
inputs are used, the execution time is 13.87 µs.
Operation
The output (OUT) is 1 if (IN1 > IN2) & (IN2 > IN3) & … & (IN31 > IN32). Otherwise the
output is 0.
Inputs
The input data type and the number of inputs (2…32) are selected by the user.
Input (IN1…IN32): INT, DINT, REAL, REAL24
Outputs
GT
Output (OUT): Boolean
>
(10042)
Type
Comparison
Illustration
,17
*7
7/PVHF
,1
287
287
,1
,1
,1
Execution time
0.89 µs (when two inputs are used) + 0.43 µs (for every additional input). When all
inputs are used, the execution time is 13.87 µs.
Operation
The output (OUT) is 1 if (IN1 > IN2) & (IN2 > IN3) & … & (IN31 > IN32). Otherwise the
output is 0.
Inputs
The input data type and the number of inputs (2…32) are selected by the user.
Input (IN1…IN32): INT, DINT, REAL, REAL24
Outputs
Output (OUT): Boolean
Standard function blocks
254
INT
(10065)
Type
Feedback & algorithms
Illustration
,17
7/PVHF
,
2
.
2 +/
7,
2 //
2
2 +/
2 //
5,17
%$/
%$/5()
2+/
2//
Execution time
4.73 µs
Operation
The output (O) is the integrated value of the input (I):
O(t) = K/TI (∫ I(t) dt)
Where TI is the integration time constant and K is the integration gain.
The step response for the integration is:
O(t) = K × I(t) × t/TI
The transfer function for the integration is:
G(s) = K 1/sTI
The output value is limited according to the defined minimum and maximum limits (OLL
and OHL). If the value is below the minimum value, output O = LL is set to 1. If the value
exceeds the maximum value, output O = HL is set to 1. The output (O) retains its value
when the input signal I(t) = 0.
The integration time constant is limited to value 2147483 ms. If the time constant is
negative, zero time constant is used.
If the ratio between the cycle time and the integration time constant Ts/TI < 1, Ts/TI is
set to 1.
The integrator is cleared when the reset input (RINT) is set to 1.
If BAL is set to 1, output O is set to the value of the input BALREF. When BAL is set
back to 0, normal integration operation continues.
Inputs
Input (I): REAL
Gain input (K): REAL
Integration time constant input (TI): DINT, 0…2147483 ms
Integrator reset input (RINT): Boolean
Balance input (BAL): Boolean
Balance reference input (BALREF): REAL
Output high limit input (OHL): REAL
Output low limit input (OLL): REAL
Outputs
Output (O): REAL
High limit output (O=HL): Boolean
Low limit output (O=LL): Boolean
Standard function blocks
255
INT_TO_BOOL
(10024)
Type
Conversion
Illustration
,17B72B%22/
7/PVHF
,1
287
287
287
287
287
287
287
287
287
287
287
287
287
287
287
287
6,*1
287
287
287
287
287
287
287
287
287
287
287
287
287
287
287
287
6,*1
Execution time
4.31 µs
Operation
The boolean output (OUT1…16) values are formed from the 16-bit integer input (IN)
value.
Example:
IN = 0111 1111 1111 1111
SIGN
OUT16…OUT1
Inputs
Input (IN): INT
Outputs
Output (OUT1…OUT16): Boolean
Sign output (SIGN): Boolean
Standard function blocks
256
INT_TO_DINT
(10025)
Type
Conversion
Illustration
,17B72B',17
7/PVHF
,
2
2
LE
Execution time
0.33 µs
Operation
The output (O) value is a 32-bit integer value of the 16-bit integer input (I) value.
I
O
32767
32767
-32767
-32767
0
0
Inputs
Input (I): INT
Outputs
Output (O): DINT
<=
(10043)
Type
Comparison
Illustration
5($/
/(
7/PVHF
,1
287
287
,1
,1
Execution time
0.89 µs (when two inputs are used) + 0.43 µs (for every additional input). When all
inputs are used, the execution time is 13.87 µs.
Operation
Output (OUT) is 1 if (IN1 < IN2) & (IN2 < IN3) & … & (IN31 < IN2). Otherwise the output
is 0.
Inputs
The input data type and the number of inputs (2…32) are selected by the user.
Input (IN1…IN32): INT, DINT, REAL, REAL24
Outputs
Standard function blocks
Output (OUT): Boolean
257
LEAD/LAG
(10071)
Type
Filter
Illustration
/($'/$*
7/PVHF
;
<
<
$/3+$
7F
5(6(7
Execution time
5.55 µs
Operation
The output (Y) is the filtered value of the input (X). When ALPHA > 1, the function block
acts as a lead filter. When ALPHA < 1, the function block acts as a lag filter. When
ALPHA = 1, no filtering occurs.
The transfer function for a lead/lag filter is:
(1 + ALPHATcs) / (1 + Tcs)
When RESET input is 1, the input value (X) is connected to the output (Y).
If ALPHA or Tc < 0, the negative input value is set to zero before filtering.
Inputs
Input (X): REAL
Lead/Lag filter type input (ALPHA): REAL
Time constant input (Tc): REAL
Reset input (RESET): Boolean
Outputs
Output (Y): REAL
Type
Selection
LIMIT
(10052)
Illustration
/,0,7
5($/
7/PVHF
01
287
287
,1
0;
Execution time
0.53 µs
Operation
The output (OUT) is the limited input (IN) value. Input is limited according to the
minimum (MN) and maximum (MX) values.
Inputs
The input data type is selected by the user.
Maximum input limit (MX): INT, DINT, REAL, REAL24
Minimum input limit (MN): INT, DINT, REAL, REAL24
Input (IN): INT, DINT, REAL, REAL24
Outputs
Output (OUT): INT, DINT, REAL, REAL24
Standard function blocks
258
LT
<
(10044)
Type
Comparison
Illustration
',17
/7
7/PVHF
,1
287
287
,1
,1
,1
Execution time
0.89 µs (when two inputs are used) + 0.43 µs (for every additional input). When all
inputs are used, the execution time is 13.87 µs.
Operation
Output (OUT) is 1 if (IN1 < IN2) & (IN2 < IN3) & … & (IN31 < IN32). Otherwise the
output is 0.
Inputs
The input data type and the number of inputs (2…32) are selected by the user.
Input (IN1…IN32): INT, DINT, REAL, REAL24
Outputs
Output (OUT): Boolean
Type
Selection
MAX
(10053)
Illustration
,17
0$;
7/PVHF
,1
287
287
,1
,1
Execution time
0.81 µs (when two inputs are used) + 0.53 µs (for every additional input). When all
inputs are used, the execution time is 16.73 µs.
Operation
The output (OUT) is the highest input value (IN).
Inputs
The input data type and the number of inputs (2…32) are selected by the user.
Input (IN1…IN32): INT, DINT, REAL, REAL24
Outputs
Standard function blocks
Output (OUT): INT, DINT, REAL, REAL24
259
MIN
(10054)
Type
Selection
Illustration
5($/
0,1
7/PVHF
,1
287
287
,1
,1
,1
Execution time
0.81 µs (when two inputs are used) + 0.52 µs (for every additional input). When all
inputs are used, the execution time is 16.50 µs.
Operation
The output (OUT) is the lowest input value (IN).
Inputs
The input data type and the number of inputs (2…32) are selected by the user.
Input (IN1…IN32): INT, DINT, REAL, REAL24
Outputs
Output (OUT): INT, DINT, REAL, REAL24
Type
Arithmetic
MOD
(10004)
Illustration
,17
02'
7/PVHF
,1
287
287
,1
Execution time
1.67 µs
Operation
The output (OUT) is the remainder of the division of the inputs IN1 and IN2.
OUT = remainder of IN1/IN2
If input IN2 is zero, the output is zero.
Inputs
The input data type is selected by the user.
Input (IN1, IN2): INT, DINT
Outputs
Output (OUT): INT, DINT
Standard function blocks
260
MONO
(10057)
Type
Timer
Illustration
0212
7/PVHF
57*
2
2
73
7(
7(
,
Execution time
1.46 µs
Operation
The output (O) is set to 1 and the timer is started, if the input (I) is set to 1. The output is
reset to 0 when the time defined by the time pulse input (TP) has elapsed. Elapsed time
(TE) count starts when the output is set to 1 and stops when the output is set to 0.
If RTG is 0, a new input pulse during the time defined by TP has no effect on the
function. The function can be restarted only after the time defined by TP has elapsed.
If RTG is 1, a new input pulse during the time defined by TP restarts the timer and sets
the elapsed time (TE) to 0.
Example 1: MONO is not re-triggable, i.e. RTG = 0.
RTG = 0, TP = 4 s
I
O
4s
0
1
2
3
4s
4
5
TE = 0 s
TE = 0 s
6
7
8
9
TE = 0 s
10
t/s
TE = 4 s
TE = 4 s
Example 2: MONO is re-triggable, i.e. RTG = 1.
RTG = 1, TP = 2 s
I
O
2s
0
1
2
TE = 0 s
Inputs
3
*
4
5
6
7
*
*
*
* TE is set to 0.
Re-trigger input (RTG): Boolean
Input (I): Boolean
Time pulse input (TP): DINT (1 = µs)
Outputs
Output (O): Boolean
Time elapsed output (TE): DINT (1 = 1 µs)
Standard function blocks
8
9
10
TE = 2 s
t/s
261
MOTPOT
(10067)
Type
Feedback & algorithms
Illustration
027327
7/PVHF
(1$%/(
287387
287387
83
'2:1
5$037,0(
0$;9$/
0,19$/
5(6(79$/
5(6(7
Execution time
2.92 µs
Operation
The motor potentiometer function controls the rate of change of the output from the
minimum to the maximum value and vice versa.
The function is enabled by setting the ENABLE input to 1. If the up input (UP) is 1, the
output reference (OUTPUT) is increased to the maximum value (MAXVAL) with the
defined ramp time (RAMPTIME). If the down input (DOWN) is 1, the output value is
decreased to the minimum value (MINVAL) with the defined ramp time. If the up and
down inputs are activated/deactivated simultaneously, the output value is not increased/
decreased.
If the RESET input is 1, the output will be reset to the value defined by the reset value
input (RESETVAL) or to the value defined by the minimum input (MINVAL), whichever is
higher.
If the ENABLE input is 0, the output is zero.
During power recycle the previous values can be stored to the memory (storing must be
activated by the user). Note: Memory storing is not supported yet.
Digital inputs are normally used as up and down inputs.
Inputs
Function enable input (ENABLE): Boolean
Up input (UP): Boolean
Down input (DOWN): Boolean
Ramp time input (RAMPTIME): REAL (seconds) (i.e. the time required for the output to
change from the minimum to the maximum value or from the maximum to the minimum
value)
Maximum reference input (MAXVAL): REAL
Minimum reference input (MINVAL): REAL
Reset value input (RESETVAL): REAL
Reset input (RESET): Boolean
Outputs
Output (OUTPUT) REAL
Standard function blocks
262
MOVE
(10005)
Type
Arithmetic
Illustration
5($/
029(
7/PVHF
,1
287
,1
287
,1
287
,1
287
287
287
287
287
Execution time
2.10 µs (when two inputs are used) + 0.42 µs (for every additional input). When all
inputs are used, the execution time is 14.55 µs.
Operation
Copies the input values (IN1…32) to the corresponding outputs (OUT1…32).
Inputs
The input data type and number of inputs (2…32) are selected by the user.
Input (IN1…IN32): INT, DINT, REAL, REAL24, Boolean
Outputs
Output (OUT1…OUT32): INT, DINT, REAL, REAL24, Boolean
Type
Arithmetic
MUL
(10006)
Illustration
,17
08/
7/PVHF
,1
287
287
,1
,1
Execution time
3.47 µs (when two inputs are used) + 2.28 µs (for every additional input). When all
inputs are used, the execution time is 71.73 µs.
Operation
The output (OUT) is the product of the inputs (IN).
O = IN1 × IN2 × … × IN32
The output value is limited to the maximum and minimum values defined by the selected
data type range.
Inputs
The input data type and the number of inputs (2…32) are selected by the user.
Input (IN1…IN32): INT, DINT, REAL, REAL24
Outputs
Standard function blocks
Output (OUT): INT, DINT, REAL, REAL24
263
MULDIV
(10007)
Type
Arithmetic
Illustration
08/',9
7/PVHF
,
2
08/
5(0
2
5(0
',9
Execution time
7.10 µs
Operation
The output (O) is the product of input IN and input MUL divided by input DIV.
Output = (I × MUL) / DIV
O = whole value. REM = remainder value.
Example: I = 2, MUL = 16 and DIV = 10:
(2 × 16) / 10 = 3.2, i.e. O = 3 and REM = 2
The output value is limited to the maximum and minimum values defined by the data
type range.
Inputs
Input (I): DINT
Multiplier input (MUL): DINT
Divider input (DIV): DINT
Outputs
Output (O): DINT
Remainder output (REM): DINT
MUX
(10055)
Type
Selection
Illustration
5($/
08;
7/PVHF
.
287
287
,1
,1
,1
,1
Execution time
0.70 µs
Operation
The value of an input (IN) selected by the address input (K) is stored to the output
(OUT).
If the address input is 0, negative or exceeds the number of the outputs, the output is 0.
Inputs
The input data type and number of inputs (2…32) are selected by the user.
Address input (K): DINT
Input (IN1…IN32): INT, DINT, REAL, REAL24
Outputs
Output (OUT): INT, DINT, REAL, REAL24
Standard function blocks
264
NE
<>
(10045)
Type
Comparison
Illustration
',17
1(
7/PVHF
,
2
2
,
Execution time
0.44 µs
Operation
The output (O) is 1 if I1 <> I2. Otherwise the output is 0.
Inputs
The input data type is selected by the user.
Input (I1, I2): INT, DINT, REAL, REAL24
Outputs
Output (O): Boolean
Type
Bitstring
NOT
(10011)
Illustration
127
7/PVHF
,
2
2
Execution time
0.32 µs
Operation
The output (O) is 1 if the input (I) is 0. The output is 0 if the input is 1.
Inputs
Input (I): Boolean
Outputs
Output (O): Boolean
Standard function blocks
265
OR
(10012)
Type
Bitstring
Illustration
25
7/PVHF
,1
287
287
,1
,1
Execution time
1.55 µs (when two inputs are used) + 0.60 µs (for every additional input). When all
inputs are used, the execution time is 19.55 µs.
Operation
The output (OUT) is 0, if all connected inputs (IN) are 0. Otherwise the output is 1.
Truth table:
IN1
IN2
OUT
0
0
0
0
1
1
1
0
1
1
1
1
The inputs can be inverted.
Inputs
The number of inputs (2…32) is selected by the user.
Input (IN1…IN32): Boolean
Outputs
Output (OUT): Boolean
Type
Feedback & algorithms
PARRD
(10082)
Illustration
3$55'
7/PVHF
*URXS
2XWSXW
,QGH[
(UURU
2XWSXW
(UURU
Execution time
6.00 µs
Operation
Output is the value of the defined parameter (Group and Index).
Error codes are indicated by the error output (Error) as follows:
Inputs
Error code
Description
0
No error
≠0
Error
Parameter group input (Group): DINT
Parameter index input (Index): DINT
Standard function blocks
266
Outputs
Output (Output): DINT
Error output (Error): DINT
PARWR
(10080)
Type
Feedback & algorithms
Illustration
3$5:5
7/PVHF
,1
(UURU
(UURU
*URXS
,QGH[
6WRUH
Execution time
14.50 µs
Operation
The input value (IN) is written to the defined parameter (Group and Index).
The new parameter value is stored to the flash memory if the store input (Store) is 1.
Note: Cyclic parameter value storing can damage the memory unit. Parameter values
should be stored only when necessary.
Error codes are indicated by the error output (Error) as follows:
Error code
Inputs
Description
0
No error
<>0
Error
Input (IN): DINT
Parameter group input (Group): DINT
Parameter index input (Index): DINT
Store input (Store): Boolean
Outputs
Standard function blocks
Error output (Error): DINT
267
PID
(10075)
Type
Feedback & algorithms
Illustration
3,'
7/PVHF
,1BDFW
2XW
,1BUHI
'HY
3
2 +/
W,
2 //
W'
(5525
2XW
'HY
2 +/
2 //
(5525
W&
,BUHVHW
%$/
%$/BUHI
2+/
2//
Execution time
15.75 µs
Standard function blocks
268
Operation
The PID controller can be used for closed-loop control systems. The controller includes
anti-windup correction and output limitation.
The PID controller output (Out) before limitation is the sum of the proportional (UP),
integral (U I) and derivative (UD) terms:
Outunlimited (t) = UP(t) + U I(t) + UD(t)
UP(t) = P × Dev(t)
UI(t) = P/tI × [∫ Dev(τ)dτ + tC × (Out(t) - Outunlimited(t))]
UD(t) = P × tD × d(Dev(t))/dt
Integrator:
The integral term can be cleared by setting I_reset to 1. Note that the anti-windup
correction is simultaneously disabled. When I_reset is 1, the controller acts as a PD
controller.
If integration time constant tI is 0, the integral term will not be updated.
Smooth return to normal operation is guaranteed after errors or abrupt input value
changes. This is achieved by adjusting the integral term so that the output will retain its
previous value during these situations.
Limitation:
The output is limited by the defined minimum and maximum values, OLL and OHL:
If the actual value of the output reaches the specified minimum limit, output O=LL is set
to 1.
If the actual value of the output reaches the specified maximum limit, output O=HL is set
to 1.
Smooth return to normal operation after limitation is requested if and only if the
anti-windup correction is not used, i.e. when tI = 0 or tC = 0.
Error codes:
Error codes are indicated by the error output (ERROR) as follows
Error code
Description
1
The minimum limit (OLL) exceeds the maximum limit (OHL).
2
Overflow with Up, Ui, or Ud calculation
Balancing:
The balancing function (BAL) permits the output signal to track an external reference
and gives a smooth return to the normal operation. If BAL is set to 1, the output (Out) is
set to the value of the balance reference input (BAL_ref). Balance reference is limited by
the defined minimum and maximum limits (OLL and OHL).
Anti-windup:
Anti-windup correction time constant is defined by input tC. If tC = 0 or tI = 0,
anti-windup correction is disabled.
Standard function blocks
269
Inputs
Proportional gain input (P): REAL
Integration time constant input (tI): REAL. 1 = 1 ms
Derivation time constant input (tD): REAL. 1 = 1 ms
Antiwind-up correction time constant input (tC): IQ6. 1 = 1 ms
Output high limit input (OHL): REAL
Output low limit input (OLL): REAL
Actual input (IN_act): REAL
Reference input (IN_ref): REAL
Integrator reset input (I_reset): Boolean
Balance input (BAL): Boolean
Balance reference input (BAL_ref): REAL
Outputs
Output (Out): REAL
Error code output (ERROR): INT32
Deviation output (Dev): REAL (= actual -reference = IN_act - IN_ref)
High limit output (O=HL): Boolean
Low limit output (O=LL): Boolean
Standard function blocks
270
RAMP
(10066)
Type
Feedback & algorithms
Illustration
5$03
7/PVHF
,1
2
67(3
2 +/
67(3
2 //
2
2 +/
2 //
6/23(
6/23(
%$/
%$/5()
2+/
2//
Execution time
4.23 µs
Operation
Limits the rate of the change of the signal.
The input signal (IN) is connected directly to the output (O) if the input signal does not
exceed the defined step change limits (STEP+ and STEP-). If the input signal change
exceeds these limits, the output signal change is limited by the maximum step change
(STEP+/STEP- depending on the direction of rotation). After this the output signal is
accelerated/decelerated according to the defined ramp times (SLOPE+/SLOPE-) until
the input and output signal values are equal.
The output is limited by the defined minimum and maximum values (OLL and OHL):
If the actual value of the output exceeds the specified minimum limit (OLL), output O=LL
is set to 1.
If the actual value of the output exceeds the specified maximum limit (OHL), output
O=HL is set to 1.
If balancing input (BAL) is set to 1, the output (O) is set to the value of the balance
reference input (BAL_ref). Balancing reference is also limited by the defined minimum
and maximum values (OLL and OHL).
Inputs
Input (IN): REAL
Maximum positive step change input (STEP+): REAL
Maximum negative step change input (STEP-): REAL
Positive ramp input (SLOPE+): REAL
Negative ramp input (SLOPE-): REAL
Balance input (BAL): Boolean
Balance reference input (BALREF): REAL
Output high limit input (OHL): REAL
Output low limit input (OLL): REAL
Outputs
Output (O): REAL
High limit output (O=HL): Boolean
Low limit output (O=LL): Boolean
Standard function blocks
271
REAL_TO_REAL24
(10026)
Type
Conversion
Illustration
5($/B72B5($/
7/PVHF
,
2
2
Execution time
1.35 µs
Operation
Output (O) is the REAL24 equivalent of the REAL input (I).
The output value is limited to the maximum value of the data type.
Example:
I = 0000 0000 0010 0110 1111 1111 1111 1111
Fractional value
Integer value
O = 0010 0110 1111 1111 1111 1111 0000 0000
Fractional value
Integer value
Inputs
Input (I): REAL
Outputs
Output (O): REAL24
REAL24_TO_REAL
(10027)
Type
Conversion
Illustration
5($/B72B5($/
7/PVHF
,
2
2
Execution time
1.20 µs
Operation
Output (O) is the REAL equivalent of the REAL24 input (I).
The output value is limited to the maximum value of the data type range.
Example:
I = 0010 0110 1111 1111 1111 1111 0000 0000
Integer value
Fractional value
O = 0000 0000 0010 0110 1111 1111 1111 1111
Integer value
Inputs
Input (I): REAL24
Outputs
Output (O): REAL
Fractional value
Standard function blocks
272
REALn_TO_DINT
(10029)
Type
Conversion
Illustration
5($/QB72B',17
5($/
7/PVHF
,
2
2
2
2
Execution time
6.45 µs
Operation
Output (O) is the 32-bit integer equivalent of the REAL/REAL24 input (I). Output O1 is
the integer value and output O2 is the fractional value.
The output value is limited to the maximum value of the data type range.
Example (from REAL to DINT):
When I = 2.04998779297, O1 = 2 and O2 = 3276.
Inputs
The input data type is selected by the user.
Input (I): REAL, REAL24
Outputs
Output (O1, O2): DINT
REALn_TO_DINT_SIMP
(10028)
Type
Conversion
Illustration
5($/QB72B',17B6,03
5($/
7/PVHF
,
2
6&$/(
(55&
2
(55&
Execution time
5.54 µs
Operation
Output (O) is the 32-bit integer equivalent of the REAL/REAL24 input (I) multiplied by
the scale input (SCALE).
Error codes are indicated by the error output (ERRC) as follows:
Error code
Description
0
No error
1001
The calculated integer value exceeds the minimum value. The output
is set to the minimum value.
1002
The calculated integer value exceeds the maximum value. The
output is set to the maximum value.
1003
Scale input is 0. The output is set to 0.
1004
Incorrect scale input, i.e. scale input is < 0 or is not a factor of 10.
Example (from REAL to DINT):
When I = 2.04998779297and SCALE = 100, O = 204.
Standard function blocks
273
Inputs
The input data type is selected by the user.
Input (I): REAL, REAL24
Scale input (SCALE): DINT
Outputs
Output (O): DINT
Error output (ERRC): DINT
REG
(10038)
Type
Feedback & algorithms
Illustration
,17
5(*
7/PVHF
6
2
2
!/
2
2
5
2
2
,
2
2
,
,
,
Execution time
2.27 µs (when two inputs are used) + 1.02 µs (for every additional input). When all
inputs are used, the execution time is 32.87 µs.
Operation
The input (I1…I32) value is stored to the corresponding output (O1…O32) if the load
input (L) is set to 1 or the set input (S) is 1. When the load input is set to 1, the input
value is stored to the output only once. When the set input is 1, the input value is stored
to the output every time the block is executed. The set input overrides the load input.
If the reset input (R) is 1, all connected outputs are 0.
Example:
S
R
L
I
O1previous
O1
0
0
0
10
15
15
0
0
0->1
20
15
20
0
1
0
30
20
0
0
1
0->1
40
0
0
1
0
0
50
0
50
1
0
0->1
60
50
60
1
1
0
70
60
0
1
1
0->1
80
0
0
O1previous is the previous cycle output value.
Inputs
The input data type and number of inputs (2…32) are selected by the user.
Set input (S): Boolean
Load input (L): Boolean
Reset input (R): Boolean
Input (I1…I32): Boolean, INT, DINT, REAL, REAL24
Outputs
Output (O1…O32): Boolean, INT, DINT, REAL, REAL24
Standard function blocks
274
ROL
(10013)
Type
Bitstring
Illustration
',17
52/
7/PVHF
%,7&17
2
2
,
Execution time
1.28 µs
Operation
Input bits (I) are rotated to the left by the number (N) of bits defined by BITCNT. The N
most significant bits (MSB) of the input are stored as the N least significant bits (LSB) of
the output.
Example: If BITCNT = 3
3 MSB
I
1 1 1 0 0 0 0 0 1 1 1 0 0 1 0 1 1 1 0 1 0 0 1 1 0 0 1 1 0 1 0 1
O 0 0 0 0 0 1 1 1 0 0 1 0 1 1 1 0 1 0 0 1 1 0 0 1 1 0 1 0 1 1 1 1
3 LSB
Inputs
The input data type is selected by the user.
Input (I): INT, DINT
Number of bits input (BITCNT): INT, DINT
Outputs
Standard function blocks
Output (O): INT, DINT
275
ROR
(10014)
Type
Bitstring
Illustration
,17
525
7/PVHF
%,7&17
2
2
,
Execution time
1.28 µs
Operation
Input bits (I) are rotated to the right by the number (N) of bits defined by BITCNT. The N
least significant bits (LSB) of the input are stored as the N most significant bits (MSB) of
the output.
Example: If BITCNT = 3
3 LSB
I
1 1 1 0 0 0 0 0 1 1 1 0 0 1 0 1 1 1 0 1 0 0 1 1 0 0 1 1 0 1 0 1
O 1 0 1 1 1 1 0 0 0 0 0 1 1 1 0 0 1 0 1 1 1 0 1 0 0 1 1 0 0 1 1 0
3 MSB
Inputs
The input data type is selected by the user.
Input (I): INT, DINT
Number of bits input (BITCNT): INT, DINT
Outputs
Output (O): INT, DINT
Standard function blocks
276
RS
(10032)
Type
Edge & bistable
Illustration
56
7/PVHF
6
4
4
5
Execution time
0.38 µs
Operation
The output (Q1) is 0 if the set input (S) is 1 and the reset input (R) value is 0. The output
will retain the previous output state if the set input (S) and the reset input (R) are 0. The
output is 0 if the set input is 0 and the reset input is 1.
Truth table:
S
R
Q1previous
Q1
0
0
0
0
0
0
1
1
0
1
0
0
0
1
1
0
1
0
0
1
1
0
1
1
1
1
0
0
1
1
1
0
Qprevious is the previous cycle output value.
Inputs
Set input (S): Boolean
Reset input (R): Boolean
Outputs
Standard function blocks
Output (Q1): Boolean
277
RTRIG
(10031)
Type
Edge & bistable
Illustration
575,*
7/PVHF
!&/.
4
4
Execution time
0.38 µs
Operation
The output (Q) is set to 1 when the clock input (CLK) changes from 0 to 1. The output is
set back to 0 with the next execution of the block. Otherwise the output is 0.
CLKprevious
CLK
Q
0
0
0
0
1
1
1
0
0
1
1
0
CLKprevious is the previous cycle output value.
Note: The output is 0 after cold restart and after the first execution of the RTRIG block.
Otherwise the output is 1, when the clock input is 1.
Inputs
Clock input (CLK): Boolean
Outputs
Output (Q): Boolean
Type
Selection
SEL
(10056)
Illustration
',17
6(/
7/PVHF
*
287
287
,1$
,1%
Execution time
1.53 µs
Operation
The output (OUT) is the value of the input (IN) selected by the selection input (G).
If G = 0: OUT = IN A.
If G = 1: OUT = IN B.
Inputs
The input data type is selected by the user.
Selection input (G): Boolean
Input (IN A, IN B): Boolean, INT, DINT, REAL, REAL24
Outputs
Output (OUT): Boolean, INT, DINT, REAL, REAL24
Standard function blocks
278
SHL
(10015)
Type
Bitstring
Illustration
,17
6+/
7/PVHF
%,7&17
2
2
,
Execution time
0.80 µs
Operation
Input bits (I) are rotated to the left by the number (N) of bits defined by BITCNT. The N
most significant bits (MSB) of the input are lost and the N least significant bits (LSB) of
the output are set to 0.
Example: If BITCNT = 3
3 MSB
I
1 1 1 0 0 0 0 0 1 1 1 0 0 1 0 1 1 1 0 1 0 0 1 1 0 0 1 1 0 1 0 1
O 0 0 0 0 0 1 1 1 0 0 1 0 1 1 1 0 1 0 0 1 1 0 0 1 1 0 1 0 1 0 0 0
3 LSB
Inputs
The input data type is selected by the user.
Input (I): INT, DINT
Number of bits (BITCNT): INT; DINT
Outputs
Standard function blocks
Output (O): INT; DINT
279
SHR
(10016)
Type
Bitstring
Illustration
6+5
,17
7/PVHF
%,7&17
2
2
,
Execution time
0.80 µs
Operation
Input bits (I) are rotated to the right by the number (N) of bits defined by BITCNT. The N
least significant bits (LSB) of the input are lost and the N most significant bits (MSB) of
the output are set to 0.
Example: If BITCNT = 3
3 LSB
I
1 1 1 0 0 0 0 0 1 1 1 0 0 1 0 1 1 1 0 1 0 0 1 1 0 0 1 1 0 1 0 1
O 0 0 0 1 1 1 0 0 0 0 0 1 1 1 0 0 1 0 1 1 1 0 1 0 0 1 1 0 0 1 1 0
3 MSB
Inputs
The input data type is selected by the user.
Input (I): INT, DINT
Number of bits (BITCNT): INT; DINT
Outputs
Output (O): INT; DINT
Type
Arithmetic
SQRT
(10008)
Illustration
6457
5($/
7/PVHF
,1
287
Execution time
2.09 µs
Operation
Output (OUT) is the square root of the input (IN).
287
OUT = sqrt(IN)
Output is 0 if the input value is negative.
Inputs
The input data type is selected by the user.
Input (IN): REAL, REAL24
Outputs
Output (OUT): REAL, REAL24
Standard function blocks
280
SR
(10033)
Type
Edge & bistable
Illustration
65
7/PVHF
6
4
4
5
Execution time
0.38 µs
Operation
The output (Q1) is 1 if the set input (S1) is 1. The output will retain the previous output
state if the set input (S1) and the reset input (R) are 0. The output is 0 if the set input is
0 and the reset input is 1.
Truth table:
S1
R
Q1previous
Q1
0
0
0
0
0
0
1
1
0
1
0
0
0
1
1
0
1
0
0
1
1
0
1
1
1
1
0
1
1
1
1
1
Q1previous is the previous cycle output value.
Inputs
Set input (S1): Boolean
Reset input (R): Boolean
Outputs
Output (Q1): Boolean
Type
Bitwise
SR-D
(10039)
Illustration
65'
7/PVHF
6
2
'
!&
5
Execution time
Standard function blocks
1.04 µs
2
281
Operation
When clock input (C) is set to 1, the data input (D) value is stored to the output (O).
When reset input (R) is set to 1, the output is set to 0.
If only set (S) and reset (R) inputs are used, SR-D block acts as an SR block:
The output is 1 if the set input (S) is 1. The output will retain the previous output state if
the set input (S) and reset input (R) are 0. The output is 0 if the set input is 0 and the
reset input is 1.
Truth table:
S
R
D
C
Oprevious
O
0
0
0
0
0
0 (= Previous output value)
0
0
0
0 -> 1
0
0 (= Data input value)
0
0
1
0
0
0 (= Previous output value)
0
0
1
0 -> 1
0
1 (= Data input value)
0
1
0
0
1
0 (Reset)
0
1
0
0 -> 1
0
0 (Reset)
0
1
1
0
0
0 (Reset)
0
1
1
0 -> 1
0
0 (Reset)
1
0
0
0
0
1 (= Set value)
1
0
0
0 -> 1
1
0 (= Data input value) for
one execution cycle, then
changes to 1 according to
the set input (S = 1).
1
0
1
0
1
1 (= Set value)
1
0
1
0 -> 1
1
1 (= Data input value)
1
1
0
0
1
0 (Reset)
1
1
0
0 -> 1
0
0 (Reset)
1
1
1
0
0
0 (Reset)
1
1
1
0 -> 1
0
0 (Reset)
Oprevious is the previous cycle output value.
Inputs
Set input (S): Boolean
Data input (D): Boolean
Clock input (C): Boolean
Reset input (R): Boolean
Outputs
Output (O): Boolean
Standard function blocks
282
SUB
-
(10009)
Type
Arithmetic
Illustration
5($/
68%
7/PVHF
,1
287
287
,1
Execution time
2.33 µs
Operation
Output (OUT) is the difference between the input signals (IN):
OUT = IN1 - IN2
The output value is limited to the maximum and minimum values defined by the selected
data type range.
Inputs
The input data type is selected by the user.
Input (IN1, IN2): INT, DINT, REAL, REAL24
Outputs
Output (OUT): INT, DINT, REAL, REAL24
SWITCH
(10063)
Type
Switch & Demux
Illustration
,17
6:,7&+
7/PVHF
$&7
287
,1
287
,1
287
,1
287
287
287
287
287
,1
Execution time
0.68 µs (when two inputs are used) + 0.50 µs (for every additional input). When all
inputs are used, the execution time is 15.80 µs.
Operation
The output (OUT) is equal to the corresponding input (IN) if the activate input (ACT) is 1.
Otherwise the output is 0.
Inputs
The input data type and the number of inputs (2…32) are selected by the user.
Activate input (ACT): Boolean
Input (IN1…IN32): INT, DINT, REAL, REAL24, Boolean
Outputs
Standard function blocks
Output (OUT1…OUT32): INT, DINT, REAL, REAL24, Boolean
283
SWITCHC
(10064)
Type
Switch & Demux
Illustration
6:,7&+&
%22/
7/PVHF
$&7
287
&+$
287
&+$
287
287
287
287
&+$
&+%
&+%
&+%
Execution time
1.53 µs (when two inputs are used) + 0.73 µs (for every additional input). When all
inputs are used, the execution time is 23.31 µs.
Operation
The output (OUT) is equal to the corresponding channel A input (CH A1…32) if the
activate input (ACT) is 0. The output is equal to the corresponding channel B input (CH
B1…32) if the activate input (ACT) is 1.
Inputs
The input data type and the number of inputs (2…32) are selected by the user.
Activate input (ACT): Boolean
Input (CH A1…CH A32, CH B1…CH B32): INT, DINT, REAL, REAL24, Boolean
Outputs
Output (OUT1…OUT32): INT, DINT, REAL, REAL24, Boolean
Standard function blocks
284
TOF
(10058)
Type
Timer
Illustration
72)
7/PVHF
,1
(7
(7
37
4
4
Execution time
1.10 µs
Operation
The output (Q) is set to 1, when the input (IN) is set to 1. The output is reset to zero
when the input has been 0 for a time defined by the pulse time input (PT).
Elapsed time count (TE) starts when the input is set to 0 and stops when the input is set
to 1.
Example:
IN
ET
Q
ET
PT
Inputs
ET
PT
Input (IN): Boolean
Pulse time input (PT): DINT (1 = 1 µs)
Outputs
Output (Q): Boolean
Elapsed time output (ET): DINT (1 = 1 µs)
Standard function blocks
285
TON
(10059)
Type
Timer
Illustration
721
7/PVHF
,1
(7
(7
37
4
4
Execution time
1.22 µs
Operation
The output (Q) is set to 1 when the input (IN) has been 1 for a time defined by the pulse
time input (PT). The output is set to 0, when the input is set to 0.
Elapsed time count (TE) starts when the input is set to 1 and stops when the input is set
to 0.
Example:
IN
ET
ET
ET
Q
PT
Inputs
PT
Input (IN): Boolean
Pulse time input (PT): DINT (1 = 1 µs)
Outputs
Output (Q): Boolean
Elapsed time output (ET): DINT (1 = 1 µs)
Standard function blocks
286
TP
(10060)
Type
Timer
Illustration
73
7/PVHF
37
4
4
!,1
(7
(7
Execution time
1.46 µs
Operation
The output (Q) is set to 1 when the input (IN) is set to 1. The output is set to 0, when it
has been 1 for a time defined by the pulse time input (PT).
Elapsed time count (TE) starts when the input is set to 1 and stops when the input is set
to 0.
IN
Q
PT
ET
PT
Inputs
PT
Input (IN): Boolean
Pulse time input (PT): DINT (1 = 1 µs)
Outputs
Output (Q): Boolean
Elapsed time output (ET): DINT (1 = 1 µs)
Standard function blocks
287
XOR
(10017)
Type
Bitstring
Illustration
;25
7/PVHF
,1
287
287
,1
,1
,1
Execution time
1.24 µs (when two inputs are used) + 0.72 µs (for every additional input). When all
inputs are used, the execution time is 22.85 µs.
Operation
The output (OUT) is 1 if one of the connected inputs (IN1…IN32) is 1. Output is zero if
all the inputs have the same value.
Example:
IN1
IN2
OUT
0
0
0
0
1
1
1
0
1
1
1
0
The inputs can be inverted.
Inputs
The number of inputs (2…32) is selected by the user.
Input (IN1…IN32): Boolean
Outputs
Output (OUT): Boolean
Standard function blocks
288
Standard function blocks
289
Control block diagrams
What this chapter contains
This chapter presents the Solution Program pages containing the firmware blocks.
Control block diagrams
Control block diagrams
3DJH6LJQDOV
)LUPZDUHYHU )LUPZDUH/LEUDU\,' YHU 6WDQGDUG/LEUDU\,' YHU &XVW'RF1R
'DWH
%DVHGRQ
&XVWRPHU
%5$.(5(6/2$'
7(03%&
7(03,19(57(5
63(('(67,0$7('
'&92/7$*(
72548(
&855(173(5&
&855(17
)5(48(1&<
63(('$&73(5&
$&78$/9$/8(6
7/)PVHF
3UHSDUHG
$SSURYHG
3URMHFWQDPH
7LWOH
5HVSGHSW
'RF1R
'RFGHV
290
>@
',
',67$786
',,19(570$6.
7/)PVHF
3DJH'LJLWDO,2
)LUPZDUHYHU )LUPZDUH/LEUDU\,' YHU 6WDQGDUG/LEUDU\,' YHU &XVW'RF1R
'DWH
%DVHGRQ
&XVWRPHU
3UHSDUHG
$SSURYHG
3URMHFWQDPH
7LWOH
>%5$.(&200$1'@
>@
>@
>+]@
>+]@
>67$786:25'@
)$8/7
63(('$&7
>2XWSXW@
02'8/$7,1*
>67$786:25'@
>2XWSXW@
5($'<5(/$<
>67$786:25'@
>2XWSXW@
52287375
5HVSGHSW
'RF1R
'RFGHV
5267$786
52
',2)0,16&$/(
',2)0$;6&$/(
',2)0,1
',2)0$;
',2)287375
',2287375
',2)5(4287
',2&21)
7/)PVHF
',267$786
',2
',2287375
',2)5(4,1
',2&21)
7/)PVHF
',267$786
',2
',2287375
7/)PVHF
',267$786
',2
',2&21)
7/)PVHF
291
Control block diagrams
Control block diagrams
>@
>@
>9@
>9@
>V@
>@
>@
>9@
>9@
>V@
$,0,16&$/(
$,0$;6&$/(
$,0,1
$,0$;
$,
$,
$,6&$/('
$,),/77,0(
7/)PVHF
$,
$,0,16&$/(
$,0$;6&$/(
$,0,1
$,0$;
$,6&$/('
$,
$,),/77,0(
7/)PVHF
3DJH$QDORJ,2
)LUPZDUHYHU )LUPZDUH/LEUDU\,' YHU 6WDQGDUG/LEUDU\,' YHU &XVW'RF1R
'DWH
%DVHGRQ
&XVWRPHU
3UHSDUHG
$SSURYHG
3URMHFWQDPH
>@
>@
>9@
>9@
63(('$&73(5&
>V@
>@
>@
>P$@
>P$@
>V@
&855(173(5&
7LWOH
$2
$2
$20,16&$/(
$20$;6&$/(
$20,1
$20$;
$2),/77,0(
$2375
7/)PVHF
$20,16&$/(
$20$;6&$/(
$20,1
$20$;
$2),/77,0(
$2375
7/)PVHF
5HVSGHSW
'RF1R
'RFGHV
$2
$2
292
>)$8/7@
>)$/6(@
>)$/6(@
>@
>USP@
>V@
>V@
>)$/6(@
>12@
>6WDQGVWLOO@
>'LVDEOHG@
>@
>USP@
>5DPS@
>PV@
>&RQVWWLPH@
>)$/6(@
>)$/6(@
>)$/6(@
>)$/6(@
72548(
63(('$&7
>3RVLWLRQ@
>6SHHG@
>V@
>1R@
>'LVDEOH@
67$57672302'(
)%$6:%65&
)%$6:%65&
)%$6:%65&
)%$6:%65&
)%$$&77565&
)%$$&77565&
)%$5()02'(6(/
)%$5()02'(6(/
&200/2667287
%5$.(&200$1'
%5$.(72540(0
%5$.()$8/7)81&
%5$.(23(1+2/'
%5$.(&/26(5(4
%5$.(23(17254
%5$.(&/26(63'
%5$.(&/26('/<
%5$.(23(1'(/$<
%5$.($&.12:/
%5$.(&21752/
7/)PVHF
0(&+%5$.(&75/
$8723+$6,1*02'(
'&+2/'
'&+2/'&855()
'&+2/'63(('
672302'(
'&0$*17,0(
67$5702'(
3DJH'ULYH/RJLF
)LUPZDUHYHU )LUPZDUH/LEUDU\,' YHU 6WDQGDUG/LEUDU\,' YHU %DVHGRQ
&XVWRPHU
&XVW'RF1R
'DWH
3UHSDUHG
$SSURYHG
3URMHFWQDPH
>)$/6(@
>)$/6(@
72545()727&
'')2//2:(5&:
63(('5()5$03('
>@
>@
>@
>$ODUP@
>'LVDEOHG@
)%$0$,1&:
>'LVDEOHG@
>758(@
>758(@
',
>758(@
>',67$786@
>)$/6(@
',
>)$/6(@
>',67$786@
>,Q@
',
>)$/6(@
>',67$786@
67$786:25'
63(('&75/67$7
)%$0$,15()
7LWOH
)2//2:(5&:65&
5()65&
5()65&
)2//2:(50$6.
)2//2:(50$6.
12'($'5(66
&200/266)81&
5HVSGHSW
'RF1R
'RFGHV
''5()
''5()
''0$,1&:
/,1.02'(
7/)PVHF
''&20081,&$7,21
-2*(1$%/(
-2*67$57
)%&:86('
67$57,1+,%,7
(067232))
(067232))
581(1$%/(
)$8/75(6(76(/
-2*67$57
(;767$57,1
(;767$57,1
(;767$57)81&
(;767$57,1
(;767$57,1
(;767$57)81&
326&25567$786
326&75/67$786
326&75/67$786
7254/,067$786
/,0,7:25'
67$786:25'
>,Q@
)%$0$,15()
'5,9(/2*,&
'')2//2:(5&:
7/)PVHF
)%$0$,16:
&200/266)81&
7/)PVHF
)%$0$,1&:
),(/'%86
)%$(1$%/(
7/)PVHF
293
Control block diagrams
Control block diagrams
%5$.(&+233(5
6833/<92/7$*(
6833/92/7$872,'
81'(592/7&75/
&XVW'RF1R
'DWH
%DVHGRQ
&XVWRPHU
86('6833/<92/7
92/7$*(&75/
29(592/7$*(&75/
7/)PVHF
%57(03$/$50/,0
%57(03)$8/7/,0
5%5
%532:(50$;&17
%57+(507,0(&2167
%&5817,0((1$
%&(1$%/(
7/)PVHF
3DJH'ULYH&RQWURO
)LUPZDUHYHU )LUPZDUH/LEUDU\,' YHU 6WDQGDUG/LEUDU\,' YHU >9@
>(QDEOH@
>(QDEOH@
>(QDEOH@
>@
>@
>2KP@
>N:@
>V@
>758(@
>'LVDEOH@
3UHSDUHG
$SSURYHG
3URMHFWQDPH
7LWOH
5HVSGHSW
'RF1R
'RFGHV
294
>=(52@
>$,@
63(('5()6(/
63(('5()6(/
63(('5()
63(('5()
63(('5()6(/
7/)VHF
>USP@
>USP@
>USP@
63(('5()0,1$%6
63(('5()-2*
63(('5()-2*
&216763(('(1$
&216763(('
63(('5()1(*(1$
63(('6+$5(
63(('5()6(/
63(('5(),1
&XVW'RF1R
'DWH
%DVHGRQ
&XVWRPHU
63(('5()5$03,1
63(('5(),1
3DJH6SHHG5HI
)LUPZDUHYHU )LUPZDUH/LEUDU\,' YHU 6WDQGDUG/LEUDU\,' YHU >)$/6(@
>USP@
>)$/6(@
>@
>)$/6(@
63(('5()
63(('5()
63(('5()02'
7/)VHF
>)$/6(@
>USP@
>V@
>V@
>V@
>V@
>V@
>V@
>V@
>V@
>V@
63(('5()5$03,1
>USP@
3UHSDUHG
$SSURYHG
3URMHFWQDPH
63(('5()%$/(1$
63(('5()%$/
(067237,0(
'(&7,0(-2**,1*
$&&7,0(-2**,1*
6+$3(7,0('(&
6+$3(7,0('(&
6+$3(7,0($&&
6+$3(7,0($&&
'(&7,0(
$&&7,0(
63(('6&$/,1*
63(('5$03,1
7LWOH
63(('5()5$03('
63(('5()5$03
7/)PVHF
'RFGHV
5HVSGHSW
'RF1R
295
Control block diagrams
Control block diagrams
>USP@
>USP@
>PV@
>USP@
>@
>@
>PV@
>(VWLPDWHG@
63(('75,30$5*,1
$%29(63(('/,0
=(5263((''(/$<
=(5263(('/,0,7
02725*($5',9
02725*($508/
63(('$&7)7,0(
63((')%6(/
63(('$&7
63((')(('%$&.
7/)VHF
>PV@
>V@
>USP@
>PV@
$&&&203)7,0(
$&&&203'(57,0(
63((':,1'2:
63(('(55)7,0(
63(('67(3
63((')(('3&75/
63(('5()3&75/
63(('5()1&75/
&XVW'RF1R
'DWH
%DVHGRQ
&XVWRPHU
$&&&2037254
63(('(5525),/7
63(('$&71&75/
3DJH6SHHG&WUO
)LUPZDUHYHU )LUPZDUH/LEUDU\,' YHU 6WDQGDUG/LEUDU\,' YHU >USP@
63((')(('):'
63(('5()326
63(('5()5$03('
63(('$&7
63(('5()86('
63(('(5525
7/)VHF
>@
>@
>)$/6(@
>@
>@
$&&&2037254
>PV@
>V@
>V@
63(('(5525),/7
>@
3UHSDUHG
$SSURYHG
3URMHFWQDPH
0$;725463&75/
0,1725463&75/
63(('&75/%$/(1
%$/5()(5(1&(
'5223,1*5$7(
$&&&203(16$7,21
'(5,9),/77,0(
'(5,9$7,217,0(
,17(*5$7,217,0(
3523257*$,1
63(('(551&75/
7LWOH
72545()63&75/
63(('&21752/
7/)VHF
'RFGHV
5HVSGHSW
'RF1R
296
>=(52@
>$,@
72545()$''6(/
72545()6(/
72548(5()$''
72545()
72545()6(/
7/)VHF
3DJH7RUTXH5HI
)LUPZDUHYHU )LUPZDUH/LEUDU\,' YHU 6WDQGDUG/LEUDU\,' YHU 72545()586+/,0
72548(5()$''
72545()63&75/
>6SHHG@
>3RVLWLRQ@
>+RPLQJ@
',
>',67$786@
',
>6SHHG@
>',67$786@
>V@
>V@
>@
>@
>@
72545()
&XVW'RF1R
'DWH
%DVHGRQ
&XVWRPHU
72545()$''65&
75()725465&
75()63(('65&
/2&$/&75/02'(
(;7&75/02'(
(;7&75/02'(
(;7&75/02'(
(;702'(6(/
(;7(;76(/
2302'($&.
72545()727&
5()(5(1&(&75/
72545$03'2:1
72545$0383
/2$'6+$5(
0,1,08072545()
0$;,08072545()
72545()586+/,0
72545(),1
7/)PVHF
72545()5$03('
72545()02'
7/)VHF
3UHSDUHG
$SSURYHG
3URMHFWQDPH
7LWOH
'RFGHV
5HVSGHSW
'RF1R
297
Control block diagrams
Control block diagrams
>+]@
>)$/6(@
>758(@
>DXWRULVLQJ@
>4XDGUDWXUH@
>@
>+]@
>)$/6(@
>758(@
>DXWRULVLQJ@
>4XDGUDWXUH@
>@
38/6((1&&21)
(1&26&/,0
(1&63(67(1$
(1&326(67(1$
(1&63&$/&02'(
(1&7<3(
(1&38/6(15
(1&26&/,0
(1&63(67(1$
(1&326(67(1$
(1&63&$/&02'(
(1&7<3(
(1&38/6(15
7/)PVHF
3DJH(QFRGHU
)LUPZDUHYHU )LUPZDUH/LEUDU\,' YHU 6WDQGDUG/LEUDU\,' YHU >PV@
>,QLWLDOSRV@
>GHJ@
>XV@
>,QLWLDOSRV@
>NELWV@
>ELQDU\@
>@
>@
>@
>@
>@
>2GG@
>)$/6(@
>@
>@
>1RQH@
>@
>@
>'RQH@
>)DXOW@
>'LVDEOHG@
>'LVDEOHG@
>1RQH@
>1RQH@
(1&2'(5326
$%62/(1&&21)
(08/38/6(15
(1&3$55()5(6+
(1&&$%/()$8/7
77/(&+26(/
(08/02'(6(/
&XVW'RF1R
'DWH
%DVHGRQ
&XVWRPHU
(1'$70$;&$/&
(1'$702'(
66,=(523+$6(
66,75$160,7&<&
66,02'(
66,%$8'5$7(
66,'$7$)250$7
66,5(92/06%
66,326,7,2106%
66,&/2&.&<&/(6
+,3(5)12'($''5
+,3(5)%$8'5$7(
+,3(5)$&(3$5,7<
5()0$5.(1$
326'$7$%,76
5(9&2817%,76
$%6(1&,17(5)
6,1(&26,1(15
)(1',67$786
(1&2'(5326
(1&2'(563(('
(1&2'(56(/
7/)PVHF
(1&2'(563(('
(1&2'(5
(1&2'(56(/
7/)PVHF
3UHSDUHG
$SSURYHG
3URMHFWQDPH
>N+]@
>9UPV@
>@
5(62/9(5&21)
7LWOH
(;&6,*1$/)5(4
(;&6,*1$/$03/
5(62/932/(3$,56
7/)PVHF
5HVSGHSW
'RF1R
'RFGHV
298
)25&(23(1/223
92/7$*(5(6(59(
6/,3*$,1
6)5()
&XVW'RF1R
'DWH
%DVHGRQ
&XVWRPHU
)/8;5()86('
)/8;5()
3DJH0RWRU&WUO
)LUPZDUHYHU )LUPZDUH/LEUDU\,' YHU 6WDQGDUG/LEUDU\,' YHU >)$/6(@
>@
>@
>N+]@
>@
02725&21752/
7/)PVHF
3UHSDUHG
$SSURYHG
3URMHFWQDPH
7LWOH
5HVSGHSW
'RF1R
'RFGHV
299
Control block diagrams
>@
>@
>$@
>758(@
>758(@
>USP@
>USP@
/,0,76
0,1,08072548(
0$;,08072548(
0$;,080&855(17
1(*63(('(1$
32663(('(1$
0,1,08063(('
0$;,08063(('
7/)PVHF
Control block diagrams
3DJH3URWHFWLRQV
)LUPZDUHYHU )LUPZDUH/LEUDU\,' YHU 6WDQGDUG/LEUDU\,' YHU >V@
>&@
>+]@
>@
>@
>&@
>&@
>&@
>(67,0$7('@
>1R@
&XVW'RF1R
'DWH
%DVHGRQ
&XVWRPHU
0277+(507,0(
0271207(035,6(
%5($.32,17
=(5263(('/2$'
027/2$'&859(
$0%,(177(03
0277(03)/7/,0
0277(03$/0/,0
0277(036285&(
0277(033527
>)DXOW@
>)DXOW@
>)DXOW@
>)DXOW@
>)DXOW@
>)DXOW@
>USP@
7LWOH
5HVSGHSW
'RF1R
'RFGHV
&5266&211(&7,21
672',$*1267,&
6833/3+6/266
($57+)$8/7
0273+$6(/266
/2&$/&75//266
63(('5()6$)(
(;7(51$/)$8/7
$/$50:25'
$/$50:25'
$/$50:25'
)$8/77,0(/2
)$8/77,0(+,
/$67)$8/7
3UHSDUHG
$SSURYHG
3URMHFWQDPH
$&7,9()$8/7
>758(@
)$8/7)81&7,216
7/)PVHF
027257(03
027257(03(67
0277+(503527
7/)PVHF
300
3AFE68848261 REV D / EN
EFFECTIVE: 12.11.2007
ABB Oy
AC Drives
P.O. Box 184
FI-00381 HELSINKI
FINLAND
Telephone
+358 10 22 11
Fax
+358 10 22 22681
Internet
http://www.abb.com
ABB Inc.
Automation Technologies
Drives & Motors
16250 West Glendale Drive
New Berlin, WI 53151
USA
Telephone
262 785-3200
800-HELP-365
Fax
262 780-5135
ABB Beijing Drive Systems Co. Ltd.
No. 1, Block D, A-10 Jiuxianqiao Beilu
Chaoyang District
Beijing, P.R. China, 100015
Telephone
+86 10 5821 7788
Fax
+86 10 5821 7618
Internet
http://www.abb.com