1
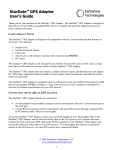
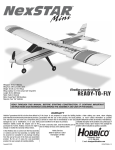
NexStar MX Series
NST-225MX-S3
2.5” SATA to USB3.0 Dual Bay RAID Enclosure
User Manual
NST-225MX-S3
2.5” Dual SATA 6 Gb/s to USB 3.0 HDD/SSD RAID
Table of Contents
PACKAGE CONTENTS .............................................................................................................................................................. 3
INTRODUCTION...................................................................................................................................................................... 3
HARD DRIVE INSTALLATION GUIDE......................................................................................................................................... 5
RAID MODE SELECTION .......................................................................................................................................................... 9
RESOURCES .......................................................................................................................................................................... 11
DRIVE MAPPING FOR HDD LED / RAID AP / PCB ............................................................................................................................. 11
LED – NORMAL STATUS................................................................................................................................................................. 11
LED – ERROR STATUS .................................................................................................................................................................. 12
HARD DRIVE FORMATTING GUIDE ....................................................................................................................................... 14
®
PARTITION A VOLUME UNDER WINDOWS OS .................................................................................................................................... 14
INITIALIZE A DISK .......................................................................................................................................................................... 17
®
PARTITION A VOLUME UNDER LINUX UBUNTU ................................................................................................................................... 20
®
PARTITION A VOLUME UNDER MAC OS ............................................................................................................................................ 24
2
NST-225MX-S3
2.5” Dual SATA 6 Gb/s to USB 3.0 HDD/SSD RAID
Package Contents
Dual 2.5” SATA 6 Gb/s to USB 3.0 HDD/SSD RAID Enclosure
1) NexStar MX main unit
2) USB 3.0 Cable
3) Power Adapter
4)
5)
6)
7)
User’s Manual
Quick Installation Guide
Installation Screws
Software CD
Introduction
Vantec NexStar® MX 2.5” Dual Bay External HDD Enclosure with USB 3.0 interface is a
small and simple way to expand and protect your data anywhere. This compact form
factor design can houses two small hard drive or Solid State Drive with
Individual/JBOD/RAID0/RAID1 mode capability and can travel with it. This RAID in a box
simplifies the configuration and at the same time provides maximum storage for your
precious family photos, music, video, and games. The sturdy drive cage protects your
hard drive while the aluminum case effectively draws away the heat; the front vents and
the rear fan keep your hard drive(s) cool and improve performance. The Vantec NexStar®
MX 2.5” is a high performance, high capacity, and durable portable storage solution and
lets you store your personal data in an enclosure with style!
3
NST-225MX-S3
Front View
2.5” Dual SATA 6 Gb/s to USB 3.0 HDD/SSD RAID
Rear View
A. Fan
B. USB 3.0 Port
C. Power Switch
D. Power Socket
E. Power LED
F. HDD1 LED
G. HDD2 LED
4
NST-225MX-S3
2.5” Dual SATA 6 Gb/s to USB 3.0 HDD/SSD RAID
Hard Drive Installation Guide
1. Remove the 4 screws shown.
2. Slide out the enclosure cover.
5
NST-225MX-S3
2.5” Dual SATA 6 Gb/s to USB 3.0 HDD/SSD RAID
3. Insert the Second (lower) HDD/SSD in to the lower bay and push all the way in for
the SATA interface on the tray to make full contact with the drive interface. The
screw hole on the drive should align with the tray screw hole.
4. Insert the HDD/SSD into the top bay and push horizontally for both the SATA
interface on the tray and drive to be fully inserted. The screw hole on the drive
should align with the tray screw hole.
5. Secure both HDD/SSD with the 4 screws on each side of the Tray.
6
NST-225MX-S3
2.5” Dual SATA 6 Gb/s to USB 3.0 HDD/SSD RAID
6. Set the RAID Mode Switch to the correct setting according to RAID SW definition
table below.
IMPORTANT: If your drive have existing data AND you like to use it as Normal mode
(Individual mode), set the switch to Normal Mode and DO NOT PRESS THE RESET
BUTTON IN THE NEXT STEP (SKIP STEP #7).
Note:
☆ When you press the RESET button, it will cause a RAID mode change.
☆ HDD formatting is required whenever RAID mode changes. If you have important data on the drive, STOP,
backup your data before you continue.
☆ Make sure the enclosure is powered on before changing RAID mode.
Mode
Operation Mode Description
Normal
Normal - Write each HDD independently
(Individual)
two separate HDDs and their capacities
Just a Bunch of Disk - It concatenates two disks to a
JBOD
single drive.
Capacity equals to the sum of two disks.
RAID 0
RAID 1
Stripe - Write data evenly across both disks
Capacity is double of the smaller HDD
Mirror - Create a mirror of data on both disks
Capacity equals to that of the smaller HDD
7
NST-225MX-S3
2.5” Dual SATA 6 Gb/s to USB 3.0 HDD/SSD RAID
7. This Step will set the RAID mode. Connect the power cable to the enclosure and
the ac adapter to your power outlet. While pressing the reset button, turn ON the
power switch and continue to hold the reset button for another 10-15 seconds
while the drive spin up and set the mode change. After 15 seconds later, you can
release the reset button and the mode change is done. The Green HDD LED will
continue to flash and the Red Power LED will be ON. You can now turn off the unit
and continue with the next step.
8. Slide the cover back on to the Tray and secure using the 4 Screws.
9. You can now start using your enclosure. If you need to initialize, partition and
format the drive, please refer to Chapter on Hard Drive Formatting Guide.
8
NST-225MX-S3
2.5” Dual SATA 6 Gb/s to USB 3.0 HDD/SSD RAID
RAID Mode Selection
Normal (Individual): It enables each HDD to be seen separately as single drives.
RAID 0 (Stripe): It’s a combination of two physical partitions where the data is striped
between them. It presents the best data speed but no data redundancy.
Both HDDs allots the loading evenly. In short, RAID 0 stands for faster transmission.
9
NST-225MX-S3
2.5” Dual SATA 6 Gb/s to USB 3.0 HDD/SSD RAID
RAID 1 (Mirror): It allows the device to automatically copy data to both HDDs. It stores
all data in duplication to both drives to protect against data loss out of drive failure.
If one drive fails, the Mirrored volume is still usable, but it is in a vulnerable state since
the other mirrored hard drive is inaccessible. When the offline drive resumes online, the
appliance begins the rebuild process immediately to restore data redundancy.
Host access takes precedence in rebuild process. If you continue using the Mirror volume
during the rebuild, the rebuild process will take a longer time to complete, and the host
data transfer performance will also be impacted.
JBOD (BIG or LARGE): It concatenates a series of physical HDDs as a single large
volume; HDD 1 and 2 are combined into a storage capacity that is equal to the sum of
both HDDs.
10
NST-225MX-S3
2.5” Dual SATA 6 Gb/s to USB 3.0 HDD/SSD RAID
Resources
The section contains information that will help answer questions about this product.
Drive mapping for HDD LED / RAID AP / PCB
LED
JMicron HW RAID Manager
Physical Location on PCB printout
HDD 1
P0 port
CON1
HDD 2
P1 port
CON2
LED – Normal Status
LED status
Situation
HDD1
HDD2
Power
PC in Sleep Mode S3/S4/S5
OFF
OFF
RED
USB, HDD1 & 2 connected
ON
ON
GREEN
Normal
HDD1 access
Flashing
ON
GREEN
(Individual)
HDD2 access
ON
Flashing
GREEN
Flashing
Flashing
GREEN
Flashing
Flashing
GREEN
RAID 0 (Strip)
Data Access
RAID 1 (Mirror)
JBOD (Big)
Rebuild
Online
Both, Flashing until finished
GREEN
Offline Both, Flashing until finished
GREEN
HDD1 access
Flashing
ON
GREEN
HDD2 access
ON
Flashing
GREEN
Flashing
GREEN
MODE change (USB connected to system) Flashing
11
NST-225MX-S3
2.5” Dual SATA 6 Gb/s to USB 3.0 HDD/SSD RAID
LED – ERROR Status
Normal Mode (Individual)
Operation
Operations
HDD1 Error
PWR USB
ON
Activities
HDD
HDD
System
HDD1
HDD2
LED
LED
LED
Linked
#1
#2
Power
Power
Power
HDD1
HDD2
PWR
Linked
Error
Read
ON
OFF
ON
Flash at Flash
Write
HDD2 Error
ON
Linked
Read
Error
ON
ON
OFF
Green
FAN
Comments
ON
HDD1 error, spin
fix
down, LED Flash at
0.5Hz
fixed 0.5Hz
Flash
Write
Flash at Green
ON
HDD2 error, spin
fix
down, LED Flash at
0.5Hz
fixed 0.5Hz
RAID 0 Mode (Strip)
Operation
Operations
HDD1 Error
PWR USB
ON
Activities
HDD
HDD
System
HDD1
HDD2
LED
LED
LED
Linked
#1
#2
Power
Power
Power
HDD1
HDD2
PWR
Linked
Error
D/C
ON
OFF
OFF
Flash at Flash
Green
FAN
Comments
OFF
HDD1 error, both
Sector Error
fix
HDD spin down, LED
HDD Failure
0.5Hz
Flash at fixed 0.5Hz
HDD2 Error
ON
Linked
D/C
Error
ON
OFF
OFF
Flash
Flash at Green
OFF
HDD2 error, both
Sector Error
fix
HDD spin down LED
HDD Failure
0.5Hz
Flash at fixed 0.5Hz
JBOD Mode (BIG)
Operation
Operations
HDD1 Error
PWR USB
ON
Activities
HDD
HDD
System
HDD1
HDD2
LED
LED
LED
Linked
#1
#2
Power
Power
Power
HDD1
HDD2
PWR
Linked
Error
D/C
ON
OFF
ON
Flash at
HDD Failure
Green
FAN
Comments
ON
HDD1 error & spin
fix
down
0.5Hz
HDD2 Error
ON
Linked
D/C
Error
ON
ON
OFF
HDD Failure
Flash at Green
fix
0.5Hz
12
ON
HDD2 error & spin
down
NST-225MX-S3
2.5” Dual SATA 6 Gb/s to USB 3.0 HDD/SSD RAID
RAID 1 Mode (Mirror)
Operation
Operations
HDD1 Error
PWR USB
ON
Activities
HDD
HDD
System
HDD1
HDD2
LED
LED
LED
Linked
#1
#2
Power
Power
Power
HDD1
HDD2
PWR
Linked
Error
Read
ON
OFF
ON
Flash at
Random
Green
fix 0.5Hz
Flash
Random
Flash at
Flash
fix 0.5Hz
Flashing
Slow
at 3Hz
Flash at
reconstructing
0.5Hz
HDD2
Write
HDD2 Error
ON
Linked
Read
Error
ON
ON
OFF
Write
RAID Rebuild
ON
D/C
Old
New
ON
ON
Source:HDD1
Target:HDD2
RAID Rebuild
ON
Slow
Flashing
Source:HDD2
Flash at
at 3Hz
Target:HDD1
0.5Hz
Rebuild error ON
D/C
D/C
New
Old
Old
New
ON
ON
ON
ON
Source:HDD1
ed
ed
down
Green
Green
ON
ON
Rebuilding
Rebuilding
reconstructing
HDD2
0.5Hz
Completed
HDD2 error & spin
0.5Hz
Target:HDD1
D/C
ON
reconstructing
Flashing
D/C
ON
Green
Flash at
Flash at
Mirror Mirror
ON
down
Flashing
Source:HDD2
D/C
Old
HDD1 error & spin
Slow
Stop
ON
New
ON
HDD1
Slow
Rebuild
D/C
Comments
Stop
Target:HDD2
Rebuild error ON
FAN
0.5Hz
Green
Green
ON
ON
Rebuilding
Rebuilding
reconstructing
HDD1
0.5Hz
Green
D/C
Rebuilding
Completed
Important Note!
-
All HDDs must be re-initialize, partition and formatted on every mode change operation.
-
All new HDDs must be initialize, partition and formatted in this enclosure when used in this
enclosure for the first time, except use of old HDDs under Normal mode**.
HDD capacity beyond 2TB are support via GPT (GUID) Windows Vista/7/8.1/10, OS X, and Linux.
Windows® XP 32bit OS cannot support capacity over 2TB HDD(s) and cannot be used in this
enclosure.
-
** If the hard drives was from another enclosure formatted differently, this enclosure may not read it correctly.
13
Hard Drive Formatting Guide
Partition a volume under Windows® OS
1. Right-click on the Computer icon (Windows 7) and select Manage from the drop-down
window. If you are using Windows 8.1, press the Windows key and X key on your
keyboard at the same time and select Computer Management. From the Computer
Management window select Disk Management under Storage to start this process.
2. Right-click on the “Unallocated” space and select “New Simple Volume”.
If this option is not available, the disk was not initialized. You must initialize the disk
first before you can continue. Please stop here and go to the section on “Initialize a
Disk” to initialize the disk before return to this section on “Partition a volume under
Windows OS”.
NST-225MX-S3
2.5” Dual SATA 6 Gb/s to USB 3.0 HDD/SSD RAID
3. Click “Next” to start the New Simple Volume Wizard.
4. Specify the partition size. If you are not sure, by default the partition occupies the
entire volume. Click “Next”.
5. Assign a drive letter. If you are not sure, the system will automatically assign the next
15
NST-225MX-S3
2.5” Dual SATA 6 Gb/s to USB 3.0 HDD/SSD RAID
available drive letter, click “Next”.
6. Change the Volume name; if you are not sure, by default the system will assign a
volume, you can change it later. Click “Next” to start the formatting.
7. Review the file system settings and click “Finish” to create the logical partition.
16
NST-225MX-S3
2.5” Dual SATA 6 Gb/s to USB 3.0 HDD/SSD RAID
Initialize a Disk
1. New disk need to be initialize before they can be used. Here are the steps for
initializing a new disk before you can create a volume to format the drive.
2. Right-click on the “Not Initialized” box.
17
NST-225MX-S3
2.5” Dual SATA 6 Gb/s to USB 3.0 HDD/SSD RAID
3. Select “Initialize Disk”.
4. Windows 7/8.1 provides options for “MBR” or “GPT”. Please select “MBR” if your drive
capacity is less than 2TB. If the capacity is over 2TB, please select “GPT”. And select
“OK”.
18
NST-225MX-S3
2.5” Dual SATA 6 Gb/s to USB 3.0 HDD/SSD RAID
5. “Online” message will replace “Not Initialized” message when disk is initialized and
ready for disk partitioning and formatting.
19
NST-225MX-S3
2.5” Dual SATA 6 Gb/s to USB 3.0 HDD/SSD RAID
Partition a volume under Linux Ubuntu®
1. Click “Disk Utility” on the Desktop
2. Find HDD(s) under “Peripheral Devices”, choose the HDD(s) and click “Format
Drive”
20
NST-225MX-S3
2.5” Dual SATA 6 Gb/s to USB 3.0 HDD/SSD RAID
3. Select “Master Boot Record” if capacity per HDD does not exceed 2TB. Select
“GUID Partition Table” if capacity per HDD is over 2TB. Press “Format” to proceed.
4. Select “Create Partition”, and then slide the bar to draw towards the desired
capacity for the HDD(s). Select “Type” of format and press “Create” to proceed.
21
NST-225MX-S3
2.5” Dual SATA 6 Gb/s to USB 3.0 HDD/SSD RAID
NOTE: some formats cannot be used under popular OS i.e.: Windows. Refer to
the circled block for details.
5. “New Volume” appears after partitioning completes, select “Mount Volume”
22
NST-225MX-S3
6. Select “Mount Point” to access the HDD.
23
2.5” Dual SATA 6 Gb/s to USB 3.0 HDD/SSD RAID
NST-225MX-S3
2.5” Dual SATA 6 Gb/s to USB 3.0 HDD/SSD RAID
Partition a volume under Mac® OS
1. Right click on the “Go” icon and select “Utilities” from the drop-down window.
2. Select “Disk Utility”
24
NST-225MX-S3
2.5” Dual SATA 6 Gb/s to USB 3.0 HDD/SSD RAID
3. Select “Partition” on the top of the window, then select 1 partition from the
“Partition Layout”
4. Select “Options” at the bottom of the window.
25
NST-225MX-S3
2.5” Dual SATA 6 Gb/s to USB 3.0 HDD/SSD RAID
5. Select “GUID Partition Table”. Currently, most of the Mac computers are Intel based.
To enhance the best compatibility, make sure GUID Partition Table is selected.
Note: For PPC Mac, please select “Apple Partition Map”
6. Select “Apply” to finish formatting a hard drive
26