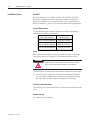
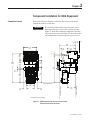
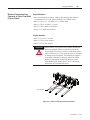
1
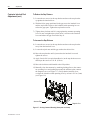
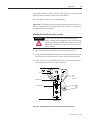
OEM Starter Frame and Components
Bulletin 1503
2400 to 7200 volts
Installation Manual
Important User Information
Read this document and the documents listed in the Additional Resources section about installation, configuration, and
operation of this equipment before you install, configure, operate, or maintain this product. Users are required to
familiarize themselves with installation and wiring instructions in addition to requirements of all applicable codes, laws,
and standards.
Activities including installation, adjustments, putting into service, use, assembly, disassembly, and maintenance are required
to be carried out by suitably trained personnel in accordance with applicable code of practice.
If this equipment is used in a manner not specified by the manufacturer, the protection provided by the equipment may be
impaired.
In no event will Rockwell Automation, Inc. be responsible or liable for indirect or consequential damages resulting from the
use or application of this equipment.
The examples and diagrams in this manual are included solely for illustrative purposes. Because of the many variables and
requirements associated with any particular installation, Rockwell Automation, Inc. cannot assume responsibility or
liability for actual use based on the examples and diagrams.
No patent liability is assumed by Rockwell Automation, Inc. with respect to use of information, circuits, equipment, or
software described in this manual.
Reproduction of the contents of this manual, in whole or in part, without written permission of Rockwell Automation,
Inc., is prohibited.
Throughout this manual, when necessary, we use notes to make you aware of safety considerations.
WARNING: Identifies information about practices or circumstances that can cause an explosion in a hazardous environment,
which may lead to personal injury or death, property damage, or economic loss.
ATTENTION: Identifies information about practices or circumstances that can lead to personal injury or death, property
damage, or economic loss. Attentions help you identify a hazard, avoid a hazard, and recognize the consequence.
IMPORTANT
Identifies information that is critical for successful application and understanding of the product.
Labels may also be on or inside the equipment to provide specific precautions.
SHOCK HAZARD: Labels may be on or inside the equipment, for example, a drive or motor, to alert people that dangerous
voltage may be present.
BURN HAZARD: Labels may be on or inside the equipment, for example, a drive or motor, to alert people that surfaces may
reach dangerous temperatures.
ARC FLASH HAZARD: Labels may be on or inside the equipment, for example, a motor control center, to alert people to
potential Arc Flash. Arc Flash will cause severe injury or death. Wear proper Personal Protective Equipment (PPE). Follow ALL
Regulatory requirements for safe work practices and for Personal Protective Equipment (PPE).
Allen-Bradley, Rockwell Software, Rockwell Automation, and TechConnect are trademarks of Rockwell Automation, Inc.
Trademarks not belonging to Rockwell Automation are property of their respective companies.
Table of Contents
Chapter 1
OEM Starter Frame Installation
Receiving ......................................................................................... 1-1
Installation ....................................................................................... 1-1
Standards and Codes ................................................................. 1-1
Imperial Tool Requirements ...................................................... 1-2
Metric Tool Requirements ......................................................... 1-2
Starter Frame Dimensions ......................................................... 1-3
Control Panel ............................................................................. 1-3
Torque Requirements ................................................................ 1-4
Fuses .......................................................................................... 1-4
Line and Load Connections ...................................................... 1-4
Commissioning ......................................................................... 1-4
Chapter 2
Component Installation
Component Layout .......................................................................... 2-1
Mounting Isolation Switch Handle Module .................................... 2-3
Mounting Isolation Switch and Trailer Fuse Block ......................... 2-5
Power Fuses ..................................................................................... 2-7
Contactor........................................................................................ 2-10
Control Panel ................................................................................. 2-10
IntelliVAC .................................................................................... 2-10
Typical Electrical Diagrams for 400A FVNR Controller with
Electro-Mechanical Control and Electrically Held
Contactor, 120VAC ........................................................... 2-11
Electro-Mechanical Control and Mechanical Latch Contactor . 2-12
IntelliVAC Control and Electrically Held Contactor ............ 2-13
IntelliVAC Control and Mechanical Latch Contactor .......... 2-14
Door Interlock Assembly ............................................................... 2-15
Connecting Isolation Switch to Isolation Switch Handle .............. 2-17
Connecting Contactor to Isolation Switch Handle ........................ 2-18
Electrical Connection From Contactor to Trailer Fuse Block
(Clip-on Fuses) ......................................................................... 2-21
Electrical Connection From Contactor to Trailer Fuse Block
(Bolt-on Fuses) ......................................................................... 2-22
Incoming Line Connections ........................................................... 2-24
Load Connections .......................................................................... 2-24
Connecting Contactor to Control Power Transformer ................... 2-25
1503-IN050E-EN-P – June 2013
ii
Table of Contents – Bulletin 1503 OEM Starter Frame and Components • Installation Manual
Chapter 3
Adjustments for 400A Equipment
Door Interlock Circumvention ......................................................... 3-1
Power Lock-out Procedure .............................................................. 3-2
Contactor Interlock Rod Adjustment ............................................... 3-5
Isolation Switch Ground Adjustment............................................... 3-7
Isolation Switch Auxiliary Contacts ................................................ 3-8
Adjusting the Normally Open (Isa) Contacts ............................ 3-9
Adjusting the Normally Closed (Isb) Contacts ....................... 3-10
Adjusting the ‘Change of State Point’......................................3-11
Chapter 4
Commissioning
Hi-pot and Megger Test ................................................................... 4-1
Vacuum Bottle Integrity Test ........................................................... 4-1
Preliminary Checklist ...................................................................... 4-2
Contactor Operation .................................................................. 4-2
Electrical Connections .............................................................. 4-2
Final Checks .............................................................................. 4-2
Chapter 5
Maintenance
Contactor.......................................................................................... 5-1
Isolation Switch Mechanism – Inspection and Lubrication ............ 5-1
Auxiliary Contacts Inspection and Replacement ............................. 5-3
Chapter 6
Spare Parts
Spare Parts ....................................................................................... 6-1
Appendix A
1503-IN050E-EN-P – June 2013
OEM Kit Chart ................................................................................A-1
Chapter
1
OEM Starter Frame Installation
ATTENTION
Receiving
Read this document before performing any installation
procedures or adjustments. Observe all applicable
safety procedures when working on the equipment.
Complete all installation procedures before connecting
the incoming line cable. Failure to do so may result in
damage to the equipment or injury to personnel.
Refer to General Handling Procedures for Medium Voltage Controllers
– Publication MV-QS050_-EN-P. This document is included with your
shipment and contains information regarding receiving, unpacking, initial
inspection, handling, storage, opening the medium voltage doors, and site
preparation.
Note: Refer to Appendix A for a listing of the items that are included in
your OEM Frame Kit.
Installation
Standards and Codes
The OEM starter frame consists of a fusible non-load-break
isolation switch, an isolation switch handle, a vacuum contactor, control
circuitry and a medium voltage door. These components are not a complete
motor controller. The user must add appropriate control circuitry for the
application, power fusing, current transformer, control power transformer,
overload protection and a suitable enclosure. It is recommended that the
user be familiar with the following safety and design standards and codes,
and any additional local codes that a medium voltage starter must comply with.
• CEC (Canadian Electrical Code)
• CSA 22.2 No. 14 (Canadian Standards Association) – Industrial Control
Equipment
• NEC (National Electrical Code)
• NEMA ICS Standards (National Electrical Manufacutrers’ Association)
• OSHA (Occupational Safety and Health Administration)
• UL 50 (Underwriters Laboratories) – Enclosures for Electrical Equipment
• UL 347 (Underwriters Laboratories) – High voltage Industrial Control
Equipment
• UL 508 (Underwriters Laboratories) – Industrial Control Equipment
• IEC 60204-1 – Safety of Machinery – Electrical Equipment of Machines,
Part 1: General Requirements
• IEC 62271-200 – AC Metal Enclosed Switchgear and Control Gear for
Rated Voltages Above 1kV and up to 52 kV
• IEC 60470 – High Voltage Alternating Current Contactors
• IEC 60529 – Degrees of Protection Provided by Enclosures (IP Code)
• IEC 62271-1 – Common Clauses for High voltage Switchgear and
Control Gear Standards
IMPORTANT
1503-IN050E-EN-P – June 2013
1-2
OEM Starter Frame Installation
Installation (Cont.)
Standards and Codes (Cont.)
The OEM starter frame assembly was fully tested and inspected at the
factory. Unless damage from shipping is suspected, the commissioning procedures in Chapter 4 of this manual should be the only additional checks
required for the unit.
Imperial Tool Requirements
Some components of this product incorporate Imperial
hardware. Rockwell Automation recommends the use of the appropriate
tools to successfully complete the assembly and maintenance procedures
for these components. If you cannot obtain such tools, contact your area
Rockwell Automation sales office for assistance.
IMPORTANT
The following Imperial size tools are recommended for installation and
maintenance of the OEM starter frame and components:
•
•
•
•
•
•
•
•
•
Standard drive ratchet with extension
Standard drive torque wrench
Standard drive sockets: 9/32, 3/8, 7/16, 1/2, 9/16, 3/4 in.
Open-end wrenches: 7/16, 1/2, 9/16, 11/16, 3/4, 7/8 in.
Drill and drill bits: 0.172, 0.219, 0.281 in.
Slot-head screwdrivers
Feeler gauge set (0.125 in to 0.300 in.)
Locking pliers
High potential tester
Metric Tool Requirements
Metric equivalent sizes are provided in parentheses
IMPORTANT
where applicable. It is important to note that all sizes given are not exact
substitutes for the corresponding Imperial sizes. To ensure proper installation, use the recommended metric hardware and dimensions for pilot holes
and clearance holes.
The following metric size tools are recommended for installing the OEM
frame and components with metric hardware.
•
•
•
•
•
•
•
•
•
1503-IN050E-EN-P – June 2013
Standard drive ratchet with extension
Standard drive torque wrench
Standard drive sockets: 8, 10, 13, 15, 18 mm
Open-end wrenches: 8, 10, 13, 15, 18 mm
Drill and drill bits: 4.6, 5.5, 6.8 mm
Slot-head screwdrivers
Locking pliers
Feeler gauge set (3mm to 8 mm)
High potential tester
1-3
OEM Starter Frame Installation
400 Amp Starter Frame Dimensions
23.85
[606]
All dimensions in inches [millimeters]
4 X ø.515 [13]
MOUNTING HOLES
21.50
[546]
50.36
[1279]
21.17
[538]
27.22
[691]
21.89
[556]
0.97
[25]
FRONT VIEW
3.83
[97]
BOTTOM VIEW
Figure 1.1 – Starter Frame Dimensions
Control Panel
1) Mount the control panel in a suitable location. Be aware that the control plug wiring harness is 10 ft. (3 meters) in length. Ensure that the
wiring harness route still allows for a proper connection to the contactor control plug.
2) Connect the control panel harness to the receptacle on the left side of
the contactor. Observe the matching number codes to ensure a proper
connection. See Control Panel, page 2-10, for more information and for
wiring diagrams.
1503-IN050D-EN-P – June 2012
1-4
OEM Starter Frame Installation
Installation (Cont.)
IntelliVAC
Refer to Publication 1503-UM051_-EN-P or 1503-UM052_-EN-P for
IntelliVAC mounting instructions. Note that a suitable wire harness is
required (1503-WHxxx) to connect IntelliVAC to the vacuum contactor.
Refer to “IntelliVAC”, page 2-10 for more information and wiring diagrams.
Torque Requirements
Use the specified torque values for all hardware whenever performing
maintenance or attaching components.
1/4 in. (M6) hardware
6 ft•lb (8 N•m)
5/16 in. (M8) hardware
12 ft•lb (15 N•m)
3/8 in. (M10) hardware
20 ft•lb (27 N•m)
1/2 in. (M12) hardware
48 ft•lb (65 N•m)
Fuses
Refer to the motor nameplate for the information necessary to determine
correct power fuse size. See page 2-7 for recommended power fuses.
ATTENTION
Only qualified personnel should select the fuse type and
rating. Failure to select the correct fuses may result in
injury to personnel and/or damage to equipment.
1) Install clip-on or bolt-on power fuses into the isolation switch fuse clips.
2) If control power is supplied by control power transformer within the
unit, fuses may be installed in the control circuit transformer primary
fuse clips at the top of the contactor (see page 2-24 for details).
Line and Load Connections
See Incoming Line Connections (page 2-24) and Load Connections (page
2-24).
Commissioning
See Commissioning, Chapter 4.
1503-IN050E-EN-P – June 2013
Chapter
2
Component Installation for 400A Equipment
Component Layout
Refer to the following diagram to determine the location of the OEM
components relative to each other.
IMPORTANT
The mounting location of the trailer fuse block varies
depending on the type of power fuses used by the unit.
Figure 2.1 shows the component configuration for units
using clip-on power fuses and Figure 2.2 shows the component configuration for units using bolt-on power fuses.
4.60
[117]
22.85
[580]
18.55
[471]
7.33
[186]
12.05
[306]
1.19
[30]
8.96
[228]
39.78
[1010]
1.00
[25]
9.53
[242]
10.80
[274]
37.11
[943]
1.20
[30]
20.89
[531]
18.82
[478]
Lower Mounting Surface
4.88
[124]
11.87
[301]
Rear Mounting Surface
4.44
[113]
Front Mounting Surface
10.50
[267]
(All dimensions in inches [millimeters])
Figure 2.1 – OEM Component Layout (Clip-on Power Fuses)
(Frame and other parts not shown)
1503-IN050E-EN-P – June 2013
2-2
Component Installation
Component Layout (cont.)
4.60
[117]
22.85
[580]
18.55
[471]
7.33
[186]
12.05
[306]
1.19
[30]
8.96
[228]
39.78
[1010]
1.00
[25]
9.53
[242]
16.67
[423]
1.20
[30]
37.11
[943]
20.89
[531]
12.95
[329]
Lower Mounting Surface
10.50
[267]
(All dimensions in inches [millimeters])
Figure 2.2 – OEM Component Layout (Bolt-on Power Fuses)
(Frame and other parts not shown)
1503-IN050E-EN-P – June 2013
11.87
[301]
Rear Mounting Surface
4.88
[124]
Front Mounting Surface
4.44
[113]
2-3
Component Installation
Mounting Isolation Switch
Handle Module
The handle is shipped in the OFF, or open, position. All
instructions assume the handle remains in the OFF
position during installation and adjustment procedures
unless otherwise stated.
IMPORTANT
Required Hardware:
• Six (6) ¼-20 x 0.5 in. (6.3 x 1.8 x 13mm Type B) self-tapping screws
• One (1) 5/16 in. (M8 x 1.25) grounding wire screw
Refer to the component layout shown in Figure 2.1 or 2.2 to determine the
mounting location and the location of the mounting holes for the isolation switch handle module. Refer to Figure 2.3 for a detailed view of the
mounting holes.
1) Prepare a cut-out in the cabinet for the handle using the dimensions
shown in Figure 2.3.
2) Drill four (4) 0.281-in. (6.8 mm) clearance holes in the locations indicated for the retaining screws.
Isolation Switch Handle
(OFF Position)
0.53
[14]
1.00
[25]
0.65
[17]
8.26
[210]
4 X Ø 0.219 (5.31)
MOUNTING HOLES
9.53
[242]
1.74
[44]
9.53
[242]
4 X Ø 0.281 [6.8]
CLEARANCE HOLES
0.48
[12]
1.00
[25]
Front Mounting Surface
Cutout Dimensions
Front Mounting Surface
Cutout Dimensions
1.06
[27]
Front View
(Handle cut away
to show lower
mounting holes)
Figure 2.3 – Handle Cut-out Dimensions
1503-IN050E-EN-P – June 2013
2-4
Component Installation
Mounting Isolation Switch
Handle Module (cont.)
3) From the inside of the cabinet, insert the handle through the cut-out and
line up the pilot holes with the pre-drilled holes in the handle assembly.
Use four (4) ¼-20 (6.3 x 1.8 Type B) self-tapping screws to attach the
front of the handle. Torque the screws according to the specifications
shown on page 1-4.
4) Mark the location of the rear mounting tabs of the handle module. Drill
two (2) 0.219-in. (5.5mm) pilot holes (see Figure 2.4).
26.23
[666]
22.67
[576]
4.61
[117]
13.00
[330]
7.02
[178]
Front Mounting Surface
Rear Mounting Surface
0.125
[3]
Clearance
4 X Ø 0.219
Mounting Holes
LEFT SIDE VIEW
2 X Ø 0.312
Clearance Holes
FRONT VIEW
(Cut away to show lower mounting holes)
(All dimensions in inches [millimeters])
See Fig. 2.3
for Punching
Dimensions
Grounding Wire
Figure 2.4 – Mounting Rear of Isolation Switch Handle Module
1503-IN050E-EN-P – June 2013
19.93
[506]
Component Installation
2-5
5) Install two (2) ¼-20 (6.3 x 1.8 Type B) self-tapping screws in the tabs
at the end of the handle module to attach it to the rear of the cabinet.
Torque the screws according to the specifications shown on page 1-4.
IMPORTANT
The rear mounting tabs may deform slightly when
secured to the mounting surface. The deformation is
normal and helps to reduce any gap between the handle
module and the mounting surface.
6) Connect the green grounding wire to a suitable grounding surface.
Mounting Isolation Switch
and Trailer Fuse Block
Refer to the component layout shown in Figure 2.1 or 2.2 to determine the
location of the isolation switch. Refer to Figure 2.6 to determine the
location of the mounting holes for the isolation switch.
Shaft
Grounding Bar
Clearance Holes
Auxiliary Contacts
Inter-phase Barriers
Dome Plugs
Figure 2.5 – Typical Isolation Switch
Required Hardware:
– Eight (8) ¼-20 x 1.0 in. (6.3 x 1.8 x 25mm Type B) self-tapping screws
– Four (4) dome plugs (supplied)
1) Drill four (4) 0.219 in. (5.5 mm) pilot holes in the mounting surface at
Location A as shown in Figure 2.6 for the isolation switch.
2) Attach the isolation switch using four (4) ¼-20 (6.3 x 1.8 Type B)
self-tapping screws. Torque the screws according to the specifications
1503-IN050E-EN-P – June 2013
2-6
Component Installation
Mounting Isolation Switch
and Trailer Fuse Block (cont.)
Refer to the component layout shown in Figure 2.1 or 2.2 to determine the
location of the trailer fuse block. Refer to Figure 2.6 to determine the
location of the mounting holes for the trailer fuse block.
1)
Drill four (4) 0.219 in. (5.5 mm) pilot holes at Location B as shown in
Figure 2.6 for the trailer fuse block.
2) Attach the trailer fuse block using four (4) ¼-20 (4.8 x 1.6 Type B)
self-tapping screws. Torque the screws according to the specifications
shown on page 1-4.
3) Install a dome plug over each screw.
ATTENTION
18.55
[471]
17.02
[432]
0.76
[19]
3.69
[94]
8.96
[228]
1.20
[30]
B
18.55
[471]
17.02
[432]
0.76
[19]
A
10.80
[274]
Reinstall any inter-phase barriers that were removed
while connecting the trailer fuse block. Failure to do so
may produce an electrical fault between the fuses and
damage the equipment.
3.69
[94]
A
8.96
[228]
A
A
4.78
[121]
4.78
[121]
A
5.25
[133]
5.00
[127]
18.50
[470]
4.00
[102]
B
5.00
[127]
A
16.67
[423]
0.90
[23]
4.00
[102]
1.20
[30]
4.94
[125]
5.00
[127]
5.00
[127]
18.50
[470]
Terminals
FRONT VIEW (BOLT-ON FUSES)
(Cut away to show upper mounting tabs)
FRONT VIEW (CLIP-ON FUSES)
(Cut away to show upper mounting tabs)
A
Ø 0.310 Isolation switch clearance hole location
B
Ø 0.310 Trailer fuse block clearance hole location
(All dimensions in inches [millimeters])
Figure 2.6 – Orientation of Isolation Switch
1503-IN050E-EN-P – June 2013
B
Terminals
Component Installation
Power Fuses
2-7
Ferraz-Shawmut medium voltage power fuses are recommeded for the
Bulletin 1503. These motor fuses have been tested and meet the
co-ordination requirements for the Bulletin 1502 vacuum contactor. The
fuses many be purchsed from Rockwell Automation, Ferraz-Shawmut, or
from a local distributor. The following part numbers are available.
(See Figures 2.7 and 2.8 for dimensions of fuses.)
Table 2.1 – Recommended Power Fuses
1503-IN050E-EN-P – June 2013
2-8
Component Installation
Power Fuses (cont.)
(All dimensions in inches [millimeters])
Figure 2.7 – Bolt-on Fuse Dimensions
1503-IN050E-EN-P – June 2013
Component Installation
2-9
(All dimensions in inches [millimeters])
Figure 2.8 – Clip-on Fuse Dimensions
1503-IN050E-EN-P – June 2013
2-10
Component Installation
Contactor
Refer to the following publications for the Bulletin 1502 Medium Voltage
Contactor:
• 400A – Publication 1502-UM050_EN-P ( Series D)
• 400A – Publication 1502-UM052_EN-P (Series E)
• 800A – Publication 1502-UM051_EN-P (Series E)
These user manuals contain detailed information on installation, adjustment
and maintenance for this product.
Contactor
Control Wire
Plug
Figure 2.9 – 120V and 230V Control Wire Plug Location and Configurations
Note: Refer to the appropriate vacuum contactor User Manual for detailed
wire plug pin configurations.
Control Panel
Required Hardware:
– Four (4) 1/4-20 x 0.5 in. (6.3 x 1.8 x 13mm Type B) self-tapping screws
Mount the control panel in a suitable location. Be aware that the control plug
wiring harness is 10 ft. (3 meters) in length. Ensure that the wiring harness
route still allows for a proper connection to the contactor control plug.
Connect the control panel harness to the contactor control wire plug on the
lower left side of the contactor. The number codes on the plug must line up
with those on the contactor to ensure a proper connection. See Figure 2.9.
Use the terminal blocks on the control panel to connect the unit to a 120- or
230-volt grounded power source (whichever is applicable to the control panel)
and to other remote devices - see Figure 2.10 or 2.12 for electrical drawings.
IntelliVAC
1503-IN050E-EN-P – June 2013
Refer to Publication 1503-UM051_EN-P or 1503-UM052_-EN-P for
information regarding the IntelliVAC control module. Refer to Figure 2.12
or 2.13 for typical electrical drawings.
Component Installation
2-11
Figure 2.10 – Typical Schematic Diagram for 400 amp Full-Voltage Non-Reversing (FVNR) Controller
with Electro-Mechanical Control and Electrically Held Contactor, 120 V AC (Normal Drop-out Time)
1503-IN050E-EN-P – June 2013
2-12
Component Installation
Figure 2.11 – Typical Schematic Diagram for 400A Full-Voltage Non-Reversing (FVNR) Controller
with Electro-Mechanical Control and Mechanical Latch Contactor
1503-IN050E-EN-P – June 2013
2-13
CC
Component Installation
Figure 2.12 – Typical Schematic Diagram for 400A Full-Voltage Non-Reversing (FVNR) Controller
with IntelliVAC Control and Electrically Held Contactor
1503-IN050E-EN-P – June 2013
2-14
Component Installation
Figure 2.13 – Typical Schematic Diagram for 400A Full-Voltage Non-Reversing (FVNR) Controller
with IntelliVAC Control and Mechanical Latch Contactor
1503-IN050E-EN-P – June 2013
Component Installation
Door Interlock Assembly
2-15
When properly installed the door interlock assembly (see Figure 2.13),
used in conjunction with the isolation switch, is designed to provide the
following interlocking features:
•
•
When the isolation switch handle is in the ON position, a pin on the
handle overlaps the Z-clip to prevent the door from being opened.
When the door is closed and the isolation switch handle is in the ON
position, a cover catch inside the door will be held in place by the
interlock defeater lever and provide another means for holding the door
closed while the unit is energized.
ATTENTION
The door interlock assembly must be installed for the
isolation switch handle to restrict access to the medium
voltage cell while the unit is energized. The isolation
switch handle alone will not provide safety interlocking.
If the door interlock assembly is not installed, the OEM
assumes the responsibility for providing a means to
isolate the medium voltage power cell while the unit is
energized. Failure to install a medium voltage power cell
isolation means can expose personnel to medium voltage
resulting in severe burns, injury or death.
Door Flange
Rear Door Surface
Z-clip
Cover Catch
Cover Catch
Mounting Bracket
Figure 2.14 – Door Interlock Assembly
1503-IN050E-EN-P – June 2013
2-16
Component Installation
Door Interlock Assembly
(cont.)
All mounting hardware for the Door Interlock Assembly
is supplied. Metric equivalents are provided should the
user wish to substitute metric hardware.
IMPORTANT
1) See Figure 2.15 for the mounting dimensions for the door interlock
assembly.
2) Drill two (2) 0.172 in. (4.6 mm) pilot holes on the right side of the door
for the Z-clip.
3) Drill two (2) 0.219 in. (5.5 mm) pilot holes on the front of the door for
the cover catch mounting bracket.
0.84
[21]
MAX.
2.11
[54]
MIN.
Customer supplied
structure
1.55
[39]
Customer
supplied door
Customer
supplied door
TOP VIEW
2 X Ø 0.219 [5.31]
Pilot Holes
(For rib-necked
carriage bolts)
0.35
[9]
0.65
[17]
See Fig. 2.3
3.50
[89]
0.88
[22]
3.13
[80]
3.38
[86]
2 X Ø 0.172 [4.09]
Pilot holes
1.95
[49]
Customer supplied
structure
FRONT VIEW
RIGHT SIDE VIEW
(All dimensions in inches [millimeters])
Figure 2.15 – Mounting Locations for Door Interlock Assembly
4) Attach the Z-clip using #10 (4.8 x 1.6 Type B) self-tapping screws, but
do not completely tighten them.
5) Attach the cover catch mounting bracket using #10-32 x 0.500
(M5 x 0.8) rib-necked carriage screws, lockwashers and hex nuts.
6) Attach the cover catch to the cover catch mounting bracket using the
supplied #10-32 x 0.219 pan-head machine screw.
IMPORTANT
1503-IN050E-EN-P – June 2013
The pilot holes in the cover catch are threaded. To avoid
damaging the thread, use the hardware provided to attach
the cover catch to the mounting bracket.
Component Installation
2-17
7) Move the handle to the OFF position. Swing the door closed and
inspect the position of the Z-clip with respect to the handle pin.
8) Set the Z-clip so that it is just above the handle pin. Do not set the Z-clip
more than 0.125 in. (3 mm) above the pin. Tighten the screws.
9) Close the door and move the isolation switch handle to the ON position. If the handle will not move to the ON position, the cover catch is
set too high and is not contacting the defeater lever. Open the door and
set the cover catch lower. Verify correct functioning.
10) Swing the door shut and move the isolation switch handle to the ON
position. Verify that the door interlock assembly is functioning properly.
IMPORTANT
Connecting Isolation Switch
to Isolation Switch Handle
The mechanical interlock is the primary safety mechanism preventing access to the medium voltage power
cell. The mechanism also prevents opening or closing
the isolation switch under load (ie. it is a non-load-break
switch). A secondary electrical interlock is intended to
disengage the contactor in the event of a mechanical interlock failure. See page 3-8 for additional information.
When properly connected, the isolation switch operating mechanism is
designed to provide the following safety features:
•
•
•
Prevent the opening of any medium voltage door interlocked with the
mechanism while the handle is in the ON position and the unit is energized.
Prevent moving the handle to the ON position and energize the unit
while the medium voltage door is open.
Disengage the contactor from the RUN mode when the handle is
moved from the ON to OFF position.
Connecting Rod
Disconnect Lever
Connection Point
(Clevis and Cotter Pin)
Isolation Switch
Operating Lever
Right Side View
Figure 2.16 – Handle Mechanism Connection
1503-IN050E-EN-P – June 2013
2-18
Component Installation
Connecting Isolation Switch
to Isolation Switch Handle
(cont.)
Perform the handle mechanism connection with the handle in the OFF
position. The isolation switch should be in the open position with the isolation switch blades resting against the ground bar. Refer to Figure 2.16.
1) Lengthen or shorten the threaded connecting rod until it lines up with
the top hole on the isolation switch operating lever.
2) Insert a clevis pin through the holes and secure it with a cotter pin.
IMPORTANT
Connecting Contactor to
Isolation Switch Handle
Complete all installation procedures before beginning
any adjustment procedures described in Chapter 3.
When properly connected, the contactor interlock in conjunction with the
isolation switch handle mechanism, are designed to offer the following
safety features:
•
•
•
prevent the isolation switch from being opened while the contactor is
closed and energized;
prevent the contactor from closing if the isolation switch is in an
intermediate position (ie. at halfway point during adjustment);
disengage the contactor if the isolation switch moved to the closed
position during a contactor test procedure.
Isolation Switch Operating Lever
Interlock Lever
Clevis
Contactor Interlock Rod
Contactor Operating Lever
Figure 2.17 – Contactor Interlock Rod Connection
1503-IN050E-EN-P – June 2013
Component Installation
2-19
Required Hardware: (all hardware supplied)
IMPORTANT
Metric hardware is not supplied; however, metric
equivalents are given should the user wish to substitute
metric hardware
• Two (2) 1/4 in. (M6) lock washers
• Two (2) 1/4 in. (M6) flat washers
• Two (2) 1/4-20 in. (M6 x 1.0) hex-head cap screws
• One (1) 5/16-18 in. (M8 x 1.25) nylock nut
• Two (2) 5/16 in. (M8) hex nuts
• One (1) 5/16 in. (M8) lock washer
• One (1) contactor operating lever
• One (1) 5/16-18 x 20.5 in. (M8 x 1.25 x 521 mm) contactor interlock rod
1) Attach the contactor operating lever to the flat section of the contactor
shaft using two 1/4-20 in. (M6 x 1.0) hex-head cap screws with two 1/4 in.
(M6) lock washers and two 1/4 in. (M6) flat washers (see Figure 2.18).
IMPORTANT
The contactor operating lever is threaded for the supplied
1/4-20 hex-head cap screws. In order to substitute metric
hardware, it is necessary to drill appropriate clearance
holes in the contactor operating lever and use M6 x 1.0
hex-head cap screws and nuts to secure the lever to the
contactor shaft.
2) From the top of the contactor interlock rod, turn a 5/16–18 in.
(M8 x 1.25) hex nut at least 2 in. (50 mm) down the rod. Place one
5/16 in. (M8) lock washer over the nut.
3) Insert a 5/16–18 (M8 x 1.25) hex nut into the clevis of the door
interlock lever (see Figure 2.17).
4) Turn the contactor interlock rod into the nut until approximately 1/2 in.
(13 mm) of the lever extends above the nut.
1503-IN050E-EN-P – June 2013
2-20
Component Installation
Connecting Contactor to
Isolation Switch Handle
(cont.)
2-1/4-20
1.0) Hex.
Cap Screws
2-1/4-20(M6
HexxHead
Cap Head
Screws
2-1/4
in.
(M6)
Lock
Washers
2-1/4 in. Lock Washers
2-1/4
Flat Washers
2-1/4in.
in.(M6)
Flat Washers
Contactor
Interlock Rod
Contactor
Shaft
Nylon Contactor
Bushing
Contactor
Operating Lever
Right Side View
Figure 2.18 – Connecting Contactor to Isolation Switch Handle
5) Tighten the bottom nut up to the clevis.
6) Insert the lower end of the rod into the nylon contactor bushing.
7) Turn a 5/16–18 in. (M8 x 1.25) nylock nut onto the lower end of the
rod and tighten it up to the flat of the contactor operating lever.
IMPORTANT
1503-IN050E-EN-P – June 2013
Complete all installation procedures before beginning
any adjustment procedures described in Chapter 3.
Component Installation
2-21
Electrical Connection from
Required Hardware:
Contactor to Trailer Fuse Block • three (3) horizontal bus links or suitable cable and lugs (bus links are
(Clip-on Fuses)
recommended to be 1/4 in. (6mm) thick and 1 in. (25mm) wide)
• three (3) 3/8-16 in. x 1 in. (M10 x 1.5 x 25mm) bolts
• three (3) 3/8-16 in. (M10 x 1.5) nuts
• three (3) 3/8 in. (M10) lock washers
• six (6) 3/8 in. (M10) flat washers
Supplied Hardware:
• three (3) 5/16-18 x 1 in. bolts
• three (3) 5/16 in. lock washers
• three (3) 5/16 in. flat washers
Double-barrel, clip-on power fuses require an anti-turn
bracket to maintain sufficient clearance between the
power phases. Do not use such fuses without this safety
feature. Failure to do so may result in injury to personnel
or damage to the equipment. The brackets are supplied
if specified at the time of ordering, otherwise contact
Rockwell Automation to obtain the brackets. Order
Allen-Bradley part number 80253-262-51. Mounting
instructions are included with the kit.
ATTENTION
Anti-turn Brackets
Figure 2.19 – Trailer Fuse Block with Anti-turn Brackets
1503-IN050E-EN-P – June 2013
2-22
Component Installation
Electrical Connection From
1) Use the supplied 5/16 in. hardware to mount the bus link or suitable
Contactor to Trailer Fuse Block
cable to the trailer fuse block (see Figure 2.20). Torque the bolts to the
(Clip-on Fuses)
specifications shown on page 1-4.
(cont.)
IMPORTANT
The trailer fuse block is equipped with 5/16-18 nuts. The
supplied hardware, or equivalent, must be used to avoid
damaging the thread in the nuts.
Trailer Fuse
Contactor
Attachment Point
(Line Side)
Trailer Fuse Block
Attachment Point
Figure 2.20 – Linking Trailer Fuse Block to Contactor (Clip-on Power Fuses)
2) Attach the bus links, or suitable cable, to the line side of the contactor
(upper terminals) using 3/8 in. (M10) hardware (see Figure 2.20).
Torque the bolts according to the requirments shown on page 1-4.
ATTENTION
1503-IN050D-EN-P – June 2012
Maintain at least 3 in. (76 mm) clearance between power
phase connections. Insufficient distance could cause
equipment damaging power faults in the unit.
Component Installation
2-23
Electrical Connection from
Required Hardware:
Contactor to Trailer Fuse Block • three (3) horizontal bus links or suitable cable and lugs (bus links are
(Bolt-on Fuses)
recommended to be 1/4 in. (6mm) thick and 1 in. (25mm) wide)
• six (6) 3/8-16 in. x 1 in. (M10 x 1.5 x 25mm) bolts
• six (6) 3/8-16 in. (M10 x 1.5) nuts
• six (6) 3/8 in. (M10) lock washers
• twelve (12) 3/8 in. (M10) flat washers
1) Attach the bus links or cables to the line terminals on the trailer fuse
block (see Figure 2.21). Torque the bolts to the specifications shown on
page 1-4.
2) Attach the bus links, or suitable cable, to the line side of the contactor
(upper terminals) using 3/8 in. (M10) hardware. (See Fig. 2.21) Torque
the bolts according to the specifications shown on page 1-4.
ATTENTION
Maintain at least 3 in. (76 mm) clearance between power
phase connections. Insufficient distance could cause
equipment damaging power faults in the unit.
Trailer Block Fuse
Contactor
Attachment Point
(Line Side)
Trailer Fuse Block
Attachment Point
Figure 2.21 – Linking Trailer Fuse Block to Contactor (Bolt-on Power Fuses)
1503-IN050D-EN-P – June 2012
2-24
Component Installation
Incoming Line Connections
Mounting hardware is suitable for use with lugs incorporating two-hole
NEMA drilling. Secure incoming cables to line terminals of the isolation
switch with suitable lugs and ½ in. (M12) hardware. Torque the hardware
according to the specifications shown on page 1-4.
IMPORTANT
Cable size should not exceed 1-500 or 2-250 MCM per phase.
Attach Incoming Line Cables Here
Figure 2.22 – Isolation Switch Incoming Line Connections (Rear View)
Load Connections
Secure load cables to load terminals of contactor using suitable lugs and
3/8 in.(M10) hardware. Torque the hardware according to the specifications
shown on page 1-4.
IMPORTANT
It is the user’s responsibility to determine a suitable means
of completing the power connection from the contactor
to the motor ie. current transformers, power fuses, etc.
Load Terminals
Figure 2.23 – Load Terminals - 400 A Contactor (Rear View)
1503-IN050E-EN-P – June 2013
Component Installation
Connecting Contactor to
Control Power Transformer
IMPORTANT
2-25
A control power transformer (CPT) is not supplied as
part of the OEM starter kit. This procedure only describes how to connect wires to the contactor that will
supply power to the control circuit. It is the user’s
responsibility to determine the correct CPT, primary fuse
sizes, power wire, lugs and current transformer for the
control circuit.
1) Remove the #10-32 hex head screw securing the fuse clips at the front
of the contactor (see Figure 2.24).
Remove Screws to mount lugs
(Front of Contactor)
Figure 2.24 – Attaching Control Power Wires to Contactor (Top View)
2) Attach lugs with a 90-degree bend (AB part # G6666 – suitable for
#12-10 AWG wire) and suitable power wire utilizing a #10 flat washer
and lock washer .
3) Torque the screws to 32 in.·lbs.
4) Use wire clips provided on the contactor to fasten the control power
transformer cables in position. This is required to avoid cables coming
into contact with live parts and to meet dielectric test requirements.
1503-IN050E-EN-P – June 2013
2-26
Component Installation
1503-IN050E-EN-P – June 2013
Chapter
3
Adjustments for 400 Amp Equipment
Door Interlock Circumvention
IMPORTANT
To ensure proper functioning of the isolation switch assembly, perform the following adjustments in the order
they are presented.
ATTENTION
The door interlock mechanism is designed to prevent
access to the medium voltage cell while the unit
is energized. When the unit is in operation, do not
circumvent this interlocking safety feature. Always
disconnect and lock out incoming power (see Power
Lock-out Procedure, pg 3-2) before proceeding with any
adjustments requiring the handle to be moved to the ON
(closed) position. Failure to do so may result in electric
shock causing severe burns, injury or death.
Some of the following sections may require moving the isolation switch
handle to the ON position while the medium voltage door is open. The
interlocking safeguards in the mechanism are designed to prevent the
handle from moving to the ON position while the cabinet door is open.
•
•
To circumvent this safety feature, use a screwdriver, or other tool, to
depress the door interlock defeater lever in the switch.
Hold the lever down while moving the handle to the ON (closed) position.
Interlock Defeater
Lever
Figure 3.1 – Door Interlock Defeater Lever
1503-IN050D-EN-P – June 2012
3-2
Adjustments
Power Lock-out Procedure
ATTENTION
ATTENTION
Always perform the power lock-out procedure before
proceeding with servicing the equipment Use suitable
personal protective equipment (PPE) per local codes or
regulations. Failure to do so may result in severe burns,
injury or death.
The following procedure requires moving the isolation
switch handle to the ON position. To avoid shock
hazards, disconnect and lock out incoming power before
proceeding with servicing the equipment. Failure to
lock out incoming power will result in a live power cell
once the isolation switch handle is in the ON position
and may cause severe burns, injury or death. Rockwell
Automation does not assume any responsibility for
injuries to personnel who have not completed the following
safety procedure prior to servicing the equipment.
1) Disconnect and lock out all feeder power supplies to the starter.
2) Move the isolation switch handle to the OFF position.
3) If the unit is equipped with power factor correction capacitors, stored
energy must be dissipated before entering the power cell. Wait at least
five minutes before entering the power cell or dissipate the power using
the following procedure:
a) Verify that the isolation switch handle is in the OFF position.
b) Open the low voltage door.
c) Plug the appropriate power supply (120 or 230V) into the auxiliary
power receptacle on the control panel (see Figure 3.2).
d) Move the control switch to the TEST position.
Auxiliary Power Receptacle
Test Switch
Figure 3.2 – Control Panel (120V shown)
1503-IN050E-EN-P – June 2013
Adjustments
3-3
e) Electrically operate the contactor by pushing the START button
on the unit or at a remote location.
f) Disengage the contactor and move the control switch to the NORMAL position. Disconnect the external power supply.
g) Complete the Power Lock-out procedure
4) Open the medium voltage door.
5) Visually inspect that the isolation switch blades fully engage the
grounding pins on the grounding bar. The isolation switch shutters
should be closed (see Figure 3.3).
Grounding Bar
Isolation Switch Blades must
fully engage Grounding Pins
of Grounding Bar
(Verify for each phase)
Isolation Switch Shutters
must be closed.
(Verify for each phase)
Figure 3.3 – Inspecting Isolation Switch in Open Position
6) Check the line and load sides of the contactor with a hot stick or appropriate voltage measuring device to verify that they are voltage free (see
Figure 3.4).
a) Check for line-side voltage at the top vacuum bottle terminals.
b) Check for load-side voltage at the bottom vacuum bottle terminals.
1503-IN050E-EN-P – June 2013
3-4
Adjustments
Power Lock-out Procedure
(cont.)
Check line-side power here
Check load-side power here
Figure 3.4 – Contactor Voltage Checkpoints
7) Use the Door Interlock Circumvention procedure described on page 3-1.
to move the isolation switch handle to the ON position.
8) Check the isolation switch blades with a hot stick or appropriate voltage measuring device to verify that they are voltage free (see Figure
3.5).
Figure 3.5 – Isolation Switch Voltage Check Points
9) Once all power circuits are verified to be voltage free, move the isolation switch handle back to the OFF position. The unit is now safe to
service.
1503-IN050E-EN-P – June 2013
Adjustments
Contactor Interlock Rod
Adjustment
ATTENTION
3-5
To avoid shock hazards, lock out incoming power (see
page 3-2) before working on the equipment. Verify with
a hot stick or appropriate voltage measuring device that
all circuits are voltage free. Failure to do so may result in
severe burns, injury or death.
1) Complete the Power Lock-out Procedure (see Page 3-2).
2) Open the medium voltage door. Use the Door Interlock Circumvention
procedure described on page 3-1 to move the isolation switch handle
halfway between the OFF and ON position (see Figure 3.6). Keep the
handle in this position until the adjustment procedure is completed.
3) With the contactor in the OFF position, insert a 0.050 in. (1.3 mm)
feeler gauge in the gap between the interlock lever and the isolation
switch operating lever. The gap must be between 0.045 in. to 0.060 in.
(1.1 mm to 1.5 mm).
4) To reduce the gap distance, follow steps 5-7.
To increase the gap distance follow steps 8-10.
Gap
(0.03 in. to 0.78 in.)
(1.00 mm to 2.0 mm)
Isolation Switch Operating Lever
Interlock Lever
Stop Bracket
Isolation Switch Handle
at Halfway Position
Contactor Interlock Rod
Contactor Operating Lever
Nylock Nut
Figure 3.6 – Isolation Switch Handle Adjustments
1503-IN050E-EN-P – June 2013
3-6
Adjustments
Contactor Interlock Rod
Adjustment (cont.)
To Reduce the Gap Distance
5) Loosen the two screws in the stop bracket and move the stop bracket
up against the interlock lever.
6) With the feeler gauge positioned in the gap, move the interlock lever
and the stop bracket closer to the isolation switch operating lever to
reduce the gap space. Tighten the stop bracket screws.
7) Tighten the nylock nut until it is snug against the contactor operating
lever. Do not overtighten the nylock nut as it will move the interlock
lever and reduce the gap. Proceed to Step 11.
To Increase the Gap Distance
8) Loosen the two screws in the stop bracket and move the stop bracket
away from the interlock lever.
9) Loosen the nylock nut until the gap reaches the desired size.
10) Move the stop bracket until it just touches the interlock lever and
tighten the screws.
11) Apply Loctite 290 (or equivalent adhesive) to the stop bracket screws
and torque the screws to 6 ft.-lb. (8 N•m).
12) Move the isolation switch handle to the ON position.
13) Manually close the contactor by attaching locking pliers to the contactor operating lever and pushing down until the armature plate contacts
the magnetic cores (see Figure 3.7). Verify that the interlock lever
overlaps the isolation switch operating lever by at least 0.125 in. (3 mm)
(see Figure 3.8).
Armature Plate
Magnetic Core
Figure 3.7 – Closing Contactor Manually (Some parts not shown)
1503-IN050E-EN-P – June 2013
Adjustments
Overlap 0.125 in. min.
(3 mm)
3-7
Isolation Switch
Operating Lever
Interlock Lever
Figure 3.8 – Isolation Switch Operating Lever Overlap
14) Open the contactor. Verify that the interlock lever and the rod move
freely and that the return springs move the assembly back to the starting
position.
Isolation Switch Ground
Adjustment
ATTENTION
To avoid shock hazards, lock out incoming power before
working on the equipment. Verify with a hot stick or appropriate voltage measuring device that all circuits
are voltage free. Failure to do so may result in severe
burns, injury or death.
1) Move the isolation switch handle to the OFF position.
2) Inspect the grounding of the isolation switch blades. When the isolation
switch handle is in the OFF (open) position, the isolation switch blades
must fully engage the ground pins of the ground bar. The isolation
switch blades must also be within 0.060 in. (1.5 mm) of the ground bar
when the handle is in the OFF (open) position (see Figure 3.9). When
the isolation switch handle is in the ON or closed position, the blades
must fully engage the line stabs (see Figure 3.5).
3) To adjust the distance from the blades to the bar, disconnect the
threaded connecting rod at the isolation switch operating lever (see
Figure 2.16).
4) Turn the threaded connecting rod to lengthen or shorten it. This will
adjust the position of the isolation switch blades in the ON and OFF
position.
1503-IN050E-EN-P – June 2013
3-8
Adjustments
Isolation Switch Ground
Adjustment (cont.)
Ground Bar
Maximum Gap 0.06 in. (1.5 mm) between Ground Bar
and Isolation Switch Blade in open position
Isolation Switch Blade
Incoming Line Stab
Auxiliary Contact
Isolation Switch (Cut-away view from right side)
Figure 3.9 – Isolation Switch Ground Adjustment
Isolation Switch Auxiliary
Contacts
The auxiliary contacts are mounted on the left side of the isolation switch,
slightly below the cams on the isolation switch shaft.
Normally open contacts (Isolation Switch a Contacts - ISa) are on the
outside of the isolation switch housing, and normally closed contacts
(Isolation Switch b Contacts - ISb) are on the inside of the housing.
Isa Auxiliary Contacts (N.O.)
Isb Auxiliary Contacts (N.C.)
Figure 3.10 – Location of Isa and Isb Auxiliary Contacts
1503-IN050E-EN-P – June 2013
Adjustments
3-9
ISa and ISb contacts are exactly the same (700 CPM). The cam controls the
normally open or normally closed status of the contacts.
Refer to Figures 2.10 to 2.13 for wiring diagrams.
Important: The Isolation Switch Ground Adjustment procedure (page 3-7)
must be completed before adjusting the auxiliary contacts to ensure proper
synchronization of the assembly.
Adjusting the Normally Open (ISa) Contacts
ATTENTION
To avoid shock hazards, lock out incoming power
before working on the equipment. Verify with a hot stick
appropriate voltage measuring device that all circuits are
voltage free. Failure to do so may result in severe burns,
injury or death.
1) Move the isolation switch handle to the ON (closed) position.
2) Loosen the bolt holding the outside cam to the shaft. Do not loosen the
bolt entirely. The cam should not be able to rotate freely on the shaft.
3) Insert a 0.25 in. (6.35 mm) diameter pin into the cam groove between
the cam follower and the end of the cam groove.
Cam
Gap
0.25 in.
(6.35 mm)
Cam Follower
20
AMP
SER. A
700-CPM
CATAL OG NO.
Auxiliary Contact
Left Side View
Figure 3.11 – Adjusting Auxiliary Contacts (Isa Auxiliary Contact Shown)
1503-IN050D-EN-P – June 2012
3-10
Adjustments
Isolation Switch Auxiliary
Contacts (cont.)
4) Adjust the cam on the shaft so that the gap from the cam follower to
the end of the cam groove is the width of the pin — 0.25 in. (6.35 mm).
5) Move the isolation switch handle to the OFF (open) position and check
that nothing prevents the cam from rotating with the shaft.
6) Tighten the bolt holding the cam to the shaft. Move the isolation switch
handle to the ON position and recheck the gap using the pin.
7) Verity that auxiliary contact ISa is open when the isolation switch is
open. Verify that ISa contact is closed when isolation switch is closed.
Adjusting the Normally Closed (ISb) Contacts
1) Move the isolation switch handle to the OFF (open) position.
2) Loosen the bolt holding the inside cam to the shaft. Do not loosen the
bolt entirely. The cam should not be able to rotate freely on the shaft.
3) Insert a 0.25 in. (6.35 mm) diameter pin into the cam groove between
the cam follower and the end of the cam groove.
4) Adjust the cam on the shaft so that the gap from the cam follower to
the end of the cam groove is the width of the pin — 0.25 in. (6.35 mm).
5) Move the isolation switch handle to the ON (closed) position and
check that nothing prevents the cam from rotating with the shaft.
6) Tighten the bolt that holds the cam to the shaft. Move the isolation
switch handle to the OFF position and recheck the gap using the pin.
7) Operate the handle several times, then recheck the 0.25 in. (6.35 mm)
clearance between the end of the cam groove and the follower pin for
both cams.
8) Verify that auxiliary contact ISb is closed when isolation switch is
open. Verify that ISb contact is open when isolation switch is closed.
1503-IN050E-EN-P – June 2013
Adjustments
3-11
Adjusting the ‘Change of State Point’
IMPORTANT
This procedure sets the secondary electrical interlock.
When properly adjusted, the electrical interlock is
designed to open the control circuit power connections
before the isolation switch opens when the handle is
moved to the OFF position.
1) Once the auxiliaries have been adjusted, move the isolation switch
handle to the ON position.
2) Connect a conductivity measuring device across the closed auxiliary
contacts.
3) Slowly move the isolation switch handle towards the OFF position and
observe the point at which the movable isolation switch blades separate
from the incoming line stabs. The auxiliary contacts must change state
from the closed to open position before the isolation switch blades lose
contact with the incoming line stabs. This prevents the isolation switch
from being opened while the unit is energized and under load conditions.
ATTENTION
The auxiliary contacts must be properly adjusted to
avoid opening the isolation switch under load conditions.
Improper adjustment may result in damage to the
equipment and/or severe burns, injury or death to
personnel.
4) If the auxiliaries do not change state before the isolation switch opens,
adjust the threaded connecting rod as described in the Isolation Switch
Adjustment procedure (see page 3-7).
1503-IN050e-EN-P – June 2013
3-12
Adjustments
1503-IN050E-EN-P – June 2013
Chapter
4
Commissioning
Hi-Pot and Megger Test
Insulation integrity should be checked before energizing electrical
equipment. Use a high voltage AC insulation tester or a Megger for this
test. If a Megger is used, a 5000 volt type is recommended.
ATTENTION
Exercise caution when performing high voltage tests on
the equipment. Failure to do so may result in electric
shock causing severe burns, injury or death.
ATTENTION
To avoid shock hazards, lock out incoming power before
working on the equipment. Verify with a hot stick or
appropriate voltage measuring device that all circuits are
voltage free. Failure to do so may result in severe burns,
injury or death.
Insulation can be tested from phase to phase and from phase to ground.
The recommended level for AC Hi-Pot testing is (2 X VLL) volts, where VLL
is the rated line-to-line voltage of the power system. The leakage current
must be less than 20 mA. Record the result for future comparison testing.
If a Megger is used, it should indicate 50 megohms or greater if the unit is
isolated from the line and the motor. If the unit is connected to a motor, the
Megger should indicate 5 megohms or greater.
Vacuum Bottle Integrity Test
Refer to the following publications for the procedure to test vacuum bottle
integrity of the Bulletin 1502 contactor:
• 400A – Publication 1502-UM050_EN-P ( Series D)
• 400A – Publication 1502-UM052_EN-P (Series E)
• 800A – Publication 1502-UM051_EN-P (Series E)
These user manuals contain detailed information on installation, adjustment
and maintenance for this product.
1503-IN050E-EN-P – June 2013
4-2
Commissioning
Preliminary Checklist
Contactor Operation
ATTENTION
To avoid shock hazards, lock out incoming power before
working on the equipment. Verify with a hot stick or
appropriate voltage measuring device that all circuits are
voltage free. Failure to do so may result in severe burns,
injury or death.
1) Connect the appropriate external power supply (120 or 230 VAC) to
the test receptacle in the control panel. Turn the selector switch to the
TEST position (see Figure 3.2).
2) Electrically operate the contactor several times. Inspect the armature
plate to verify that it fully contacts the cores (400A) or yolk plate (800A).
3) Turn the selector switch back to the OFF position and disconnect the
test power supply.
Electrical Connections
1) Verify correct power cable phase sequencing and that the connections
are tight. See Torque Requirements, page 1-4.
2) Verify power fuse ratings and condition.
3) Verify control fuse ratings and condition.
4) Check that components were not damaged during power cable
installation, and that electrical spacings are sufficient.
Final Checks
1) Remove all tools from the cabinet. All tools and hardware used
during installation and commissioning must be accounted for prior to
energizing the unit.
2) Remove all temporary jumpers and grounding devices used during the
installation procedures.
3) Ensure that all barriers or covers removed during installation have been
securely reattached.
4) Close and secure all doors. Verify that all interlocks preventing access
to medium voltage power cells are functioning correctly.
ATTENTION
Use suitable personal protective equipment (PPE) per
local codes or regulations. Failure to do so may result in
severe burns, injury or death.
5) Restore incoming power from main power supply.
6) Move the isolation switch handle to the ON position.
7) The controller is now ready to supply power to the load.
1503-IN050E-EN-P – June 2013
Chapter
5
Maintenance
IMPORTANT
Contactor
Establish a maintenance and inspection schedule for the
equipment. Annual servicing (or every 20,000 operations
– whichever comes first) is the minimum recommended;
however, extreme operating conditions may warrant additional attention.
Refer to the following publications for detailed maintenance information
on the Bulletin 1502 contactor:
• 400A – Publication 1502-UM050_EN-P ( Series D)
• 400A – Publication 1502-UM052_EN-P (Series E)
• 800A – Publication 1502-UM051_EN-P (Series E)
These user manuals contain detailed information on installation, adjustment
and maintenance for this product.
Isolation Switch Mechanism
Inspection and Lubrication
ATTENTION
To avoid shock hazards, lock out incoming power (see
page 3-2) before working on the equipment. Verify with
a hot stick or appropriate voltage measuring device that
all circuits are voltage free. Failure to do so may result in
severe burns, injury or death.
1) Complete the Power Lock-out Procedure (see Page 3-2).
2) Open the medium voltage door.
3) Inspect the condition of the clevis pin and cotter pins shown in Figure
5.1. Replace any worn parts.
1503-IN05E-EN-P – June 2013
5-2
Maintenance
Isolation Switch Mechanism
Inspection and Lubrication
(cont.)
Threaded
Connecting Rod
Clevis Pins and
Cotter Pins
Isolation Switch
Operating Lever
Interlock Lever
Lubrication Points
(Only at replacement)
Contactor
Interlock Rod
Figure 5.1 – Isolation Switch Handle Mechanism Lubrication Points
4) If it is necessary to replace the isolation switch operating lever or the
interlock lever, apply Dow Corning 55 O-ring lubricant (or equivalent)
to the pivot points before installing the new components (see Figure
5.1).
5) Inspect the mounting hardware on the isolation switch operating lever
and contactor interlock rod (see Figure 5.1). Tighten any loose hardware.
6) Inspect the isolation switch blades and the incoming line stabs (see
Figure 3.9). The mating surfaces must be clean and well lubricated.
7) Remove any dirt and dried grease.
IMPORTANT
Do not scrape or file the parts. This may remove the plating and expose the underlying copper to corrosion.
8) Lubricate the isolation switch blades and the isolation switch blade pivot
points with Nyogel 759G - part number T9327-105 (see Figure 5.2).
IMPORTANT
1503-IN050E-EN-P – June 2013
Lubricate the isolation switch blades a minimum of once
per year to avoid excessive wear to the components and
to prevent the isolation switch blades from overheating.
Maintenance
5-3
Lubricate Isolation Switch Blades
Lubricate Pivot Points
Figure 5.2 – Isolation Switch Lubrication Points
Auxiliary Contacts
Inspection and Replacement
ATTENTION
To avoid shock hazard, lock out incoming power before
working on the equipment. Verify with a hot stick or
appropriate voltage measuring device that all circuits are
voltage free. Failure to do so may result in severe burns,
injury or death.
1) Move the isolation switch handle to the OFF position and open the
controller door.
2) Inspect the auxiliary contacts for wear, scorching or heat damage.
Replace any damaged contacts. The contacts have a mean time between
failure (MTBF) rating of 20 million operations if used within the operating specifications.
3) To remove the contact, turn both of the D-head fasteners until the flat
sections are aligned with the edge of the contact (See Figure 5.3).
4) Remove the contact from the housing.
5) Disconnect the wires from the auxiliary contact.
6) Reverse the procedure to replace the auxiliary contact.
7) Ensure the contact is correctly positioned into the contact carrier (See
Figure 5.3).
1503-IN050E-EN-P – June 2013
5-4
Maintenance
Auxiliary Contacts
Inspection and Replacement
(cont.)
20
AMP
SER. A
700-CPM
CATALOG NO.
Correct Positioning
CATALOG NO.
700-CPM
SER. A
20
AMP
Incorrect Positioning
Install as Shown Above
Figure 5.3 – Auxiliary Contact Orientation
1503-IN050E-EN-P – June 2013
D-head
Fastener
Chapter
6
Spare Parts
Refer to the following publications for information on spare parts for the Bulletin 1502 medium
voltage 400A contactor (120V and 230V):
• 400A – Publication 1502-UM050_EN-P ( Series D)
• 400A – Publication 1502-UM052_EN-P (Series E)
• 800A – Publication 1502-UM051_EN-P (Series E)
These user manuals contain detailed information on installation, adjustment and maintenance for this
product.
1503-IN050E-EN-P – June 2013
6-2
Spare Parts
1503-IN050E-EN-P – June 2013
Appendix A
OEM Kit Chart
Table A.1 – Items That Should be Included with the Power Cell and Frame
Final Part
Number
1503F-E4GCD
Qty
Description
1
400 Amp, 2.3 – 5.0 kV, Electrically held, Clip On Fuse, Electro-Mechanical,
110-120 VAC Control Frame
Electrically Held 120V Control panel
400 Amp, 2.3 – 5.0 kV, Electrically Held, Clip On Fuse, ElectroMechanical, 220-230VAC Control Frame
Electrically Held 230V Control Panel
400 Amp, 2.3 – 5.0 kV, Electrically Held, Clip On Fuse, IntelliVAC, 110120VAC Control Frame
IntelliVAC Base
Wire Harness-IntelliVAC
400 Amp, 2.3 – 5.0 kV, Electrically Held, Bolt On Fuse, ElectroMechanical, 110-120VAC Control Frame
Electrically Held 120V Control Panel
400 Amp, 2.3 – 5.0 kV, Electrically Held, Bolt On Fuse, ElectroMechanical, 220-230VAC Control Frame
Electrically Held 230V Control Panel
400 Amp, 2.3 – 5.0 kV, Electrically Held, Blot On Fuse, IntelliVAC, 110-120
VAC Control Frame
IntelliVAC Base
Wire Harness-IntelliVAC
400 Amp, 2.3 - 5.0 kV, Mechanical Latch, Clip On Fuse, ElectroMechanical, 110-120VAC Control Frame
Mechanical Latch 120V Control Panel
400 Amp, 2.3 – 5.0 kV, Mechanical Latch, Clip On Fuse, IntelliVAC< 110120 VAC Control Frame
IntelliVAC Base
Wire Harness – IntelliVAC
400 Amp, 2.3 – 5.0 kV, Mechanical Latch, Blot On Fuse, ElectroMechanical, 110-120 VAC Control Frame
Mechanical Latch 120V Control Panel
400 Amp, 2.3 – 5.0 kV, Mechanical Latch, Blot On Fuse, IntelliVAC< 110120VAC Control Frame
IntelliVAC Base
Wire Harness – IntelliVAC
400 Amp, 5.1 – 6.9 kV, Electrically Held, Clip On Fuse, ElectroMechanical, 110-120 VAC Control Frame
Electrically Held 120V Control Panel
400 Amp, 5.1 – 6.9 kV, Electrically Held, Clip On Fuse, ElectroMechanical, 220-230 VAC Control Frame
Electrically Held 230V Control Panel
400 Amp, 5.1 – 6.9 kV, Electrically Held, Clip On Fuse, IntelliVAC, 110-120
VAC Control Frame
IntelliVAC Base
Wire Harness-IntelliVAC
400 Amp, 5.1 – 6.9 Electrically Held, Blot On Fuse, Electro-Mechanical,
110-120 VAC Control Frame
Electrically Held 120V Control Panel
400 Amp, 5.1 – 6.9 kV, Electrically Held, Bolt On Fuse, ElectroMechanical, 220-230 VAC Control Frame
Electrically Held 230V Control Panel
1503F-E4GCE
1
1
1503F-E4GCU
1
1
1503F-E4GBD
1
1
1
1503F-E4GBE
1
1
1503F-E4GBU
1
1
1503F-M4GCD
1
1
1
1503F-M4GCU
1
1
1503F-M4GBD
1
1
1
1503F-M4GBU
1
1
1503F-E4KCD
1
1
1
1503F-E4KCE
1
1
1503F-E4KCU
1
1
1
1503F-E4KBD
1
1503F-E4KBE
1
1
1
Saleable Part
Number
1503F-E4GCD
RA Internal
Part Number
80158-951-61
1503C-E4D
1503F-E4GCE
80158-143-51
80158-951-65
1503C-E4E
1503F-E4GCU
80158-143-53
80178-373-58
1503VC-BMC5
1503-WHE4V
1503F-E4GBD
80178-370-52
80178-142-57
80158-951-59
1503C-E4D
1503F-E4GBE
80158-143-51
80158-951-63
1503C-E4E
1503F-E4GBU
80158-143-53
80178-373-55
1503VC-BMC5
1503-WHE4V
1503F-M4GCD
80178-370-52
80158-142-57
80158-951-69
1503C-M4D
1503F-M4GCU
80158-143-52
80178-373-63
1503VC-BMC5
1503-WHM4V
1503F-M4GBD
80178-370-52
80158-142-52
80158-951-67
1503C-M4D
1503F-M4GBU
80158-143-52
80178-373-61
1503VC-BMC5
1503-WHM4V
1503F-E4KCD
80178-370-52
80158-142-52
80158-951-62
1503C-E4D
1503F-E4KCE
80158-143-51
80158-951-66
1503C-E4E
1503F-E4KCU
80158-143-53
80178-373-68
1503VC-BMC5
1503-WHE4V
1503F-E4KBD
80178-370-52
80158-142-57
80158-951-60
1503C-E4D
1503F-E4KBE
80158-951-51
80158-951-64
1503C-E4E
80158-143-53
1503-IN050E-EN-P – June 2013
A-2
OEM Kit Chart
Table A.1 – Items That Should be Included with the Power Cell and Frame (cont.)
Final Part
Number
1503F-E4KBU
Qty
Description
1
400 Amp, 5.1 – 6.9 kV, Electrically Held, Blot On Fuse, IntelliVAC, 110-120
VAC Control Frame
IntelliVAC Base
Wire Harness-IntelliVAC
400 Amp, 5.1 – 6.9 kV, Mechanical Latch, Clip ON Fuse, ElectroMechanical, 110-120 VAC Control Frame
IntelliVAC Base
Wire Harness-IntelliVAC
400 Amp, 5.1 – 6.9 kV, Mechanical Latch, Bolt On Fuse, ElectroMechanical, 110-120 VAC Control Frame
Mechanical Latch 120V Control Panel
400 Amp, 5.1- 6.9 kV, Mechanical Latch, Blot On Fuse, IntelliVAC, 110120 VAC Control Frame
IntelliVAC Base
Wire Harness-IntelliVAC
600 Amp, 2.3 – 5.0 kV, Electrically Held, Blot On Fuse, ElectroMechanical, 110-120 VAC Control Frame
Electrically Held 120V Control Panel
600 Amp, 2.3 – 5.0 kV, Electrically Held, Blot On Fuse, IntelliVAC, 110-120
VAC Control Frame
IntelliVAC Base
Wire Harness-IntelliVAC
600 Amp, 2.3 – 5.0 kV, Mechanical Latch, Blot On Fuse, ElectroMechanical, 110-120 VAC Control Frame
Mechanical Latch 120V Control Panel
600 Amp, 2.3 – 5.0 kV, Mechanical Latch, Blot On Fuse, IntelliVAC 110–
120 VAC Control Frame
IntelliVAC Base
Wire Harness-IntelliVAC
600 Amp, 5.1 – 6.9 kV, Electrically Held, Bolt On Fuse, ElectroMechanical, 110-120 VAC Control Frame
Electrically Held 120V Control Panel
600 Amp, 5.1 – 6.9 kV, Electrically Held, Bolt On Fuse, IntelliVAC, 110-120
VAC Control Frame
IntelliVAC Base
Wire Harness-IntelliVAC
600 Amp, 5.1 – 6.9 kV, Mechanical Latch, Bolt On Fuse, ElectroMechanical, 110-120 VAC Control Frame
Mechanical Latch 120V Control Panel
600 Amp, 5.1 – 6.9 kV, Mechanical Latch, Bolt On Fuse, IntelliVAC 110120 VAC Control Frame
IntelliVAC Base
Wire Harness-IntelliVAC
1503F-M4KCD
1
1
1
1503-M4KBD
1
1
1
1503F-M4KBU
1
1
1503F-E6GBD
1
1
1
1503F-E6GBU
1
1
1503F-M6GBD
1
1
1
1503F-M6GBU
1
1
1503F-E6KBD
1
1
1
1503F-E6KBU
1
1
1503F-M6KBD
1
1
1
1503F-M6KBU
1
1
1
1
1503-IN050E-EN-P – June 2013
Saleable Part
Number
1503F-E4KBU
RA Internal
Part Number
80178-373-65
1503VC-BMC5
1503-WHE4V
1503F-M4KCD
80178-370-52
80158-142-57
80158-951-70
1503C-M4D
1503F-M4KCU
1503VC-BMC5
80158-143-52
80178-373-73
80178-370-52
1503-WHM4V
1503F-M4KBD
80158-142-59
80158-951-68
1503C-M4D
1503-WHM4V
1503F-E6GBD
80158-143-52
80158-142-59
80158-333-57
1503FC-E8D
1503F-E6GBU
80158-143-54
80178-374-52
1503VC-BMC5
1503-WHE8V
1503F-M6GBD
80178-370-52
80178-142-58
80158-333-60
1503C-M8D
1503F-M6GBU
80158-143-60
80178-374-55
1503VC-BMC5
1503-WHM8D
1503F-E6KBD
80178-370-52
80158-142-55
80158-333-58
1503C-E8D
1503F-E6KBU
80158-143-54
80178-374-57
1503VC-BMC5
1503-WHE8V
1503F-M6KBD
80178-370-52
80158-142-58
80158-333-61
1503C-M8D
1503F-M6KBU
80158-143-55
80178-374-60
1503VC-BMC5
1503-WHM8D
80178-370-52
80158-142-55