1
ZyFIND Manual
ZyFIND Manual
Contact Us
For full contact details, visit the ZyLAB website - http://www.zylab.com
For support, visit our ZyLAB support website - http://support.zylab.com
Contents
About ZyFIND ............................................................................................................ 1
ZyFIND Options ......................................................................................................... 2
ZyFIND Tools ............................................................................................................. 4
Document Basket ................................................................................................. 4
Transliteration Assistant ...................................................................................... 5
Multi-index Batch Search ..................................................................................... 7
Search for information .............................................................................................. 8
Select index(es) .................................................................................................... 9
Full-text searching.............................................................................................. 15
Search tools ....................................................................................................... 17
Search Techniques .................................................................................................. 29
Command line .................................................................................................... 30
Search Performance .......................................................................................... 31
Work with documents ............................................................................................ 32
View ................................................................................................................... 33
Organize ............................................................................................................. 44
Refine Your Results ............................................................................................ 59
Field Definition Option: Use for visualization .................................................... 60
Analyze ............................................................................................................... 61
Customize .......................................................................................................... 63
Create Redaction index ...................................................................................... 76
Share .................................................................................................................. 91
ZyFIND Manual
About ZyFIND
ZyFIND is a powerful and robust program that allows you to search, find and organize all documents that
are in your ZyLAB archives.
Search
With ZyFIND, you can perform detailed searches for your documents. Because all documents are full-text
indexed by ZyINDEX, you can search for any word or combination of words. ZyFIND supports all search
techniques that are also available in the search engines that you find on the Internet. After your search, a
result list displays the documents sorted by relevance.
Find
A big difference exists between searching and finding. ZyFIND provides a unique feature—called “hit
highlighting”—that helps you find the information you looked for, immediately. Hit highlighting marks the
words you where looking for in the original scanned or electronic document. You can see right away if this
document is the one you are looking for. ZyFIND enables you go directly to the page where the hit appears,
which saves you time, especially if your hit is on the last page of a lengthy document.
Organize
After you have found the information you are looking for, you can start organizing your data. Of course,
ZyLAB offers organizing capabilities at the point of input, but in many cases, you’ll want to organize on the
fly. Therefore, ZyLAB offers different techniques to label, structure and organize your data at different
times. You can manually change or add additional indexes (key fields) to the document or add a hierarchical
structure to your documents. With this flexibility, you are better able to find a particular document the next
time you open your ZyLAB archive. All of your colleagues will also be able to use the structure you added to
the documents.
Analyze
Using ZyView in combination with ZyLAB Analytics Server lets you run on-the-fly analysis of the found
document, including data extraction and translation (depends on the Job Definition and Job Profile setup in
Analytics Server).
Distribute
After you find the document you are looking for, you can view it or send it by email, print the document, or
export the document to another archive or even another application.
1
ZyFIND Manual
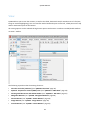
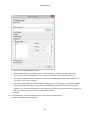
ZyFIND Options
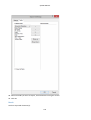
Go to ZyFIND > Options > Global Settings, to define some basic settings.
Global
•
Text Editor (browse to select the text editor)
•
Enable Statistics Logging (will only take effect after restart)
•
Functional Security enabled (change from ZyINDEX/Security)
•
Cascade Windows
•
Always view PDF files with Adobe
Directories
•
Index list directory (browse to select the correct directory)
•
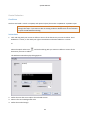
Index root directory (browse to select the correct directory)
•
Users directory (browse to select the correct directory)
Search preferences
•
Reload last open index at startup
•
Allow search tools to be set (when selected, you can (de)select search tools via View > Search tools. At
startup the selected search tools will be loaded.)
•
Turn-off drive mapping
•
Depending on the update index automatically after field edit setting, the index will be automatically
updated after a field edit operation. If this option is disabled, then all documents that are modified are
stored in a temporary database of the index so they may be updated all together at a later time.
•
Allow indexed results only
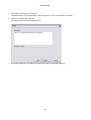
With the Database Fields module, multiple indexes can be linked to one database. In a scenario where
field information is first registered in xml fields, after which the document is being scanned (with
barcode and primary key), it is possible that the document linked to the xml fields is not yet processed.
In order to find the information in the fields, it is possible to search the fields, without them being
2
ZyFIND Manual
linked to an (indexed) document. This is not always useful. To turn off this option, select "Allow indexed
results only".
•
Maximum number of search results
•
Maximum number of search-terms (default is 1.000.000. Only increase this after receiving too many
(3065 max) wild card limit errors. Modification will only take effect after a restart.)
Table of contents
If you want to change a Table of Contents that is located on a network, make sure Broadcast updates in the
table of contents is on. Restart before making changes.
3
ZyFIND Manual
ZyFIND Tools
Document Basket
Conditions
You have searched one or more indexes in ZyFIND. You want to collect your documents in a Document
Basket.
Instructions
1. Select a document from the available search results.
2. Click the Add to Basket button.
or, click the right mouse button and select Add to Document Basket.
3. The documents you added to the Document Basket are shown in a separate window, once you click the
Open Document Basket button
.
All functionalities available in ZyResult can also be used here.
Result
You have collected documents from several result pages in a Document Basket.
4
ZyFIND Manual
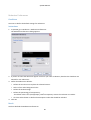
Transliteration Assistant
The Transliteration Assistant enables you to search translated and/or original documents for transliterated
parts (letters/words represented in the corresponding characters of another alphabet). The Transliteration
Assistant is used primarily to search for names of individuals and locations. For example, Pravda.
Search for transliterated text
1. Open ZyFIND.
2. Go to File > Select Index(es).
3. Select an index with translated documents.
4. Click OK.
5. Go to Tools > Transliteration Assistant.
6. If you want to change the Language, click the Select Language button.
7. Select 'latin2arabic.xml' or 'latincyrillic2.xml' and click Open.
8. Enter a search query, using your keyboard or mouse.
Add an * to make sure all occurrences of your search query are found.
9. To add only the Latin(/Diacritic) or Arabic/Cyrillic search query, choose the radio button Latin(/Diacritic)
or the radio button Arabic/Cyrillic.
To add both the Latin(/Diacritic) and Arabic/Cyrillic search query, choose the radio button
Latin(/Diacritic) and Arabic/Cyrillic.
10. Add the search query by clicking Insert.
11. Click Search.
The search results will be shown in ZyResult.
Re-use search queries
Select the History tab to re-use old search queries. Select a query and click Insert.
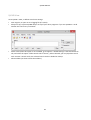
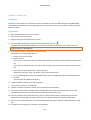
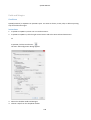
Search Assistant
You can use the Transliteration Assistant, or Search Assistant, also in your WebClient.
1. Go to C:\Inetpub\wwwroot\<indexname>\styles
2. If you are using the default templates, open user.css in Notepad.
3. Change the following line:
#search_assistant { display: none; }
/* only for specialized applications */
to
#search_assistant { /* display: none; */ }
/* only for specialized applications */
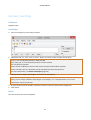
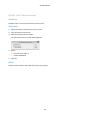
5
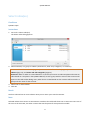
ZyFIND Manual
4. Save and close the file.
5. Open your WebClient.
6. Click Search Assistant
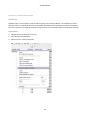
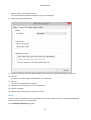
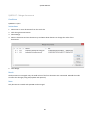
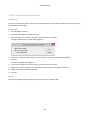
.
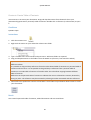
Below you see an example of a search query where the Latin and Cyrillic versions are combined with
boolean OR. The Latin (left) query part is expanded so that D variations are also searched for automatically.
6
ZyFIND Manual
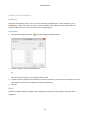
Multi-index Batch Search
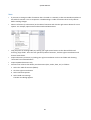
The ZyLAB Multi-index Batch Search module allows you to search in more than 100 plain indexes, or 50
indexes using XML-wrapper module, sequentially in one batch. This Search module is accessed from the
ZyFIND window.
During the actual search, a progress dialog keeps you informed about which index is currently being
queried and the number of documents found so far. You can cancel the query at any time, and only the
results found up to that point will be shown.
When the search is complete (or cancelled), a query result list is shown containing the file or files in which
the 'hits' for the word, phrase or string appear. Double-click a file to open it in ZyVIEW. In ZyVIEW, use the
navigation tools in the Navigate toolbar to view the hits.
Conditions
Indexes are available.
Instructions
1. Open ZyFIND.
2. In the ZyFIND menu bar click Tools > Multi-index Batch Search. The Multi-index Batch Search module
opens.
3. On the Indexes tab, select which indexes you want to search. You can select all indexes by pressing
ctrl+A and selecting one index in the list. You can select multiple adjacent indexes by clicking and
dragging the mouse over the indexes you want to select, then selecting one index in the list.
4. On the Query tab, enter your query text and select the settings
The functionality of the options and settings is the same as in ZyFIND.
5. Click Search. ZyFIND Multi-index Batch Search searches the selected indexes, and displays the progress
in a separate progress window. Errors are also shown in the progress window, and a reminder message
about the errors appears when the search is complete.
If you want to stop a search click Cancel. The items found up to that time are displayed in the results.
Searching many large indexes can take a long time.
6. The results are shown in a ZyRESULT window.
Result
Multiple indexes have been searched. The found items can be opened in ZyVIEW.
7
ZyFIND Manual
Search for information
After you have built an index, you can search for information in the files of your index. You can search using
ZyFIND, ZySEARCH or ZyLAB Webserver (the Web Portal).
First, select one or more index(es). Now, you can start full-text searching. To enhance your searches,
choose from several search tools and search techniques. The search tools and search techniques are
described for ZyFIND but most are also applicable to ZySEARCH and/or the Web Portal. The Web Portal has
its own help.
Full descriptions are in the following sections:
•
Select index(es) (page 9)
•
Full-text searching (page 15)
•
Search tools (page 17)
•
Search techniques (page 29)
•
Command line (page 30)
•
Multi-index Batch Search (page 7)
8
ZyFIND Manual
Select index(es)
Conditions
ZyFIND is open.
Instructions
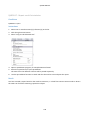
1. Go to File > Select Index(es).
The Select Index dialog appears.
2. Select Standard, or a group of indexes (Annotations, Audit Trail, Categories, or scenarios).
You can Add an index to the list (page 10), Remove an index from the list (page 11), View not available
indexes (page 12), and Create and edit categories (page 13).
Scenarios: When an index is created based on a scenario (see Create an index template and Create an
index based on a template in the ZyINDEX Manual) an extra group with the name of that scenario will
appear in the Select Index dialog. Every index that is created based on that scenario will be stored in a
group with the name of that scenario.
3. Select one or more indexes.
4. Click OK.
Result
You have selected one or more indexes. Now you can enter your search statement.
Note
Selected indexes that contain an Annotations or Audit trail module will show one or two more icons. One of
the icons is the TOC view, the other contains the search options for that particular module.
9
ZyFIND Manual
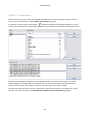
Add an index to the list
Conditions
The Select Index dialog is open. You can access this dialog via ZyFIND (File > Select index(es)), or via
ZyINDEX (File > Open).
Instructions
1. Click the Add Index button
.
2. Browse for the index you want to add. Click Add.
Or
Use the lower part of the dialog to search for the exact location of an index.
a) Browse to select a drive or disk.
b) If desired, select Include subfolders.
c) Click Search.
d) Select an index from the list.
e) Click Add selected.
Result
You have added an index to the list.
10
ZyFIND Manual
Remove an index from the list
Conditions
The Select Index dialog is open. You can access this dialog via ZyFIND (File > Select index(es)), or via
ZyINDEX (File > Open).
Instructions
Click the
icon of the index you want to remove.
Result
The index is removed from the list. Only the link is removed, the index still exists. If required, it can be
added to the index list again.
11
ZyFIND Manual
View not available indexes
Conditions
The Select Index dialog is open. You can access this dialog via ZyFIND (File > Select index(es)), or via
ZyINDEX (File > Open).
Instructions
Click the Rescan indexes button
.
Result
All indexes that are not available at this time, turn red.
Note
Not available indexes are, for example, moved indexes or indexes that are on a network drive with which
there is no current connection.
12
ZyFIND Manual
Create and edit categories
Conditions
The Select Index dialog is open. You can access this dialog via ZyFIND (File > Select index(es)), or via
ZyINDEX (File > Open). You want to create or edit a category (set of indexes), to be able to select all
required indexes at once. This removes the risk of forgetting one.
Instructions
1. Click the Edit Categories button
2.
. The Edit Categories dialog appears.
Select a category from the dropdown list.
Or
Click Add. Enter a name for your category and click OK.
3. Use the arrows to (de)select the indexes you want to include to or remove from the category. You can
work with all indexes that are listed in the Select Index dialog.
4. Click OK.
Result
You have created or edited a category. Click Categories in the Select Index dialog to view and select
categories.
13
ZyFIND Manual
Note
•
Use the Edit name button to change the name of a category.
•
Even in a category the indexes can be selected or deselected individually. Click the icon on the right side
of the category: , to view and (de)select the included indexes.
•
Indexes that are created using a scenario in ZyINDEX are all stored in the same tab that has the name of
the used scenario.
14
ZyFIND Manual
Full-text searching
Conditions
ZyFIND is open.
Instructions
1. Enter a word (query) in the Query text box.
2. Select the 'and, 'or', 'w/5', 'not' or 'more..' button to create a more complex search query.
and, or, not: see Boolean operators: AND, OR, NOT
w/5, w/25, p/5, to: see Positional operators: Context related
2of: see Quorum operator
fdate: The file modification date of a file can be searched with the fdate operator.
fname: The file name of a document can be searched with the fname operator.
For more information, see Search techniques (page 29).
3. Specify the Fuzzy degree (the degree of closeness to your query).
For TBIE indexes, use Fuzzy Search in your search query with a tilde ~. For each word in your search
query you can assign a different fuzzy degree. For example, 'car~1 transportation~3'. For more
information, see Fuzzy searches.
4. If you executed a search already, and want to search in the last results, select Progressive.
5. Click Search.
Result
The search results are listed in ZyResult.
15
ZyFIND Manual
Note
•
You can save a (complex and/or long) query via File > Save Query to File (define a name, and click Save).
Reuse this query, via File > Open Query from File (select the correct file, click Open).
•
Use the arrows at the left side of the screen to minimize or maximize your search possibilities.
•
The settings of the Search tools may defer, depending on the settings of the index. If you selected two
or more indexes, select the correct tools by selecting an index from the dropdown listbox.
•
Click the arrow button (next to Search), if you want to determine a search method (other than the
standard ZyFIND Query, where ZyFIND will look for search operators, wildcards, brackets, etc., in your
query):
All Words (AND operators are inserted automatically between the words)
Any Word (OR operators are inserted automatically between the words)
Exact Phrase (all words are automatically put in quotes)
16
ZyFIND Manual
Search tools
To enhance your searches, use one or more Search tools.
Use the search tools to reduce the number of results that must be reviewed. Almost any kind of search can
be made, from exploring (to get a sense of the available information) to very precise searches.
Search tools are:
•
Contents: Locate documents (page 18)
•
Contents: Search marked folders (page 20)
•
History: Reuse or delete previous searches (page 21)
•
Vocabulary: Find related documents (page 22)
•
Thesaurus: Include synonyms (page 23)
•
Concepts: Predefined complex queries (page 24)
•
Fields: Meta information (page 25)
•
Reference: Help (page 28)
17
ZyFIND Manual
Contents: Locate documents
Conditions
ZyFIND is open. You have done a search and the results are listed in ZyResult. You would like to know
whether similar or related documents are available. These documents might be located in the Table of
Contents. However, the Table of Contents is large and you are not familiar with its hierarchical structure.
Instructions
1. Select a document from the result list.
2. Click the right mouse button.
3. Select Locate in Table of Contents.
18
ZyFIND Manual
Result
If the document is present in the Table of Contents, the location will be shown.
Note
•
You can also locate a document in ZyVIEW. Click the 'Locate in table of contents' button:
. You can
navigate through multiple occurrences of the document with 'Locate Next in Table of Contents'.
•
If you want to create or edit a Table of Contents, see Contents: Structure your documents (page 45).
19
ZyFIND Manual
Contents: Search marked folders
Conditions
ZyFIND is open. You have entered a search query and want to restrict your search to documents in marked
folders of the Table of Contents.
Instructions
1. Select a folder from the Table of Contents.
2. Click the right mouse button.
3. Go to Search folders, and select one of the following options:
Mark 'selected folder' for searching
Mark 'selected folder' and subfolders for searching
4. Select the Search button.
Result
You have searched only the folders that were marked.
Note
•
To deselect all marked folders, select Search folders > Unmark all folders.
•
If you want to create or edit a Table of Contents, see Contents: Structure your documents (page 45).
20
ZyFIND Manual
History: Reuse or delete previous searches
If you cannot remember a successful previous search, look it up in History and reuse it. Delete unsuccessful
searches.
Conditions
ZyFIND is open.
Instructions
1. Click the History icon:
. A list with previous searches (max. 100) appears.
2. Double click a previous query to reuse it.
If added to a query, you can replace the automatically inserted search operator 'or' with your own.
3. Select a previous query and click Delete to remove it.
Result
You viewed, reused and/or deleted previous searches.
21
ZyFIND Manual
Vocabulary: Find related documents
View all searchable words and find all related documents.
Conditions
ZyFIND is open.
Instructions
1. Click the Vocabulary icon:
. A list with all searchable words appears.
2. Scroll through the list, view the number of occurrences for each.
3. Double click a word to insert it in the Search dialog.
If added to a query, you can replace the automatically inserted search operator "or" with your own.
4. Click Search.
Result
You viewed all searchable words and searched on one to find all related documents.
22
ZyFIND Manual
Thesaurus: Include synonyms
Broaden the scope of your search statement and include synonyms.
Conditions
ZyFIND is open.
Instructions
1. Type a search statement.
2. Click on a word in your search statement.
3. Click the Thesaurus icon to look for synonyms:
.
4. View the available synonyms and the number of occurrences for each.
5. Double click synonyms to add them to your search statement.
You can replace the automatically inserted search operator "or" with your own.
Result
You added synonyms to your search statement.
Note
Customize the standard thesaurus with Edit. Add synonyms to a root word, or delete them. Only custom
synonyms can be deleted.
23
ZyFIND Manual
Concepts: Predefined complex queries
Concepts are (complex) search statements with a name. Define often repeated searches as concepts and
save them for later use. For example, a concept named "legal" could be defined as:
lawyer OR justice OR rechtsanwald OR advocaat OR court
Conditions
ZyFIND is open.
Instructions
1. Click the Concepts icon:
.
2. Search for a concepts in the index related, private or public folders.
3. Double click to insert a concept.
Result
You added a concept to your search statement.
Note
•
Click Add to add concepts (fill out a name and definition (search statement)).
•
Click Modify to change the definition of a concept.
24
ZyFIND Manual
Fields: Meta information
Search for information about your documents. For example, author or description.
Conditions
ZyFIND is open.
Instructions
1. Click the Fields icon:
.
2. Select the field(s) you want to search on.
3. Type a field value, select one from a list or calendar, or leave it empty.
4. Optionally, if you want to search the field contents on a number of field values, and edit the search
query before executing it, you can use this option. Define the field values you want to search on, click
the right mouse button and select 'Insert'. All values are inserted in the full text query box. Edit the
search query and execute the search.
Fields can be inserted if:
- Show as search field (Client tab) is checked
- Field storage type is either Document, Document Catalog or Xml Wrapper (Storage & Index tab)
- Document Catalog and XML Wrapper fields will only be inserted if:
TBIE: 'Duplicated/cached' or 'Full text searchable' is checked
HAPI: 'Full text searchable' is checked
25
ZyFIND Manual
You can check this via Edit Definitions.
Search XML Wrapper fields
If you want to search on fields to get a result list with all populated or empty field values of a specific
field, make sure you search an XML Wrapper index with XML Wrapper fields and the option 'Full text
searchable' selected in the Storage & Index tab (of the New Field Definition dialog).
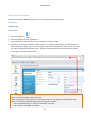
Select the Fields icon, click the right mouse button and select Edit Definitions. Use the Id (delimiter) of a
field to define a search query.
Query syntax:
<delimiter> to "/<delimiter>" {}
For example:
name to "/name" {john} will return all documents with the value john in the name field
name to "/name" {*} will return all documents with values in the name field
name to "/name" {} will return all documents with empty values in the name field
5. Click Search.
Result
A list of results appears in ZyResult.
Note
•
Use Refresh to remove all field values.
•
Use Advanced Search Options to define the and/or operators:
26
ZyFIND Manual
•
Change the look of Fields by choosing a different template.
a) Click the right mouse button.
b) Select Edit Definitions.
The Field Definitions dialog appears.
c) Select Advanced settings.
The Advanced Field View Settings dialog appears.
d) Choose a different template for View/edit values and Query values. Use the VerticalPluginsTab
template to group and store the field definitions underneath one tab. Select Show undefined fields,
to show all fields (including the ones of which the field values are not defined).
e) Click OK twice.
For more information on Field Definitions, see Add fields.
27
ZyFIND Manual
Reference: Help
Click Reference:
, if you want help with defining your search statement. For more information,
see Search techniques (page 29).
28
ZyFIND Manual
Search Techniques
Use Search techniques to reduce the number of results that must be reviewed. Almost any kind of search
can be carried out, from exploring (to get a sense of the available information) to very precise searches.
The search techniques are described in the ZyLAB Search Language Guide.
29
ZyFIND Manual
Command line
The Command Line feature allows you to start and run ZyFIND using the Windows Run feature.
Go to Start > Run. The Run dialog box appears, with the Command Line text box active. Type this
information into the box to start ZyFIND.EXE:
Path to the shareable files, e.g.
“C:\Program Files\ZyLAB\Information Management Platform\bin\”
Executable program file, e.g.
ZyFIND.EXE
Command line parameters such as:
-i[ShortIndexName, ShortIndexName2, (etc.)] - Specifies the list of short index names that will be
opened for searching
-q[query] - e.g. -q["in fieldname{value}"]
-f[fuzzy level, minimum percentage correct] - the search method
-p - progressive search
-v - start ZyVIEW immediately when only one result is found in ZyRESULT
-m[0-3] - 0 = regular search, 1 = search all words, 2 = search any word, 3 = search exact phrase
A typical command would appear like this:
“C:\Program Files\ZyLAB\Information Management Platform\bin\ZyFIND.EXE” -i[index1, index2] q[ZyLAB] -f[1,80] -v -m[0]
To find all documents with the word ZyLAB in index1 and index2 with a fuzzy level of 1 for words longer or
equal than 5 characters, regular search.
30
ZyFIND Manual
Search Performance
Due to fragmentation (inefficient use of storage space) of indexed files the search performance may slow
down. In order to avoid that, it is advised to schedule defragmentation (physically organizing the contents
of the disk to store the pieces of each file close together and contiguously) on a nightly basis.
Disk Defragmenter is a computer program included in Microsoft Windows designed to increase access
speed by rearranging files stored on a disk to occupy contiguous storage locations.
The techniques used by the Disk Defragmenter are as follows:
1. Moving all the index or directory information to one spot. Moving this spot into the center of the data,
i.e. one third of the way in, so that average head travel to data is halved compared to having directory
information at the front.
2. Moving infrequently used files further from the directory area.
3. Obeying a user provided table of file descriptions to emphasize or ignore.
4. Making files contiguous so that they can be read without unnecessary seeking.
In Windows Vista, Disk Defragmenter includes an option to automatically run at scheduled times using Task
Scheduler.
31
ZyFIND Manual
Work with documents
After you have found the information you were looking for, you can work with your documents. View (page
33), Organize (page 44), Customize (page 63), and Share (page 91) your documents, using ZyFIND,
ZyRESULT and ZyVIEW.
Enter a search statement in ZyFIND and click Search. A result list appears in ZyResult. Double click an item
to view it in ZyVIEW.
32
ZyFIND Manual
View
ZyVIEW allows you to view the contents, as well as the fields, bookmarks and/or attachments of a file (text,
image or with hit highlighting). You can view files with a bookmarks pane on the left, a field pane on the top
and an attachments pane at the bottom.
All viewing options can be selected through menu options and buttons in toolbars. Enable/disable toolbars
via View > Toolbar.
The following topics describe the viewing functions:
•
View the result list (statistics) (see "ZyRESULT List View" page 35)
•
ZyResult - Keyword in context (KWIC) view (see "ZyRESULT - KWIC View" page 36)
•
Viewing a Pdf document with Adobe Reader (see "ZyRESULT - PDF View" page 37)
•
Navigation Buttons (see "ZyVIEW - Navigation Buttons" page 38)
•
Viewer Buttons (see "ZyVIEW - Viewer Buttons" page 39)
•
Image Buttons (see "ZyVIEW - Image Buttons" page 40)
•
Launch Buttons (see "ZyVIEW - Launch Buttons" page 42)
33
ZyFIND Manual
ZyFIND View
Go to ZyFIND > View, to define some basic settings.
•
View Log File, to open an error logging file (if it exists).
•
Always on top, to place ZyFIND always on top of your other programs. If you use ZyFIND in a small
window this can be very convenient.
•
Search tools (when this option is not available, go to Options > Global Settings > Search Preferences
tab, and select the option "Allow search tools to be set"), when selected, you can (de)select search
tools via View > Search tools; the selected search tools are loaded at startup.
•
Show toolbars (to show or hide the toolbars).
34
ZyFIND Manual
ZyRESULT List View
The result list functions like lists in other windows applications, for example, the list of e-mail items in your
Outlook inbox folder. The results are displayed in a list control, which consists of the following columns:
•
Rank
•
Number of hits
•
Hit density
•
Volume name
•
Filename
•
Links
•
Bookmark
•
Path
•
Time/date
•
Short description
•
Comment
•
Index
•
Guid (Globally Unique IDentifier)
•
Email Content
•
Has Email Attachments
The result list provides standard file information from the operating system such as document filename, on
which volume it is stored, in which directory, file date, etc.
Search statistics and file information is standard for any document in the result list. Next to this standard
information, ZyRESULT also displays document fields if such fields are present. The presence of these fields
allows you to quickly disseminate the results and determine which results may be more important than
others.
In the footer of the ZyRESULT window the amount of documents in the result list, the total amount of hits
in the documents and the sorting method are available.
You can save the Result list using File Save (as..). Define a name, and click Save. Open it using ZyFIND > File
> Open Result File (select the correct file, and click Open).
35
ZyFIND Manual
ZyRESULT - KWIC View
In KWIC (keyword in context) view, the context of the (first) hit is shown. The hit is highlighted.
KWIC view is available via ZyResult > View > Kwic view, via an icon on the toolbar
CTRL + K.
or with the shortcut
Go to ZyResult > View > Options to define the KWIC view settings:
•
Define the maximum number of contexts and the number of words (max 50) around the keyword.
•
Select the Display mode: Compact or Separated. Compact displays all contexts one after the other,
Separated displays all contexts on a separate line.
36
ZyFIND Manual
ZyRESULT - PDF View
If documents were indexed with Adobe Reader they will not be displayed with ZyVIEW but instead Adobe
Reader will be launched for document viewing. A special module has been developed that provides hit
highlighting, hit navigation and bookmark support from within Adobe Reader or Adobe Acrobat.
Conditions
A PDF document created with Adobe Acrobat has been indexed. Adobe Reader is installed on your
computer. ZyRESULT is open.
Instructions
1. Double click the PDF document.
2. The document will be automatically opened in Adobe Acrobat.
3. Use the Hit buttons to jump from hit to hit.
Result
You have viewed a PDF document with Adobe Reader.
37
ZyFIND Manual
ZyVIEW - Navigation Buttons
Navigation buttons in ZyVIEW
Results
Previous document/page/hit, and Next
hit/page/document
38
ZyFIND Manual
ZyVIEW - Viewer Buttons
Viewer buttons in ZyVIEW
Display as text
Display as images
WYSIWYG
Results
Displays the text file containing the OCR text and image links
of an image document exported by ZySCAN or any other filter
indexed as type ASCII.
Displays images and shows hit-highlighting on the hits in the
image.
Displays electronic file contents with hit highlighting. In this
view it is also possible to copy selected text to the windows
clipboard. This may be useful to reuse a particular paragraph of
the OCR text in a document.
Displays file in media player.
Display media player
Display translation
Fieldview
Attachments view
When a file has been translated using ZyLAB Analytics Server,
this displays the original document in a new ZyVIEW window.
Activates the field view frame above the text/image/hit
highlighting view.
View attachments. For electronic documents with
attachments. Attachment view is located below the
text/image/inso view panel.
39
ZyFIND Manual
ZyVIEW - Image Buttons
Image buttons in ZyVIEW
Results
Select an area. You can use it to
copy and past an area in for instance
Word, or to select an area to
highlight as an annotation or
hyperlink area.
Grab and drag
Select area and zoom in
Zoom in
Zoom out
Adjust image to height
Adjust image to width
Adjust image to height and width of
the viewing frame
Rotate left
Rotate right
If you want to change font (style) and size, go to View > Change textfont. If text from another codepage is
being viewed, this is particularly useful.
Go to ZyVIEW > View > Options to select the following options as required:
Allow exit on escape
Synchronize Text- and Image Contents
Lock selected View
Goto First Hit (to jump directly to the first hit when opening a document)
Print Hits on Images
Allow deleting of document
This option must be selected if you want to delete pages in a document.
Display next document after delete
Edit fields in main window (to edit field (values) in Field View. For more information, see Editing
Field values (page 69)).
View TIFF Converted documents first
40
ZyFIND Manual
•
Go to File > Properties to view the location, name, type, size, other document properties and image
links.
•
Click the right mouse button to select Image Properties (filename, type, compression, resolution, size,
WHYIWYG version).
41
ZyFIND Manual
ZyVIEW - Launch Buttons
Launch buttons in ZyVIEW
Results
Print
Launch
About
Open .xml file
Is only enabled if an xml document is
found that matches the filename of the txt
file. Typically this is an xml file that was
generated by ZySCAN. A browser is
launched and the xml can be viewed. In
Internet Explorer 5.0 and higher, xml is
parsed and the document structure can be
browsed as an xml document.
Open Document Basket
Add to Document Basket
42
ZyFIND Manual
ZyVIEW - View Email
Conditions
When searching an Email Archive, you want to view if an email contains an attachment, or is an
attachments itself.
Instructions
1. Open and search an Email Archive in ZyFIND.
2. Make sure that, in ZyRESULT, the option Hide Attachments (View > Email) not is selected.
3. Open an email.
4. If, in File View, you view:
an icon with paperclip, the email contains an attachment.
Click on the icon, to view the attachment (child email).
an icon without a paperclip, the email itself is an attachment.
Click on the icon, to view the email (parent email).
Result
You were able to view whether or not an email contained an attachment, or was an attachment itself.
43
ZyFIND Manual
Organize
Organize your documents by structuring them within a Table of Contents, adding bookmarks (notes) and
labeling them with fields.
You can use the traditional way of archiving, i.e. by organizing document references. It is easy to have
document references to the same document in different folders, therefore it provides a very intuitive and
flexible method to organize your information from different perspectives.
ZyFIND offers several search tools to add structure to your documents:
•
Contents allows you to structure your documents. You can use the traditional way of archiving, i.e. by
organizing document references. It is no problem to have document references to the same document
in different folders. So, it provides a very intuitive and flexible method to organize your information
from different perspectives.
•
Fields that are fully searchable can be added to label your documents.
ZyResult allows you to view and manipulate results of a query.
ZyVIEW can be used to edit fields and add bookmarks to lines of text on specific pages.
The following topics describe the organizing of documents:
•
Contents: Structure your documents (page 45)
•
Fields: Label your documents (page 54)
•
Link between documents (see "ZyRESULT - Link between documents" page 57)
•
Document Basket: Collecting Documents (see "Document Basket" page 4)
44
ZyFIND Manual
Contents: Create Table of Contents
Use Contents to structure your documents. Drag and drop documents from the Result list to your
(automatically generated or personal) Table of Contents. Double click a reference (to a document) to open
it.
Conditions
ZyFIND is open.
Instructions
1. Click the Contents icon:
.
2. Right click the mouse on your Index then select Insert folder.
3. Type a suitable name for the folder and press enter. Add more folders as required.
4. Drag and drop documents to the folders from the Result list (of course, first search the index!).
A personal table of contents is not index-specific and can contain references to documents from
different indexes.
It is possible to drag and drop references from the index-related table of contents to a personal table of
contents and vice versa. It is not possible to drag and drop a reference from a personal table of
contents to an index table of contents of another index. This also allows copying between different
table of contents.
References in the personal table of contents to indexes that are not selected are inactive, denoted by
their gray color. The reference may be activated by selecting the index associated with that reference.
5. Select Refresh to update the contents of the folder. Use the Move up and Move down buttons to order
your documents.
Result
You created a personal Table of Contents, added documents and structured them.
45
ZyFIND Manual
Note
•
If you want to change a Table of Contents that is located on a network, make sure Broadcast updates in
the table of contents is on. Go to Options > Global Settings > Table of contents tab to verify. Restart
before making changes.
•
Select a reference (to a document) in the Table of Contents and click the right mouse button for more
options. For example, Open entries and Print Selected Documents.
•
Copy and paste an existing folder, by clicking your right mouse button on the desired folder and
choosing 'Copy folder'. Go to the new (personal) Table of Contents, click the right mouse button and
choose 'Paste folder'.
•
Import a directory structure, by clicking your right mouse button on the root folder and choosing
"Generate from Index Definition".
•
Import ZySCAN documents only
•
Structure the columns that define your documents (title, author, date, etc.) as follows:
1. Select the Table of Contents (folder).
2. Click the right mouse button.
3. Select Contents Options.
4. Select Field view settings.
The Edit view dialog appears.
46
ZyFIND Manual
5. Click New.
6. Enter a new view name.
7. Click OK.
8. Select a category.
9. Select and order the items with the arrows and the Move up and down buttons.
10. Click OK three times.
11. Click the right mouse button in the right pane and select the view with Select View.
•
When a CD is published of an index, the table of contents is published as well.
•
Maintain the Table of Contents by selecting it in the left pane and clicking the right mouse button.
Select Database > Pack or Reindex to optimize the internal record structure (removing deleted
records, etc.).
47
ZyFIND Manual
Select Update items to update all document fields to show the latest changes.
48
ZyFIND Manual
Contents: Sort Table of Contents
Conditions
You can sort the Table of Contents in ZyFIND based on field values. ZyFIND is open.
Instructions
1. Click the Contents icon:
.
2. Sort on column by clicking on the column header.
You cannot use the options Cut entries, Paste entries, Move up, and Move down when sorting the Table
of Contents.
Result
You have sorted the Table of Contents.
49
ZyFIND Manual
Search Folders: Pre-set Search Queries
Search Folders are pre-set search queries that automatically group the documents found by the search
settings in a dynamic table of contents (TOC). There are two types:
•
Index-specific search folders which only find documents in the related index
•
Global search folders which find documents in all the indexes in the Web Client. (A global search folder
can only be created and added using ZyFIND and not the ZyLAB Web Client).
Search Folders created in ZyFIND can be used and edited in the ZyLAB Web Client.
Conditions
ZyFIND is open, and at least one index is selected. You want to create a dynamic Table of Contents in which
files are automatically placed in a results list created using pre-set queries.
Instructions
1. Click the Search Folders icon:
.
50
ZyFIND Manual
2. Right click on the index folder, located beneath the SearchFolders folder.
3. Select the option Edit Search Folder Query.
4. Define a full text query.
5. Select a fuzzy degree (the degree of closeness to your query) from the dropdown listbox.
Fuzzy degree 2 is recommended for normal text searches. This provides for mistakes such as broken
and joined characters. Set Fuzzy degree 3 or 4, if you search for long words.
51
ZyFIND Manual
6. Select a search method from the dropdown listbox.
Standard (ZyFIND will look for search operators, wildcards, brackets, etc. in your query)
All Words (automatically AND operators are inserted between the words)
Any Word (automatically OR operators are inserted between the words)
Exact Phrase (automatically all words are quoted)
7. Define the sort options.
8. Select and define the values of the fields you want to search on.
9. Combine the selected fields with AND or OR.
10. Combine the fields and full-text query with AND, OR, or AND NOT.
11. Click OK.
If a search query is defined for a folder, the following icon appears:
12. You can create more folders, and add search queries to them.
13. Search queries can be viewed, edited, deleted or copied by right clicking on the folder, and choosing
View Search Folder Query
Edit Search Folder Query
Delete Search Folder Query
Copy Current Query to Search Folder.
Result
You have defined the queries, based on which the Search Folders Table of Contents will be filled
dynamically.
Global Search Folders
You can also add Global Search Folders, to create a dynamic TOC for all open indexes in ZyFIND:
1. Right click on the SearchFolders folder.
2. Select Create Global Search Folders.
3. Define a name and location.
4. Click Save.
5. Right click on the new Global Search Folder, and select Insert Folder.
6. Define a name for the folder.
7. Right click on the new folder, and select the option Edit Search Folder Query.
8. Follow the steps explained above to create a search query.
9. Click OK.
10. Select the folder to execute the search query for all opened indexes.
52
ZyFIND Manual
Narrow Search
If you want to limit your search to one folder (including subfolders), right click on a folder, and select
Narrow Search. Choose from narrowing your search to the selected folder, or include the subfolders too.
•
All folders that are searched, have the following icon:
•
All excluded folders, have the following icon:
53
ZyFIND Manual
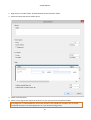
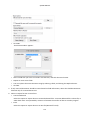
Fields: Label Documents
Conditions
ZyFIND is open. Use Fields to label your documents.
Instructions
1. Select an index. For more information, see Select index(es) (page 9).
2. Click the Fields icon:
.
3. Click the right mouse button.
4. Select Edit Definitions.
5. Click Add definition.
The New Field Definition window appears.
6. Fill out the Name of the field definition.
For example, author, name or contract number. A field name may not contain spaces!
54
ZyFIND Manual
7. Select a Type from the dropdown list.
For more information about the different types, see Field types.
8. Select the Storage & Index tab.
9. If you work with an index with XML Wrapper, make sure Store field in XML Wrapper is selected.
10. Click OK.
For more information about Field definitions, see Add fields.
11. Click OK.
You can see the added field in ZyFIND.
12. Search for the document you want to add fields to.
13. Open it in ZyVIEW.
14. Double click the Field, select it and enter a value.
Result
You have added a field definition and field value to a document. After the index is updated (see Build the
index), you can search on the added field.
Also see Editing Field values (page 69).
55
ZyFIND Manual
Fields: Define Start and End Point Comment String
Conditions
You want adjust the string to be used in the short or long description by defining the start and end
character of the comment string. This way, the GUID (starting point of the comment string when using the
XML Wrapper for your key fields, and used for fast access to the fields) can be skipped, which will make the
description much clearer.
ZyFIND is open.
Instructions
1. Click the Fields icon:
.
2. Click the right mouse button.
3. Select Edit Definitions.
The Field Definitions dialog appears.
4. Select Advanced Settings.
The Advanced Field View Settings dialog appears.
5. Select the Short or the Long description.
6. Select the Edit description button.
The Short (or Long) Description Editor dialog appears.
7. Adjust [docprop:Comment] or [docprop:Comment,50] to, for example, [docprop:Comment,10-50].
Now, instead of the whole comment string, or the first 50 characters of the string, the characters 10 to
50 will be used.
8. Click OK twice.
Result
You have defined the start and end character of the comment string to be used in your short or long
description.
56
ZyFIND Manual
ZyRESULT - Link between documents
Conditions
You have executed a search. ZyResult is open with a result list. You want to create a link between two
documents. Check if Hyperlinks is enabled for this index (ZyINDEX > Build > Index Settings > Settings).
Instructions
1. Select the document you want to link to.
2. Click the right mouse button.
3. Select Copy as hyperlink.
4. Double click the document you want to link from.
ZyVIEW opens with the document.
5. Click the right mouse button.
6. Select Hyperlink > Insert.
A blue arrow appears.
If you are in the WYSIWYG view, you first select a spot with the Select button:
mouse button and select Hyperlink > Insert. The selected area turns blue.
, click the right
Result
You have created a link between two documents. Now, you can double click on the blue arrow/area and
jump from document to document.
Note
•
When working with the Annotations module it is possible to create links between certain parts of the
documents as well.
57
ZyFIND Manual
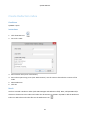
ZyRESULT - Refine Results
Refine results allows you to refine your ZyFIND (and Web Client) results by filtering on fields that have
content (contain metadata or a value) (Refine Your Results (page 59)).
In ZyResult, the 'Open refine results button'
displays the Refine Results dialog showing a list of the
values in the visualization-activated fields together with the number of documents containing each value.
Selecting a value displays all documents containing that value in the 'Show results' panel. The 'Select'
button highlights a selected result in the ZyResult list. The 'View' button opens the selected result in
ZyView. A 'Filter' button further filters the Group values list to get more precise results.
Only fields that have the option 'Use for visualization' selected can be used for the 'Refine your results'
function. For more information, see Field Definition Option: Use for Visualization (page 60).
58
ZyFIND Manual
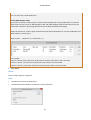
Refine Your Results
Conditions
You want to refine your results in ZyFIND. The relevant fields have the 'Use for visualization' option selected
(Field Definition Option: Use for visualization (page 60)).
Instructions
1. Search your index(es).
The results are displayed in the ZyResult list.
2. Click the Open Refine Results dialog
button to show the Refine Results dialog.
3. Select a field in the Groups panel. The field values ('Values' column) and the number of documents
containing that field value ('Occurs' column) are shown inthe Group values panel.
4. Click the 'Show results' checkbox.
5. Select a value in the Value column. All documents containing this field value are listed in the Show
results panel.
If necessary, click the Filter button to filter on that field value. The 'Group values' list then shows
only those documents containing that field values, and displays the other field values in the same
field on those documents. You can filter down to a single document.
Click Reset to view all group values again.
6. In the 'Show results' panel select one result:
Click the Select button to locate the document in the ZyResult list.
Click the View button to open the document immediately in ZyView.
Result
You have refined the results.
59
ZyFIND Manual
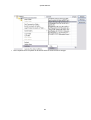
Field Definition Option: Use for visualization
ZyINDEX > Build > Define Fields > Define > Add definition > Client tab
The option 'Use for visualization' enables you to refine your search results by filtering on the content of the
field (see Refine Your Results (page 59)). For the Single-select list field, the Multi-select list field and the
Logical field, 'Use for visualization' is a default option.
Once the 'Use for visualization' checkbox is selected, you can define the Value separator (the default value
is a comma). The defined delimiter will be used for dynamic filtering (Refine your Results), including the
Star Tree and Tree Map. It is recommended to use punctuation characters. If the value separator is empty,
the field value will not be split. A value separator can include, start or end with one or more space
characters.
Notes
•
When editing fields, still a comma will be used to split or combine field values.
•
In eDiscovery the Value separator is particularly useful. For example, in Microsoft Outlook fields with
email addresses are split with a semicolon (;). These fields should be linked to a ZyINDEX field with a
semicolon as the Value separator.
60
ZyFIND Manual
Analyze
With the ZyLAB Analytics Server (part of the Analytics Bundle) installed you can run on-the-fly analysis of a
document that is open in ZyView.
Conditions
The following conditions are required for on-the-fly analysis from ZyView:
•
In ZyINDEX, you must enter the Analytics Server location (see ZyINDEX > ZyINDEX Options > Global
Settings > System Settings).
•
The Index must be connected to a database (see ZyINDEX > Advanced Indexing > Linking to ZyLAB
Analytics Server) with specific fields modules.
•
The Analytics Server job profile must be set up, and the fields mapped to the index (see ZyLAB Analytics
Server > About Analytics Server > Job Definition and Field Mapper.
•
The Analytics Server Job must be active and the job process started (see ZyLAB Analytics Server >
Processing in Detail > Select/Monitor Process Jobs).
Instructions
1. Search for a document in ZyFIND and open it (in ZyView).
2. In ZyView, click the Show Analysis Dialog button
.
This button is only active when all settings are correct.
The Analysis dialog box opens.
3. Select the required Profile from the drop-down list. The profiles listed are the currently-active jobs in
Analytics Server.
61
ZyFIND Manual
4. Click Schedule to schedule the document for analysis. The document is added to the Analytics Provider
queue for processing. The speed of processing depends on the capacity of the analysis providers. The
Status panel shows the status of the process; the status can be updated using the Update button. The
statuses are:
Scheduled - document is queued for processing
Processing - document is being analyzed and the fields populated with analysis data and/or the
document is being translated
Completed - the process is finished
Failed - the process has failed. Possible reasons are that the Analytics Server is not correctly
configured, or there is a network failure.
5. The History shows the processes completed on the document.
6. Click Close to close the Analysis dialog.
The Close button does not stop the analysis process. You have to use the Cancel Process button in
Analytics Server to stop a process.
7. When the analysis has finished build the index using ZyINDEX.
8. Extracted information stored in fields is visible in the fields area of the ZyFind window.
9. If text was translated, in ZyView click the Display Translation button
translation and the original.
to toggle between the
Result
The document was analyzed and its fields were populated with analysis information. Translations were
stored in a linked document.
62
ZyFIND Manual
Customize
Customize describes various options for using the results list and working with documents:
•
Sort the result list (see "ZyRESULT - Sort the result list" page 64)
•
Editing Field values (page 69)
•
Delete a page (see "ZyVIEW - Delete a page" page 72)
•
Merge documents (see "ZyRESULT - Merge documents" page 66)
•
Delete documents (see "ZyRESULT - Delete documents" page 68)
•
Delete references to documents (see "ZyRESULT - Delete references to documents" page 67)
•
Split a document (see "ZyVIEW - Split a document" page 73)
•
Edit a document (see "ZyRESULT/ZyVIEW - Edit a document" page 71)
•
Reuse an image (see "ZyVIEW - Reuse an image" page 74)
63
ZyFIND Manual
ZyRESULT - Sort the result list
Conditions
You have executed a search. ZyResult is open with a result list.
Instructions
•
Click the table headers of the columns to sort the results.
•
Columns may be switched on/off via View > Column.
Result
You have sorted the result list.
Note
•
By default, the list is sorted based on hit density. The most relevant document, i.e. with the highest hit
density, it ranked first.
•
Numbers are sorted as follows:
002string
02string
2string
3string
20string
64
ZyFIND Manual
st2ring
st3ring
st20ring
string2
string3
string20
The Guid field follows traditional sort ordering. This ordering is equivalent to hexadecimal numeric
ordering.
65
ZyFIND Manual
ZyRESULT - Merge documents
Conditions
ZyRESULT is open.
Instructions
1. Select two or more documents from the result list.
2. Click the right mouse button.
3. Select Merge.
4. Select a document and use the Move up and Move down buttons to change the order of the
documents.
5. Click Merge.
Result
The documents are merged. Only the Field values of the first document are maintained. Rebuild the index
to reflect the changes (using add, update and optimize).
Note
Only documents created with ZySCAN can be merged.
66
ZyFIND Manual
ZyRESULT - Delete references to documents
Conditions
ZyRESULT is open.
Instructions
1. Select one or more references (documents) from the result list.
2. Click the Delete Reference(s) button.
Result
You have deleted references to documents. The documents are still present in the index.
Note
You can also delete references in ZyVIEW.
67
ZyFIND Manual
ZyRESULT - Delete documents
Conditions
ZyRESULT is open.
Instructions
1. Select one or more references (documents) from the result list.
2. Click the Delete Document(s) button
.
Result
You have deleted documents from the file system. The next time the index is built with update and
optimize, it will no longer appear in the index.
Note
•
To prevent mistakes, you can disable the function "Allow deleting of document" in menu View >
Options.
•
You can also delete a document (contents) in ZyVIEW. Click the Delete Contents button. First, make
sure "Allow deleting of document" is selected (menu View > Options).
68
ZyFIND Manual
ZyRESULT/ZyVIEW - Edit Field values
Conditions
ZyRESULT or ZyVIEW is open. In ZyVIEW, the "Display as images" view is active.
Instructions
Change the field values of a set of documents
1. In ZyRESULT, select two or more documents with Ctrl or Shift.
2. Click the right mouse button.
3. Select Fields.
The Document Properties dialog appears.
4. Double click a Value and change it.
5. Select the Field.
6. From the dropdown list at the right, choose from
Append (if you have an empty text string for fields that you do not want to change in the selected
documents)
Replace (if the new field data is empty, all current field values will be replaced by the same value, or
are deleted!)
Delete (deletes the field value)
7. Click OK.
Change the field values of a set of documents, using different values for each document
1. Open the first document of the result list (the batch).
2. Select the Batch Field Edit button
.
3. Change the Field Value(s).
4. If the last field you changed is a plain text edit field, use Ctrl + Alt + Arrow Right to navigate to the next
document. If not (the last field you changed was, for example, a date field), use Ctrl + Arrow Right. A
dialog will appear.
5. If you want to save your changes automatically each time you go to the next document with Ctrl +
Arrow Right, select 'Yes, apply always'.
For changing the field values of a set of documents via the web, see Web Client: Fast Key Fielding.
Change the field values of one document
1. In ZyVIEW, select the Fieldview button:
.
2. Double click a Value and change it.
3. Select the Field name.
4. Click the right mouse button and select Save.
69
ZyFIND Manual
Result
You have edited Field values.
Note
•
If are working with ZySCAN Service and TIMER Service, ZyRESULT and ZyVIEW are the only places where
the field values can be entered. The field editor shows all fields that are defined in the index and that
occur in the document.
•
Depending on the update index automatically after field edit setting in ZyFIND (Options > Global
Settings > Search preferences), the index will be automatically updated after a field edit operation. If
this option is disabled, then all documents that are modified are stored in a temporary database of the
index so they may be updated all together at a later time.
•
If you want to edit or add new field definitions, click the right mouse button and select Show
Definitions.
•
If you want to choose between editing field (values) in Field View or in a separate dialog, go to ZyVIEW
> View > Options and (de)select 'Edit Fields in Main Window'. If this option is selected, Edit Fields (Edit >
Edit Fields, CTRL + F or double clicking) will use standard Field View. If not, the separate Document
Properties dialog will appear.
70
ZyFIND Manual
ZyRESULT/ZyVIEW - Edit a document
Conditions
ZyRESULT or ZyVIEW is open.
Instructions
1. Select a document in ZyRESULT or view one in ZyVIEW.
2. Click the Launch button:
.
3. The document will be opened in the associated application (based on the extension).
4. Edit the document.
5. Save it.
6. Close the application.
Result
You have edited a document. Update the index, to make the changes searchable.
Note
Alternatively, you can export a document from ZyVIEW and then manipulate it in another application. For
more information, see Export document(s (page 110)).
71
ZyFIND Manual
ZyVIEW - Delete a page
Conditions
ZyVIEW is open.
Instructions
1. Click the right mouse button.
2. Select Delete page.
Result
You have deleted a page.
Note
•
If you want to delete pages, make sure the option "Allow deleting of document" is selected (via ZyVIEW
> View > Options).
•
Only pages from txt and tiff files can be deleted.
72
ZyFIND Manual
ZyVIEW - Split a document
Conditions
ZyVIEW is open.
Instructions
1. Go to menu Edit > Split, or click on the right mouse button.
2. Select Split > Before this page, After this page, or Delete this page.
Result
You have split a document.
73
ZyFIND Manual
ZyVIEW - Reuse an image
Conditions
ZyVIEW is open. You are viewing an image.
Instructions
1. Click the Select button.
2. Select (a part of) the image.
3. Click the right mouse button.
4. Go to Copy > Selection or Page.
5. Open the Windows application you want to use the image in.
6. Paste.
Result
You have reused an image in another Windows application.
74
ZyFIND Manual
ZyVIEW - Redaction
Redaction is the careful editing of a document to remove confidential information. Sensitive government
documents, confidential legal documents, insurance contracts, and other sensitive documents are often
redacted before being made available to the public.
ZyFIND Redaction makes it easy for you to mark sections of a document. You can then redact the document
so that the sections you specified are blacked out or replaced with something else. You can either print the
redacted document or use it electronically. In the redacted version of the document, the redacted text
cannot be converted back to text or retrieved.
Documents produced as TIFF files in ZySCAN can be directly redacted. Electronic documents built directly
into an index must first be converted to the TIFF format using the TIFF Conversion feature in ZyVIEW.
Redaction has the following topics:
•
Create Redaction index (page 76)
•
TIFF Conversion for Redaction (page 77)
•
Create Redaction (page 78)
•
Edit/Delete Redaction (page 82)
•
Print Redacted Document (page 83)
•
Export Redacted Document (page 84)
•
Search Redactions (page 85)
•
Security Redaction (page 86)
75
ZyFIND Manual
Create Redaction index
Conditions
ZyINDEX is open.
Instructions
1. Click the BUILD icon:
.
2. Go to File > New.
3. Enter a Short name (max. 8 characters).
4. Enter a descriptive Long name (max. 80 characters). Use the name to describe the contents of the
index.
5. Select Redaction.
6. Click OK.
Result
You have created a Redaction index (with XML Wrapper and Redaction field). Now, add ZySCAN and/or
electronic documents to this index and redact the documents via ZyFIND > ZyVIEW or add the Redaction
index to a Web Client and redact files via the Redactions icon
76
.
ZyFIND Manual
TIFF Conversion for Redaction
Conditions
The document you want to redact is not in a TIFF format. You have installed the ZyLAB Export2TIFF printer
driver (this appears in your printer list as 'ZyLAB Tiff Export' printer). You have defined the Tiff Conversion
Settings in ZyINDEX.
Note: Documents already in a TIFF format (for example, those created in ZySCAN) can be
directly redacted (Create Redaction (page 78)).
Instructions
1. Open the non-TIFF document you want to redact in ZyVIEW.
2. Click Tiff Conversion > Create Tiff Conversion (or press the Create Tiff Conversion button
image is created from your document and is displayed on the screen.
). A TIFF
3. To change back to the original document click View > WYSIWYG. To view the TIFF again click View >
Display as images. You can also use the 'Display as Images' and 'WYSIWYG' toolbar buttons.
4. To delete the TIFF image, click Tiff Conversion > Delete Tiff Conversion (or press the Delete Tiff
Conversion button
).
Result
A TIFF version of your document has been created, and it can now be redacted.
The TIFF file is saved in the index's Data > TIFF folder. The TIFF file can also be viewed in the ZyLAB Web
Client.
77
ZyFIND Manual
Create Redaction
Conditions
You have executed a search via ZyFIND, and opened a (TIFF) document via ZyRESULT. ZyVIEW is open.
Note: When you create a new redaction the redaction wizard appears to guide you
through the steps. If you want to edit an existing redaction double-click on the redaction
to open the Edit Redaction dialog.
Instructions
1. Click and drag with your mouse to define a section of the document you want to redact. Go to
Redaction > Create, or click with your right mouse button and select Redaction > Create.
or
Select the Quick redact icon
document you want to redact.
and click and drag with you mouse to define a section of the
The Redaction Wizard Display dialog appears.
2. Define the text that must replace the selected section.
3. Select a font and a background color.
4. Define the Strike through.
78
ZyFIND Manual
5. Define the percentage of Transparency.
The default value is 0% (solid/opaque), 100% transparency means the redaction is invisible.
6. Click Next to display the Fields tab.
The Redaction Wizard Fields dialog appears.
7. Enter a description for the redaction (for example, what you replaced and why).
79
ZyFIND Manual
8. Click Next to display the properties dialog showing the Author, Source and Created date of the
redaction.
Select the Private checkbox, to show a redaction only to the person who created it.
9. Click Finish.
10. If you want to apply a Freedom of Information Act (FOIA) or Privacy Exemption Code to your redaction,
select your redaction.
11. Go via the menu to Redaction > Exemption Dialog to display the Exemption Codes dialog. Select the
exemption code(s) you want from the drop-down lists (you can add multiple codes in random order).
To remove older codes, select the Clear button.
Choose from exemption codes for USA FOIA, USA Privacy, and UK FOIA. Exemption Codes define when
the general right of access to information is either not allowed or qualified. The exemptions relate to
issues such as national security, law enforcement, commercial interests, and data protection.
If you plan on making more redactions, you can leave the Exemption Codes dialog open. It will
always float on top. When you select another redaction, it will show the codes of the currently
selected redaction and enable you to add/remove codes immediately.
80
ZyFIND Manual
12. You can set the position of the exemption code by selecting one of the following from the Redaction >
Show Exemption menu:
Left aligned. The exemption code appears in the left margin adjacent to the redaction, and in the
Exemption codes text box on the Edit Redaction dialog - Fields tab.
Track redaction. The exemption code appears in the redaction box itself, and in the Exemption
codes text box on the Edit Redaction dialog - Fields tab.
Off. The exemption code is not shown on the document. It only appears in the Exemption codes
text box on the Edit Redaction dialog - Fields tab.
Result
You have created a redaction. All occurrences of the selected text are redacted.
Note
•
To re-use a redaction, select one or more redactions (via Redaction > Select), and go to Redaction >
Copy. Open another document (or go to another page within the document), select the correct section
of the text and go to Redaction > Paste.
81
ZyFIND Manual
Edit/Delete Redaction
Conditions
You have created one or more redactions in ZyVIEW.
Instructions
1. Click on a redaction to select it.
To select multiple redactions, go to Redaction > Select > All on page, or All in document.
2. If you want to delete the redaction(s), go to Redaction > Delete.
Click Yes.
3. If you want to edit the redaction(s), go to Redaction > Edit.
Change the text and/or representation.
See also the Fields tab for changing meta data.
Click OK.
If you selected multiple redaction, the next redaction will appear.
4. If you want to resize or move a redaction:
To resize a redaction, select it and click and drag one of the borders/corners of the selection.
To move a redaction, select it and click and drag it to the new position.
5. To re-use a redaction, select one or more redactions, and go to Redaction > Copy. Open another
document (or go to another page within the document), select the correct section of the text and go to
Redaction > Paste.
6. Show/hide redactions using Redaction > Show.
Result
You have edited or deleted a redaction.
82
ZyFIND Manual
Print Redacted Document
Conditions
You redacted and saved a document in ZyVIEW.
Instructions
1. Go to File > Print.
2. Select the option 'Print Redactions'.
3. For all other options, see ZyFIND Manual > Working with documents > Share > Print > Print
document(s) (page 97).
4. Click OK.
Result
You have printed a redacted document.
83
ZyFIND Manual
Export Redacted Document
Conditions
You redacted and saved a document in ZyVIEW.
Instructions
1. Go to File > Export.
2. Select Export to directory, or Export to zip.
3. Select in the ZySCAN document options section, the option Redact output.
4. From the dropdown listbox Exemptions, select the position of the exemption code.
Left aligned. The exemption code appears in the left margin adjacent to the redaction, and in the
Exemption codes text box on the Edit Redaction dialog - Fields tab.
Track redaction. The exemption code appears in the redaction box itself, and in the Exemption
codes text box on the Edit Redaction dialog - Fields tab.
Off. The exemption code is not shown on the document. It only appears in the Exemption codes
text box on the Edit Redaction dialog - Fields tab.
5. For all other options, see ZyFIND Manual > Working with documents > Share > Export document(s)
(page 110).
6. Click OK.
Result
You have exported a redacted document. A tiff and xml file is exported. The tiff file contains the redaction
zone on it. Redacted documents can only be exported as multipage tiff images. The corresponding xml file
contains a link to the tiff file without any ocr text or file information data/size etcetera.
You can import the exported documents using the ZyLAB Data XML import filter to (re-)OCR them without
the redacted zone on it. Just point to the correct import directory that contains the tiff images and related
xml files (ZySCAN > ZyIMPORT Source Properties, or via Template Wizard > ZyIMPORT).
84
ZyFIND Manual
Search Redactions
Conditions
The redactions and descriptions of the redactions are saved in the Redaction field. They can be searched via
ZyFIND > Fields.
Instructions
1. Define in the field Redaction the term you want to search on.
2. Click Search.
Result
You have searched all redactions and descriptions of the redactions.
85
ZyFIND Manual
Security Redaction
Functional Security Redaction
ZyLAB Functional Security can be used to restrict access to redaction editing features in ZyFIND. Index
administrators and editors are able to create and edit redactions. Index users and guests are not allowed to
do this. Everyone will be able to view redactions for inspection. A user can be assigned to a particular role.
This role can be changed per index, if necessary.
There are no separate functions to secure redaction editing or creating. Both are secured as part of the
'Edit Redaction' function.
Settings can be changed via ZyINDEX > Security > Functional (Application) Security (make sure Functional
Security is On, via ZyINDEX > Security > General > Settings) > Assign Role to Functions. Go to
Product/ZyFIND, Part/ZyVIEW, and Function/Edit Redaction. For more information, see Functional
(Application) Security.
Audit Trail Redaction
When a redaction change is applied, a record to the Audit Trail is saved. For more information, see ZyINDEX
Manual > Security > General > Audit Trail.
86
ZyFIND Manual
Redaction Preferences
Conditions
You want to define the default settings for redactions.
Instructions
1. In ZyVIEW, go to Redaction > Redaction Preferences.
The Redaction Preferences dialog appears.
2. If you do not want the Wizard to appear each time you make a redaction, deselect the checkbox Use
Wizard for new redactions.
3. Define the Redactions defaults.
Define the text that must replace the selected section.
Select a font and a background color.
Define the Strike through.
Define the percentage of Transparency.
The default value is 0% (solid/opaque), 100% transparency means the redaction is invisible.
Click the Select button to define the Exemption Codes that should be included.
4. Click OK.
Result
You have defined the Redaction Preferences.
87
ZyFIND Manual
ZYVIEW - Strikethrough
Conditions
You want to generate strikethrough text in a document.
Instructions
1. Go to Redaction > Quick Strikethrough or select the Quick Strikethrough button
.
2. Click and drag with your mouse to define a section of the document you want to strikethrough. The
function will be active, until you deactivate it by selecting t
3. Select the Strikethrough checkbox, define the height and click Next until Finish.
Result
You have generated strikethrough text in a document.
88
ZyFIND Manual
ZyVIEW - Stamp Tool
Conditions
You want to add a stamp to a document. You have created an index with XML Wrapper in ZyINDEX/Build,
and added scanned documents using ZySCAN (for more information on how to proceed, see Review Guide
Index Scan Find).
Instructions
1. Start ZyFIND and select the correct index.
2. Enter a query and click Search.
3. Select a document and double click to view.
4. Go to Stamps > Stamp Tool > Stamp or select the Stamp tool icon
.
The Stamp Properties dialog appears. You can select a stamp from the library, or create a new one.
Create Image is in development.
5. If you want to create a text stamp, click Create Text.
The Define Text Stamp dialog appears.
Define a Title for the stamp.
Define the Text.
If you want to include the date, use %ZD to list the date in the format of the regional settings of the
OS.
If you want to include the time, use %ZT to list the time in the format of the regional settings of the
OS.
If you want to select another font, click Select font.
Define the font (type, style, size, effects, color, script) and click OK.
For a solid background, select the checkbox Solid. Select a background color via the dropdown box.
Click OK.
The stamp will be added to the library.
6. To edit or delete a stamp, select Edit or Delete.
7. To use a stamp, select it and click OK.
8. Choose a location to place the stamp, and click your left mouse button.
9. The chosen stamp will be available (visible through the arrow with stamp image) and can be used
repeatedly until you turn the stamp tool off via Stamp > Stamp Tool > Off.
10. Once the stamp tool has been turned off, you can rotate stamps. Select a stamp and go to Stamp >
Rotate Left or Rotate Right. Or select one of the icons (Rotate stamp left or Rotate stamp right).
11. Once you are finished and want to make all stamps permanent, go to Stamps > Make Permanent. Click
Yes.
12. To hide/show all stamps, go to Stamps > Show Stamps.
89
ZyFIND Manual
13. Adjustments to stamps can be made via Stamps > Stamps Tool > Preferences.
14. If you want to print your document, go to File > Print. Select the option Print annotations, if you want
to include them.
15. If you want to export your document, go to File > Export.
Result
You have created text stamps, and added them to a document.
90
ZyFIND Manual
Share
Share has the following topics:
•
Print (page 92)
•
Mail document (see "ZyRESULT/ZyVIEW - Mail document" page 108)
•
Share a result list (see "ZyRESULT - Share a result list" page 109)
•
Export document(s) (page 110)
•
About Legal Production
•
Export TOC and documents (see "ZyFIND - Export TOC and documents" page 117)
•
Report result list statistics (see "ZyRESULT - Report result list statistics" page 118)
•
TIFF Production Module
91
ZyFIND Manual
Print
The print functions are:
•
Print Table of Contents (see "ZyFIND - Print Table of Contents" page 93)
•
Print result list (see "ZyRESULT - Print result list" page 95)
•
Print document(s) (see "ZyFIND/ZyRESULT/ZyVIEW - Print document(s)" page 97)
92
ZyFIND Manual
ZyFIND - Print Table of Contents
Conditions
ZyFIND is open. You have selected the Contents icon.
Instructions
1. Select the Table of Contents you want to print.
2. Click the right mouse button.
3. Select Print Documents in Folder.
The Print Documents in Folder dialog appears.
4. Select
Only Current Folder, or
Include Subfolders
5. Click OK.
Result
The documents listed in the Table of Contents are printed.
93
ZyFIND Manual
Print Document(s) in the T-View Lay-Out
Conditions
You want to print document(s) in the lay-out of the T-View (Display as Text). Displays the text file containing
the OCR text and image links of an image document exported by ZySCAN or any other filter indexed as type
ASCII.
Instructions
1. Open ZyFIND.
2. Search document(s).
3. Right click on the document(s).
(Or, in ZyRESULT/ZyVIEW, select the Print icon, or go to File > Print (Selected Documents))
4. Select Print Selected Documents.
The Print Job Configuration dialog appears.
5. Select, in the Document Settings box, the option Print raw text.
6. Click OK.
Result
You have printed document(s) in the T-View lay-out.
94
ZyFIND Manual
ZyRESULT - Print result list
Conditions
You have executed a search. ZyRESULT with the result list is open.
Instructions
1. Go to File > Print Result List.
2. Click Setup.
3. Select a printer from the Name dropdown listbox.
4. To view/define the properties of the selected printer, click Properties.
5. Optionally, define Paper (Size and/or Source) and Orientation (Portrait or Landscape).
6. To connect to a shared network printer, click Network.
Expand and select a printer from the list.
Click OK.
7. If you want to change the logo on the result list, click Select.
Choose from:
Browse (select another image),
Default (keep the ZyLAB image) or
None (no images will be included).
Click OK to confirm.
Once an image has been changed, it will become the default image.
8. Click OK.
Result
The result list is printed.
95
ZyFIND Manual
Use Unabridged document fields
Conditions
ZyRESULT is open. You want to print an entire long field value (> 1024 characters). For example, more than
200 people in the CC field of an email.
Instructions
1. Go to File > Print Result List.
2. Select the option "Use Unabridged document fields".
3. Click OK.
Result
The entire long field values are printed.
96
ZyFIND Manual
ZyFIND/ZyRESULT/ZyVIEW - Print document(s)
Conditions
ZyFIND (Contents) or ZyRESULT or ZyVIEW is open.
Instructions
1. In ZyFIND (Contents) or ZyRESULT, select one or more documents, click the right mouse button and
select Print Selected Documents.
In ZyFIND (Contents), select a folder, right click and select Print Documents in Folder.
In ZyRESULT, go to File > Print Result List.
In ZyVIEW, click the Print button
or go to File > Print.
The Print Job Configuration dialog appears.
2. Click Setup to select another printer and specify the Paper and Orientation.
3. Click OK.
You are back in the Print Job Configuration dialog.
4. Select the number of copies you want to print and if you want to collate the copies.
97
ZyFIND Manual
The controls are only enabled if the printer supports them. Printers that print to a file, such as Microsoft
Office Document Writer and the ZyLAB TIFF Printer, do not support multiple copies.
5. Select which information you want to print before printing the actual document(s). Choose from
Include banner page
The banner page includes the query, index (name), user, date and time.
You can also add a comment:
- Click Setup.
- Enter a comment.
- Click OK.
The comment will be placed beneath the query information on the banner page.
To change one or more of the standard images, click Setup.
Click Select (Top Right, Bottom Left or Bottom Right).
Choose from:
Browse (select another image),
Default (keep the ZyLAB image) or
None (no images will be included).
Click OK to confirm.
Once an image has been changed, it will become the default image.
Click OK to return to the Print Job Configuration dialog.
Include table of contents (not available via ZyVIEW)
An extra page with a Table of Contents will be printed. By default, the ZyLAB logo will be printed
Bottom Right. Another logo is possible, but will be the same as the logo on the banner page
(Bottom Right).
Include result list (not available via ZyVIEW)
As shown in result list: printed as the document appears in the result list.
Standard document properties: e.g. comment, file name, hit density, etc.
Long descriptions: defined in Field editor, composed using the field definitions and document
properties.
If you want to change the logo on the result list, click Setup.
Click Select, and choose from:
Browse (select another image),
Default (keep the ZyLAB image) or
None (no images will be included).
Click OK to confirm.
Once an image has been changed, it will become the default image.
98
ZyFIND Manual
Click OK to return to the Print Job Configuration dialog.
Number all pages (will only be printed on images and field pages)
If you are printing multiple documents and a table of contents, it is possible to number all pages
consecutively and show these numbers in the table of contents. Note that with this option enabled
only images will be printed and the page numbering is generated by the printing module and does
not necessarily correspond to the original page numbering in the documents.
Separate print job
When printing very large amounts of data, it is possible to print in a batch to keep a certain order in
your documents. Disable separate print jobs when you do not want to print all results as separate
spool jobs, but as one single spool job.
6. Security Information
To add security information to your printed document(s), select the Security Information button. The
Security Information dialog appears.
- To add a message to the (printed) result list, select the checkbox Add message to result list. Define the
message you want to add. For example, confidential.
- To add a security field on all (printed) pages, select the checkbox Security field on all pages (Only for
electronic documents). Select a field from the dropdown listbox. Define the Font size.
- To define Electronic Document Margins, select the Define button. The Electronic Document Margin
Settings dialog appears. Define the Text-based document margins. Define the Graphic document
margins. Define the Margin text font size. Click OK.
- Click OK.
7. Bates Stamping
To add bates stamping to your printed document(s), select the Bates Stamping button. The Bates
Settings dialog appears.
For more information, see Export document(s) (page 110). The bates stamp(s) will be printed on the
document(s).
99
ZyFIND Manual
8. In the Document settings box, you can specify which information should be printed for each selected
document. For instance, it is possible to print a front page containing the document field values. It is
possible to print a range of pages and to include the OCR text, etc. Choose from
Fields and Margins
- Select the checkbox Fields and Margins.
- Choose a Style from the dropdown listbox.
- To create, edit or delete a style, select the Define button. The Page Setup dialog appears.
- To change the chosen style, select another one from the dropdown listbox.
- To copy or delete a style, select the Define button. The Define Page Style dialog appears.
- To copy a style, select it, and click the Copy button. Define a new name, and click OK.
- To delete a style, select it, and click the Delete button.
In the General tab, you can define whether you want
- No extra fields on separate front page, or
- All fields on separate front page
And if you want to
100
ZyFIND Manual
- Include Annotations
- Print pages relevant to Annotations
In the Fields tab, select a position (left, center, or right) in the header or footer (or on the front
page), and double click on a field.
In the Margins tab, define the
- Field information margins
In inches, the margins for Top, Left, Right, and Bottom can be set.
- Image layout
Choose from Fit image between margins, Fit image on total page, and Position and Scale.
- Print options
Define Orientation, Center image, Font and (de)select Enable word wrap in field texts.
Print document (images / original format), and optionally select or define
- Include OCR text (no hits)
- Print images as Tiff Group 3
- Print Range
Print hits
Hits are printed in white with a black background from the result list (ZyRESULT) and from the File
View (ZyVIEW) using the File > Print menu. Using the Context Menu on the document (right mouse
click) in the File View no attachments are printed and hits are displayed in yellow.
Include attachments
If you want to print (hits in) attachments and/or all nested messages, select Include attachments.
This option is not available via File View (ZyVIEW). If the attachment is an image, the image is not
resized to fit on the page, but the image will be printed on several pages.
Printing of all nested messages within an e-mail
Select the options as required:
- Print page numbers
- Print stamps
- Print redactions. Also select the Exemptions (see Notes) and select/define Override redaction
transparency.
- Print raw text
9. Click OK.
Result
The (selected) document is printed.
101
ZyFIND Manual
Note
•
If you print a document in ZyVIEW, you cannot include the Table of Contents and the result list.
•
If you print document(s) in ZyFIND (Contents), you cannot print hits.
•
If you want to hide attachments in the result list, use the following registry entry:
Windows Registry Editor Version 5.00
[HKEY_CURRENT_USER\Software\ZyLAB\ZyResult\Preferences]
"HideEmailAttachments"="1"
Only actual e-mails will be displayed, also when hits are found in the attachments.
•
If you want to print classification text on the document, use the following registry entry:
Windows Registry Editor Version 5.00
[HKEY_LOCAL_MACHINE\SOFTWARE\ZyLAB\ZyRESULT\Preferences]
"DocumentPrintSecurityField"="Classification"
The value "Classification" can be changed, but must be the same as the field (name) created in the
index with which it is linked. is the field name, in which the classification level will be specified. This
field name can be changed. If you create an index, with the field "Classification", then the value in that
field, will be printed.
Classification text will be printed on documents and result list.
Printing of classification text does not work on ZySCAN documents
•
From the dropdown listbox Exemptions, select the position of the exemption code.
Left aligned. The exemption code appears in the left margin adjacent to the redaction, and in the
Exemption codes text box on the Edit Redaction dialog - Fields tab.
Track redaction. The exemption code appears in the redaction box itself, and in the Exemption
codes text box on the Edit Redaction dialog - Fields tab.
Off. The exemption code is not shown on the document. It only appears in the Exemption codes
text box on the Edit Redaction dialog - Fields tab.
102
ZyFIND Manual
Security Information
Conditions
ZyFIND (Contents) or ZyRESULT or ZyVIEW is open. You want to add Security Information to your printed
document(s).
Instructions
1. In ZyFIND (Contents) or ZyRESULT, select one or more documents, click the right mouse button and
select Print Selected Documents.
In ZyFIND (Contents), select a folder, right click and select Print Documents in Folder.
In ZyRESULT, go to File > Print Result List.
In ZyVIEW, click the Print button
or go to File > Print.
The Print Job Configuration dialog appears.
103
ZyFIND Manual
2. To add security information to your printed document(s), select the Security Information button.
3. To add a message to the (printed) result list, select the checkbox Add message to result list.
Define the message you want to add. For example, confidential.
4. To add a security field on all (printed) pages, select the checkbox Security field on all pages (Only for
electronic documents).
Select a field from the dropdown listbox.
Define the Font size.
5. To define Electronic Document Margins, select the Define button. The Electronic Document Margin
Settings dialog appears.
104
ZyFIND Manual
Define the Text-based document margins.
Define the Graphic document margins.
Define the Margin text font size.
Click OK.
6. Click OK.
7. For more information about the other settings, see Standard User Manual > Working with documents >
Share > Print > Print document(s) (page 97).
Result
You have defined Security Information.
105
ZyFIND Manual
Fields and Margins
Conditions
ZyFIND (Contents) or ZyRESULT or ZyVIEW is open. You want to choose, create, edit, or delete a printing
style for fields and margins.
Instructions
1. In ZyFIND or ZyRESULT, select one or more documents.
2. In ZyFIND or ZyRESULT, click the right mouse button and select Print Selected Documents.
Or
In ZyVIEW, click the Print button:
.
The Print Job Configuration dialog appears.
3. Select the checkbox Fields and Margins.
4. Choose a Style from the dropdown listbox.
106
ZyFIND Manual
5. To create, edit or delete a style, select the Define button.
The Page Setup dialog appears.
6. To change the chosen style, select another one from the dropdown listbox.
7. To copy or delete a style, select the Define button.
The Define Page Style dialog appears.
To copy a style, select it, and click the Copy button. Define a new name, and click OK.
To delete a style, select it, and click the Delete button.
8. In the General tab, you can define whether you want
No extra fields on separate front page, or
All fields on separate front page
And if you want to
Include Annotations
Print pages relevant to Annotations
9. In the Fields tab, select a position (left, center, or right) in the header or footer (or on the front page),
and double click on a field.
10. In the Margins tab, define the
Field information margins
In inches, the margins for Top, Left, Right, and Bottom can be set.
Image layout
Choose from Fit image between margins, Fit image on total page, and Position and Scale.
Print options
Define Orientation, Center image, Font and (de)select Enable word wrap in field texts.
11. For more information about the other settings, see Standard User Manual > Working with documents >
Share > Print > Print document(s) (page 97).
Result
You have defined a printing style for fields and margins.
107
ZyFIND Manual
ZyRESULT/ZyVIEW - Mail document
Conditions
ZyRESULT or ZyVIEW is open.
Instructions
1. In ZyRESULT, select one or more documents. Click the right mouse button and select Send Selected
Documents.
Or
In ZyVIEW, go to File > Send.
2. Specify how you want to send the document(s).
3. Click Send.
A mail message, with the attached document(s) appears.
4. Specify to whom you want to send the document(s).
5. Click Send.
Result
You have mailed the document(s).
108
ZyFIND Manual
ZyRESULT - Share a result list
Conditions
ZyRESULT is open.
Instructions
1. Delete Reference(s) from the list that are not relevant or that were already communicated in other
collections.
2. Store the Result list as a .zyr file (either on disk or in an email attachment).
Store on disk
1. Go to File > Save as.
2. Select a location.
3. Enter a file name
4. Click Save.
Store in an email attachment
1. Go to File > Sent To > Mail Recipient.
A mail message, with the attached .zyr file appears.
2. Specify to whom you want to send the .zyr file.
3. Click Send.
Result
You have shared the Result list either by saving it on a shared location or by sending it to someone.
109
ZyFIND Manual
ZyRESULT/ZyVIEW/ZyALERT - Export document(s)
Conditions
ZyRESULT/ZyVIEW/ZyALERT is open.
Instructions
1. Select one or more document(s).
2. Go to menu File > Export, or click the right mouse button and select Export.
The Export Settings dialog appears. The Settings tab is selected.
3. Select a destination to export the document(s) to. Choose from export to (another) index, (network or
local) directory, (new or already existing) zip file, or export to email. Browse for the exact location.
4. If you want to generate new filenames for the exported documents from (a selection of) fields, select
the checkbox Generate filename from fields.
110
ZyFIND Manual
Click Edit.
The Filename editor appears.
Select a field that you want to include in the filename, and click the Insert button.
Repeat to insert more fields.
You can replace the entire Filename string by selecting a field, and clicking the Replace button.
Click OK.
5. If only scanned documents should be named based on field information, select the checkbox Generate
filename only for scanned documents.
6. Select an Export format. Choose from:
Comma Delimited
Select this option to export data into comma delimited files. A comma delimited file is a data file, in
which data items are separated by commas to facilitate the transfer of data to another program.
Excel
Select this option to export data into an XLS file (Microsoft® Excel).
111
ZyFIND Manual
Original
Select this option to export data in the original format.
Xml
Select this option to export (field) data into an XML file, which explicitly describes content,
structure, properties and formatting.
Tiff and Xml
Select this option to export documents as Tiff. The export includes an XML meta file.
7. If you selected the Tiff and Xml Export Format, click the Settings button.
The ZyLAB Tiff Export Properties dialog appears.
In the Device Settings tab, you can define the Paper size, Force FAX resolution, Orientation, and
Graphic Resolution to which the documents must be exported. For more information, see Device
Settings.
In the File Formats tab, you can define the File format, Color Depth, Options, TIFF Options, and
Photo Quality to which the documents must be exported. For more information, see File Formats.
In the Watermark tab, you can define how the watermark should be printed with Watermark
options (Portrait pages and/or Landscape pages). For more information, see Watermark.
In the Embed Annotation tab, you can define how an annotation should be embedded with general
settings, and Annotation position. For more information, see Embed Annotation.
In the Profile Manager tab, you can select and manage different profiles for printer settings. For
more information, see Profile Manager.
8. Select the Maximum files in directory.
9. If you do not want to overwrite files which are using the same file name (in different folders), deselect
the checkbox Overwrite duplicates. By default, the checkbox is selected.
10. If you want to be able to prove the authenticity of exported (fields) file(s), select 'Generate hash code
on output'. The file(s) (and/or fields file(s)) are exported, with the accompanying hash code. For more
information, see ZyResult/ZyView - Export Settings - Generate hash code on output (page 119).
11. To include bates stamps in the exported document(s), select the Bates Settings button.
The Bates Settings dialog appears.
112
ZyFIND Manual
Select the checkbox Add Bates stamp.
Define a Bates Prefix. This can be any text. A sequential Bates number is added to the prefix.
Give a name to the Bates Number File, or browse to the location of the file you want to use.
If you want the Bates number to appear in a field, select a field definition from the drop-down list.
This option is not always available.
Select the ZySCAN stage you want the Bates stamping to occur. This option is not always available.
If you want the Bates numbers to be permanently added to the pages check the Burn into page
checkbox. The X and Y measurements are the distances from the bottom left corner of the page. Or
select the location where the bates stamp should be placed.
Click OK.
12. To include fields in the exported document(s), select the Burn Fields button.
The Burn Fields options dialog appears.
113
ZyFIND Manual
Make sure the Burn fields into pages checkbox is selected, if you want to 'stamp' the value of a
selected key field on the images of the exported document.
Select a category (index key fields or document properties).
Define the X and Y margin to determine the exact location or select a location and double click on
the field you want to place there.
To select a font, select the Font button.
Click OK.
13. Select the Image format and Page range.
14. To export redactions, select the Redact output checkbox.
15. From the dropdown listbox Exemptions, select the position of the exemption code.
Left aligned. The exemption code appears in the left margin adjacent to the redaction, and in the
Exemption codes text box on the Edit Redaction dialog - Fields tab.
Track redaction. The exemption code appears in the redaction box itself, and in the Exemption
codes text box on the Edit Redaction dialog - Fields tab.
114
ZyFIND Manual
Off. The exemption code is not shown on the document. It only appears in the Exemption codes
text box on the Edit Redaction dialog - Fields tab.
16. Select an Export Selection.
Select Fields and Files, Fields only, or Files only.
If you want to include attachments, select that option.
If you want to export the location in Table of Contents, select that option.
Optionally, select Create taxonomy file for Table of Contents.
If you want to export Hyperlinks, select that option.
17. If you selected 'Fields and Files' or 'Fields only' as the Export Selection, select the Fields tab.
To manually select fields, deselect the Select all fields checkbox.
115
ZyFIND Manual
18. Select the fields you want to export, and include them using the arrows.
19. Click OK.
Result
You have exported document(s).
116
ZyFIND Manual
ZyFIND - Export TOC and documents
Conditions
You want to export the Table of Contents (including documents, hyperlinks and the location in the TOC) to,
for example, another index.
Instructions
1. Go to ZyFIND > Contents.
2. Select the TOC folder you want to export.
3. Click your right mouse button, and select Export document in folder.
The Export documents in Folder dialog appears.
4. Select if you want to export only the current folder, or if you want to include subfolders.
5. Click OK.
The Export Settings dialog appears.
6. If you want to export to another index, browse for the correct index.
7. Define if you want to export the location (of the documents) in the Table of Contents.
8. Define if you want to export hyperlinks.
9. Click OK.
Result
You have exported the TOC (and documents) of an index to another index.
117
ZyFIND Manual
ZyRESULT - Report result list statistics
Conditions
ZyRESULT is open.
Instructions
1. Select one or more document(s) (reference(s)) in the list.
2. Click the right mouse button.
3. Select "Copy as tab-delimited text".
4. Open a spreadsheet program, for example Microsoft Excel.
5. Paste the copied text into your spreadsheet.
The items from the different columns will be pasted separately.
6. Use the spreadsheet functions to work with the data and to save and print the report.
Result
You have created a report based on the result list statistics, i.e. which files contain certain words or what is
the total size of all files containing a particular subject.
118
ZyFIND Manual
ZyResult/ZyView - Export Settings - Generate hash code on output
If you want to be able to prove the authenticity of an exported (fields) file, go to File > Export and select the
option 'Generate hash code on output'. Fill out the other settings, and click OK. The file (and/or fields) is
exported, with the accompanying hash code. The hash code for exported files is based on a hash code
calculation of the original document in the index.
If you are exporting several (fields) files, a separate hash code is created for each file. All hash codes are
summarized in one text (txt) file. The name of this text file consists of the hash code which is calculated
based on all collected hash codes (without the filepaths). This hash code summary text file enables you to
prove the authenticity of a set of (exported) files at once.
What is a hash code?
Hash codes are used to prove the authenticity of files. A hash code is a string, presented as 40 hex
characters:
<field id="hashcode">1004046B52575F85AF065E24594271B63B0E92D2</field>
This hash code is calculated based on the contents of a text (txt/XML/PDF/etc.) or an image (TIFF) file.
The hash code is based on the Secure Hash Standard. In this standard, the SHA-1 (Secure Hash Algorithm-1)
is specified. This Secure Hash Algorithm-1 is designed to ensure that it is impossible to find two different
files which produce the same hash code. This means that you can use this code to prove the authenticity of
your files.
Therefore if you want to share your files and want to have the possibility to prove that everyone is using
the same file and no changes are made, you are advised to add hash codes to your files.
119
ZyFIND Manual
ZyRESULT/ZyVIEW - Export: Generate filename from fields
Conditions
You want to generate new filenames for the exported documents from (a selection of) fields.
Instructions
1. In ZyRESULT or ZyVIEW, go to File > Export.
The Export Settings dialog appears.
2. In the box Export Options, select the checkbox Generate filename from fields.
3. Click Edit.
The Filename editor appears.
4. Select a field that you want to include in the filename, and click the Insert button.
5. Repeat step 4 to insert more fields.
6. You can replace the entire File name string by selecting a field, and clicking the Replace button.
120
ZyFIND Manual
7. Click OK.
8. If only scanned documents should be named based on field information, select the checkbox Generate
filename only for scanned documents.
9. For more information about the other settings, see Working with documents > Share > Export
document(s) (page 110).
Result
You have defined how new filenames are created for exported documents from field information.
121
ZyFIND Manual
ZyRESULT/ZyVIEW - Export: Overwrite Duplicates
Conditions
You do (or do not) want to overwrite files which are using the same file name (in different folders).
Instructions
1. In ZyRESULT, ZyVIEW, go to File > Export.
The Export Settings dialog appears.
2. In the box Export Options, (de)select the checkbox Overwrite duplicates.
By default, the checkbox is selected.
3. For more information about the other settings, see Standard User Manual > Working with documents >
Share > Export document(s) (page 110).
Result
You have defined whether you do or do not want to overwrite duplicates (in different folders).
122