1
ZyLAB Web Client for
Users Manual
Copyright Notice
Information in this document is subject to change without notice and does not
represent a commitment on the part of ZyLAB Technologies BV. The software
described in this document is furnished under a license agreement or nondisclosure
agreement. The software may be used or copied only in accordance with the terms of
the agreement. It is against the law to copy the software on any medium except as
specifically allowed in the license or nondisclosure agreement. No part of this manual
may be reproduced or transmitted in any form or by any means, electronic or
mechanical, including photocopying and recording, for any purpose without the
express written permission of ZyLAB Technologies.
© Copyright 2011 - ZyLAB Technologies BV.
ZyLAB, ZyINDEX, ZyFIND, ZySCAN, PUBLISH, and the flying Z are registered
trademarks of ZyLAB Technologies BV. ZySEARCH, ZyALERT, ZyBUILD,
ZyIMPORT, ZyOCR, ZyFIELD, ZyEXPORT, ZyARCHIVE, ZyTIMER, MyZyLAB are
trademarks of ZyLAB Technologies BV. All other brand and product names are
trademarks or registered trademarks of their respective companies.
Contact Us
Full contact details can be found on the ZyLAB website - www.zylab.com.
For support visit the ZyLAB support website - support.zylab.com.
i
Contents
Introduction to ZyLAB Web Client for Users............................................................. 1
Log In ............................................................................................................................ 2
ZyLAB Web Client Homepage .................................................................................... 3
Starting a Simple Search............................................................................................. 5
The Search Results Page ............................................................................................ 7
View (and Search) a Document .................................................................................. 9
Search Techniques .................................................................................................... 13
Content Words and Phrases ................................................................................. 14
Fuzzy Searches..................................................................................................... 15
Wild Card Searches: ?, * ....................................................................................... 16
Boolean Operators: AND, OR, NOT...................................................................... 17
Positional Operators: Context Related .................................................................. 18
Precedence and Parentheses ............................................................................... 20
Combined Search.................................................................................................. 22
Number Range Operator ....................................................................................... 23
Quorum Operator .................................................................................................. 24
Separators ............................................................................................................. 25
Refine Your Results............................................................................................... 26
Keyword in Context (KWIC) View on the Web Client ............................................ 27
Web Client: Fast Key Fielding ............................................................................... 28
Search for All Items ............................................................................................... 29
Search Rules and Conventions ............................................................................. 30
Search Tools .............................................................................................................. 31
ii
Contents ................................................................................................................ 32
Search Folders: Add, Edit or Delete ...................................................................... 33
History ................................................................................................................... 35
Vocabulary............................................................................................................. 36
Thesaurus.............................................................................................................. 37
Concepts ............................................................................................................... 38
Fields ..................................................................................................................... 39
Subscriptions ......................................................................................................... 40
Subscriptions to Alerts (create / edit / delete) ................................................. 41
Taxonomy.............................................................................................................. 44
Additional Viewing Functions................................................................................... 45
View Hit Highlighting in Adobe PDF Files ............................................................. 46
Convert to TIFF for Redaction ............................................................................... 47
Visualization ............................................................................................................... 49
Using the Visualization Module ............................................................................. 50
Choose algorithm, font size, and borders ....................................................... 51
Choose size, color, and label attributes .......................................................... 52
Filter your data ................................................................................................ 53
Create (Flexible) Hierarchies .......................................................................... 54
iii
Redactions.................................................................................................................. 55
Create Redaction index ......................................................................................... 56
Using Redaction .................................................................................................... 58
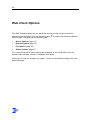
Web Client Options.................................................................................................... 60
Search Options...................................................................................................... 61
Results Options ..................................................................................................... 63
File Options ........................................................................................................... 65
Global Options....................................................................................................... 67
Document Basket....................................................................................................... 68
Using Document Basket ........................................................................................ 69
Upload.........................................................................................................................70
Upload a Document to an Index ............................................................................ 71
Save hash codes ................................................................................................... 73
Printing from the Web Client .................................................................................... 74
Help Menu................................................................................................................... 77
Index............................................................................................................................ 79
1
Introduction to ZyLAB Web Client for Users
The ZyLAB Web Client uses ZyLAB scanning and full-text retrieval technology to
provide transparent Internet or intranet access to scanned and indexed information.
You can access the ZyLAB Web Client with any Internet browser and search for
documents that contain the information you are looking for.
In ZyLAB Web Client you can organize, group, print, upload and download documents
from multiple indexes using all the features that make ZyFIND so powerful.
Using the ZyLAB Web Client, you can easily share information throughout your
company even if you have offices in different locations. All you have to do is start your
Internet browser and access the URL of your archive. The intuitive and fully
customizable interface allows you and your colleagues to find what you are looking
for.
This manual contains information about searching for information and viewing and
organizing the results using the Web Client in an internet browser. For configuration
instructions refer to the manual ZyLAB Web Client for System Administrators.
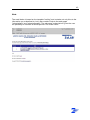
2
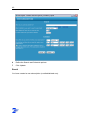
Log In
When you visit a web site that uses ZyLAB Web Client, the first action you have to
perform as a user is to log in. For every site a customized page layout can be
designed, with the exception that the Username and Password boxes and the Login
button are fixed properties.
The Register page asks for your name and password. If you are not registered yet,
you can use the anonymous settings (if allowed for the site):
Username: anonymous
Password: anonymous
Click the Login button to proceed. Note: Pressing the Enter key will NOT work.
If you cannot get access, contact the ZyLAB Web Client administrator or the site’s
organization, and ask for a name and password.
When you have logged in the ZyLAB Web Client Homepage (page 3) is displayed.
3
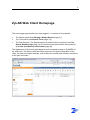
ZyLAB Web Client Homepage
The home page appears after you have logged-in. It consists of three panels:
The Search panel (see Starting a Simple Search (page 5)).
The Tools panel (see Search Tools (page 31)).
The Results panel. The Results panel can show both the results list (see The
Search Results Page (page 7)) and the document opened from the results list
(see View (and Search) a Document (page 9)).
The appearance of the home page depends on the template chosen in ZyINDEX for
the web client. The buttons that are visible depend on the type/configuration of the
index, the web client option settings, and whether the results panel shows a results list
or an open document.
4
The home page Menu Options at the top of the page comprise the following buttons:
Options
Define how results and documents are presented. See Web Client Options (page
60).
Upload
Uploads a new document to an index. See Upload (page 70).
Document Basket
Collect documents from several result pages. See Document Basket (page 69).
Log out user '..'
Log out, and be redirected to the Login page. See Log In (page 2).
5
Starting a Simple Search
As soon as you have successfully logged in you will see the home page containing the
search panel where you can enter your search query.
1
Enter your search query in the search text box. You can use the full range of
search techniques (see Search techniques (page 13)).
2
Define the Fuzzy degree to find all occurrences of a word, including the ones that
were not recognized correctly by the OCR engine. Choose from 4 fuzzy degrees
(the degree of closeness to your query). Fuzzy degree 2 is recommended for
normal text searches, and accommodates mistakes such as broken and joined
characters. Set Fuzzy degree 3 or 4 when you search for long words. For more
information, see ZyFIND > Fuzzy searches (page 15).
3
To search in the results of your last query, select the checkbox Search in last
results.
4
To search the recently-added files first, select the checkbox Fast results, last
indexed first. The results list displayed the most recently added files, while
continuing to search for more in the background.
If the ZyINDEX Web Client option "Disable total hit count for Fast Results" is
selected you will only see the first 15 found items in the results list. The following
15 results are searched for when the "next" link (above the results list) is clicked.
6
See the Web Client for System Administrators manual > General options for more
details.
5
To view all available indexes, click Show all indexes. Indexes to which you do not
have access permission will not appear in the list.
6
To deselect all indexes, click deselect all indexes. You can also deselect indexes
individually.
7
If you are finished with defining your search query, click Search.
ZyLAB Web Client will execute the search statement and show you a results list.
For details about the Results page see The Search Results Page (page 7).
Search Tools (page 31) are advanced features that allow you to store, reuse and
expand searches. They can be used in support of your search or instead of your
search. Depending on the template used, the icons are either always visible in a
ribbon on the screen or are accessed using the Tools icon
.
7
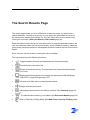
The Search Results Page
The results page shows you a list of files that contain the words you entered as a
search statement. Clicking on any entry in a cell opens the associated document in
the same panel, replacing the results list. You can easily return to the results list by
clicking the list button (View (and Search) a Document (page 9)).
Extra information is also shown for each document, for example available actions, the
rank, the searched index, the hits and hit density, and the fields (if present). Searches
giving many results are shown on extra pages which are listed at the top of the results
screen.
Some columns can be sorted by clicking the column header.
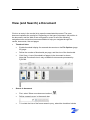
The tool buttons have the following functions:
Toggle between selecting and deselecting all documents shown.
Hide all fields in the results list.
Delete selected documents. The documents will be permanently deleted
from your index.
Export selected documents. Documents are exported as XML/Multipage
TIFF, XML/PDF or Original/Single page TIFF.
Edit document field values of selected documents.
Merge selected documents.
Add selected documents to the table of contents. See Contents (page 32).
Put selected documents in your basket. See Document Basket (page 69).
Open in Fast Key Fielding Mode. See Web Client: Fast Key Fielding (page
28).
8
Print selected documents. Enabled by the Show print button option on the
Global Options (page 67) page.
Send selected documents. Documents are saved as a ZyMAILER
document (ZYOUTPUT.ZDX). Enabled by the Show mail button option on the
Global Options (page 67) page.
Refine your results using the contents of fields. See Refine Your Results
(page 26). Enabled by the Show refine results option on the Results Options
(page 63) page.
Note: The following Star Tree and Tree Map buttons are enabled by the Show
visualization buttons option on the Global Options (page 67) page. See Using the
Visualization Module (page 50).
Show Star Tree by group.
Show Tree Map by group.
Show Star Tree by order.
Show Tree Map by order.
9
View (and Search) a Document
Click on an entry in the results list to open the associated document. The open
document replaces the results list. Depending on the type of document, the position in
the document, and the Web Client configuration, some or all of the following
navigation tools and actions become available to help you navigate through the
results, documents, hits and pages:
Thumbnail view
Enable thumbnail display for scanned documents on the File Options (page
65) page.
Define the number of thumbnails per page, and the size of the thumbnails.
Click Save. A row of thumbnails of pages in the document is shown.
Note that Thumbnail view is only available for documents processed by
ZySCAN.
Search in document
First, select 'Show more document actions'
Define a search query in the search box
.
.
To include the hits of the former search query, select the checkbox Include
10
current hits.
View and navigate through the document
Go to the previous page with a hit.
Go to the previous page.
Go to the previous file.
Shows all the pages as one scroll. Clicking a page or hit icon
returns the view to a single page.
Show the results list (closes the document).
Go to the next file.
Click the magnifying glass. The search hits are highlighted in the current
document.
Go to the next page.
Go to the next page with a hit or go to the first hit.
Zoom in.
Zoom out.
Rotate document left.
Rotate document right.
Use or edit the document
Show/hide more document actions. This displays the document
toolbar. Click the icon again to hide the toolbar.
Show the open document's key fields and properties in a pop-up panel.
Click the icon again to hide the panel.
Add document to the Table of Contents. This lets you add the
document to an index's TOC. A dialog box appears to allow you to select an
index and the TOC (sub-)folder (see Contents (page 32)).
11
Download this document. Downloads the currently-open document and
gives you the option to save the file or open it using the program associated
with the file-type.
Print this document (enabled on the Global Options (page 67) page).
Delete the currently open document. The document is permanently
deleted from your index.
View as TIFF. Prints the currently-open document to a TIFF file (a
multi-page TIFF is created for documents of more than one page). You have
the option to open or save the file. (Note: some picture viewers will only
show the first page of a multi-page TIFF.)
View as PDF. Prints the currently-open document to a PDF file.
Splits the document before the current page. When the index is built
again the two parts appear as separate documents with an incremental
number appended to the file name.
Put this document in your basket (see Document Basket (page 69)).
Delete current page from a multi-page document.
Edit Fields. The field editor is opened to let you change the document's
field values. You will not be able to search on those new values until you
have built the index using ZyINDEX.
Additional functions
The TIFF buttons will only appear on Redaction indexes. You cannot redact in
ZyLAB Web Client. You must redact in ZyVIEW.
Convert this document to TIFF. This uses the ZyLAB TIFF Export
printer to create TIFF files which can then be edited (for example, redacted)
(Convert to TIFF for Redaction (page 47)).
Delete the converted TIFF file (the original document remains in the
index).
Switch between the TIFF file and the original document.
12
The View Translations button is only visible when the document was translated
using ZyLAB Analytics Server.
View translations. A new window opens showing the translation
either on its own or side-by-side with the original (this is set when the
translation was created).
13
Search Techniques
Use Search techniques to reduce the number of results that must be reviewed. Almost
any kind of search can be carried out, from exploring (to get a sense of the available
information) to very precise searches.
The search options can be adjusted on the Search Options (page 61) page.
The search techniques are:
Content Words and Phrases (page 14)
Fuzzy Searches (page 15)
Wild Card Searches: ?, * (page 16)
Boolean Operators: AND, OR, NOT (page 17)
Positional Operators: Context Related (page 18)
Precedence and Parentheses (page 20)
Combined Search (page 22)
Number Range Operator (page 23)
Quorum Operator (page 24)
Separators (page 25)
Refine Your Results (page 26)
Keyword in Context (KWIC) View on the Web Client (page 27)
Search in document (View (and Search) a Document (page 9))
Web Client: Fast Key Fielding (page 28)
Search for All Items (page 29)
Search Rules and Conventions (page 30)
14
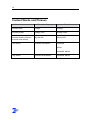
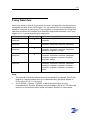
Content Words and Phrases
Search statement
Example of query
Results
Content word
chicago
chicago
Content phrase
chicago cubs
chicago cubs
Content phrase (with one
or more noise words)
Billy the Kid
Billy the Kid
Two words
cleveland OR detroit
cleveland
detroit
cleveland, detroit
Two words
cleveland AND detroit
cleveland, detroit
15
Fuzzy Searches
Use Fuzzy search to find all occurrences of a word, including the ones that were not
recognized correctly by the OCR engine. You can choose from 4 fuzzy degrees (the
degree of closeness to your query). Fuzzy degree 2 is recommended for normal text
searches and allows for mistakes such as broken and joined characters. Use Fuzzy
degree 3 or 4 if you are searching for long words.
Example query
computer
computer
computer
computer
computer
Fuzzy degree
0
1
2
3
4
Results
computer
computer, commuter, compute, computter
computer, commuter, compute, computter,
computw, cumpoter, comput
computer, commuter, compute, computter,
computw, cumpoter, ounputer, cumpotor,
ocnputter, compu
computer, commuter, compute, computter,
computw, cumpoter, ounputer, cumpotor,
ocnputter, ccnpoter, oompotor, cunnputcr,
comp
Note
The retrieval of irrelevant shorter words is prevented. For example, if the Fuzzy
Degree is 4 and the search term is six characters long, the actual Degree of
Fuzzy will be 0.5 X 6 = 3 and not 4.
Go to ZyFIND > Options > ZyFIND, to adjust the percentage of fuzzy
incorrectness for a match. By default this percentage is set at 50. The Open the
results in a new window option opens new search results in a new window.
16
Wild Card Searches: ?, *
? replaces one character.
* replaces zero or more characters.
Example of query
Results
b?rn
born, barn, burn
?andy
candy, dandy, sandy
sh??e
shore, shade
60?
600, 601, 602, 603, 604, 605, 606, 607, 608, 609
*most
most, almost
auto*
auto, automobile, automotive, autobiography, autocracy,
autograph
auto AND automo*
auto, automobile, automotive
17
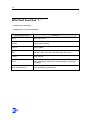
Boolean Operators: AND,
OR, NOT
Boolean
operator
OR
Recommended use
Broaden your search and
look for terms that have
similar meaning, or refer to
similar subjects.
Example of query
car OR
transportation
Results
car
transportation
car, transportation
AND
Narrow your search and
look for terms that have
different meanings.
new england AND
north dakota
new england, north
dakota
NOT
Narrow your search and
look for documents that do
not contain the word after
NOT.
NOT cars
bikes
boats
anything but
AND NOT
Narrow your search and
exclude terms often
connected to your search.
leaf AND NOT tree leaf
AND NOT
used cars AND
NOT cars
No results
AND NOT
(cars) AND NOT
used cars
cars
OR NOT
used cars OR NOT No results
cars
OR NOT
(cars) OR NOT
used cars
cars
And all documents
that do not contain
the phrase "used
cars".
18
Positional Operators:
Context Related
Use Positional operators to ensure that your search terms are contextually related.
This is especially useful when searching long documents.
Positional
operator
WITHIN: W/n
Recommended use
Limit your search to
words that appear
within a defined
range (n (max.
16382)) in either
direction.
Example of
query
client W/6
complaint
Results
"The client was
determined to file a
complaint."
"A complaint was
filed by his client."
blue sky w/10
green grass w/10
clear water
"From high in the
blue sky, he could
see the green grass
and the sparkling
clear water of the
sea."
W/n/EOS
(sentence)
Minnesota
W/3/EOS (Maine)
Minnesota appears
within 3 sentences of
Maine, and vice
versa.
W/n/ EOP
(paragraph)
Minnesota
W/3/EOP (Maine)
Minnesota appears
within 3 paragraphs
of Maine, and vice
versa.
W/n/EOG (page)
Minnesota
Minnesota appears
W/3/EOG (Maine) within 3 pages of
Maine, and vice versa
Precedence: P/n
Find terms in a
specific order.
education P/100
fitness
Education precedes
fitness within 100
words.
TO
Search for
blue TO green
"Blue and red and
19
occurrences of a
term falling between
two other terms.
{red}
green."
Only red is
highlighted, blue and
green function as
start and end
delimiters.
20
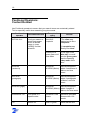
Precedence and
Parentheses
When you use two or more operators, the order in which these operators are executed
is determined by operator precedence. You can override this order by using
parentheses (grouped terms). Content within parentheses is interpreted as one unit.
Always use parentheses in complex search statements (more than two operators).
The following operator precedence is applied:
1
NOT
2
OR
3
W/n, P/n (these operators are of equal precedence)
4
AND
5
TO
Examples
(cars AND sales) OR car dealer
Results
Files with cars and sales are retrieved.
From that group, files with car dealer are
selected.
(disk drive AND printer AND
modem) OR (sales AND revenue
AND profit)
Files with all terms from at least one set of
parentheses are retrieved:
disk drive, printer, modem
disk drive, printer, modem, sales, revenue,
profit
sales, revenue, profit
((cars AND trucks) OR trains) AND Only files with terms from both sides are
(ships OR submarines)
retrieved:
cars, trucks, ships, submarines
cars, trucks, ships
cars, trucks, submarines
21
cars, trucks, trains, ships, submarines
cars, trucks, trains, ships
cars, trucks, trains, submarines
chicago OR los angeles AND new
york
Remember: OR precedes AND.
chicago, new york
equals
los angeles, new york
(chicago OR los angeles) AND
new york
chicago, los angeles, new york
chicago OR (los angeles AND new Parentheses override precedence.
york)
chicago
los angeles, new york
chicago, los angeles, new york
22
Combined Search
A combined search is a search for a word and a field value at the same time. You can
use Boolean operators AND, OR and NOT.
Example of query
car AND (IN <fieldname> {rental})
Results
Files containing "car" and a specified field with
the value "rental" are selected.
You can achieve the same results using a Fields (page 39) search.
23
Number Range Operator
You can use these math operators in number range searches:
< less than
< > not equal to
< = less than or equal to
> greater than
= equal to
> = greater than or equal to
Example of query
Results
"60615"
60615
60615
60615, 606154, 060615, etc.
>=65 w/10 social security
Number 65 or higher within 10 words from social security.
> 21 AND high school
graduate
22, high school graduate
23, high school graduate
etc.
>1 : <10
All values between 1 and 10.
1.000000000001
2
3.333333
9.9999999999999
Note: Searches of this type take time to execute. A lack of
system resources may cause the search to error out.
<> 5
is identical to
NOT 5
Documents without value 5 are retrieved.
24
Quorum Operator
Use Quorum operators to search for a specified number of terms within a search
statement.
n of {term, term, ...}
Example of query
2 of {history, english,
social studies, french,
dutch, german}
1 of {blue, green, red}
equals
Results
history, social studies
dutch, german
etc.
blue
green
red
blue OR green OR red
3 of {blue, green, red}
equals
blue AND green AND red
blue, green, red
25
Separators
Use Separators to limit a search to a physically defined range of a text file. Separators
are very useful when combined with the TO operator.
You can use these separators:
EOP end of paragraph
EOG end of page
EOS end of sentence
EOL end of line
EOG end of page
Example of query
Results
experience TO EOP {(driver or
chauffeur) and >= 3}
Locates resumes of persons with a minimum of
three years' experience as a driver.
EOP TO EOP {economic and
policy}
Locates a single paragraph that includes both
economic and policy.
"EOG"
EOG
EOG
Retrieves all files with an End Of Page marker,
which is, of course, every file.
26
Refine Your Results
Using the Refine your results button
you can refine your results by filtering on
fields that have content. On the Results Options (page 63) screen the 'Show refine
results' option must be enabled (the default setting is "enabled"). The button shows a
list of the fields with content (metadata or a value). Selecting a field or fields filters the
results list on those fields. You can filter down to a single document.
Only fields that have the option 'Use for visualization' selected will be displayed in the
Refine your results section. For more information, see the ZyINDEX manual > Field
Definition Option: Use for Visualization.
27
Keyword in Context (KWIC)
View on the Web Client
In KWIC (keyword in context) view, the (first) hit is shown in a part of its surrounding
text to give an idea of its applicability. The hit is highlighted.
Enable KWIC on the Results Options (page 63) screen.
28
Web Client: Fast Key
Fielding
If you want to change the field values of a set of documents in the web client, using
different field values for each document, use the Fast Key Fielding mode to walk
through your documents:
1
Search index(es) using the web client.
2
Select the Open In Fast Key Fielding Mode button
3
Change the field values of the first document.
4
Use the Next and Previous arrow buttons (or Ctrl < and Ctrl >) to quickly walk
through all the documents, changing field values as required.
.
You can also use this feature in ZyVIEW, where it is called Batch Field Editing. For
more information, see ZyFIND Manual > Editing Field Values.
29
Search for All Items
To search for all items in your index except for TIFF files that have been created in
ZySCAN enter @@docs(0) in the search panel.
30
Search Rules and
Conventions
Operators are placed only between search terms, except NOT.
NOT can be placed at the beginning of a search statement, but never at the end.
Two operators cannot appear in sequence, except NOT (AND NOT, OR NOT).
Operators are noise words, therefore, you cannot use them as content words. For
example, the search statement and OR or will not be accepted.
Uppercase and lowercase letters are considered identical. We show operators in
upper case for emphasis and clarity.
An operator can appear more than once in a search statement.
The W/n operator must include an integer in the range 1 to 16382, followed by a
space and a content word.
You can use one term to retrieve both the hyphenated and non-hyphenated
spellings of a term; for example, the search term:
- database retrieves database and data-base, but not data base
- data-base retrieves data-base, but not database and data base
- data base retrieves data-base and data base, but not database.
Searches with duplicate words in series also find single occurrences of that word;
for example, the search statement, sing sing, would find single occurrences of
sing as well as the phrase, sing sing.
Words that are normally hyphenated are recognized, for example,
Winston-Salem.
All printable characters in the ASCII character set are recognized.
A sentence-ending period and other trailing punctuation marks are ignored, when
a space or a carriage return follows. Periods are recognized when followed by a
character, as in I.B.M. or in 292.004. Apostrophes are treated as null characters,
and ignored.
31
Search Tools
To enhance your searches, use one or more Search tools. Almost any kind of search
can be carried out, from exploring to get a sense of the available information to very
precise searches targeting exact information.
The search tools are:
Contents (page 32)
Search Folders: Add, Edit or Delete (page 33)
History (page 35)
Vocabulary (page 36)
Thesaurus (page 37)
Concepts (page 38)
Fields (page 39)
Subscriptions (page 40)
Taxonomy (page 44)
32
Contents
Contents allows you to structure your relevant documents in a Table of Contents and
TOC sub-folders.
When you have searched for and found documents you can either add one or more
selected documents in the results list to a TOC using the Add selected documents
button
, or you can add an open document to a TOC using the Add document to
the table of contents button
.
The Contents button
shows the table of contents, and its sub-folders if they have
been made. You can create new sub-folders by right-clicking on the index or a subfolder.
You can delete a sub-folder by right-clicking on a sub-folder and selecting 'Delete
folder'.
If you want to search on a selected folder (and sub-folders), select 'Search selected
branch only'. The contents of a folder appear in the results panel, from where
documents can be viewed.
33
Search Folders: Add, Edit or
Delete
Search Folders are pre-set search queries that automatically group the documents
found by the search settings in a dynamic table of contents (TOC). There are two
types:
Index-specific search folders which only find documents in the related index
Global search folders which find documents in all the indexes in the Web Client.
A global search folder can only be created and added using ZyFIND.
Search Folders can also be created in ZyFIND, which has more options available.
Search Folders created in one program are usable in the other program.
Conditions
You want to create, edit or delete Search Folders in Web Client. A Web Client is
created, and one or more indexes are added. An optional Global Search Folder can
be present.
Instructions
1
2
3
Open your web client and select the Search Folders icon
.
Right click on the folder you want to edit to display these four options:
Edit query
Delete query
Add folder
Delete folder
If you selected Edit query, the Edit search folder query dialog appears. You can
adjust all settings which are available in ZyFIND too:
a)
In the 'Search for' box define a full text query.
b)
Select a search method from the dropdown listbox.
- ZyLAB query (ZyINDEX will look for search operators, wildcards, brackets,
etc., in your query)
- All Words (automatically AND operators are inserted between the words)
- Any Word (automatically OR operators are inserted between the words)
- Exact Phrase (automatically all words are quoted)
c)
Select Yes or No for Progressive search. A progressive search searches in
the last results.
34
d)
Define the search values of fields you want to include in the search.
e)
Combine the selected fields with AND or OR.
f)
Combine the fields and full-text query with AND or OR.
g)
Click OK.
h)
Refresh the browser window to implement the changes.
4
If you selected Delete query, the query defined for the folder is deleted
immediately in both the Web Client and ZyFIND (reopen the index(es) in ZyFIND
to see the changes).
5
If you selected Add folder, define the name of the new subfolder, and click OK.
The folder is added to the Search Folder Table of Contents in both the Web
Client and ZyFIND (reopen the index(es) in ZyFIND to see the changes). Edit the
folder's query so it returns a results list - see step 3 above.
6
If you selected Delete folder, the folder is deleted immediately in both the Web
Client and ZyFIND (reopen the index(es) in ZyFIND to see the changes).
Result
You have edited Search Folders (in ZyFIND) through the web client.
35
History
View and re-execute the queries you have made in the past. Click the history button
to show your search history. Click on a search entry to re-execute it.
If you want to use this search tool, go to Options
> Search > "Remember query
history" and select either "Only when something is found" or "Always" (Search
Options (page 61)).
36
Vocabulary
The vocabulary tool
lists similarly-spelled words found in the index. The number of
similar words listed is set in the 'Number of entries to show' box.
Define the word you want to find, and define the total number of vocabulary entries
you want returned. Click Show. A list of words and the number of their occurrences
appears, with the defined word in or near the middle of the list. Click the AND, OR and
NEW options to add the word to a search query. The results list immediately shows
the documents found using the query.
37
Thesaurus
Broaden the scope of your search statement by including synonyms.
Click the Thesaurus button
. Define the word you want to find synonyms for. Click
Show. A list of synonyms and the number of occurrences in the selected indexes
appears. Click the AND, OR and NEW options to add the word to a search query. The
results list immediately shows the documents found using the query.
38
Concepts
The Concepts button
displays all available Concepts (predefined queries) that
have been defined in the chosen index using ZyFIND.
Concepts are search statements. Define often repeated searches as concepts in
ZyFIND and save them for later use (see the ZyFIND manual > Search tools >
Concepts: Predefined complex queries).
Searching on a concept
1
Select a concept.
All concepts that are defined in the chosen index are displayed.
2
Click Search.
Searching on two or more concepts
1
Select a concept.
2
Click OR or AND of the next concept you want to search on.
3
Repeat step 3 until finished.
4
Click Close.
5
Click Search.
39
Fields
The Fields tool
allows you to search in your index's fields; this can be done as
fields only, or in combination with a text search.
The Fields tab displays all available fields that have been defined in the chosen index.
Note that fields must be defined in ZyFIND or ZyINDEX before they appear in the
fields page. The Fields tab has the same function as in ZyFIND: Search on the meta
data that is added to the documents during data processing.
Instructions
1
Select the fields you want to search in and enter your query.
All fields that are defined in the chosen index are displayed.
2
Combine the selected fields using AND or OR.
3
Combine the fields with full-text query using AND or OR.
First specify a full-text query.
4
Click Search.
Result
All files that contain a search term within the area defined as the field are retrieved.
40
Subscriptions
The Subscription tool
allows people who receive alerts to edit their alerts. The
search queries can be adapted so the information sent to the users will be the
information that matches their search query. It is also possible to subscribe to new
alerts and configure them. See Subscriptions to Alerts (page 41).
41
Subscriptions to Alerts (create / edit / delete)
To determine what kind of information will be sent to you, use the register pages from
ZyALERT. These pages allow people who receive alerts to edit their alerts. The
search queries can be adapted so the information sent to the users will be the
information they long for at the moment. It is also possible to subscribe to new alerts
and configure them via the web client.
Conditions
A Web Client is created. You are logged in as a user with an account in ZyALERT.
Attention: Without an account in ZyAlert you cannot create new subscriptions! For
more information on creating an account in ZyALERT, seethe ZyAlert user manual >
Add, Edit or Delete Users.
Instructions
1
Open the correct Web Client.
2
Select Subscriptions
3
To delete a subscription, click
4
To edit a subscription, click
5
To create a new subscription (for a specific index), select the index and click New
Subscription.
from the menu.
.
.
42
6
Define the Search and Schedule options.
7
Click Update.
Result
You have created a new subscription (or edited/deleted one).
43
Note
The email below is based on the template "mailing" and contains not only links to the
information you subscribed to, but it also contains links to the web pages
"subscriptions" and "subscriptionedit". The web page "subscriptions" gives the user
the possibility to maintain all subscriptions in his or her name.
44
Taxonomy
A taxonomy enables you to classify and manage your documents, based on
hierarchical structures. An existing taxonomy may be linked to a ZyLAB index,
ensuring faster and more precise access to relevant information. The classification
values will be part of the document, stored as field values belonging to the field
Taxonomy. This enables dynamic structuring of information, which saves storage
space and enhances search capabilities.
Conditions
A taxonomy index must exist and be attached to a taxonomy value file (see the
ZyINDEX manual > Taxonomy Field Index). A Web Client must exist with the
taxonomy index attached (see the ZyLAB Web Client for System Administrators
manual > Create and Edit a Web Client).
Instructions
1
Open the Web Client.
Make sure the Taxonomy index is either the only selected index or is displayed
on top of the index list.
2
Select the Taxonomy tab.
3
Double click on a folder to display the results list.
4
Edit document field values of selected
Add (taxonomy) field values via
documents. Select the Taxonomy field and use the Taxonomy Browser
(displayed below the Taxonomy field) to make a selection. To make multiple
selections, press Alt and select as many selections as you like. Click Save
Multiple Selections.
5
Go to ZyINDEX and build the index.
Result
You created a Taxonomy index, added documents and (taxonomy) field values. Now,
you can search the index using either ZyFIND > Fields, or in the Web Client using the
Taxonomy button
to display the Taxonomy Browser. Use the ALT key to make
multiple selections and click the Search button to display the results list.
45
Additional Viewing Functions
ZyLAB Web Client has some extra features to make viewing and working with
documents easier. These are:
View Hit Highlighting in Adobe PDF Files (page 46)
Convert to TIFF (page 47)
46
View Hit Highlighting in
Adobe PDF Files
To be able to see hit highlighting in Adobe PDF files you must change a setting in
Adobe Acrobat or Acrobat Reader. You must do this on each work station or PC used
to access the ZyLAB Web Client. (Make sure Adobe Acrobat or the free Acrobat
Reader is installed. Visit www.adobe.com for more information.)
You cannot see PDF hit highlighting on the host server.
Instructions
1
On the work station open Adobe Acrobat or Acrobat Reader (v8.0 or higher).
2
Go to Edit > Preferences > Search. Check the Enable search highlights from
external highlight server checkbox. Click OK.
3
If the ZyLAB Web Client is open, press key F5 to refresh the screen, then do the
search again.
47
Convert to TIFF for
Redaction
Conditions
In a Redaction index (see the ZyFIND manual > Create Redaction index (page 56))
You want to convert a document to TIFF format so you can redact it in ZyVIEW. You
have installed the ZyLAB TIFF Export printer driver (this appears in your printer list as
"ZyLAB Tiff Export" printer). You have defined the TIFF conversion settings (see the
ZyINDEX manual > ZyINDEX Options > TIFF Conversions Settings).
Note: Documents already in a TIFF format (for example, those created in ZySCAN)
can be directly redacted (see the ZyFIND manual > Create Redaction).
Instructions
1
The Web Client is showing a non-TIFF document.
2
. A TIFF image is created
Click the "Convert this document to TIFF" button
from your document and is displayed on the screen.
Note that the TIFF buttons only appear when the index is a Redaction index.
3
To change between the original document and the TIFF image click the "Switch
between TIFF and Original" button
4
.
To delete the TIFF image, click the "Delete Converted TIFF" button
.
Note: This will delete all TIFF versions, including redactions, of the original
document.
5
If you want the TIFF version of a document to be opened in preference to the
on the File tab check the "View
original document, click the Options button
TIFF Converted documents first" checkbox (File Options (page 65)).
Result
A TIFF version of your document has been created, and it can now be redacted.
48
The TIFF file is saved in the index's Data >> TIFF folder. The TIFF file can be
redacted in ZyVIEW.
49
Visualization
The ZyLAB Visualization Module provides two ways for users to quickly and easily
assess the full palette of file information available to them. The foundation of this
module is a hyperbolic tree, which allows users to view and present their information
on an easy-to-use, interactive, multi-dimensional tree, with additional visual navigation
features such as location, color, size and spatial orientation. The Visualization Module
also offers a tree map for quick comparative analysis of large hierarchical structures.
Visualization comprises:
Star Tree
Presents each file as a node that can be clicked on to access the file or grabbed and
pulled for better viewing of subfolders. See Using the Visualization Module (page
50).
Tree Map
Enables users to compare nodes and sub-trees even at varying depth in the tree,
helping users spot general patterns and exceptions. See Using the Visualization
Module (page 50).
50
Using the Visualization
Module
Instructions
1
Open and log-in to a Web Client with an added Visualization index. For more
information, see the ZyINDEX manual >Advanced indexing > Field Definition
Option: Use for visualization.
2
In the Contents tab, you can click the Star Tree
view all documents in the Table of Contents.
3
Alternatively, you can search the index and use the Show Star Tree by group
/order
result list.
4
5
and Show Tree Map by group
or Tree Map button
/order
, to
buttons to view the
To search and analyze the Star Tree use position, color, size and focus.
To centralize the Root node, select the Center icon.
To reduce the distance between nodes, select the Shrink Tree icon.
To enlarge the distance between nodes, select the Expand Tree icon.
To change the layout of the nodes, select the Change Orientation icon.
To change the text size, use the Increase and Decrease Font Size icons.
Select nodes and drag them around for a better view using the mouse.
Treemap is a space-filling visualization for hierarchical structures. It is particularly
effective in revealing attributes of leaf nodes using size and color coding.
Treemaps enable users to compare sizes of nodes and of sub-trees, and can
reveal patterns and exceptions.
See Choose algorithm, font size, and borders (page 51).
See Choose size, color, and label attributes (page 52).
See Filter your data (page 53).
See Create (Flexible) Hierarchies (page 54).
51
Choose algorithm, font size, and borders
To choose algorithm, font size, and borders use the Main tab.
Treemap implements three Layout Algorithms
Slice And Dice - Stable and ordered, but poor aspect ratio. It can generate long
skinny rectangles, but is very good to compare sets of items side by side. Note
the "flip slice and dice option".
Squarified - Best aspect ratios, unordered, medium stability. The nodes will
move when the size changes.
Strip - Ordered, moderately good aspect ratios with some exceptions, medium
stability. The nodes move, but not as often as in Squarified Algorithm.
You will find that the best choice of algorithm depends largely on your data and
task, so try all three versions using the menu in the "Main" tab.
Note that in all the cases, nodes that have a size of zero will not appear on the
screen, and that subtrees that have too many nodes to be drawn will appear
black because the 1 pixel border drawn to separate nodes are black.
Label font size
Making the size = 0, hides the labels but their values remain visible on the cursor
activated popup window.
Border padding
This padding helps see the grouping of nodes in subtrees, but pixels are "lost"
with this padding. So reducing the size of the padding may reveal more nodes.
Reducing the font size also helps regain pixels.
Hide borders: will remove ALL borders and padding so that every pixel is dedicated to
the painting of nodes. But watch out that adjacent nodes of the same color will appear
to be merged. Turning this control on and off several times is helpful to gain an
understanding of the structure of the tree and see details as well.
Restore default settings in Treemap: simply reloads the file you last opened.
52
Choose size, color, and label attributes
To choose size, color, and label attributes use the Legend tab.
Label attribute
By selecting "None" all labels will be removed, but you might prefer to set the font
size to zero so that the pop-up still displays some information about the node.
Size attribute
Only numerical attributes will appear in this option box. If the attribute has
negative values they will be handled as zero, i.e. the node will not be visible.
Color attribute
If you choose a numerical attribute, a color legend and color binning panel will
appear.
53
Filter your data
Nodes
You can choose to automatically hide filtered nodes.
Hide Filtered Nodes.
Hiding filtered nodes is particularly useful to reclaim the pixels of the filtered out
nodes to show more details on the remaining nodes. Note that the layout will
most likely change drastically.
Hide Individually Selected Nodes
To select nodes, click on the nodes or subtree border while holding the
CTRL key down.
The nodes' border will become dark blue.
The nodes are removed when you click on Hide Selected button.
Show All Nodes.
Filter by Maximum Depth
By filtering by depth, you can aggregate the lower levels of the tree.
The size is (by definition) aggregated using a "sum" function.
Filter on Name, Value and Link
Select Show all, or one or more fields/values/links.
54
Create (Flexible) Hierarchies
Some data is best presented with a fixed hierarchy. For example, census data falls
nicely in a hierarchy of country, states, counties, and blocks which could not be
rearranged. Some other data could be rearranged using various hierarchies based on
the attributes available. For example, if you have health data provided for the 2 sexes,
3 races and 5 age groups, you could present the data in a variety of ways. One
example would be by separating men and women at the 1st level, then splitting by
race at the second level and then by age. Another hierarchy could be to split by age
first, then sex, then race. Flexible hierarchies let you specify the order you want those
attributes to be used when creating the hierarchy.
If the (xml) data file you are using has a default hierarchy, you can first remove
the default hierarchy. All nodes will appear together on the treemap without any
hierarchy. Now you can create your own hierarchy.
Choose from the list of available attributes (at the bottom), then click on the "Add"
button and the attribute will be added in the Hierarchy List.
Attributes that have only a few values (for example, sex or race) make good
hierarchy attributes. Others like "age" need to have their values grouped in bins
to split the tree nicely, e.g. you can split between young and old people by
binning the age attribute into 2 bins. To BIN an ATTRIBUTE, click on the right
most cell of the corresponding hierarchy attribute table.
To remove an attribute, select the attribute and click the "Remove" button.
You will find that it is better to use the last/bottom attribute as the label attribute
and remove it from the hierarchy definition.
You can create different permutations of the attributes in the Hierarchy List by
using "Up" and "Down", or "auto", to permute automatically and review the many
options. Treemap redraws the tree as you change the hierarchy.
Once you are happy with a hierarchy you can give it a name (by typing a new
name where it says "hierarchy: 1") and you can use the "New" button to create
another hierarchy. Remember to save the settings as well!
55
Redactions
Redaction is the careful editing of a document to remove confidential information.
Sensitive government documents, confidential legal documents, insurance contracts,
and other sensitive documents are often redacted before being made available to the
public.
Redactions makes it easy for you to mark sections of a document. You can then
redact the document so that the sections you specified are blacked out or replaced
with something else. You can either print the redacted document or use it
electronically. In the redacted version of the document, the redacted text cannot be
converted back to text or retrieved.
Documents produced as XML/TIFF and TXT/TIFF files in ZySCAN can be directly
redacted. Electronic documents built directly into an index must first be converted to
the TIFF format using the TIFF Conversion feature in ZyVIEW or Tiff-on-the-fly in the
Web Client.
56
Create Redaction index
Conditions
ZyINDEX is open.
Instructions
1
Click the BUILD icon:
.
2
Go to File > New.
3
Enter a Short name (max. 8 characters).
4
Enter a descriptive Long name (max. 80 characters). Use the name to describe
the contents of the index.
5
Select Redaction.
6
Click OK.
Result
You have created a Redaction index (with XML Wrapper and Redaction field). Now,
add ZySCAN and/or electronic documents to this index and redact the documents via
ZyFIND > ZyVIEW or add the Redaction index to a Web Client and redact files via the
57
Redactions icon
.
58
Using Redaction
Conditions
You have executed a search, and opened a document. You want to add a redaction.
Instructions
1
Select the Redactions icon
.
This icon is only available when a Redaction index is added to the Web Client.
2
Select the checkbox Redaction Editor.
The Redaction Editor dialog appears.
3
In the Display tab, define the text that must replace a section.
4
Define the font, style, size, color and background of the redaction. Also, you can
select the possibility to strikethrough and/or underline your redaction.
5
Select the Fields tab.
6
Define a description for the redaction.
7
Select exemption code(s).
8
Select the Properties tab.
9
Define if the redaction should be private. In other words, only shown to the
person who created the redaction.
10
Define the Author, Source and Creation date of the redaction.
11
Drag the new redaction onto the document.
To resize a redaction, select the Shift key, select the redaction and drag the
mouse to resize your redaction.
To copy a redaction, select the Ctrl key and click on the redaction once. Drag and
drop the copy of the redaction with the mouse.
Result
You have created a Redaction.
59
Note
To define where you want to show the Exemption Codes, go to Redactions
> Show Exemptions and choose from:
Left Aligned
Displays exemption codes left-aligned.
Track Redaction
Displays exemption codes on the redaction itself.
Off
No redaction codes are displayed.
Via the Redaction Editor you are able to:
Select all redactions on page
Redact all hits
Unredact all hits
Delete selected Redaction
Reload redactions
Save redactions
60
Web Client Options
The Web Template options let you adjust the way the results and documents are
presented and displayed. Click the Options button
to display the Advanced Search
Options page. The page has the following tabs:
Search Options (page 61)
Results Options (page 63)
File Options (page 65)
Global Options (page 67)
You can find information about editing web templates in the ZyLAB Web Client for
System Administrators manual > Templates and Styles.
Click Save to save any changes you made. To return to the default settings click Load
Default Settings.
61
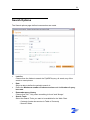
Search Options
The Search options page defines how searches are made.
Look for
Choose from the listbox to search the ZyINDEX query, all words, any of the
words or exact phrase.
Date
Select a date to define the period to search in.
Define the Maximum number of indexes to show and the Number of query
box rows.
Remember query history
Choose from 'No', 'Only when something is found' and 'Always'.
Search Tools
Select the Search Tools you want to be available for the Web Client.
- Contents (locate documents via Table of Contents)
- Search Folders
62
- History (reuse previous searches)
- Vocabulary (find related documents)
- Thesaurus (broaden the scope of your search statement and include
synonyms)
- Concepts (use (complex) search statements with a name)
- Fields (meta information: Search for information about your documents)
- Subscriptions (determine what kind of information will be sent to you via
alerts)
- Taxonomy (classify and manage your documents, based on hierarchical
structures)
- Annotations (create annotations on documents).
Search tool to show at start up
Select a search tool to open the Web Client with at start up. You can choose from
Contents, History, Vocabulary, Thesaurus, Concepts, Fields, Subscriptions,
Taxonomy, and Annotations.
Search tool selection
Define how you want to select search tools, via tabs or a dropdown menu.
63
Results Options
The Results Options page defines how results are displayed.
Results per page
Select the maximum number of files you want to display in the View Page.
Rank Search results on
Define the way files are ranked. You can choose between Number of hits,
Hitdensity, File size, File date, Comment, File Name and File path.
Choose between Ascending and Descending.
KWIC options
The options are:
- Enable KWIC
- Display type: Compact or Separated. Compact displays all contexts one
after the other, Separated displays all contexts on a separate line
- Show n hits with n words around hit: Defines the maximum number of hits
shown per result, and the number of words (maximum 50) around the hit.
64
Enable functions in toolbars
- Toolbar function to select all entries
- Show or hide all fields
- Delete entries
- Move entries
- Copy entries
- Select target toc (for move or copy)
Search result options
Select Show refine results if you want to further filter your search results.
Shorten long field contents to no more than nn characters displays only the first
part of a field's contents to decrease the width of the search results screen.
Default action
- File display
- Launch file in original application
- View as PDF
- View as multi-page TIFF
65
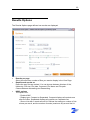
File Options
The File Options page controls what you will see when a item is opened.
Control which page will be viewed first
Choose whether you want to view the first page of a file, or the first hit within a
file.
What to display, and which image quality to use
Images displays the image format. Choose the Image quality: low, medium,
high, 200% enlarged, 280% enlarged, 400% enlarged and TIFF.
Specify whether the Original format must be displayed. If it is not displayed then
an ASCII file is displayed containing the text of the original file. With the original
format you can also view the following:
- Document properties. These are the document properties stored by the
original program.
- Show hidden rows/columns/sheets. These are rows/columns/sheets
normally hidden by the program used to create the file (for example Excel).
- Show hidden text. This is text normally hidden and comprises reference
66
codes and text marked as hidden by the program used to create the file (for
example Word).
- Show change tracking. Will show change tracking marked as hidden by
the program used to create the file (for example Word).
Note that these four options are disabled if Original format is not selected.
Specify whether the Highlights (these are the hit highlights) are shown.
Shorten long field contents to no more than nn characters reduces the length
of a field's contents to the first nn characters, but will also disable the hithighlighting in fields.
Thumbnail display for scanned documents
To view a small image of a page in advance, select the checkbox Enable
thumbnails. Select the maximum number of thumbnails per page, and the size of
the thumbnails. Choose from default, small or large. Thumbnail view is only
available for ZySCAN documents.
View TIFF converted documents first
Views the TIFF version of a file first.
67
Global Options
The Global Options page controls the web client style and the visibility of some
buttons..
Style sheet
To change the appearance of the web client, choose another Style sheet. The
style sheet is applied when you click the Save button.
Visibility
To use the Visualization Module (refer to the ZyINDEX Modules Manual), select
the checkbox Show visualization buttons.
To show the print button, select the checkbox Show print button.
To show the mail button, select the checkbox Show mail button.
The Use dynamic results option reloads search results each time a document is
selected. This ensures that the latest documents and the field data are always
shown. This is useful for indexes that are constantly being updated but you may
notice that for large results lists documents open more slowly.
68
Document Basket
The document basket lets you collect documents from results lists so you can do
various batch processes on them. The option buttons have the following actions:
Toggle between selecting and deselecting all documents shown. You can
also select individual documents by clicking the selection box.
Download the selected documents. First define the Download format at the
bottom of the dialog. Choose from:
- Default (..)
- XML/Multipage TIFF
- XML/PDF
- Original/Single Page TIFF
Hide/Show all fields in the results list. Only the basic columns are displayed
for clarity.
Print selected documents. Enabled by the Show print button option on the
Global Options (page 67) page.
Edit document field values of selected documents. Note that you cannot
search on the changes until the index has been rebuilt in ZyINDEX.
Remove all documents from the basket.
Remove the selected documents from the basket.
Add selected documents to the table of contents.
To use Document Basket refer to Using Document Basket (page 69).
69
Using Document Basket
Conditions
You have searched one or more indexes and the found documents are displayed in
the results list.
Instructions
1
Select one or more documents in the results list.
2
Click the "Put selected documents in your basket" button
3
The documents you added to the basket are shown in a separate window. You
can either close this window and continue searching and adding documents, or
you can select one or more documents and do a document basket action
(Document Basket (page 69)).
.
Result
You have collected documents from several results pages and performed some
actions on them.
Note
To view all collected documents again (once you have closed the dialog), click
Document Basket:
.
70
Upload
Upload allows you to add a file to an index. When your web client has more than one
index selected the file is added to the first selected index. You can use Upload from
two situations:
Directly to the selected index using the Upload button
When the Contents tab is selected, directly to the Table of Contents in the
selected index using the Upload button
.
.
However, the functionality of the two buttons are the same: both upload to an index,
and both can place the document in a Table of Contents. Note that you cannot search
the document until you build the index again, but if the document is placed in a Table
of Contents you can open it from that Table of Contents.
Hash Codes
When hash codes have been generated (see the ZyFIND manual > ZyResult/ZyView Export Settings - Generate hash code on output), the ZIP file will also contain the hash
code summary text file. This ZIP file may be uploaded to any ZyLAB Web Client which
will process the contents of the zip file whenever the "Process ZIP file contents" option
is checked.
ZyLAB Web Client will process the ZIP file contents and will also calculate hash codes
for each file that is imported into the index, including any XML wrapper files that are
present in the ZIP file. ZyLAB Web Client will scan the ZIP archive for the hash code
summary text file and will match the filename of this file against the filename of the
hash code summary file of the imported files. When these filenames match, this
indicates that all uploaded files are authentic. The uploaded hash code summary text
file will also be stored as a retrievable file in the index so that, at any time, this file can
be used for authenticity verification.
71
Upload a Document to an
Index
Conditions
You want to add a document to an index, with the option to place the document in a
Table of Contents.
Instructions
1
Select the index you want to upload a document to. If more than one index is
selected, the index at the top of the index list will be automatically selected.
2
To upload a file directly to an index click the Upload button
3
To upload a file from the Contents tab
and click the using the Upload button
.
, select a folder in a table of contents
.
4
On the Upload file window, click Browse to locate the file.
5
If you are uploading a ZIP file, select 'Process contents of ZIP file'.
6
If you want electronic documents to be saved in the electronic folder, and
ZySCAN data to be saved in the appropriate tiff, xml (fields) and txt folders, select
the option 'Treat uploaded contents as ZySCAN data'.
72
If this option is not selected, all contents are placed in the electronic folder.
7
Select a Table of Contents folder in which to store the documents, or create a
new subfolder (for example, you could use the date (yyyymmdd) for the folder
name).
8
If necessary, enter data in the field(s).
9
Click Upload.
10
When the file has uploaded the Uploaded files report screen appears. Click OK to
close the screen, or use the download link to save a hash values file (refer to
Save hash codes (page 73)).
Result
You have uploaded a document or ZIP file to an index. Hash codes have been
generated for the uploaded file(s). If you uploaded a ZIP file, it is extracted, and hash
codes are also generated for the set of documents.
You must build the index before you can search in uploaded files. Documents added
to a Table of Contents folder can be opened immediately from the Table of Contents
file list. If ZyALERT is installed, emails will be sent to other (members of) user groups
added to the Web Client, notifying them of updates.
73
Save hash codes
Hash codes can be downloaded in a text file and used to prove the authenticity of
document(s).
Conditions
You have successfully uploaded a file or ZIP file and the 'Uploaded files report'
window is displayed showing information about the uploaded file(s).
Instructions
1
To view the hash number and file path click on 'download'. The information
appears in a new window.
2
To download a text file containing the hash information Click with the right mouse
button on 'download' and select Save Target As. Browse for the correct location
to save the .txt file with the hash codes. Click Save.
Result
You have viewed or downloaded the hash codes.
74
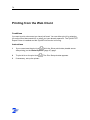
Printing from the Web Client
Conditions
You want to print a document you have just found. You can either print it by selecting
it from the found documents list, or when you have already opened it. The ZyLAB TIFF
Export Printer is installed and the ZyLAB Print Service is running.
Instructions
1
If you cannot see the print icon
click the Show print button (enable server
side printing) on the Global Options (page 67) page.
2
To print click on the print icon
3
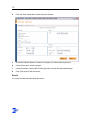
If necessary, set-up the printer:
. The Print Setup window appears.
75
a)
Click on the Add/remove printers tab.
b)
From the list of printers select the printers you want to use for printing.
Transfer them to the Selected Printers panel using the > button.
c)
If you want to give the printer a user-friendly name, select the printer and
type the name in the Edit printer name/handle box. Click Enter to change the
printer's name.
d)
Choose a printer to select as the default printer.
e)
Press Refresh to see your changes.
f)
Press Save
76
4
Click the Print setup tab to show the print window.
5
Press the Refresh button to show all changes you have made to printers.
6
In the Printer box, select a printer.
7
In the Document, Layout and Finishing boxes choose the required settings.
8
Click Print to print the document.
Result
You have printed the (selected) document.
77
Help Menu
The Help menu access the following:
Help Contents
Opens the ZyLAB Web Client for Users Manual.
Guides and Manuals
Links to the Manuals and Review Guides in PDF format. Adobe Acrobat Reader
must be installed to open these guides.
Support by ZyLAB
Opens the ZyLAB support page containing information about how to contact
ZyLAB.
Contact Us
Opens the ZyLAB.com website on the Offices page showing the contact details
for all the ZyLAB offices.
ZyLAB on the Web
Opens the ZyLAB homepage.
79
Index
A
H
Additional Viewing Functions ..........45
Help Menu ......................................77
History.............................................35
B
Boolean Operators
AND, OR, NOT .........................17
C
Choose algorithm, font size, and
borders .......................................51
Choose size, color, and label
attributes.....................................52
Combined Search ...........................22
Concepts.........................................38
Content Words and Phrases...........14
Contents..........................................32
Convert to TIFF for Redaction ........47
Create (Flexible) Hierarchies ..........54
Create Redaction index ..................56
I
Introduction to ZyLAB Web Client for
Users ............................................1
K
Keyword in Context (KWIC) View on
the Web Client............................27
L
Log In ................................................2
N
Number Range Operator ................23
D
P
Document Basket............................68
Positional Operators
Context Related........................18
Precedence and Parentheses ........20
Printing from the Web Client...........74
F
Fields ..............................................39
File Options.....................................65
Filter your data ................................53
Fuzzy Searches ..............................15
Q
Quorum Operator............................24
G
R
Global Options ................................67
Redactions ......................................55
Refine Your Results........................26
Results Options ..............................63
80
S
Save hash codes ............................73
Search Folders
Add, Edit or Delete ...................33
Search for All Items.........................29
Search Options ...............................61
Search Rules and Conventions ......30
Search Techniques .........................13
Search Tools...................................31
Separators ......................................25
Starting a Simple Search ..................5
Subscriptions ..................................40
Subscriptions to Alerts (create / edit /
delete) ........................................41
T
Taxonomy .......................................44
The Search Results Page .................7
Thesaurus .......................................37
U
Upload.............................................70
Upload a Document to an Index .....71
Using Document Basket .................69
Using Redaction..............................58
Using the Visualization Module.......50
V
View (and Search) a Document ........9
View Hit Highlighting in Adobe PDF
Files ............................................46
Visualization....................................49
Vocabulary ......................................36
W
Web Client
Fast Key Fielding......................28
Web Client Options .........................60
Wild Card Searches
?, * 16
Z
ZyLAB Web Client Homepage ..........3