1
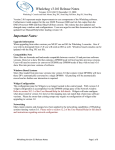
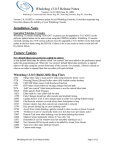
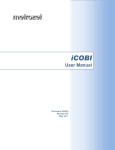
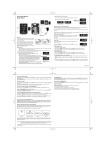
GETTING STARTED
Chapter 1
GETTING STARTED
CONTENTS
Overview of the Interface ............................................................... 2
Title Bar ............................................................................................ 3
File Menu .......................................................................................... 4
Status Bar ........................................................................................ 5
Attention Icons ..................................................................................... 5
Status Bar Customisation.................................................................... 6
Main Button Menu ........................................................................... 7
Customising the Main Button Menu ................................................... 9
Work Area ...................................................................................... 10
Common Toolbar........................................................................... 11
HAIRLINKSQL User Manual v4.5
Updated 01/05/2012
1
Chapter 1
GETTING STARTED
OVERVIEW OF THE INTERFACE
The HairlinkSQL screen can be broken down into a number of sections that show the user information
about their HairlinkSQL session as well as providing an interface to the day to day functionality. The
main sections can be broken down to the Title Bar, File Menu, Notification Toolbar, Main Button
Menu, Work area and the common toolbar. This chapter will describe each section in detail.
Fig. 1 - 1
2
HAIRLINKSQL User Manual v4.5
Updated 01/05/2012
GETTING STARTED
Chapter 1
TITLE BAR
Fig. 1 - 2
The Title Bar displays four important pieces of information; the user, config, staff member and the
access level that the staff member is using. In the example above ‘Kieran’ is the ‘User’,
‘DEFAULT’ is the ‘Config’, OWN is the staff members ID and ‘Owner’ is the ‘Access Level’ that
the staff member is using.
User
The User is created from the windows user profile that you log
on with. Some setup options in HairlinkSQL are saved against
this user profile. Therefore each user can behave slightly
differently than the next.
Config
The Config is a group that the User belongs to. Each Config
has settings that are shared by each member in that group.
These mainly apply to the printer settings.
For example, you may have two computers and a printer at
reception, as well as two computers and a printer in the back
office. The front two computers may use a config called ‘Front’
which directs printing to the printer at ‘Recpetion’. The back
two computers may use a config called ‘Back’ which directs
printing to the printer at the back office. If the printer is
replaced at Reception, the printer settings in HairlinkSQL only
need to be updated in one location which will update both
computers automatically.
Access Level
HairlinkSQL has been designed so an administrator can assign
users to an Access Level Group. This Access Level group will
be able to access certain areas of the application as
deterimined by the administrator. For example, Junior Staff
members can be excluded from accessing financial reports.
HAIRLINKSQL User Manual v4.5
Updated 01/05/2012
3
Chapter 1
GETTING STARTED
FILE MENU
Fig. 1 - 3
The file menu provides access to some of the less commonly used areas of HairlinkSQL. To open a
menu single left click on the menu name and a drop down list will open. Depending on the windows
you currently have open in the Work Area, the menus available may change. For example, when a
client record is open an ‘Actions’ menu will appear.
Jump To
Utilities
Options
Log In /
Out
Window
Help
Navigate
Actions
4
The ‘Jump To’ file menu is used for fast keyboard navigation to the
areas listed in the ‘Main Button Menu’. For example, pressing
‘ALT+J’ (to activate the Jump to menu) then ‘B’ will take you to the
billing menu.
The ‘Utilities’ file menu is where you will find the program utilities.
One of the most important utilities is the End of Period utility; this is
where the End of Day, End of Month and End of Year functions are
located.
The ‘Options’ file menu is where the setup options for the application
are found.
The ‘Log in/Out’ menu option will open the Password Control
window. This enables you to log in or out of areas of the program that
have been restricted.
The ‘Window’ menu option is where you can arrange the windows
you have open by tiling, cascading them or even closing them en
masse. This menu will also list all the windows you have open in
HairlinkSQL at any one time.
The ‘Help’ menu lists all functionality that will assist users to run
HairlinkSQL.
The ‘Navigate’ menu option is used to navigate through records. The
Navigate window is only available when certain windows are open, for
example the Arrivals window.
The ‘Actions’ menu will only appear when certain windows are open
and active. The ‘Actions’ menu will only display options that are
relevant to the current window that is open.
HAIRLINKSQL User Manual v4.5
Updated 01/05/2012
GETTING STARTED
Chapter 1
STATUS BAR
The Status Bar provides a go-to area for all alerts and things that need your attention. The Status
Bar has now been cut into three sections and is displayed at the top by default.
Left - Icons:
This shows the status of some important portions of the
application as they change in the background or due to other
users.
Middle - Text:
This shows messages for important events.
Right - Panels:
This shows things like current date and time, current store
and till etc. Clicking on a panel allows you to change that
item.
Attention Icons
The Status Bar has six icons that will quickly let you know if something needs attention in the
program. By default the icons are Yellow, when one of them requires your attention they change
colour to Red and start blinking.
Clicking on the icon will view the information needing attention and also signals to the program that
you are attending to it so the icon will stop flashing and turn back to Yellow, letting other staff
members know that it is being taken care of. The icon will turn back to red and start blinking again if
anything new needs attention.
Stock Take is currently in progress at your store.
A new Email message has arrived (Not Implemented).
A new SMS reply has arrived.
Background has posted a serious error.
A transaction is in error, this includes bills, invoices, documents etc.
Indicates whether the Background Processor is running.
HAIRLINKSQL User Manual v4.5
Updated 01/05/2012
5
Chapter 1
GETTING STARTED
Status Bar Customisation
The status bar can be customised to your own preference, to customise it simply right-click anyone
on the bar and it will bring up the setup menu. Please note that these settings are saved for that
workstation only.
6
Position:
Defines where the Status Bar will reside, the options are top
and bottom.
Appearance:
Controls the style of the Status Bar.
Colour
Scheme:
Determines the colour of the Status Bar. Note the Icon Panel
becomes gray for some of the colours. This is because the
icons do not stand out in those Colour Schemes.
Icon Blinking:
This controls how fast the icons will blink when requiring
attention. If you are using Terminal Services and find that the
blinking slows down the responsiveness of the screen, then you
should turn the blinking off.
Icon Refresh:
This determines how often the HairlinkSQL will check to see if
anything new requires attention. It is strongly recommended that
you DO NOT turn off the update unless there are other users
that are dedicated to handling the icons. The recommended
setting is every 3 seconds.
HAIRLINKSQL User Manual v4.5
Updated 01/05/2012
GETTING STARTED
Chapter 1
MAIN BUTTON MENU
Fig. 1 - 4
The Main Button Toolbar is where users can access the most commonly used functions in the
system. Each buttons function is listed in the table below.
The ‘Padlock’ button is your login icon; it is used to access areas
that have been set up by management as restricted, or to perform
special functions in the system. The button changes its appearance
once someone has logged in. The characters at the top of the button
refer to the user who is logged in, while the characters on the
bottom of the button refer to the access level that has been granted
to that user.
The ‘Billing’ menu is used to process financial transactions for
clients. (For more information on the billing menu see chapter on
Billing)
The ‘Diary’ menu button is used to access the appointment book /
Diary where you can create, view or edit appointments for clients.
The ‘Arrivals’ menu button is used to access the client arrivals
screen which shows clients who are due, who have arrived and for
how long clients have been waiting.
The ‘Client’ menu button is used to access client records. The client
record is where all client related information is found. (For more
information on the client menu see the chapter on client
management).
The ‘Ac. Hist’ (Account History) menu button is used for looking up
all the transaction history. The account history screen contains
every client transaction ever created in the system including all bills
and refunds.
The ‘Staff’ menu button is used to access staff records. The staff
records include personal details, contact information, rosters and
sales and purchase history.
The ‘Product’ button is used to access the goods and services file.
From the product screen you can add and edit products and
services.
HAIRLINKSQL User Manual v4.5
Updated 01/05/2012
7
Chapter 1
GETTING STARTED
The ‘Creditors’ menu gives access to the ordering / invoicing
module, this is where most inventory control is handled.
The ‘Reports’ menu button is used to access the reporting and
marketing module.
The ‘H/outs’ button is used to access any documents you have
created and stored in the handouts folder. For example you can
store any information that you need to provide to clients such as
post treatment care sheets.
The ‘Int Doc’ button is used to access any documents you have
created and stored in the internal documents folder. For example
any instructions of information that is used internally.
The ‘Orientation’ button changes the position of the ‘Main Button
Toolbar’. By default the toolbar will display vertically along the left
hand side of the page, clicking the ‘Orientation’ button will change
the position to horizontal acrross the top of the page.
8
HAIRLINKSQL User Manual v4.5
Updated 01/05/2012
GETTING STARTED
Chapter 1
Customising the Main Button Menu
You can customise which buttons you want to display on the Main Button Toolbar from Options ->
Setup -> Misc -> At Startup -> Show Buttons in Tool Bar. From here you just need to tick the
buttons that you wish to appear in the menu toolbar. These settings are user based so each user
can have different buttons showing on the toolbar. This is great for removing clutter from the toolbar
restricting access to areas of the application. E.g. The computer in the storage room might solely be
used for receipting and ordering stock and staff members in this area may not have the authority to
make bills. In this scenario you can remove buttons, like the bills button, that are not applicable to
operations in this area.
Fig. 1 - 5
HAIRLINKSQL User Manual v4.5
Updated 01/05/2012
9
Chapter 1
GETTING STARTED
WORK AREA
The ‘Work Area’ is where windows are opened and the day to day procedures performed in
HairlinkSQL take place.
The Work Area uses MDI technology. MDI (Multiple Document Interface), technology allows the
user to work on an unlimited number of windows at the same time on screen. Unlike legacy
applications where you have to close a task window to perform another task or have a limit of open
windows, this technology allows virtually an unlimited number of multiple windows to be open at the
same time on-screen.
For example, you could be viewing an client’s history when another client calls and asks when their
next appointment is. With MDI technology you can leave the client history open and also open the
diary to check for the client’s next appointment. Once the appointment has been you can close the
diary the client history will still be in the position you left it.
Fig. 1 - 6
TIP: The ‘Windows’ menu has many functions that help manage the
work area when multiple windows are open. It lists all current windows
that are open as well as providing an option to close all windows at
once if the work space has become too cluttered.
10
HAIRLINKSQL User Manual v4.5
Updated 01/05/2012
GETTING STARTED
Chapter 1
COMMON TOOLBAR
The common toolbar is usually displayed on product, client and supplier records as well as bills,
creditor orders, invoices and payments. Each type of record will display different buttons that
provide different functionality to that record; the common buttons are displayed below.
Fig. 1 - 7
Scroll Buttons: These buttons enable you to
scroll from record to record in the direction shown
by the arrow. The arrows with the lines on the end
will scroll directly to the first and last records
respectively. The scroll order is based on the
scroll mode as outlined below.
Scroll Mode: This is the order in which you are
currently scrolling through the database. By
clicking on this button you can change the scroll
mode to a different order. For example on the
client record you can scroll through the records in
Category 1 or 2 order, company name order, first
or last name order, client number or user code
number order.
Search: This button will open a new search
window to find another record
Grid View: This button will open a new window
that lists all your records, but in a table view,
rather than one record at a time. Double-clicking
a record in this view will open the record in the
window behind.
Fig. 1 - 8
Print: This button will open a Print Menu that
allows you to print forms and reports specific to
this record
HAIRLINKSQL User Manual v4.5
Updated 01/05/2012
11
Chapter 1
GETTING STARTED
Refresh: This button refreshes the record on your
screen, to show any changes if someone else has
modified the record while you are viewing it.
Add: This button will open a new record, ready
for you to create a new record quickly.
Not Applicable.
Edit: This button will allow you to edit or make
changes to the record that you have on your
screen. This is controlled by a setup options,
most businesses will be able to edit records
without clicking on this button.
Actions: This button brings up a list of extra
functions that are unique to the record that you
are opening.
Exit: This button will close the window that you
have open.
12
HAIRLINKSQL User Manual v4.5
Updated 01/05/2012