1
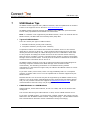
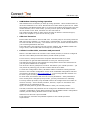
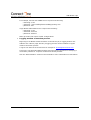
Wi-REACH Classic User Manual Version 1.09 April 2011 Version Comments 1.03 Initial version 1.04 Changes for firmware version 8.08.q11 1.05 Changes for firmware version 8.08.q15 - New modem logging to file function 1.06 Changes for firmware version 8.08.q23 - Host name is displayed on DHCP clients page - Minor document editing 1.07 Minor document editing due to default SSID change 1.08 Changes for firmware version 8.08.q30 - Addition of country and provider selector in Cellular configuration screen - Additional modems supported - Increase download throughput 1.09 MAJOR RELEASE Changes for firmware version 8.08q42 - Wi-REACH Classic operates in full Access Point mode - Up to 8 WiFi stations - New WiFi security modes - WPA-PSK - WPA2-PSK - WPA/WPA2 Mixed Mode - Show number of connected stations in main status page 2 Program License Agreement Program License Agreement The information in this document is subject to change without notice and shall not be construed as a commitment on the part of Connect One. Connect One assumes no liability for any errors that may appear in this document. The software described in this document is furnished under a license agreement and may be used or copied only in accordance with the terms of such a license agreement. It is forbidden by law to copy the software on any medium except as specifically allowed in the license agreement. No part of this document may be reproduced or transmitted in any form or by any means, electronic or mechanical, including but not limited to photocopying, recording, transmitting via fax and/or modem devices, scanning, and/or information storage and retrieval systems for any purpose without the express written consent of Connect One. Wi-REACH, Wi-REACH Classic and Connect One are trademarks of Connect One Ltd. Copyright 2009-2011 Connect One Ltd. All rights reserved. Program License Agreement 3 About This Guide About This Guide Thank you for purchasing Wi-REACH Classic – a standalone personal mobile hotspot. You can now share a wireless internet connection with your friends, family and colleagues. The purpose of this User Manual is to familiarize you with the functionality and operation of Wi-REACH Classic. This manual is updated from time to time. Its contents will usually coincide with the most recent Wi-REACH Classic firmware version. The most recent version can be found on Connect One's web site – www.connectone.com – follow the links to Wi-REACH Classic support page. About This Guide 4 About This Guide Warranty Statement Connect One warrants to the Customer that the Products to be delivered hereunder will function in accordance with the specifications published with regard thereto by Connect One, under conditions of normal use and service and when used in accordance with Connect One's instructions, for a period of 12 (twelve) months from shipment by Connect One or its distributor to the customer. Connect One will, at its option, repair or replace Products that fail to perform as aforesaid. The Customer shall ship defective Products to be repaired or replaced to Connect One under warranty at Connect One's expense, and Connect One shall, at its expense, ship the repaired Products or its replacement to the Customer. In no event will Connect One's liability under the foregoing warranty exceed the purchase price of the defective Products. The warranty set forth above shall not apply (i) with respect to defects or damage caused by the use of unauthorized parts, the making of unauthorized repairs or improper use or maintenance, (ii) if service or repairs of the allegedly defective Products have been performed by persons other than qualified persons who have been properly trained to perform the same, (iii) if the allegedly defective Products have been affected by alterations, modifications or other tampering or misuse, (iv) if the allegedly defective Products have been removed from their original packaging prior to sale to the end-user or (v) if the allegedly defective Products have been used otherwise than in accordance with Connect One's instructions. The provisions of the above sections set forth the Customer’s sole and exclusive remedies with regard to Product failure. CONNECT ONE MAKES NO OTHER WARRANTIES, EXPRESSED OR IMPLIED, WITH RESPECT TO THE PRODUCTS, INCLUDING BUT NOT LIMITED TO ANY WARRANTY OF MERCHANTABILITY, FITNESS FOR A PARTICULAR PURPOSE, OR NON-INFRINGEMENT OF PATENT OR OTHER INTELLECTUAL PROPERTY RIGHTS. THERE ARE NO OTHER WARRANTIES WITH RESPECT TO THE PRODUCTS ARISING FROM ANY COURSE OF DEALING, USAGE OR TRADE OR OTHERWISE. IN NO EVENT SHALL CONNECT ONE BE LIABLE FOR INDIRECT, SPECIAL OR CONSEQUENTIAL DAMAGES WHETHER UNDER THIS AGREEMENT, IN TORT OR OTHERWISE, OR FOR AN AMOUNT IN EXCESS OF THE ACTUAL AMOUNT PAID BY THE CUSTOMER TO CONNECT ONE FOR THE FAILED PRODUCTS. About This Guide 5 Table of Contents Table of Contents 1 Product Overview..................................................................................................7 1.1 2 How to Use this Manual ..........................................................................................7 Getting Started......................................................................................................8 2.1 What’s in the Package? ..........................................................................................8 2.2 Additional Documentation.......................................................................................8 2.3 Panel Buttons and Indications .................................................................................9 2.4 Unpacking and Installing ...................................................................................... 10 2.4.1 Configuring Wi-REACH Classic via WiFi and a web browser ................................ 11 2.4.2 Installing a USB Modem ................................................................................ 13 3 Using Wi-REACH Classic ......................................................................................16 3.1 General .............................................................................................................. 16 3.2 Wi-REACH Classic Features and Configuration ......................................................... 17 3.2.1 Status Information ....................................................................................... 17 3.2.2 Cellular Configuration ................................................................................... 20 3.2.3 WiFi Configuration........................................................................................ 20 3.2.4 DHCP Configuration...................................................................................... 22 3.2.5 Gateway Configuration ................................................................................. 23 3.2.6 Profiles ....................................................................................................... 25 3.2.7 Remote Update............................................................................................ 26 3.2.8 Administration ............................................................................................. 28 4 Restore to Factory Defaults .................................................................................32 5 WiFi Connection Tips ...........................................................................................33 6 Power and Battery Tips .......................................................................................34 7 USB Modem Tips..................................................................................................36 Table of Contents 6 Product Overview 1 Product Overview Connect One’s Wi-REACH™ Classic Standalone Mobile Hotspot connects WiFi enabled devices to the internet through the mobile network. Whether on the beach, in the car, on the train or in the park, you and your friends can quickly and easily access the internet with only one button to push. WiFi Wi-REACH Share a 3G/4G internet connection Wi-REACH Classic combines the connectivity merits of WiFi with the excellent mobile coverage of 3G/4G cellular. You connect to Wi-REACH Classic via WiFi and the hotspot is connected via a 3G/4G modem to the mobile network. 1.1 How to Use this Manual This manual will assist you in setting up your Wi-REACH Classic after your initial purchase. You may also use this manual as a reference guide in operating Wi-REACH Classic. Product Overview 7 Getting Started 2 Getting Started This section describes the content of the Wi-REACH Classic package and provides unpacking and first-time configuration instructions. The final section of this chapter offers several ways to test the Wi-REACH Classic connection. 2.1 What’s in the Package? The Wi-REACH Classic package includes the following items: • Wi-REACH Classic • USB cable (used for charging) • 90º USB adapter • 110V/220V power supply • Release CD that contains this manual Note: Before you can connect to the 3G/4G network, you will need to have a 3G/4G USB modem with an activated SIM card. Your local cellular provider should have this available along with data packages which you can choose according to your needs. For the latest list of supported 3G/4G USB modems please see http://www.connectone.com/media/upload/3G-USB-LIST.pdf If your USB modem is not on the list, please contact [email protected] as your modem may have been added but is not on the list yet. 2.2 Additional Documentation The release CD contains this manual. Note: Because documentation, utilities and firmware files change from time to time, please be sure to check for the latest versions on the Connect One Web site: http://www.connectone.com. Getting Started 8 Getting Started 2.3 Panel Buttons and Indications PWR LED Color State Indication None None Power is OFF RED Solid Power is ON RED Flashing slow Battery low YELLOW Solid Power is OFF and Battery is charging ORANGE Solid Power is ON and Battery is charging Color State Indication None None No USB stick installed RED Solid USB stick installed, not connected RED Flashing fast USB stick installed, not supported BLUE Solid USB stick installed and ready BLUE Flashing slow Connected to Network PURPLE Solid Battery fully discharged NET LED Panel Buttons and Indications: NET LED PWR LED Mini USB Connector ON/OFF Button (for power adapter) Restore Button Getting Started 9 Getting Started 2.4 Unpacking and Installing Wi-REACH Classic installation is simple and all the required accessories are supplied with the device (except for the USB 3G modem which you should already have). ➣ To install Wi-REACH Classic: 1 Before you can use Wi-REACH Classic, you will need to charge its battery, insert the SIM card into the USB 3G modem and keep the modem handy for the procedure "Installing a USB Modem" further down. Note: Charge the battery with the power supply provided for at least 3 hours before first use when the unit is turned OFF. Alternatively, connect the power supply and keep this connection during the installation. Note: To use the power supply, connect the USB cable provided to the power supply USB connector and select the correct AC plug for your area. The mini USB plug on the end of the cable connects to the Wi-REACH Classic mini USB connector. 2 Press the power switch. The PWR LED will turn ON and the NET LED will flash BLUE once. Note: PWR LED color will depend on whether you are running on battery power, or with a power supply connected. (see LED indications chart for more details) Getting Started 10 Getting Started 2.4.1 Configuring Wi-REACH Classic via WiFi and a web browser This section describes how to configure Wi-REACH Classic via your web browser. In order to access Wi-REACH Classic with your browser, you first need to connect your computer or device to Wi-REACH Classic via WiFi. ➣ To connect to Wi-REACH Classic: 1 Make sure Wi-REACH Classic power is ON. 2 Find and connect to Wi-REACH Classic using the WiFi manager application on your computer or device. This process varies depending on your computer/device and operating system. 3 Select "Wi-REACH 12345678" from the wireless networks found and connect to it. The 8 digits are unique to your Wi-REACH Classic, and are also printed on a label on the back of your unit. Wi-REACH Classic is shipped from the factory with no WiFi security configured. 4 In your web browser's address bar, type in http://192.168.0.1 and Enter. Wi-REACH Classic's internal configuration web site will be displayed showing the General Information page. Getting Started 11 Getting Started ➣ To configure cellular parameters: 5 Select "Cellular". The Cellular configuration page will be displayed. You may select your Country and Provider from the drop-down lists. If you know the configuration for your cellular provider, or if your provider is not on the list, you can fill the parameters manually. Erase the "APN" text and fill out the APN that you received from your cellular provider, and User Name and Password if needed. If you have a CDMA modem, fill out "CDMA" (without the quotes) in the APN field, and fill in #777 as the Dial String. Select "Save". Getting Started 12 Getting Started ➣ To configure WiFi parameters: 6 Select "WiFi". The WiFi configuration page will be displayed. You can change the configuration as you wish. Note: Wi-REACH Classic is shipped from the factory with a unique SSID so that your Wi-REACH Classic will be not be confused with other Wi-REACH Classic hotspots in your immediate area. This unique SSID is also printed on a sticker on the back of your unit. You may change this SSID as you wish (for example "Wi-REACH_YourName") When selecting a security setting, a Security Key needs to be entered. Note: For WPA and WPA2, at least 8 characters need to be entered. Note: For WEP64, 5 ASCII characters or 10 hex characters need to be entered. For WEP128, it's 13 ASCII or 26 hex characters. Example for WEP64: 12345 (ASCII) or 3132333435 (hex – which is the hex representation of 12345 ASCII). When you complete your selections, select "Save". Note: If you changed the settings, the new settings will be used the next time the Wi-REACH Classic is powered ON. 2.4.2 Installing a USB Modem ➣ To connect Wi-REACH Classic to the network: 1 Getting Started Make sure Wi-REACH Classic is turned OFF. 13 Getting Started 2 Insert the USB modem into the Wi-REACH Classic and turn ON Wi-REACH Classic. 3 Find and connect to Wi-REACH Classic using the WiFi manager application on your computer or device. This process varies depending on your computer/device and operating system. 4 Select "Wi-REACH 12345678" (or the SSID you changed to in the previous step) from the wireless networks found and connect to it. 5 In your web browser's address bar, enter http://192.168.0.1 and Enter. Wi-REACH Classic's internal configuration web site will be displayed. On the Wi-REACH Classic, the NET LED will initially turn RED. After the modem is recognized and ready, the NET LED will turn a solid BLUE. Finally, when the modem goes online, the NET LED will flash BLUE slowly. Once the modem goes online, the IP Address will show the address received from the cellular provider, the System Status will show "Connected to ISP", and the Modem Status will show "USB modem online". Getting Started 14 Getting Started Note: The amount of time it will take the modem to go online depends on the type of modem and the specific cellular provider you are connecting to. In general, this process may be as fast as 30 seconds, or as slow as about 2 minutes. If the modem does not go online, pls recheck the APN, username and password you entered in the Cellular configuration page. Once the modem is online, you can browse to an internet location. Note: If you are unable to immediately browse to an internet location, wait a few seconds and try again since DNS information is usually retrieved from the cellular provider only after going ONLINE. Getting Started 15 Using Wi-REACH Classic 3 Using Wi-REACH Classic This section describes how to use Wi-REACH Classic as a personal hotspot. 3.1 General Wi-REACH Classic is a personal hotspot that you can carry with you wherever you go, and provide internet connectivity to PCs or devices with WiFi capability where you have 3G/4G coverage. Wi-REACH Classic works in conjunction with a USB 3G/4G modem dongle with an activated data plan. Example use scenarios: • You travel to a conference with your colleagues from work, and you can't seem to find an available open WiFi service. Turn ON Wi-REACH Classic and you and your colleagues will have instant connectivity. • You arrive at a customer location to demo your product which requires you to connect to the internet. You cannot gain access to your customer's WiFi because it requires a password, and the IT people do not allow guests onto the customer's network. Turn ON Wi-REACH Classic and you have instant WiFi access to the internet – you can also allow the customer access to the internet via your personal hotspot to view a demo you prepared. • You are driving in your car with the family and your kids want to access a social network while you are driving. Turn ON Wi-REACH Classic and each one of them can access the internet with their WiFi-enabled device or PC. Using Wi-REACH Classic 16 Using Wi-REACH Classic 3.2 Wi-REACH Classic Features and Configuration 3.2.1 Status Information 1 The General Info page shows the following info: IP Address is the address received from the 3G/4G operator, and the System Status shows the connection status to that operator. Connected Stations are the number of WiFi stations or devices currently connected to Wi-REACH Classic. SSID, MAC Address and Security relate to the WiFi connection. Firmware Version is the version of the Wi-REACH Classic software currently in the unit. Modem Status shows the status of the USB modem. Using Wi-REACH Classic 17 Using Wi-REACH Classic 2 The Connection Info page shows the following: Current Time Online shows how long it has been since the Wi-REACH Classic went ONLINE. Accumulated Profile Time is how much ONLINE time has been accumulated for the current profile. The Active Profile is shown at the bottom left. Entire Profile Time is the total of all profiles ONLINE time. Current Bytes Received and Current Bytes Sent are the total number of bytes received/sent during the current ONLINE session. Accu. Profile Bytes Received and Accu. Profile Bytes Sent are the total number of bytes received/sent accumulated for the current profile. Entire Profile Bytes Received and Entire Profile Bytes Sent are the total number of bytes received/sent for all profiles. Using Wi-REACH Classic 18 Using Wi-REACH Classic 3 The Modem Info page shows the following: This is the information retrieved from the USB modem. Using Wi-REACH Classic 19 Using Wi-REACH Classic 3.2.2 Cellular Configuration The Cellular configuration page shows: Wi-REACH Classic contains a database of providers around the world with the relevant cellular configuration for each provider. You may use the Country and Provider drop-down lists to select your provider. Once you select the Provider, its parameters will be filled in automatically. You can still make changes in the fields as needed. Dial String is the number required to dial and get ONLINE with the USB modem. This is set by the cellular operator. The most common for GSM modems is *99# which is the default shipped with the Wi-REACH Classic. If you have a CDMA modem, the most common dial string is #777. APN (Access Point Name) User Name and Password are set by the cellular operator. You will need to get this info from your cellular operator, or this information may exist on the internet with a quick search. Note: If you have a CDMA modem, fill out "CDMA" (without the quotes) in the APN field. 3.2.3 WiFi Configuration The WiFi configuration page shows: Using Wi-REACH Classic 20 Using Wi-REACH Classic Channel is the WiFi channel used by Wi-REACH Classic. Try to use a channel as far away from the channel used by any surrounding access points. For example, if you know there is another access point on channel 1, you should use a channel which is at least 5 channels away from that access point, i.e. 6. This prevents interference between the existing access point, and your personal hotspot. SSID is the name given to an access point or hotspot, which is used to identify that hotspot when using the WiFi manager application on your device or PC. Wi-REACH Classic is shipped from the factory with a unique SSID containing a unique 8 digit code (i.e. "Wi-REACH 12345678"). You may want to change this SSID to something more personal (for example "Wi-REACH_YourName"), but still different enough so that it will not be confused with other Wi-REACH Classic units in the area. Security Key is the WiFi security and can be WEP64, WEP128, WPA, WPA2 or mixed WPA/WPA2. When selecting a security setting, a Security Key needs to be entered. Note: For WPA and WPA2, at least 8 characters need to be entered. Note: For WEP64, 5 ASCII characters or 10 hex characters need to be entered. For WEP128, it's 13 ASCII or 26 hex characters. Example for WEP64: 12345 (ASCII) or 3132333435 (hex – which is the hex representation of 12345 ASCII). Using Wi-REACH Classic 21 Using Wi-REACH Classic 3.2.4 DHCP Configuration 1 The DHCP configuration page shows: You can change the Base IP address of Wi-REACH Classic, along with the Maximum Number of Clients that can connect to Wi-REACH Classic at the same time. Computers or devices connecting to Wi-REACH Classic will receive consecutive IP addresses starting at Base IP Address + 1. You may also enter a Primary and Alternate DNS Address as static values, or if left empty, these values will be received from your cellular provider during the modem connection. It is advisable to leave these values empty as DNS values may be changed by your cellular provider from time to time. It is also advisable to leave the Lease Time of the IP addresses at 60, which means connected devices will renegotiate their IP address every 60 minutes. 2 DHCP Clients shows the IP Addresses given out by the Wi-REACH Classic DHCP server, their MAC addresses and Host Names. Using Wi-REACH Classic 22 Using Wi-REACH Classic 3.2.5 Gateway Configuration As part of its routing function, Wi-REACH Classic keeps a NAT (Network Address Translation) table to enable each device or PC connected via WiFi to access the internet via the WAN (3G/4G) connection. However, none of the PCs or devices connected via WiFi can be accessed from the internet since they do not have public IP addresses and are assigned private IP addresses by the Wi-REACH Classic DHCP server. If there is a need to enable a connection from the internet to one of the PCs or devices connected to the Wi-REACH Classic, a Port Forwarding Rule needs to be defined. Using Wi-REACH Classic 23 Using Wi-REACH Classic 1 The Port Forwarding configuration page shows: The WAN Port is the port to be used on the public internet side. The Local IP is the IP address of the device or PC connected via WiFi to Wi-REACH Classic that needs to be accessed from the internet. The Local Port is the port on the device or PC through which it will be accessed. A rule can be defined for a TCP, UDP connection, or both. For example, if the WAN port is 8000, Local IP is 192.168.0.3, and Local Port is 80, data arriving from the internet on port 8000 will be routed to the device or PC that has local IP address 192.168.0.3 port 80, and vice versa. Note: Since Wi-REACH Classic provides IP addresses dynamically as devices or PCs connect to it, it is advisable to set the Local IP as a static IP address on the device or PC connected to Wi-REACH Classic. Using Wi-REACH Classic 24 Using Wi-REACH Classic 2 The Gateway Clients information page shows: This information page shows which PC or device is using the port forwarding rules. 3.2.6 Profiles Wi-REACH Classic provides the ability to store up to 7 configuration profiles. When moving around, you may need to connect to several 3G/4G operators, use several USB modems, etc. For each configuration you use, you can save a profile and give it an identifiable name. Using Wi-REACH Classic 25 Using Wi-REACH Classic The Profiles page shows: Loading a saved profile: Choose the profile you want to load from the drop-down list. Saving the current profile: Select "Save Profile" and enter a name for that profile when a text entry window is shown. After the profile is saved, its main parameters are displayed. Reset Data Counters resets the data counters displayed in the Connection Info page. Reset Timers resets the timers displayed in the Connection Info page. 3.2.7 Remote Update The remote update section contains the ability to update 2 types of files. Using Wi-REACH Classic 26 Using Wi-REACH Classic Modem Table – this is a modem table file – as new modems will be supported by Wi-REACH Classic, a new table can be updated. A modem table contains new modems that have been added since the last firmware version. When a new firmware version is released, it will contain all the modems supported up to the version release date. So, to make sure your Wi-REACH Classic supports all the recent modems, you should first update to the most recent firmware version, then update the recent modem table. Firmware – this is the firmware of the Wi-REACH Classic product. It is a file with an "imz" extension. Firmware update process is as follows: 1 Unzip the firmware file (can be downloaded from Connect One's web site) and save i2128dxxxxxxWRCH.imz to your computer where you will be able to retrieve it later on. 2 Make sure Wi-REACH is OFF and the modem is NOT inserted. 3 Turn ON Wi-REACH. 4 Connect to the Wi-REACH using your WiFi and browse to http://192.168.0.1. 5 Select "Remote Update" from the top menu line. 6 Select "Browse" under "Firmware imz file to upload", and select the i2128dxxxxxxWRCH.imz file you saved to your computer in Step 1. 7 Select "Submit". Using Wi-REACH Classic 27 Using Wi-REACH Classic 3.2.8 8 After a few seconds, you should see "Firmware x.xx.xxx upload is complete", "Configuration site is down". 9 Wait about 15 seconds, and refresh the web page to re-connect to Wi-REACH management website. (http://192.168.0.1) Administration The Admin page shows: Using Wi-REACH Classic 28 Using Wi-REACH Classic 1 Change Password: You may enter or change a password for managing and configuring Wi-REACH Classic. If the password is not left blank, you will need to enter the password when entering a page that allows changing parameters. Important Note: No password is denoted by a blank password. After changing the password, you will need to Reset Wi-REACH for the new password to take effect. 2 Operational setup: Memory buffer size sets the size of the upload buffer to the internet. The larger buffer size allows better upload speed to the internet. If you are sending a lot of data, (for example, sending large email messages), you should set the buffer to its maximum size. If, on the other hand, you do regular browsing with an occasional large message to send out, you should set the buffer to its midpoint level. USB Interface ID should not be changed unless you are requested to do so by a qualified technical support person. This number is related to the USB implementation of the modem manufacturer. 3 Modem Keep Alive settings: "Keep Alive" is a term used for making sure the modem stays connected to the cellular provider all the time. Providers may bring down the connection when there is no traffic, so the connection may be considered as "on-demand" instead of "always-on". In most cases, "Keep Alive" is not required, but in case it is, these settings will allow to Enable or Disable this capability. The "Keep Alive" function is implemented using the PING protocol. By "pinging" a known server on the internet, the Wi-REACH Classic generates PING traffic at a given Interval, thereby keeping the connection alive all the time. You may configure 2 servers for this function – a Main Server Address and an Alt. Server Address. It is important that the server addresses are known servers on the public internet which will always answer a PING request. You may fill in a server name like www.server.com, or an IP address like 123.45.67.89. Interval: interval between PING requests in seconds Main Server Address: a known server on the public internet Alt. Server Address: another known server on the public internet In case there are no responses to the PING requests from the configured servers when the "Keep Alive" function is enabled, the Wi-REACH Classic will attempt to reconnect the modem to the cellular network. Using Wi-REACH Classic 29 Using Wi-REACH Classic Note: When "Keep Alive" is enabled, you should see the status of this service at the bottom of the web page. The status will first appear after the Interval time you have set. 4 Modem Connection Log: This logging facility is used in case there are problems in modem connection, or if the modem is not recognized by Wi-REACH Classic. Selecting "Create Modem LOG" initiates a logging process beginning with a reset of Wi-REACH Classic and several minutes of log thereafter. Once the logging process begins, you will see a timer countdown showing how much time is left in the process. Once complete, you will be asked to save the log file. Using Wi-REACH Classic 30 Using Wi-REACH Classic Save the log file, and send to [email protected] for analysis with a brief description of your modem and problem. Using Wi-REACH Classic 31 Restore to Factory Defaults 4 Restore to Factory Defaults Wi-REACH Classic's non-volatile memory contains a backup of the initial firmware and parameters which were originally shipped with the unit from the factory. If for some reason there is a need to restore Wi-REACH Classic to its initial firmware, the following procedure should be followed: Important Note: All firmware versions which may have been updated to the unit will be erased, including parameters, updated modem tables, etc. 1 Make sure the unit is OFF, and there is no modem connected. 2 Press the restore button (pin hole located just to the left of the PWR LED) with a paperclip ("feel" the click and keep pressing), and then momentarily press the PWR switch. 3 Let go of the restore button after about 1 second (once you let go, the NET LED will start flashing showing the unit has entered restore mode). If the NET LED does not flash after you let go, repeat the process from step 1. 4 When the unit is flashing, press again the restore button with the paperclip to initiate the restore process. The NET LED will turn solid for the duration of the restore process. 5 After the restore process is complete, the PWR LED will turn ON to designate restore complete. After the restore process, you will need to configure Wi-REACH Classic for operation – see the section in this manual on unpacking and installing. Restore to Factory Defaults 32 WiFi Connection Tips 5 WiFi Connection Tips To use or configure Wi-REACH Classic, you will need to connect to it with a device that has WiFi capability. When turned ON, Wi-REACH Classic automatically establishes an ad-hoc WiFi access point, regardless if a USB modem is connected or not. ➣ Wi-REACH Classic WiFi Range The typical WiFi range for Wi-REACH Classic is about 30 meters (about 100 feet) in a home environment, and up to 100 meters in an unobstructed outdoor environment. ➣ Connecting to Wi-REACH Classic with a WiFi Manager Application Every computer or device has its own WiFi manager to manage the WiFi connection process, therefore, you should connect to Wi-REACH Classic using the same process you use to connect to any other WiFi connection you are used to. Wi-REACH Classic is shipped from the factory with a unique SSID consisting of "WiREACH" and an 8 digit unique code (for example "Wi-REACH 12345678"). Therefore, when connecting to Wi-REACH Classic the first time, you should look for this name in the list of WiFi networks in the WiFi Manager application. If you have changed the SSID in the "WiFi" configuration page, then you should look for that name in the list of WiFi networks. ➣ Using more than 1 Wi-REACH Classic Make sure each Wi-REACH Classic has a unique SSID. If more than one unit with the same SSID will be turned ON in the immediate area, you will not be able to know which Wi-REACH Classic you are connected to. ➣ Managing WiFi Users Any user connected to Wi-REACH Classic has access to its configuration website at http://192.168.0.1. If you do not want to allow users full access to the configuration website, you should enter a password in the "Admin" configuration page. This will allow regular users access just to the main information page in the configuration website. Wi-REACH Classic contains a DHCP server which provides IP addresses to WiFi users that connect to it. Based on the max number of clients (default is 5) you set in the "DHCP" configuration page, that many users can get connected. You will be able to see how many IP addresses the DHCP server has given out in the "DHCP Clients" tab in the "DHCP" configuration screen. However, Wi-REACH Classic will also allow clients with static IP addresses within its IP segment to also route data and connect to Wi-REACH Classic. Those clients will not appear in the "DHCP Clients" tab. If you do not want people "stealing" connectivity from you, you should set the WiFi security in the "WiFi" configuration screen. WiFi Connection Tips 33 Power and Battery Tips 6 Power and Battery Tips The battery in Wi-REACH Classic is a 2000mA Li-ion polymer rechargeable battery. In regular operation, it should last for 4-5 hours of operation after a full charge. Battery operation time varies depending on the type of modem used (each modem has different power requirements), the amount of data routed through the modem (the more data routed, the more power consumed) and the cellular reception in the area you are located (bad reception consumes more power). ➣ Battery re-charging Using the power adapter provided, it should take about 2 to 2.5 hours to fully charge the battery from zero charge while the Wi-REACH Classic is powered OFF. Note: It will take about 4 times as long to recharge the battery during WiREACH Classic operation, than while the Wi-REACH Classic is powered OFF. (See explanation below regarding working with Wi-REACH Classic with power connected) Wi-REACH Classic's battery can be recharged in 1 of 2 ways: 1. Using the power adapter provided, or 2. Using 2 USB ports on a laptop computer The power adapter provided is rated at 5V, 1A and connects to the Wi-REACH Classic at the mini USB connector via the supplied USB double-headed cable (only 1 USB head needs to be connected to the power adapter). The reason for the 2 USB heads on the cable is to enable a connection to 2 USB ports on a laptop computer to charge the Wi-REACH Classic from the laptop instead of the power adapter. On laptop computers, each USB port is limited to 0.5A, and by connecting to 2 ports, a total of 1A can be drawn from the laptop USB connectors. When this method is used, it is important to connect the 2 USB heads on the cable directly to the laptop computer USB ports, and not via a USB hub. Most likely, the hub will not be able to provide a high enough current at each USB connector – especially if the USB hub does not have its own power supply. ➣ Battery Fully Discharged If the Wi-REACH Classic is left on and the battery fully discharges, the NET LED will turn purple to indicate this condition. At this point, turn OFF Wi-REACH Classic and recharge its battery as described above. ➣ LED indications While running on battery power, the PWR LED is used to indicate: 1. Solid RED – Wi-REACH Classic is ON 2. Slow flashing RED – Low battery condition, the Wi-REACH Classic should be recharged. Once you see this indication, you should have about 15-30 minutes of use left. Power and Battery Tips 34 Power and Battery Tips ➣ Working with Wi-REACH Classic with power connected: While power is connected to Wi-REACH Classic, the battery is recharged, and the unit can be operated. However, since much of the power from the power adapter is required by Wi-REACH Classic to operate, the amount of power supplied to the battery for recharging is much less than when the unit is OFF. Note: It will take about 4 times as long to recharge the battery during Wi-REACH Classic operation, than while the Wi-REACH Classic is powered OFF. It is important to use the power adapter supplied when connecting the unit to power. Power and Battery Tips 35 USB Modem Tips 7 USB Modem Tips Wi-REACH Classic supports many USB 3G modems, and the updated list of modems known to be supported can be found on www.connectone.com. Wi-REACH Classic supports modems that adhere to the USB CDC (Communication Device Class) specification and standard AT Commands. Note: if a modem is not supported by Wi-REACH Classic, when it is inserted into WiREACH Classic, the NET LED will eventually flash (fast) RED. ➣ Types of USB Modems There are usually two types of USB modems: 1. Standard modems (usually older modems) 2. Composite modems (usually newer modems) Composite modems are modems that contain the modem drivers on the modem itself with no need for a driver CD. These modems when plugged into a USB port, identify themselves initially as a Mass Storage Device like a CD-ROM or Flash Disk for the purpose of loading the modem drivers from the internal modem memory. After the driver is loaded, it sends a command to the modem to switch it from Mass Storage mode to Modem mode. At that point the modem is identified as a standard modem and AT Commands can be sent to it. Wi-REACH Classic contains a long list of supported modems and methodologies for switching composite modems from Mass Storage mode to Modem mode. Unfortunately, this switching mechanism is not standard among modem manufacturers, and therefore support may be added to Wi-REACH Classic for newer modems over time. If you have a fairly new modem, there is a high probability that it is a composite modem, so please make sure it is on the updated list of modems supported by WiREACH Classic. Modems that are not on the list may still be supported by Wi-REACH Classic if they adhere to one of the switch methodologies already supported by Wi-REACH Classic, and you may contact Connect One support at [email protected] with the modem details to find out if they may be supported. ➣ CDMA Modems vs. GSM Modems CDMA modems, unlike GSM modems, do not use a SIM, and do not need an APN configured. The common dial string for GSM modems is *99#, and for CDMA modems #777. If you have a CDMA modem, you should enter "CDMA" (without the quotes) into the APN field in the Wi-REACH Classic Cellular configuration page. The Wi-REACH Classic then understands to build the modem initialization strings accordingly. USB Modem Tips 36 USB Modem Tips ➣ USB Modem Heating During Operation USB modems have a tendency to heat up during operation. Some modems have an internal mechanism to turn off or disconnect the modem when it gets too hot. When this happens, Wi-REACH Classic will try to turn on the modem and reconnect it to the cellular network, but in some cases, you may need to power off Wi-REACH Classic, let the modem cool a while, and then turn the unit back on. The modem usually heats up when larger amounts of data are routed through it, and/or the reception in your area is not very good. ➣ SIM Card Insertion Each modem has a slot to insert a SIM card. It is fairly easy to incorrectly insert the SIM card into the modem (i.e. upside down, or backwards), so care should be taken to insert the SIM card correctly. You should revert to your modem documentation if you are having difficulties with this. If the SIM card is not inserted correctly into the modem, the Wi-REACH Classic will not go online, and the NET LED will usually stay a solid BLUE. ➣ Cellular Provider APN, username and password Before a 3G USB modem can connect to the cellular provider, it must be configured with the correct APN (Access Point Name) of that cellular provider. For 3G service, most providers have a specific APN that needs to be used. The best place to get this APN information is from your cellular provider. The APN info may also be found within the configuration area of the modem driver you may have installed on a computer. The internet is also a good place to look for the APN for your cellular provider – you may search by entering your provider's name and the text "APN". To make this configuration easier, Wi-REACH Classic contains a Country/Provider selector in the Cellular configuration screen of its embedded configuration web site (accessed by browsing to http://192.168.0.1). This Country/Provider selector can be used a guide to filling in the cellular parameters. In most cases, this selector will fill in the correct parameters. If the parameters have recently been changed by the provider, you may still fill them in manually. For many cellular providers, only the APN needs to be configured to the modem to connect correctly. Some cellular providers, however, require a "username" and "password" to be configured as well. Again, the best place to get this information is from your cellular provider. The APN, username and password can be configured in Wi-REACH Classic in the "Cellular" configuration screen after browsing to the Wi-REACH Classic configuration website (see the Getting Started section in this manual). CDMA service does not require an APN. It will require a username and password specific to the cellular provider's requirements. USB Modem Tips 37 USB Modem Tips For example, Verizon USA CDMA service requires the following: - dial string: #777 - username: {your modem phone number}@vzw3g.com - password: vzw Virgin Mobile USA CDMA service requires the following: - dial string: #777 - username: Internet - password: Internet Other providers will require similar configurations. ➣ Logging modem connection process Beginning in Wi-REACH Classic firmware version 8.08.q15, a logging feature was added to the "Admin" page whereby a logging process can be initiated to log the modem connection process. A log file can then be saved and sent for analysis to [email protected]. This log file can assist Wi-REACH Classic technical support personnel in analyzing a connection problem for a specific modem and cellular provider. See the "Administration" section of this manual for more information on this feature. USB Modem Tips 38