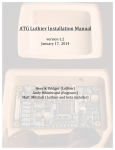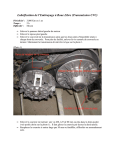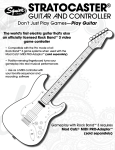
1
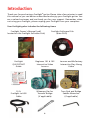
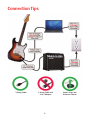
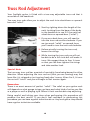
Owner’s Manual
Table of Contents
3
Introduction
4
Software Installation
5
Quick Start
7
Connection Tips
9
Getting Started
11 Fretlight Neck & System
12 Truss Rod Adjustment
13 Customer FAQ
14 Service Note
15 Customer Care
16 Fretlight Limited Warranty
Introduction
Thank you for purchasing a Fretlight® guitar. Please take a few minutes to read
this manual so you can better understand and enjoy your Fretlight guitar. You
are a valued customer and we thank you for your support. Remember, when
not using your Fretlight, please unplug your Fretlight from your computer.
Your Fretlight guitar includes the following items:
Fretlight Owner’s Manual (.pdf
located on the Fretlight Software Disk)
Fretlight Software Disk
(data DVD)
Fretlight
QUICKSTART
Guide
Beginner 101 & 102
Interactive Video
Lessons
Lennon and McCartney
Interactive Play-Along
Video
10 ft.
Fretlight-to-USB
Cable
Whammy Bar for
Tremolo Bridge
(if applicable)
Truss Rod and Bridge
Saddle Wrenches
(if applicable)
3
Software Installation
PC Installation:
Step 1 Insert the Fretlight software installation disk into your computer.
A menu screen will pop up with various menu options including a
link to an audio message by Rusty Shaffer, Inventor of the Fretlight.
This message gives you a good overview of how to proceed to install
and enjoy your new Fretlight guitar. Follow the onscreen steps 1-3.
Step 2 Connect the Fretlight-to-USB cable to your guitar and your computer.
NOTE: The ¼” female jack located on the USB end of your cable is for
connection to the optional Fretlight dual footswitch.
Step 3 Launch the Fretlight Studio software on your desktop by doubleclicking the Fretlight Studio icon (which is probably on your desktop).
Mac Installation:
Step 1 Insert the included Fretlight software disk into your computer. Browse
the disk and install Mac designated programs.
Step 2 Connect the Fretlight-to-USB cable to your guitar and your computer.
NOTE: The ¼” female jack located on the USB end of your cable is for
connection to the optional Fretlight dual footswitch.
Step 3 Launch any of the Fretlight software programs on your computer and
start jamming.
4
Quick Start
Open a Fretlight Ready
Interactive Video:
PC:
Step 1 Insert the Data-DVD disk into your computer.
Step 2 Browse the disk.
Step 3 Double click on the title of the video.
Mac:
Step 1 Move your Fretlight FVP video file from the disk to: HD/Users/
"nameofyourcomputer"/Music/Fretlight/Fretlight Player/Fretlight Videos
Step 2 Open the Studio and click on "Launch the Fretlight Player".
Step 3 Double click the name of the video.
Open an Improviser Progression:
PC and Mac:
Step 1 Open the Fretlight Studio.
Step 2 Click on “Launch the Fretlight Improviser”.
Step 3 Click the “Load song” button.
Step 4 Click on a progression.
Step 5 Click the “Select” button on a Mac or click the “Open” button on a PC.
5
Light up Chords and Scales:
PC and Mac:
Step 1 Open the Fretlight Studio.
Step 2 Click on “Launch the Fretlight Chord and Scale Library”.
Step 3 Click the “Chords and Scales” button.
Step 4 Click a chord or scale.
Step 5 Click on the interactive picture to show the chord. Select a root note
to show the scale.
Install and Open Fretlight MIDI Songs:
PC and Mac:
Step 1 Open the Fretlight Studio.
Step 2 Click on “Launch the Fretlight Player”.
Step 3 Double click on a Fretlight song in the Fretlight Songs folder.
Mac:
Step 1 Download, or move, your Fretlight MIDI song to: HD/Users/
"nameofyourcomputer"/Music/Fretlight/Fretlight Player/Fretlight Songs
Step 2 Open the Studio and click on "Launch the Fretlight Player"
Step 3 Double click the name of your song
Download Guitar Pro 6 Tab Files:
PC and Mac:
Step 1 Go to Fretlight’s Song Finder:
www.fretlight.com/song-finder
Step 2 Search a song title.
Step 3 Click on the song that has the highest number of stars, as this will be
the “most accurate” version.
Step 4 Scroll to the bottom and click on “Download (song name) Guitar Pro Tab”.
Step 5 Click “Open” and Guitar Pro 6 will automatically launch and load your
Guitar Pro tab file, press play and start rocking!
Step 6 Don’t forget to save your song.
6
Connection Tips
3-Prong Cable
2-Prong Cable and
3-to-2 Adapter
7
Power Strips and
Extension Chords
DO:
• When your computer is connected to a power outlet, make sure it has a
grounded three-prong plug. Most computers come standard with grounded
power supplies and cables.
• You may connect your Fretlight to a laptop without connecting the laptop
to a power outlet.
• If connecting to a desktop, make sure that you are connecting the Fretlight
to a root USB port—most likely located on the back of the computer.
• Make sure you are connecting your computer to a grounded power outlet
that has three prongs.
• When connected to both a computer and an amp, make sure to use the
pickup closest to the bridge.
DON’T:
• Do not use a two-prong plug or a 3-to-2 adapter plug.
• Do not use a two-pronged wall outlet—only use a three-pronged, grounded
wall outlet.
• Do not use an external USB hub. Your Fretlight must be connected directly
to your computer’s USB port.
CAUTION:
• Try not to use power strips or extension cords as they WILL introduce extra
noise into the system. For best results, connect your system as shown.
• Make sure that you are using a quality, shielded guitar cable. Using a cheap
cable can introduce extraneous noise into your system.
8
Using Your Fretlight
Beginner Players—Take an interactive video lesson or play an interactive
play-along song
Now that your Fretlight is connected to your computer, you’re ready to start
playing. We recommend you take your first lesson or jump right in and play a
song. Just follow these steps:
PC:
Step 1 Insert the Beginning 101 Lesson disk (or the Lennon & McCartney disk)
into your computer.
Step 2 Browse the disk.
Step 3 Double click on the title of the video.
Mac:
Step 1 Insert the Beginning 101 Lesson disk (or the Lennon & McCartney disk)
into your computer.
Step 2 Browse the disk.
Step 3 Open a new Finder window, open your Home folder (it will usually
have your name as the title and a little home icon next to it), and
navigate to: Macintosh HD>Music>Fretlight>Fretlight Player>
Fretlight Videos
Step 4 Move the Fretlight FVP video file into that location by copying
and pasting or by dragging and dropping.
Step 5 Open the Studio and click on "Launch the Fretlight Player".
Step 6 Double click the name of the video.
Beginner/Intermediate Players—Light up chords and scales
Let’s see some different chord and scale patters light up on your Fretlight.
PC and Mac:
Step 1 Open the Fretlight Studio.
Step 2 Click on “Launch the Fretlight Chord and Scale Library”.
Step 3 Click the “Chords and Scales” button.
Step 4 Click a chord or scale.
Step 5 Click on the interactive picture to show the chord. Select a root note
to show the scale.
9
Intermediate & Advanced Players—Solo using different scales and
chord tones
A good place to work on soling techniques is the Improviser. You can practice
soloing over one of the 120+ built-in progressions in Fretlight Studio.
PC and Mac:
Step 1 Open the Fretlight Studio.
Step 2 Click on “Launch the Fretlight Improviser”.
Step 3 Click the “Load song” button.
Step 4 Click on a progression.
Step 5 Click the “Select” button on a Mac or click the “Open” button on a PC.
Guitar Pro 6 Fretlight Ready software (optional)
If you’ve purchased the optional Guitar Pro 6 Fretlight Ready software lets get
some tab files downloaded from the internet and get them playing on your
Fretlight. Just follow these steps:
PC and Mac:
Step 1 Go to Fretlight’s Song Finder: www.fretlight.com/song-finder
Step 2 Search a song title.
Step 3 Click on the song that has the highest number of stars, as this will be
the “most accurate” version.
Step 4 Scroll to the bottom and click on “Download (song name) Guitar Pro Tab”.
Step 5 Click “Open” and Guitar Pro 6 will automatically launch and load your
Guitar Pro tab file, press play and start rocking!
Step 6 Don’t forget to save your song.
10
Fretlight Neck & System
The 8-Pin DIN Fretlight Jack
Your Fretlight guitar has what looks like a MIDI jack
mounted in the body. This is NOT a 5-pin MIDI jack.
This is an 8-pin DIN plug. The data and power transmitted over this connection is proprietary to Optek
Music Systems, Inc. Please do not try to plug a MIDI
cable or MIDI plug into this jack or try to send any
MIDI information to your Fretlight neck. Doing so will result in severe damage
to your Fretlight guitar system and will VOID the warranty.
Your Fretlight Guitar Neck
Your Fretlight neck has a circuit board in between Optek’s advanced polymer
fretboard and maple neck. If you ever need to remove the neck from the body,
you will need to re-attach the internal cable with the GREEN wire on the left,
oriented as you look down the neck to the headstock.
Optional Fretlight Dual Footswitch
Integrating the optional Fretlight dual-footswitch
gives you hands-free control of your Fretlight
software. Simply plug the ¼” male jack from
the footswitch into the ¼” female jack on you
Fretlight-to-USB cable.
Cleaning Your Fretboard
The advanced polymer fretboard acts and behaves like a normal rosewood or
ebony fingerboard in many ways except, for example, cleaning and/or sanding.
Please only use a dry or damp cloth (water only) to clean any finger oil or
residue from your Fretlight fretboard. DO NOT use any solvents, oils, or fluids
other than water at anytime. Doing so will VOID the warranty. If you want to
blend any fingernail scratches that may occur naturally over usage and time,
we strongly recommend lightly sanding your fretboard with a scotch-brite pad,
or some fine steel wool-hand sanding only. If you use a powered sander or
sanding device on your Fretlight, you will VOID the warranty.
Because the fretboard is a polymer material, you may never experience any
fret migration and, for the most part, your Fretlight neck is going to remain
more straight and true than most all other wood fingerboard necks. The inert
dense polymer material will also provide your tone with an increase in the
natural sustain of the guitar.
11
Truss Rod Adjustment
Your Fretlight guitar is fitted with a two-way adjustable truss rod that is
accessible at the headstock.
Two-way truss rods allow you to adjust the neck into a back-bow or upwardbow aka “relief”.
1. Start by sighting down the length of the
neck. Looking from the base of the body
to the headstock to see if if the neck has
a back-bow or upward-bow (“relief”).
2. If you see a back-bow, you will need to
turn the truss rod counter-clockwise. If you
see too much “relief” or upward- bow,
you’ll need to turn the truss rod clockwise.
3. Before actually turning the truss rod,
loosen the strings.
4. While turning the truss rod you will not
be able to do a full circle but will make ¼
turns. We suggest three to four, ¼ turns
so that you can then tighten the strings
and take another look.
Special Note
The two-way truss rod has a period of neutrality from being bowed in either
direction. When adjusting the truss rod nut (that you are turning) may feel
loose like it is stripped or just turning freely-don’t worry. After 4 to 5, ¼ turns
the nut will “catch” and you will begin to feel tension again.
Remember
There is no exact amount of perfect “relief”. The relief on your guitar neck
will depend on what gauge strings you have and what kind of action you like
as a player as well as playing style. When it feels comfortable stop adjusting.
Being careful and taking your time when performing this procedure will
produce the best results. If you don’t feel confident in performing this
procedure you can have a guitar technician do so. Any local guitar shop should
have a guitar technician available.
12
Frequently Asked Questions (FAQ)
Q: I broke a string; what do I do now?
A: You will have to purchase another string, they are usually sold in a set of
six. Your local guitar store should have strings or you can purchase a set from
us at www.store.fretlight.com.
Q: What does the Optional Fretlight Dual Footswitch do?
A: It allows a player to have hands free operation of Fretlight software
functions. Note: The optional Fretlight footswitch is not functional with
Fretlight Lesson Player.
Q: How do I operate my Optional Fretlight Dual Footswitch?
A: You will need to set the action/function for the two footswitch selectors in
each of the program’s options or settings menu. To perform this action, begin
by choosing the action you wish the footswitch to perform and step on the
footswitch selection you wish to assign to that action. If the footswitch is not
responding, rotate the cable where the ¼" cable connects to the USB Y
connection while testing the foot pedal.
Q: How do I purchase more interactive video lessons?
A: You can purchase additional lessons either through your Authorized
Fretlight Reseller or direct from Fretlight at www.store.fretlight.com
Q: How can I choose additional scales in Improviser other than the 3 that
it automatically suggests?
A: Hold down the CTRL key and click the “P” (pattern) button in the upper
right of the Improviser screen. A window will pop up giving you the choice of
many more scales to use.
Q: How do I set the software to switch to a left-handed Fretlight?
A: All Fretlight software has the ability to correctly light-up a left-handed
Fretlight guitar. Look for a check box in the software or preferences/options
windows. Click on the guitar icon to switch to lefty in the Fretlight Player.
13
Important Service Note
for Guitar Technicians
Two-Way Truss Rod Adjustment
If you are performing a set-up or adjustment on a Fretlight please understand
that every Fretlight guitar has a two-way truss rod. Turning the truss-rod
performs the following action:
1. Clockwise-turning the truss rod in a clockwise direction will induce the neck
to form a back bow.
2. Counter Clockwise-turning the truss rod counter clockwise will induce a
forward or “upward” bow.
NOTE: When turning the truss rod from back bow to forward bow (or vice
versa) please realize that the truss rod will go slack. It will turn freely, as if it is
loose or stripped. After 4 to 5 more quarter turns of the truss rod it will “catch”
and begin to tighten and bow the neck in the opposite direction.
Other Set-Up Concerns
A Fretlight is a normal guitar in every way except for the polymer fretboard
and cable running from the neck to the back of the body. You can remove the
Fretlight cable from the neck if needed by pulling it straight out from the neck.
Please only use water to clean any finger oil or residue from the fretboard. DO
NOT use any solvents, oils, or fluids other than water at any time. If you have
any other questions regarding the Fretlight you are working on please feel
free to contact Customer Support at 800.575.6511.
14
Customer Care
Please feel free to contact us at anytime we appreciate your feedback!
Email
Sales, Support and Service: [email protected]
Live Chat
www.fretlight.com
Phone
1.800.575.6511
9:00 a.m. to 4:30 p.m. PST, Monday thru Friday
15
One Year Limited Warranty
Optek Music Systems, Inc. (herein “OPTEK”) warrants this product as stated below.
1. Terms and Conditions:
Except as provided below, OPTEK warrants solely to the original purchaser of this OPTEK
musical instrument that the instrument purchased shall be free from defects in materials and
workmanship under normal use for a term of one-year from the receipt of product as long as
the instrument is owned by the original purchaser and until the ownership of the instrument is
transferred to another. This Limited Warranty does not apply: (a) to wear and tear to or breakage
of frets, strings, nuts, saddle, batteries, or other damage or deterioration due to normal wear
and tear of the instrument or its parts, or to normal wear and tear or breakage of any part of
an instrument, including but not limited to controls, switches, jacks, plated surfaces, tuning
devices, pickguards or finish, or to any instrument case, gig bag, gig bag handles, zippers,
latches, case hardware, or finish; (b) to asserted defects or damage caused by modification,
misuse, neglect, abuse, accidents, acts of nature, or improper maintenance of the instrument or
its parts (OPTEK reserves the exclusive right to make such determination of misuse, modification,
or neglect based on inspection by OPTEK or an authorized OPTEK representative); (c) to asserted
defects involving subjective personal likes or judgments, including subjective opinions regarding
tonal characteristics of the instrument or grain characteristics or colors of woods; (d) to asserted
defects or damage to an instrument such as cracks, splitting, or warping of wood or damage to
the instrument’s finish caused by accident or exposure to changes in or extreme instances of
temperature or humidity, exposure to sunlight, moisture, body salts or acids, guitar straps, or
guitar stands or hangers which cause harm to the instrument; (e) to electrical components not
manufactured by OPTEK, (h) to setups, adjustments, or any routine maintenance, (i) to any
instrument whose serial number is missing, altered, or tampered with in any fashion, or (j) to
asserted defects or damage to an instrument which has had work performed on it by or has
been otherwise repaired or modified by a technician or repair person other than an OPTEK
certified technician at an authorized OPTEK service center.
2. Warranty Limitations:
THE OBLIGATIONS OF OPTEK HEREUNDER ARE LIMITED TO REPAIR OR REPLACEMENT OF PARTS
OF THE INSTRUMENT FOUND TO BE DEFECTIVE UNDER THIS LIMITED WARRANTY. IN NO EVENT
SHALL OPTEK BE LIABLE FOR ANY INDIRECT, INCIDENTAL OR CONSEQUENTIAL DAMAGES,
INCLUDING BUT NOT LIMITED TO TIME, WAGES OR LOST PROFITS, OF ANY NATURE OR KIND
OR FOR DAMAGES TO OR LOSS OF PROPERTY. OPTEK reserves the right to modify, refine, or
improve its instruments and pickup systems, including making mechanical and electrical
refinements, without incurring any responsibility to modify or exchange any products purchased
prior to such modifications. THIS LIMITED WARRANTY IS THE SOLE WARRANTY OF ALL OPTEK
MUSICAL INSTRUMENTS.
3. Obtaining Warranty Service:
To obtain warranty service, notice must be given within the warranty period. Proof or assignment
must be presented. The product, bearing its serial number, must be returned to OPTEK or its
designated repair facility once Return Authorization is provided to the customer by OPTEK. The
purchaser shall prepay shipping charges for the product returned for warranty service and
OPTEK shall pay for return of the product to the customer. The purchaser or his or her assigns
shall pay all shipping charges (to and from), duties, and taxes for products returned to OPTEK
from locations outside the United States of America.
16
4. No Other Warranties:
The Limited Warranty set forth herein constitutes the entire warranty and representation of
OPTEK with regard to the OPTEK products identified in the preceding paragraph. This Limited
Warranty shall be controlling over any conflicting terms and conditions of any purchase orders,
contracts or invoices which may be executed in connection with the purchase of any OPTEK
musical instrument or related product. NO representation or warranty made by any OPTEK
salesperson, dealer, agent, representative or employee shall be binding upon OPTEK other
than as set forth herein.
5. Legal Remedies:
Some states or provinces do not allow the exclusion or limitation of incidental or consequential
damages, so the above limitation may not apply. This warranty gives you specific legal rights,
and you may also have other rights which may vary from state to state, or province to province.
Optek and Fretlight are registered Trademarks of Optek Music Systems, Inc.
© 2012 Optek Music Systems, Inc. All rights reserved.
17