1
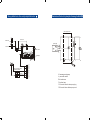
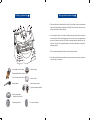
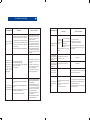
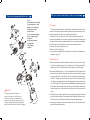
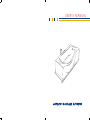
USER'S MANUAL
CONTENTS
Please read carefully before using
SAFETY NOTICE
Safety statement
Installation and operation
instruction
The creepage overload protector should be installed in the power supply.
The crust earth wire of the water pump should be well earthed.
Trouble shootig
It is forbidden to use the machine after having alcohol dring or hypnotic
medicine.
Maintenance
The children should be accompanied by their parents when using the
machine.
Water pump installation and
operation instruction
The parameters of the massage bathtub:
1.The steam generator: the rated
working voltage is
Ac220V.
Ac110V.
2.Frequency is
50Hz.
60Hz.
1.The applicable range of the
voltage:
Ac187V-256V
Ac100V-115V
Water pump : power750W
Transformer: transformation 9V power20W
The pool bottom lamp:voltage AC12V power20W
The pump flux:20 stere/hour
Illustration of the electric principle of massage bathtub
Message bathtub water flow control principle illustration
water pump crust
cold water
water fau
power plug
hot water
shower
head
overflow outlet
drawinage
massage
water pump
hydro-massage water
outlet nozzle4
hydro-massage water
regulating switch
M: massage water pump
k: pneumatic switch
Bk: transformer
D: bottom lamp
G1: the earth wire of water pump plug
G2: the earth wire of water pump crust
Fittings explanation
The operation instruction
1.A,B are cold and hot water control valves.They can be turned on at the same
time to adjust the water temperature.Then B can be used to choose to use
shower head(D) or water outlet(I).
2.J is pneumatic switch. It turned on/off the water pump and bottom lamp at
the same time. When the water pump is turned on, hydro-massage water
comes out from the nozzles (E). Water flows back through the net thus it begins to circulate. K is regulating switch controlling the power of the hydromassage water.
3.F is the drainage switch, which is used to drain the water.
4.H is the bottom lamp which makes it more convenient to use at night and
beautify the enironment.
A. hot water control valve
H. bottom lamp
B. water distribution control valve
C. cool water control valve
D. show head
I. water outlet
J. water pump switch
K. hydro-massage switch
E. hydro-massage
water outlet nozzle
F. drainage switch
G. water outlet net
Maintenance
1.Temperature
4.Prepare to use:
The massage bathtub is suitable for water beow 80 C.When using it,turn
on the cold water before turning on the hot water.
Please make the water level reach normal height (usually 10cm higher than
the nozzles), to prevent the pump from working without water. The direction
of the nozzles can be adjusted to your mind.
2.Maintenance
Maintenance of plated parts: Please use flannelet to rub them gently. Don't
use rough cloth to rub them.
Maintenance of the bathtub body: When scratches appear, 1500 # sand
paper can be used to rub it. Then polish the tub by toothpaste and flannelet.
5.Special notice:
When installing the bathtub, please make sure the metal parts are well earthed. The creepage overload protector should be installed in the power supply wire.
How to clean the net: Unscrew the net and remove it. Clean the net to make
the water flow smoothly. Do not use strongly corrosive chemical liquid (e.g. vitriol, muriatic acid or lye) to rub the net.
6.Note:
3.Installation:
First adjust the screws so that they reach the ground. Then make the bathtub level and fasten the screws. Fixing the four legs of the steel stand to reduce the vibration of pump. To prevent the pump or steel stand from translocation after long time use, rubber or some flexible material can be used as shockproof cushion. Seal the gap between the bathtub and the wall with glue.
Please note that the drainage tube can not be folded.
Before connecting the water pipe to the water inlet valve of the bathtub, please eliminate the impurities in the pipe such as rust. Take care not to damage the valve core.
Tr o u b l e s h o o t i n g
phenomenon
reason
1.The steel stand under the bathtub is not
balanced. The screws are not fastened.
Violent vibration
and too much
noise
2. The fastening screw or the shockproof
glue of the motor are incomplete or loose;
3. The water level does not reach the
norm al height.
4. There is something with wrong the motor.
The motor works
normally but no
water comes out
from the nozzles
or the water
pressure is not
high enough.
1. The not is partly jammed.
2. The water level is too low;
3. The hydro-massage water regulating
switch is turned off .
4. Other reasons.
2. The fuse is cut off the creepage switch
is off;
3.The pipe connecting the pneumatic switch
to the motor falls off or blows.
4. The pneumatic switch is broken.
phenomenon
1.Put the bathtub flatly on the
floor and adjust the screws to
m a k e t h e s t e e l st a n d l e v e l .
Fasten the screws.
2 . N o r m a l l y, t h e r e s h o u l d b e
fo u r a n d f o u r s h o c k p r o o f
cu s h i o n s t o f i x t h e m o t o r .
Fasten the loosen screws.
14.Dismantle the net and clean
it to make the wate r flow
smooth.
15.Increase the water level to
normal height (10cm higher
than all the nozzles).
1. a)Turn on the power;b) Insert
the motor power plug into the
special socket;
2.Ask a technician to check whether there is something wrong. If nothing wrong replace
the fuse or turn on the creepage overload protector.
3.Get the plastic pipe connected or replace it.
4. Ask an electrician to replace
the pneumatic switch.
reason
how to solve
a). The bulb is broken
The bottom lamp
does not work.
3.The normal height of the water
level should be 10cm higher
than the metal parts of the
nozzles.
16.Turn on the hydro-massage
water regulating switch.
1. The voltage is abnormal or the power is
off;
The motor of the
massage bath tub
can not be started.
how to solve
1. The water
pump works
but the lamp
doesn't
b).The connection line
breaks off
c).The transformer is
broken
2. Neither the pump nor the lamp
works.
The waterdistribution pump can
not be turned
completely.
The cold and hot
water valve can
not be inlet turned
completely.
2. Check the massage motor following
the process when the motor can not
be started.
The rubber ring in the valve is
distorted or worn out .
Replace it.
The magnetic core is worn out.
Replace it.
The crystal handwheel is loose.
The drainer can
not jump up,or
leaks.
1. a).Replace the bulb;
b).Get the line connected.
c).Replace the transformer
Press the screws on the top of the wheel
and screw them clockwise.
1. The screw is loosen or adjusted
too low;
2. The drainer's drawing cable is
broken.
3. The cushion is uneven.
1. Put off the drainer's stopper screw it or
adjust the screw to suitable position.
2. Replace the whole set.
3. Dismantle the drainer then adjust it to
be even reinstall it.
The water pump installation
1) nut
2) connection tube ( 11/2"tube)
3) connection tube (1" tube)
4)&9)& 15) "O" shape ring
5) stainless steel bolt
6) stopper head
7) cover, the siphon, SB type
8) cover, siphon, SC type
10) impeller
11) airproof groupware
12) pump body
13) centrifugal
14) motor
How to install and operate the water pump
I.Dismantle
The repair of the water pump should be done by professional worker. This
instruction can help to repair and install the water pump.Dismantle of the pump should follow the instruction supplied by the producer.
1.Demount 6 bolts (5), remove the cover(7) (8) from the pump body (12).
2.Demount the impeller anti-clockwise. Insert the screwdriver into the gap at
the axis end of the motor to withstand the motor axis, to remove the impeller.
3.Loosen 4 bolts on the back of the motor to removethe pump body.
4.Demount the airproof groupware (11)
5.Demount the "O" shape ring
6.Push out the fix sealing block from the back of crust (12) and check the centrifugal oil ring (13)
II.Reinstallation
1.Before reinstallation, please check the centrifugal oil ring (13), the impeller (10), the airproof groupware (11), and the cover "O" shape ring (9).Replace them if worn. Clean the surface of the airproof cavity thoroughly.
Notice
The above picture illustrates the
name of each part. If the fittings are
needed, please specify the name and
number of the parts. Also please specify
the type and special number of the pump
which is indicated on the label of the pump).
2.Encase the fix sealing block ---- take a small ball with RTV glued seal to the
brass axis cover, push the airproof block into the airproof cavity.It's enough
to press by the figure. Clean the RTV on the surface of the seal thoroughly.
Put the "O" shape ring to the brass axis cover on the fix sealing block (the
"O" shape ring must be stick close to the flange side). Put some rubber lube
( e.g. P80) on the "O" shape ring for easy installation(the gasoline type lube
is forbidden). Take a plastic lining and firmly put it to the flange bound of the
brass sealing block. Push the total seals to the crust's seal cavity of the
motor.
3.Clean the hub. use water to clean the circumgyrating sealing block.Evenly
push the hub by the finger. The screwdriver and other hard tools are not allowed to be used to prevent the sealing block from being damaged.
4.According to the picture, push the centrifugal oil ring (13) from the axis shoulder to the suitable position.
5.Use 1/16 ball bearing and RTV sealing glue. The sealing glue should be
360 degrees in touch with the axis and the centrifugal oil ring. Keep the
sealing glue for 15 minutes.
6.Install the crust (10). Screw down 4 inserting bolts.
7.Screw the impeller down to the axis. The axis cover pushes the certrifugal
oil ring, which is sealed to the impeller by the RTV glue.
8.Install "O" shape ring (9) to the cover (7) (8).
9.Put the cover (7) (8) in position. Screw down 6 bolts (5).
10.Let the RTV to be hard set for 1 hour before the motor can be started, otherwise the RTV glue will be thrown away. If the water pump is not used in
the CSA bath series, the RTV glue need not to be used.
III. Clue on
We are not responsible for any faults resulted in the using of water pump
and motor without following the operation instructions.Please read the statement carefully before starting the pump.
1.Do not use sealing glue with stone base to the cannulation screw thread.
Please use the RTV silicone sealant, which is specially used in the plastic
fluorin whorl strap. When putting sealant, be carefully not to drop into the
pump to prevent from wrongly sticking to other parts.
2.When the water level in the pump is lower than the nozzles, it is not allowed to start the pump.
3.Please check if the motor circuit diagram, the power voltage and the power
plug are up to the standard.
4.All the metal parts 1.5 m away from the bath should be earthed with the motor.The earth line should be copper wire not thinner than 1.5 square millimeters.
5.The earthing lines inside the room should be copper wire not thinner than
4.0 square millimeters.
Notice: All lines must be fixed according to standard by the professional electrician. The motor must be earthed.
Please keep this explanation
The following basic preventive measures should be followed when
installing and using the electric product.
1.Read and follow the instruction.
2.Warning --- any children without adult accompanying them can not use this
product.
3.All installation of motor power lines should be done by the qualified electrIcian.
4.The motor that drives the pump can work under high temperature.Don't touch the motor's crust to prevent from scald.
5.Make sure that the water level should be higher than all the nozzles.
6.This product can only connect to the power that protected by GFCI (the Ground Fault Current Interrupter), which should be checked and installed by
the qualified electrician, and operated according to the instructions.
7.Do not let anything drop into the gaps between the pump and motor.
8.The water pump can not be refitted, added or deleted.
9.The air switch driver (the push and press style air cell switch) should be installed above the highest position of the bath when the pump is used.
10.One connection bolt inside the connection box should be earthed to the
earth end of the power circuit board, using the same line with the power
wire,which should not be thinner than 1.5 square millimeters.
11.Warning --- to prevent from getting an electric shock, the earthing type socket protected by the GFCIshould be used.
12.Warning --- to prevent from getting an electric shock, the worn out wires
should be changed in time.
13.Warning --- to prevent from getting an electric shock,, do not use the extend wire to connect the power. The suitable socket position is required.
[ Please keep this instruction]