1
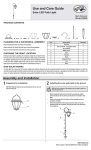
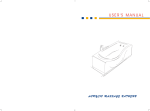
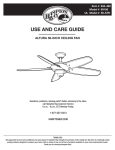
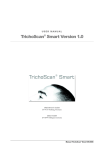
Item #1001 262 100
Model #99940
Use and Care Guide
40 Lumen Solar Flag Light
PACKAGE CONTENTS
A
D
C
B
PLANNING FOR A SUCCESSFUL ASSEMBLY
E
F
G
H
I
Part
Description
Quantity
Read all instructions before assembly and installation.
A
Flag light head with post
1
Inspect each part for defects that may have occurred during shipping.
B
Solar panel with post
1
C
Fixing bracket with connector
2
D
Bracket
2
CHOOSING THE RIGHT LOCATION
E
Wall anchor
4
Install your solar light in a location with full, direct sunlight. Do not install the solar
panel in shaded areas as these areas will not allow the battery to fully charge and
reduce the nighttime operating hours for your light. Ensure that the installation
location is away from other nighttime light sources such as street or porch lamps.
These light sources may prevent your solar light from automatically turning on.
F
Screw
4
G
Bolt
4
H
Wing nut
4
I
800mAh LiFePO4, 18500 rechargeable
battery (pre-installed)
1
Keep your receipt and these instructions for proof of purchase.
HOW SOLAR WORKS
The solar light has a solar panel that converts sunlight into electricity. During the day, the converted electricity is stored in the rechargeable battery.
At night, the solar light is powered by the battery using the electricity stored during the day. The operating time depends on geographical location,
daily weather conditions, and season. For optimal performance during the evening, allow the battery to charge for 6 to 7 hours in direct sunlight.
Assembly and Installation
1
Preparing for installation
□□
Open the battery cover (1) of the solar panel
to remove the pull tab (4) (first time use
only). This will allow the battery to make a
connection and become active.
Loosen, but do not remove the connector (2)
on the fixing bracket (C).
Put the connecting post of the flag light
(A) into the fixing bracket (C) and twist the
connector (2) clockwise until it is tight.
Repeat the previous step to connect the
solar panel (B) to the other fixing bracket (C).
□□
□□
□□
1
2
Installing the flag light on
a wall (Option 1)
NOTE: Different mounting options allow for
various lighting angles. Choose the best
option for your application.
NOTE: For wood installation, use the screws
(F) only. The wall anchors are not necessary.
□□
□□
□□
Drill a 1/4 in. diameter hole, 1 in. in depth, into
the mounting area for the wall anchor (E).
Align the fixing bracket (C) with wall anchor (E),
and use the screws (F) to mount the solar panel
(B).
Repeat the previous steps to mount the flag
light (A).
4
B
2
Installing the flag light on a
post (Inline option)
□□
Place the fixing bracket (C) of the flag light
(A) and the fixing bracket (C) of the solar
panel (B) against the post.
Install the bolts (G) through the fixing
brackets (C) and fasten the wing nuts (H)
onto the bolts (G), twisting them clockwise
until tight.
□□
A
H
C
G
C
B
H
G
2
C
A
E
C
F
B
2
C
B
E
C
F
1
A
HAMPTONBAY.COM
Please contact 1-855-HD-HAMPTON for further assistance.
Assembly and Installation (continued)
2
Installing the flag light on a
post (offset option)
□□
Mount fixing bracket (C) of the flag
light (A) and the bracket (D) against
the post.
Install the bolts (G) through the fixing
G
bracket (C) and the bracket (D) and
fasten the wing nuts (H) on the bolts
C
(G), twisting them clockwise until tight.
Repeat the previous step to mount the
solar panel (B) to the post.
D
□□
□□
3
A
□□
B
□□
G
G
G
Connecting the flag light
Open the rubber cover (5) on the
underside of the solar panel (B).
Insert the wire (3) from the flag light
(A) into the underside of the solar
panel (B) and twist the whorl cover
(6) clockwise until it is tight.
B
5
A
6
3
C
H
H
D
H
H
Maintenance
Replacing the battery
CAUTION: When replacing the battery, use a 800mAh
LiFePO4, 18500, 3.2V rechargeable battery.
1
IMPORTANT: Dispose of the battery in accordance with
local, state, and federal regulations.
□□
□□
□□
Open the battery cover (1) on the solar panel (B).
Replace the old battery with a fresh 800mAh LiFePO4,18500, 3.2V rechargeable battery.
Replace the battery cover (1) on the solar panel (B).
I
Charging the battery
□□
□□
For optimum performance, it is best to install the solar light in full sunlight and let it charge for
10-12 hours.
Allow the light to run at least 8-12 entire charging and discharging cycles to reach the
maximum capacity of the battery.
Winter tips
□□
Keep debris and snow off the solar panel to allow the battery to recharge. If lights have been
covered by snow for a long time, allow the battery to recharge in full, direct sunlight for at
least 10-12 hours so it can maintain maximum capacity.
Care & Cleaning
□□
Clean the solar panel with a damp cloth. Do not use any chemicals or abrasives.
Troubleshooting
Problem
The nightly runtime for the lights is shorter.
Solution
□□
□□
The lights do not turn on in the evening.
□□
The battery is not adequately charged. Locate the solar light in an area where it can receive the
maximum amount of full, direct sunlight every day.
The battery is reaching the end of its useful life. Replace the old battery with new battery.
The solar panel is installed close to other light sources. Relocate the solar panel or eliminate the other
light sources.
Warranty
The manufacturer warrants this product to be free for two (2) years against any defects that are due to faulty materials or workmanship. This warranty applies only
to the original consumer purchaser and only to products used in normal use and service. If this product is found to be defective, the manufacturer’s only obligation,
and your exclusive remedy, is the repair or replacement of the product at the manufacturer’s discretion, provided that the product has not been damaged through
misuse, abuse, accident, modifications, alterations, neglect or mishandling. This warranty shall not apply to any product that is found to have been improperly
installed, set up, or used in any way not in accordance with the instructions supplied with the product. This warranty shall not apply to a failure of the product as
a result of an accident, misuse, abuse, negligence, alteration, or faulty installation or any other failure not relating to faulty workmanship. This warranty shall not
apply to the finish on any portion of the product, such as surface and/or weathering, as this is considered normal wear and tear. The manufacturer does not warrant
and specifically disclaims any warranty, whether expressed or implied, or fitness for a particular purpose, other than the warranty contained herein. The manufacturer specifically disclaims any liability and shall not be liable for any consequential or incidental loss or damage, including any labor/expense costs involved in the
replacement or repair of said product.
Contact the Customer Service Team at 1-855-HD-HAMPTON or visit www.hamptonbay.com.
2
Artículo núm. 1001 262 100
Modelo #99940
Guía de uso y mantenimiento
Lámpara solar para bandera, 40 Lúmenes
CONTENIDO DEL PAQUETE
A
D
C
B
CÓMO PLANIFICAR
UN ENSAMBLAJE EXITOSO
E
F
G
H
I
Pieza
Descripción
Cantidad
A
Cabezal de luz para bandera con poste
1
B
Panel solar con poste
1
C
Soporte fijador con conector
2
D
Soporte
2
CÓMO ELEGIR LA UBICACIÓN ADECUADA
E
Anclaje para pared
4
Instala tu lámpara solar en un lugar que reciba luz solar plena y directa. No
instales el panel solar en áreas de sombra pues las baterías no se cargarán
completamente y se reducirán las horas de funcionamiento nocturno. Asegúrate
de instalar la lámpara lejos de otras fuentes de luz nocturna, como luces públicas
o luces de porche. Estas fuentes de luz pueden evitar que la lámpara solar se
encienda automáticamente.
F
Tornillo
4
G
Perno
4
H
Tuerca de mariposa
4
I
Batería recargable de fosfato de litio
18500, de 800 mAh (preinstalada)
1
Lee todas las instrucciones antes de ensamblar e instalar.
Verifica que ninguna de las piezas haya sufrido daños durante el envío.
Conserva el recibo y estas instrucciones como comprobante de compra.
CÓMO FUNCIONA LA TECNOLOGÍA SOLAR
La lámpara solar tiene un panel solar que convierte la luz diurna en electricidad. Durante el día, la electricidad convertida se almacena en las
baterías recargables. De noche, la lámpara solar usa la electricidad que las baterías almacenaron durante el día. El tiempo de funcionamiento
depende de la ubicación geográfica, las condiciones climáticas diarias y las estaciones. Para un rendimiento óptimo durante la noche, deja que las
baterías se carguen de 6 a 7 horas en la luz solar directa.
Ensamblaje e instalación
1
Cómo prepararse para
la instalación
□□
Abre la cubierta de la batería (1) del panel
solar para quitar la lengüeta (4) (sólo cuando
se usa por primera vez). Esto permitirá que
la batería haga conexión y se active.
Afloja, pero no quites, el conector (2) del
soporte fijador (C).
Coloca el poste conector de la luz para
bandera (A) en el soporte fijador (C) y gira el
conector (2) en sentido de las manecillas del
reloj hasta que quede fijo.
Repite el paso anterior para conectar el
panel solar (B) al soporte fijador (C).
□□
□□
□□
1
Cómo instalar la luz para
bandera en una pared
(Opción 1)
NOTA: Las diferentes opciones de montaje
permiten variar los ángulos de iluminación.
Selecciona la mejor opción, dependiendo
del uso.
NOTA: Para instalar en madera, usa
solamente los tornillos (F). Los anclajes de
pared no son necesarios.
□□
□□
□□
4
B
2
Taladra un orificio de 1/4 de plg de diámetro, de
2.5 cm de profundidad, en el área de montaje
para el anclaje de pared (E).
Alinea el soporte fijador (C) con el anclaje de
pared (E) y monta el panel solar (B) con los
tornillos (F).
Repite los pasos anteriores para montar la luz
para bandera (A).
2
Cómo instalar la luz para
bandera en un poste
(opción en línea)
□□
Coloca el soporte fijador (C) de la luz para
bandera (A) y el soporte fijador (C) del panel
solar (B) contra el poste.
Instala los pernos (G) por los soportes
fijadores (C) y asegura con tuercas de
mariposa (H) en los pernos (G), girándolas
en sentido de las manecillas del reloj hasta
que queden fijas.
□□
A
H
C
G
C
B
H
G
2
C
A
E
C
F
B
2
C
B
E
C
F
1
A
HAMPTONBAY.COM
Para obtener asistencia, llama al 1-855-HD-HAMPTON.
Ensamblaje e instalación (continuación)
2
Cómo instalar la luz para bandera
en un poste (opción suspendida)
□□
Monta el soporte fijador (C) de la
luz para bandera (A) y el soporte (D)
contra el poste.
Instala los pernos (G) por el soporte
G
fijador (C) y el soporte (D) y asegura
con tuercas de mariposa (H) en los
C
pernos (G), girándolas en sentido de
las manecillas del reloj hasta que
queden fijas.
D
Repite el paso anterior para montar el
H
panel solar (B) al poste.
□□
□□
3
A
□□
B
□□
G
G
G
C
H
Cómo conectar la luz
para bandera
Abre la cubierta de goma de la
batería (5) en la parte inferior
del panel solar (B).
Inserta el cable (3) de la luz para
bandera (A) en la parte inferior del
panel solar (B) y gira la cubierta
circular (6) en sentido de las
manecillas del reloj hasta
que quede fija.
B
5
A
6
3
D
H
H
Mantenimiento
Cómo reemplazar la batería
PRECAUCIÓN: Al reemplazar la batería, usa una (1) batería
recargable de fosfato de litio 18500, de 800 mAh y 3.2 V.
1
IMPORTANTE: Desecha la batería conforme con
las regulaciones locales, estatales y federales.
□□
□□
□□
Abre la cubierta de la batería (1) del panel solar (B).
Remplaza la batería vieja por una nueva recargable, de fosfato de litio 18500, de 800 mAh y 3.2 V.
Vuelve a colocar la cubierta de la batería (1) del panel solar (B).
I
Cómo cargar la batería
□□
□□
Para un funcionamiento óptimo, es mejor instalar la lámpara solar cuando haya luz solar total
y dejarla cargar de 10 a 12 horas.
Deja que la luz funcione en ciclos completos de carga y descarga de al menos 8 a 12 horas
para alcanzar el máximo de capacidad de la batería.
Consejos para el invierno
□□
Quita los desechos y la nieve del panel solar para permitir que se recargue la batería. Si la
nieve ha cubierto las luces durante mucho tiempo, deja que la batería se recargue con luz
solar directa y total durante al menos 10 a 12 horas para que pueda funcionar al máximo de
su capacidad.
Cuidado y limpieza
□□
Limpia el panel solar con un paño húmedo. No uses ningún químico ni producto abrasivo.
Solución de problemas
Problema
Las luces funcionan por menos tiempo.
Solución
□□
□□
Las luces no encienden en la noche.
□□
La batería no está debidamente cargada. Asegúrate de que el producto esté colocado en una zona
donde pueda recibir la cantidad máxima de luz solar directa y total todos los días.
La batería está llegando al final de su vida útil. Reemplaza la batería vieja por una nueva.
El panel solar está instalado cerca de otras fuentes de luz. Cambia la ubicación del panel solar o quita
las otras fuentes de luz.
Garantía
El fabricante garantiza que este producto no presentará defectos debido a materiales o fabricación defectuosos, durante dos (2) años. Esta garantía es válida sólo
para el comprador original y sólo cubre productos en uso y funciones normales. Si se descubre algún defecto en este producto, la única obligación y solución
exclusiva del fabricante, a criterio del mismo, será reparar o reemplazar el producto, siempre y cuando el defecto no sea resultado de un mal uso, abuso, accidente,
modificaciones, alteraciones, negligencia o manejo indebido. Esta garantía no cubre ningún producto instalado, configurado o usado incorrectamente sin seguir
las instrucciones adjuntas al producto. Esta garantía no cubre fallas del producto a consecuencia de un accidente, mal uso, abuso, negligencia, modificaciones o
instalaciones defectuosas, o cualquier otra falla no relacionada con defectos de fabricación. Esta garantía no se aplica al acabado de ninguna parte del producto,
como por ejemplo el de la superficie, ni al deterioro por condiciones ambientales, ya que eso se considera un desgaste normal. El fabricante no garantiza y se exime
especialmente de cualquier garantía, explícita o implícita, de la capacidad del producto de asumir una función específica, distinta de la indicada en la garantía
incluida en la presente. El fabricante se exime específicamente de cualquier obligación y no es responsable de daños o pérdidas directos o indirectos, incluidos
cualquier costo de mano de obra o gastos relacionados con el reemplazo o reparación de dicho producto.
Comuníquese con el equipo de servicio al cliente al 1-855-HD-HAMPTON o visite www.hamptonbay.com.
2