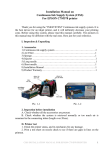
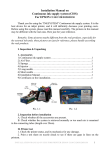
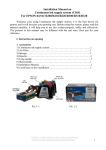
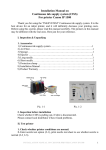
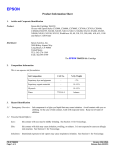
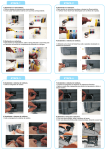
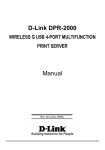
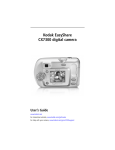
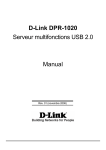
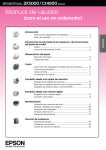
1
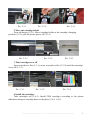
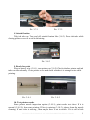
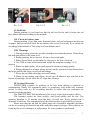
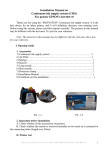
Installation Manual on
Continuous Ink Supply System (CISS)
For printer EPSON
CX7400/CX8400/CX9400FAX/CX5000/CX6000/CX7000F
DX7450/DX8450/DX4000/DX4400/DX5000/DX6000/DX7000F
CX7300/CX8300/CX3900/CX4900/CX5900/CX6900F/CX5500
Thank you for using the “INKSYSTEM” Continuous ink supply system. It is the
best device for an inkjet printer, and it will definitely decrease your printing costs.
Before using this system, please read this manual carefully.
Note: The pictures in this manual may be different with the real ones. Here just
for your reference. Especially ink tank (1- 2), printer surface, cartridge model and tube
etc.
I. Instruction
1. Accessories
1) Continuous ink supply system ………………………………………….1
2) Air Filter ………………………………………………………………..1
3) Sponge ………………………………………………………………….1
4) Injector ………………………………………………………………….1
5) Long needle ……………………………………………………………..1
6) Short needle …………………………………………………………….1
8) Installation Manual ……………………………………………………..1
9) Certificate on free installation…………………………………………..1
Pic. 1-1
INSTALLATION MANUAL ON CISS FOR PRINTER EPSON CX8400
1
Pic. 1-2
II. Test printer
1. Check printer status to see whether it is normal or not, and check its mechanics
for any damage.
2. Print a test sheet on nozzle check to see if gaps appear on lines in the printout.
Pic. 2-1
Pic. 2-2, 2-3
3. If printer is alright, please print a picture to see the result.
Note: This system will not cause any damage to your printer.
III. Installation Procedure
l Prepare System
Put the system on the right side of the printer. Tidy up ink tube (3-1 -1), pull out
air plugs and keep them well for next use (3-1-2), install air filters (5pcs) (put them with
the bigger side) (3-1-3).
2
INSTALLATION MANUAL ON CISS FOR PRINTER EPSON CX8400
Pic. 3-1-1
Pic. 3-1-2
Pic. 3-1-3
2 Move out cartridge holder
Press ink button (3-2-1). Move cartridge holder to the cartridge, changing
position (3-2-2), pull the printer power off (3-2-3).
Pic. 3-2-1
Pic. 3-2-2
Pic. 3-2-3
3 Take cartridge cover off
Insert screwdriver like (3-3-1), screw screwdriver like (3-3-2) until take cartridge
cover off (3-3-3).
Pic. 3-3-1
Pic. 3-3-2
Pic. 3-3-3
4 Install ink cartridges
Take cartridges out (3-4-1). Install CISS cartridges according to the printer
indication and press cartridge down to the place (3-4-2, 3-4-3).
INSTALLATION MANUAL ON CISS FOR PRINTER EPSON CX8400
3
Pic. 3-4-1
Pic. 3-4-2
Pic. 3-4-3
5 Attach rack
Tear sponge seal off (3-5-1).Tidy up ink tube. Stick rack on the printer cover like
(3-5-2). Make sure that tube and rack will not fall off while printing. Do not twist ink
tube (3-5-3).
Pic. 3-5-1
Pic. 3-5-2
Pic. 3-5-3
6 Check tube
Move cartridge holder to left side (3-6-1), then to right side (3-6-2), check if the
tube is too long or too short. Move cartridge holder to right side, check if ink tube will
fall down during movement, if fall down, then the holder will be blocked during
printing. Generally, before shipment, we have adjusted the tube to the right size, please
double check before printing.
Pic. 3-6-1
Pic. 3-6-2
If step 6 is normal, then there is no need to do this step. If its length is too short (3-7-1),
If it’s length is too long (3-7-2), redo step 6 and adjust tube to a good condition.
4
INSTALLATION MANUAL ON CISS FOR PRINTER EPSON CX8400
Pic. 3-7-1
Pic. 3-7-2
8 Attach fixation
Tidy ink tube up. Tear seal off, attach fixation like (3-8-3). Press ink tube while
closing printer cover to avoid it deforming.
Pic. 3-8-3
9. Ready for print
Plug on power wire (3-9-1), turn printer on (3-9-2).Check whether printer and ink
tube can run normally. Close printer cover and check whether it is strange noise while
printing.
Pic. 3-9-1
Pic. 3-9-2
10. Test printer nozzle
Enter printer nozzle inspection option (3-10-1), print nozzle test sheet. If it is
normal (3-10-2)), then start printing. If line is missing (3-10-3), please clean the nozzle
cleaning. If one color is missing , then maybe there is air in nozzle. If it is still a little
INSTALLATION MANUAL ON CISS FOR PRINTER EPSON CX8400
5
line missing after cleaning, please turn printer off and let it stay turned off for one hour
or more. Please contact your local distributor if still have problem.
Pic. 3-10-1
Pic. 3-10-2, 3-10-3
IV. Ink Amount Reset
It requires to change cartridges while printing (4-1-1) and ink light flash (4-1-2).
Press ink button to move out cartridge holder. Press chip reset button for 3 seconds (41-3), repress ink button to move back cartridge holder, then ink amount shows 99%
again. Redo nozzle inspection and printer can run normally if it is alright. (Black and
other colors can be handled by the same method).
Pic. 4-1-1
Pic. 4-1-2
Pic. 4-1-3
V. Removing used continuous ink supply system
Replace air filters with air plugs (5-1-1).Move out cartridge holder and take the
rack off. Take the cartridges out (5-1-2) and place the cartridges on the tissue with the
ink flow nozzle downwards, and let the tissue at the same level with the system ink tank
(5-1-3).
6
INSTALLATION MANUAL ON CISS FOR PRINTER EPSON CX8400
Pic. 5-1-1
Pic. 5-1-2
Pic. 5-1-3
VI. Refill ink
During printing, if you found out that the ink level in the tank is below the red
line, please add ink according to the methods.
VII. Check air balance tube
During printing, if you find some abnormal cases, such as bad output, ink drip out
on paper, then you need to check the air balance tube to see if exist ink. If yes, please do
according to the manual of "ink pump out from balance tube”.
VIII. Warnings
1. During printing, please do not take cartridges over than the printer. Please keep
ink tank and printer in the same level.
2. During printing, do not inverse, lift up or lower ink tanks.
3. Please do not block up ink tanks for curiosity or for fear of less ink
4. Use CISS at clean environment and within the temperature range 15-35
degrees.
5. Please use high-quality ink to prolong and to increase printing quality.
6. During shipment or storage, please do not turn the system over and always have
the holes sealed with plugs, to prevent ink leakage.
7. Please do not shake cartridges to avoid leaking.
8. Please do not unplug joint elbow, do not tear off adhesive tape seal that at the
bottom of cartridge, do not touch the IС chips that sideways.
IX. Product Warranty
INKSYSTEM warrants its products to be free from defects in material or
workmanship. Rarely the equipment partly or completely fails within the warranty
period. In these cases we do everything possible to ensure that our customers are
satisfied with the purchase.
The INKSYSTEM CISS installation is free in any of the representative offices.
The warranty repairs are done quickly, with good quality and for free. The
warranty duration is 12 months from the date of retail sale. Every product has a
Warranty Certificate. The transportation of the failed product is provided by its owner.
Please note that the ink and the photo paper are expendable materials and there
can be no returning of unsealed ink tanks and photo paper packages. When defects are
found by the service managers, a replacement for a new product is performed.
INSTALLATION MANUAL ON CISS FOR PRINTER EPSON CX8400
7
Please adhere to the following points to receive a warranty service as soon as
possible:
When accepting the product check if the warranty certificate is filled in correctly.
Keep the original receipt that contains the date of purchase information.
Adhere to operating conditions that are provided in the User’s Manual, or on the
web-page of the specific product.
Try to avoid mechanical damages when operating the product: chippings, dents,
fractures, scratches, etc.
Demonstrate the failed device to the service center managers (the warranty repair
or replacement can be provided only upon the failed product availability).
Ensure that the service center gets the product with its full set: descriptions, chips,
tubes, etc.
We cannot provide a warranty repair under several conditions:
If the warranty certificate is wrongly filled in.
If the device has mechanical damages: chippings, dents, fractures, scratches, etc.
If the identification information was removed or the information identification
has been complicated in any possible way: additional notes, stickers, etc.
If the user has previously performed a repair or change in the internal parts of the
device.
If the equipment has previously been repaired in a service center that is not an
«INKSYSTEM» representative center.
If the device was installed by the user.
If the defect appeared under the circumstances of insuperable forces, accidents,
intended or careless actions of the user or a third party.
If the ink used was not manufactured by “INKSYSTEM” (South Korea)
If the printing limit was exceeded – more than 100 000 prints.
Warranty certificate
(Product)
Continuous ink supply system
Seller company
(Model Name)
_____________________________________
(Serial №)
_____________________________________
(Date of Purchase)
_____________________________________
SEAL
(Warranty Period)
1 year from the date of retail purchase
The warranty conditions are agreed and accepted. No claims against the product appearance
and the list of equipment.
8
INSTALLATION MANUAL ON CISS FOR PRINTER EPSON CX8400