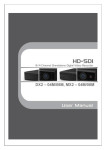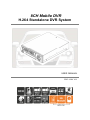
1
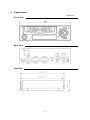
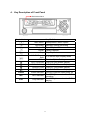
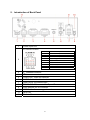
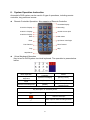
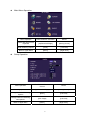
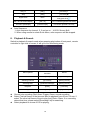
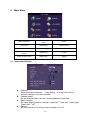
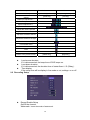
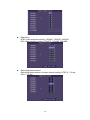
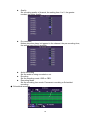
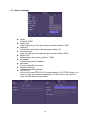
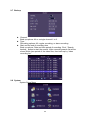
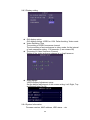
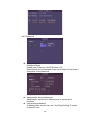
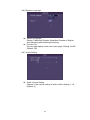
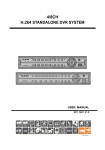
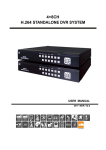
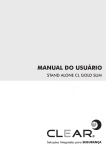
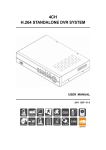
8CH Mobile DVR H.264 Standalone DVR System USER MANUAL 2013 JAN V1.1 1 CONTENTS 1. Features................................................................................................... 1 2. Specification ............................................................................................ 2 3. Appearance ............................................................................................. 3 4. Key Description of Front Panel ................................................................ 4 5. Introduction of Back Panel ....................................................................... 5 6. System Operation Instruction................................................................... 6 7. Display Mode ........................................................................................... 8 8. Playback & Search ................................................................................ 10 9. Main Menu ............................................................................................. 12 9.1 Camcorder Settings ............................................................................ 12 9.2 Recording Setup ................................................................................. 14 9.3 Sensor Detection ................................................................................ 17 9.4 Motion Detection ................................................................................. 18 9.5 Network Settings................................................................................. 19 9.6 Log Search ......................................................................................... 21 9.7 Backup ................................................................................................ 22 9.8 System ................................................................................................ 22 9.8.1 Time Setup .................................................................................... 23 9.8.2 Hard disk management ................................................................. 23 9.8.3 Display setting ............................................................................... 25 9.8.4 System Information ....................................................................... 25 9.8.5 User management ......................................................................... 26 9.8.6 System Language ......................................................................... 27 9.8.7 Audio Setting ................................................................................. 27 9.8.8 System Maintenance ..................................................................... 28 10. Player Description .................................................................................. 29 0 1. Features Video image output, enable to replay and playback from DVR device. Enable recording by multiple formats, including Audio In/Out functions. The most user-friendly software player, easy to operate. The fully complete and reliable event log to search image easily. Completely time and date records can be display on the monitor directly. Multiple voltage input design can be used in any type of vehicles. Auto recording while power on, without any operation. The image files are designed to be recorded in removable 2.5 inch SATA HDD, which is for anti-shock purpose, to completely prevent shocking while driving. Four Alarm in, built-in buzzer. Upgrade firmware by USB drive directly. Recording image and voice while driving, instantly gathering driving info at any time. Auto-formatting new HDD when system startup; after formatting, it will start recording. IR remote controller, available for multiple languages Extend-recording function while power off, this can be setup by the control display interface. 1 2. Specification Item Video Format Video Input Camera Power Output Description NTSC PAL st nd 8 CH Input (1 , 2 Harness connectors) Power supply 8 sets, 12V/250Ma (1st , 2nd Harness Connectors) Video Output 1 CH / 3rd Harness Connector or AV Terminal Audio Input 1 CH / 3rd Harness Connector or AV Terminal Audio Output 1 CH / 3rd Harness Connector or AV Terminal Alarm Input 4 CH Alarm In / 3rd Harness Connector Alarm Output Operation Mode Buzzer Graphical Interface, Multiple Languages Display Mode Full Screen / Quarter Screen / Nine Split Screen Multiple Mode Recording / Playback / Network Display Resolution 720 x 480 720 x 576 Highest 720 x 480 720 x 576 High 720 x 240 720 x 288 Normal 360 x 240 360 x 288 480 fields/s (8x60 fields/s) 400 fields/s (8x50 fields/s) Max.30fps @CIF (real time recording) / Channel Max. 30fps @CIF (real time playback) / Channel Max.25fps @CIF (real time recording) / Channel Max. 25fps @CIF (real time playback) / Channel Recording Resolution Display Frame Recording Frame Playing Frame Compression Format H.264 Operating System Embedded Linux Hard Disk Backup Search 1 (Min.) ~ 5 (Max.) Removable SATA 2.5” HDD x 1 USB 2.0 Flash Memory Stick, HD tray Mode Time/Date/Event Log Search image Full Screen Key / Indicator 9/3 Motion Detector Yes Signal Loss Detector Yes RS485 System Monitoring Control Method Power Supply 2P terminals Automatic recovery recording while power on/off IR Remote Controller / Mouse DC 8V ~ 36V (ACC power-off delay by software settings: Max. 20 minutes) (Using the vehicle 3P female power jack) 3G Network Dimension Default Maintenance 195mm X 257.1mm X 64.5mm (W X D X H ) Weight 2.45 KG without HDD Operation Temperature -20℃~+65℃ 2 3. Appearance Unit: mm Front View Back View Side View 3 4. Key Description of Front Panel HDD Socket Rack Key Indicator Main Menu Key Definition Startup/Return Menu Option Recording Manually Startup Recording Playback Pause POWER Open Playback Files Pause Playback Stop 4 / 8 CH Screen Spilt Enter CH1 / CH5 Key CH2 / Ch6 Key CH3/CH7 Key CH4/CH8 Key Power Indicator REC REC Indicator PLAY Play Indicator Stop Playback 4 / 8 Screen Spilt Display Mode Function/Option Setting CH1/CH5 Full Screen Display CH2/CH6 Full Screen Display CH3/CH7 Full Screen Display CH4/CH8 Full Screen Display The LED lights on when power on The LED lights on when the DVR is recording The LED lights on when the DVR is playing 4 5. Introduction of Back Panel 1 Power Input Port 3nd Harness Connector 2 3 4 5 6 7 8 9 10 11 12 Port 1. Port 2. Port 3. Port 4. Port 5. Port 6. Port 7. Port 8. Port 9. Port 10. CH 1 Alarm Input CH 2 Alarm Input CH 3 Alarm Input CH 4 Alarm Input Grounding VIEDO-OUT。 VIEDO-GND。 AUDIO-IN。 AUDIO-OUT。 AUDIO-GND。 2nd Harness connector 1st Harness connector VIDEO OUT: Video out terminal AUDIO: Audio in/out terminal USB Port for 3G module input RS-485: RS-485 connector for Speed Dome use. LAN: Network RJ-45 connector USB Port for firmware upgrade and mouse use. GPS Port Radiator Fan 5 6. System Operation Instruction Automobile DVR system can be used in 3 type of operations, including remote controller, key panel and mouse. Remote Controller Operation– Key mapping of Remote Controller CH2/CH6 Display CH1/CH5 Display Recording CH3/CH7 Display 4/8 CH Screen Spilt CH4/CH8 Display Mute Main Menu Up/ Down/ Left/ Right Enter Fast Rewind Fast Forward Stop Play Step/Pause Virtual Keyboard Operation Key-in text to DVR system via virtual keyboard. The operation is presented as below: Menu Operation Select key from Virtual Keyboard Select Key of Front Panel Exit the Virtual Keyboard Panel & Remote Controller Mouse [Up/Down/Left/Right] [Moving Cursor] [Enter] [Left Click] [MENU] [Left Click] Out of Selecting Area Key Description of Virtual Keyboard Delete the previous character Switch to text input Enter input of character string and exit Other Key-in Character 6 Main Menu Operation Menu Operation Panel & Remote Controller Mouse Select Key from Virtual Keyboard [Up/Down/Left/Right] [Moving Cursor] Enter Selecting Options [Enter] [Left Click] Back to Upper Menu [Menu] [Right Click] Setup Operation Menu Operation Front Panel & Remote Control Mouse Selecting Operation [Up/Down/Left/Right] [Moving Cursor] Change Default of Selecting Options [Enter] [Left Click] Change Default of Selecting Bar Options [Left / Right] [Left Click] Back to Upper Menu [Menu] [Right Click] 7 7. Display Mode DVR provide 3 display modes, including Live monitoring, Auto Sequence and PTZ. Live Monitoring Live monitoring while DVR system is power on. Five figures represent different meaning respectively: ● : Record M : Motion Triggered L : Video Loss A : Alarm Triggered : Sound On/Off Setup Operation Front Panel & Controller Mouse CH 1-8 Single Screen Display [CH 1 ~ 8] CH 1~8 [Double Left Click] CH 4/8 Screen Spilt Display [CH 4/8 Screen Spilt] Full Screen [Double Left Click] Quick Menu [Menu] [Right Click] Playback Mode [Play] [Right Click] Quick Menu Start/Stop Manual Recording [Recording] [Right Click] Quick Menu Start/Stop Auto Switching None [Right Click] Quick Menu Start/Stop Mute Remote Controller [Mute] [Left Click] Click Quick Menu Menu Operation Front Panel & Remote Control Mouse Selecting Options [Left / Right] [Moving Cursor] Enter Sub-Menu [Up / Down] [Moving Cursor] Execute the option [Enter] [Left Click] [Menu] [Left Click] Out of Selecting Area Exit Quick Menu 8 PTZ Before choosing【PTZ】, understand the spec and setup of Speed Dome firstly. Please make the correct setup firstly at [PTZ Setup]. Selecting Options Front Panel & Remote Controller [Left / Right] [Moving Cursor] Execute Options [Enter] [Left Click] [Menu] [Right Click] Setup Operation Mouse Zoom +, Focus +, Iris +, Adjust Movement Speed PTZ Upward PTZ Downward PTZ Left PTZ Right Start/Stop Auto Cruise Tracking Back to Live Monitoring Playback Setup Operation Front Panel & Remote Controller Mouse Fast Rewind Setting [Fast Rewind] [Left Click] Fast Forward Setting [Fast Forward] [Left Click] Step Forward Setting [Step Forward] [Left Click] | Step / Pause [Step/Pause] [Left Click] | 9 Play 1x [Play] [Left Click] Stop [Stop] [Left Click] Digital Zoom None CH 1~8 Full Screen Display [CH 1~8] CH 1~8 Screen [Double Left Click] 8 Screen Spilt Display [8 Screen Spilt] Full Screen [Double Left Click] Drag [Left Click] Auto Sequence 1. Auto sequence by channel, 2, 3 and so on…, 4/8 CH Screen Spilt. 2. When using mouse to select Quick Menu, auto sequence will be stopped. 8. Playback & Search Switch to playback & search mode when pressing play button of front panel, remote controller or right click of mouse, it will go to Live monitoring mode. Menu Options Front Panel & Remote Controller Mouse Search [Enter] [Left Click] Selecting Channel [Up / Down] [Moving Cursor] Selecting Date [Up/Down/Left/Right] [Moving Cursor] Playback [Enter] [Left Click] Back to Upper Menu [Menu] [Right Click] Ground: w/o recording; Red: Alarm Trigger; Green: normal recording Select First half frame of the time and start to playback from 00 min: 00 sec, if select The other half frame of time to play from 30min: 00sec. If no recording data at that time, please select [Recording List] for searching. Select playback to choose 8 CH for playing. 10 Recording List Menu Operation Execute Options Selecting Options Back to Upper Menu The First Page Front Panel & Remote Controller [Enter] [Up/Down/Left/Right] [Menu] Mouse [Left Click] [Cursor Moving] [Right Click] Previous Page Next Page The Last Page Select all events & remark in this page Backup List all events at that day, click the event of recording list and playback directly. Event Backup After ticking backup field in the event list and click on [Backup] to start backup. 11 9. Main Menu Menu Operation Panel and remote control Mouse Select Item [arrow keys] [Move index] Select Item [arrow keys] [Move index] Select the menu item to enter [Enter key] [Left] Leave the main menu [Menu key] [Right] 9.1 Camcorder Settings Channel Select the desired channel. 『Copy button』is to copy the current channel settings to all other channels. Channel name Set the channel name, use the virtual keyboard to input data. Name Location Set name display position, settings: "upper left", "lower left", "upper right", "lower right", "off". Display Set the channel in live mode or not, settings: on or off. 12 Color Setting ◆ Color: Setting from 0 to 50. ◆ Brightness: Setting from 0 to 50. ◆ Contrast: Setting from 0 to 50. ◆ Saturation: Setting from 0 to 50. PTZ Setting ◆Model Speed Dome Model, the setting are for PTC-301, PTC-203ST, FUM 626, JG_QG988, FUM 622SD, FUM 628 or off. If this option is enabled, please specify the correct protocol type. ◆Protocol Speed Dome Protocol, the value of setting PELCO P, PELCO D, MIKAMI or off. ◆Address Speed Dome Address, the setting from 0 to 255. ◆Baud rate Speed Dome baud rate, the setting: 1200, 2400, 4800, 9600, 19200. ◆ Tour time Speed Dome cruise time, the setting: 5, 10, 15, 20, 25 seconds or off. ◆ Tilt opposite Motion control of Speed Dome is upside down, the setting: on or off. ◆ Preset 13 Screen operation Panel and remote control Mouse Select control option Implementation of control options Telescopic adjustment +, - [Left and right buttons] [Moving index] [Enter key] [Left key] [MENU key] [Right Key] Focus adjustment +, Aperture adjustment +, Adjust the movement speed Adjust the camera upward Adjust the camera downward Adjust the camera to the left Adjust the camera to the right Set the default saving PTZ camera menu Save Clear Clear all Return to the previous menu Loss buzzer duration If it is disconnected, the beep time of DVR keeps on. Loss alarm duration If it is disconnected, the duration time of starts Alarm I / O (Relay) . Time display If the setup time will be display in live mode or not, settings: on or off. 9.2 Recording Setup Record Enable Setup On/Off the channel. Watermark: Insert the words of watermark. 14 Resolution NTSC video resolution setting: 720x480, 720x240, 360x240. PAL video resolution setting: 720x576, 720x288, 360x288. Recording frame amount Recording frame amount of single channel setting: NTSC 0 ~ 30 fps; PAL 0 ~ 25 fps. 15 Quality Set recording quality of channel, the setting from 1 to 5; the greater number, the better quality. Pre-recorded Motion detection alarm is triggered in the channel, the pre-recording time, the setting from 0 to 10 seconds. Audio Recording Set the audio is being recorded or not. Encoding Set the encoding mode: VBR or CBR. Recording Mode Set the recording time mode: Permanent recording or Scheduled recording. ◆ Scheduled recording 16 Menu Operation Configuration options Select channel schedule Select the time schedule Back to the top menu Panel and remote control Mouse [Enter key] [Left key] [arrow keys] [mobile wheel] [arrow keys] [Click or drag] [MENU button] [Right key] ◆Replication (1) Select Source (2) Select the object (3) Click the Copy button to complete the copy settings. 9.3 Sensor Detection Channel Select the channel. 『Copy button』to copy the current channel settings to all other channels. Mode Alarm mode setting is normally continuous on or off. Record Duration After the channel is triggered to be recording, the setting duration: 10, 20, ..., 60 seconds or off. Buzzer Duration the beep duration time when the channel is being triggered. Setting: 1,5,10,15,20,30 seconds or off. Alarm Duration The duration time of the alarm of the channel is being triggered (continuous beeping during trigger), the setting: 1,5,10,15,20,30 seconds or off. Event Popup The duration time of event is being triggered jump to single-screen when the alarm is triggered, it will automatically jump to the single screen of the channel. The duration time of setting: 1,5,10,15,20,30 seconds or off. 17 9.4 Motion Detection Motion Detection Select the desired channel. 『Copy button』to copy the current channel settings to all other channels. Channel switch Set motion detection of the channel is on or off. Sensitivity The sensitivity of motion detection of this channel; setting from 1 to 10. The greater number, the greater sensitivity. Motion Area Setup Regional Settings Set the detection range, based on a small green box as a unit. Menu Operation Panel and remote control Mouse Selection range [Arrow key] [Moving target] Set detection area: To be non-detection zone (transparent) (1) mobile location (2) [OK button] to set the range [Drag to left] Clear detection area: Be detected as area (green) (1) mobile location (2) [OK button] to set the range [Drag to left] Back to the previous menu [MENU key] [Right key] 18 9.5 Network Settings Mode Fixed IP, DHCP. Media Port Video Streaming for the specified port number, default: 9000. Web port Port number specified of the web page, default: 80. Command port Save the setting for the specified port number, default: 8000. Mobile Port Mobile phone port (factory default): 15961. IP address Currently specified IP address. Net mask Currently specified net mask. Network Gateway Currently specified gateway. PPPOE/3G We could choose PPPOE or 3G module setting. For PPPOE setting, you need to enter user name and password. For 3G module, you need to enter the APN and dial-up number. 19 DDNS Setting ◆ DNS1 the first domain name server, default is 168.095.001.001 ◆ DNS2 the second domain name server, default is 168.095.192.001 ◆ DDNS DDNS settings: On or Off. ◆ Server Setting of DNS server is 3322, dyndns, cctvdvr. DDNS server required the Host domain name and DDNS user account and password. E-MAIL Settings ◆ E-MAIL When the alarm is triggered, sending the notification by E-MAIL, settings: On, Off. ◆ SSL Set SSL encryption: On or Off; for example, using gmail needs to be set 『ON』. ◆SMTP port Enter the SMTP port number. For example, gmail set: 465. ◆SMTP server Enter the SMTP server. For example, gmail set: smtp.gmail.com. ◆Sender address Enter the sender address. For example, gmail set: [email protected]. ◆Sender Password Enter the sender password. ◆Recipient address Enter the recipient mail. For example, gmail set: [email protected]. ◆Transmission interval 20 When the alarm keeps going on, The interval of the notification letter will be sent by E-MAIL in every: 10, 30, or 60 seconds. 9.6 Log Search Log Type To search the event in certain time. The following options can be chosen: all, alarm, operation, motion detection, sensor detection and video loss. Beginning and the end of time Searching time period of the video (year / month / day); after finishing setting, press “start searching.” Menu Operation Executive Options Select Options Back to the previous menu First Page Previous page Next page Last Page Implementation of export action. Export to USB Flash Drives Panel and remote control [Enter key] [arrow keys] [MENU button] Mouse [Left key] [Move index] [Right key] ★ When selecting『yes』, it means you can directly click for playback of that event. 21 9.7 Backup Channel Back up options: All or a single channel 1 to 8. Type Recording options: All, regular recording, or alarm recording. Start and the end of recording time Back up options: Date and time period of recording. Click『Search backup』button to start the search. Video recording search list will be shown within time period of the video files; then back up by “video recording list.” 9.8 System System Setup Menu 22 9.8.1 Time Setup Date / Time Using Virtual keyboard to enter Date Format Two kinds of settings YY/MM/DD、MM/DD/YY Time Format Settings: 24-hour, 12-hour Time Zone Setup mobile DVR time zone NTP setting (Network Time Protocol) NTP: On/Off Set the time schedule: Using Virtual keyboard to enter. Set the NTP server: Using Virtual keyboard to enter. 9.8.2 Hard disk management Format Format the selected HDD All information will be lost, Ready to format? 23 Auto-overwritten Enable/Disable Overwritten function, Setting: On/Off. If Auto-overwritten function is enabled, Setting: 6, 12, 24, 36, 48, and 72 hours; Days: 7, 15, 30, and 60 days. Set-up Recording Time Frame For the regular recording, recording time frame setting: 5 min, 10min, 15min, 20min, 30min, or 60min. HDD buzzer setting When the lack of hard disk space occurred or some error triggered the buzzer; the buzzer setting: On/Off. HDD alarm setting When lack of the hard disk occurred or some errors triggered the alarm; setting: On/Off. USB Disk information Format USB Memory Stick 24 9.8.3 Display setting GUI display option GUI display setting: VIDEO or VGA. Default setting: Video mode Video Switching Time Time setting of VIDEO sequence channel The time setting of auto-sequence in video mode; for the interval of each sequence setting: 1-99 seconds. (0 sec means Off) The setup of Video Sequence Channel Setting of the video sequence channel is in 9 split screens. Video Margin VIDEO Display Adjustment setup Set the display adjustment of the screen setting: Left, Right, Top and Bottom from 0 to 36. 9.8.4 System Information Firmware version, MAC address, HDD status….etc 25 9.8.5 Password Using password Password Setup Enable User Password: On/Off (Default: off) Administrator account/password can not be blank. And at least 4 characters for the password. Administrator account/password Administrator account is for allowed user to access all of functions. User account/password In Administrator account can use “User Right Setting” Function for specific user. 26 9.8.6 System Language System Language Setting: Traditional Chinese, Simplified Chinese or English. Auto rebooting after finishing the setting. Function Tip Function tips display under main menu page. Setting: On/Off (Default: Off). 9.8.7 Audio Setting Audio Volume Setting Channel 1 the volume setting of audio In/Out. Setting: 1-10. (Default: 5) 27 9.8.8 System Maintenance delay-recording after power off Set up the time for delay-recording after power off. Setting: on/off set up time for delay-recording Setup time of delay-recording, setting: 5, 10, 15, and 20 minutes F/W Upgrade Please install update firmware into USB memory stick, and plug in the front panel USB socket of DVR, then click F/W update function. Note: the update firmware can only be upgraded by using the USB port. Please don’t operate the system, remove the USB memory stick, or remove the power during the upgrading process; in order to prevent any serious errors occur. The system will be auto rebooting after upgrading. Load Default setup Restore factory default.. Reboot the device Reboot the system now. Power Off System will do auto-separating files. Please turn off the power manually. 28 10. Player Description To double-click H264DVRPlayer.exe to start the player as below: open file click select HDD location click (1) Date event log search (2 click or (3) click playback Click the event on file list directly setting fast forward speed click setting rewind speed click single frame play click screen snapshoot Click 1/4/9 Split screen display click Volume click play file click backup file click fast forward slow rewind next frame or click for screen snapshot 29 previous frame play backup file and removable HDD data i.click ”open file” to select the file location (1) click (2) click to select the folder where the file is located. to select removable HDD location. ii. After selecting the folder or HDD location, Red box display on the date indicates it contained recorded data; it also meant if no red box display indicated it contained no recorded data. As shown in the following picture: 30 iii. Select and click the data and file type for single channel playback, as shown in the following picture: Player Setting Description: Click the right button of the mouse to open the setting screen, and then click the selected item to do the setting i. Top display The tick symbol will be shown in front of the “top display” after being selected. 31 ii. AVI Converting The dialog will pop up after it is selected for the file data conversion iii. Setup For Photo & backup file path, file pre-saving type, player interface language, enable/disable watermarking function, the numbers of split screen setting…etc. iv. H264DVRPlayer Player version information. v. Exit Close the player. 32