1
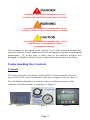
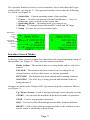
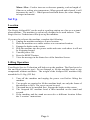
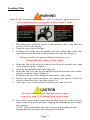
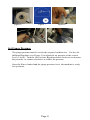
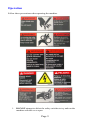
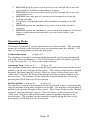
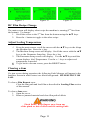
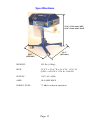
User Manual
©2007 Pregis Corporation. All Rights Reserved.
Table of Contents
Introduction...............................................2
Safety ........................................................3
Understanding the Controls ..................... 4
Set Up........................................................6
Operation...................................................9
Maintenance............................................13
Troubleshooting ......................................15
Specifications..........................................17
Notes .......................................................18
Introduction
The Pregis AirSpeed HC (Hybrid Cushioning) machine produces quilted panels
of air-filled packing cushions in any quantity, as needed. The ability to create
packing cushions on demand saves storage space and reduces packaging
material waste.
The film is available in two different sizes. HC Small has a roll width of 16.75”
and a length of 1250 feet. This roll has pillow size of 8 squares by 8 squares for
a ¾” cushion. HC Large has a roll width of 17.25” and a length of 1250 feet.
This roll has pillow size of 5 squares by 5 squares for a 1 ¼” cushion.
A string of cushions can be torn apart at the perforation points between the
panels. Cushions are created at a rate of up to 75 feet per minute (fpm) of film
speed.
Page 2
Safety
Operator safety and the safety of others in the work area depend on the operator using
good judgment and reasonable care while operating the machine. This user manual and
the warning labels affixed to the machine provide notification of specific potential
hazards.
The following instructions are only a guideline and should be considered a supplement to
your plant’s comprehensive safety program. Your business’ policy supersedes these
guidelines if at any time the two contradict each other.
1.
2.
3.
4.
5.
6.
7.
8.
9.
10.
11.
12.
13.
14.
Read and understand the manual including all of the danger, warnings,
and caution statements. If after reading the manual you have questions,
contact your supervisor or your Pregis technician to get answers before
working with the machine.
Only authorized personnel may use the equipment.
Only trained authorized persons will carry out any adjustments, repairs,
maintenance or cleaning with the equipment isolated from power
supply, no longer in motion and allowed to cool.
Never deface or remove factory installed warning decals. If a decal
ever becomes lost, damaged, or illegible, report this condition to a
supervisor and obtain a replacement decal from Pregis.
Keep the work area clean and uncluttered. Walking surfaces should
always be free of packing material and debris to prevent a slipping or
tripping hazard.
Ensure that all covers, guards and other safety devices are in place.
NEVER defeat a safety device for any reason.
Follow the recommended procedures in this manual.
Never leave the equipment unattended while operating. Shut the
machine off if you must leave the work area.
Keep body parts and clothing away from moving components. NEVER
reach into the machine for any reason while it is in motion.
Understand proper material path and safe loading procedures.
Learn safe procedure for clearing jams.
Exercise extreme care whenever inspecting or adjusting the machine
while it is in motion. NEVER reach into the machine for any reason
while it is in motion.
Understand which adjustments are operator adjustments; contact
maintenance person for all other adjustments.
DO NOT operate equipment if you are under the influence of alcohol,
drugs or medications that can make you less alert or affect your
judgment.
Safety signs on the machine and in this manual are used to alert operating and
maintenance personnel to potential hazards. The safety signs use signal words
to identify the seriousness of the potential hazard. The signal words for this
machine are Danger, Warning and Caution.
Page 3
A definitely hazardous situation that, if not
avoided, will result in serious injury or death.
A potentially hazardous situation that, if not
avoided, could result in serious injury or death.
A potentially hazardous situation that, if not
avoided, may result in minor injury
(or machine damage).
The meanings of the signal words and the level of the potential hazards they
represent must be clearly understood before attempting to operate or performing
maintenance. If, at any time, a safety sign on the machine becomes lost,
damaged, or illegible, contact Pregis to order replacement signs at no charge.
Understanding the Controls
Controls
The Power Switch for the Pregis AirSpeed HC is used to turn the electrical
power ON or OFF and is located above the power supply cord (see Figure 1)
The Air Inflation Regulator is used to set the air inflation pressure of the
cushions while the machine is running (see Figure 2).
Regulator
Figure 1
Pressure
Gauge
Figure 2
Page 4
Figure 3
The Operator Interface Screen is used to monitor, select and adjust the Pregis
AirSpeed HC (see Figure 3). The operator Interface Screen has the following
five fields (see Figure 4):
1. Status Box – Current operating status of the machine.
2. Cursor – Used in conjunction with the Plus/Minus (+/-) keys to
change the value or mode on the screen line.
3. Operating Mode – Operating mode you want to use.
4. Recipe – To change recipes between HC small and HC large
5. Setup – For use by service personnel only
Status Box
Cursor
Operating
Mode
Recipe
Setup
Figure 4
Figure 5
Interface Screen Modes
At the top of the screen is a status box that shows the current operating status of
the machine (see Figure 5). There are four statuses available:
Ready to Run - The machine has no existing faults and is ready to be
started
PAUSED - The machine has been started, but is waiting for an
external source, such as a bin sensor, to initiate operation.
RUNNING - The machine has been started and is making cushions.
JOGGING - The JOG key is being pressed and machine belts are
being advanced.
Changes are made to the AirSpeed HC Operation using the controls as follows
(see Figure 3)
Up / Down Arrows - Used to navigate through various display screens
START - Used to start the machine in the desired mode of operation.
STOP - Used to stop machine operation.
JOG - Used to feed the film through the machine without inflation.
RESET - Used to clear fault messages and allows the machine to run.
ress to return to the Ready to Run screen.
Page 5
Minus / Plus - Used to increase or decrease quantity, such as length of
film run or sealing wire temperature. When pressed and released, it will
increment by one (1). When pressed and held down, the value changes
in larger increments.
Set Up
Location
The Pregis AirSpeed HC can be used at a packing station on a line or as a stand
alone machine. The machine is exclusively designed to be used indoors. Your
Pregis Service Technician will help set up the machine.
If you need to relocate the machine, complete the following:
1. Unplug the machine and move to new location.
2. Place the machine on a stable surface at a convenient location.
3. Engage the brake on the casters
4. Plug the machine into the power outlet and route cord where it will not
be a tripping hazard.
5. Turn the power ON.
6. Press the RESET button.
7. View the message in the Status box of the Interface Screen.
Lifting Operation
Your Pregis Service Technician will help set up the machine. The floor has to be
flat and rigid (concrete type). Do not attempt to lift the machine head or any
components without assistance. The weight of the AirSpeed HC machine fully
assembled is 114 kg (252 lbs).
1.
2.
3.
4.
5.
Turn off the machine and unplug the power cord before lifting the
machine.
Two people are required to lift the machine head, use only the frame of
the machine to lift it. The cover can not be used.
The stand has to be installed first. Engage the brake on the casters
The Airspeed HC machine head is then installed on the stand and
secured.
If the machine and the stand are moved to a different location follow
the “Location” instructions.
Page 6
Loading Film
Pinch Point! Keep hands and fingers clear of all drive, guide, and pinch
rollers while machine is being JOGGED or in RUN mode.
1.
2.
3.
Disconnect the electrical power to the machine and verify that the
power is OFF at the display.
Open the cover on the machine.
Load the roll of film onto the spindle with the leading edge of the film
unrolling towards the front of the machine from the top (Figure 6).
Lifting hazard! Use proper lifting techniques when
placing the roll of film onto the cradle.
4.
5.
6.
7.
8.
9.
Route the film to the air pipe as shown on the decal located to the right
of the pressure gauge. (Figure 7)
Open the air channel in the film (Figure 8).
Route the film over the air pipe and pull forward until the film reaches
the first set of nip rollers (Figure 9).
Hold open the tow rollers and place film inside of the rollers.
Release the tow rollers and allow the spring load action of the tow
rollers to hold this end of the film (Figure 10).
Close the cover, reconnect the electrical power, and turn ON.
Moving machinery! The machine can be jogged
with cover open. Use caution when cover is open.
10. Press JOG on the control panel until the film flows out of the out feed
chute at the front of the machine. Jogging the machine will not inflate
the cushions.
NOTE: When loading the film, do not force or help guide the film
through the belts as you are pressing the JOG button.
Page 7
Figure 6
Figure 7
Figure 9
Figure 8
Figure 10
Set Gauge Pressure
The gauge pressure must be set for the required cushion size. Use the Air
Inflation Regulator (see Figure 2) to adjust the air pressure to the correct
level (3-8 psi). Turn the Air Pressure Regulator knob clockwise to increase
the pressure, or counter clockwise to reduce the pressure.
Once the film is loaded and the gauge pressure is set, the machine is ready
for operation.
Page 8
Operation
Follow these precautions when operating the machine.
1.
DO NOT attempt to defeat the safety switches to try and run the
machine with the cover open.
Page 9
2.
3.
4.
5.
6.
7.
DO NOT stick any part of your person or any foreign object into the
belts when the machine is operating or jogging.
DO NOT stick any part of your person or any foreign object into the
cutting knife area.
DO NOT place any part of your person or foreign object into the
heating assembly.
Keep clear of all pinch points while machine is running or in JOG
mode.
DO NOT operate the machine if any part of your body becomes
fatigued.
DO NOT operate the machine if you are under the influence of alcohol,
drugs or medications that can make you less alert or affect your
judgment.
Operating Mode
The Pregis AirSpeed HC can be operated in one of three modes. The operating
modes are selected at the first line below the operating status box display. The
three (3) operating modes include the following:
Normal Operation
(Figure 11)
The machine is manually started using the foot pedal switch and will run until
one of the following happens: 1. The STOP button or the foot pedal is pressed
2. The film runs out. 3. A fault occurs in the machine.
Automatic Stop (after xx ft.)
(Figure 12)
The machine is manually started using the foot pedal switch and will run until it
produces the specified length of film (xx ft). The footage length can be changed
using the Operator Interface Screen. Place the cursor on the same line as the
“after xx ft” and press the Minus/Plus buttons until the number changes to the
desired value. The machine can be manually stopped during this process by
pressing the STOP button or the foot switch.
Fill The Basket (with xx ft.)
(Figure 13)
The machine is operated in conjunction with an external source to automatically
start the machine when more cushions are needed. The machine will run until it
produces the specified length of film (xx ft). The footage length can be changed
using the Operator Interface Screen. Place the cursor on the same line as the
“after xx ft” and press Minus/Plus buttons until the number changes to the
desired value. The machine can be manually stopped during this process by
pressing the STOP button or the foot switch.
Page 10
Figure 11
Figure 12
Figure 13
HC Film Recipe Change
The main screen will display what recipe the machine is running (2nd line from
the bottom). To change:
1. Scroll the cursor to the 2nd line from the bottom using the Ÿź keys.
2. Press the + button to toggle to the other recipe.
Adjust Sealing Temperature
1. From the main screen, scroll the cursor with the Ÿź keys to the Setup
the Machine line. Press the + key.
2. The Machine Setup screen will display. Scroll the cursor with the Ÿź
keys to the Parameter Setup line. Press the + key
3.
4.
The Parameter Setup screen will display. Use the Ÿź keys until the
screen displays Seal Temperature. Use the + / - keys to adjust seal
temperature as needed.
To get back to the run screen, press the RESET button.
Clearing a Jam
If a jam occurs during operation, the following Fault Message will appear in the
Interface Screen in white letters on a black background: FILM RUNOUT OR
JAM.
To clear a Film Runout error:
Clear the film path and load film as described in Loading Film section
of this manual.
To clear a Jam error:
1. Open the cover
2. Remove jammed material and clear film path of debris
Pinch Point! Keep fingers away from any
of the pinch or drive rollers and the cutting knife.
Page 11
3.
Continue with Step 4 in Loading Film
Fault Messages
If the operating status box is blackened out with white letters, a fault has
occurred in the machine. Operator intervention is required to correct the fault.
In addition to FILM RUNOUT OR JAM, the following fault messages may
appear:
COVER GUARD IS OPEN
Cover should be closed prior to operation. If any covers are removed, place the
machine power switch in the OFF position and remove the power cord from the
AC power source.
Moving machinery! The machine can be jogged with cover open. Use
caution when cover is open.
SEAL HEAT WIRE OPEN - The sensor on the heating wire has failed. Call
Pregis for technical support.
UNDER TEMPERATURE - While running, the temperature of the heater fell
below or did not reach the required level for several seconds. This usually
indicates that some part in the heater system has failed and requires service. Call
Pregis for technical support.
REPLACE DRIVE BELTS - The belt odometer has reached the preset limit.
This can be reset by a Pregis technician or other technician with the proper
training.
Page 12
Maintenance
The AirSpeed HC is designed to require minimal maintenance. The following
recommended minor maintenance items will help to keep the AirSpeed HC
running and minimize any down time on your packaging line. If there are any
questions about the maintenance of the AirSpeed HC, please contact your local
Pregis Service Technician for additional assistance.
Electrical shock or unexpected machine movement can cause injury. DO
NOT run the machine with the cover open. Unplug the machine before
performing maintenance tasks.
Disconnect the power cord before performing ANY maintenance to the machine
other than inspections.
Weekly Maintenance
1.
2.
3.
4.
5.
Inspect the belts, guide and idler rollers, and drive pulley. If the
belt splice is peeling or pulling apart more than 0.03”, contact the
Pregis Service Technician to have the belts replaced.
Either by hand or using a vacuum or compressed air line, clean the
belts, belt guide and idler rollers, drive pulley, tow rolls, slitter
blade, air pipe, and film idlers of any contamination and/or debris.
Jog the machine and visually inspect that all parts turn freely,
including all belt idlers. Turn the power OFF before making any
adjustments or cleaning.
Ensure the unwind spring-loaded brake strap mechanism works
properly.
Jog the machine and visually inspect that the belt alignment and
tracking is correct. Turn the power OFF before making any
adjustments or cleaning.
Page 13
Monthly Maintenance
1.
2.
3.
4.
Jog the machine and visually inspect that all components for
excessive wear, including the tow rollers and the slitter blade.
Contact the Pregis Service Technician to replace any necessary
parts.
Check that fasteners are not loose and tighten as needed.
Clean the compressor air inlet screen of any debris.
Inspect the sealing surface of the sealing drum for wear and
replace if necessary.
Page 14
Troubleshooting
Electrical shock or unexpected machine movement can cause injury. DO
NOT run the machine with the cover open. Unplug the machine before
performing maintenance tasks.
1.
Problem:
Cause:
Solution:
Machine will not start
Machine not set-up properly.
a. Turn power ON.
b. Press RESET button.
c. Press START button.
d. Read message at top of screen. Text will read
Ready to Run, Paused, or Running.
e. Thread the film so encoder wheel on tow roll turns.
Machine will not run more than a few seconds if
the counter wheel does not turn.
2.
Problem:
Cause:
Solution:
Cushion does not inflate.
Machine not ready
Press START button
Follow procedures to Set Gauge Pressure as noted in
this manual.
Insufficient injection air.
Check if air injection tube is plugged or
disconnected.
Check if air compressor is operating
properly.
Too much air blows cushion seals open.
Reduce the inflation air pressure. Follow procedures
to Set Gauge Pressure as noted in this manual.
Cause:
Solution:
Cause:
Solution:
3.
Problem:
Cause:
Solution:
Cause:
Solution:
Cause:
Solution:
Cause:
Solution:
Film jams
Cushion release slit not being cut properly.
Clean or replace the slitter blade.
Film burn through.
Sealing temperature too high. Use the Operator
Interface Screen “Temp” and the Minus button to
turn down the sealing temperature.
Gap in film is too small for air injector tube.
Replace the roll of film
Film waste clogging slitter blade.
Turn power OFF. Open cover. Remove film and
waste from slitter area. Turn power ON and Reset
machine.
Page 15
4.
Problem:
Cause:
Solution:
Cause:
Solution:
5.
Problem:
Cause:
Solution:
Cause:
Solution:
Cause:
Solution:
Cause:
Solution:
6.
Problem:
Cause:
Solution:
No film movement
Film is not properly positioned in machine.
Thread the film as per the Loading Film instructions
in this manual.
Film slipping
Check film nip idlers and belts for contamination and
clean as necessary. See also Weekly Maintenance
instructions in this manual.
Poor quality seals or no seals.
Sealing element not hot enough.
Sealing temperature too low. Use the Operator
Interface Screen “Temp” and the Plus button to turn
up the sealing temperature.
Air pressure blowing out the seals
Air pressure too high. Reduce the inflation air
pressure. Follow procedures to Set Gauge Pressure
as noted in this manual. Also, check that the out feed
cooling fan is working properly.
Film not being held tight together between sealing
belts.
Replace worn sealing belts as necessary. Contact
your Pregis Technician for replacement.
Surface damage to drum sealing element including
nicks, cuts or bare aluminum showing through
element covering.
Call Pregis Technician for replacement.
Main screen “Ready to Run” message
Replaced with “Change Belts” message.
Belt Odometer has reached the preset belt change
interval.
Contact your Pregis Technician for replacement.
Page 16
Specifications
51.6” (1310 mm) MIN
65.6” (1666 mm) MAX
32.4”
(822 mm)
32.6”
(828 mm)
WEIGHT:
252 lbs (114kg)
SIZE:
32.6” L x 32.4” W x 51.6” H – 65.6” H
(828 L x 822 W x 1310 H - 1666 H)
SUPPLY:
115V AC, 60Hz
AMP:
10.0 AMP MAX
NOISE LEVEL:
77 dB(A) when in operation
Page 17
Notes
Page 18