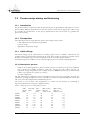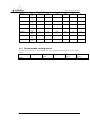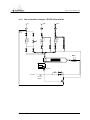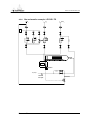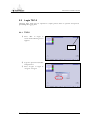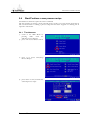
1
Process Manual
Tempress® Systems, Inc.
Process manual
M220.383.02 January 2004
TABLE OF CONTENTS
Preface ..................................................................................... V
Tempress documentation set................................................................. V
User Definition ...................................................................................... VI
Notes, Cautions and Warnings ............................................................ VII
Contents description ........................................................................... VIII
Revision History .................................................................................. VIII
1. Introduction .......................................................................1-1
1.1
General ..................................................................................... 1-1
1.2
Process engineer area description............................................ 1-2
2. Safety .................................................................................2-2
2.1
Emergency Off (EMO) .............................................................. 2-2
2.2
Alarm Signals............................................................................ 2-2
2.2.1
Buzzer / LED ............................................................. 2-2
2.2.2
Touchscreen.............................................................. 2-2
2.2.3
Light tower ................................................................. 2-3
2.2.4
TSC Alarm menu ....................................................... 2-3
2.3
Light tower signal description.................................................... 2-3
2.4
Toxic Material ........................................................................... 2-5
2.5
Safety measures ....................................................................... 2-5
3. Process setup and acceptance.....................................2.5-1
3.1
3.2
Process recipe setup procedure ............................................ 3.1-1
3.1.1
Introduction............................................................. 3.1-1
3.1.2
6 steps to a process recipe..................................... 3.1-1
3.1.3
Recommended command sequence ...................... 3.1-2
3.1.4
Modifying the default Tempress recipe ................... 3.1-3
Process recipe startup and fine-tuning................................... 3.2-1
3.2.1
Introduction............................................................. 3.2-1
3.2.2
Prerequisites........................................................... 3.2-1
3.2.3
Initial settings .......................................................... 3.2-1
PROCESS MANUAL
I
TABLE OF CONTENTS
3.2.4
3.3
3.4
Further fine-tuning .................................................. 3.2-2
Alarm handling with Branch and Abort commands ................ 3.3-1
3.3.1
Introduction............................................................. 3.3-1
3.3.2
Do nothing with an alarms ...................................... 3.3-1
3.3.3
Handling alarms with the Branch command ........... 3.3-1
3.3.4
Handling alarms with the Abort command .............. 3.3-2
3.3.5
Recipe example: LPCVD Nitride abort recipe......... 3.3-3
Process acceptance conditions ............................................. 3.4-1
3.4.1
Introduction............................................................. 3.4-1
3.4.2
Default process test conditions ............................... 3.4-4
4. Process description ..........................................................4-1
4.1
4.2
Nitride from NH3 and SiH2Cl2 ................................................. 4.1-1
4.1.1
Basic configuration ................................................. 4.1-1
4.1.2
Description.............................................................. 4.1-1
4.1.3
Process result indication......................................... 4.1-2
4.1.4
Startup parameters for processing.......................... 4.1-2
4.1.5
Recommended cleaning interval ............................ 4.1-3
4.1.6
Gas schematic example: LPCVD siliconnitride ....... 4.1-4
4.1.7
NH3
Recipe example: LPCVD siliconnitride from SiH2Cl2 and
4.1-5
4.1.8
Troubleshooting a standard-nitride process............ 4.1-8
4.1.9
NH4Cl vapor pressure curve ................................... 4.1-9
Flat Polycrystalline Si from SiH4............................................. 4.2-1
4.2.1
Basic configuration ................................................. 4.2-1
4.2.2
Description.............................................................. 4.2-1
4.2.3
Process result indication......................................... 4.2-2
4.2.4
Startup parameters for processing.......................... 4.2-2
4.2.5
Recommended cleaning interval ............................ 4.2-2
4.2.6
Gas schematic example: LPCVD Flat poly ............. 4.2-4
4.2.7
Recipe example: LPCVD Flat poly-silicon from SiH4 4.2-
5
4.2.8
PROCESS MANUAL
Troubleshooting a flat poly process ........................ 4.2-8
II
TABLE OF CONTENTS
4.3
Silicondioxide (LTO SiO2) from SiH4 and O2 .......................... 4.3-1
4.3.1
Basic configuration ................................................. 4.3-1
4.3.2
Description.............................................................. 4.3-1
4.3.3
Startup parameters for processing.......................... 4.3-2
4.3.4
Recommended cleaning interval ............................ 4.3-2
4.3.5
Process result indication......................................... 4.3-3
4.3.6
Gas schematic example: LPCVD LTO.................... 4.3-4
4.3.7
and O2
Recipe example: LPCVD silicondioxide from LTO SiH4
4.3-5
4.3.8
Troubleshooting an LTO process ........................... 4.3-8
5. Operation Instructions...................................................4.3-1
5.1
5.2
Load or Unload process wafers ............................................. 5.1-1
5.1.1
Load process wafers............................................... 5.1-1
5.1.2
Unload wafers......................................................... 5.1-1
Login TSC-2........................................................................... 5.2-1
5.2.1
5.3
5.4
5.5
5.6
5.7
TSC-2 ..................................................................... 5.2-1
Selecting a new process recipe ............................................. 5.3-1
5.3.1
Touchscreen........................................................... 5.3-1
5.3.2
TSC-2 ..................................................................... 5.3-3
Start/Continue a new process recipe ..................................... 5.4-1
5.4.1
Touchscreen........................................................... 5.4-1
5.4.2
TSC-2 ..................................................................... 5.4-2
Stop a running process recipe ............................................... 5.5-1
5.5.1
Touchscreen........................................................... 5.5-1
5.5.2
TSC-2 ..................................................................... 5.5-2
Abort a running process recipe .............................................. 5.6-1
5.6.1
Touchscreen........................................................... 5.6-1
5.6.2
TSC-2 ..................................................................... 5.6-2
Edit ‘Variable Process Command’.......................................... 5.7-1
5.7.1
Touchscreen........................................................... 5.7-1
5.7.2
TSC-2 ..................................................................... 5.7-3
PROCESS MANUAL
III
TABLE OF CONTENTS
5.8
5.9
Clear Alarms .......................................................................... 5.8-2
5.8.1
Required action....................................................... 5.8-2
5.8.2
Touchscreen........................................................... 5.8-2
5.8.3
TSC-2 ..................................................................... 5.8-3
Write/Edit process recipe ....................................................... 5.9-2
5.9.1
Touchscreen........................................................... 5.9-2
5.9.2
TSC-2 ..................................................................... 5.9-3
5.10
Edit graphical image ............................................. 5.10-2
5.10.1
Touchscreen......................................................... 5.10-2
5.10.2
TSC-2 ................................................................... 5.10-2
5.11
Logging process data ........................................... 5.11-2
5.11.1
PROCESS MANUAL
TSC-2 (only) ......................................................... 5.11-2
IV
PREFACE
Preface
This set of manuals explains how to operate and maintain a Horizontal Diffusion/LPCVD
furnace.
Refer to the Touchscreen reference manual (M440.00) or the TSC-2 reference manual
(M450.00) for a full description of all operating screens.
For information about maintenance, refer to the maintenance manual (M230.00).
The Tempress Horizontal Diffusion Furnaces are fully described in the reference manuals
(M300.00).
Tempress documentation set
The complete Tempress documentation set includes:
•
Safety manual
•
Operator manual
•
Reference manuals
1. Loadstation
2. Furnace
3. Gas cabinet
4. Main Power cabinet
5. DPC (Digital Process Controller)
6. DTC (Digital Temperature Controller)
7. ETC (Excess Temperature Controller)
8. Touchscreen
9. TSC-2 (+ SECS/GEM)
•
Vendor documentation
1. Digital pressure switch
2. Mass Flow Controllers
3. External torch controller (if used)
PROCESS MANUAL
V
PREFACE
User Definition
It is strongly recommended that all users first read this manual before starting any procedure.
To produce an accessible manual suiting on various responsibilities, Tempress defines the
following users:
Operator
The operator is handling the process from loading until unloading of the wafers. Therefore
the operator needs to select a recipe, put the wafers on the boat, fill in Lot ID, Start the
process and monitor the progress using the Touchscreen and/or TSC-II.
Process engineer
The process engineer is a qualified chemical engineer, who is responsible for the process
recipes and their results. The process engineer writes, tests and releases new process recipes.
Service or Maintenance engineer
The maintenance engineer is a qualified electrician or mechanic, who is responsible for a
proper functioning system in accordance to its designated purpose. A Tempress qualified
service engineer will perform the first installation.
PROCESS MANUAL
VI
PREFACE
Notes, Cautions and Warnings
Notes, Cautions and Warnings appear throughout this manual, where extra attention is
required to a particular (safety) item. Three levels can be distinguished:
NOTE
)
Notes alert to pay attention to items or procedures of special importance.
CAUTION
Cautions alert for a potentially hazardous situation that may result in minor
or moderate injuries.
Cautions can also alert for potential equipment and/or product damage.
WARNING
Warnings alert for conditions that may result in permanent and/or lethal
injuries.
PROCESS MANUAL
VII
PREFACE
Contents description
This manual is divided into the following sections and appendices:
Section 1
Introduction
Provides an overview of the Tempress Systems Inc.
Horizontal furnace, what it is and what it can do.
Section 2
Safety
Describes the safety components and functions. It describes all measures
that are required to provide a safe way of working.
Section 3
Process setup and acceptance
Describes the basis of how to setup a process recipe and how to handle
alarms that are generated during the process. Finally all minimal process
requirements for acceptable process results are defined in process
acceptance.
Section 4
Process description
Contains specific process information including chemicals used, start-up
parameters and a basic recipe layout.
Section 5
Operation Instruction
Describes all procedures that are required for the process engineer.
Revision History
This manual is revision 0 of the Process Manual and is intended to explain the required
procedures. The function and screens it describes are based on the following software
releases:
•
TSC 2 version 6.0
(17-02-2003)
•
DPC 2.I.03
(17-02-2003)
•
DTC 2.F.02
(17-02-2003)
•
Touchscreen 2.I.05 (17-02-2003)
For minor software and hardware changes, addendum to this manual will be available. For
major changes, a new revision will be available. For price information or other questions
please contact Tempress Systems Inc.
PROCESS MANUAL
VIII
INTRODUCTION
1.Introduction
1.1
General
The horizontal furnaces of Tempress Systems Inc. are developed according to the latest
European directives for Machinery (98/37/EC), Low Voltage (73/23/EC) and EMC
(89/336/EEC).
The Tempress Diffusion system is a modular horizontal furnace designed to process (silicon)
wafers as part of the manufacturing technology of semiconductor, optical, MEMS and solar
devices.
Figure 1-1 shows an example of a L-shape diffusion system with 4 process tubes shown
without the partition of a cleanroom wall.
It is a right-handed system, defined according to the position of the furnace relative to an
operator.
Usually the system contains more than 1 tube. Based on the number and size of tubes, the
system is referred to as a 2, 3 or 4 stack.
Figure 1-1 is an example of a 4-stack system, allowing up to 4 different processes at any time.
The tubes are numbered from 1 to 4, with tube number 1 at the top and tube 4 at the
bottom. All tubes operate fully independently.
Main Power Cabinet
Figure 1-1 Schematic view of a right-handed 4-stack Diffusion System
PROCESS MANUAL
1-1
INTRODUCTION
1.2
Process engineer area description
HOT SURFACE
Buzzer/LED
Light/Fan Switch
Touchscreen
Wafers
MOVING PART
Figure 1-2 Loadstation
The process engineer area is limited to the loadstation only. Figure 1-2 shows all relevant
items.
The Loadstation part of a Tempress System should be placed in the cleanroom. The Furnace
and Gas cabinet can optionally be placed in the greyroom.
To load wafers, several loader types can be implemented, including the (default) inline loader,
the Amtech Atmoscan® and the backmounted softlander. To prevent particles on the wafers
during the loading process, a constant horizontal laminar flow is created from the loadstation
into the cleanroom.
The loadstation is powered by 230V and has an illuminated On/Off switch for the fans and
the lights.
The remote control cabinet in the loadstation contains TFT-Touchscreens, one for each
tube. These are the user interface for communication with the Digital System Controllers
(DPC, DTC and DMC).
PROCESS MANUAL
1-2
SAFETY
2.Safety
This section contains a brief description of the safety features of a Tempress Horizontal
Diffusion System for the process engineer.
Process engineers must have a general knowledge of the technology involved in diffusion
systems. They should understand safety practices outlined in this manual. Process engineers
must have additional knowledge about chemistry and chemicals used in the customer specific
process applications.
The descriptions contained in this user manual are general in nature. The actual furnace may
differ in minor detail from the furnace described in this manual, because of customer specific
requirements or modifications. Please refer to the Tempress Safety manual (M110.00) for a
complete description of available safety features.
2.1
Emergency Off (EMO)
Emergency Off (EMO) buttons are located around the system at accessible locations
according to EN 60204-1 especially EN 418. Pressing an EMO button turns off all power to
the system except to the fans on top of the furnace. This prevents fire hazard as a result of
high heat concentration in the furnace cabinet. Also those parts that are connected to a UPS
facility remain operational.
Press the EMO button when a person is in danger, when there is a fire, a water leak
or any other event that could be hazardous to life.
2.2
Alarm Signals
Alarms and alerts generated by tube controls are presented in several ways:
•
Buzzer / LED
•
Touch screen
•
Light tower
•
TSC-II
2.2.1
Buzzer / LED
Visible and audible alarm signals are generated by the process controller (DPC) and the
temperature controller (DTC). The visible signals will be presented with a LED, located
below the buzzer position as shown in Figure 1-1. Each process is represented by one LED
and buzzer combination.
2.2.2
Touchscreen
The visible alarms will be presented on the
touchscreen bottom line. Alarms on the
Touchscreen are always in combination with an
audible signal.
Touching the screen deactivates the audible signal.
PROCESS MANUAL
2-2
SAFETY
2.2.3
Light tower
Alarms generated by the DPC, DTC and DMC will be made visible by three colors. Each
color of the light tower represents particular circumstances.
-
Green represents safe, operational condition.
Yellow represents warnings and alerts
Red represents alarms
See section 2.3 for a full description.
2.2.4
TSC Alarm menu
Activating the alarm menu gives an overview of all active and passed
alarms during the process. In case of an active alarm the “Alarm”
button start flashing on and off.
2.3
Light tower signal description
Red
Yellow
Green
Two light towers, one on top of the loadstation in the
cleanroom and one on top of the furnace in the greyroom, are
installed for fast anticipation on the status of the (production)
process. This section describes the function of each light and its
relation to the tube status.
A light tower is (default) comprised of 3 lights: from top to
bottom RED, YELLOW and GREEN.
The green light can indicate 2 signals:
1) OFF
2) ON
The yellow and red light can indicate 2 signals:
1) OFF
2) BLINK
Figure 2-1 Default light tower configuration
The light tower is controlled by a tower signal PLC that receives its commands from the
various controllers, among others DPC/DTC/DMC, Excess temperature controller, gas
detection system alarm and the TSC Host control.
In case the EMO-switch is activated or a power failure occurs for more than 4 seconds, the
power supply to the furnace will stop and also the light tower will be off.
The tower signal PLC is programmed by Tempress Systems Inc. and is not adjustable by
customers.
Note: Per tube there are 2 PLC-Inputs available for customer specific applications, like H2
detection.
PROCESS MANUAL
2-3
SAFETY
For a functional description of the light tower signals see table 1:
Signal
Green
Yellow
Mode
ON
Operational
OFF
Not operational
Description
No warnings or messages
BLINKING N2 pressure-switch
No N2 gas flow detected
Air pressure switch
No Air flow detected
Torch temp (750)
The torch temperature has
to exceed 750oC
Torch Flame failure
There is no flame, the H2
valve will be closed
Torch H2/O2 ratio
The H2/O2 ratio exceeds
the safety value
Torch shell
The skin temperature of the
torch is too high
Temperature
powerpack
sensor Temperature powerpack is
too high
Bubbler temp
Bubbler temp is too high
Bubbler level
Fluid level is too low
O2- low
O2 flow is too low
Exhaust (Low/High)
Exhaust flow out of limits
Limit alarm (only if Actual value is out of limits
programmed in the process
recipe)
Wait for operator (only if Operator action is required
programmed in the process to continue
recipe)
Process is finished
OFF
Red
Boat manual
Servo driver is in manual
mode
Maintenance mode
Maintenance
activated
mode
is
No alarm and/or alert
BLINKING Excess
temperature Tube is overheated
controller has been activated
(Optional)
Leakage detection
A gas or water leak has been
detected
OFF
No alarm and/or alert
No actual dangerous or
hazardous situation
Table 1 Light tower signal description
PROCESS MANUAL
2-4
SAFETY
2.4
Toxic Material
The process engineer, responsible for all process related activities, has to inform the operator
about the hazards of the process. See section 4 Process description or safety manual for a
complete description of all details.
2.5
Safety measures
Safety measures are indicated in the appropriate procedures.
PROCESS MANUAL
2-5
PROCESS SETUP AND ACCEPTANCE
3. Process setup and acceptance
3.1
Process recipe setup procedure
3.1.1
Introduction
The Tempress Systems, Inc. process controller, DPC, has some unique features that enable the user
to program any kind of process recipe in any way possible.
A process recipe is made of steps, and within one step several commands can be programmed.
The DPC is designed to execute commands in one particular step simultaneously. The sequence of
commands is therefor not important (except for “Branch on” and “Abort on “ alarm commands).
It is recommended, though, to use a consequent sequence to improve readability for the user.
3.1.2
6 steps to a process recipe
3.1.2.1 Step 1: Determine the required process temperature
The first step is to define the required process temperatures. These include the Load/Unload
temperature and the Process temperature(s).
Settings that need to be determined are the setpoint, the slope, the Hi and Low limits and the type
of temperature control (spike or paddle).
3.1.2.2 Step 2: Program the temperatures
The temperatures must be programmed in the DTC memory either using a touchscreen or using
the TSC-2 computer(s).
Touchscreen
2. certifications menu
2. temperature menu
2. normal temperature table
TSC-2
Recipes menu
Normal temperature menu
3.1.2.3 Step 3: Make temperature schematic
From the selected temperatures a schematic can be made that typically has the following shape:
PROCESS MANUAL
3.1-1
PROCESS SETUP AND ACCEPTANCE
3.1.2.4 Step 4: Make detailed schematic
The schematic can be split into different sections. Each section is going to represent one process
step. The detailed schematic typically has the following shape:
3.1.2.5 Step 5: Convert schematic to block diagram
The detailed schematic represents the individual steps that will be used in the process recipe. Each
step can also be presented in a block diagram with the following shape:
Step 0
Step 1
Step 2
3.1.2.6 Step 6: Fill in each block
Each block can now be programmed. It must be recognized that Step 0 (the first step) has some
unique properties that are not found in any other step:
1.'standby' step
2.selection of other recipe only here
3.must be started manually (no automatic continuation)
4.is the target for an Abort command
5.no time command available
6.no branch command available
7.no abort command available
3.1.3
Recommended command sequence
As stated previously, the DPC will execute all commands simultaneously, except for the
“Branch on” and “Abort on” instructions.
To improve readability the following sequence is recommended:
1.message
2.time
3.temperature
4.boat
PROCESS MANUAL
3.1-2
PROCESS SETUP AND ACCEPTANCE
5.analog out (MFCs)
6.digital out (valves)
7.alarm limits
8.alarm on digital inputs
9.branch on
10.abort on
11.wait for
12.abort recipe
As step 0 has been designed as the Standby step all commands in step 0 must be programmed
to create a safe condition.
This involves closing all gas flows and valves, except for a small N2 purge flow, setting a
low temperature and programming the boat in.
3.1.4
Modifying the default Tempress recipe
The default Tempress process recipe is designed with Step 0 as Standby for all atmospheric
processes. Obviously customers are free to alter the default recipe to fit their particular
needs. For example, a 24 hr production environment typically uses step 0 as Load/unload
step, not as a standby condition, because the machine is actually never in standby.
The transition is easy:
1) Modify the step 0 settings such that it contains:
1) Message Load/Unload with Sonalert
2) Boat out
3) Gas N2 flow high
2) Remove step 1 Boat Out
3) Remove Step 2 Load Wafers
PROCESS MANUAL
3.1-3
PROCESS SETUP AND ACCEPTANCE
3.2
Process recipe startup and fine-tuning
3.2.1
Introduction
Process fine-tuning is required to reach the guaranteed process specifications and improve a current
process. Many different methods lead to the same process result and any approach is valid as long
as it satisfies the specifications. A few tips are described here that can be used as a guideline for
process fine-tuning.
3.2.2
Prerequisites
The following items are required before process fine-tuning can be started.
- a fully functional system (leaktested, profiled)
- a process recipe
- appropriate temperature recipes
3.2.3
Initial settings
The initial settings can be copied from an existing recipe if that is available. Alternatively, the
example recipes given later in this manual can be used. These recipes are based on a default system,
therefore the example recipes need to be adapted to fit the customer specific machine.
Two different process conditions occur. The atmospheric processes and the LPCVD processes.
3.2.3.1 Atmospheric process
-
calculate the required gasflow to obtain a refresh interval of 3 minutes for process conditions
and 5 minutes for standby conditions. Take into account the tube volume and the gas
expansion at high temperatures. For example flows see Table 3-1, and keep in mind that at
1000oC a gas expands 4.7x (and 3.6x at 700oC)
- use a flat temperature
The flat temperature is sufficient for most atmospheric processes anyway (especially (dry and wet)
oxidations). A ramped temperature can be used later to counter the expected depletion effects that
will occur in the POCl3 deposition and diffusion process.
The reason to start of with a flat temperature is to make sure the machine is performing as
expected (and therefore should give a depletion effect).
Table 3-1: Initial gas flows for atmospheric processes
TS430x
TS460x
TS480x
TS4100x
TS630x
TS660x
TS680x
TS6100x
TS840x
MFC setting
Tube Tube ID Tube
MFC setting
[slm] for
length [dm]
volume [slm] for
1000oC 3 min
[dm]
[liter]
700oC 5 min
13
1.6
26
1.5
1.9
18
1.6
36
2.0
2.6
20
1.6
40
2.3
2.9
25
1.6
50
2.8
3.6
13
2.12
46
2.6
3.3
18
2.12
64
3.6
4.5
20
2.12
71
4.0
5.0
25
2.12
88
5.0
6.3
13
2.7
74
4.2
5.3
PROCESS MANUAL
3.2-1
PROCESS SETUP AND ACCEPTANCE
TS860x
TS880x
TS8110x
TS1280x
18
20
25
20
2.7
2.7
2.7
4
103
115
143
251
5.8
6.4
8.0
14.1
7.4
8.2
10.2
18.0
3.2.3.2 LPCVD process
-
due to the low pressure refresh intervals are not an issue. Use the initial gasflows and pressure
settings recommended in the appropriate process description.
- use a flat temperature
Most LPCVD processes exhibit the depletion effect. This shows as a reduction in the deposition rate at the
pump side due to consumption of process gases.
The reason to start of with a flat temperature is to make sure the machine is performing as
expected (and therefore should give a depletion effect). A ramped temperature can be used after that
to counter the expected depletion effects.
3.2.4
Further fine-tuning
Use the trouble shooting tables at each process desciption to fine-tune the process result, meet the
specifications and/or improve the process.
PROCESS MANUAL
3.2-2
PROCESS SETUP AND ACCEPTANCE
3.3
Alarm handling with Branch and Abort commands
3.3.1
Introduction
The Tempress Systems, Inc. process controller, DPC, has some special features that allow alarm
conditions to be handled automatically.
A process recipe is made of steps, and within one step several commands can be programmed.
Alarm conditions can be set, and when these conditions are compromised a very specific alarm message is
generated. It is up to the process engineer to decide whether or not action is required on the specific alarm
message.
Three options are available to the process engineer:
1) do nothing, the process recipe continues as programmed
2) branch to another step within the process recipe
3) abort the process recipe, which brings the tube back to step 0 of that process recipe.
The Branch on Alarm command is issued after 3 seconds of consecutive alarm condition and jumps to the
designated step within the same process recipe.
The Abort on Alarm command is issued after 30 seconds of consecutive alarm condition and aborts the
process recipe, either directly into step 0 of that process recipe, or via an assigned Abort Recipe.
3.3.2
Do nothing with an alarms
Some types of alarm conditions are not important enough to stop a running process. These alarms still
need to be fixed, though, and can be traced in long term history using the Tempress Systems, Inc. host
computer system TSC-2 and short term history using the touchscreen alarm status screen.
An example of this type of alarm is a temperature limit alarm during ramping, or a bubbler level alarm
while the bubbler is not used in this particular process recipe.
3.3.3
Handling alarms with the Branch command
Any kind of alarm can be handled by the Branch command. It is often used to finish a process recipe
trying to save valuable process wafers.
Figure 3-1: Branch command jumps to a specified step number
PROCESS MANUAL
3.3-1
PROCESS SETUP AND ACCEPTANCE
As the DPC has been designed to remember the last settings until they are changed, it is vital to verify the
settings in the step one branches to.
For example, in step 3 of the schematic above a Branch on Alarm y has been programmed. If this Alarm y
occurs for more than 3 consecutive seconds then the DPC will branch to step 5. While branching it
bypasses any changes programmed in step 4.
3.3.4
Handling alarms with the Abort command
An Abort command can be issued in two ways:
1) programmed in a process recipe in a specific step
2) manually by an operator at any time
If any Abort command is issued the DPC will stop the running process recipe. The DPC will return to
step 0 of the process recipe, either directly or via an Abort Recipe. An Abort recipe also contains steps
and is used to bring the tube in a safe condition.
Note: An Abort recipe must be programmed such that a tube is automatically brought to a SAFE
situation.
As step 0 of the process recipe is the target of an Abort command it should be programmed to contain a
safe condition. In some applications however, such as in a 24hr production environment, this is likely not
the case.
Therefore, the use of an Abort recipe must be applied as soon as in the process recipe potentially
dangerous situations occur when that process recipe is aborted and brought back to step 0.
3.3.4.1 Abort command in a specific step
The programmed Abort command can be used similarly to the Branch on Alarm command. In fact, an
Abort command could be interpreted as a Branch on Alarm to Step 0 command.
Figure 3-2: Abort command initiated from a specific alarm condition without (left) and with (rightt) the use of an
Abort recipe
PROCESS MANUAL
3.3-2
PROCESS SETUP AND ACCEPTANCE
3.3.4.2 Manual abort command at any time
A manual Abort command can be issued at any time by an operator and should be used only if a potentially
dangerous or damaging situation is likely to occur that can only be prevented by aborting the running
process quickly.
Also, the manual Abort command is used to stop a process recipe with an endless loop.
Because the manual Abort command can be issued at any time, the use of an Abort recipe must be applied
as soon as in the process recipe potentially dangerous situations occur when that process recipe is aborted
and brought back to step 0.
Figure 3-3: An operator initiated Abort command without (left) and with (right) the use of an Abort recipe
3.3.5
Recipe example: LPCVD Nitride abort recipe
1 00 EVACUATE
2
Message ABORTED !!! [16]. Sonalert alarm No
3
Time: 000:15:00 (hr:min:sec) Variable Command: No
4
Normal recipe 00 Zone1 800.0 °C Slope 10.00 °C/min Zone2 800.0 °C Slope 10.00 °C/min
Zone3 800.0 °C Slope 10.00 °C/min Zone4 800.0 °C Slope 10.00 °C/min Zone5 800.0 °C Slope
10.00 °C/min , profile table A
5
Boat to 2000.0 mm at 300.0 mm/min with oscillation speed of 0.0 mm/min. Variable Command:
No
6
Gas N2 [1] at 0.00 [SLM ] Variable Command: No
7
Gas DCS 1 [2] at 0.0 [SCCM] Variable Command: No
8
Gas DCS 2 [3] at 0.0 [SCCM] Variable Command: No
9
Gas NH3 [4] at 0 [SCCM] Variable Command: No
10
Gas PRESSURE [8] at 0 [MTOR] Variable Command: No
11
Digital out ,,,,,,,WATERVLV[8] = ON Variable Command: No
12
Digital out N2 PURGE[9] = OFF,N2PROCES[10] = ON,PROCESS[11] =
ON,EVACDCS1[12] = OFF,EVACDCS2[13] = OFF,EVACNH3[14] = OFF,SOFTSTRT[15] =
ON,MAINVAC[16] = ON Variable Command: No
13
Alarm Limit Setting for All Analog Output Channel at 0 %
14
Alarm on digital in PRESS N2[1] = ON,PRESSAIR[2] = ON,DOORCLSD[3] =
ON,VACFAIL[4] = ON,WATRCOOL[5] = ON,,TEMP SCR[7] = ON,EXCESS[8] = ON
15
Alarm on digital in FANCONTR[9] = ON,,,OPERATE[12] = ON,WARNING[13] =
ON,FAILURE[14] = ON,,
16 01 PURGE
PROCESS MANUAL
3.3-3
PROCESS SETUP AND ACCEPTANCE
17
18
19
20 02
21
22
23
24 03
25
26
27
28 04
29
30
31
32 05
33
34
35
36
37
Message ABORTED !!! [16]. Sonalert alarm No
Time: 000:15:00 (hr:min:sec) Variable Command: No
Digital out N2 PURGE[9] = ON,N2PROCES[10] = ON,PROCESS[11] = ON,EVACDCS1[12]
= OFF,EVACDCS2[13] = OFF,EVACNH3[14] = OFF,SOFTSTRT[15] = ON,MAINVAC[16]
= ON Variable Command: No
EVACUATE
Message ABORTED !!! [16]. Sonalert alarm No
Time: 000:05:00 (hr:min:sec) Variable Command: No
Digital out N2 PURGE[9] = OFF,N2PROCES[10] = ON,PROCESS[11] =
ON,EVACDCS1[12] = OFF,EVACDCS2[13] = OFF,EVACNH3[14] = OFF,SOFTSTRT[15] =
ON,MAINVAC[16] = ON Variable Command: No
READY
Message STANDBY [1]. Sonalert alarm Yes
Digital out N2 PURGE[9] = ON,N2PROCES[10] = ON,PROCESS[11] = ON,EVACDCS1[12]
= OFF,EVACDCS2[13] = OFF,EVACNH3[14] = OFF,SOFTSTRT[15] = ON,MAINVAC[16]
= ON Variable Command: No
Wait for operator
BACKFILL 1
Message BACKFILL [14]. Sonalert alarm No
Time: 000:01:00 (hr:min:sec) Variable Command: No
Digital out N2 PURGE[9] = ON,N2PROCES[10] = ON,PROCESS[11] = ON,EVACDCS1[12]
= OFF,EVACDCS2[13] = OFF,EVACNH3[14] = OFF,SOFTSTRT[15] = ON,MAINVAC[16]
= OFF Variable Command: No
BACKFILL 2
Message BACKFILL [14]. Sonalert alarm No
Time: 000:10:00 (hr:min:sec) Variable Command: No
Gas N2 [1] at 10.00 [SLM ] Variable Command: No
Digital out N2 PURGE[9] = ON,N2PROCES[10] = ON,PROCESS[11] = ON,EVACDCS1[12]
= OFF,EVACDCS2[13] = OFF,EVACNH3[14] = OFF,SOFTSTRT[15] = OFF,MAINVAC[16]
= OFF Variable Command: No
END
PROCESS MANUAL
3.3-4
PROCESS SETUP AND ACCEPTANCE
3.4
Process acceptance conditions
The process specifications of Amtech/Tempress Systems, Inc. can only be guaranteed if the
conditions are satisfied as described in the following sections.
3.4.1
Introduction
The Tempress process is characterised with either film thickness, sheet resistivity, added particle
count, refractive index and/or dopant concentration, where applicable.
3.4.1.1 Uniformity definitions
Standard edge exclusion: 5 to 9 mm depending on wafer size and process unless otherwise stated in
the process specifications.
Table 3-2: Default edge exclusion
Wafer diameter
[mm]
76.2
100
125
150
200
300
Edge exclusion
[mm]
4
5
5
6
9
9
Minimum, maximum and average values are measured over 5 or 9 points as shown in the picture
below. Default amount of measurement points are indicated in Table 3-3.
Figure 3-4: 5 or 9 measurement point indicator
Table 3-3: Default amount of measurement points
Wafer diameter
[mm]
76.2
100
125
150
200
300
PROCESS MANUAL
Measurement points
[nr]
5
5
5
5
9
9
3.4-1
PROCESS SETUP AND ACCEPTANCE
3.4.1.2 Formula’s
-
The general formula that is used for the uniformity calculation:
Uniformity [+-%] = maximum value – minimum value
2 * average value
-
The point-to-point (cross wafer) uniformity is presented as an average wafer value +/- the
uniformity in %. It is based on 5 or 9 measurement points as indicated in section Error!
Reference source not found..
P/P Uniformity [+-%] = maximum (point) value – minimum (point) value
2 * average (5 or 9 point) value
-
The wafer-to-wafer (cross load) uniformity is presented as an average load value +/- the
uniformity in %. It is based on the average wafer values as determined in the point-to-point
uniformity calculation.
W/W Uniformity [+-%] = maximum (wafer average) value – minimum (wafer average) value
2 * average (all wafer average) value
-
The run-to-run uniformity is presented as an average run value +/- the uniformity in %. It is
based on the average load values as determined in the wafer-to-wafer calculation.
R/R Uniformity [+-%] = maximum (load average) value – minimum (load average) value
2 * average (run average) value
Example:
Figure 3-5 : Example of process result calculation
3.4.1.3 Equipment
-
Standard Process recipes supplied by Amtech/Tempress Systems will be used for process
acceptance runs.
-
All measurement equipment should be supplied by the customer and be available to the
Amtech/Tempress Systems Engineer.
PROCESS MANUAL
3.4-2
PROCESS SETUP AND ACCEPTANCE
-
Thickness and refractive index measurements should be done with a Plasmos automated
ellipsometer or comparable equipment.
-
Sheet resistivity should be measured with an automated 4-point probe or comparable machine.
-
Dopant concentration measurement should be supplied by the customer. Dopant variation will
be characterised in absolute percentages and measured with SIMS or a comparable technique.
-
Particle measurements should be done with a Tencor Surfscan 6420 or comparable equipment.
PROCESS MANUAL
3.4-3
PROCESS SETUP AND ACCEPTANCE
3.4.2
Default process test conditions
3.4.2.1 Test material requirements
Bare Si wafers are prime wafers, single or double side mirror polished and according to SEMI
standard M1-0298.
Standard film thickness, sheet resistivity and/or dopant concentration as indicated in this section
apply unless otherwise stated in the customer specific process specifications.
3.4.2.2 Tempress Systems, Inc. Atmospheric processes
Atm-01 Anneal
Test: temperature overshoot and stability
Atm-02 Metalalloy anneal
Test: temperature overshoot and stability
Atm-03 Dry oxidation
test thickness: 500Å
test temperature: 1000oC
time indication: 60 min
base: bare Si wafer
testmethod: ellipsometer
Atm-04 Dry oxidation + liquid cleaning
test thickness: 500Å
test temperature: 1000oC
time indication: 60 min
base: bare Si wafer
testmethod: ellipsometer
Atm-04s Thin gate oxidation +Atmoscan®
test thickness: 500Å
test temperature: 1000oC
time indication: 60 min
base: bare Si wafer
testmethod: ellipsometer
Atm-05 Pyrogenic oxidation
Equipment: Tempress Systems, Inc. external torch
test thickness: 2000Å
test temperature: 1000oC
time indication: 30 min
PROCESS MANUAL
3.4-4
PROCESS SETUP AND ACCEPTANCE
base: bare Si wafer
testmethod: ellipsometer
Atm-06 Pyrogenic oxidation + liquid cleaning
Equipment: Tempress Systems, Inc. external torch
test thickness: 2000Å
test temperature: 1000oC
time indication: 30 min
base: bare Si wafer
testmethod: ellipsometer
Atm-07 reserved
Atm-08 POCl3 diffusion
Test sheet resistivity: 8 or 30 ohm/square
test temperature: 900oC deposition - 1000 drive-in oC
time indication: 30 min – 30 min
base: bare Si wafer
testmethod: four-point probe
Atm-09 reserved
Atm-10 reserved
Atm-11 reserved
Atm-12 Wet oxidation H2O bubbler
test thickness: 2000Å
test temperature: 1000oC
time indication: 30 min
base: bare Si wafer
testmethod: ellipsometer
Atm-13 Wet oxidation H2O injection
Equipment: Tempress Systems, Inc. water injection
test thickness: 2000Å
test temperature: 1000oC
time indication: 30 min
base: bare Si wafer
testmethod: ellipsometer
PROCESS MANUAL
3.4-5
PROCESS SETUP AND ACCEPTANCE
3.4.2.3 Tempress Systems, Inc. LPCVD processes
LP-01 Ramped poly
test thickness: 3000Å
test temperature: 625oC (ramped)
time indication: 30 min
base: 1000Å dryoxide on Si wafer
testmethod: ellipsometer
LP-02 Flat poly
test thickness: 3000Å
test temperature: 610oC
time indication: 30 min
base: 1000Å dryoxide on Si wafer
testmethod: ellipsometer
LP-03 Sipos
test thickness: 2000Å
test temperature: 670oC (ramped)
time indication: 30 min
base: 1000Å dryoxide on Si wafer
testmethod: incremental thickness/mass method or ellipsometer
LP-04 Nitride
test thickness: 900Å (blue)
test temperature: 800oC (ramped)
time indication: 30 min
base: bare Si wafer
testmethod: ellipsometer
LP-04s Low stress nitride
test thickness: 3000Å
test temperature: 850oC
time indication: 30 min
test refractive index: 2.15
test stress: <= 200MPa tensile
base: bare Si wafer
testmethod: ellipsometer, curvature
LP-05 Oxynitride
test thickness: 900Å
test temperature: 800oC
time indication: 30 min
test refractive index: 1.8
base: bare Si wafer
testmethod: ellipsometer
PROCESS MANUAL
3.4-6
PROCESS SETUP AND ACCEPTANCE
LP-06 undoped TEOS
test thickness: 2000Å
test temperature: 725oC
time indication: 30 min
base: bare Si wafer
testmethod: ellipsometer
LP-07 undoped LTO
test thickness: 1500 Å
test temperature: 425oC
time indication: 30 min
base: bare Si wafer
testmethod: ellipsometer
LP-08 HTO
test thickness: 900 Å
test temperature: 900oC
time indication: 30 min
base: bare Si wafer
testmethod: ellipsometer
LP-09 Phosphorous doped poly
test thickness: 5000Å
test temperature: 600oC
time indication: 400 min
test sheet resistivity: 20 ohm/square (after 30 min 900oC N2 anneal)
base: 1000Å dryoxide on Si wafer
testmethod: ellipsometer (thickness), four-point probe (sheet resistivity)
LP-10 Boron doped poly
test thickness: 5000Å
test temperature: 600oC
time indication: 400 min
test sheet resistivity: 20 ohm/square (after 30 min 900oC N2 anneal)
base: 1000Å dryoxide on Si wafer
testmethod: ellipsometer (thickness), four-point probe (sheet resistivity)
LP-11 reserved
LP-12 reserved
LP-13 reserved
PROCESS MANUAL
3.4-7
PROCESS SETUP AND ACCEPTANCE
0
LP-15 BPSG TEOS
test thickness: 3000 Å
dopant concentration: 4%B, 4%P
test temperature: 680oC
time indication: 30 min
base: bare Si wafer
testmethod: ellipsometer (thickness), SIMS (dopant)
LP-16 PSG LTO
test thickness: 2000 Å
dopant concentration: 8%P
test temperature: 425oC
time indication: 30 min
base: bare Si wafer
testmethod: ellipsometer (thickness), SIMS (dopant)
LP-17 reserved
LP-18 BPSG LTO
test thickness: 2000 Å
dopant concentration: 4%B, 4%P
test temperature: 425oC
time indication: 30 min
base: bare Si wafer
testmethod: ellipsometer (thickness), SIMS (dopant)
LP-19 Thantalum oxide
test thickness: 600 Å
test temperature: 400oC
time indication: 30 min
base: bare Si wafer
testmethod: ellipsometer
LP-20 reserved
PROCESS MANUAL
3.4-8
PROCESS SETUP AND ACCEPTANCE
PROCESS MANUAL
3.4-9
PROCESS DESCRIPTION
4.Process description
A variety of guaranteed processes are available on the Tempress Diffusion systems, including:
Atmospheric
•
Anneal
•
Dry Oxidation (with or without TransLC® cleaning)
•
Wet Oxidation (with or without TransLC® cleaning)
•
POCl3
Low pressure
•
Ramped Poly
•
Flat Poly
•
Nitride
•
TEOS
•
LTO
•
Ta2O5
Because of the flexibility of the Tempress Systems Inc. systems variations on these processes are
available as well and will be manufactured on customer request.
PROCESS MANUAL
4-1
PROCESS DESCRIPTION
4.1
Nitride from NH3 and SiH2Cl2
4.1.1
Basic configuration
NH3, SiH2Cl2 (DCS)
Temperature ramp at 700-800oC
4.1.2
Description
4.1.2.1 Purpose
Nitride is used as an insulating and masking layer in electrical applications, and as an antireflecting coating in optical applications.
4.1.2.2 Chemicals
SiH2Cl2, also known as DCS (DiChloroSilane), is a liquid at room temperature with a vapor
pressure of 16 psi. Due to this relatively low vapor pressure it easily condensates at cold spots
and care should be taken to prevent these.
The residue of the reaction of DCS and NH3 is NH4Cl.
Some properties of NH4Cl:
Sublimation at 320oC @ 1 atm.
Sublimation at 120oC @ 100 mtor. See also its vapor pressure curve in the appendix.
Two different forms are likely to occur:
A white powdery form and a glassy solid form. The glassy form is what occurs as the gasses
cool down abruptly on a cold surface. This is the form that is wanted on the coldtrap. The
white form occurs from condensation in the gas phase, and will not be trapped by the
coldtrap. Instead, it will be found at the inlet filter of the dry pump and in the exhaust of the
same pump, or in the oil of a wet pump.
4.1.2.3 Process
The chemical reaction is as follows assuming a complete reaction:
3SiH2Cl2 + 7NH3 Æ Si3N4 + 6H2 + 3HCl + 3NH4Cl
The thickness uniformity decreases along the load due to depletion of DCS, much like
depletion of SiH4 in the poly-Si process.
A temperature ramp as high as of + and – 30oC around the center temperature is sufficient to
overcome this problem. Cross-wafer uniformity is usually very good, since the deposition
process is limited by the surface reaction part. A decreasing process pressure does improve
the uniformity, mainly the cross load. If relatively small wafers are used compared to the tube
diameter an increased gas flow improves cross-wafer and cross-load uniformity dramatically.
PROCESS MANUAL
4.1-1
PROCESS DESCRIPTION
4.1.2.4 Typicalities
Due to the low vapor pressure condensation may occur at any cold spot in the supply line.
Condensation leads to droplets formation, which cause MFC blockage. Heat tracing the
supply line strongly depends on the customer situation. A long distance between the bottle
cabinet and tube necessitates heating. This includes the bottle and lines supplied by the
customer, and the lines in the gas cabinet up to the MFC.
On the other hand, a small distance may not require heating and simple insulation may be
sufficient. Therefore, insulation and heating of the supply lines needs to be addressed at each
location. If it is a necessity apply an increased temperature from bottle to tube.
Due to the lower pressure downstream the MFC heating is not required from the MFC to the
tube and insulation is sufficient.
As DCS reacts with NH3 the residual product is NH4Cl. That must be trapped using a
coldtrap. These gasses should be cooled down with a shock, not with a gradual decrease.
A cooled flange is required to extent O-ring lifetime, due to the high temperature of 770-800830oC. Especially at unloading conditions, the door O-ring is likely to burn. Also, the balljoint
O-ring receives a lot of heat, especially at pumping down conditions.
However, a too cold flange will cause NH4Cl condensation, which shows as a white powder
deposit on the flange.
To improve cross-wafer uniformity in the first few wafers it is necessary to apply a set of
dummy wafers at the gas inlet side of the load. An extra boat might be necessary.
4.1.3
Process result indication
Nitride results (2)
pressure effect
70
thickness [A]
60
50
40
30
high flow
medium flow
low flow
20
10
0
0
4.1.4
50
100
150
200
250
deposition pressure [mtor]
300
350
Startup parameters for processing
The optical properties of a new and/or cleaned quartz tube change most dramatically after
the first deposition of foreign (=different refractive index) material. For accurate temperature
control a new and/or cleaned tube needs therefore to be coated before any (automatic)
profiling is performed. Use the default process settings for 1 hour to obtain a reasonable
coating.
SiH2Cl2
NH3
Type
Wafer
Process
Pressure
Thickness
Temp.
[sccm]
[sccm]
Size
Time
[mtor]
[Å]
[oC]
[mm]
[min]
PROCESS MANUAL
4.1-2
PROCESS DESCRIPTION
TS630x
TS660x
TS680x
TS6100x
TS840x
TS860x
TS8100x
TS1280x
4.1.5
100
150
100
150
100
150
100
150
150
200
150
200
150
200
200
300
30
250
1000
800
20
60
30
250
1000
800
30
90
30
250
1000
800
40
120
30
250
1000
800
50
150
30
250
1000
800
50
150
30
250
1000
800
60
180
30
250
1000
800
100
300
30
200
1000
800
150
450
Recommended cleaning interval
Cleaning interval for the several components after cumulative deposition in microns on the
wafers.
Tube
Cassettes
/ SiC paddle
Trap (upstream Oil and filter
baffles
tubing)
change
Nitride
4
2
4
2
10
PROCESS MANUAL
4.1-3
PROCESS DESCRIPTION
4.1.6
Gas schematic example: LPCVD siliconnitride
N2
NH3
DCS
PS
Water
Coldtrap
10T/ATM
Baratron
To pump
Vacuum
testport
PROCESS MANUAL
4.1-4
PROCESS DESCRIPTION
4.1.7
1
2
3
4
5
6
7
8
9
10
11
12
13
14
15
16
17
18
19
20
21
22
23
24
25
26
27
28
29
30
31
32
33
34
35
36
Recipe example: LPCVD siliconnitride from SiH2Cl2 and NH3
00 START RECIPE
Message LOAD/UNLOAD [4]. Sonalert alarm No
Normal recipe 00 Zone1 800.0 °C Slope 10.00 °C/min Zone2 800.0 °C Slope 10.00
°C/min Zone3 800.0 °C Slope 10.00 °C/min , profile table A
Boat to 2000.0 mm at 300.0 mm/min with oscillation speed of 0.0 mm/min.
Variable Command: No
Gas N2 [1] at 0.00 [SLM] Variable Command: No
Gas DCS 1 [2] at 0.0 [SCCM] Variable Command: No
Gas DCS 2 [3] at 0.0 [SCCM] Variable Command: No
Gas NH3 [4] at 0 [SCCM] Variable Command: No
Gas PRESSURE [8] at 0 [MTOR] Variable Command: No
Digital out ,,,,,,,WATERVLV[8] = ON Variable Command: No
Digital out N2 PURGE[9] = OFF,N2PROCES[10] = OFF,PROCESS[11] =
OFF,EVACDCS1[12] = OFF,EVACDCS2[13] = OFF,EVACNH3[14] =
OFF,SOFTSTRT[15] = OFF,MAINVAC[16] = OFF Variable Command: No
Alarm Limit Setting for All Analog Output Channel at 0 %
Alarm on digital in PRESS N2[1] = ON,PRESSAIR[2] = ON,doorclsd[3] =
OFF,VACFAIL[4] = OFF,WATRCOOL[5] = OFF,,TEMP SCR[7] =
ON,EXCESS[8] = ON
Alarm on digital in FANCONTR[9] = ON,,,OPERATE[12] = ON,WARNING[13]
= ON,FAILURE[14] = ON,,
01 BOAT OUT
Message BOAT OUT [3]. Sonalert alarm No
Time: 000:10:00 (hr:min:sec) Variable Command: No
Boat to 10.0 mm at 300.0 mm/min with oscillation speed of 0.0 mm/min. Variable
Command: No
Gas N2 [1] at 10.00 [SLM] Variable Command: No
Digital out N2 PURGE[9] = ON,N2PROCES[10] = ON,PROCESS[11] =
OFF,EVACDCS1[12] = OFF,EVACDCS2[13] = OFF,EVACNH3[14] =
OFF,SOFTSTRT[15] = OFF,MAINVAC[16] = OFF Variable Command: No
Wait for boat to reach setpoint
02 LOAD WAFERS
Message LOADWAFERS [5]. Sonalert alarm Yes
Wait for operator
03 BOAT IN
Message BOAT IN [2]. Sonalert alarm No
Time: 000:10:00 (hr:min:sec) Variable Command: No
Boat to 2000.0 mm at 300.0 mm/min with oscillation speed of 0.0 mm/min.
Variable Command: No
Wait for boat to reach setpoint
Wait on digital in PRESS N2[1] = OFF,PRESSAIR[2] = OFF,doorclsd[3] =
ON,VACFAIL[4] = OFF,WATRCOOL[5] = OFF,,TEMP SCR[7] =
OFF,EXCESS[8] = OFF
04 EVAC 1
Message EVACUATE 1 [8]. Sonalert alarm No
Time: 000:01:00 (hr:min:sec) Variable Command: No
Gas N2 [1] at 0.00 [SLM] Variable Command: No
Digital out N2 PURGE[9] = ON,N2PROCES[10] = ON,PROCESS[11] =
OFF,EVACDCS1[12] = OFF,EVACDCS2[13] = OFF,EVACNH3[14] =
OFF,SOFTSTRT[15] = ON,MAINVAC[16] = OFF Variable Command: No
05 EVAC 2
PROCESS MANUAL
4.1-5
PROCESS DESCRIPTION
37
38
39
40
41
42
43
44
45
46
47
48
49
50
51
52
53
54
55
56
57
58
59
60
61
62
63
64
65
66
67
68
69
70
71
72
Message EVACUATE 2 [9]. Sonalert alarm No
Time: 000:05:00 (hr:min:sec) Variable Command: No
Digital out N2 PURGE[9] = OFF,N2PROCES[10] = ON,PROCESS[11] =
OFF,EVACDCS1[12] = OFF,EVACDCS2[13] = OFF,EVACNH3[14] =
OFF,SOFTSTRT[15] = ON,MAINVAC[16] = ON Variable Command: No
Wait on digital in PRESS N2[1] = OFF,PRESSAIR[2] = OFF,doorclsd[3] =
OFF,VACFAIL[4] = ON,WATRCOOL[5] = OFF,,TEMP SCR[7] =
OFF,EXCESS[8] = OFF
Branch on wait alarm to step BACKFILL 1. Sonalert alarm Yes
06 EVAC 3
Message EVACUATE 3 [10]. Sonalert alarm No
Time: 000:05:00 (hr:min:sec) Variable Command: No
Digital out ,,,,,,,WATERVLV[8] = OFF Variable Command: No
Digital out N2 PURGE[9] = OFF,N2PROCES[10] = ON,PROCESS[11] =
ON,EVACDCS1[12] = OFF,EVACDCS2[13] = OFF,EVACNH3[14] =
OFF,SOFTSTRT[15] = ON,MAINVAC[16] = ON Variable Command: No
Abort recipe 01
07 PURGE
Message PURGE [12]. Sonalert alarm No
Time: 000:05:00 (hr:min:sec) Variable Command: No
Digital out N2 PURGE[9] = ON,N2PROCES[10] = ON,PROCESS[11] =
ON,EVACDCS1[12] = OFF,EVACDCS2[13] = OFF,EVACNH3[14] =
OFF,SOFTSTRT[15] = ON,MAINVAC[16] = ON Variable Command: No
Alarm limit setting for Gas PRESSURE [8] at 0 % ( ± 0 MTOR) Variable Command:
No
08 EVACUATE
Message EVACUATE 3 [10]. Sonalert alarm No
Time: 000:05:00 (hr:min:sec) Variable Command: No
Digital out N2 PURGE[9] = OFF,N2PROCES[10] = ON,PROCESS[11] =
ON,EVACDCS1[12] = OFF,EVACDCS2[13] = OFF,EVACNH3[14] =
OFF,SOFTSTRT[15] = OFF,MAINVAC[16] = ON Variable Command: No
09 LEAKCHECK
Message LEAKCHECK [11]. Sonalert alarm No
Time: 000:02:00 (hr:min:sec) Variable Command: No
Digital out N2 PURGE[9] = OFF,N2PROCES[10] = ON,PROCESS[11] =
ON,EVACDCS1[12] = OFF,EVACDCS2[13] = OFF,EVACNH3[14] =
OFF,SOFTSTRT[15] = OFF,MAINVAC[16] = OFF Variable Command: No
Alarm limit setting for Gas PRESSURE [8] at 2 % ( ± 40 MTOR) Variable
Command: No
Branch on gas/pressure PRESSURE [8] to step PURGE. Sonalert alarm Yes
10 EVACUATE
Message EVACUATE 3 [10]. Sonalert alarm No
Time: 000:00:30 (hr:min:sec) Variable Command: No
Normal recipe 01 Zone1 800.0 °C Slope 0.00 °C/min Zone2 800.0 °C Slope 0.00
°C/min Zone3 800.0 °C Slope 0.00 °C/min , profile table A
Digital out N2 PURGE[9] = OFF,N2PROCES[10] = ON,PROCESS[11] =
ON,EVACDCS1[12] = OFF,EVACDCS2[13] = OFF,EVACNH3[14] =
OFF,SOFTSTRT[15] = OFF,MAINVAC[16] = ON Variable Command: No
Alarm limit setting for Gas PRESSURE [8] at 0 % ( ± 0 MTOR) Variable Command:
No
11 SET NH3
Message PURGE [12]. Sonalert alarm No
Time: 000:01:00 (hr:min:sec) Variable Command: No
Gas [NH3 [4]] at [180] [SCCM] Variable Command: Yes
PROCESS MANUAL
4.1-6
PROCESS DESCRIPTION
73 12 SET PRESSURE
74
Message PURGE [12]. Sonalert alarm No
75
Time: 000:02:00 (hr:min:sec) Variable Command: No
76
Gas [PRESSURE [8]] at [250] [MTOR] Variable Command: Yes
77
Alarm limit setting for Gas NH3 [4] at 10 % ( ± 50 SCCM) Variable Command: No
78
Branch on gas/pressure NH3 [4] to step NH3 PURGE. Sonalert alarm Yes
79 13 DEPOSITION
80
Message DEPOSITION [13]. Sonalert alarm No
81
Time: [000:30:00] (hr:min:sec) Variable Command: Yes
82
Gas DCS 1 [2] at [60.0] [SCCM] Variable Command: Yes
83
Alarm limit setting for Gas DCS 1 [2] at 10 % ( ± 20.0 SCCM) Variable Command:
No
Alarm limit setting for Gas PRESSURE [8] at 5 % ( ± 100 MTOR) Variable
Command: No
85
Branch on gas/pressure DCS 1 [2] to step NH3 PURGE. Sonalert alarm Yes
86
Branch on gas/pressure NH3 [4] to step NH3 PURGE. Sonalert alarm Yes
87
Branch on gas/pressure PRESSURE [8] to step NH3 PURGE. Sonalert alarm Yes
88 14 NH3 PURGE
89
Message PURGE [12]. Sonalert alarm No
90
Time: 000:02:00 (hr:min:sec) Variable Command: No
91
Gas DCS 1 [2] at 0.0 [SCCM] Variable Command: No
92
Gas PRESSURE [8] at 0 [MTOR] Variable Command: No
93
Digital out N2 PURGE[9] = OFF,N2PROCES[10] = ON,PROCESS[11] =
ON,EVACDCS1[12] = OFF,EVACDCS2[13] = OFF,EVACNH3[14] =
OFF,SOFTSTRT[15] = ON,MAINVAC[16] = ON Variable Command: No
94
Alarm Limit Setting for All Analog Output Channel at 0 %
95 15 EVAC CONTINUED
96
Message EVACUATE 3 [10]. Sonalert alarm No
97
Time: 000:05:00 (hr:min:sec) Variable Command: No
98
Gas NH3 [4] at 0 [SCCM] Variable Command: No
99
Digital out N2 PURGE[9] = OFF,N2PROCES[10] = ON,PROCESS[11] =
ON,EVACDCS1[12] = OFF,EVACDCS2[13] = OFF,EVACNH3[14] =
OFF,SOFTSTRT[15] = ON,MAINVAC[16] = ON Variable Command: No
100 16 PURGE
101
Message PURGE [12]. Sonalert alarm No
102
Time: 000:05:00 (hr:min:sec) Variable Command: No
103
Digital out N2 PURGE[9] = ON,N2PROCES[10] = ON,PROCESS[11] =
ON,EVACDCS1[12] = OFF,EVACDCS2[13] = OFF,EVACNH3[14] =
OFF,SOFTSTRT[15] = ON,MAINVAC[16] = ON Variable Command: No
104 17 EVACUATE
105
Message EVACUATE 3 [10]. Sonalert alarm No
106
Time: 000:05:00 (hr:min:sec) Variable Command: No
107
Digital out N2 PURGE[9] = OFF,N2PROCES[10] = ON,PROCESS[11] =
ON,EVACDCS1[12] = OFF,EVACDCS2[13] = OFF,EVACNH3[14] =
OFF,SOFTSTRT[15] = ON,MAINVAC[16] = ON Variable Command: No
108 18 LEAKCHECK
109
Message LEAKCHECK [11]. Sonalert alarm No
110
Time: 000:02:00 (hr:min:sec) Variable Command: No
111
Digital out N2 PURGE[9] = OFF,N2PROCES[10] = ON,PROCESS[11] =
ON,EVACDCS1[12] = OFF,EVACDCS2[13] = OFF,EVACNH3[14] =
OFF,SOFTSTRT[15] = OFF,MAINVAC[16] = OFF Variable Command: No
112
Alarm limit setting for Gas PRESSURE [8] at 2 % ( ± 40 MTOR) Variable
Command: No
84
PROCESS MANUAL
4.1-7
PROCESS DESCRIPTION
Branch on gas/pressure PRESSURE [8] to step EVAC CONTINUED. Sonalert
alarm Yes
114 19 READY
115
Message STANDBY [1]. Sonalert alarm No
116
Digital out N2 PURGE[9] = ON,N2PROCES[10] = ON,PROCESS[11] =
ON,EVACDCS1[12] = OFF,EVACDCS2[13] = OFF,EVACNH3[14] =
OFF,SOFTSTRT[15] = OFF,MAINVAC[16] = ON Variable Command: No
117
Wait for operator
118 20 BACKFILL 1
119
Message BACKFILL [14]. Sonalert alarm No
120
Time: 000:01:00 (hr:min:sec) Variable Command: No
121
Gas N2 [1] at 0.00 [SLM] Variable Command: No
122
Gas DCS 1 [2] at 0.0 [SCCM] Variable Command: No
123
Gas DCS 2 [3] at 0.0 [SCCM] Variable Command: No
124
Gas NH3 [4] at 0 [SCCM] Variable Command: No
125
Gas PRESSURE [8] at 0 [MTOR] Variable Command: No
126
Digital out ,,,,,,,WATERVLV[8] = ON Variable Command: No
127
Digital out N2 PURGE[9] = ON,N2PROCES[10] = ON,PROCESS[11] =
ON,EVACDCS1[12] = OFF,EVACDCS2[13] = OFF,EVACNH3[14] =
OFF,SOFTSTRT[15] = ON,MAINVAC[16] = OFF Variable Command: No
128
Alarm on digital in PRESS N2[1] = ON,PRESSAIR[2] = ON,doorclsd[3] =
ON,VACFAIL[4] = OFF,WATRCOOL[5] = ON,,TEMP SCR[7] =
ON,EXCESS[8] = ON
129
Abort recipe 08
130 21 BACKFILL 2
131
Message BACKFILL [14]. Sonalert alarm No
132
Time: 000:10:00 (hr:min:sec) Variable Command: No
133
Gas N2 [1] at 10.00 [SLM] Variable Command: No
134
Digital out N2 PURGE[9] = ON,N2PROCES[10] = ON,PROCESS[11] =
ON,EVACDCS1[12] = OFF,EVACDCS2[13] = OFF,EVACNH3[14] =
OFF,SOFTSTRT[15] = OFF,MAINVAC[16] = OFF Variable Command: No
135 END
113
4.1.8
Troubleshooting a standard-nitride process
Problem:
Cause:
Wafers are thick at door side and • Depletion of DCS
thin at pump side.
• Temperature ramp is
correct.
• Insuffient dummywafers
Wafers are thick at the pump side •
and thin at the door side.
•
Wafers are thick at the top and •
thin at the bottom.
PROCESS MANUAL
Solution:
• Increase temperature ramp
(door side temperature lower
not
then pump side temperature).
• Decrease process pressure.
• Increase DCS flow.
• Use 5-10 dummy wafers at
pump side
Temperature ramp is not • Reduce temperature ramp
correct.
(door side temperature higher
then pump side temperature).
Insuffient dummywafers
• Use 12-25 dummy wafers at
doorside
The paddle is situated too • Adjust height of the paddle at
high in the tube.
the cantilever system.
4.1-8
PROCESS DESCRIPTION
•
The paddle is colder then the •
wafers and the tube.
Wafers are thick at the edges and •
thin at the center.
•
Temperature
is
not •
homogeneous within wafer.
Process pressure is too high.
•
•
No consistency in uniformity.
•
•
•
Dirty quartz ware or wafers.
No constant pressure control.
•
Draft along the furnace.
•
•
Layer is too thin cross load.
•
•
Deposition time is too short.
Pressure is too low.
Layer is too thick cross load
•
•
Deposition time is too long.
Pressure is too high.
4.1.9
•
•
•
•
Insert
temperature
stabilization step in the recipe
after ‘evacuate’ and/or ‘heat
up’ step.
Insert
temperature
stabilization step in the recipe
after ‘boat in’ and/or ‘heat up’
step.
Decrease process pressure.
Clean tube, quartz ware and
paddle.
Use clean wafers.
Check pressure control.
Decrease draft by reducing
overpressure cleanroom or
close possible draft holes.
Increase deposition time in
recipe.
Increase pressure.
Decrease deposition time in
recipe.
Decrease pressure.
NH4Cl vapor pressure curve
PROCESS MANUAL
4.1-9
PROCESS DESCRIPTION
Figure 1: NH4Cl vapor pressure
PROCESS MANUAL
4.1-10
PROCESS DESCRIPTION
4.2
Flat Polycrystalline Si from SiH4
4.2.1
Basic configuration
SiH4
Temperature flat
610oC (fine grain)
650oC (coarse grain)
4.2.2
Description
4.2.2.1 Purpose
A flat poly-Si process is used in situations with a strong demand for exactly dimensioned
grain structures. As diffusion source it is required to have small grains (more grain boundaries
to diffuse along) and as “bulk material” in Thin Film Transistor (TFT) applications the grain
structure is involved in the mobility of charge carriers (larger grain means less grain
boundaries, less barriers to cross for the charge carriers and a higher mobility).
4.2.2.2 Chemicals
SiH4 is a pyrogenic gas, which means it will burn spontaneously when it comes into contact
with O2 or air. It is also toxic, but generally it will burn before it gets toxic.
4.2.2.3 Process
Since the temperature is flat and the reaction consumes SiH4 (depletion) the thickness
decreases along the load.
This can be improved in basically two manners: by using a high flow of (inert) gases to dilute
the SiH4 and reduce its consumption. This will affect the growth rate since the partial
pressure of SiH4 is reduced. Or, use a specially designed set of injectors to create a
homogeneous local SiH4 concentration. This latter approach is described in the next section.
Cross-wafer uniformity is generally pretty good, since the deposition process is limited by the
surface reaction part. A decreasing process pressure does improve the uniformity, both the
cross wafer and the cross load. If relatively small wafers are used compared to the tube
diameter an increased gas flow improves cross-wafer and cross-load uniformity drastically.
4.2.2.4 Typicalities
To improve cross-wafer uniformity of the edge wafers it is necessary to apply a set of dummy
wafers at the gas inlet side of the load. An extra boat might be necessary.
The injector design is crucial and consists of a tube with front- and back-flange, through
which one long double-sided injector is placed. An extra injector position is available to add
some extra SiH4 at a specific position should that be required.
PROCESS MANUAL
4.2-1
PROCESS DESCRIPTION
4.2.3
Process result indication
A schematic view of the thickness profile along the load as function of normalized gasflows is
given in the figure below.
Door
Pump
A sccm
Saddle profile
C sccm
A sccm
B sccm
D sccm
F sccm
The extra injector can also be removed to simplify processing.
4.2.4
E sccm
Startup parameters for processing
The optical properties of a new and/or cleaned quartz tube change most dramatically after
the first deposition of foreign (=different refractive index) material. For accurate temperature
control a new and/or cleaned tube needs therefore to be coated before any (automatic)
profiling is performed. Use the default process settings for 1 hour to obtain a reasonable
coating.
An oxidized substrate wafer is required to enable accurate measurement, typically 1000Å
thermally oxidized wafers are used.
Type
Wafer
Process
Pressure
Thickness
Temp.
SiH4
o
Size
Time
[mtor]
[Å]
[ C]
[sccm]
[mm]
[min]
TS630x
100
30
250
3000
610
30-30-10
150
TS660x
100
30
250
3000
610
40-40-20
150
TS680x
100
30
250
3000
610
60-60-30
150
TS6100x
100
30
250
3000
610
60-60-30
150
TS840x
150
30
250
3000
610
60-60-30
200
TS860x
150
30
250
3000
610
80-80-40
200
TS8100x
150
30
250
3000
610
100-100-50
200
TS1280x
200
30
250
3000
610
200-150-50
300
4.2.5
Recommended cleaning interval
Cleaning interval for the several components after cumulative deposition in microns on the
wafers.
PROCESS MANUAL
4.2-2
PROCESS DESCRIPTION
Tube
Poly
20/100
PROCESS MANUAL
Cassettes
baffles
10
/ SiC paddle
10
Trap (upstream Oil and filter
tubing)
change
80
4.2-3
PROCESS DESCRIPTION
4.2.6
Gas schematic example: LPCVD Flat poly
SiH4
N2
PS
Pump exhaust
burn chamber
Injector
option
10T/ATM
Baratron
To pump
Vacuum
test port
PROCESS MANUAL
4.2-4
PROCESS DESCRIPTION
4.2.7
1
2
3
4
5
6
7
8
9
10
11
12
13
14
15
16
17
18
19
20
21
22
23
24
25
26
27
28
29
30
31
32
33
34
35
36
Recipe example: LPCVD Flat poly-silicon from SiH4
00 LOAD/UNLOAD
Message LOAD/UNLOAD [4]. Sonalert alarm No
Normal recipe 00 Zone1 610.0 °C Slope 10.00 °C/min Zone2 610.0 °C Slope 10.00
°C/min Zone3 610.0 °C Slope 10.00 °C/min , profile table A
Boat to 2000.0 mm at 300.0 mm/min with oscillation speed of 0.0 mm/min.
Variable Command: No
Gas N2 [1] at 0.0 [slm] Variable Command: No
Gas SIH4DOOR [2] at 0.0 [sccm] Variable Command: No
Gas SIH4REAR [3] at 0.0 [sccm] Variable Command: No
Gas PRESSURE [8] at 0.0 [mtor] Variable Command: No
Digital out N2 PURGE[9] = OFF,N2PROCES[10] = OFF,PROCESS[11] =
OFF,EVACSIL1[12] = OFF,EVACSIL2[13] = OFF,EVACSIL3[14] =
OFF,SOFTSTRT[15] = OFF,MAINVAC[16] = OFF Variable Command: No
Alarm Limit Setting for All Analog Output Channel at 0 %
Alarm on digital in PRESS N2[1] = ON,PRESSAIR[2] = ON,doorclsd[3] =
OFF,VACFAIL[4] = OFF,,,TEMP SCR[7] = ON,EXCESS[8] = ON
Alarm on digital in FANCONTR[9] = ON,,,OPERATE[12] = ON,WARNING[13]
= ON,FAILURE[14] = ON,,
01 BOAT OUT
Message BOAT OUT [3]. Sonalert alarm No
Time: 000:10:00 (hr:min:sec) Variable Command: No
Boat to 10.0 mm at 300.0 mm/min with oscillation speed of 0.0 mm/min. Variable
Command: No
Gas N2 [1] at 10.0 [slm] Variable Command: No
Digital out N2 PURGE[9] = ON,N2PROCES[10] = ON,PROCESS[11] =
OFF,EVACSIL1[12] = OFF,EVACSIL2[13] = OFF,EVACSIL3[14] =
OFF,SOFTSTRT[15] = OFF,MAINVAC[16] = OFF Variable Command: No
Wait for boat to reach setpoint
02 LOAD WAFERS
Message LOADWAFERS [5]. Sonalert alarm Yes
Wait for operator
03 BOAT IN
Message BOAT IN [2]. Sonalert alarm No
Time: 000:10:00 (hr:min:sec) Variable Command: No
Boat to 2000.0 mm at 300.0 mm/min with oscillation speed of 0.0 mm/min.
Variable Command: No
Wait for boat to reach setpoint
Wait on digital in PRESS N2[1] = OFF,PRESSAIR[2] = OFF,doorclsd[3] =
ON,VACFAIL[4] = OFF,,,TEMP SCR[7] = OFF,EXCESS[8] = OFF
04 EVAC 1
Message EVACUATE 1 [8]. Sonalert alarm No
Time: 000:01:00 (hr:min:sec) Variable Command: No
Gas N2 [1] at 0.0 [slm] Variable Command: No
Digital out N2 PURGE[9] = ON,N2PROCES[10] = ON,PROCESS[11] =
OFF,EVACSIL1[12] = OFF,EVACSIL2[13] = OFF,EVACSIL3[14] =
OFF,SOFTSTRT[15] = ON,MAINVAC[16] = OFF Variable Command: No
05 EVAC 2
Message EVACUATE 2 [9]. Sonalert alarm No
Time: 000:05:00 (hr:min:sec) Variable Command: No
PROCESS MANUAL
4.2-5
PROCESS DESCRIPTION
37
38
39
40
41
42
43
44
45
46
47
48
49
50
51
52
53
54
55
56
57
58
59
60
61
62
63
64
65
66
67
68
69
70
71
72
73
74
75
Digital out N2 PURGE[9] = OFF,N2PROCES[10] = ON,PROCESS[11] =
OFF,EVACSIL1[12] = OFF,EVACSIL2[13] = OFF,EVACSIL3[14] =
OFF,SOFTSTRT[15] = ON,MAINVAC[16] = ON Variable Command: No
Wait on digital in PRESS N2[1] = OFF,PRESSAIR[2] = OFF,doorclsd[3] =
OFF,VACFAIL[4] = ON,,,TEMP SCR[7] = OFF,EXCESS[8] = OFF
Branch on wait alarm to step BACKFILL 1. Sonalert alarm Yes
06 EVAC 3
Message EVACUATE 3 [10]. Sonalert alarm No
Time: 000:05:00 (hr:min:sec) Variable Command: No
Digital out N2 PURGE[9] = OFF,N2PROCES[10] = ON,PROCESS[11] =
ON,EVACSIL1[12] = OFF,EVACSIL2[13] = OFF,EVACSIL3[14] =
OFF,SOFTSTRT[15] = ON,MAINVAC[16] = ON Variable Command: No
Abort recipe 01
07 PURGE
Message PURGE [12]. Sonalert alarm No
Time: 000:05:00 (hr:min:sec) Variable Command: No
Digital out N2 PURGE[9] = ON,N2PROCES[10] = ON,PROCESS[11] =
ON,EVACSIL1[12] = OFF,EVACSIL2[13] = OFF,EVACSIL3[14] =
OFF,SOFTSTRT[15] = ON,MAINVAC[16] = ON Variable Command: No
Alarm limit setting for Gas PRESSURE [8] at 0 % ( ± 0.0 ) Variable Command: No
08 EVACUATE
Message EVACUATE 3 [10]. Sonalert alarm No
Time: 000:05:00 (hr:min:sec) Variable Command: No
Digital out N2 PURGE[9] = OFF,N2PROCES[10] = ON,PROCESS[11] =
ON,EVACSIL1[12] = OFF,EVACSIL2[13] = OFF,EVACSIL3[14] =
OFF,SOFTSTRT[15] = OFF,MAINVAC[16] = ON Variable Command: No
09 LEAKCHECK
Message LEAKCHECK [11]. Sonalert alarm No
Time: 000:02:00 (hr:min:sec) Variable Command: No
Digital out N2 PURGE[9] = OFF,N2PROCES[10] = ON,PROCESS[11] =
ON,EVACSIL1[12] = OFF,EVACSIL2[13] = OFF,EVACSIL3[14] =
OFF,SOFTSTRT[15] = OFF,MAINVAC[16] = OFF Variable Command: No
Alarm limit setting for Gas PRESSURE [8] at 2 % ( ± 0.0 ) Variable Command: No
Branch on gas/pressure PRESSURE [8] to step PURGE. Sonalert alarm Yes
10 EVACUATE
Message EVACUATE 3 [10]. Sonalert alarm No
Time: 000:00:30 (hr:min:sec) Variable Command: No
Normal recipe 01 Zone1 610.0 °C Slope 0.00 °C/min Zone2 610.0 °C Slope 0.00
°C/min Zone3 610.0 °C Slope 0.00 °C/min , profile table A
Digital out N2 PURGE[9] = OFF,N2PROCES[10] = ON,PROCESS[11] =
ON,EVACSIL1[12] = OFF,EVACSIL2[13] = OFF,EVACSIL3[14] =
OFF,SOFTSTRT[15] = OFF,MAINVAC[16] = ON Variable Command: No
Alarm limit setting for Gas PRESSURE [8] at 0 % ( ± 0.0 ) Variable Command: No
11 SET GASFLOWS
Message PURGE [12]. Sonalert alarm No
Time: 000:01:00 (hr:min:sec) Variable Command: No
Gas [SIH4DOOR [2]] at [60.0] [sccm] Variable Command: Yes
Gas [SIH4REAR [3]] at [60.0] [sccm] Variable Command: Yes
12 SET PRESSURE
Message PURGE [12]. Sonalert alarm No
Time: 000:02:00 (hr:min:sec) Variable Command: No
Gas [PRESSURE [8]] at [250.0] [mtor] Variable Command: Yes
Alarm limit setting for Gas SIH4DOOR [2] at 10 % ( ± 30.0 ) Variable Command:
No
PROCESS MANUAL
4.2-6
PROCESS DESCRIPTION
Alarm limit setting for Gas SIH4REAR [3] at 10 % ( ± 30.0 ) Variable Command:
No
77
Branch on gas/pressure SIH4DOOR [2] to step EVACUATE. Sonalert alarm Yes
78
Branch on gas/pressure SIH4REAR [3] to step EVACUATE. Sonalert alarm Yes
79 13 DEPOSITION
80
Message DEPOSITION [13]. Sonalert alarm No
81
Time: [000:30:00] (hr:min:sec) Variable Command: Yes
82
Alarm limit setting for Gas PRESSURE [8] at 5 % ( ± 0.0 ) Variable Command: No
83
Branch on gas/pressure SIH4DOOR [2] to step EVACUATE. Sonalert alarm Yes
84
Branch on gas/pressure SIH4REAR [3] to step EVACUATE. Sonalert alarm Yes
85
Branch on gas/pressure PRESSURE [8] to step EVACUATE. Sonalert alarm Yes
86 14 EVACUATE
87
Message EVACUATE 3 [10]. Sonalert alarm No
88
Time: 000:05:00 (hr:min:sec) Variable Command: No
89
Gas N2 [1] at 0.0 [slm] Variable Command: No
90
Gas SIH4DOOR [2] at 0.0 [sccm] Variable Command: No
91
Gas PRESSURE [8] at 0.0 [mtor] Variable Command: No
92
Digital out N2 PURGE[9] = OFF,N2PROCES[10] = ON,PROCESS[11] =
ON,EVACSIL1[12] = OFF,EVACSIL2[13] = OFF,EVACSIL3[14] =
OFF,SOFTSTRT[15] = ON,MAINVAC[16] = ON Variable Command: No
93
Alarm limit setting for Gas SIH4DOOR [2] at 0 % ( ± 0.0 ) Variable Command: No
94
Alarm limit setting for Gas SIH4REAR [3] at 0 % ( ± 0.0 ) Variable Command: No
95
Alarm limit setting for Gas PRESSURE [8] at 1 % ( ± 0.0 ) Variable Command: No
96
Wait for gas PRESSURE [8]
97 15 PURGE
98
Message PURGE [12]. Sonalert alarm No
99
Time: 000:05:00 (hr:min:sec) Variable Command: No
100
Digital out N2 PURGE[9] = ON,N2PROCES[10] = ON,PROCESS[11] =
ON,EVACSIL1[12] = OFF,EVACSIL2[13] = OFF,EVACSIL3[14] =
OFF,SOFTSTRT[15] = ON,MAINVAC[16] = ON Variable Command: No
101 16 EVACUATE
102
Message EVACUATE 3 [10]. Sonalert alarm No
103
Time: 000:05:00 (hr:min:sec) Variable Command: No
104
Digital out N2 PURGE[9] = OFF,N2PROCES[10] = ON,PROCESS[11] =
ON,EVACSIL1[12] = OFF,EVACSIL2[13] = OFF,EVACSIL3[14] =
OFF,SOFTSTRT[15] = ON,MAINVAC[16] = ON Variable Command: No
105 17 READY
106
Message STANDBY [1]. Sonalert alarm No
107
Digital out N2 PURGE[9] = ON,N2PROCES[10] = ON,PROCESS[11] =
ON,EVACSIL1[12] = OFF,EVACSIL2[13] = OFF,EVACSIL3[14] =
OFF,SOFTSTRT[15] = OFF,MAINVAC[16] = ON Variable Command: No
108
Wait for operator
109 18 BACKFILL 1
110
Message BACKFILL [14]. Sonalert alarm No
111
Time: 000:01:00 (hr:min:sec) Variable Command: No
112
Gas N2 [1] at 0.0 [slm] Variable Command: No
113
Gas SIH4DOOR [2] at 0.0 [sccm] Variable Command: No
114
Gas PRESSURE [8] at 0.0 [mtor] Variable Command: No
115
Digital out N2 PURGE[9] = ON,N2PROCES[10] = ON,PROCESS[11] =
ON,EVACSIL1[12] = OFF,EVACSIL2[13] = OFF,EVACSIL3[14] =
OFF,SOFTSTRT[15] = ON,MAINVAC[16] = OFF Variable Command: No
116
Alarm on digital in PRESS N2[1] = ON,PRESSAIR[2] = ON,doorclsd[3] =
ON,VACFAIL[4] = OFF,,,TEMP SCR[7] = ON,EXCESS[8] = ON
117
Abort recipe 08
76
PROCESS MANUAL
4.2-7
PROCESS DESCRIPTION
118 19 BACKFILL 2
119
Message BACKFILL [14]. Sonalert alarm No
120
Time: 000:10:00 (hr:min:sec) Variable Command: No
121
Gas N2 [1] at 100.0 [slm] Variable Command: No
122
Digital out N2 PURGE[9] = ON,N2PROCES[10] = ON,PROCESS[11] =
123
ON,EVACSIL1[12] = OFF,EVACSIL2[13] = OFF,EVACSIL3[14]
OFF,SOFTSTRT[15] = OFF,MAINVAC[16] = OFF Variable Command: No
END
4.2.8
Troubleshooting a flat poly process
Problem:
Wafers are thick at door side and
thin at pump side.
Wafers are thick at the pump side
and thin at the door side.
Wafers are thick at the top and
thin at the bottom.
Cause:
• Gas distribution is incorrect
•
Gas distribution is incorrect
•
The paddle is situated too
high in the tube.
The paddle is colder then the
wafers and the tube.
•
Wafers are thick at the edges and •
thin at the center.
•
Temperature
is
not
homogeneous within wafer.
Pressure is too high.
No consistency in uniformity.
•
•
•
Dirty quartz ware or wafers.
No constant pressure control.
Draft along the furnace.
Layer is too thin cross load.
•
•
Deposition time is too short.
Pressure is too low.
Layer is too thick cross load
•
•
Deposition time is too long.
Pressure is too high.
PROCESS MANUAL
=
Solution:
• Increase gasload from the
pump side
• Increase gasload from the
doorside
• Adjust height of the paddle at
the cantilever system.
• Insert
temperature
stabilization step in the recipe
after ‘evacuate’ and/or ‘heat
up’ step.
• Insert
temperature
stabilization step in the recipe
after ‘boat in’ and/or ‘heat up’
step.
• Decrease pressure.
• Clean tube, quartz ware and
paddle.
• Use clean wafers.
• Check pressure control.
• Decrease draft by reducing
overpressure cleanroom or
close possible draft holes.
• Increase deposition time in
recipe.
• Increase pressure.
• Decrease deposition time in
recipe.
• Decrease pressure.
4.2-8
PROCESS DESCRIPTION
4.3
Silicondioxide (LTO SiO2) from SiH4 and O2
4.3.1
Basic configuration
LPCVD Low Temperature Oxide (LTO)
SiH4, O2, (PH3 and/or TMB optional)
Injectors are used for SiH4+PH3+TMB, and for O2
Flat temperature of 425oC
Quartz caged cassettes
4.3.2
Description
4.3.2.1 Purpose
Low Temperature Oxide (LTO) is mainly used as a passivation layer over devices, which
already have metal contacts. Aluminum is widely used but with melting point of roughly
600oC a passivation layer deposition technique with a deposition temperature higher than the
aluminum melting point is not possible.
LTO is used to create a passivation layer while maintaining the aluminum contact integrity.
The low temperature reduces the electrical and mechanical properties of the deposited SiO2
film, which makes it typically unsuitable for electrical applications.
4.3.2.2 Chemicals
Oxygen is the basic gas of every combustion reaction and therefore leaks can be dangerous
near hot areas.
SiH4 is a pyrogenic gas, which means it will burn spontaneously when it comes into contact
with O2 or air. It is also toxic and should be handled accordingly, although generally it will
burn before it gets toxic.
4.3.2.3 Process
Due to the pyrophoric nature of SiH4 combining SiH4 and O2 to do a process requires a
distinct handling procedure. This includes reduction of the process pressure and applying a
specific gas distribution system.
The deposition of LTO from SiH4 and O2 is a very physical process. This means, the
deposition rate strongly depends on the gas flows and diffusion properties. The gas flow is
mainly affected by the hardware configuration and not so much by the temperature. The
result is, that the deposition rate and thickness uniformity do not react much on temperature
changes, but do react on hardware changes such as cage and injector design, position of these
in view of each other, injector alignment and wafer alignment.
Additionally, as with most LPCVD processes, the pressure will also affect the process results.
The chemical reaction of a basic LTO process is as follows:
SiH4 + O2 Æ SiO2 + 2 H2
PROCESS MANUAL
4.3-1
PROCESS DESCRIPTION
4.3.2.4 Typicalities
The cage design is critical for the cross wafer thickness uniformity, while the injector design
and the position of the cage(s) compared to the position of the injector holes are critical for
the cross load uniformity. If the cross wafer uniformity is above 5% a new cage design is
required.
The cage(s) almost fully cover the holes of the injector. In other words, the holes are
distributed in between the first and last cage. Note that the front of the cages is leaded by 1 or
2 holes to get sufficient SiH4 before the cages.
The O2 and SiH4 injectors should be aligned as indicated in the following picture:
O2 injector
SiH4 injector
If the gas entry mounting points are mirrored also the injector alignment should be mirrored,
the O2 should mix in the SiH4 stream.
For O2 one or two extra holes are added at the door side.
If strong depletion is observed and the cross load uniformity is not improving some N2 can
be added to the SiH4 injector.
The pressure should be kept as low as possible while maintaining an acceptable deposition
rate. Decreasing the pressure will improve cross load uniformity some and reduce the
deposition rate.
The temperature is not an important parameter, a temperature ramp of +- 10 to 20oC is
typical but has limited effect.
4.3.3
Startup parameters for processing
Type
TS630x
TS660x
TS680x
TS6100x
4.3.4
Wafer
Size
[mm]
100
150
100
150
100
150
100
150
Process
Time
[min]
30
Pressure
[mtor]
Thickness
[Å]
Temp.
[oC]
SiH4
[sccm]
O2
[sccm]
N2
[sccm]
200
2000
425
30
90
500
30
200
2000
425
40
120
500
30
200
2000
425
50
150
500
30
200
2000
425
70
200
500
Recommended cleaning interval
Cleaning interval for the several components after cumulative deposition in microns on the
wafers.
Tube
Cassettes
/ SiC paddle
Trap (upstream Oil and filter
baffles
tubing)
change
LTO
20
10
10
10
50
PROCESS MANUAL
4.3-2
PROCESS DESCRIPTION
LTO process results (1)
cross wafer uniformity [%]
cage design effect
4.5
4.0
3.5
3.0
2.5
2.0
1.5
1.0
0.5
0.0
cage 1
cage 2
cage design
4.3.5
Process result indication
LTO process results (2)
cross load uniformity [%]
injector design effect
12.0
10.0
8.0
6.0
4.0
2.0
0.0
injector 1
injector 2
injector design
PROCESS MANUAL
4.3-3
PROCESS DESCRIPTION
4.3.6
Gas schematic example: LPCVD LTO
N2
O2
SiH4
PS
10T/ATM
Baratron
To pump
Vacuum
test port
PROCESS MANUAL
4.3-4
PROCESS DESCRIPTION
4.3.7
1
2
3
4
5
6
7
8
9
10
11
12
13
14
15
16
17
18
19
20
21
22
23
24
25
26
27
28
29
30
31
32
33
34
35
36
Recipe example: LPCVD silicondioxide from LTO SiH4 and O2
00 START RECIPE
Message LOAD/UNLOAD [4]. Sonalert alarm No
Normal recipe 00 Zone1 425.0 °C Slope 10.00 °C/min Zone2 425.0 °C Slope 10.00
°C/min Zone3 425.0 °C Slope 10.00 °C/min , profile table A
Boat to 2000.0 mm at 300.0 mm/min with oscillation speed of 0.0 mm/min.
Variable Command: No
Gas N2 [1] at 0.00 [SLM] Variable Command: No
Gas O2 [2] at 0 [SCCM] Variable Command: No
Gas SIH4 [3] at 0.0 [SCCM] Variable Command: No
Gas PRESSURE [8] at 0 [MTOR] Variable Command: No
Digital out N2 PURGE[9] = OFF,N2PROCES[10] = OFF,PROCESS[11] =
OFF,EVACSIH4[12] = OFF,,,SOFTSTRT[15] = OFF,MAINVAC[16] = OFF
Variable Command: No
Alarm Limit Setting for All Analog Output Channel at 0 %
Alarm on digital in PRESS N2[1] = ON,PRESSAIR[2] = ON,doorclsd[3] =
OFF,VACFAIL[4] = OFF,,,TEMP SCR[7] = ON,EXCESS[8] = ON
Alarm on digital in FANCONTR[9] = ON,,,OPERATE[12] = ON,WARNING[13]
= ON,FAILURE[14] = ON,,
01 BOAT OUT
Message BOAT OUT [3]. Sonalert alarm No
Time: 000:10:00 (hr:min:sec) Variable Command: No
Boat to 10.0 mm at 300.0 mm/min with oscillation speed of 0.0 mm/min. Variable
Command: No
Gas N2 [1] at 10.00 [SLM] Variable Command: No
Digital out N2 PURGE[9] = ON,N2PROCES[10] = ON,PROCESS[11] =
OFF,EVACSIH4[12] = OFF,,,SOFTSTRT[15] = OFF,MAINVAC[16] = OFF
Variable Command: No
Wait for boat to reach setpoint
02 LOAD WAFERS
Message LOADWAFERS [5]. Sonalert alarm Yes
Wait for operator
03 BOAT IN
Message BOAT IN [2]. Sonalert alarm No
Time: 000:10:00 (hr:min:sec) Variable Command: No
Boat to 2000.0 mm at 300.0 mm/min with oscillation speed of 0.0 mm/min.
Variable Command: No
Wait for boat to reach setpoint
Wait on digital in PRESS N2[1] = OFF,PRESSAIR[2] = OFF,doorclsd[3] =
ON,VACFAIL[4] = OFF,,,TEMP SCR[7] = OFF,EXCESS[8] = OFF
04 EVAC 1
Message EVACUATE 1 [8]. Sonalert alarm No
Time: 000:01:00 (hr:min:sec) Variable Command: No
Gas N2 [1] at 0.00 [SLM] Variable Command: No
Digital out N2 PURGE[9] = ON,N2PROCES[10] = ON,PROCESS[11] =
OFF,EVACSIH4[12] = OFF,,,SOFTSTRT[15] = ON,MAINVAC[16] = OFF
Variable Command: No
05 EVAC 2
Message EVACUATE 2 [9]. Sonalert alarm No
Time: 000:05:00 (hr:min:sec) Variable Command: No
PROCESS MANUAL
4.3-5
PROCESS DESCRIPTION
37
38
39
40
41
42
43
44
45
46
47
48
49
50
51
52
53
54
55
56
57
58
59
60
61
62
63
64
65
66
67
68
69
70
71
72
73
Digital out N2 PURGE[9] = OFF,N2PROCES[10] = ON,PROCESS[11] =
OFF,EVACSIH4[12] = OFF,,,SOFTSTRT[15] = ON,MAINVAC[16] = ON
Variable Command: No
Wait on digital in PRESS N2[1] = OFF,PRESSAIR[2] = OFF,doorclsd[3] =
OFF,VACFAIL[4] = ON,,,TEMP SCR[7] = OFF,EXCESS[8] = OFF
Branch on wait alarm to step BACKFILL 1. Sonalert alarm Yes
06 EVAC 3
Message EVACUATE 3 [10]. Sonalert alarm No
Time: 000:05:00 (hr:min:sec) Variable Command: No
Digital out N2 PURGE[9] = OFF,N2PROCES[10] = ON,PROCESS[11] =
ON,EVACSIH4[12] = OFF,,,SOFTSTRT[15] = ON,MAINVAC[16] = ON
Variable Command: No
Abort recipe 01
07 PURGE
Message PURGE [12]. Sonalert alarm No
Time: 000:05:00 (hr:min:sec) Variable Command: No
Digital out N2 PURGE[9] = ON,N2PROCES[10] = ON,PROCESS[11] =
ON,EVACSIH4[12] = OFF,,,SOFTSTRT[15] = ON,MAINVAC[16] = ON
Variable Command: No
Alarm limit setting for Gas PRESSURE [8] at 0 % ( ± 0 MTOR) Variable Command:
No
08 EVACUATE
Message EVACUATE 3 [10]. Sonalert alarm No
Time: 000:05:00 (hr:min:sec) Variable Command: No
Digital out N2 PURGE[9] = OFF,N2PROCES[10] = ON,PROCESS[11] =
ON,EVACSIH4[12] = OFF,,,SOFTSTRT[15] = OFF,MAINVAC[16] = ON
Variable Command: No
09 LEAKCHECK
Message LEAKCHECK [11]. Sonalert alarm No
Time: 000:02:00 (hr:min:sec) Variable Command: No
Digital out N2 PURGE[9] = OFF,N2PROCES[10] = ON,PROCESS[11] =
ON,EVACSIH4[12] = OFF,,,SOFTSTRT[15] = OFF,MAINVAC[16] = OFF
Variable Command: No
Alarm limit setting for Gas PRESSURE [8] at 2 % ( ± 40 MTOR) Variable
Command: No
Branch on gas/pressure PRESSURE [8] to step PURGE. Sonalert alarm Yes
10 EVACUATE
Message EVACUATE 3 [10]. Sonalert alarm No
Time: 000:00:30 (hr:min:sec) Variable Command: No
Normal recipe 01 Zone1 425.0 °C Slope 0.00 °C/min Zone2 425.0 °C Slope 0.00
°C/min Zone3 425.0 °C Slope 0.00 °C/min , profile table A
Digital out N2 PURGE[9] = OFF,N2PROCES[10] = ON,PROCESS[11] =
ON,EVACSIH4[12] = OFF,,,SOFTSTRT[15] = OFF,MAINVAC[16] = ON
Variable Command: No
Alarm limit setting for Gas PRESSURE [8] at 0 % ( ± 0 MTOR) Variable Command:
No
11 SET O2
Message PURGE [12]. Sonalert alarm No
Time: 000:01:00 (hr:min:sec) Variable Command: No
Gas [O2 [2]] at [150] [SCCM] Variable Command: Yes
12 SET PRESSURE
Message PURGE [12]. Sonalert alarm No
Time: 000:02:00 (hr:min:sec) Variable Command: No
Gas [PRESSURE [8]] at [250] [MTOR] Variable Command: Yes
PROCESS MANUAL
4.3-6
PROCESS DESCRIPTION
74
Alarm limit setting for Gas O2 [2] at 10 % ( ± 50 SCCM) Variable Command: No
75
Branch on gas/pressure O2 [2] to step O2 PURGE. Sonalert alarm Yes
76 13 DEPOSITION
77
Message DEPOSITION [13]. Sonalert alarm No
78
Time: [000:30:00] (hr:min:sec) Variable Command: Yes
79
Gas [SIH4 [3]] at [50.0] [SCCM] Variable Command: Yes
80
Alarm limit setting for Gas SIH4 [3] at 10 % ( ± 10.0 SCCM) Variable Command:
No
Alarm limit setting for Gas PRESSURE [8] at 5 % ( ± 100 MTOR) Variable
Command: No
82
Branch on gas/pressure O2 [2] to step O2 PURGE. Sonalert alarm Yes
83
Branch on gas/pressure SIH4 [3] to step O2 PURGE. Sonalert alarm Yes
84
Branch on gas/pressure PRESSURE [8] to step O2 PURGE. Sonalert alarm Yes
85 14 O2 PURGE
86
Message PURGE [12]. Sonalert alarm No
87
Time: 000:02:00 (hr:min:sec) Variable Command: No
88
Gas N2 [1] at 0.00 [SLM] Variable Command: No
89
Gas SIH4 [3] at 0.0 [SCCM] Variable Command: No
90
Gas PRESSURE [8] at 0 [MTOR] Variable Command: No
91
Digital out N2 PURGE[9] = OFF,N2PROCES[10] = ON,PROCESS[11] =
ON,EVACSIH4[12] = OFF,,,SOFTSTRT[15] = ON,MAINVAC[16] = ON
Variable Command: No
92
Alarm limit setting for Gas SIH4 [3] at 0 % ( ± 0.0 SCCM) Variable Command: No
93
Alarm limit setting for Gas PRESSURE [8] at 0 % ( ± 0 MTOR) Variable Command:
No
94 15 EVACUATE
95
Message EVACUATE 3 [10]. Sonalert alarm No
96
Time: 000:05:00 (hr:min:sec) Variable Command: No
97
Gas O2 [2] at 0 [SCCM] Variable Command: No
98
Alarm limit setting for Gas O2 [2] at 0 % ( ± 0 SCCM) Variable Command: No
99 16 PURGE
100
Message PURGE [12]. Sonalert alarm No
101
Time: 000:05:00 (hr:min:sec) Variable Command: No
102
Digital out N2 PURGE[9] = ON,N2PROCES[10] = ON,PROCESS[11] =
ON,EVACSIH4[12] = OFF,,,SOFTSTRT[15] = ON,MAINVAC[16] = ON
Variable Command: No
103 17 EVACUATE
104
Message EVACUATE 3 [10]. Sonalert alarm No
105
Time: 000:05:00 (hr:min:sec) Variable Command: No
106
Digital out N2 PURGE[9] = OFF,N2PROCES[10] = ON,PROCESS[11] =
ON,EVACSIH4[12] = OFF,,,SOFTSTRT[15] = ON,MAINVAC[16] = ON
Variable Command: No
107 18 READY
108
Message STANDBY [1]. Sonalert alarm No
109
Digital out N2 PURGE[9] = ON,N2PROCES[10] = ON,PROCESS[11] =
ON,EVACSIH4[12] = OFF,,,SOFTSTRT[15] = OFF,MAINVAC[16] = ON
Variable Command: No
110
Wait for operator
111 19 BACKFILL 1
112
Message BACKFILL [14]. Sonalert alarm No
113
Time: 000:01:00 (hr:min:sec) Variable Command: No
114
Boat to 2000.0 mm at 300.0 mm/min with oscillation speed of 0.0 mm/min.
Variable Command: No
115
Gas N2 [1] at 0.00 [SLM] Variable Command: No
81
PROCESS MANUAL
4.3-7
PROCESS DESCRIPTION
Gas O2 [2] at 0 [SCCM] Variable Command: No
Gas SIH4 [3] at 0.0 [SCCM] Variable Command: No
Gas PRESSURE [8] at 0 [MTOR] Variable Command: No
Digital out N2 PURGE[9] = ON,N2PROCES[10] = ON,PROCESS[11] =
ON,EVACSIH4[12] = OFF,,,SOFTSTRT[15] = ON,MAINVAC[16] = OFF
Variable Command: No
120
Alarm on digital in PRESS N2[1] = ON,PRESSAIR[2] = ON,doorclsd[3] =
ON,VACFAIL[4] = OFF,,,TEMP SCR[7] = ON,EXCESS[8] = ON
121
Abort recipe 08
122 20 BACKFILL 2
123
Message BACKFILL [14]. Sonalert alarm No
124
Time: 000:10:00 (hr:min:sec) Variable Command: No
125
Gas N2 [1] at 10.00 [SLM] Variable Command: No
126
Digital out N2 PURGE[9] = ON,N2PROCES[10] = ON,PROCESS[11] =
ON,EVACSIH4[12] = OFF,,,SOFTSTRT[15] = OFF,MAINVAC[16] = OFF
Variable Command: No
127
END
116
117
118
119
4.3.8
Troubleshooting an LTO process
Problem:
Cause:
Solution:
Wafers are thick at the door side • Temperature ramp is not • Increase temperature ramp
and thin at the pump side.
(door side temperature lower
correct.
then pump side temperature).
• Injector design is not optimal
• Use different injector design
• Insufficient N2 carrier gas
• Increase N2 carrier gas
Wafers are thick at the pump side • Temperature ramp is not • Reduce temperature ramp
and thin at the door side.
(door side temperature higher
correct.
then pump side temperature).
• Injector design is not optimal
• Use different injector design
• Too much N2 carrier gas
• Reduce N2 carrier gas
Wafers are thick at the top and • Wafers are not aligned • Place wafers parallel and flat
thin at the bottom.
parallel.
side at the top
Wafers are thick at the edges and • Wafers are placed too close • Place wafers further apart
thin at the center.
together
• Use different cage design
• Cage design is not optimal
No consistency in uniformity.
• Dirty quartz ware or wafers. • Clean tube, quartz ware and
paddle.
• No constant pressure control.
• Use clean wafers.
• Draft along the furnace.
• Check pressure control.
• Close possible draft holes.
Layer is too thin cross load.
• Deposition time is too short. • Increase deposition time in
recipe.
Layer is too thick cross load
• Deposition time is too long. • Decrease deposition time in
recipe.
PROCESS MANUAL
4.3-8
OPERATION INSTRUCTIONS
5.Operation Instructions
This document describes the various procedures required for a process engineer. The
procedures describe all information according to the process engineers.
5.1
Load or Unload process wafers
Loading and unloading process wafers on the paddle is required before and after each process
run.
5.1.1
Load process wafers
•
•
•
5.1.2
Place the wafers on the wafer carriers, depending on the situation with (vacuum)
tweezers or a wafer transfer system.
Pick-up wafer carriers with a pick-up fork or automated loading tool.
Place the wafer carriers around the center of flatzone as indicated on the
loadstation.
Unload wafers
CAUTION
Wafers and paddle are hot.
•
•
•
Allow the wafers to cool down.
Pick-up wafer carriers with a pick-up fork or automated loading tool. (Amtech
Systems S300)
Remove the wafers from the wafer carriers, depending on the situation with
(vacuum) tweezers or a wafer transfer system.
PROCESS MANUAL
5.1-1
OPERATION INSTRUCTIONS
5.2
Login TSC-2
Changing login name may be required to couple process data to operator and process
proceeding for logging data.
5.2.1
TSC-2
1) Press “ID” to Login as
screen until following screen
appears:
USER
LOGIN
2) Type the personal username
and password
3) Press “Login” to login or
“Logout” to logout
PROCESS MANUAL
5.2-1
OPERATION INSTRUCTIONS
5.3
Selecting a new process recipe
A new process recipe needs to be selected so the new instructions can be executed. A new
process recipe can only be selected if the current process recipe is in ‘Step 0‘.
5.3.1
Touchscreen
1) return to the Main Menu by
pressing ‘ESC’ until the
following screen appears:
2) press ‘4’ to access ‘Tube
control’
3) press ‘6’ to ‘Select a Process
Recipes’
4) select the desired process
recipe by entering its
number.
PROCESS MANUAL
5.3-1
OPERATION INSTRUCTIONS
5) press ‘Yes’ to confirm the
question ‘Sure to SELECT
PROCESS recipe (Yes/No)?’
Note: selecting another process recipe is only possible if the current process recipe is in
Step 0.
PROCESS MANUAL
5.3-2
OPERATION INSTRUCTIONS
5.3.2
TSC-2
1) select the desired tube from the
pull-down menu or from the
‘Overview’ screen.
2) select ‘Operations’ to access the
operations screen.
3) Select the desired process recipe
from the pull-down menu
4) Press ‘Yes’ to confirm the
question ‘Are you sure to select
another process recipe?’
Note: selecting another process
recipe is only possible if the
current process recipe is in Step 0.
PROCESS MANUAL
5.3-3
OPERATION INSTRUCTIONS
5.4
Start/Continue a new process recipe
Two different situations require the ‘Start‘ command.
The first situation is starting a newly selected process recipe so it starts running from Step 0.
The second situation is starting a process recipe that has been stopped or is waiting for an
‘Operator‘ instruction.
5.4.1
Touchscreen
1) return to the Main Menu by
pressing
‘ESC’
until
the
following screen appears:
2) press ‘4’ to access ‘Tube Control’
3) press ‘2’ to access ‘Start/Stop
Process Recipe’.
4) press ‘Start’ to start/continue the
selected process recipe.
PROCESS MANUAL
5.4-1
OPERATION INSTRUCTIONS
5.4.2
TSC-2
1) select the desired tube from the
pull-down menu or from the
‘Overview’ screen.
2) select ‘Operations’ to access
the operations screen.
3) press ‘Start’ to start the selected
process recipe from ‘Step 0’
4) press ‘Continue’ to start a
process recipe that has been
stopped or is waiting for an
‘Operator‘ instruction.
5) press ‘Yes’ to confirm the
question ‘Do you want to start?’
PROCESS MANUAL
5.4-2
OPERATION INSTRUCTIONS
5.5
Stop a running process recipe
Stopping a running process recipe may be required to temporarily stop the process recipe.
When activated, the ‘Stop‘ command will stop the timer while all given commands are maintained.
5.5.1
Touchscreen
1) return to the Main Menu by
pressing ‘ESC’ until the following
screen appears:
2) press ‘4’ to access ‘Tube Control’
3) press ‘2’ to access ‘Start/Stop
Process Recipe’
4) press ‘Stop’ to stop the selected
process recipe
PROCESS MANUAL
5.5-1
OPERATION INSTRUCTIONS
5.5.2
TSC-2
1) select the desired tube from the
pull-down menu or from the
‘Overview’ screen.
2) select ‘Operations’ to access
the operations screen.
3) Press ‘Pause’ to stop the selected
process recipe from the current
step.
PROCESS MANUAL
5.5-2
OPERATION INSTRUCTIONS
5.6
Abort a running process recipe
A manual ‘Abort‘ instruction may be required if the operator foresees a dangerous situation
or a continuous looped process recipe needs to be reset to Step 0 to allow selection of
another process recipe.
5.6.1
Touchscreen
1) return to the Main Menu by
pressing ‘ESC’ until the following
screen appears:
2) press ‘4’ to access ‘Tube Control’
3) press ‘3’ to access ‘Abort Process
Recipe’
4) press ‘Yes’ to confirm the
question ‘Are you sure you want
to abort?’
5) press ‘Yes’ again to activate the
abort command
PROCESS MANUAL
5.6-1
OPERATION INSTRUCTIONS
5.6.2
TSC-2
1) select the desired tube from the
pull-down menu or from the
‘Overview’ screen.
2) select ‘Operations’ to access the
operations screen.
3) Press ‘Abort’ to abort the
selected process recipe.
4) Press ‘Yes’ to confirm the
question ‘Sure to abort?’
PROCESS MANUAL
5.6-2
OPERATION INSTRUCTIONS
5.7
Edit ‘Variable Process Command’
‘Variable Process Command‘ can be used to quickly modify specific process settings. Only
those lines in the process recipe that have been assigned as ‘Variable Commands‘ will be
presented in a list. From this list the desired process setting may be modified.
‘Variable Process Command‘ can be set at all times until the recipe step is executed in which
the specific ‘Variable Command‘ is programmed.
5.7.1
Touchscreen
1) return to the Main Menu by
pressing ‘ESC’ until the following
screen appears:
2) press ‘4’ to access ‘Tube Control’
3) press ‘5’ to access ‘Variable
Commands’
4) edit the desired process setting
1)
enter
the
corresponding
line
number
2)
modify to the
desired setting
3)
press ‘Return’ to
confirm
the
modification
5) repeat step 4) until all desired
process settings have been
set
6) Press ‘Esc’ to store the new
commands.
The
message
‘Process
recipe
variable
PROCESS MANUAL
5.7-1
OPERATION INSTRUCTIONS
commands stored’ appears.
7) Go to the Start/Continue a
new process recipe procedure
to start the process recipe if it is
not running.
PROCESS MANUAL
5.7-2
OPERATION INSTRUCTIONS
5.7.2
TSC-2
1) select the desired tube from the
pull-down menu or from the
‘Overview’ screen.
2) select ‘Operations’ to access the
operations screen.
3) Select ‘Edit Variable Commands’
to open the list with available
Variable Commands
4) edit the desired process setting
1) highlight the desired process
setting
2) press ‘Edit’ to open the Edit
mode
3) modify to the desired process
setting
5) press ‘Updates’ to store the new
commands
6) go to the Start/Continue a new
process recipe procedure to
start the process recipe if it is not
running.
PROCESS MANUAL
5.7-3
OPERATION INSTRUCTIONS
5.8
Clear Alarms
Visible and audible Alarms signals are generated by the DPC and DTC. The visible alarms
will be presented both on the touchscreen and the TSC-2 computer(s), the audible alarms are
available on the touchscreen only.
Two different audible alarm signals are available:
•
operator alert: an intermittent beep-beep-beep to alert an operator for action (press ‘Start‘
for example)
•
alarm signal: a continuous beeeeeeeeeeeeep to alert for an alarm situation
5.8.1
•
•
5.8.2
Required action
Operator alert signals (beep-beep-beep) require the operator to press ‘Start‘ to have the
furnace proceed to the next step in the process.
Alarm situation signals (beeeeeeeeeeep) require the operator to alert the responsible
person(s) immediately.
Touchscreen
1) touch the touchscreen to silence
the buzzer
2) read the alarm message in the
bottom line of the screen
3) take the appropriate action as
described in section Error!
Reference source not found..
PROCESS MANUAL
5.8-2
OPERATION INSTRUCTIONS
5.8.3
TSC-2
1) the overview screen gives an
instant view of which tubes are in
alarm in RED
2) select the desired tube from the
pull-down menu or from the
‘Overview’ screen
4) select the ‘Alarm’ screen
3) read the alarm message(s)
4) take the appropriate action as
described in section Error!
Reference source not found.
PROCESS MANUAL
5.8-3
OPERATION INSTRUCTIONS
5.9
Write/Edit process recipe
A new process recipe needs to be written or edited so the desired instructions are executed in
the required order. A new process recipe can always be generated. Editing an existing and
RUNNING recipe is possible but poses considerable danger. It is therefore NOT allowed,
except when using variable commands only.
5.9.1
Touchscreen
1) return to the Main Menu by
pressing ‘ESC’ until the
following screen appears:
2) press ‘3’ to access ‘Process
Recipes’
3)
enter recipe nr. to edit or ‘0’ to
create a new process recipe
followed by ‘RETURN’
4) follow instruction at the bottom
line to add or edit commands.
PROCESS MANUAL
5.9-2
OPERATION INSTRUCTIONS
5.9.2
TSC-2
1) return to the main overview
screen
2) select ‘Recipes’ in the
navigation bar to access the
recipe screen
3) double click ‘Normal’ or
‘Abort’ in the mainfield
4) select ‘New’ to create a new
or ‘Edit’ to edit a process
recipe
5) for a new process recipe
confirm the question: ‘Do
you want to add a new recipe’
6) give recipe name
PROCESS MANUAL
5.9-3
OPERATION INSTRUCTIONS
7) select a recipe to copy from
or cancel
8) repeat step 3-7 for each
process step and command.
PROCESS MANUAL
5.9-4
OPERATION INSTRUCTIONS
5.10 Edit graphical image
To support the process recipe and to give actual progress information during the process run
a graphical representation of the tube and its components can be added to the process
certifications.
The touchscreen allows predefined symbols and locations only, TSC-2 allows total freedom
for the graphical operations screen layout.
Note: For accurate representation keep the process gas schematic at hand.
5.10.1 Touchscreen
1) return to the Main Menu by
pressing ‘ESC’ until the
following screen appears:
2) press ‘2’ to access ‘Tube
Certifications’
3)
press ‘1’ to access ‘Process
Controller Certifications’
4) press ‘8’ to access ‘Graphic
System Layout’
PROCESS MANUAL
5.10-2
OPERATION INSTRUCTIONS
5) select SCREEN to find the
desired screen number (max 4)
6) define the tube configuration
(Left or Right) and the amount
of heating zones first
7) select L for Door on Left, select
R for Door on Right
8) select the number of heating
zones by pressing the correct
number (typically 3 or 5). Press
RETURN to confirm.
9) for LPCVD tubes define the
Pressure Transducer valve up to
the Top Tube Line Evacuate
Valve if applicable. Select the
appropriate Digital Output
number (DOx)
10) select G-2 to access the second
part of the graphical system
layout
11) select the appropriate gas
number
(Analog
Output
number)
to
place
the
corresponding gasline in the
desired column 1-8
12) select Purge or No purge
(default) to define its use for the
gasline if applicable
13) select Bottom and/or Top valve
+ MFC or FLM to match the
appropriate DOx numbers
14) select Top Valve Left Line
and/or Top Valve Right Line
and connect them to 1 out of 4
possible horizontal gaslines
15) select the appropriate purge
valve DOx and/or orifice if
applicable
PROCESS MANUAL
5.10-3
OPERATION INSTRUCTIONS
16) select DIS to test the graphical
system layout
17) select SET to activate the
selected screen
PROCESS MANUAL
5.10-4
OPERATION INSTRUCTIONS
5.10.2 TSC-2
1) return to the main overview
screen
2) select ‘System’ in the navigation
bar to access the system
overview screen
3) select the desired tube from the
pull-down menu or from the
previous ‘Overview’ screen.
4) select ‘Operations Screen’ to
access the operations screen
editor.
New
PROCESS MANUAL
5.10-2
OPERATION INSTRUCTIONS
5) select New screen to create a
new display
6) previously defined Operations
Screens from the same or other
tubes can be copied alternatively
Note: It is recommended to use
unique display names among tubes
by including tube numbers
7) select the Object Library button
to gain access to predefined
objects
8) standard objects include line,
square, circle, ellipse, arc and text
objects
9) customer objects include valve,
MFC, 3- or 5-zone furnace,
loader, bubbler, orifice, needle
valve, pump and 3-way valve
objects
10) select the desired object by
clicking once and place it on the
display editor grid
Note: objects can be resized, rotated
and repositioned at any time
PROCESS MANUAL
5.10-3
OPERATION INSTRUCTIONS
11) select the Open Dialog button to
edit an existing screen
12) an example screen is presented
next
13) connect object properties to
DPC or DTC parameters by
selecting the object and pressing
the RMB.
14) Check the conditional box and
the condition dialog appears
PROCESS MANUAL
5.10-4
OPERATION INSTRUCTIONS
15) Select Digital condition for
ON/OFF change of a property,
such as the valve fill color
connected to a DO status
16) Select Data above value for AO
minimum value change of a
property, such as the MFC fill
color connected to an AO status.
Recommended value is 0.05
17) Select Absolute for real value
change of a text object, such as
gas flow (AO) or temperature
(spike or paddle)
18) Select Relative with Multiply for
a relative change, such as the
loader object position on the
screen connected to the real
value boatloader position.
Note: Recommend value is 0.10, it
must be verified with actual
boatloader travel distance and screen
position
Note: make sure to press SAVE to
store any modification.
PROCESS MANUAL
5.10-5
OPERATION INSTRUCTIONS
5.11 Logging process data
Logging data is automatically collected and can be used to optimize the process based on the
process results.
This logging function is only available in TSC-2, not on a touchscreen.
5.11.1 TSC-2 (only)
1) Return to the main overview
screen
2) Select ‘Data’ in the navigation
bar to access the data logging
screen
3) Select Log Data
4) Double click on a predefined
dataset or use the New button
to create one
5) Select the data points of interest
PROCESS MANUAL
5.11-2
OPERATION INSTRUCTIONS
6) Select History Time to select
logging data based on a Start and
End time.
Note: if the desired Start Time is
later than the time already shown,
the END Time must be extended
first.
7)
Select History Lot to search all
logging data for matching Lot
IDs.
Note: use wildcards to extend the
search
8) Select History Recipe to search
all logging data for matching
recipe names
Note: use wildcards to extend the
search
PROCESS MANUAL
5.11-3
OPERATION INSTRUCTIONS
9) Select History Actual for real
time logging
10) Select the Graphical tab page for
a graphical presentation of the
logging data found by the search
criteria above
11) Select the Data tab page for the
raw data presentation of the
logging data found by the search
criteria above
PROCESS MANUAL
5.11-4
OPERATION INSTRUCTIONS
12) Select the Alarm tab page for all
alarm messages of the logging
data found by the search criteria
above
13) Use the Right Mouse Button
(RMB) in the Graphical tab page
to
gain
access
to
the
customization dialog. Titles and
fonts can be added and/or
modified here
PROCESS MANUAL
5.11-5