1
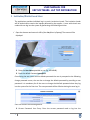
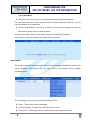
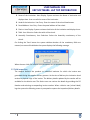
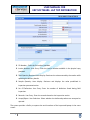
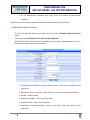
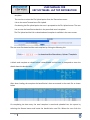
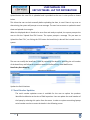
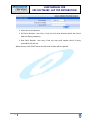
USER MANUAL FOR ERP SOFTWARE- LAP TOP DISTRIBUTION Table of Contents 1 Institution/District Level User .......................................................................... 2 1.1 Institution Master- Captures the Institution Details ......................................... 4 1.2 Field inspection ................................................................................................... 5 1.3 Institution Demo ................................................................................................ 7 1.4 Beneficiary Data Collection ................................................................................ 8 1.5 Beneficiary Data Modification ........................................................................... 9 1.6 Beneficiary Data Collection- File Upload ........................................................... 9 1.7 Serial Number Updation ................................................................................... 11 1 USER MANUAL FOR ERP SOFTWARE- LAP TOP DISTRIBUTION 1 Institution/District Level User The application provides individual log in to each institutions heads. The institution heads will be authorized to receive the laptops delivered by the supplier. A user with school user credentials can log into the system by performing the following activities. Open the browser and enter the URL of the site (elcot.in/laptop). The screen will be displayed. Enter the User Name provided to you (Eg: 10GA3046). Enter the default Password:pass@123 On entering the user name and the default password the user is prompted to the following change password screen, the user has to change the default password by providing a new password. It is mandatory for all the users to change their default password when they log into the system for the first time. The new password will be effective during the next log in. User has to enter the following details. Current Password- User Entry- Enter the current password used to log into the 2 USER MANUAL FOR ERP SOFTWARE- LAP TOP DISTRIBUTION system(pass@123) Password -User Entry- Enter the new desired password to log into the system. The new password must contain minimum eight characters and user must not use the current password as new password. Confirm New Password- User Entry- In order to confirm the new password, enter the password once again same as entered above. On clicking the Submit button the system prompts the following message box. When the user clicks 'OK' button user is taken the home screen. Menu Details The system is provided with interactive menus for easy navigation through the system. The menus displayed in the system may vary from a user to user based on the privileges enjoyed by them. The home page of the system contains the following menus. Home – Takes to user to the home page. Institution Master - Displays the institution master screen. Transactions – Following are the list of sub menus in the Transactions menu. 3 USER MANUAL FOR ERP SOFTWARE- LAP TOP DISTRIBUTION Field inspection- Provides a screen to capture the field inspection results. Demo Details- Provides a screen to capture the demonstration sessions Beneficiary Data Collection – Provides a screen to capture beneficiaries' data. Serial Number Updation- Provides a screen to update the the replaced laptop's serial numbers. File Upload – Provides a screen to upload the beneficiaries' data. Change Password- Prompts the user to change the log in password. 1.1 Institution Master- Captures the Institution Details After getting into the home screen the user has to select the Institution Master from the menu. On selecting the menu the following screen will be displayed. The system will retrieve the details associated with the school and displays them in the respective fields as shown below. Institution Type- Auto Display- System retrieves the type of institution and displays them. Institution Sub Type- Auto Display- System retrieves the Sub type of institution and displays them 4 USER MANUAL FOR ERP SOFTWARE- LAP TOP DISTRIBUTION Name of the Institution- Auto Display- System retrieves the Name of institution and displays them. User can edit the name of the institution. Head of the Institution- User Entry- Enter the name of the school head master Postal Address- User Entry- Enter the postal address of the school. District- Auto Display- System retrieves the district of the institution and displays them. Taluk- User Selection- Select the taluk of the school. Assembly Constituency- User Selection- Select the Assembly constituency of the school. On clicking the 'Save' button the system validate whether all the mandatory fields are entered, on successful validation the system displays the following message. When the user clicks 'OK' button the entered data will be updated successfully. 1.2 Field inspection The supplier delivers the products to individual institutes for which the invoice was generated during the supplier delivery process. At the time of delivery the institution head receives a physical copy of the invoice. The delivery details updated by the vendor will be available for the district user. The district user can retrieve the details by providing the PO Number and selecting corresponding invoice number. When a district user (school Head) logs the system the following screen is prompted to capture the inspection/delivery details. 5 USER MANUAL FOR ERP SOFTWARE- LAP TOP DISTRIBUTION PO Number - Enter the Po number provided. Invoice Number- User Entry- Enter the invoice number available in the physical copy provided. Total Quantity Received- Auto Display- Retrieves the value entered by the vendor while updating the delivery details. Sample Quantity- Auto display- Retrieves and displays the value predefined in inspection parameterization. No. Of Defectives- User Entry- Enter the number of defectives found during field inspection. Remarks- User Entry- Enter the remarks based on the inspection results. Accept/Reject- User Selection- Select whether the delivered products are accepted or rejected. The system provides a facility to capture the serial numbers of the inspected laptops in the same screen. 6 USER MANUAL FOR ERP SOFTWARE- LAP TOP DISTRIBUTION Product Serial Number- User Entry- Enter the product serial number. On clicking the button the entered serial number will be added and will be displayed in the screen space adjacent to it. On completing the data entry in all the fields the user is prompted to save the entered data. The system alerts the user by displaying “Data successfully inserted” 1.3 Institution Demo The institution demonstration is the process in which each supplier provides a demonstration about the usage of their products. The details about the demonstration are captured by the district user (Institution Head). The user has to log into the system with District user's credentials and select “Institute Demo” from the “Transactions” menu. The system prompts the user to capture the details in the following screen. PO Number - Enter the Po number provided. Invoice Number- Auto Display- System will display the invoice number provided to the institution. Is Demo Completed for all students- Check Box- User can select this option when the demo session is held for all the beneficiaries on a single day. If the user does not select this option user can enter the date and number beneficiaries participated in the demo session individually. System restricts the user to enter values when the number of beneficiaries attended the demo session is more than the total number of beneficiaries. Date of Demonstration- User Entry- Enter date on which the demonstration session performed. 7 USER MANUAL FOR ERP SOFTWARE- LAP TOP DISTRIBUTION No. Of Beneficiaries attended- User Entry- Enter the number of beneficiaries attended. When the user clicks the Save button the details will be inserted into the data base. 1.4 Beneficiary Data Collection The user can add the beneficiary’s details with the help of Beneficiary Data Collection menu. Link to the menu Transactions>> Beneficiary Data Collection. When the selects the above menu the following screen will be displayed and the user is prompted to capture the beneficiary details. The Beneficiary Roll No- User Entry- Alpha Numeric- Enter the roll number of the beneficiary. Beneficiary Name- User Entry- Alpha Numeric- Enter the name of the beneficiary. Gender – Select Gender Beneficiary Religion – Elect from Drop down Beneficiary Class- User Entry- Displayed. Beneficiary section/Department / Branch- User Entry- Enter the section of the beneficiary 8 USER MANUAL FOR ERP SOFTWARE- LAP TOP DISTRIBUTION Group / Major - Enter the Group / Major Institution name- Auto display- System displays the name of the school. Postal Address- user Entry- Enter the postal address of the beneficiary, Father Name- user Entry- Enter the father name of the beneficiary Family Card number- User entry- Enter the beneficiary's family card number. Date of Birth- user Entry- Enter the date Beneficiary Community – Select Beneficiary Community Aadhar Card Number – Enter Aadhar Card Number When the user clicks the Save button the system validate whether all the mandatory fields are entered, on successful validation the system displays the following message. When the user clicks 'OK' button the entered beneficiary data will be added successfully. The user can add the next beneficiary data by repeating the same procedure. Note: The system allows the user to add the beneficiaries’ details until the added beneficiaries are equal to the total number of students in the institution. The system prevents the user to add beneficiaries more than the total number of users. 1.5 Beneficiary Data Modification The user can retrieve the beneficiary data by providing the Beneficiary Roll No, the system retrieves and displays the data associated with the entered roll number the respective fields. The user can modify the desired data and on clicking the save button the modified data will be inserted into the system. Note: The system will not accept same roll number for two beneficiaries. 1.6 Beneficiary Data Collection- File Upload The system allows the user to upload the beneficiaries details enter in the specified excel 9 USER MANUAL FOR ERP SOFTWARE- LAP TOP DISTRIBUTION template. The user has to select the File Upload option from the Transactions menu. Link to the menu Transactions>>File Upload. On selecting the file upload option the user is prompted to the File Upload screen. The user has to enter the beneficiaries details in the prescribed excel a template. The File Upload and the link to download excel template is available in the same screen. The user must first download the excel template by clicking the following link. A blank excel template as shown below is downloaded and the user is prompted to enter the details about the beneficiaries. After down loading the template the beneficiaries' data are entered in the excel file as shown below. On completing the data entry the excel template is saved and uploaded into the system by selecting the Browse button and locate the beneficiaries excel file. When the user clicks the 10 USER MANUAL FOR ERP SOFTWARE- LAP TOP DISTRIBUTION Upload button the excel file is uploaded and is provided to the user in view profile as shown below. This allows the user to check manually before uploading the data, in case if there is any error or data missing the system will prompt an error message. The user has to correct or update the excel sheet and uploads it once again. When the displayed data is found to be error free and ready to upload, the system prompts the user to click the 'Upload Excel File' button. The system prompts a message “Do you want to Upload the Excel File”, on clicking the 'OK' button the beneficiary's data will be inserted into the system. The user can modify the beneficiary's data by retrieving the details by providing the roll number of the beneficiary and follow the procedure stated in the Beneficiary Data Modification Beneficiary Data Mapping Update the Serial Numbers 1.7 Serial Number Updation The serial number updation screen is available for the user to replace the products identified as defective at the time of field inspection. User can update the serial number of the laptop by selecting this option from the menu. In order to replace an existing laptops serial number user has to enter the details in the following screen. 11 USER MANUAL FOR ERP SOFTWARE- LAP TOP DISTRIBUTION Select the Invoice Number Old Serial Number- User Entry- Enter the old serial Number which was found defective during inspection. New Serial Number- User entry- Enter the new serial number which is being replaced for the old one. When the user clicks 'SAVE' button the old serial number will be replaced. 12