1
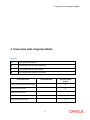
Oracle FLEXCUBE Direct Banking Corporate Cash Management User Manual Release 12.0.2.0.0 Part No. E50108-01 September 2013 Corporate Cash Management User Manual September 2013 Oracle Financial Services Software Limited Oracle Park Off Western Express Highway Goregaon (East) Mumbai, Maharashtra 400 063 India Worldwide Inquiries: Phone: +91 22 6718 3000 Fax:+91 22 6718 3001 www.oracle.com/financialservices/ Copyright © 2008, 2013, Oracle and/or its affiliates. All rights reserved. Oracle and Java are registered trademarks of Oracle and/or its affiliates. Other names may be trademarks of their respective owners. U.S. GOVERNMENT END USERS: Oracle programs, including any operating system, integrated software, any programs installed on the hardware, and/or documentation, delivered to U.S. Government end users are “commercial computer software” pursuant to the applicable Federal Acquisition Regulation and agency-specific supplemental regulations. As such, use, duplication, disclosure, modification, and adaptation of the programs, including any operating system, integrated software, any programs installed on the hardware, and/or documentation, shall be subject to license terms and license restrictions applicable to the programs. No other rights are granted to the U.S. Government. This software or hardware is developed for general use in a variety of information management applications. It is not developed or intended for use in any inherently dangerous applications, including applications that may create a risk of personal injury. If you use this software or hardware in dangerous applications, then you shall be responsible to take all appropriate failsafe, backup, redundancy, and other measures to ensure its safe use. Oracle Corporation and its affiliates disclaim any liability for any damages caused by use of this software or hardware in dangerous applications. This software and related documentation are provided under a license agreement containing restrictions on use and disclosure and are protected by intellectual property laws. Except as expressly permitted in your license agreement or allowed by law, you may not use, copy, reproduce, translate, broadcast, modify, license, transmit, distribute, exhibit, perform, publish or display any part, in any form, or by any means. Reverse engineering, disassembly, or decompilation of this software, unless required by law for interoperability, is prohibited. The information contained herein is subject to change without notice and is not warranted to be error-free. If you find any errors, please report them to us in writing. This software or hardware and documentation may provide access to or information on content, products and services from third parties. Oracle Corporation and its affiliates are not responsible for and expressly disclaim all warranties of any kind with respect to third-party content, products, and services. Oracle Corporation and its affiliates will not be responsible for any loss, costs, or damages incurred due to your access to or use of third-party content, products, or services. Oracle FLEXCUBE Direct Banking 12.0.2.0.0 Corporate Cash Management Contents 1. Preface ..................................................................................................................................................... 4 1.1. Intended Audience ............................................................................................................................. 4 1.2. Documentation Accessibility .............................................................................................................. 4 1.3. Access to OFSS Support ................................................................................................................... 4 1.4. Structure ............................................................................................................................................ 4 1.5. Related Information Sources ............................................................................................................. 5 2. Transaction Host Integration Matrix ..................................................................................................... 6 3. Setup Account Structure ........................................................................................................................ 7 4. Create Group Linkage ........................................................................................................................... 10 5. Modify Account Structure .................................................................................................................... 13 6. View Account Structure........................................................................................................................ 18 7. Unmark Account as Parent .................................................................................................................. 24 Oracle FLEXCUBE Direct Banking 12.0.2.0.0 Corporate Cash Management Preface 1. Preface 1.1. Intended Audience This document is intended for the following audience: Customers Partners 1.2. Documentation Accessibility For information about Oracle's commitment to accessibility, visit the Oracle Accessibility Program website at http://www.oracle.com/pls/topic/lookup?ctx=acc&id=docacc. 1.3. Access to OFSS Support https://flexsupp.oracle.com/ 1.4. Structure This manual is organized into the following categories: Preface gives information on the intended audience. It also describes the overall structure of the User Manual Transaction Host Integration Matrix provides information on host integration requirements for the transactions covered in the User Manual. Chapters post Transaction Host Matrix are dedicated to individual transactions and its details, covered in the User Manual 4 Preface 1.5. Related Information Sources For more information on Oracle FLEXCUBE Direct Banking Release 12.0.2.0.0, refer to the following documents: Oracle FLEXCUBE Direct Banking Licensing Guide 5 Transaction Host Integration Matrix 2. Transaction Host Integration Matrix Legends NH No Host Interface Required. Host Interface to be developed separately. Pre integrated Host interface available. Pre integrated Host interface not available. Transaction Name FLEXCUBE UBS Third Party Host System Create Parent Account Group Linkage Setup Acount Structure Modify Acount Structure View Acount Structure Unmark Account as Parent 6 Setup Account Structure 3. Setup Account Structure Using this option you can setup new Account Structure. You can define the type of Account Structure to be done. You can also define multiple child account while setting up Account Structure. To Setup Account Structure: Navigate through Cash Management > Account Structure > Setup Account Structure. Setup Account Structure 7 Setup Account Structure Field Description Field Name Description Parent Account Select Parent Account [Mandatory, Drop-Down] Select the parent account from the drop-down. Funds will be swept or pooled into and out of this account. Scheme Type [Mandatory, Drop-Down] Select any type of cash management from the drop-down. The options are as follows. Notional Sweep Effective Date [Mandatory, Pick List] Select the date from which cash management will come in effect, from pick list. Child Account [Mandatory, Drop-Down] Select the child account where the funds will be pooled from and to the account which is selected in the drop-down. Note: Only those accounts will be displayed which are not a part of any cash management instruction. Sweep Type [Conditional, Drop-Down] Select type of sweep from the drop-down. Options are as follows. Sweep in Sweep out Threshold. This field is enabled if the Type option is selected as Sweep from the drop-down list. Note: This field is activated only when Type is selected as Sweep. Not displayed when type is selected as Notional. Base Amount [Conditional, Numeric, 15] Type the Base amount that needs to be maintained in the child accounts for sweeps. Note: This field is activated only when Type is selected as Sweep. Not displayed when type is selected as Notional. 1. Click the Submit button. The system displays Verify Setup Account Structure screen 8 Setup Account Structure Verify Setup Account Structure 2. Click the Confirm button. The system displays the Confirm Setup Account Structure screen with the status message. OR Click the Change button to go to the previous screen and edit the entered data. Confirm Setup Account Structure 3. Click the OK button. The system displays the Setup Account Structure screen. 9 Create Group Linkage 4. Create Group Linkage Using this option, you can create a Parent Account group. You can link this group to any Accout Structure or can link a group to an account. While performing any sweep operation, group has to be created and the linkage of the group with the parent account has to be done. To Create Group Linkage: Navigate through Cash Management > Parent Account-Group Linkage > Create Group Linkage. Create Group Linkage 10 Create Group Linkage Field Description Field Name Description Group [Mandatory, Drop-Down] Select a group from this drop-down. You can select new group or already created old group. Group Name [Mandatory, Alphanumeric, 15] Type any group name. This will be the title for the new group created. Select Account [Mandatory, Drop-Down] Select any account number from this drop-down to which the group is to be assigned. Effective Date [Mandatory, Pick List] Select any date from the pick list from which the group is applicable. Pool Benefit [Optional, Check box] Select the check-box for the interest amount to be credited in each account separately or the parent account. Intraday Sweep [Optional, Check box] Select the check-box for intraday sweep batch to run for transfer of funds within the day in case of withdrawal. Reverse Sweep [Optional, Check box] Select the check-box for reverse sweep to be done for funds to be deposited back to the original accounts or not. 1. Click the Submit button. The system displays Create Group Linkage verify screen Create Group Linkage 2. Click the Confirm button. The system displays final confirmation screen Create Group Linkage Confirm screen with status message. OR Click the Back button to edit the entered data. 11 Create Group Linkage Create Group Linkage 12 Modify Account Structure 5. Modify Account Structure Using this option you can modify Account structure that have been previously setup. While modifying, you can add child accounts or can delete active accounts but you cannot modify parent account, type of instruction and amount. To Modify Account Structure: Navigate through Cash Management > Account Structure > Modify Account Structure. Modify Account Structure Field Description Field Name Description Parent Account [Optional, Drop-Down] Select the parent account from the drop-down. Funds will be swept or pooled into and out of this account. Child Account [Optional, Drop-Down] Select the child account where the funds will be pooled from and 13 Modify Account Structure to the account which is selected in the drop-down. Note: Only those accounts will be displayed which are not a part of any cash management instruction. Group Name [Optional, Alphanumeric, 25] Type any group name by which the cash management instruction has been setup. Scheme Type [Mandatory, Drop-Down] Select any type of cash management to be done, Notional or Sweep. From Date [Optional, Pick List] Select the start date from which the instruction has been setup from pick list. To Date [Optional, Pick List] Select the end date up to which the instruction has been setup from pick list. 1. Click the Search button. The system displays Modify Account Structure screen with account details. Modify Account Structure Field Description 14 Modify Account Structure Field Name Description Parent Account [Display] This column displays the Parent Account. Group Name [Display] This column displays the group name. Scheme Type [Display] This column displays the scheme type. Effective Date [Display] This column displays the effective date. 2. Select the parent account radio button for the account to be modified. 3. Click the 4. Click the Edit button to Edit the column. Optimize data button to optimize the columns. 5. Click the Modify button. the system displays the Modify Account structure screen. Modify Account Structure Field Description 15 Modify Account Structure Field Name Description Parent Account [Display] This field displays the Parent Account. Group Name [Display] This field displays the group name. Scheme Type [Display] This field displays the scheme type. Effective Date [Display] This field displays the effective date. Child Account [Optional, Drop-Down] Select any child account from the drop down. funds will be pooled from and to the account which is selected in the drop-down. Note: Only those accounts will be displayed which are not already a part of any cash management instruction. Active Instructions Child Account [Display] It displays the child account that exists under the cash management instruction. Sweep Type [Display] This field displays the sweep type done for the child account. This field is displayed for the scheme type as sweep. Base Balance [Display] This field displays the Base balance. This field is displayed for the scheme type as sweep. New Account Structure Child Account [Display] It displays the child account which is selected in the Child Account dropdown. Sweep Type [Conditional, Drop-Down] Select type of sweep from the drop down which is to be done for the selected child account. This field is displayed for the scheme type as sweep. 16 Modify Account Structure Field Name Description Base Balance [Conditional, Numeric, 15] Type minimum threshold amount that needs to be maintained in the child accounts for sweeps. This field is displayed for the scheme type as sweep. 6. Click the Submit button. The system displays Modify Account Structure - Verify screen. OR Click the Back button to go to the previous screen and edit the entered data. Modify Account Structure - Verify 7. Click the Confirm button. The system displays Modify Account Structure - Confirm screen with the status message. OR Click the Back button to go to the previous screen. Modify Account Structure - Confirm 8. Click the OK button. The system displays initial Modify Account Structure screen. 17 View Account Structure 6. View Account Structure Using this option you can view the Account Structure that are previously setup. You will be able to view all the Account Structure that have been setup for your customer id. To View Account Structure: Navigate through Cash Management > Account Structure > View Account Structure. View Account Structure Field Description Field Name Description Parent Account [Optional, Drop-Down] Select any parent account from the drop-down. Funds will be swept or pooled into this account. 18 View Account Structure Field Name Description Child Account [Mandatory, Input box] Select the child account where the funds will be pooled from and to the account which is selected in the drop-down. Note: Only those accounts will be displayed which are not already a part of any cash management instruction. Group Name [Optional, Alphanumeric, 25] Type any group name by which the Account Structure has been setup. Scheme Type [Mandatory, Drop-Down] Select the type of Account Structure. The options are as follows: Notional Sweep. From Date [Mandatory, Pick List] Select the start date from which structure has been setup. To Date [Optional, Pick List] Select the end date up to which structure has been setup. 1. Click the Search button. The system displays View Account Structure screen. View Account Structure Field Description Field Name Description Parent Account [Display] This column displays the Parent Account. 19 View Account Structure Field Name Description Group Name [Display] This column displays the group name. Scheme Type [Display] This column displays the scheme type. Effective Date [Display] This column displays the effective date. 2. Click the Parent Account hyperlink. The system displays the child account in the View Child Account screen. View Child Account Field Description Field Name Description Child Account [Display] This column displays the Child Account. Sweep Type [Display] This column displays the Sweep type. Base Balance [Display] This column displays the Base Balance. 20 View Account Structure 3. Click the Back button. The system displays initial View Account Structure screen. 4. Click or 5. Click or to navigate to the next or previous page in the list, respectively. to navigate to the first or last page in the list, respectively. 6. To download the complete statement, click the Download View Account dialog screen. 7. Click the reorder button 8. Click the Print button 9. Click on Edit button button. The system displays the to reorder the columns or select the columns that appear in the list. to print the data. column to edit the number of columns. View Child account Download Field Description Field Name Description Download Type [Mandatory, Drop-Down] Select the appropriate report type from the drop-down list. The available choices are: Page Layout 21 View Account Structure Field Name Description File Format [Conditional, Drop-Down] Select the appropriate type of file format from the drop-down list. The options available are PDF XLS HTML RTF Included This box lists all the fields that will be included in the report. Excluded This box lists all the fields that will be excluded from the report. 10. Select the fields that are to be excluded from the Included box and click the Excluded box appears on the left-side of the dialog box. button. The 11. Select the fields that are to be included from the Excluded box and click the button. The Included box appears on the right-side of the dialog box. All the fields are, by default, selected and included. 12. Select the appropriate report type, format, and fields from the Download Deal details and click the Download button. The system displays the File Download message box. File Download 13. Click the Save button to save the file on your file system. The system displays the Save As dialog box. 22 View Account Structure 14. Enter the name for the file and the location and click on the Save button. Once the download is complete, the system displays the Download complete message box. Download Complete 15. Click the Open button to open the file or click the Close button to view the file later. OR Click the Open Folder button to open the folder in which the file is saved OR Click the Close button to close the Download Outward Guarantee dialog box. 23 7. Unmark Account as Parent Using this option you can unamrk asn account as Parent which does not have any child associated with it. To Unmark Account as parent: Navigate through Cash Management > Parent Account-Group Linkage > Unmark Account as Parent. Unmark Account as Parent Field Description Field Name Description Parent Account [Optional, Drop-Down] Select any parent account from the drop-down. Funds will be swept or pooled into and out of this account. 24 Unmark Account as Parent Group Name [Optional, Alphanumeric, 25] Type any group name by which the Account Structure has been setup. Scheme Type [Mandatory, Drop-Down] Select any type of Account Structure from the drop down. Options are as follows Notional Sweep. From Date [Optional, Pick List] Select the start date from the pick list from which structure has been setup. To Date [Optional, Pick List] Select the end date from the pick list up to which structure has been setup. 1. Click the Search button. The system displays Unmark Account as Parent screen. Unmark Account as Parent 2. Select any Parent Account Radio button to be deleted and click the Unmark button. The system displays Unmark Account as Parent – Verify screen. Unmark Parent Account - Verify 3. Click the Confirm button. The system displays Unmark Account as Parent - Confirm screen. 25 Unmark Account as Parent Unmark Parent Account - Confirm 4. Click the OK button. The system displays initial Unmark Account as Parent screen. 26