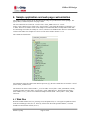
1
SN82xx SW Design
SN82xx SNIC EZ Web Wizzard
Development Platform User Manual
Version: 1.5
September 6, 2013
SyChip LLC reserves the right to make changes in specifications at anytime and without notice. The information
furnished in this document is believed to be accurate and reliable. However, no responsibility is assumed by SyChip
for its use, nor any infringements of patents or other rights of third parties resulting from its use. No license is
generated under any rights of SyChip or its supporters unless specifically agreed.
Murata / SyChip
Page 1 of 42
SN82xx SW Design
Release Record
Version Number
Version 1.0
Version 1.1
Version 1.2
Version 1.3
Version 1.4
Version 1.5
Murata / SyChip
Release Date
12/14/12
01/09/13
05/10/13
06/10/13
08/30/13
09/06/13
Comments
Initial release
Added HTTP port and retry in FW config
Added WPA AES security support
Added WPS support
Added UART break
Added web upgrade
Page 2 of 42
SN82xx SW Design
THE TABLE OF CONTENTS
1.
INTRODUCTION ................................................................................................................................. 6
1.1
1.2
2.
TERMS .................................................................................................................................................. 6
REFERENCES ........................................................................................................................................ 6
EZ WEB WIZZARD DEVELOPMENT PLATFORM ..................................................................... 7
2.1
DEVELOPING APPLICATION FOR EZ WEB WIZZARD ............................................................................. 7
2.2
EMBEDDED EZ WEB WIZZARD FRAMEWORK ....................................................................................... 8
2.2.1
Configuration function ................................................................................................................ 9
2.2.2
Soft AP mode .............................................................................................................................. 9
2.2.2.1
2.2.2.2
2.2.3
2.2.4
2.2.4.1
2.2.4.2
2.2.5
3.
Simple DHCP server .............................................................................................................................. 9
Simple DNS server ................................................................................................................................. 9
STA mode .................................................................................................................................... 9
Embedded web-server ................................................................................................................. 9
Embedded HTTP Server ........................................................................................................................10
JSON Parser ..........................................................................................................................................10
Web contents ............................................................................................................................. 10
SNIC MONITOR ................................................................................................................................ 11
3.1
SETTING UP THE SN82XX EVK+ FOR WINDOWS................................................................................ 11
3.2
SPECIFY PRODUCT-SPECIFIC CONFIGURATIONS................................................................................... 11
3.2.1
AP mode parameters .................................................................................................................. 12
3.2.2
STA mode parameters ............................................................................................................... 13
3.3
IMPORTING WEB-CONTENTS TO EZ WEB WIZZARD FRAMEWORK ...................................................... 14
3.4
DOWNLOADING THE FIRMWARE ......................................................................................................... 15
4.
SAMPLE APPLICATION AND WEB PAGE CUSTOMIZATION .............................................. 16
4.1
4.2
4.3
4.4
4.5
4.6
4.7
4.8
5.
WEB FILES .......................................................................................................................................... 16
CONTENTTYPE.CONF .......................................................................................................................... 17
.CONF FILE .......................................................................................................................................... 18
FOLDER X-MURATA-AP AND X-MURATA-STA ..................................................................................... 18
FOLDER JAVASCRIPT .......................................................................................................................... 18
COMPRESSING WEB FILES ................................................................................................................... 19
IMPORTING WEB FILES INTO FIRMWARE.............................................................................................. 19
DOWNLOADING THE FIRMWARE ......................................................................................................... 20
RUNNING THE SAMPLE WEB APPLICATION .......................................................................... 22
5.1.1
5.1.1.1
5.1.1.2
5.1.1.3
Soft AP web pages ..................................................................................................................... 22
Wifi and network management ..............................................................................................................22
GPIO demo ............................................................................................................................................25
UART demo ..........................................................................................................................................29
5.1.1.3.1
5.1.1.3.2
5.1.1.3.3
5.1.1.3.4
5.1.1.4
5.1.1.5
Send data to UART from web browser ........................................................................... 30
Send break signal before sending UART data ................................................................. 31
Read data from UART to web browser ........................................................................... 31
Read UART after write ................................................................................................... 32
I2C demo ...............................................................................................................................................32
Miscellaneous tabs.................................................................................................................................34
5.1.2
STA web pages .......................................................................................................................... 35
5.2
DESIGN NOTE ..................................................................................................................................... 38
5.3
WEB CONTENT UPGRADE .................................................................................................................... 38
5.3.1
Creating web image ................................................................................................................... 39
5.3.2
Updating web image .................................................................................................................. 39
6.
THIRD PARTY LICENSING INFORMATION ............................................................................. 41
Murata / SyChip
Page 3 of 42
SN82xx SW Design
Murata / SyChip
Page 4 of 42
SN82xx SW Design
TABLE OF FIGURES
Figure 1 Example EZ Web Wizzard usage scenario ....................................................................................... 7
Figure 2 EZ Web Wizzard development platform ........................................................................................... 8
Figure 3 EZ Web Wizzard embedded framework for simple web services (SWS) ......................................... 8
Figure 4 Customize firmware parameters ...................................................................................................... 12
Figure 5 Import web files .............................................................................................................................. 20
Figure 6 Download firmware to SN82xx ...................................................................................................... 21
Figure 7 Download complete ........................................................................................................................ 21
Murata / SyChip
Page 5 of 42
SN82xx SW Design
1. Introduction
SN82xx is a complete embedded wireless solution to address the connectivity demand for deeply
embedded systems. It integrates an ARM Cortex M3 micro-controller, Wi-Fi BB/MAC/RF IC, RF front
end, flash memory, fast clocks, and on-board antenna into a small form factor module. The EZ Web
Wizzard architecture supports easy web-based control without the need for any additional host controller.
It contains a firmware running onboard SN82xx to support wireless network configuration, JSON parser,
HTTP server, TCP/IP network stack, WiFi driver and I/O peripherals driver. EZ Web Wizzard supports
dual APSTA mode that simplifies WLAN connection setup using an embedded web server. The web
server provides simple web services (SWS) through an Ajax interface that supports application-specific
web-based control, enabling the creation of wireless IP-capable nodes in a simple and straight forward
manner. This document describes the EZ Web Wizzard specification for developing SN82xx applications
with the SN82xx EVK+ using HTTP, HTML, CSS, javascript and JSON.
1.1 Terms
-
The term APSTA mode refers to the capability to simultaneously support both WiFi AP and STA
modes of operation.
The term IP address in this document refers to IPv4 IP address.
1.2 References
[1] Fielding, R., et al., “Hypertext Transfer Protocol -- HTTP/1.1”, RFC 2616, June 1999
[2] Crockford, D., “The application/json Media Type for JavaScript Object Notation (JSON)”, RFC 4627,
July 2006
[3] SyChip, “SN82xx SNIC EVK+ User Guide”
[4] SyChip, “SN82xx EZ Web Wizzard Simple Web Services URIs”
[5] SyChip, “SN82xx SNIC UART Serial Interface User Manual”
[6] SyChip, “SN82xx SNIC SPI Serial Interface User Manual”
Murata / SyChip
Page 6 of 42
SN82xx SW Design
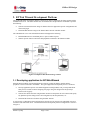
2. EZ Web Wizzard Development Platform
The EZ Web Wizzard development platform consists of two major components, the SNIC monitor and the
embedded web-server. The SNIC monitor runs on a Windows PC and provides the mechanism to perform
the following:
Generate customized firmware image for SN82xx based on application-specific configurations and
custom web pages.
Download that firmware image to the SN82xx WiFi network controller module.
The embedded web-server runs onboard the SN82xx and supports the following:
Embedded HTTP server and JSON parser to process HTTP requests.
SN82xx-specific URIs to control IOs and peripherals connected to the SN82xx module.
Figure 1 Example EZ Web Wizzard usage scenario
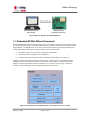
2.1 Developing application for EZ Web Wizzard
EZ Web Wizzard enables web-based applications to directly control the SN82xx module and any
peripheral or sensor connected to the module. The typical application development process is as follows:
Develop application-specific web-enabled applications using HTML, CSS, javascript and JSON.
That process is similar to that of designing web-pages using web-design tools and javascript
libraries such as jQuery.
Generate the custom firmware using the SNIC monitor to incorporate the web contents and specify
any platform-specific settings such as I/O configurations, WLAN parameters, etc.
Download the firmware to SN82xx using the SNIC monitor.
A web-browser or other HTTP-client application may then be used to connect to the embedded web-server
in SN82xx and control that device. The EZ Web Wizzard development platform configuration is as shown
in Figure 2.
Murata / SyChip
Page 7 of 42
SN82xx SW Design
Host Development Kit:
SNIC Monitor
SN8200 EVB for
Embedded web server
Figure 2 EZ Web Wizzard development platform
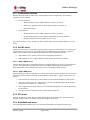
2.2 Embedded EZ Web Wizzard framework
The EZ Web Wizzard framework supports simple web services (SWS) which provide the means by which
web-based applications can be executed onboard SN82xx to control the module and any associated sensors
and peripherals. An embedded web-server retrieves the resources specified by incoming HTTP requests,
including processing of SWS-specific Request-URIs to perform the following:
ExecuteWiFi-specific actions such as scanning for available APs,
Perform IP network configuration and management,
Configure and control peripherals connect to SN82xx through GPIOs, I2C, UART, etc.
SN82xx can function as both AP and STA at the same time. HTTP clients can communicate with the
embedded web-server through either the AP or STA interface of the SN82xx. The EZ Web Wizzard
platform permits the application developer to limit access to a specific web-page to any of those two
interfaces. The block diagram for the embedded framework is shown below.
Figure 3 EZ Web Wizzard embedded framework for simple web services (SWS)
Murata / SyChip
Page 8 of 42
SN82xx SW Design
2.2.1 Configuration function
EZ Web Wizzard provides an API to setup various product-specific configurations. The following
parameters may be specified:
Soft AP parameters:
o
WLAN parameters such as SSID and WLAN security type and key.
o
DHCP server parameters such as subnet mask, IP address for the AP, etc.
o
DNS domain string.
STA parameters:
o
WLAN parameters such as SSID and WLAN security type and key.
o
IP networking parameters such as address configuration by static IP or DHCP.
o
Hostname string advertised to the DHCP server, if any.
All of those parameters can be configured by SNIC monitor and stored in the SN82xx NVM. See 3.2 for
details.
2.2.2 Soft AP mode
SN82xx can function as a soft AP which is typically used to specify the WiFi-parameters for connecting to
a specific WLAN. It may also serve as another interface for administering and controlling a Wireless
Sensor Network (WSN). EZ Web Wizzard provides the following AP-specific functions:
Simple DNS server to connect to the web-server through the AP interface,
Simple DHCP server to assign IP addresses for the WLAN controlled by the soft AP.
2.2.2.1 Simple DHCP server
EZ Web Wizzard provides a simple DHCP interface to assign IP addresses for devices associated with the
soft AP. The simple DNS server does not store the MAC address and IP addresses association, so a
different IP address will be assigned to the same STA if it sends multiple DHCP requests.
2.2.2.2 Simple DNS server
EZ Web Wizzard provides a simple DNS server for the AP interface to permit an HTTP client to connect to
the EZ Web Wizzard without needing the actual IP address of that interface. Typical usage scenario is as
follows:
1.
User associates the control device to the SN82xx soft AP and obtain IP address to that interface
2.
User uses a web browser in the control device to connect to EZ Web Wizzard using the domain
configured for the module, e.g., “sn8200.com”
3.
User configures the WLAN parameters or control SN82xx through the web-contents supported by
the AP interface
4.
User access the STA interface after successfully joining that WLAN.
2.2.3 STA mode
SN82xx can function as a STA and join another WLAN and access to that network. EZ Web Wizzard
provides a DHCP client for the module to obtain the IP address for the STA.
2.2.4 Embedded web-server
The EZ Web Wizzard embedded web-server runs onboard the SN82xx and supports the following:
Murata / SyChip
Page 9 of 42
SN82xx SW Design
Embedded HTTP server and JSON parser to process HTTP requests.
SN82xx-specific SWS URIs to control IOs and peripherals connected to the SN82xx module.
2.2.4.1 Embedded HTTP Server
The embedded HTTP server runs onboard SN82xx. It can process the HTTP requests received from the
AP and STA interfaces of the SN82xx, subject to the following constraints:
Persistent connections are not supported,
Contents for SWS-specific URIs must be transported using JSON as specified in [4],
Absolute path URIs must be used.
2.2.4.2 JSON Parser
The JSON parser runs onboard SN82xx to process contents for the SWS-specific Request-URIs. The JSON
object transferred by the POST operation must be URL encoded, and there cannot be any unnecessary
spaces between any components of the JSON object.
2.2.5 Web contents
EZ Web Wizzard enables the application-specific contents to be stored onboard SN82xx. The application
developer creates the necessary HTML, CSS and javascript files and converts them to the EZ Web Wizzard
framework using SNIC monitor (3.3).
Murata / SyChip
Page 10 of 42
SN82xx SW Design
3. SNIC monitor
The SNIC monitor runs on a Windows-XP Service Pack 3 or Windows 7 enabled computer. It provides the
following capabilities:
Setup product and deployment specific configurations such as network and WLAN access
parameters,
Import into EZ Web Wizzard framework web-based contents described by HTML, CSS, javascript
and JSON,
Download firmware to SN82xx module.
3.1 Setting up the SN82xx EVK+ for Windows
SNIC monitor must be installed along with the drivers for the SN82xx EVK. The procedures for those
operations are detailed in SN82xx SNIC EVK+ User Guide ([3]).
3.2 Specify product-specific configurations
Application developers can modify the firmware startup parameters to suit their needs. The default software
package released by Murata has a prebuilt binary firmware file for SN82xx. This file will be the input to
generate a new binary firmware file to include any customized parameters.
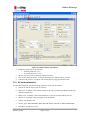
Execute the following steps to generate a new firmware suited for the customer platform.
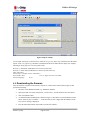
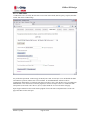
Open SNIC monitor and click on the green “C” configuration button on the tool bar.
Click the Browse button to select source firmware file, and click on Load button. This will
populate the above fields according to the file. After loading, the Save Firmware button should be
enabled.
The upper left area is interface configuration. If UART is to be used in the customer web
application, modify the parameters for UART to the same as the device that connects to UART.
Otherwise leave it as is. If the UART is used by the web-based EZ Web Wizzard application,
ensure that it is not also used by the serial interface protocol over UART.
Do not click on SPI tab for EWW application, because it is for a host application that
communicates with SN82xx via SPI interface ([6]).
Murata / SyChip
Page 11 of 42
SN82xx SW Design
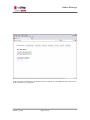
Figure 4 Customize firmware parameters
Modify any parameters for the following:
o AP mode parameters (3.2.1)
o STA mode parameters (3.2.2)
Select or type in the name of the target firmware file name.
Click on Save Firmware button. A message should pop up to indicate success or failure.
Continue to the Section 3.3 to import web contents into the newly generated Firmware.
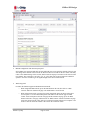
3.2.1 AP mode parameters
The Soft AP Config block specifies the startup parameters for the soft AP interface.
Soft AP on: Soft AP will be on or off at startup
DNS server: if enabled, it will return IP address for the value specified in the Domain name field
(default is sn8200.com).
DHCP server: if enabled, it will assign IP addresses to devices associated with the soft AP.
Web server: if enabled, it will serve pages for the AP interface.
Country code: default is US.
Security: open, WPA-TKIP-PSK, WPA-AES-PSK, WPA2-AES-PSK, or WPA2-MIXED-PSK
Pass phrase: 64 characters or less
Murata / SyChip
Page 12 of 42
SN82xx SW Design
Channel: WiFi channel for soft AP
SSID Prefix: this is the broadcasted SSID prefix for the soft AP
Append MAC to SSID: if checked, the soft AP’s SSID will be the prefix plus the last 3 bytes of
the MAC address; otherwise, the SSID prefix will be used as the SSID.
Domain name: default is sn8200.com, can be modified to any name.
The edit box next to the Domain name is the HTTP port, default is 80.
IP: default is 172.31.0.1, can be customized to be any valid IP.
Subnet mask: default is 255.255.0.0.
Gateway: should be same as IP.
3.2.2 STA mode parameters
The STA Config block specifies the startup parameters for STA interface.
SSID to connect: enter SSID to connect when the module boots up (or after a reset).
Security: the target AP’s security mode which can be open, WEP, WPA-TKIP-PSK, WPA-AESPSK, WPA2-AES-PSK, or WPA-MIXED-PSK.
Pass phrase: the target AP’s pass phrase.
Retry itvl (T1): if the SSID specified is not on (or with wrong security settings) at the time the
SN82xx boots up, the auto-joining will fail. This parameter specifies the initial retry interval. If
STA fails to connect for the first time, STA waits for T=T1. Once T expires, STA retries
connection. Failed attempt will result in next attempt at T=min(2*T, Tmax). The unit of timeout
is second(s), and the range is from 0x0000 - 0xFFFF. The value of 0 has a special meaning for T1,
which indicates no retry. Note: this is only supported in SN82xx EVK+ and not SN82xx EVK.
Max itvl (Tmax): maximum retry interval SN82xx waits to retry joining. If T1=10 and
Tmax=1000, the following intervals (seconds) will be set for retries: 10, 20, 40, 80, 160, 320, 640,
1000, 1000, 1000… Either a Join request or a Leave request from other interface (e.g., web) will
stop the retry process. Note: this is only supported in SN82xx EVK+ and not SN82xx EVK.
Internal web server: if enabled, it will serve pages for the STA interface. Default is enabled.
Port: HTTP (internal web server) port, default is 80.
DHCP client: if checked, the module will send DHCP request out to obtain IP after connecting to
AP.
IP, Gateway and Netmask: if DHCP client is not checked, specify the static IP info here.
Hostname prefix: this is the prefix of the hostname that will be advertised through the DHCP host
name option (12). Default value is NUL string which means no hostname is used.
Append MAC to hostname: if checked, the hostname will be the hostname prefix plus the last 3
bytes of the MAC address; otherwise, the hostname prefix will be used as the hostname.
WPS configuration: click on “WPS” button, a window will pop up for user to enter WPS
parameters.
o
Murata / SyChip
Click “Fill with default”, all fields will be populated with default values.
Page 13 of 42
SN82xx SW Design
o
Modify the parameters as needed. The Default Pin is used when Label or Display pin is
selected. If pin length is 7 digits, the 8th checksum digit will be calculated and shown
after “Keep data” button is clicked.
o
Click on “Keep data” button. Data will be saved in SNICMonitor’s memory, and window
will be dismissed. Click on “WPS” button again if needed to see what is saved in
memory. The “Save Firmware” button in the Firmware Config window needs to be
clicked to actually save the data to firmware file. If “Keep data” button is not clicked,
WPS parameters will not be saved to memory or the firmware.
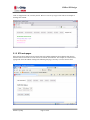
3.3 Importing web-contents to EZ Web Wizzard framework
SNIC monitor enables application developers to easily import into EZ Web Wizzard framework
application-specific web-pages. It supports the use of web-content configuration file (ending “.conf”) to do
the following:
Specify HTTP headers to be included in response for a specified URI,
Specify the Content-Type of the specified URIs.
Bind a specified URI to AP or STA interface only so that HTTP request for that URI is only
permitted for that interface. SNIC monitor enables the developer to use the same URI to retrieve
interface-specific contents, e.g., “/index.html” may refer to different resources depending on
whether the HTTP request is received from the AP or STA interface.
This process is detailed in Section 4.
Murata / SyChip
Page 14 of 42
SN82xx SW Design
3.4 Downloading the firmware
After the firmware is imported with web files and configured with the product specific configurations, click
the “F” button on the SNIC monitor to download the image to the SN82xx EVB. See Section 4.8 for a
detailed example.
Murata / SyChip
Page 15 of 42
SN82xx SW Design
4. Sample application and web page customization
The sample web-page contents for the default firmware image are provided in the release package. The
jQuery library is used for dynamic web-page control.
The web content files are located in <Install Folder>\SNIC_EWW\webroot or <Install
Folder>\SNIC_EWW\webroot1 folder. The <Install Folder> is the folder the package is extracted to, e.g.,
C:\SNIC. Webroot1 is another version of the sample web content that shows a totally different look and
feel. Following screen shots are mainly for webroot, which covers all EWW APIs. Webroot1 demonstrates
a subset of the APIs. One example of webroot1 screen can be found in Section 5.1.1.4.
The contents are listed below:
For applications using the UART serial interface protocol ([5]), the web content files are located in <Install
folder>\SNIC_UART\webroot.
The firmware file SN82xx-SNIC-EWW-xx _xxxxx.bin under <Install folder>\SNIC_EWW\Binary already
contains all sample web files under <Install folder>\SNIC_EWW\Webroot. The firmware file SN82xxSNIC-EWW-xx-xxxxx_webroot1.bin contains all sample web files under <Install folder>\ SNIC_EWW
\Webroot1.
4.1 Web files
Web files include all html, xml, css, javascript, icon, and picture files, etc. File types acceptable are listed
in the file contentType.conf (see 4.2). If for any reason a web file needs special treatment, a .conf file
should be created for that web file (see 4.3).
Murata / SyChip
Page 16 of 42
SN82xx SW Design
If a web file is ASCII, it will be in ASCII format within the SN82xx firmware, which occupies flash space.
So if an ASCII web file is big in size, it is recommended to be compressed before being imported into the
SN82xx firmware. See 4.6.
Files directly under the Webroot folder are accessible from both soft AP and STA interface. For example,
wifi_sta_status.html is directly under Webroot, so it can serve requests coming from both interfaces.
If a web file is designed to be accessible from just one interface, it should be put into the special folder of
x-murata-ap or x-murata-sta. See 4.4.
The default URL for a web file is the folder plus the web file name. For example, the main.js is under
javascript folder, so the default URL is /javascript/main.js.
4.2 ContentType.conf
This reserved file lists all acceptable files in the EZ Web Wizzard development environment. It must be
located directly under the Webroot folder. User can add any new file types in this file. The first column is
the file extension name. The second column is the default content type that is going to be assigned to
Content-Type in the HTTP header. The third column is the type of the web file. “a” stands for ASCII, “b”
stands for binary.
html:
text/html
a
htm:
text/html
a
js:
application/javascript
a
json:
application/json
a
java:
text/x-java-source
a
jar:
application/java-archive
b
class:
application/java-vm
b
css:
text/css
a
txt:
text/plain
a
xml:
application/xml
a
dtd:
application/xml-dtd
a
zip:
application/zip
b
bmp:
image/bmp
b
gif:
image/gif
b
jpg:
image/jpeg
b
jpeg:
image/jpeg
b
png:
image/png
b
ico:
image/x-icon
b
mp3:
audio/mpeg
b
mpeg:
video/mpeg
b
mpg:
video/mpeg
b
avi:
video/x-msvideo
b
wm:
video/x-ms-wm
b
Murata / SyChip
Page 17 of 42
SN82xx SW Design
4.3 .conf file
The file with .conf as extension is to specify special treatment for a particular web file, e.g., abc.html.conf
would be applied to the file abc.html. Special treatment mainly includes:
-
Specify a different URL than the default URL (aliasing)
-
Specify a different Content-Type than that specified in ContentType.conf
-
Add other HTTP header (including way to compress web file)
The way to specify a different URL is to specify X-MURATA-URL in the .conf file. For example, if the follow
entry is in the oldName.html.conf, a request for /newName.html will get a response with the content of
oldName.html.
X-MURATA-URL: /newName.html.
If a web file needs a different Content-Type than the default Content-Type defined in ContentType.conf, or
a web file needs any extra HTTP headers, just add the Content-Type line and list the extra headers in the
.conf file. For example, the index.html.conf under Webroot\x-murata-ap has the following content:
Content-Type:
text/html; charset=ISO-8859-4
Date:
Tue, 15 August 2012 08:12:31 GMT
Content-Language:
mi, en
This cause the change of the Content-Type to include an extra charset=ISO-8859-4, and two extra headers
(Date and Content-Language) are added to the HTTP response.
4.4 Folder x-murata-ap and x-murata-sta
Folder x-murata-ap contains web files and .conf files that are accessible only from the soft AP interface,
and fold x-murata-sta contains web files and .conf files that are accessible only from the STA interface.
This allows the same URL be used by different WiFi interfaces.
These are reserved folders used by the EZ Web Wizzard framework to control access to the web files
stored under these folders. These folders are logical entities and are not treated as part of the URL, i.e. the
URL for files under these two folders does not contain the prefix /x-murata-ap or x-murata-sta. For
example, URL for x-murata-ap\support.html is /support.html.
If a web file name for one interface must be the same as the web file name for the other interface, put those
two files with the same name into the two separate folders. For example, there is a distinct index.html in
each of the two folders, so that the home page for STA and soft AP can be different. Same is true for
support.html and gpio.html
4.5 Folder javascript
This folder contains all javascript source code. It is not a reserved folder and it is part of the URL. User can
change the folder name or move the script files under it to other folders.
For bigger sized script files, it is recommended that the files be compressed before being imported into the
firmware. See the next section for details.
Murata / SyChip
Page 18 of 42
SN82xx SW Design
4.6 Compressing web files
The gzip utility can be downloaded by a web search on “gzip download”. The command to compress a file
is “gzip <filename>”. The original file will be removed after the command, and a new <filename>.gz will
be created. If for any reason, the file needs to be recovered, use the command “gzip –d <filename>.gz”.
The version of gzip in this sample development is “gzip 1.2.4 Win32 (02 Dec 97)”, which is the output of
“gzip --help”.
Rename the <filename>.gz back to <filename>. Since the file type is changed from ASCII to binary, an
extra step is needed to override the default setting defined in ContentType.conf. Create a file named
<filename>.conf that contains at least the following header.
Content-Encoding: gzip
Other headers can also be added in this .conf file if needed. See 4.3.
For example, the javascript\jquery-1.3.2.min.js is actually a binary file. It is produced by running the gzip
utility. Due to the fact that the jquery-1.3.2.min.js is a not an ASCII file, the jquery-1.3.2.min.js.conf is
needed to tell the system to include the extra Content-Encoding header in HTTP response, so that the web
browser can decompress it properly.
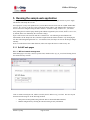
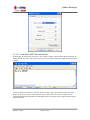
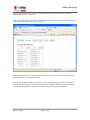
4.7 Importing web files into firmware
Once all the web files and config files are in place, the SNIC monitor tool can be used to import all the files
under Webroot into the SN82xx firmware.
Open the SNIC monitor and click on the “W” button. Select the web root folder and the firmware file to be
imported. Click on “Import web files to firmware” button. If the popup window shows “Firmware file
updated”, then the import is successful.
If the firmware file size after the import exceeds the flash size, an error message will popup.
Murata / SyChip
Page 19 of 42
SN82xx SW Design
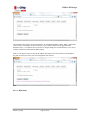
Figure 5 Import web files
To see import activity log or check for error, check the “Log to web_import.log” checkbox before the actual
import. A file “web_import.log” should be created under the Webroot folder after the import. For example,
following is the log entry for x-murata-ap\index.html.
Web file: C:\SNIC\SNIC_EWW\Webroot\x-murata-ap\index.html
Meta file: C:\SNIC\SNIC_EWW\Webroot\x-murata-ap\index.html.conf
URL: /index.html
Content Type: text/html; charset=ISO-8859-4
Extra header: Date:
Tue, 15 August 2012 08:12:31 GMT
Content-Language:
mi, en
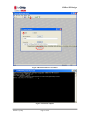
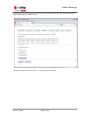
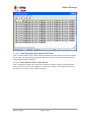
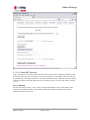
4.8 Downloading the firmware
After the firmware is imported with web files, click the “F” button on the SNIC monitor (Figure 6) and
perform the following:
1.
Select the correct SN82XX module (e.g., SN8200 or SN8205).
2.
Specify the SNIC root folder, which is the <Install Folder>, and the firmware file to download.
3.
Click “Download” button.
4.
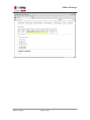
A command window should popup as shown in Figure 7. Wait about 12 seconds until the window
shows “Press any key to continue…”. If the firmware file size is bigger than the SN82xx’s flash
size, an error message is displayed.
5.
Press the white Reset button on the EVB to run the new firmware.
Murata / SyChip
Page 20 of 42
SN82xx SW Design
Figure 6 Download firmware to SN82xx
Figure 7 Download complete
Murata / SyChip
Page 21 of 42
SN82xx SW Design
5. Running the sample web application
Connect power to the EVB either through the mini-USB connector or through external 5V power supply.
The SN82xx will startup the soft AP.
On a Laptop PC (or any web capable device), turn on WiFi and scan for the soft AP’s SSID “Murata-WSxxxxxx”, the “xxxxxx” is the last 3 octets of the EVB’s MAC address. The SSID and other parameter of
the soft AP can be configured using the SNIC monitor’s “Firmware config” window. See for details.
After joining the soft AP, the laptop should get IP address assignment by the soft AP, which is 172.31.0.xx,
by default (unless it is modified by the “Firmware config”).
Open a web browser such as Firefox and enter “sn8200.com”. The following sections illustrate the
functionalities of the sample web files, which are imported into the SN82xx firmware. By modifying the
web files and running through Section 4.7 - 4.8 and this section, developer can exercise the design changes
instantly.
Note: to test the GPIO or the UART functions, it does not require the STA to connect to any AP.
5.1.1 Soft AP web pages
5.1.1.1 Wifi and network management
Initial main page is served by x-murata-ap\index.html, which invokes wifi_sta_status.html showing STA is
not connected to any network.
Click on “WiFi scan and join” tab, which is served by the file Webroot\wifi_scan.html. The user can join
the WiFi network using one of the following methods:
o
WiFi protected setup (WPS) using either the PIN or virtual Push Button method
o
Manual configuration by selecting the AP and entering security information.
Murata / SyChip
Page 22 of 42
SN82xx SW Design
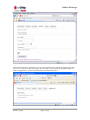
Manual configuration with Scan and join panel
Select SSID, enter password and click on Join. When the join is successful, the channel of the soft AP
will change to the channel of the selected AP. Wait for about 10 seconds for the new status. The delay
is due to the channel change of the soft AP, which causes the Laptop to reconnect to the soft AP in the
new channel. The result page is served by wifi_sta_status.html, but two more buttons are added for
options to leave the network or get the signal strength of the current connected AP.
WPS setup panel
For WPS, the SN82xx supports Push Button and Pin mode.
o
When using Push Button mode, press the WPS button on the AP, then click on “WPS
Connect” button on sn8200.com page with “Push Button” mode selected.
o
When selecting Pin mode, a message box on Pin length will appear as shown in the above
screen capture. Use a PC/tablet/smart phone and connect to the AP web page for WPS
control. Enter valid pin into the AP web page and the sn8200.com page, press the WPS
button on the AP’s web page, and then click on “WPS Connect” button on sn8200.com page
with “Pin” mode selected. It may take up to 2 minutes for WPS connection to complete. User
needs to click the “WiFi STA Status” tab to check the connection status.
Murata / SyChip
Page 23 of 42
SN82xx SW Design
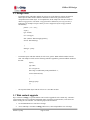
Click on “STA IP Configuration” tab and then click on “Configure IP” with DHCP checked. This is served
by the file Webroot\ip_config.html.
Murata / SyChip
Page 24 of 42
SN82xx SW Design
The hostname field is used to specify a hostname to be embedded into DHCP request. When “Append last
3 bytes of MAC to hostname” is checked, the last 3 bytes of MAC address will be appended to the
hostname. Enter “*” if hostname does not need to be changed. Empty the field if hostname is to be erased
so that it would not be embedded into DHCP request.
Click on “Get IP Info” button to show the IP address information of the STA interface. That IP address
may then be used to access the web server through the STA interface.
5.1.1.2 GPIO demo
Murata / SyChip
Page 25 of 42
SN82xx SW Design
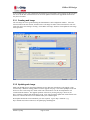
“GPIO demo” tab is served by the file Webroot\gpio.html. Check on some pins and configure them to be
output by clicking on “Configure GPIO”.
Change the values for the selected pins to “1”, and click on “Write GPIO”.
Murata / SyChip
Page 26 of 42
SN82xx SW Design
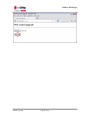
Select more pins and click on “Read GPIO”. Green background means value 1, yellow means 0, and white
means not selected.
Murata / SyChip
Page 27 of 42
SN82xx SW Design
Murata / SyChip
Page 28 of 42
SN82xx SW Design
5.1.1.3 UART demo
“UART demo” tab is served by the file Webroot\uart.html. Select baud, data bits, parity, stop bits, and flow
control, then click “UART config”.
Any of the three operations: UART Config, the Read from UART, or Read after write will disable the SNIC
serial interface protocol, and the state is saved in flash. So the SNICMonitor will not be able to
communicate with SN82xx via serial port after that (even after a reset). Click the Disconnect icon button on
SNICMonitor if it is connected (or close the program) to free the serial port. Note: to re-enable the SNIC
serial protocol, one needs to do a Reset to factory default under the Versions tab on the web page.
Open a hyper-terminal or other serial console program. Choose the same serial parameters as in the web
page and connect to the serial port.
Murata / SyChip
Page 29 of 42
SN82xx SW Design
5.1.1.3.1 Send data to UART from web browser
On the Laptop PC that runs the web browser, click “Write to UART” button. Default data should appear on
HyperTerminal. The data is sent from the web browser to the SN82xx which then output them to the UART
interface.
Check the “Bulk write 950 bytes”, and click “Write to UART”. This is max number of bytes that can be
written in one write operation. If more than 950 bytes of data needs to be written to UART, the web
application should fragment the data. The embedded webserver currently does not support chunk encoded
incoming message.
Murata / SyChip
Page 30 of 42
SN82xx SW Design
5.1.1.3.2 Send break signal before sending UART data
Click on “Send break then write to UART” button. The SN82xx will send a break signal first then send the
data to UART. The baud and length of the break signal can be specified, which can be different than the
actual UART data transfer parameters.
5.1.1.3.3 Read data from UART to web browser
Click on “Read from UART” button. That causes the SN82xx to read the UART port and send the data
back to the web browser. Press any printable keys on the Hyper-terminal, the web page should show the
keys when one of the three ending condition is triggered.
Murata / SyChip
Page 31 of 42
SN82xx SW Design
5.1.1.3.4 Read UART after write
Click on “Read after write” button. That causes the SN82xx to write data to UART then read from UART
and send the data back to the web browser. Check Hyper-terminal to see the output (write) data, and press
any printable keys on the hyper-terminal, the web page should show the keys when one of the three ending
condition is triggered. If a break signal needs to be sent before the write, it can be done similar to Section
5.1.1.3.2.
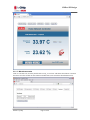
5.1.1.4 I2C demo
The I2C demo tab is served by i2c.html. There is a temperature/humidity sensor on the SN82xx EVK+
connected to the SN82xx module via I2C interface. When the tab loads, it initializes, resets the I2C
interface and shows the clock rate.
Murata / SyChip
Page 32 of 42
SN82xx SW Design
Click on Read temperature sensor or Read humidity sensor, the I2C interface is written and read. The page
shows the current sensor reading. Note: temperature reading is higher than room temperature because the
board temperature is higher.
Note: the webroot1 version of the web page has a different look and feel as shown below. The “Lamp
On/off” buttons are to set GPIO pin 7 to 1 and 0 respectively.
Murata / SyChip
Page 33 of 42
SN82xx SW Design
5.1.1.5 Miscellaneous tabs
Click on “Versions” tab, served by the file Webroot\wifi_version.html. This shows the software versions in
the release as well as a button to reset SN82xx to default state (same as firmware download and reset).
Murata / SyChip
Page 34 of 42
SN82xx SW Design
Click on “Support info” tab, served by the file Webroot\x-murata-ap\support.html. This is an example of
showing static content.
5.1.2 STA web pages
If the STA has been connected to an external AP, and a valid IP address has been obtained, then devices
from the same network can access the web server from the STA interface. For example, on a web browser,
typing in the STA’s IP address would get the following web page, served by x-murata-sta\index.html.
Murata / SyChip
Page 35 of 42
SN82xx SW Design
The page is different than the one from soft AP because the index.html in the x-murata-sta folder is
different than the one in x-murata-ap.
Click on the “WiFi scan” tab. The page only shows the AP list without “Join” functionality. This is served
by the file Webroot\x-murata-sta\wifi_sta_scan.html.
The Soft AP tab allows user to turn soft AP on and off. If the soft AP is turned off, then the only way to
access the SN82xx is via the STA web server.
The “AP on with params” button is to change the soft AP’s parameters at run time. The soft AP will be
reset with the new parameters. The parameters will be saved in NVM if “Persist” is checked, which will
override the soft AP parameters shown in “Firmware Config” window of the SNICMonitor.
Murata / SyChip
Page 36 of 42
SN82xx SW Design
The “GPIO management” tab and the “Versions” tab are identical to the soft AP’s because the gpio.html
and wifi_version.html are under the common Webroot folder. They are shared by both WiFi interfaces.
Click on “Support info”, it shows a different contact info than the Soft AP’s.
Murata / SyChip
Page 37 of 42
SN82xx SW Design
5.2 Design note
-
For HTTP request with POST method, the web service in the firmware requires the POSTed
JSON object be URL encoded, and there should be no unnecessary spaces between any
components in the JSON object. To accomplish this, all the sample web files use a function
JSON.stringify(params). The JSON. stringify function is defined in javascript\json2.min.js.
Following is an example. The space in the params is stripped off by the stringify function
automatically.
params = {"if": "sta"};
$.ajax({
type: "POST",
url: "/sws/ip/get",
data: {Params: JSON.stringify(params)},
success: function(disp){
…
},
dataType: "jsonp"
});
-
For HTTP request with GET method, the web server gets the JSON callback number from the
URL. The sample web files use the following method to append the generated callback number to
the URL.
$.ajax({
type:'GET',
url:"/sws/gen/ver",
data:"lang=en-us&format=json&jsoncallback=?",
success:function(feed) {
…
},
dataType:'jsonp'
});
-
The response JSON object from the web server is not URL encoded.
5.3 Web content upgrade
http://<Domain>/webupg is a special URI that can be used to upgrade the web content only. <Domain>
can be sn8200.com or user configured AP domain name if using the soft AP interface; or the STA’s IP
address if using the STA interface. The following steps must be followed:
1.
Use the SNICMonitor to create the web image
2.
Access URI: http://<Domain>/webupg with browser, enter and upload the new web image
Murata / SyChip
Page 38 of 42
SN82xx SW Design
As an example use case, after a product has been deployed to end customer, the web pages for the soft AP’s
web server or the STA’s internal web server need to be updated. This does not upgrade the firmware but
only the web content.
5.3.1 Creating web image
The web image file can be generated using the SNICMonitor’s Web configuration window. Select the
webroot folder in the first edit box, and then enter a web image file name in the second edit box. The web
image file can be non-existing or existing. Click “Make web image” button to create/update the web image
file as specified.
5.3.2 Updating web image
Make sure the HW devices connected to SN820x are all in idle state when doing a web upgrade. Then,
issue the http://<Domain>/webupg URI to access the upgrade web page. User will be prompted in the web
browser to enter a web image file, which will be sent to the SN8xxx over the air and update the web
content inside the SN82xx. The upgrade operation will erase any existing web page. However, the
http://<Domain>/webupg URI should always work. If for some reason the update fails, ensure that the web
browser is connected to web server in SN820x and try the command again.
Web update should take effect immediately (no reset required). Type in http://<Domain> (e.g.,
http://sn8200.com) in the web browser, the updated page should appear.
Murata / SyChip
Page 39 of 42
SN82xx SW Design
Murata / SyChip
Page 40 of 42
SN82xx SW Design
6. Third party licensing information
The demo application uses the following open source and vendor-specific libraries:
FTDI (libftdi/libusb) open source driver
FreeRTOS open source RTOS
LwIP open source network stack
ARM GNU open source gcc toolchain
STM32F1x library
Cortex-M3 CMSIS
Broadcom WICED SDK
jQuery
The means for obtaining the licenses and sources for those components is located in <Install
Folder>\License & Open Source Related.
Murata / SyChip
Page 41 of 42
SN82xx SW Design
(END)
Murata / SyChip
Page 42 of 42