1
INSTAPLAY™
USER MANUAL
INSTALLATION INSTRUCTIONS
REV 3.1
November, 2013
ID #DNHT
ALARMCO, Instaplay, intelligent message repeaters, and the ALARMCO logo are
trademarks of ALARMCO.
Contact Information
Toll Free from US & Canada: 800-824-5006
Phone: 203-458-2646
1 Bailey Drive
Guilford, Connecticut 06437
Copyright © 2013 ALARMCO ® All rights reserved.
NOTE: This equipment has been tested and found to comply
with the limits for a Class A digital device, pursuant to Part 15
of the FCC Rules. These limits are designed to provide
reasonable protection against harmful interference when the
equipment is operated in a commercial environment. This
equipment generates, uses, and can radiate radio frequency
energy and, if not installed and used in accordance with the
instruction manual, may cause harmful interference to radio
communications. Operation of this equipment in a residential
area is likely to cause harmful interference in which case the
user will be required to correct the interference at his own
expense.
TABLE OF CONTENTS
Introduction................................................................................................................................... 5
Instaplay Command List............................................................................................................... 6
Chapter 1: Recording Tutorial......................................................................................................7
Chapter 2: User-Recorded Messages.......................................................................................11
CREATE A TEXT MESSAGE [ 5 ]..........................................................................................11
SET MAXIMUM MESSAGE LENGTH [ *6# ]..........................................................................11
SET THE RECORDING SOURCE [ *7# ]...............................................................................11
RECORD A MESSAGE [ *1# ]...............................................................................................12
Changing messages............................................................................................................ 13
HEAR A MESSAGE [ *2# ].....................................................................................................13
]Chapter 3: Playlists................................................................................................................... 15
CREATE A PLAYLIST [ *41# ] / APPEND TO A PLAYLIST [ *45# ]......................................15
Add a Message to the Playlist (1#)......................................................................................16
Insert a Playlist to Run One Time (2#)................................................................................17
Set Message Spacing (3#)..................................................................................................17
Set a Relay (4#).................................................................................................................. 18
Add a text message (5#).....................................................................................................19
Add a Factory-Installed Message to the Playlist (6#)..........................................................19
Add a One-Time Spacing Entry to the Playlist (7#).............................................................19
Add a “WAIT TO CONTINUE” Entry (8#)............................................................................20
Set the Message Volume (9#).............................................................................................21
Activate the Playthrough Source (11#).................................................................................22
ENABLE Audio Outputs (13#)..............................................................................................22
Activate the Auto-Dialer (14#)..............................................................................................23
Set a Virtual Control Input (15#)...........................................................................................24
HEAR PLAYLIST ENTRIES [ *42# ].......................................................................................25
DELETE OR RESET A PLAYLIST [ *44# ].............................................................................26
Chapter 4: Announcer Settings and Status................................................................................27
SET MESSAGE SPACING [ *4# ]..........................................................................................27
SET BACKGROUND MUSIC OPERATION [ *9# ].................................................................28
SET MESSAGE VOLUME LEVELS [ *11# ]...........................................................................28
CHECK ANNOUNCER STATUS [ *14# ]...............................................................................29
CHECK AVAILABLE MEMORY [ *15# ].................................................................................29
HEAR FACTORY-INSTALLED MESSAGES [ *17# ].............................................................30
Chapter 5: Control Input Operation............................................................................................31
SET THE OVERALL CONTROL INPUT OPERATION [ *31# ]..............................................31
Playlist Queuing Mode......................................................................................................... 31
Playlist Cancellation Modes.................................................................................................32
SET THE INDIVIDUAL CONTROL INPUT OPERATION [ *32# ]...........................................34
Set Repeat Mode (1#).......................................................................................................... 34
Set Emergency Override Operation (4#)..............................................................................35
Set Control Input 2 to Synchronize the Clock (5#)................................................................36
Set STOP Input Operation (6#)............................................................................................36
A Note about Prioritization...................................................................................................37
Chapter 6: Relay Option............................................................................................................ 39
SET A RELAY [ *62# ]............................................................................................................ 40
Automatic Relay Operational Mode......................................................................................41
Manual Relay Operational Mode..........................................................................................42
Chapter 7: Scheduler Option ....................................................................................................43
SET CLOCK [ *20# ]............................................................................................................... 43
Set the Time (1#)................................................................................................................. 43
Set the Date (2#).................................................................................................................. 44
CREATE A SCHEDULED EVENT [ *21# ].............................................................................45
Creating Scheduled Events..................................................................................................45
Activating/Deactivating Priority Event Scheduling (0#)........................................................48
HEAR SCHEDULE ENTRIES [ *22# ].....................................................................................49
DELETE A SCHEDULE [ *24# ].............................................................................................49
Chapter 8: Remote Options ......................................................................................................51
REMOTE INACTIVITY TIMEOUT PERIOD [ *50# ]................................................................51
SET UNIT ID NUMBER [ *56# ]..............................................................................................52
DIAL-UP TELEPHONE CONTROL OPTION..........................................................................53
Accessing the Announcer from a Remote Phone.................................................................53
Remote Recording of Messages..........................................................................................53
Remote Hearing of Messages..............................................................................................53
DUPLEX RADIO CONTROL OPTION.....................................................................................55
HEAR THE HARDWARE ADDRESS [*53#]........................................................................55
“LISTEN UP” [*57#]............................................................................................................. 55
TERMINATING A REMOTE DUPLEX RADIO SESSION [*59#].........................................56
SERIAL LINK OPTION............................................................................................................ 57
ETHERNET OPTION ............................................................................................................. 57
ASCII Control Commands (Serial, USB, or Ethernet)...........................................................58
ASCII Report Commands (Serial, USB, or Ethernet)...........................................................60
Digital Download of Audio Files (Serial Port or Ethernet).....................................................62
Create a Text Message (*1,999,5,TextMsg,Text&Formatting\FF)........................................62
Chapter 9: Remote Security and Auto-Dialer Settings...............................................................63
Set the REMOTE Access [ *71# ]...........................................................................................63
CONFIGURE THE AUTO-DIALER [ *75# ].............................................................................66
HEAR THE AUTO-DIALER NUMBERS [ *76# ]......................................................................68
DELETE AN AUTO-DIALER GROUP [ *77# ].........................................................................68
Chapter 10: Interactive Manual Control.....................................................................................69
SET A VIRTUAL CONTROL INPUT [ *92# ]..........................................................................69
SET A LIVE AUDIO PATH [ *99# ].........................................................................................70
Chapter 11: Reset and Restart Commands...............................................................................71
FACTORY RESET [ *127# ]...................................................................................................71
RESET VALUES [ *128# ]......................................................................................................72
RESTART [ *129# ]................................................................................................................ 72
MANUALLY RESETTING INDIVIDUAL FACTORY DEFAULTS.............................................72
Installation Instructions............................................................................................................... 73
INTRODUCTION
USING THE ALARMCO INSTAPLAY RECORDER/ANNOUNCER
Instaplay is a non-volatile digital message repeater that is normally used to broadcast
prerecorded messages whenever one of its control inputs is activated. Individual
messages and programming can be changed at any time.
Instaplays are available with 4 or more inputs. Each input has a corresponding playlist.
A playlist can be a single audio or text message or a series of messages and other
functions. Activating Control Input 1 causes playlist 1 to be run, Input 2 causes playlist 2
to be run, and so forth.
Instaplay is controlled using a standard analog Touch-Tone telephone. All commands
begin with "star" [*] and end with "pound" [#]. Instaplay responds verbally through the
telephone handset in spoken English. Optionally, Instaplay can be controlled from an
RS-232 link, a modem, an Ethernet connection, or an incoming audio channel.
Instaplay's verbal instructions are there for your benefit. There is no need to wait when
you know what keys you’d like to press.
Instaplay is easy to use. The Recording Tutorial in Chapter 1 will lead you step by step
as you record a message, change it, and so forth.
Instaplay is also extremely powerful. The following chart contains a comprehensive list
of Instaplay's commands, both Standard and Optional.
For simple applications, you only need to look at the Installation Instructions and read
about recording messages in Chapter 2. You may also want to look at the Recording
Tutorial in Chapter 1.
Instaplay
/ / / ///ALARMCO message repeaters
5
Instaplay Command List
Chapter
Press
6
*
*
*
*
*
*
*
*
*
*
*
*
0
1
2
3
4
6
7
9
11
14
15
17
#
#
#
#
#
#
#
#
#
#
#
#
to
to
to
to
to
to
to
to
to
to
to
to
Hear the Command List
Record a Message
Hear a Message
Erase a Message
Set Spacing Between Messages
Set the Maximum Message Length
Set Record Source
Set the Background Music Operation
Set Message Volume Levels
Check Announcer Status
Check Available Memory
Hear Factory-Installed Messages
2
2
2
2
2
2
4
4
4
4
4
*
*
*
*
20
21
22
24
#
#
#
#
to
to
to
to
Set the Clock
Create a Scheduled Event
Hear Schedule Entries
Delete a Schedule
7
7
7
7
*
*
31
32
#
#
to Set the Overall Control Input Operation
to Set the Individual Control Input Operation
5
5
*
*
*
*
41
42
44
45
#
#
#
#
to
to
to
to
3
3
3
3
*
*
*
50
53
56
#
#
#
to Configure the Remote Inactivity Timeout Period
to Hear the Serial Number
to Set the Unit ID Number
8
8
8
*
*
57
59
#
#
to Enable Duplex Radio Transmission
to Disconnect from the Remote Radio Session
8
8
*
62
#
to Set the Relays
6
*
*
*
*
71
75
76
77
#
#
#
#
to
to
to
to
9
9
9
9
*
*
92
99
#
#
to Set a Control Input
to Set a Live Audio Path
10
10
*
*
*
127
128
129
#
#
#
to Set to Default Values & Erase Messages & Programming
to Return to Factory Default Settings
to Restart the Announcer
11
11
11
Create a Playlist
Hear Playlist Entries
Delete a Playlist
Append to a Playlist
Set the Remote Access
Configure the Auto-Dialer
Hear the Auto-Dialer Numbers
Delete an Auto-Dialer Group
Instaplay Command List
Instaplay
CHAPTER 1: RECORDING TUTORIAL
This chapter tells how to record a message, listen to it, and how to delete it. Instaplay
lets you record hundreds of messages and change them at any time. The only limitation
is that the combined length of your messages cannot exceed the total recording time
available for your unit, nor can any individual message exceed 30 minutes.
Getting started
Please refer to the Installation Instructions at the front of this manual for information on
wiring your Instaplay and connecting it in your environment.
Any standard touch-tone telephone can be used to program the Instaplay. Simply
connect a standard touch-tone telephone into the RJ-11 jack labeled "Control Phone" on
the back of the Instaplay. If you have power to the Instaplay, it should now be operable.
Pick up the handset on the control phone and listen to it.
You can always hang up at any time. Instaplay will stop whatever it is doing. So if you
ever get confused, just hang up and start over.
During this Tutorial, we will be making changes to your Instaplay. You can read other
chapters, make changes, and play around all you want without being concerned that
you’ll “break” something. Instaplay can always be restored to the exact configuration as
when it was shipped from the factory with a RESET command, as described in Chapter
11.
Notice where the "star" [*] key and the "pound" [#] key are. You'll be using them a lot, as
all commands begin with [*] and end with [#].
Your first command
Pick up the Control Phone and listen. Let's do as the voice suggests and press the
keys: * 0 #. Instaplay will start reciting the command list.
After it recites the first few commands, press: * 0 # again.
This time after you hear a command or two, press: *.
Any time you press *, Instaplay stops what it's doing and gets ready for a new
command. That means you can restart a command or switch to a new one at any time.
Instaplay
/ / / ///ALARMCO message repeaters
7
Since you have a list of the commands in this manual, it's faster to look at it than to have
Instaplay recite the list to you. If you want to play around a bit now, go ahead.
Setting the RECORD SOURCE
Before we begin, you will need something to record from. Instaplay can record from the
mouthpiece of the Control Phone, a microphone (if you have one), from its Aux. Input, or
from a microphone or T/R connections if these re included on your model.
Press: * 7 # and listen. Unless someone else changed it, Instaplay should have told
you it’s set to record from the Control Phone.
Recording messages
Instaplay’s messages are numbered by you. You can choose any numbering scheme
that makes sense to you and record messages in any order.
Press: * 1 # and listen.
Instaplay responds by telling you what RECORD SOURCE is selected.
We're going to record message 4.
anything until we describe the steps:
Get ready to talk into the phone, but don't do
Press: * 1 # to tell the Instaplay you want to record a message
Press 4 to indicate the message to record.
Press # to start the recording.
Say into the telephone handset something like, "This is message 4."
or "Message 4 sounds like this."
Press: # to stop the recording.
Do the same for messages 1, 2, and 3, making each of the messages at least 10
seconds long for this tutorial. (You don't need to press * 1 # again, once is enough.)
Don't start each recording until you're ready to talk. Stop each recording as soon as you
finish. Notice the # acts as a toggle to start, then stop recording a message.
You can record over an existing message by saying something like, "This is a new
version of message 3." If you want to change a message, you don't have to erase it
before recording it again. When you save a newly recorded message, Instaplay
8
Chapter 1: Recording Tutorial
Instaplay
automatically erases any previous version. The new recording can be either longer or
shorter than the original.
Hearing the recorded messages
Instaplay gives you the option to listen to recordings as you make them, but you can
also review your recordings at any time by using the HEAR MESSAGE command.
Press: * 2 # and listen to the prompt.
Press: 1# to hear the complete message
Or : 2# to hear just the first few seconds of the message
Press: 0 # to hear all the recorded messages and listen.
How did they sound? Want to hear message 2 again?
Press: 2 #.
If they didn't sound great, don't worry. The objective was to record several messages,
and you succeeded.
Erasing recorded messages
You can erase individual messages one at a time or all messages at once. Let’s delete
message 2.
Press: * 3 # to delete a message
Press: 2 # to erase message 2
Let’s confirm it by scanning all messages.
Press: * 2 # to hear the messages
Press: 2# to hear just the first few seconds of the message
Press: 0 # to hear all the recorded messages.
Listen. The only remaining messages are messages 1, 3 and 4.
Instaplay
/ / / ///ALARMCO message repeaters
9
Creating a playlist
By default, all messages will play out Audio Output Channel 1, which is the case for this
example. Please refer to Chapter 3 for information on multiple Audio Output Channels.
Also by default, each Control Input has its companion Playlist and each Playlist has its
companion message. Therefore, Message 1 is on Playlist 1, which is triggered by
Control Input 1, and so forth for each available Control Input and Playlist.
Playlist flexibility also allows multiple messages to be associated with a single contact
closure. Let’s create a playlist to play five messages when Control Input 2 is triggered.
Press: * 41 # and listen.
Instaplay first responds by asking you to enter the number of the playlist you want to
create. Let's create playlist 2.
Press: 2 # and listen.
Instaplay asks you to enter the type of playlist command.
Press: 1 # to add a message to the playlist
You next enter the message numbers you want on the chosen playlist. For example:
7#
10 #
8#
7 #
24 #
...to play messages 7, 10, 8, 7 again, and then 24. You can create these messages at
any time. They do not need to exist before you add them to a playlist.
Press: 0 # to stop entering messages to this playlist.
You can now use the Record a Message Command (*1#) to record messages 7, 8, 10,
and 24.
That’s it!
It’s as simple as that. Instaplay is ready to play the messages you want it to. Once you
hang up (or disconnect) the Control Phone, a closure on Control Input 1 will cause
message 1 to play, a closure on Control Input 2 will cause the newly created playlist to
run, and so forth.
10
Chapter 1: Recording Tutorial
Instaplay
CHAPTER 2: USER-RECORDED MESSAGES
Instaplay can have both audio and text messages. Each of the available messages can
be either audio or text.
This chapter tells how to record, preview, and delete messages. Instaplay can record
hundreds of messages and change them at any time. A single message cannot exceed
30 minutes in length, nor can the combined length of the messages exceed the total
recording time available for the unit.
All Instaplay commands begin with [*] and end with [#].
CREATE A TEXT MESSAGE [ 5 ]
Text messages to be displayed on a sign or a computer monitor must be created using
the ASCII interface as described in Chapter 8.
SET MAXIMUM MESSAGE LENGTH [ *6# ]
Audio Message Length Default = 30 minutes (1800 seconds) for Commercial Series
15 minutes (900 seconds) for Plus Series
7.5 minutes (450 seconds) for Deluxe Series
Even when more time is available, each individual audio message has a limitation based
on the Series.
To limit the recording time for individual messages,
Press: * 6 #
Instaplay prompts:
Enter the maximum recording length for an individual message.
Enter: (max recording length in seconds) #
Instaplay confirms the new message length. Each time a message is to be recorded
with the * 1 # command, the restricted length will be recited.
SET THE RECORDING SOURCE [ *7# ]
Default = Control Phone
Instaplay
/ / / ///ALARMCO message repeaters
11
Instaplay can record from a microphone (if present), from the mouthpiece of the Control
Phone, or from any of its available Aux. inputs (for example, a CD player, an MP3
player, or a tape deck). Instaplay will record from the Control Phone unless set
otherwise.
To specify another recording source,
Press: * 7 # to set the recording source.
Instaplay will list the valid recording sources. Possible choices will be:
1. Mic
2. Aux 1
3. Phone
To set Aux1 as the record source, the entire sequence of commands would be:
*7#2#
When recording from any input, the control phone can be used to monitor the recording
as it is being digitized.
NOTE: BACKGROUND MUSIC CANNOT BE ACTIVE WHEN RECORDING FROM MIC OR AUX1. PLEASE
REFER TO CHAPTER 4 FOR INSTRUCTIONS TO SET BACKGROUND MUSIC OPERATION (*9#).
RECORD A MESSAGE [ *1# ]
Instaplay messages are numbered by the User and can be recorded in any order.
Message numbering need not be sequential, i.e., message numbers can be skipped.
When recording messages, the pound sign (#) acts as a toggle switch to start, then stop
recording a message.
To choose a different RECORD SOURCE, please refer to the previous section of this
chapter. Regardless of the recording source, Instaplay’s control phone can be used to
monitor recordings as they are being digitized.
Press: * 1 # to record a message
Enter:
(message number)
Press:
#
to start recording.
{Record the message}
Press:
#
to stop recording.
Once the Instaplay acknowledges the message has been saved, more messages can
be recorded.
12
Chapter 2: User-Recorded Messages
Instaplay
To record multiple messages, it is not necessary to press * 1 # again. For example,
Enter
(next message number)
Press #
to start recording.
{Record the next message}
Press: #
to stop recording.
… and so forth.
NOTE: INSTAPLAY
SAVED."
WILL NOT RESPOND TO FURTHER
TOUCH-TONES
UNTIL IT CONFIRMS,
"MESSAGE
Changing messages
To change a message, simply record it again. When a recorded message is saved,
Instaplay automatically erases any previous version. New recordings can be either
longer or shorter than the original and can be any length within the available capacity.
HEAR A MESSAGE [ *2# ]
Prior to broadcasting the messages over a PA system, recordings can be reviewed over
the Control Phone (or the Remote Phone if the Instaplay has this option) by using the
HEAR MESSAGE command. When a single message is chosen, the complete
message will be heard. When all messages are to be heard, they can be listened to in
their entirety or "scanned."
Press: * 2 #
to hear messages
Press: (message number) # to hear a specific message
Or:
0#
to hear all the recorded messages
When all messages are chosen, each message can be played completely, or just the
first few seconds of each message can be “scanned.”
Press: 1 #
Or : 2 #
to hear complete messages
to scan messages
Example 1: To scan all messages,
Press: * 2 # to hear messages
0#
to specify ALL messages
2#
to choose scanning mode
In this example, Instaplay will announce the message number, followed by the first few
seconds of each User message that is stored in the Instaplay.
Instaplay
/ / / ///ALARMCO message repeaters
13
Example 2: To hear messages 5 and 7,
Press: * 2 # to hear messages
5#
to specify message 5
7#
to specify message 7
In this example, message 7 will begin to play when the User enters “7#.” If message 5
is still playing, it will abort. This allows the User to hear as much or as little of the
message as he chooses.
When hearing messages, each message is preceded with its message number, and
complete messages are followed by a “beep.” If a null message or text message is
requested, Instaplay will immediately follow the message number with a “beep.”
If the recorded message contains touchtones, this command will play the message up to
the first touchtone, but not the remainder of the message. Although not able to be
previewed in its entirety, the message remains intact.
ERASE A MESSAGE [ *3# ]
All messages (both audio and text) can be erased at once or individual messages can
be erased one at a time.
Press: * 3 # to delete messages
Press: 0 # to erase all the recorded messages
Or : (message number) # to delete a specific message
(message number) # to delete another message
For example, to delete messages 1, 3, & 6, enter the sequence: * 3 # 1 # 3 # 6 #
Each time a message is erased, Instaplay will say, "Message (number) erased."
If the User selects the option to delete all recorded messages, Instaplay will ask the
User to Press 1 # to confirm deleting all messages.
For example, to delete all messages, enter the sequence * 3 # 0 # 1 #
The User should wait until hearing the message, "All messages deleted."
NOTE: THE INSTAPLAY WILL BE UNAVAILABLE UNTIL IT HAS FINISHED DELETING MESSAGES. THAT IS,
ANY USER ACTIVITY SUCH AS ENTERING TOUCH-TONES OR HANGING UP WILL BE IGNORED UNTIL THE
ERASING OPERATION IS COMPLETED. THE USER NEEDS TO WAIT FOR THE INSTAPLAY TO RESPOND,
"MESSAGE DELETED" OR "ALL MESSAGES DELETED." DEPENDING ON THE NUMBER OF MESSAGES
AND THEIR RESPECTIVE LENGTHS, THIS OPERATION COULD TAKE SEVERAL MINUTES TO COMPLETE.
14
Chapter 2: User-Recorded Messages
Instaplay
CHAPTER 3: PLAYLISTS
Default =
Playlist 1 contains message 1 and is activated by Control Input 1,
Playlist 2 contains message 2 and is activated by Control Input 2,
... and so forth up to the number of Control Inputs on the Instaplay.
If your application has just a single message for each Control Input, you can skip the
remainder of this chapter.
Playlists are very powerful.
First and foremost, they can control, coordinate, and organize the playing of messages.
All kinds of messages. Playlists can invoke pre-loaded Factory Messages and Splash
Tones. Playlists can invoke messages that have been recorded or downloaded by the
User. Playlists can control the spacing between events, the Audio Output Channel(s)
where messages will play, and the volume at which they will play. Playlists can invoke
other playlists to run. Playlists can even coordinate audio messages with signage.
Playlists can control and track events with Timers, Relays, and Counters. And they can
define how a Control Input will be interpreted when a contact closure occurs.
Although Instaplays may have far fewer Control inputs, many more playlists are
available which can contain thousands of total entries.
Instaplay will process each playlist entry sequentially as it is encountered. That is, for
each playlist, the first entry will be processed before the second entry is “looked at.”
CREATE A PLAYLIST [ *41# ] / APPEND TO A PLAYLIST [ *45# ]
If the User hasn’t specified otherwise, Playlist 1 contains Message 1, Playlist 2 contains
message 2, and so forth up to the number of Playlists available on the Instaplay.
Also, by default, only Audio Output Channel 1 is enabled. If the Instaplay has multiple
audio Output Channels, please refer to "ENABLE Audio Outputs" later in this chapter.
When a new Playlist is created, any previously entered messages and programming
entries will be deleted. When a Playlist is appended, all previous entries remain intact.
Press: * 41 # to create a playlist
Or:
* 45 # to append to an existing playlist
Instaplay
/ / / ///ALARMCO message repeaters
15
Instaplay first responds by asking the User to enter the number of the playlist to create
or append. Whether creating a new Playlist or appending to an existing one, all Playlist
entries are identical.
Enter: (playlist number) #
Instaplay will inform the User of the total number of entries on the playlist. If creating a
playlist, this number will be zero.
Instaplay prompts:
Enter the type of playlist command
1 # to add a message to the playlist
2 # to insert a playlist to run one time
3 # to set the message spacing
4 # to set a Relay
5 # to add a text message
6 # to add a factory-installed message
7 # to enter a One-Time Spacing entry
8 # to add a “Wait to Continue” entry
9 # to set the Message Volume Levels
11 # to activate the playthrough source
13 # to ENABLE audio output channels
14 # to activate the Auto-Dialer
15 # to set a Virtual Control Input
Note that the command to create a playlist begins with the star [*] character and ends
with a pound sign [#]. Once in the mode to create a playlist, entries do NOT contain a
star [*]. Any time a star [*] is entered, Instaplay will stop what it’s doing and wait for a
new command.
Add a Message to the Playlist (1#)
Instaplay prompts:
Enter the message number followed by the pound sign
Or zero pound to add other entries
Instaplay allows the User to add numerous audio messages to the playlist by simply
entering one message number after the next. For example, to add messages 1 through
3 plus message 9, the User would enter:
1#
2#
3#
9#
0#
16
Chapter 3: Playlists
Instaplay
Each time a valid message number is added to the playlist, the User is again prompted
to enter the message number followed by the pound sign or enter zero pound to
continue. (There is no need to wait for Instaplay to finish talking before entering the next
entry.)
NOTE: ALL MESSAGES WILL PLAY OUT THE ENABLED AUDIO OUTPUT CHANNEL(S). BY DEFAULT,
THIS IS CHANNEL 1 ONLY, EVEN IF THE INSTAPLAY HAS MULTIPLE AUDIO OUTPUT CHANNELS.
Once the 0 # is entered, the User is returned to the Create a Playlist section and is once
again prompted to enter the type of playlist command.
Insert a Playlist to Run One Time (2#)
Playlists can call other playlists to run. With this entry, the playlist that is being created
will call another playlist that will only run one time and immediately return to process the
next command on the calling playlist.
Press: 2 # to insert a Playlist to run one time
The User is prompted for the Playlist number. A playlist cannot call itself, but any other
playlist number is considered valid, whether the called playlist contains any entries or
not.
If the "One-Time Playlist" changes which Audio Output Channels are ENABLED, the
original playlist will continue to use the modified Audio Output Channels.
NOTE: THERE
IS A LIMITATION OF ONE LEVEL OF NESTING.
THAT
IS, ONE PLAYLIST CAN CALL A
SECOND PLAYLIST TO RUN ONE TIME, BUT THE SECOND PLAYLIST CANNOT CALL A THIRD.
Once the one-time playlist entry is added, the User is returned to the Create a Playlist
section and prompted to enter the type of playlist command.
Set Message Spacing (3#)
By default, Instaplay has a Message Spacing of 3 seconds between messages when it
is shipped from the factory. This is the amount of time Instaplay will “wait” between
messages in a playlist. If another Spacing is preferred, the Message Spacing can be
redefined.
Instaplay
/ / / ///ALARMCO message repeaters
17
After a message is announced, Instaplay will automatically wait for the appropriate
amount of time as defined by the Message Spacing. Spacing is set in seconds and can
be any number from 0 seconds to greater than 18 hours (65,535 seconds).
Press: 3 #
to add a Message Spacing entry on the Playlist
Enter: (seconds) # to specify the Message Spacing
Any time the Message Spacing is changed (either with the * 4 # command or with this
playlist entry), all subsequent messages on each playlist will play with the new spacing
between them.
The message spacing will not be applied to the end of the playlist. If this functionality Is
required, a one-time spacing (7#) entry should be used.
Once the message spacing entry is added, the User is returned to the Create a Playlist
section and prompted to enter the type of playlist command.
Set a Relay (4#)
Instaplay comes with one standard normally-open relay that is "fixed" to operate in
Automatic Mode and cannot be changed. Only Instaplays with the Relay Option can be
programmed.
By default, each Audio Output Channel is coupled with a corresponding relay, i.e., the
relay is set to Automatic Relay Operational Mode (when both the relays and audio
output channels exist). Relay 1 is coupled to Audio Output Channel 1, and so forth for
all Audio Output Channels. The default state for any relay without a corresponding
Audio Output Channel is OFF.
Press: 4 # to insert a Relay programming entry on the Playlist
Enter: (Relay Number) # to select a relay for programming
Press: 1 # to set to operate Automatically
Or:
2 # to turn ON
Or:
3 # to turn OFF
Or:
4 # to turn ON for a specific amount of time
NOTE: PLEASE REFER
OPERATIONAL MODES.
TO
CHAPTER 6
FOR A THOROUGH DISCUSSION OF RELAYS AND THEIR
Once the Relay entry is added, the User is returned to the Create a Playlist section and
prompted to enter the type of playlist command.
18
Chapter 3: Playlists
Instaplay
Add a text message (5#)
NOTE: TEXT MESSAGES CAN ONLY BE ENTERED USING ASCII COMMANDS. WHERE PLAYLIST,
TEXTMSG, AND CHANNEL, ARE NUMERIC ENTRIES, THE FORMAT IS:
*UNITID,999,45,PLAYLIST,5,TEXTMSG,CHANNEL[RETURN]
Add a Factory-Installed Message to the Playlist (6#)
In addition to playing user-recorded audio messages, factory-installed messages can be
played. Factory-installed messages include messages and splash tones. All Instaplays
have splash tones installed, but not all will have messages.
These Factory Messages and “Splash Tones,” like any other messages, can be added
to playlists and used any time.
The various tones can be auditioned by using the * 17 # (HEAR FACTORY
MESSAGES) command. A description of these commands can be found in Chapter 4.
NOTE: FACTORY-INSTALLED MESSAGES CANNOT BE CREATED OR DELETED BY THE USER.
Add a One-Time Spacing Entry to the Playlist (7#)
In addition to the standard message spacing, a playlist can insert a one-time spacing.
This playlist entry will cause the processing of the next playlist entry to “wait” for a
specific amount of time. Although this entry is not specifically “linked” to a message, it
can be used to temporarily override the Message Spacing between two messages. This
one-time event will not alter the Message Spacing that automatically happens between
all other messages.
To insert a One-Time Spacing, this entry (in tenths of a second) is added to the playlist.
For example, to enter the One-Time Spacing of 10.0 seconds
Press: 7 #
100 #
Or to enter the One-Time Spacing of 0.5 seconds
Press: 7 #
5#
Instaplay
/ / / ///ALARMCO message repeaters
19
One-Time Spacing entries can occur at numerous points in a playlist, such as after a
Relay entry or a Play Message entry. For example, the playlist can turn a relay ON, wait
for a specified amount of time, then turn the relay OFF. (Note that this is not the same
as a Timed Relay entry, where Instaplay would immediately process the next entry on
the playlist.)
A One-Time Spacing can be any amount of time from 0 seconds to 1 hour (36,000
tenths of a second). It is possible to create longer PAUSE times by adding multiple
entries to the playlist. For example, to enter a two-hour spacing, the User could enter
two One-Time Spacing entries.
Once the Spacing entry is inserted into the playlist, the User is returned to the Create a
Playlist section and prompted to enter the type of playlist command.
Add a “WAIT TO CONTINUE” Entry (8#)
For each playlist associated with a Control Input, Instaplay allows the User to step
through the playlist with the WAIT TO CONTINUE entry. Each time the entry is
encountered, Instaplay looks to the appropriate Control Input for a CLOSURE or an
OPEN state. For “Wait to Continue” to operate properly, Instaplay should be set to
Queue New Requests without cancellation of any previously queued playlists (* 31 # 2 #
1 #). Please refer to Chapter 4 for a discussion of Control Input Operation settings.
To add a playlist entry that will look at the Control Input before proceeding
Press: 1 # to add an entry to wait for a CLOSURE
Or:
2# to add an entry to wait for an OPEN
For example, to create Playlist 7 that will step through messages 2, 4, and 6 each time a
closure is present on the Control Input 7, enter the following:
Press:
* 41 #
to create a playlist
7#
to create playlist 7
1#
to add a message to the playlist
2#0#
to add message 2 and continue
20
8#1#
1#
4#0#
to add an entry to wait for a CLOSURE
to add a message to the playlist
to add message 4 and continue
8#1#
1#
6#0#
to add an entry to wait for a CLOSURE
to add a message to the playlist
to add message 6 and continue
Chapter 3: Playlists
Instaplay
The appropriate Control Input Operation Mode must be set as described in Chapter 4.
With the press of the button, message 2 starts to play. After message 2, if the switch is
still on, Instaplay will sequence to message 4. If the switch is off, Instaplay will proceed
to message 4 when the button is pressed again. Likewise for message 6.
NOTE: THIS ENTRY IS ONLY VALID FOR PLAYLISTS THAT HAVE A CONTROL INPUT ASSOCIATED WITH
THEM. FOR EXAMPLE, AN 8-INPUT INSTAPLAY WOULD ONLY BE ABLE TO HAVE THIS FEATURE ON
PLAYLISTS 1 THROUGH 8.
NOTE: IF A SECOND CONTROL INPUT IS ACTIVATED, ITS PLAYLIST WILL BE PLACED
IT WILL NOT RUN UNTIL THE CURRENTLY ACTIVE PLAYLIST HAS COMPLETED RUNNING.
IN THE QUEUE.
Set the Message Volume (9#)
Instaplay’s output volume can be set with software. This allows each of the available
audio output channels to have unique volume settings that can be adjusted by different
playlists.
Instaplay prompts the User to enter a number between 0 and 100 plus the pound sign
for the volume, where 0 refers to no volume and 100 is maximum volume.
Instaplay then prompts the User to enter the Audio Output Channels followed by the
pound sign. Instaplay has a maximum of 7 Audio Output Channels possible. Each
channel to be assigned the pre-selected volume is then entered. Once all channels are
entered, the pound sign terminates the entry.
For example, to set Audio Output Channels 1 and 3 to the maximum volume and Audio
Output Channel 2 to no volume, the User would enter
* 41 #
to enter the Create A Playlist Command
(playlist number) #
9#
100 #
13#
to enter the Set a Volume mode
to set the maximum volume
to set output channels 1 and 3
9#
0#
2#
to enter the Set another volume
to set the minimum volume
to set output channel 2
Once the volume is set for this playlist, the User is returned to the Create a Playlist
section and prompted to enter the type of playlist command. In the example above, the
User chose to set another volume.
Instaplay
/ / / ///ALARMCO message repeaters
21
Activate the Playthrough Source (11#)
Instaplay can use playlist entries to activate or deactivate an alternate audio input
source, i.e., Aux1, Aux2, Aux3, or Mic, to play out one audio output channel. The
destination will be the lowest number Audio Output Channel, as specified with the
ENABLE Audio Outputs (13#) playlist entry.
Instaplay prompts:
Select the Audio Source
Press 1 # for Aux 1
2 # for Aux 2 (if present)
3 # for Aux 3 (if present)
4 # to activate a live mic feedthrough
0 # to stop playthrough
For example, to activate an audio stream from Aux2 for 30 seconds
Press: 11 # to set the playthrough source
2#
to select aux2 as the source for the audio
7#
to add a one-time spacing
300 # for 30 seconds
11 # to set the playthrough source (again)
0#
to stop playthrough
NOTE: THIS
AUDIO PATH WILL REMAIN UNTIL ANOTHER PLAYTHROUGH SOURCE IS ACTIVATED, A
MESSAGE IS PLAYED, OR UNTIL AN AUDIO OUTPUT IS ENABLED.
ENABLE Audio Outputs (13#)
For Instaplays with more than one Audio Output Channel, messages can be broadcast
over one or several Audio Output Channels. By default, all Instaplays will have Audio
Output Channel 1 ENABLED.
Any remaining Audio Output Channels will be
DISABLED.
ENABLING different Audio Output Channels throughout a playlist allows the playlist to
specify one or several Audio Output Channels for messages. Any Audio Output
Channels that are currently ENABLED will remain active until changed.
Each time an ENABLE entry is encountered on a playlist, the selected Audio Output
Channels will become active and all others will be DISABLED.
22
Chapter 3: Playlists
Instaplay
For example, to play one message out one channel, another message out another
channel, then several messages out both channels, a playlist may:
ENABLE Audio Output Channel 1,
Play Message 1,
ENABLE Audio Output Channel 2,
Play Message 2,
ENABLE Audio Output Channels 1 & 2,
Play Message 3,
Play Message 5,
Play Message 9
Instaplay prompts:
Enter all audio output channels followed by the pound sign
For example,
Enter: 1 2 3 # to ENABLE audio output channels 1, 2, and 3
Or:
3 # to ENABLE only audio output channel 3.
Each time an ENABLE entry appears on a playlist, the previous setting is overwritten
and the new setting will be active for all subsequent commands and playlists.
Once the ENABLE entry is specified on the playlist, the User is returned to the Create a
Playlist section and prompted to enter the type of playlist command.
Activate the Auto-Dialer (14#)
With the Auto-Dialer option, Instaplay can initiate one of sixty-four pre-programmed dialout sequences to alert key personnel to specific events as they are happening. This
playlist entry specifies the sequence of numbers to dial, the message number to play to
the called party, and how many times the message should play.
Each dialing sequence is defined with the “Configure the Auto-Dialer” (*75#) command.
Instaplay prompts:
Enter a number to select which Auto-Dialer sequence to activate.
Instaplay prompts:
Enter the message number to run followed by the pound sign.
Instaplay prompts:
Enter the number of times for the message to play, followed by the pound sign.
Instaplay
/ / / ///ALARMCO message repeaters
23
This is the number of times the message will repeat after each phone number is dialed.
As Instaplay does not detect when a line was answered, its message can be repeated
for the called party to hear the message from the beginning.
NOTE:
AS INSTAPLAY
WILL BE LOOKING FOR AN ACKNOWLEDGEMENT, THE MESSAGE SHOULD
CONTAIN THE DIRECTIVE TO
“PRESS THE POUND SIGN TO CONFIRM RECEIPT OF THIS MESSAGE.”
Set a Virtual Control Input (15#)
In addition to being activated by an actual physical dry contact closure, Instaplay’s
Control Inputs can be virtually activated or deactivated from a playlist.
When adding a playlist entry to set a Control Input, the User is first prompted to select a
Control Input. If the Control Input selected is valid (i.e., present), the user is then
prompted to select the programming option. Control Inputs can be set to an ON
condition, i.e., sustained, or set OFF. To simulate a momentary closure, the playlist
should contain an ON entry followed by an OFF entry.
Instaplay prompts:
Enter the Control Input followed by the pound sign
Enter: (Control Input number) #
Instaplay prompts:
Press:
2 # to turn ON
3 # to turn OFF
Once a Control Input is set to a particular mode, it will remain that way until changed by
another playlist entry, a Set Control Input (*92#) command, or otherwise changed.
NOTE: IF A CONTROL INPUT
TURN IT OFF.
24
Chapter 3: Playlists
HAS BEEN PHYSICALLY TURNED
ON,
THIS PLAYLIST ENTRY CANNOT
Instaplay
HEAR PLAYLIST ENTRIES [ *42# ]
Playlist entries can be reviewed by using the HEAR PLAYLIST ENTRIES command.
The User can choose between hearing the playlist entry numbers or the actual
recordings.
Press: * 42 #
to hear playlists
Instaplay prompts:
Press: 1 # to hear the playlist entry numbers
Or:
2 # to hear the actual recordings
Enter: (playlist number) #
For example, to hear the playlist entry numbers on playlist 17, press:
* 42 #
1#
17 #
If the User chooses to hear playlist entry numbers (1#), Instaplay will recite the entries
on the Playlist. For example,
Playlist 2 has 5 entries
Step 1: Set Message Spacing to 5 seconds
Step 2: Play Message 31
Step 3: Play Message 5
Step 4: One-Time spacing of Zero seconds
Step 5: Play Message 14
End of playlist
If the User chooses to hear the actual recordings (2#), Instaplay will play the recordings
as they occur on the Playlist. For example,
Playlist 2 has 5 entries
Set Message Spacing to 5 seconds
Message 31 “Thank you for shopping with us.”
Message 5 “Today we will be closing at…”
One-Time spacing of Zero seconds
Message 14 “Eight o’clock”
End of playlist
Instaplay
/ / / ///ALARMCO message repeaters
25
DELETE OR RESET A PLAYLIST [ *44# ]
Individual or multiple Playlists can be deleted from the Instaplay.
Press: * 44 # to delete or reset a playlist
Enter: (playlist number) # to delete or reset one playlist
Or:
0 # to delete or reset all playlists
Deleting an empty playlist has no consequence. If in doubt of the status of a playlist,
this command can be issued as a precautionary measure.
Before erasing all playlists, Instaplay will prompt the User to enter 1 # to confirm.
This command allows playlists to be deleted completely, or reset to factory defaults.
When a playlist is deleted completely, the playlist will be empty and not contain any
operations. That is, Instaplay does NOT return to the default setting of Playlist 1
containing message 1, Playlist 2 containing message 2, and so forth.
If the playlist to be deleted has a control input (either physical or virtual) associated with
it, this can be reset to factory default, that is Playlist 1 contains message 1 and is
activated by Control Input 1, and so forth.
Instaplay prompts:
Press:
1 # to delete playlists
2 # to return to factory default values
26
Chapter 3: Playlists
Instaplay
CHAPTER 4: ANNOUNCER SETTINGS AND STATUS
Instaplay has several hardware settings that can be adjusted by the User in order to
tailor the Instaplay to a particular application. Settings discussed in this chapter include
the following:
Message Spacing – the amount of “wait” time between messages
Background music operation
Volume of messages playing
Announcer Status information
Available User memory
Factory-Installed messages
In addition, the general status of the announcer and the status of counters can be
reported.
SET MESSAGE SPACING [ *4# ]
By default, Instaplay has a Message Spacing of 3 seconds between messages when it
is shipped from the factory. This is the amount of time Instaplay will “wait” between
messages in a playlist. If another Spacing is preferred, the Message Spacing can be
redefined.
After a message is announced, Instaplay will automatically wait for the appropriate
amount of time as defined by the Message Spacing. Spacing is set in seconds and can
be any number from 0 seconds to greater than 18 hours (65,535 seconds).
Any time the Message Spacing is changed (either with this command or with a playlist
entry), all subsequent messages will be played with the new spacing between them.
To change the Message Spacing from the Command Level,
Press: * 4 # to set the Message Spacing
Enter: (seconds) #
Message Spacing can also be changed with Playlist entries. Please refer to Chapter 3
for more information on using playlist entries to control the overall Message Spacing or
One-Time spacing between messages or events.
Instaplay
/ / / ///ALARMCO message repeaters
27
SET BACKGROUND MUSIC OPERATION [ *9# ]
With this command background music can play through Instaplay’s first audio channel
between messages. Audio from a source such as a satellite feed or a CD player can be
fed into the Music (or Aux 2) Input.
Instaplay echoes the current settings and prompts:
Press:
1 # for no audio between messages
2 # for audio feedthrough between messages
SET MESSAGE VOLUME LEVELS [ *11# ]
This command sets the volume level of messages for all Audio Output Channels.
Audio Output volume levels are numbered from 0 to 100, where 0 means no volume and
100 means 100% volume.
Instaplay echoes the current settings.
If multiple Audio Output Channels exist, Instaplay prompts:
Press:
1 # to set the same volume levels for all Audio Output Channels
2 # to set different volumes for each Audio Output Channel
For the same Audio Output levels, Instaplay prompts:
Enter:
(volume level) #
for the messages
If multiple Audio Output Channels exist and different volumes are to be set for each
Audio Output Channel, Instaplay prompts:
Enter each volume level as it is prompted for. Follow each entry with a pound
sign.
Output 1 Message level
Enter:
(volume level) #
for the first Audio Output Channel
IP:
Output 2 Message level
Enter:
(volume level) #
for the second Audio Output Channel
And so forth for all Audio Output Channels.
Any time the volume of an Audio Output Channel is changed, either with this command
or with a Playlist Entry, all subsequent messages will be played at the specified volume.
28
Chapter 4: Announcer Settings and Status
Instaplay
CHECK ANNOUNCER STATUS [ *14# ]
When this command is issued from either the Control Phone or a Remote Phone,
Instaplay gives a status report that includes the following information:
Serial number (Unique 9-digit serial number)
The following Control Inputs are active: (First active input) …(n th active input)
The following Relays are active: (First active relay) … (n th active relay)
The announcer is currently running playlist (playlist number)
The announcer is currently (active / inactive)
A/C Power is (active / inactive)
The announcer has been running for (days, hours, minutes, seconds)
CHECK AVAILABLE MEMORY [ *15# ]
To give an accurate assessment of the amount of available memory, Instaplay initiates a
cleanup routine to free up the maximum amount of recording capacity.
Enter: * 15 # to initiate this command
Instaplay reports:
Memory cleanup complete
Record time available is [time] of [time] maximum
NOTE: IF
MESSAGES ARE CHANGED ON A REGULAR BASIS, IT IS PRUDENT TO ISSUE THIS COMMAND
PERIODICALLY, SUCH AS DAILY, WEEKLY, OR MONTHLY.
Instaplay
/ / / ///ALARMCO message repeaters
29
HEAR FACTORY-INSTALLED MESSAGES [ *17# ]
Instaplay has splash tones, sounds, and possibly verbal messages that have been
installed at the factory. Any of the available tones or messages can be added as playlist
entries. To hear these messages,
Press: * 17 #
to hear factory-installed messages
0#
to hear all factory-installed messages
(message number) #
to hear a specific message
Unlike user-created messages, these messages cannot be recorded, modified, or
erased by the User. For example, a factory reset as described in Chapter 10 would not
change or remove these messages.
Message
901
902
903
904
905
911
912
913
Description
1 beep
2 beeps
3 beeps
Longer sequence
Shorter sequence
1 bing
2 bings
3 bings
Message
930
931
932
933
934
935
936
937
938
939
Description
1 loud beep
2 loud beeps
3 loud beeps
High-low tones
Modern chime
Rising siren
1 buzzer
2 buzzers
1 loud buzzer
2 loud buzzers
Message
920
921
922
923
924
925
926
927
928
929
Description
DTMF “0”
DTMF “1”
DTMF “2”
DTMF “3”
DTMF “4”
DTMF “5”
DTMF “6”
DTMF “7”
DTMF “8”
DTMF “9”
Optional messages that may be installed:
Message
Description
970
971
972
973
Music Box Lullaby
Lullaby (med)
Lullaby (short)
Lullaby (short clip)
30
Chapter 4: Announcer Settings and Status
Instaplay
CHAPTER 5: CONTROL INPUT OPERATION
Each time a Control Input is activated, a playlist is executed (unless the Control Input is
programmed to be a STOP Input or to provide a "live" audio feed as described later in
this chapter). As described in Chapter 3, playlists can perform numerous activities, such
as playing messages, activating relays, and so forth.
Instaplays are available with 4, 8, or 16 Control Inputs. These Control Inputs can be set
to operate in different ways to provide considerable flexibility for numerous applications.
Some programming parameters must be the same for all Control Inputs [* 31 #]; other
parameters can be set for each individual Control Input [* 32 #].
By default, Instaplay queues all requests, without canceling any previous ones. Each
momentary CLOSURE on Control Input 1 causes playlist 1 to run one time, each
momentary CLOSURE on Control Input 2 causes playlist 2 to run one time, and so forth
for all Control Inputs. A sustained closure will cause each respective playlist to repeat
indefinitely. The remainder of this chapter explains how the User can modify these
settings.
To reset to factory default status,
Enter: * 31 # 1 # 1 #
* 32# 1# 1# 6# 2#
SET THE OVERALL CONTROL INPUT OPERATION [ *31# ]
All Control Inputs can be programmed to control playlist queuing and prioritization.
These are overall machine settings, not unique to a specific Control Input.
Playlist Queuing Mode
Playlist queuing and prioritizing include the ability to define how Instaplay will respond to
multiple Control Input CLOSUREs. Multiple Control Input CLOSUREs can cause each
request to be added to the queue, or only requests for NEW playlists to be added to the
queue, as described below.
First, the User is prompted:
Press:
1#
to queue all requests
Or:
2#
to queue only new requests
Instaplay
/ / / ///ALARMCO message repeaters
31
Queue All Requests
When set in this mode, each time a Control Input is activated its playlist is added to the
queue. For example, if a Control Input is triggered 3 times, the playlist will be added to
the queue 3 times, causing the playlist to be run 3 times.
By default, Instaplay will queue all requests without canceling any previously queued
playlists. To change the cancellation mode, please see below.
Queue New Requests
In this mode, each time a NEW Control Input is activated its playlist is added to the
queue. For example, assume Control Input 2 is triggered multiple times. The first
activation will cause Playlist 2 to be run. As long as Playlist 2 is still playing, additional
activations of Control Input 2 will be ignored. If, however, Control Input 4 is triggered
while playlist 2 is running, the activation of Control Input 4 will not be ignored and
Playlist 4 will be added to the queue.
This setting may be chosen for in-store assistance requests. For example, if someone
in the store presses a button for assistance ten times in a row, the message will not be
added to the queue ten times.
In addition to being programmed to Queue New Requests, Instaplay can be
programmed to handle previously queued playlists as described below.
NOTE:
IF
STAR COMMAND IS ENTERED OR THE CONTROL PHONE IS HUNG UP WITHOUT
COMPLETING THE CANCELLATION MODE SETUP, IT IS POSSIBLE TO LEAVE THE INSTAPLAY IN AN
UNSUPPORTED CONFIGURATION.
A
Playlist Cancellation Modes
In conjunction with the two queuing options above, the following three cancellation
options allow further refinement of Instaplay's Control Inputs.
After choosing the queuing mode, the User is prompted:
Press:
1#
for no cancellation of any previously queued playlists
2#
to cancel all playlists and start the requested one
3#
to cancel all lower priority playlists (only if set to queue new requests)
32
Chapter 5: Control Input Operation
Instaplay
No Cancellation
In this mode, each playlist is added to the queue as it is activated, but playlists currently
in the queue are not cancelled.
Cancel all playlists and start (or restart) the requested one
In this mode, any playlist currently being run is aborted and the playlist associated with
the input request is immediately started.
If in the mode to queue all requests, pressing an input pushbutton several times will
cause the associated playlist to be aborted and restarted several times. For example,
this setting would allow a playlist to start from the beginning each time someone walks
up to a kiosk or museum display and pushes the button.
If in the mode to queue only new requests, a request for the same playlist will be
ignored.
Cancel all lower priority playlists
In this mode, the Control Inputs are ranked by priority. Control Input 1 (running Playlist
1) has the highest priority, Control Input 2 is second, and so forth. A request will abort
all lower priority playlists and start the newly requested playlist. It will not restart its own
playlist or affect a higher priority one.
Because Control Inputs can be set individually to repeat or not if a closure is maintained,
it’s important to keep this in mind when considering what will happen when multiple
control inputs are triggered.
For example, if Control Input 1 is activated while Playlist 3 is executing, Playlist 3 will be
aborted and Playlist 1 will immediately run. Conversely, if Control Input 3 is activated
while Playlist 1 is executing, Playlist 3 will be added to the queue and processed after
Control Input 1 has been satisfied.
NOTE: IF CONTROL INPUT 1
“IGNORED.”
Instaplay
IS SET TO
REPEAT
IF STILL
ON, PLAYLIST 3
/ / / ///ALARMCO message repeaters
WILL EFFECTIVELY BE
33
SET THE INDIVIDUAL CONTROL INPUT OPERATION [ *32# ]
In addition to the overall operation of Control Inputs, each individual Control Input can be
programmed to behave in a way that is not dependent on the operation of other Control
Inputs. Customization of each Input may include:
how many times a playlist is run from a momentary closure,
whether Control Input 1 will act as an Emergency Override switch,
whether Control Input 2 will synchronize the (optional) clock
whether Control Input 4 will act as a STOP Input.
Instaplay prompts:
Press:
1 # to set the Repeat Mode
4 # to set Emergency Override operation
5 # to set Control Input 2 to synchronize the clock (if one exists)
6 # to set Control Input 4 as a STOP Input
Set Repeat Mode (1#)
By default, Instaplay is set to run a playlist one time for each momentary Control Input
trigger, and repeatedly for each sustained CLOSURE. However, each Control Input can
be set to run playlists a specific number of times.
Press:
1#
2#
to set one repeat mode for all Control Inputs
to set different repeat values for each Control Input
To set all Control Inputs the same, Instaplay prompts:
Press:
0 # to set all the playlists to repeat if still ON
Or:
(1 - 9) # to specify the number of times the playlists will run
If different values are to be set for each Control Input, Instaplay prompts:
Press zero pound to set to repeat if still ON, or the number pound to specify the
number of times the playlist will run.
Input 1
Enter:
(0) # or (1-9) # for the first control input
IP:
Input 2
Enter:
(0) # or (1-9) # for the second control input
IP:
Input 3
Enter:
(0) # or (1-9) # for the third control input
And so forth for all Control Inputs.
Choosing 0 # will cause the playlist to continue to repeat if a sustained CLOSURE is
detected. This playlist will terminate upon its completion if the CLOSURE is removed.
34
Chapter 5: Control Input Operation
Instaplay
Choosing a specific number from 1 through 9, plus the pound sign will cause a playlist to
run the specified number of times for each activation of the associated Control Input.
After setting the repeat mode, the User is prompted to choose additional Control Input
parameters to be set, as described above.
Set Emergency Override Operation (4#)
Instaplay prompts:
Press:
1#
to set Emergency Override ON
2#
to run Playlist 1 (Default)
When set for Emergency Override Operation to be ON, a CLOSURE on Control Input 1
will override all other activity in the Instaplay, thereby allowing live announcements or
emergency messages to be broadcast while Control Input 1 remains activated. The
source for this audio can be a push-to-talk microphone* or an auxiliary input. The
destination will be Audio Output Channel 1.
When Emergency Operation is turned ON, feedthrough will be active as long as the
closure is maintained. When the closure is removed, Instaplay will stop the feedthrough
operation and the Instaplay will return to its normal activities.
For Emergency Override, Instaplay prompts:
Press: 1 #
for Mic
(if available)
2#
for Aux 1
4#
for Aux 2
5#
for Aux 3 (if available)
NOTE: WHEN SET FOR EMERGENCY OVERRIDE MODE (ON), THIS CONTROL INPUT ALWAYS TAKES
PRIORITY, WHETHER OVERALL CONTROL INPUT PRIORITIZATION IS SET OR NOT. THAT IS, WHILE
CONTROL INPUT 1 IS ACTIVATED, ONLY THE SOURCE SPECIFIED WILL BE ACTIVE AND ALL OTHER
CONTROL INPUT AND SCHEDULED ACTIVITIES WILL BE IGNORED.
*PUSH-TOTALK NOTE: THE PUSH-TO-TALK FEATURE USES INSTAPLAY’S CONTROL INPUT 1
BEFORE USING THIS FUNCTIONALITY, CONTROL INPUT 1 MUST BE CONFIGURED PROPERLY AND WILL
NO LONGER BE AVAILABLE TO ACTIVATE A PLAYLIST. THE PUSH-TO-TALK FEATURE OVERRIDES ALL
OTHER INSTAPLAY ACTIVITY, INCLUDING THE STOP INPUT.
ANY ACTIVE PLAYLISTS WILL BE
CANCELED. UPON RELEASE OF THE MIC SWITCH, INSTAPLAY WILL CONTINUE TO PROCESS ANY
ACTIVE CONTROL INPUTS.
INSTAPLAYS
WITH THE PUSH-TO-TALK MICROPHONE CONNECTOR ARE CONFIGURED AT THE FACTORY
TO OPERATE AS REQUIRED.
FACTORY RESET (*127#1#) COMMAND WOULD
THIS CONFIGURATION TO BE DONE ON SITE BY ENTERING THE STRING, *32# 4# 1# 1#.
Instaplay
ISSUING
A
/ / / ///ALARMCO message repeaters
REQUIRE
35
After setting the operation for Control Input 1, the User is prompted to choose additional
Control Input parameters to be set, as described above.
Set Control Input 2 to Synchronize the Clock (5#)
When the Scheduler Option is present and the Instaplay is set to operate this way,
Instaplay's clock can be synchronized to a master clock.
To set or change the way Control Input 2 operates,
Press:
1#
to synchronize the clock
2#
to run Playlist 2 (Default)
When synchronizing a clock, enter the time of day in 24-hour time (hours, minutes, and
seconds). This is the time to which the clock will synchronize when it receives a closure.
For example,
an entry of 90000 #
will synchronize the clock to 9AM, or
an entry of 155959 #
will synchronize the clock to 1 second before 4PM,
or
an entry of 160105 #
will synchronize the clock to 5 seconds after 4PM.
NOTE: SETTING THE SYNCH TIME TO MIDNIGHT IS NOT RECOMMENDED.
Once the clock synch time has been entered, Instaplay echoes the fact, giving the User
the opportunity to select this option again, if necessary.
After setting the operation for Control Input 2, the User is prompted to choose additional
Control Input parameters to be set, as described above.
Set STOP Input Operation (6#)
By default, Control Input 4 is set to activate playlist 4. Alternatively, Control Input 4 can
be set to act as a STOP Input. That is, each time Control Input 4 is activated, all
playlists on the Instaplay are stopped immediately. A sustained closure will also stop
background music.
To set or change the way Control Input 4 operates,
Press:
1#
to act as a STOP Input
2#
to run Playlist 4
NOTE: WHEN CONTROL INPUT 4 IS SET TO OPERATE AS A STOP INPUT, IT WILL HAVE PRIORITY
OVER ALL OTHER CONTROL INPUTS EXCEPT CONTROL INPUT 1 WHEN CONTROL INPUT 1 IS SET TO
EMERGENCY OVERRIDE MODE.
After setting the operation for Control Input 4, the User is prompted to choose additional
Control Input parameters to be set, as described above.
36
Chapter 5: Control Input Operation
Instaplay
A Note about Prioritization
The order in which Control Inputs are prioritized will vary, based on how the individual
Control Inputs are set, as well as whether the Overall Control Input Operation is set for
prioritized Inputs.
For a 4-input Instaplay WITH overall prioritized Inputs, there are several combinations
that provide a total of 4 settings.
Control Input 1 will run playlist 1.
Control Input 2 can be set to either (1) provide a Clock Synch or (4) run playlist 2.
Control Input 3 will run playlist 3.
Control Input 4 can be set to either (2) provide a STOP Input or (6) run playlist 4.
For each possibility, the order of prioritization is as follows:
1. Clock Synch
2. STOP Input
3. Control Input 1 triggering Playlist 1
4. Control Input 2 triggering Playlist 2 (if Clock Synch is not set)
5. Control Input 3 triggering Playlist 3
6. Control Input 4 triggering Playlist 4 (if STOP Input is not set)
For a 4-input Instaplay WITHOUT prioritized Inputs, the order of prioritization is as
follows:
1. Clock Synch
2. STOP Input
3. Control Inputs triggering Playlists as they are activated
Instaplay
/ / / ///ALARMCO message repeaters
37
38
Instaplay
CHAPTER 6: RELAY OPTION
Instaplay comes with one standard normally-open relay and can be expanded to 2, 4, or
8 relays. Without the Relay Option, the standard operational mode for Relay 1 is to be
"fixed" in Automatic Mode and cannot be changed.
When multiple relays are present, the Relay Option software allows all relays to be
programmed as described here.
With the Relay Option, each relay can be programmed for the desired method of
operation, either Automatic or Manual Mode. In Automatic Relay Operational Mode, a
relay is energized (ON) for the duration of each message, and otherwise it is OFF. In
Manual Relay Operational Mode, a relay can be turned ON or OFF, or it can be held ON
or OFF for a specific amount of time.
The default method of operation for Relay 1 is to be coupled to Audio Output Channel 1.
Relay 1 will automatically energize for the duration of each announcement played out
Audio Output Channel 1.
The default method of operation for Relays 2 through 7 is Automatic, if BOTH Relays
are present AND Audio Output Channels 2 through 7 are present. Each Relay and
Audio Output Channel "pair" will be coupled together and operate automatically.
The default state for any relay without a "paired" Audio Output Channel is OFF.
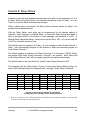
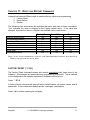
For Instaplays with the Relay Option, Figure 6.1 shows the factory default settings for
each of the 8 possible relays on Instaplays with 1 through 7 Audio Output Channels.
1 Channel
2 Channels
3 Channels
4 Channels
5 Channels
6 Channels
7 Channels
Relay 1
Auto
Auto
Auto
Auto
Auto
Auto
Auto
Relay 2
OFF
Auto
Auto
Auto
Auto
Auto
Auto
Relay 3 *
OFF
OFF
Auto
Auto
Auto
Auto
Auto
Relay 4
OFF
OFF
OFF
Auto
Auto
Auto
Auto
Relay 5
OFF
OFF
OFF
OFF
Auto
Auto
Auto
Relay 6
OFF
OFF
OFF
OFF
OFF
Auto
Auto
Relay 7
OFF
OFF
OFF
OFF
OFF
OFF
Auto
Relay 8
OFF
OFF
OFF
OFF
OFF
OFF
OFF
Figure 6.1 Factory default settings for each Relay
on Instaplays with 1 through 7 Audio Output Channels
NOTE: IF THE INSTAPLAY HAS THE DUPLEX RADIO OPTION, RELAY 3 WILL OPERATE
TO CHAPTER 8 FOR MORE DETAILED INFORMATION.
Instaplay
/ / / ///ALARMCO message repeaters
DIFFERENTLY.
PLEASE
REFER
39
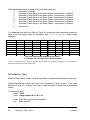
Valid operational modes for each of the 8 possible relays are:
1
Automatic or Manual
2
Automatic (if both Relay 2 and Audio Output 2 are present) or Manual
3
Automatic (if both Relay 3 and Audio Output 3 are present) or Manual
4
Automatic (if both Relay 4 and Audio Output 4 are present) or Manual
5
Automatic (if both Relay 5 and Audio Output 5 are present) or Manual
6
Automatic (if both Relay 6 and Audio Output 6 are present) or Manual
7
Automatic (if both Relay 7 and Audio Output 7 are present) or Manual
8
Manual only
For Instaplays with the Relay Option, Figure 6.2 shows the valid operational modes for
each of the 8 possible relays for Instaplays with 1, 2, 3, 4, 5, 6, or 7 audio output
channels.
1 Channel
2 Channels
3 Channels
4 Channels
5 Channels
6 Channels
7 Channels
Relay 1
Auto / Man
Auto / Man
Auto / Man
Auto / Man
Auto / Man
Auto / Man
Auto / Man
Relay 2
Relay 3 * Relay 4 Relay 5 Relay 6 Relay 7
Manual
Manual
Manual
Manual
Manual
Manual
Auto / Man Manual
Manual
Manual
Manual
Manual
Auto / Man Auto / Man Manual
Manual
Manual
Manual
Auto / Man Auto / Man Auto / Man Manual
Manual
Manual
Auto / Man Auto / Man Auto / Man Auto/ Man Manual
Manual
Auto / Man Auto / Man Auto / Man Auto / Man Auto / Man Manual
Auto / Man Auto / Man Auto / Man Auto / Man Auto / Man Auto / Man
Figure 6.2 Valid Operational Modes for each Relay
on Instaplays with 1 through 7 Audio Output Channels
Relay 8
Manual
Manual
Manual
Manual
Manual
Manual
Manual
* NOTE: IF THE INSTAPLAY HAS THE DUPLEX RADIO OPTION, RELAY 3 WILL OPERATE DIFFERENTLY. PLEASE REFER TO
CHAPTER 8 FOR MORE DETAILED INFORMATION.
SET A RELAY [ *62# ]
With the Relay Option, relays can be programmed to operate automatically or manually.
When programming a relay, the User is first prompted to select a relay. If the relay
selected is valid (i.e., present), the user is then prompted to select the programming
option.
To program a relay,
Press: * 62 #
Enter: (relay number) # or 0 # for All
Press: 1 # to set to operate Automatically
Or:
2 # to turn ON
40
Chapter 6: Relay Option
Instaplay
Or:
Or:
3 # to turn OFF
4 # to turn ON for a specific amount of time
Once a relay is set to a particular mode, it will remain that way until changed by another
Set Relay (*62#) command or with a Playlist entry.
NOTE: CAUTION SHOULD BE EXERCISED WHEN CHANGING A RELAY'S OPERATIONAL MODE, AS THE
STATE OF THE RELAY WILL IMMEDIATELY CHANGE. FOR EXAMPLE, IF A RELAY THAT IS OPERATING
AUTOMATICALLY IS IN THE MIDDLE OF REPEATING A MESSAGE, THE RELAY MAY BE TURNED OFF. IF
THIS RELAY IS CONTROLLING AN AMPLIFIER, THE RESULT MAY BE UNDESIRABLE.
Automatic Relay Operational Mode
With this type of programming, a relay and output channel are “linked” together. If the
User selects Relay 1, then Relay 1 is linked to Audio Output 1. Each time a message is
playing out Audio Output 1, Relay 1 is activated (energized) for the duration of the
message.
Similarly, if Relay 3 is selected, each time a message is playing out Audio Output
Channel 3, Relay 3 is energized for the duration of the message.
For example, to set All Relays to energize during announcements on the respective
output channels,
Press: * 62 #
to program a relay
0#
to select all relays
1#
to set to Automatic Mode
As there are a maximum of 7 Audio Output channels, this command is only valid for
Relays 1 through 7 at most. If, for example, there are only 2 Audio Output channels,
then this command is only valid for Relays 1 and 2, regardless of the number of relays
present. If setting All Relays to Automatic mode, only Relays 1 and 2 would be set to
Automatic and the remainder would be unchanged.
When in Automatic Mode, the appropriate Relay will cycle during Audio feed-through, if
the Instaplay has this feature. A 300 ms delay is provided between the relay activation
and playing of the message. If more than one audio output is ENABLED and at least
one output channel is linked to a relay, all ENABLED channels will play simultaneously
after a 300 ms delay.
Instaplay
/ / / ///ALARMCO message repeaters
41
Manual Relay Operational Mode
When a Relay is set ON or OFF, or Timed ON, it is considered to be in Manual Mode.
Relays can be set to an ON or OFF state. For example, to turn all relays OFF,
Press: * 62 #
to program a relay
0#
to select all Relays
3#
to set to an OFF state
Timed Relays can be held in an ON state for up to one hour. To turn the selected relay
ON for a specific amount of time, the User is prompted to enter the hold time in seconds.
To set a timed relay,
Press: (seconds) # for the relay hold time
For example, to set Relay 7 to turn ON for 15 seconds,
Press: * 62 #
to program a relay
7#
to select relay 7
4#
to hold in an ON state
15 #
for 15 seconds
When a relay is set with this function, the relay has its own timeline that is separate from
all other activity in the Instaplay. Valid Hold times are between 1 second and 1 hour
(3600 seconds).
NOTE: ENTERING
AND ON AGAIN.
MULTIPLE
TIMED RELAY COMMANDS
WOULD CAUSE THE RELAY TO CYCLE
OFF
The appropriate action is taken on the selected relay and is echoed to the user. For
Timed Relays, the hold time is echoed to the User in hours, minutes, and seconds
format, helping to verify the time was calculated correctly.
Relay Control from Playlists
Relays can also be set (or reset) with Playlist entries. Any time a Relay's Operational
Mode is changed, it immediately affects the way the relay operates. Please refer to
Chapter 3 for specific Playlist Programming information.
42
Chapter 6: Relay Option
Instaplay
CHAPTER 7: SCHEDULER OPTION
With this option, Instaplay has a 365-day clock to allow event scheduling in addition to
event triggering.
Instaplay’s Master Schedule can contain three hundred individual scheduled events.
Individual events can be scheduled for a specific day of the week and for a time of day.
The Scheduler can be used to program Instaplay to act differently on weekdays and
weekends or to act differently at different times during the day.
SET CLOCK [ *20# ]
Instaplay’s clock keeps track of the following:
the day of the week
the month, day, and year
the time of day
To hear the current settings,
Press: * 20 #
Instaplay will respond:
Today is
The time is
[day of week]
[month], [day], [year]
[hours] [minutes]
Press: 1 # to set the time
2 # to set the date
As with all commands, pressing the star [ * ] key, will exit the current section and return
to the Command Level. This can be done at any time after changes are entered, or if
settings are already accurate.
Set the Time (1#)
Instaplay uses 24-hour time from 0 hours, 0 minutes (midnight) to 23 hours, 59 minutes.
Instaplay prompts:
Enter the time in 24-hour format
Instaplay
/ / / ///ALARMCO message repeaters
43
To set the time,
Enter: (hhmm) #
For example, enter 815# for 8:15AM or enter 2015# for 8:15PM. It is not necessary to
enter leading zeroes.
Instaplay echoes the current time and prompts the User for additional clock parameters
to be set, as described above.
Set the Date (2#)
Instaplay's date is entered in the format yyyy # mm # dd #. Instaplay’s internal
calendar will automatically calculate the day of the week and adjust for Leap Year.
Instaplay prompts:
Enter the year with 4 digits
Enter the month from 1 to 12
Enter day from 1 to 31
Follow each entry with a pound sign
To set the date,
Enter: (year) #
(month) #
(day) #
in 4 digits
For example, enter 2012 # 7 # 4 # for July 4, 2012.
Instaplay echoes the day of the week and the current date. It then prompts the User for
additional clock parameters to be set, as described above.
44
Chapter 7: Scheduler Option
Instaplay
CREATE A SCHEDULED EVENT [ *21# ]
With the Scheduler Option, each individual schedule contains information about the day
and time a playlist is to be run. The Scheduler adds playlists to the Master Schedule
Queue for execution at the requested time. When all previously queued playlists
complete, the scheduled playlist will begin. Therefore, clock-based events may occur
slightly later than the time requested.
Individual events can be scheduled to occur weekly, hourly or annually. Weekly events
are those that occur, for example, every day of the week, Wednesdays only, or
weekends only. Hourly events are those that occur once an hour at a specified number
of minutes after each hour. Annual events are those that occur on a particular calendar
day. At the specified time on the specified day, the requested playlist will be added to
the playlist queue.
Each individual schedule is numbered by the User and need not be numbered
sequentially. The numbering scheme chosen may be completely arbitrary or have some
significance to the User.
Instaplay prompts:
Enter the Schedule Number, followed by the pound sign
Or zero pound to activate priority for scheduled events
Enter: (Schedule number) #
or 0#
Creating Scheduled Events
Instaplay prompts:
Enter the type of Schedule Entry
Press: 1 # for daily or weekly events
2 # for hourly events
3 # for annual events
Enter: (1 - 3) #
Scheduling Daily or Weekly Events (1#)
Daily or weekly events happen on a particular day of the week or at a particular time
daily. For example, a store may close at one time during the week, but at different times
on Saturday and Sunday.
Instaplay
/ / / ///ALARMCO message repeaters
45
The 10 Day of the Week parameters are as follows:
0 = all days
5 = Thursday
1 = Sunday
6 = Friday
2 = Monday
7 = Saturday
3 = Tuesday
8 = every Weekday
4 = Wednesday
9 = both Saturday and Sunday
Instaplay prompts:
Enter the day of the week parameter between zero and nine, where
zero is all days,
one through seven are weekdays,
eight is every weekday,
and nine is Saturday and Sunday only.
Enter: (0 - 9) #
Instaplay prompts:
Enter the time in 24-hour format.
Enter: (hhmm) #
Instaplay prompts:
Enter the playlist number to run
Enter: (playlist number) #
For example, to create schedule 5 to run playlist 17 every Friday at 3PM,
Press: * 21 # to create a scheduled event
5#
to create Schedule Number 5
1#
to enter a Daily event
6#
for Friday
1500 # for 3:00 PM
17 #
for playlist 17
Scheduling Hourly Events (2#)
Hourly events happen at a given time every hour. These events can be scheduled to
occur every day of the week, on a particular day of the week, every weekday, or
weekends only. Events can be scheduled to happen at some number of minutes after
each hour, allowing playlists to execute “on the hour” or “on the half-hour,” for example.
Instaplay prompts:
Enter the day of the week parameter between zero and nine, where
zero is all days,
one through seven are weekdays,
eight is every weekday,
and nine is Saturday and Sunday only.
46
Chapter 7: Scheduler Option
Instaplay
Enter: (0 - 9) #
Instaplay prompts:
Enter the offset from 0 to 59 minutes
Enter: (0 - 59) #
Instaplay prompts:
Enter the playlist number to run
Enter: (playlist number) #
For example, to create schedule 7 that will run playlist 17 every day at the top of every
hour,
Enter: * 21 # to create the eventually
7#
for Schedule 7
2#
for an hourly event
0#
to specify all days
0#
to specify no offset
17 # to run playlist 7
NOTE: TO HAVE HOURLY EVENTS PLAY DURING CERTAIN TIMES OF THE DAY, E.G., BUSINESS HOURS
ONLY, SCHEDULE 2 PLAYLISTS WITH VOLUME CONTROL AS THE ONLY ENTRY. AT THE START OF
BUSINESS, RUN THE PLAYLIST THAT SETS THE VOLUME TO THE DESIRED LEVEL. AT THE CLOSE OF
BUSINESS, RUN THE PLAYLIST THAT TURNS THE VOLUME OFF.
Scheduling Annual Events (3#)
Annual events can be scheduled to happen on a particular date, for example, Halloween
messages may be scheduled to start playing on October 1, Thanksgiving messages
may begin on Nov. 1, and Christmas messages may start the day after Thanksgiving.
To schedule an event to happen on a particular date, enter the date, time, and playlist
number.
Instaplay prompts:
To add an entry to the schedule, enter the month from 1 to 12
Enter: (1 – 12) #
Instaplay prompts:
Enter the day from 1 to 31
Enter: (1 – 31) #
Instaplay prompts:
Enter the hour in 24-hour format.
Enter: (hh) #
Instaplay
/ / / ///ALARMCO message repeaters
47
Instaplay prompts:
Enter the playlist number to run
Enter: (playlist number) #
At the appropriate date and time, the playlist will start to run.
As in the example above, to play a series of Halloween messages on October 1, the
playlist could include the command to set a virtual control input and the list of
Halloween-specific messages. These messages would play continuously as long as the
virtual control input is in the active state (ON).
Activating/Deactivating Priority Event Scheduling (0#)
With the Scheduler Option, playlists are added to the queue at the requested time.
Without Priorities enabled, any previously queued playlists complete, the scheduled
playlist will begin. To run a playlist at the time specified, this command would be used.
Because this feature can cause a currently running playlist to stop abruptly, it should be
used sparingly.
When Priority Event Scheduling is active, any scheduled event can be scheduled with
Priority status, allowing it to cancel any currently running playlist.
Scheduled Priority Events can be “interlaced” with prioritized Control Inputs. That is, the
user can specify the priority of a Scheduled Priority Event relative to prioritized Control
Inputs. A scheduled event with a priority “1” is considered a higher priority than Control
Input 1. A scheduled event with a priority “2” is considered a higher priority than Control
Input 2. And so forth. A schedule’s priority number cannot be larger than the number of
control inputs on the Instaplay.
When priority event scheduling is active, each scheduled event will have an associated
priority that allows it to run relative to prioritized Control Inputs.
Instaplay echoes the status and prompts:
Press: 1 #
to enable
2#
to disable
The appropriate action is taken and the status is echoed to the User
48
Chapter 7: Scheduler Option
Instaplay
HEAR SCHEDULE ENTRIES [ *22# ]
All scheduled events may be reviewed by schedule number.
Instaplay prompts:
Enter the schedule number followed by the pound sign
Or zero pound for all
Press: * 22 #
Enter: (schedule number) #
Or:
0#
to hear schedule entries
to hear one schedule
to hear all schedules
DELETE A SCHEDULE [ *24# ]
Individual or multiple schedules can be deleted from the Instaplay.
Instaplay prompts:
To delete a Schedule, enter the Schedule Number followed by the pound sign
Or zero pound for all
Press:
Enter:
Or:
* 24 #
(schedule number) #
0#
to delete a schedule
to delete one schedule
to delete all scheduled events
Before erasing all schedules, Instaplay will prompt the User to enter 1 # to confirm.
If a single schedule was deleted, Instaplay will re-prompt.
Instaplay
/ / / ///ALARMCO message repeaters
49
50
Chapter 7: Scheduler Option
Instaplay
CHAPTER 8: REMOTE OPTIONS
Several options are available for controlling Instaplay remotely.
Dial up Telephone
Duplex Radio
RS-232 Serial Link
Ethernet
When Instaplay is requested by multiple Users, the following priority is in effect.
1. Control Phone
2. “Live” Mic
3. Duplex Radio
4. Dial-up Telephone
That is, if the Control Phone is lifted when either the Duplex Radio or the Remote
Telephone is in use, the Control Phone will take control of the Instaplay. Conversely, if
the Instaplay is in use by either the Control Phone or the Duplex Radio, the Remote
Telephone will not be granted access.
REMOTE INACTIVITY TIMEOUT PERIOD [ *50# ]
Inactivity Timeout Period can be set when the Instaplay is being programmed remotely.
When the user is not entering touchtones, recording a message, or listening to
Instaplay, an internal timer is set. The values set at the factory can be adjusted if
necessary. Valid inactivity timeout periods can be up to 30 minutes.
Default: Dial-up Telephone Control = 2 minutes
Duplex Radio Control = 10 minutes
If these options are present, Instaplay will prompt for one or more inactivity timeout
periods.
If Telephone Control is present, Instaplay prompts:
The Remote Telephone will disconnect after [minutes] minutes of inactivity.
Enter the inactivity timeout period (or zero for none) followed by the pound sign
Enter:
[minutes] #
Instaplay responds, “The Remote Telephone will disconnect after [minutes] minutes of
inactivity.”
Instaplay
/ / / ///ALARMCO message repeaters
51
If Duplex Radio is present, Instaplay prompts:
The Duplex Radio will disconnect after [minutes] minutes of inactivity.
Enter the inactivity timeout period followed by the pound sign
Enter:
[minutes] #
Instaplay responds, Duplex Radio will disconnect after [minutes] minutes of inactivity.
NOTE: THERE IS NO TIMEOUT FOR EITHER THE SERIAL PORT OR NETWORK CONNECTIONS.
SET UNIT ID NUMBER [ *56# ]
Each Instaplay has a Unit ID number that is used to access the Instaplay from a Serial
Port. When shipped from the factory, this number is 1, but can be changed in the field.
Instaplay prompts:
The Unit ID number is [UnitID]
Enter the new Unit ID number followed by the pound sign
Enter:
(Unit ID) #
52
Chapter 8: Remote Options
Instaplay
DIAL-UP TELEPHONE CONTROL OPTION
With the Telephone Control option, Instaplay can be programmed and controlled by a
User who is in another part of the building, at a remote location calling from his cellular
phone, or even across the globe.
The Telephone Control option allows Users to dial into Instaplay over a switched
telephone system using a standard touch-tone phone.
Accessing the Announcer from a Remote Phone
When Instaplay’s extension or direct phone number is dialed, the Instaplay detects
ringing on its line and answers the phone after detecting a ring voltage of at least ½
second.
What happens next depends on the current security settings. Specific security features
are described in Chapter 9.
A customized greeting (message 99) can be recorded to inform remote callers they’ve
reached the appropriate unit. If the greeting message is present, it will play as soon as
Instaplay determines the call is from an authorized user.
Once past security, all programming and control is similar to commands executed from
the Control Phone as described elsewhere in this manual. Two minimal differences are
noted below.
Remote Recording of Messages
When recording from a remote phone, the recording source is automatically set to be
the remote phone for the duration of the call. This does not affect the recording source
specified by the Set Record Source (* 7 #) command which is used when the local
control phone is off hook. However, if the recording source is changed during the
Remote Session, Instaplay will retain the setting for future recordings.
Remote Hearing of Messages
The * 2 # command turns off the DTMF detector while it is playing messages back over
the remote phone.
Instaplay
/ / / ///ALARMCO message repeaters
53
TERMINATING A REMOTE TELEPHONE SESSION
Instaplay will automatically timeout and release the telephone line when the Remote
User hangs up.
Instaplay will stop responding to remote commands and disconnect when any of the
following happens:
1.
2.
3.
4.
5.
6.
7.
54
The caller hangs up.
The call is terminated, e.g., a cellular connection is lost.
A FACTORY RESET, RESET VALUES or RESTART command sequence is executed.
The local Control Phone is taken off hook.
A Duplex Radio Session is activated.
Power is lost to the Instaplay.
The inactivity timeout period is exceeded.
Chapter 8: Remote Options
Instaplay
DUPLEX RADIO CONTROL OPTION
With this option, Instaplay can be programmed or controlled from a duplex radio
connection. The Instaplay is connected to a radio receiver and transmitter. Instaplay
listens to the receiver for its own unique hardware address. Once its address is
recognized, a particular Instaplay will respond with the appropriate voice prompts
based on the security settings and can be controlled remotely just as with the
Telephone Control (-TC) option. Please refer above for information on the Remote
Telephone and to Chapter 9 for information on the Security Options.
Relay 3 is energized automatically at the appropriate times to key the transmitter.
Therefore, if the Duplex Radio Control option is present, Relay commands (*62#) or
Relay Playlist entries should not be used for Relay 3.
HEAR THE HARDWARE ADDRESS [*53#]
Each Instaplay with Duplex Radio Control has a permanent, unique nine-digit
hardware address (Serial Number) assigned at the factory, which is used to address
the announcer.
Press: * 53 # from the Control Phone to hear Instaplay’s hardware address
“LISTEN UP” [*57#]
The broadcast stream starts with the “listen up” addressing sequence, *57#, followed
by the 9-digit hardware address (Serial Number) as reported by the *53# command.
This number can also be found on the invoice, the packing slip, and on the back or
bottom of the Instaplay.
Press: * 57 # (hardware address) # to begin communications with a specific
Instaplay
Once through Security, the remote User can enter the appropriate telephone touchtone commands to control the announcer and any programming or messages that
are to be recorded.
Instaplay's messages, playlists, and so forth can be changed remotely at any time
from a radio signal. No on-site personnel are required.
Instaplay
/ / / ///ALARMCO message repeaters
55
To address another Instaplay, simply enter the addressing sequence again, followed
by the hardware address of the next Instaplay to be addressed.
TERMINATING A REMOTE DUPLEX RADIO SESSION [*59#]
An Instaplay being addressed via Duplex Radio Control will stop responding to
control channel commands when any of the following occurs:
1.
2.
3.
4.
5.
6.
7.
56
The Disconnect from Remote Session command sequence (* 59 # 1 #) is received.
The addressing sequence (* 57 #) is received.
A FACTORY RESET, RESET VALUES or RESTART command sequence is executed.
The local Control Phone is taken off hook.
Emergency Override is activated.
Power is lost to the Instaplay.
The inactivity timeout period is exceeded.
Chapter 8: Remote Options
Instaplay
SERIAL LINK OPTION
With the serial link option, Instaplay programming, message downloading, message
triggering, and reporting can be performed from a computer's Serial or USB Port.
A UART (Universal Asynchronous Receiver/Transmitter) is the microchip with
programming that controls a computer's interface to its attached serial devices.
Instaplay's UART has the following configuration:
Baud rate:
Data bits:
Parity:
Stop bits:
Flow control:
38,400
8
NONE
1
NONE
Instaplay is now connected to the RS-232 port and will respond to ASCII Control and
Report Commands entered using the ALARMCO Command Center, which (along with
instructions) can be downloaded from http://www.MessageRepeaters.com/links.html.
NOTE: IF
A
SERIAL-USB ADAPTER CABLE WAS PROVIDED
PC PRIOR TO OPERATION.
WITH YOUR INSTAPLAY, THE DRIVER
MUST BE INSTALLED ON YOUR
ETHERNET OPTION
With the Ethernet option, Instaplay programming, message triggering, and report
generation can be performed over a network connection. Instaplay is configured for
dynamic IP addressing. This address can be found in your router’s DHCP table. For
example,
Hardware Address
Assigned IP
Hostname
00:20:4A:A9:71:61
192.168.1.111
CA97161
Instaplay’s MAC addresses begin with the 3 octets 00:20:4A -or- 00:80:A3.
To assign a static IP address, point your browser to the IP address assigned by DHCP.
On the window that appears, select “Network” from the main menu.
Select “Use the following IP configuration” radio button.
Enter the IP address (and subnet mask and default gateway, if necessary).
When finished, click the “OK” button.
On the main menu, click “Apply Settings.”
Cycle power on the Instaplay. Instaplay is now connected to the network and will
respond to ASCII Control and Report Commands entered using the ALARMCO
Command Center, which (along with instructions) can be downloaded from
http://www.MessageRepeaters.com/links.html.
Instaplay
/ / / ///ALARMCO message repeaters
57
ASCII Control Commands (Serial, USB, or Ethernet)
Control Commands are used to program or otherwise direct the Instaplay to perform an
action. The following Star Commands, as those entered with the telephone interface,
can also be entered through the Serial or Ethernet Interface.
*
*
*
*
*
*
*
3
4
5
7
9
11
15
#
#
#
#
#
#
#
to
to
to
to
to
to
to
Erase a Message
Set Spacing Between Messages
Create a Text Message
Set Record Source
Set Background Music Operation
Set Volume Levels
Cleanup Available Memory
*
*
*
20
21
24
#
#
#
to
to
to
Set the Clock
Create a Schedule
Delete a Schedule
*
*
31
32
#
#
to
to
Set the Overall Control Input Operation
Set the Individual Control Input Operation
*
*
44
45
#
#
to
to
Delete a Playlist
Append to a Playlist
*
62
#
to
Set the Relays
*
*
71
75
#
#
to
to
Set the Remote Access
Configure the Auto-Dialer
*
92
#
to
Set a Control Input
* 127
* 128
* 129
#
#
#
to
to
to
Set to Default Values & Erase Messages & Programming
Return to Factory Default Settings
Restart the Announcer
When entering Star Command equivalents, the Star (*) is replaced with the numbers
999, and Pound signs (#) are replaced with commas. At the end of the command, the
final Pound sign is replaced with a Carriage Return character. Therefore, the format for
converting Star Commands for using the ASCII Interface is:
*UnitID,999,StarCommand,parameter2,paramater3,…,parameter(n) [RETURN]
For example, the Star Command to set the spacing between messages to 5 seconds on
an Instaplay would be:
*4#5#
The format to enter this command for Instaplay unit #1 using the ASCII Control
Command, enter:
*1,999,4,5[RETURN]
58
Chapter 8: Remote Options
Instaplay
Please refer to the appropriate chapters for proper data entry for each of the valid Star
Commands. Unless specified otherwise, they will follow an identical format. Some
differences to note are as follows:
Creating a Playlist – When creating a playlist using the ASCII Control Commands, the
target Playlist should first be deleted with the * 44 # command. The new playlist can
then be created using the Append a Playlist command.
* 45 # Append a Playlist – When adding messages to a playlist, each message
should be contained on its own line. For example, if messages 4, 5, and 6 are to be
added to playlist 7, the following entries would be used:
*1,999,45,7,1,4 [RETURN]
*1,999,45,7,1,5 [RETURN]
*1,999,45,7,1,6 [RETURN]
ASCII Control Programming examples
1) Create a playlist
In this example, playlist 2 contains a command to set the Message Spacing to 4
seconds, play factory message 905, play message 15, and play message 32.
The following playlist would be created with a text editor such as WordPad or Notepad.
Each line may contain comments to help with readability.
*1,999,44,2
*1,999,45,2,3,4
*1,999,45,2,6,905
*1,999,45,2,1,15
*1,999,45,2,1,32
//delete playlist 2
//playlist 2: set message spacing to 4 seconds
//playlist 2: play factory message 905
//playlist 2: play message 15
//playlist 2: play message 32
2) Create scheduled entries with priority scheduling
To create scheduled entries when priority scheduling is enabled would require a little
more planning. This example will play a message at the top of the hour. If a lower
priority playlist is running, it will be cancelled and the higher-priority scheduled playlist
will run.
*1,999,31,2,3
// set Instaplay to queue new requests & cancel lower ones
*1,999,21,0,1
// turn priority scheduling on
*1,999,21,1,2,0,0,11,1 // schedule1: run playlist 11 every day at the top of the
// hour with a priority of 1
Once the programming is entered into a text file, the Alarmco Command center program
can be used to transfer the programming to the Instaplay.
Instaplay
/ / / ///ALARMCO message repeaters
59
Instaplay acknowledges each command line with an ACK or NAK, which is echoed to
the Serial or Ethernet Port. If all parameters are valid, Instaplay acknowledges with an
ACK. If the command is not entered properly, Instaplay sends a NAK, and subsequently
ignores the command. Therefore, if a NAK is returned, the command should be
reentered correctly, or the text file should be edited and resent.
Alternatively, a text file can be sent to the Instaplay from a DOS Command Prompt using
the format: copy filename.txt COM1, for an Instaplay that is connected to the PC’s
COM 1 port.
ASCII Report Commands (Serial, USB, or Ethernet)
Unlike ASCII Control Commands which are used to program or direct the Instaplay,
ASCII Report Commands interrogate the Instaplay and return information to the User
over an RS-232 or Ethernet link.
The following Star Commands, as those entered with the telephone interface, can also
be entered through the Serial or Ethernet Interface. Each of the following ASCII Report
Commands are supported.
*
*
*
*
*
*
*
*
*
*
*
*
*
*
0
2
4
5
7
11
14
15
17
20
22
31
42
76
#
#
#
#
#
#
#
#
#
#
#
#
#
#
to
to
to
to
to
to
to
to
to
to
to
to
to
to
List Valid Serial Commands
List Message Numbers
Report the Message Spacing
Display Text Messages
Report the Recording Source
Report the Audio Output Volumes
Report Announcer Status
Report Available Memory
List Factory Messages
Report the Current Date & Time
Report Schedule Entries
Report the Overall Control Input Operation
Report Playlist Entries
Report the Auto-Dialer Numbers
Additionally, a command to report system information is available.
* 199
#
to
Report System Information
When entering Star Command equivalents for ASCII Reports, the Star (*) is replaced
with the numbers 998, and Pound signs (#) are replaced with commas. At the end of
the command, the final Pound sign is replaced with a Carriage Return character.
Therefore, the format for ASCII Report Commands is:
*UnitID,998,StarCommand,parameter2,paramater3,…,parameter(n) [RETURN]
60
Chapter 8: Remote Options
Instaplay
NOTE: SOME
COMMANDS CAN BE EXECUTED USING EITHER THE
WOULD HAVE DIFFERENT RESULTS.
FOR
EXAMPLE, THE
*20#
CLOCK OR REPORT THE CURRENT SETTINGS ON THE CLOCK.
“999”
OR
“998”
PREFIX, WHICH
COMMAND WOULD EITHER SET THE
ASCII Report examples
1) Report the Time
In this example, the User would like to verify that the clock for Instaplay Unit ID1 has
been set correctly. From the Alarmco Command Center the User would enter:
*1,998,20 [RETURN]
Instaplay would respond:
Today is [day of week] [month] [day], [year] [hours] : [minutes] : [seconds]
2) Report System Information
In this example, the User would like to obtain system information for Instaplay Unit ID
22. From the Alarmco Command Center, the User would enter:
*22,998,199 [RETURN]
Instaplay would respond:
Machine Description
[Descriptive String]
Serial Number
[9-digit serial number]
Application Software Version [number]
FPGA Version
[number]
DTMF Software Version
[number]
Memory
[hours] hours, [minutes] minutes
Control Inputs
[number]
Audio Input Channels
[number]
Audio Output Channels
[number]
Relays
[number]
Maximum User Messages
[number]
Maximum Playlists
[number]
Maximum Schedules
[number]
The remainder of this listing would include available options, such as:
Background Music Available
Audio Feedthrough Available
Microphone Available
Telephone Control Available
Ethernet Available
Scheduler Available
Duplex Radio Control Available
OutDial Available
Instaplay
/ / / ///ALARMCO message repeaters
61
Digital Download of Audio Files (Serial Port or Ethernet)
Instaplay’s messages are stored in WVX format, which is similar to WAV format, with
additional information specific to Instaplay.
Files to be downloaded to Instaplay must first be converted to WVX format, which is
done with the Alarmco Audio File Conversion program, WavConvert.
These files can then be digitally downloaded using the Alarmco Command Center
program.
Instructions and Software programs can be found at
http://www.MessageRepeaters.com/downloads.html.
Create a Text Message (*1,999,5,TextMsg,Text&Formatting\FF)
Instaplay can display a text message that includes simple text and message formatting.
For example, as each audio message is played, a concurrent text message can indicate
a brief description of the audio message.
TextMsg is the number of the user-created message, e.g., msg123.txt
Text&Formatting is the actual message with formatting included.
All Text messages must be terminated with the octal code \FF.
Formatting can include octal representations of ASCII Control Characters. For example,
\0D to enter a Carriage Return or \0A to enter a Line Feed.
62
Instaplay
CHAPTER 9: REMOTE SECURITY AND AUTO-DIALER SETTINGS
For Instaplays with Remote Access, both incoming access and outgoing event reporting
can be configured. This section discusses the security code that may be required for
Users to access the Instaplay from a Remote Telephone or a Duplex Radio session, as
well as the parameters necessary for Instaplay to perform an out-dial to report specific
events.
SET THE REMOTE ACCESS [ *71# ]
A security code may be required to access the Instaplay remotely. The way in which
Instaplay responds to the remote user depends on the value of the security code.
Valid security codes range from 0 to 999,999,999. The default security code is 98304,
with an access level 1 for each available remote telephone connection.
Access Level 0
If the security code is set to "0," Instaplay effectively has no security. When a User dials
into the Instaplay, normal announcing continues while it talks to the caller and grants full
access to the system. When connection is established, the Instaplay will play message
number 99, if it exists. This is a personal greeting that can be assigned by the User.
For example, “You have reached store number 127 in Newark, NJ.”
Access Level 1
If the security code is a non-zero number of 5 digits or less, Instaplay will continue its
normal announcing while it prompts the User to, "Enter the security number, followed by
the pound sign."
If the correct security code and pound sign are entered, Instaplay will talk to the User
and accept commands. When connection is established, the Instaplay will play
message number 99, if it exists. This is a personal greeting that can be assigned by the
User. For example, “Welcome to the Fort Lauderdale branch office.”
If an incorrect number is entered, Instaplay will continue to re-prompt until the number of
retries is exhausted.
Access Level 2
If the security code is between 6 and 9 digits, Instaplay will continue its normal
announcing and not initially talk to the caller. That is, it will not announce a greeting or
prompt the User in any way.
Instaplay
/ / / ///ALARMCO message repeaters
63
If the correct security code and pound sign are entered, only then will Instaplay talk to
the caller and accept commands.
If an incorrect number is entered, Instaplay will NOT inform the User of the error or reprompt for the correct code. Once the number of retries is exhausted, the connection
will be terminated.
No Access
If the caller hesitates for more than 30 seconds, Instaplay will hang up. By default,
callers have 5 attempts to enter the correct access code before the Instaplay is locked.
After a default timeout period of 1 minute, the Instaplay will reset and once again allow
attempted access. These parameters can be changed to increase or decrease security,
as described below.
Setting the Access Parameters
The Security Code can be changed after successfully dialing into the Instaplay, or from
the Control Phone.
Instaplay prompts:
The access code is [number]
The number of retries for this line is [number]
The timeout period is [hours/minutes/seconds]
Press: 1 #
2#
3#
to set the Access Code
to set the number of retries
to set the timeout period in minutes
Setting a new Access Code
Instaplay prompts:
Enter the new Access Code, followed by the pound sign
Enter: [Access Code]
Instaplay prompts:
For confirmation, reenter the Access Code
Enter: [Access Code]
If the same Access Code is entered twice in a row, the Access Code is reset and
Instaplay prompts for more telephone access parameters.
64
Chapter 9: Remote Security and Auto-Dialer Settings
Instaplay
Setting the number of retries
Default = 5
Number of retries is the number of attempts to enter the correct Access Code before
Instaplay ignores more attempts. When the number of retries is exceeded without
receiving the correct code, Instaplay will not respond to the ringing.
Instaplay prompts:
Enter the number of retries, followed by the pound sign
Enter: [number] #
Once the number of retries has been set, Instaplay prompts for more telephone access
parameters.
Setting the lockout period
Default = 1 minute
If the number of retries has been reached, Instaplay will "lock up" for a specified amount
of time. During this time period, Instaplay will not respond to ringing from a remote
telephone. The timer will be reset to the beginning if subsequent attempts to access the
Instaplay occur before the lockout period expires. If this feature not required, the value
would be set to zero.
Instaplay prompts:
Enter the timeout period, followed by the pound sign
Enter: [seconds] #
Instaplay
/ / / ///ALARMCO message repeaters
65
CONFIGURE THE AUTO-DIALER [ *75# ]
Instaplay can notify Users in the event of a power outage, or for other user-determined
conditions.
With the Auto-Dialer option, Instaplay can initiate up to sixty-four dial-out sequences
(groups) to alert key personnel to specific events as they are happening. Each group
can contain up to five phone numbers with an overall maximum of 128 phone numbers.
Any playlist can contain an Auto-Dialer entry as defined in Chapter 5.
Instaplay will continue to dial each of the phone numbers in turn until it receives a pound
sign [#] response from the called party or has completed the final phone call in the
group.
Press:
1# to setup the Auto-Dialer Groups
2# for A/C Power Fail Detection parameters
Setting up the Auto-Dialer Groups (1#)
Instaplay prompts:
Enter the Auto-Dialer group to configure
Enter: (auto-dialer group number) #
If one or more entries are in the chosen Auto-Dialer group, Instaplay will prompt:
Auto-Dialer Group number (number) has (number) entries.
To hear these entries or to delete them, the “Hear Auto-Dialer Numbers” [*76#] or
“Delete Auto-Dialer Groups” [*77#] commands should be used.
If no entries exist in the chosen Auto-Dialer group, Instaplay will begin by prompting for
the first phone number. Otherwise, it will begin by prompting for the next available one.
To create a new Auto-Dialer sequence, the “Delete Auto-Dialer Groups” command
should be issued.
For each of the 5 telephone numbers, a series of numbers and pauses can be entered,
allowing a great deal of flexibility in the format of the dialed number. For example, this
number can contain a digit for obtaining an outside line from a PBX system, numerous
digits for international dialing, and an extension number once the dialed number is
reached.
A number or series of numbers is entered followed by a pound sign. After each pound
sign, Instaplay will prompt for the pause time followed by the pound sign or just the
pound sign to complete the entry.
66
Chapter 9: Remote Security and Auto-Dialer Settings
Instaplay
For each phone number, Instaplay prompts:
Group number (n)
First (or Second, Third, Fourth) phone number:
Enter portion of number to call followed by the pound sign
Enter the wait time in seconds pound, or just the pound sign to complete the
entry
:
:
Enter portion of number to call followed by the pound sign
Enter the wait time in seconds pound, or just the pound sign to complete the
entry
For example, the user would enter 5551234## to dial the number 555-1234 or
9#3#18005551234## to obtain an outside line, pause for 3 seconds, then dial the
number 1-800-555-1234.
As each number entry is completed, Instaplay will echo the telephone number stored
and prompt for confirmation. For example, “First phone number – 9, wait 3 seconds,
18005551234. Press one pound to accept or two pound to change.”
For each Auto-Dialer Group, Instaplay will prompt for up to five individual numbers. As
with all commands, pressing the star [*] key at any time, will exit the current section and
return to the Command Level.
Multiple Auto-Dialer sequences can be queued, however a previously queued event will
not be added to the queue a second time, as long as it is still in the queue. Once it has
been cleared from the queue, it can be added again.
Playlists will continue to execute independently of the activity in the Auto-Dialer Queue.
Entries will not be added to the Auto-Dialer Queue while the Control Phone is off-hook.
Configuration for A/C Power Fail Detection (2#)
Press:
Instaplay
1# to enable Power Fail Detection
2# to disable Power Fail Detection
/ / / ///ALARMCO message repeaters
67
HEAR THE AUTO-DIALER NUMBERS [ *76# ]
Each auto-dialer group configuration can be heard using the Touch Tone telephone.
Instaplay prompts:
Enter the Auto-Dialer Group, or zero pound for all
Enter: (Auto-Dialer Group) # or 0#
For an individual Auto-Dialer Group, Instaplay will recite the Auto-Dialer Group and its
associated telephone numbers.
In this example, Instaplay will dial an internal extension (x2123) as the first option. If
this extension is busy or does not respond, Instaplay would dial a second extension
(x2129). If this extension is busy or does not respond, Instaplay would then obtain an
outside line, pause for 3 seconds, and dial the external number. This sequence would
be something like the following:
Auto-Dialer Group Number 3
First phone number – 2123
Second phone number – 2129
Third phone number – 9, wait 3 seconds, 18005551234
When listening to All Auto-Dialer Groups, Instaplay will state only the Group Number
and the number of entries in the Group.
DELETE AN AUTO-DIALER GROUP [ *77# ]
Auto-Dialer Group information can be deleted at any time. Either a single group or all
groups can easily be deleted.
Instaplay prompts:
To delete an Auto-Dialer Group, enter the Group Number pound, or zero pound
for all.
Before deleting all groups, Instaplay prompts for confirmation.
Each time an auto-dialer group is deleted, Instaplay confirms.
68
Chapter 9: Remote Security and Auto-Dialer Settings
Instaplay
CHAPTER 10: INTERACTIVE MANUAL CONTROL
Authorized users can program the Instaplay to operate in any way they choose. In
addition to the standard software commands, Instaplay has the ability to control the
hardware virtually.
Relays can be manually turned ON and OFF as described in Chapter 6. Volumes of the
audio output channels can be immediately adjusted as described in Chapter 4.
This chapter describes how control inputs can be activated remotely and how a
telephone can act as if it were a live microphone.
SET A VIRTUAL CONTROL INPUT [ *92# ]
Instaplay’s Control Inputs can be “triggered” from a remote location. That is, each Con trol Input can be activated from either an actual physical dry contact closure or virtually
from the Control Phone, a remote Session, a computer, or PLC. In addition to the 16
physical control inputs that are available with Instaplay, the –SLVxxx option provides 32,
64, or 128 control inputs that can be operated virtually.
Control Inputs run playlists, which in turn play messages, turn on relays, enable audio
output channels, and so forth. Therefore, this command provides significant functional ity from a remote location.
When programming a Control Input, the User is first prompted to select a Control Input.
If the Control Input selected is valid (i.e., physical or virtual), the user is then prompted to
select the programming option. Control Inputs can be set to an ON condition, i.e.,
sustained, or set ON for a specific amount of time.
To program a Control Input,
Press: * 92 #
Enter: (Control Input number) # or 0 # for All
Press:
2 # to turn ON
3 # to turn OFF
4 # to turn ON for a specific amount of time
Once a Control Input is set to a particular mode, it will remain that way until changed by
another Set Control Input (*92#) command or otherwise changed.
NOTE: IF
OFF.
Instaplay
A
CONTROL INPUT
HAS BEEN PHYSICALLY TURNED
ON,
/ / / ///ALARMCO message repeaters
THIS COMMAND CANNOT TURN IT
69
Timed Control Inputs can be held ON for up to one minute. To turn the selected Control
Input ON for a specific amount of time, the User is prompted to enter the Hold Time in
seconds.
To set a timed Control Input,
Enter: (seconds) # for the hold time
Setting a hold time of 1 second would be equivalent to giving a momentary closure to
the selected Control Input.
Valid Hold times are between 1 second and 1 minute (60 seconds).
NOTE: ENTERING MULTIPLE TIMED VIRTUAL CONTROL INPUT COMMANDS
CONTROL INPUT TO CYCLE OFF AND ON AGAIN.
WOULD CAUSE THE
NOTE: IF A POWER OUTAGE SHOULD OCCUR DURING THE PERIOD OF A TIMED CONTROL INPUT,
INPUT WOULD REMAIN ON.
THE
SET A LIVE AUDIO PATH [ *99# ]
Authorized Users can “take control” of Instaplay from either the Control Phone or from a
remote telephone. When this command is issued, the caller can broadcast “live”
through the Instaplay, taking priority over all other activity. This is analogous to having a
live microphone broadcast from a remote location.
All sounds, including Touch-Tones, will be broadcast over Audio Output Channel 1.
Instaplay will not decode the Touch-Tones, and will not respond to Star Commands
while the live audio path is active.
The audio path remains active until the caller hangs up.
CAUTION: Instaplay is looking for a break in loop current to determine that the call has
ended. Issuing the *99# command remotely when an Instaplay is connected to a PBX
system that does not break loop current could cause the line to not be released.
70
Chapter 10: Interactive Manual Control
Instaplay
CHAPTER 11: RESET AND RESTART COMMANDS
Instaplay has several different ways of resetting factory values and programming.
1. Factory Reset
2. Reset Values
3. Restart
The following chart summarizes the activities that occur with each of these commands.
“Yes” indicates the value is returned to the Factory default value. If the value was
changed, by either the User or a Playlist, the modified value is overwritten.
Message spacing reset
User Messages erased
Control Input Operation Mode reset
Passwords reset
Playlists returned to default
Volume reset
Relays reset
Record source reset
Factory Reset
Yes
Yes
Yes
Yes
Yes
Yes
Yes
Yes
Reset Values
Yes
No
Yes
No
No
Yes
Yes
Yes
Restart
No
No
No
No
No
No
No
No
NOTE: IF ANY VALUE IS DEFINED ON A PLAYLIST, THIS USER-SPECIFIED VALUE WILL BE IN EFFECT AS
SOON AS THE APPLICABLE PLAYLIST RUNS.
FACTORY RESET [ *127# ]
The Factory Reset command erases and cancels everything that's been done to the
Instaplay. All messages are erased and any programming is canceled. This is identical
to the configuration the Instaplay had when it shipped from the factory.
Press: * 127 #
A Factory Reset command will reset all factory default values, all counter values, and all
passwords. It also erases all schedule entries, messages, and playlists.
Press: 1 # to confirm resetting the Instaplay.
Instaplay
/ / / ///ALARMCO message repeaters
71
RESET VALUES [ *128# ]
Similar to the Factory Reset command, the Reset Values command resets the Instaplay
to its factory default values. However, it will NOT erase messages or programming that
have been entered by the User.
Press: * 128 #
A Reset Values command will reset all factory default values. All counter values,
passwords, schedule entries, messages, and playlists will remain intact.
Press: 1 # to confirm resetting the Instaplay values
RESTART [ *129# ]
The Restart Command will simulate a fresh “power up” of the unit but does not change
any programming or delete any messages.
Press: * 129 #
Press: 1 # to confirm restarting the Instaplay
MANUALLY RESETTING INDIVIDUAL FACTORY DEFAULTS
Factory default values can also be reset individually. For example, it is not necessary to
do a Factory Reset [*127#] or a Reset Values [*128#] to change just a few settings.
Here are some commonly used commands.
Erase All Messages
Reset Message Spacing
Reset Record Source
Reset Volume Levels
Reset Overall Control Inputs
Reset Individual Control Inputs
*3#0#1#
*4#3#
*7#2#
* 11 # 1# 100 #
* 31 # 1 # 1 #
* 32 # 1 # 1 # 6 # 2 #
Please refer to the respective chapters for a complete discussion of each of these
parameters.
72
Chapter 11: Reset and Restart Commands
Instaplay
INSTALLATION INSTRUCTIONS
Removable plugs are provided for ease of installation or replacement.
1.
Prepare the power connections to the associated terminals.
THE FOLLOWING CONNECTIONS SHOULD BE MADE BEFORE THE POWER
SUPPLY IS TURNED ON. Instaplay will operate from a range of either 12 to 16
VAC or 12 to 24 VDC power. Separate screw terminals are provided. NOTE: If
you are using a supply with AC output it should be attached to the two terminals
marked "AC" and it doesn't matter which wire goes to which AC terminal. For a
supply with DC output, the wires should be attached to the terminals marked DC.
For DC it is important to attach the positive side to + and the negative side to -. An
external 1Amp slow blow fuse should be used in the circuit.
DO NOT APPLY
POWER YET.
2.
Connect a standard touch tone telephone to the RJ11 jack labeled “Control”.
3.
Make any desired connections to the Control Inputs.
A closure (short) to Control Input 1 will cause message 1 to play after it has been
recorded. Multiple closures to the Control Input will cause message 1 to play
multiple times. If the Control Input remains closed the message will repeat. The
closure should be between the Control Input and a common terminal labeled “C”
next to it.
4.
Make any desired connections to the output relay contacts.
Relay 1 is energized during announcements. During the message playback a
closure is provided across its terminals should one be needed.
5.
Connect the Ch 1 audio output terminals to your amplifier’s line level audio
input. (signal to + , shield to - )
6.
Connect a low impedance microphone, if you're using one. If you're recording
from a line level audio source, connect your player to the screw terminals
labeled "AUX 1" (signal to + , shield to - ) on the announcer.
Instaplay expects the Control Phone to be the record source. To record from AUX 1
or a 3-pin microphone (if you have one), the record source must be set using the
control phone by pressing * 7 #.
If your Instaplay has the push-to-talk option, a 5-pin XLR jack and mating connector
are included. Wiring is: 1) Shield, 2) Audio -, 3) Audio +, 4) PTT, and 5) PTT.
Pushing the bar on the push-to-talk mic should provide a closure between pins 4 &
5, which are connected internally to Instaplay's Control Input 1 and Common.
Instaplay
/ / / ///ALARMCO message repeaters
73
INSTALLATION INSTRUCTIONS CONTINUED
7.
For music between messages, attach music source to the screw terminals
labeled "AUX 2" (signal to + , shield to - ) on the announcer.
8.
Apply power to the announcer.
A green LED should begin flashing slowly on the front of the unit.
9.
Pick up the control phone handset.
After a few seconds you should hear a voice prompt over the Control Phone each
time it's taken off hook.
10. Record a test message and play it back:
a.
Take the Control Phone off hook
b. Press: * 1 # 1 # (to start recording message 1).
c.
Talk into the Control Phone (or mic, if you have set it as the record source).
d. Press # to stop recording.
e.
To hear what you have recorded without playing it out the Ch 1 terminals, press
the command to hear a message, * 2 #. Press 1 # again to choose the message
1 you recorded. It should play back to you over the control phone’s handset.
Recording a new message 1 will cause the old one to be erased. After
recording a message you should wait for the response, “Message saved” before
continuing.
11. Set your amplifier’s output to a low level and trigger Control Input 1 to play
the message you recorded.
The recorded message will play at the announcer’s full volume. To lower the
announcer’s output volume press * 11 # on the control phone.
12. Disconnect the Control Phone if desired.
To lower electromagnetic emissions, a ferrite clamp has been provided.
Wires attaching to the announcer should be bundled together to enable
the clamp to be placed around them before being routed to other
locations or equipment.
License and Terms for ALARMCO Software and firmware
ALARMCO grants you a non-exclusive, non-transferable license to use this software and
related documentation. Any attempted sub-license, assignment, rental, sale or other
transfer of the Software or the rights or obligations of this Agreement without the prior writ ten consent of ALARMCO shall be void. This License will automatically terminate without
notice if you fail to comply with its terms. This agreement will be governed by the laws of
the State of Connecticut.
THE SOFTWARE AND DOCUMENTATION ARE COPYRIGHTED. UNAUTHORIZED
COPYING, REVERSE ENGINEERING, DECOMPLILING, DISASSEMBLING, AND CREATING DERIVATIVE WORKS BASED ON THE SOFTWARE ARE PROHIBITED. TITLE
TO THE SOFTWARE IS NOT TRANSFERRED TO YOU BY THIS LICENSE. OWERNSHIP AND TITLE TO THE SOFTWARE AND THE ASSOCIATED DOCUMENTATION
ARE RETAINED BY ALARMCO.
SOFTWARE LIMITATIONS
ALARMCO DOES NOT WARRANT THAT THE SOFTWARE WILL BE FREE FROM ERROR OR WILL MEET YOUR SPECIFIC REQUIREMENTS. You assume complete responsibility for decisions made or actions taken based on information obtained using the
software. Any statements made concerning the utility of the software are not to be construed as expressed or implied warranties.
ALARMCO MAKES NO WARRANTY, EITHER EXPRESSED OR IMPLIED, INCLUDING,
BUT NOT LIMITED TO ANY IMPLIED WARRANTIES OF MERCHANTABLITY AND FITNESS FOR A PARTICULAR PURPOSE, REGARDING THE SOFTWARE, AND MAKES
THE SOFTWARE AVAIALBLE SOLELY ON AN "AS IS" BASIS. ALARMCO SHALL NOT
BE RESPONSIBLE FOR INCIDENTAL, SPECIAL, OR CONSEQUENTIAL DAMAGES,
EVEN IF ALARMCO HAS BEEN APRISED OF THE LIKELIHOOD OF SUCH DAMAGES
OCCURING.
LIMITED WARRANTY AND DAMAGES DISCLAIMER
The hardware (not the software) is warranted to the original purchaser against defects in
material and workmanship for a period of twelve (12) months from the date of original purchase. Defective hardware under warranty will be repaired or replaced when it is returned
postage prepaid to ALARMCO. IN NO EVENT SHALL ALARMCO’S LIABLITY (WHETHER BASED ON AN ACTION OR CLAIM IN CONTRACT, TORT OR OTHERWISE) TO
ANY PARTY EXCEED THE PURCHASE PRICE OF THE PRODUCT. THIS PARAGRAPH
EXPRESSESS ALARMCO'S SOLE LIABLITY AND YOUR EXCLUSIVE REMEDY.
This warranty gives you specific legal rights, and you may also have other rights, which
vary from state to state. Some states do not allow the exclusion or limitation of incidental
or consequential damages or limitations on how long implied warranty lasts, so the above
limitations or exclusions may not apply to you.
ALARMCO
1 Bailey Drive
Guilford, CT 06437
800 - 824 - 5006
203 - 458 - 2646
www.MessageRepeaters.com