1
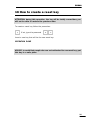
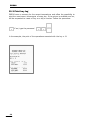
P A Y K E Y
®
USER MANUAL
PK300
Paykey™ reserves the right to make chances at any time in order to improve design and to
supply the best product possible.
Ver. 1.0 05/20/04
USER MANUAL
PK300
How to read this manual
This manual was created to give clear and precise information without too much
detail on the theoretical concepts of this product.
As you browse this manual, take a minute to review the table of contents. The
topics were edited according to a logical sequence in order to facilitate the learning; a review of the index will give you an idea of what the PK300 can do for your
business.
This manual also outlines in depth the various operations of the PK300.
PK300
Introduction
Before illustrating the PK300’s features, we must thank her for the confidence
granted us.
We are confident that you will not regret choosing this product. The PK300 is the
result of much experience in the field of electronics and vending systems. PK300
was planned with the best electronic and software technologies from MicroHard
Srl, which has always been a leader in the field of technology.
5
PK300
Table of contents
1 Safety instructions .................................................................................. 4
2 What the packaging contains ................................................................... 4
3 Manufacturer info ................................................................................... 4
4 PK300 dimension ................................................................................... 5
5 System Outlook ...................................................................................... 5
6 Types of keys .......................................................................................... 7
7 How to install PK300 .............................................................................. 7
8 First thing to do: set the system code ...................................................... 8
9 Password administrator ........................................................................... 9
10 Menu layout and utilization .................................................................... 9
11 Navigating PK300’s menu by keyboard ................................................ 10
12 Navigating PK300 menu by code ......................................................... 11
13 How to sell a product .......................................................................... 12
13.1 How to see the Key’s information .............................................. 13
14 How to recharge a user key ................................................................. 13
15 How to configure a user key ................................................................ 14
15.1 How to configure a user key parameters .................................... 14
16 How to create a user key .................................................................... 15
17 How to create a service key ................................................................. 16
18 How to create a reset key ................................................................... 17
19 Print and receipt ................................................................................. 18
19.1 How to reprint the receipt ......................................................... 18
19.2 How to print the counters ......................................................... 18
19.3 Print key log ............................................................................ 20
6
PK300
20 How to display the daily income ........................................................... 21
21 How to customize the receipt .............................................................. 21
22 Password ........................................................................................... 24
23 How to set the date and time .............................................................. 24
24 Expiry date ......................................................................................... 25
25 Software version ................................................................................. 25
7
PK300
1 Safety instructions
- Do not use a damaged or loose plug.
This may cause an electric shock or fire.
- Use only a properly grounded plug and recepticle.
An improper ground may cause electric shock or equipment damage.
- Disconnect the plug from the outlet during storms or lightening or if it is
not used for a long period of time.
Failure to do so may cause an electric shock or fire.
2 What the packaging contains
-
User key (pz. 10);
PK300;
User manual;
Power Supply;
Printer cable.
3 Manufacturer info
PK300 is a product realized by Microhard srl ITALY and commercialized by Paykey
USA INC. If you have any problems or would like more information about the
product, please contact Paykey USA at the following address:
Paykey USA Inc.
120D Old Mill Road, Greenville, SC 29607 Ph.864 527-4408
E-mail: [email protected] / web site: www.paykeytech.com
You may also contact Microhard srl at the following address:
Microhard srl
Via Montaletto, 65
47042 Cesenatico FC ITALY
Tel. +39 0547 75450 Fax +390 0547 81247
www.microhard.it / e-mail: [email protected]
8
PK300
4 PK300 dimension
Power supply: 12-24 V AC max. 250 mA
Power supply device: input: 110-220V AC 50-60 Hz Output: 24V AC – 500mA
Working temperature: 41-105°C
Humidity: 0-85% HR
5 System Outlook
PK 300 is a Point of Sale (POS) desktop
that simplifies the creation of the Pkeys,
payment, and recharging procedures.
In addition to withdrawal and deposit functions, PK300 retrieves a list of each key
transaction, shows partial and overall
sales, and prints informative receipts after each transaction. With the exception
of the payment with keys, every function
can be password-protected.
Pkey
9
PK300
Display
Slot reader
Keyboard
Keyboard
The PK300 keyboard is multipurpose and presents the keys numbered from 0 to
9, two cursor keys [(+) and (-)], confirmation key (ENTER), deleting key (Del) and
the key to access the menus
.
Display
The PK300’s display utilizes alphanumeric form by 8 LED digits (inclusive of
“comma” character). The display shows values from 8 numbers and up to
99,999,999.
Slot reader
The Slot Reader is the space in which the Paykey is inserted.
Connectors
PK300 has the ability to link to a personal computer* (PC) and also connect to
the PK Printer (PRN). The connector (VAC) provides the power supply. INT is the
switch for power supply.
* not implemented
10
PK300
6 Types of keys
User key
The User key is the key that your customers will use to buy the products. The User
key contains an ID number, the recharge value, and the rechargeable maximum
value.
Reset key
The Reset key is used to reset the PK300. When the PK300 is reset, (see chap.
18 “How to create a reset key” pag. 17) all of the passwords will be reset as well
as the counters and the value configuration of the keys. However, the receipt text
is not changed.
Service key
It’s a manager’s key. It’s like the User key but doesn’t the ID number and expiry
date; the operations aren’t registered and stored in the counters.
7 How to install PK300
Once you have taken the PK300 out of the box, check to make sure that it is
connected to the power supply contained in the box. Insert the power supply into
a current socked (110 VAC 50 Hz) and connect the PK300 as shown in figure
below. Turn the power on with the VAC switch.
To connect the PK Printer, see the image below:
11
PK300
8 First thing to do: set the system code
IMPORTANT: The System Code for the PK300 is provided by a CODE KEY
to deny the use of keys belonging to other companies and/or other administrators.
Codifying the PK300 is simply assigning it a univocal number. This operation
identifies all the systems so that all vendors keys will be spendable on its only
devices. The coding operation is performed using the System Code Key, a special
key released by Paykey™ (the System Code key is identified by a number written
under it).
PK300 is supplied from Paykey™ without any System code inside.
With PK300 already powered, insert the System Code key into slot reader.
If the operation is successfully done on display will be show:
CHANGE OF CODE SYSTEM DONE EXTRACT THE KEY
12
PK300
9 Password administrator
To set the password administrator press the follow buttons:
INSERT PASSWORD
Enter your personal code (although it is possible to enter up to 8 digits, it isn’t
necessary to use 8 digits ), then press “ENTER” .
VERIFY PASSWORD
Enter password again and press “ENTER”.
To enter any password, press “ENTER” without inserting any number and confirm
with the “ENTER” key.
10 Menu layout and utilization
When PK300 is waiting (stand-by) press
and the first menu will be displayed.
If the PK300 is protected by password administrator, the display will show the
following message: INSERT PASSWORD.
Insert correct password - for instance, if the password is 1234, type the following:
If the password is correct the following message will display:
PASSWORD OK.
It’s now possible to browse the menu.
13
PK300
The PK300 menus are arranged on several levels and divided by subject as shown
in table below:
Every topic is linked to a number. You can to access to function by entering the
appropriate number. The functions that have a submenu are indicated by “-”between the number and the name’s function (for instance 4-KEY).
When you enter the menu, you will always see: 1 CHARGE.
To exit the menu and get back in stand-by mode, press:
.
11 Navigating PK300’s menu by keyboard
To enter into the menu press
and use buttons
topics. Press "ENTER" to confirm the topics.
or
to show the menu
There are five topics:
1 CHARGE
2-CONFIG
3 PRINT
4-KEY
5 INFO
The functions that have a submenu are indicated by “-”between the number and
the name’s function (for instance 2-CONFIG). Press button “ENTER” to enter in
this submenu.
To exit the menu and get back into stand-by mode press:
14
.
PK300
12 Navigating PK300 menu by code
This second mode allows you to quickly access the functions without rolling the
menu’s items.
For instance: if you want create a new user key press the follow buttons:
INSERT USE KEY
The number combination on the keyboard to enter in the function is the function’s
code. The list of all functions available on PK300 is as follows:
221
222
223
224
CHARGE
CONFIG PASSW.
CONFIG RECEIP ROW#1
CONFIG RECEIP ROW#2
CONFIG RECEIP ROW#3
CONFIG RECEIP ROW#4
(To recharge the user keys)
(To configure password administrator)
(To modify the first row of the receipt)
(To modify the second row of the receipt)
(To modify the third row of the receipt)
(To modify the fourth row of the receipt)
23
24
25
CONFIG DATE
CONFIG TIME
CONFIG EXPIR.
(To configure date)
(To configure time)
(To set the expiry date)
1
21
311 PRINT COUNT DISPL.
312 PRINT COUNT PAPER
32 PRINT KEY’S LOG
41
42
43
441
442
443
KEY USER
KEY SERVIC
KEY RESET
KEY CONFIG MAXVAL
KEY CONFIG VALUE
KEY CONFIG NUMBER
444 KEY CONFIG VALID.
45 KEY LOST
5
INFO
(Tho show counters on the display)
(To print counters by PK Printer)
(To print key’s log by PK Printer)
(To create a user key)
(To create a service key)
(To create a reset key)
(To config the max value to recharge on the user key)
(To define the current value on new user key)
(To configure the initial number. This number will be
incremented by one during other user key creation)
(To define validity date)
(To define or delete lost keys)
(To show software version and other information about own
PK300)
15
PK300
13 How to sell a product
Insert the User key in the slot reader
The display will show the value on the Pkey (ex. 10.00), type the product’s cost:
7.00 Extract the Pkey..
3.00 was deducted from the Pkey and the display will show the value still available on the user key.
4.50
2.50
The display shows the available amount (10.00 - 3.00 - 2.50 - 2.00 = 2.50).
PK300 waits the extraction of the key to print the receipt; the print is automatically cancelled if the PK Printer is turned off or not connected.
If it tries to deduct an amount higher than the value of the key, PK300 informs
with an acoustic signal and will be shown the excess value:
15.50
SURPLUS AMOUNT 19.50
16
PK300
13.1 How to see the Key’s information
To show the key’s information press the
.Will be shown:
Key’s number;
Expiry date:
Available value.
If you use a User Key, the total sells is added to all the counters and operation
is registered in the log (see chap. 19.3 “Print key log” pag.20). The service key
does not change neither counters nor log.
14 How to recharge a user key
Cash value can be added to the key by accessing first item of menu.
If set, type the password then press
INSERT KEY
Type the value to recharge (for instance 5.00):
If the key is empty, the display will show the new value on the key, which is
25.00. If available, PK printer will print the receipt with the recharge value
report.
17
PK300
15 How to configure a user key
15.1 How to configure a user key parameters
The creation of the user key requires two parameters - the key number and the
value. Follow the procedure:
If set, type the password
MAX VAL “Maximum value” is the highest value that can be loaded onto the user
key and can assume values between 0 and 999,999.
Type the value and confirm with “ENTER”.
Press button
VALUE is the amount that will be proposed during the creation of a user key. Type
the value and confirm with “ENTER”.
Press button
NUMBER is the progressive number that will be assigned to the next user key
that will be created. Every time a user key is created with the number proposed
by PK300, this number will be increased by 1.
Type the number and confirm with “ENTER”.
18
PK300
16 How to create a user key
ATTENTION: during this operation, the key will be totally overwritten; it
will not be to restore the previous data.
To create a new user key follow the procedure:
If set, type the password
The display will read: INSERT KEY
Insert a new user key user or a key to be reused. PK300 proposes the predefined
key number; press "ENTER" to confirm the key number or type a new number. If
the proposed number is confirmed, this will be increased by 1 for the creation of
the new next user key.
Then PK300 proposes the predefined value, you could type another one or
confirm it with “ENTER”.
Then PK300 propose the Validity date (see chap. 23 “How to set date and
time” pag. 24), you could type another one or confirm it with “ENTER”.
WAIT
OPERAT. DONE EXTRACT KEY
Take the key out. The user key is ready and can be delivered to the customer.
19
PK300
17 How to create a service key
ATTENTION: during this operation, the key will be totally overwritten; it
will not be to restore the previous data.
To create a new service key follow the procedure:
If set, type the password
The display will read: INSERT KEY
Then PK300 proposes the predefined value, you could type another one or
confirm it with “ENTER”.
WAIT
OPERAT. DONE EXTRACT KEY
Take the key out. The service key is ready.
20
PK300
18 How to create a reset key
ATTENTION: during this operation, the key will be totally overwritten; you
will not be able to restore the previous data.
To create a reset key follow the procedure:
If set, type the password
Insert a new key that will be the new reset key:
OPERATION DONE
ADVICE: to avoid that people who are not authorized to use reset key; put
this key in a safe place.
21
PK300
19 Print and receipt
PK300 is able to print receipts and counters through the PK Printer (optional).
If the PK Printer is not available, the sales and recharges amounts, can be shown
on the display (see chap. 20 “How to display the daily income” pag. 21)
19.1 How to reprint the receipt
The receipt is printed for many operation like recharge or sales, but if you want
reprint it again after the first press buttons
or
.
NOTE: the receipt will read “COPY” as indicated in the image below:
19.2 How to print the counters
To print the counters follow the procedure:
If set, type the password
22
PK300
The receipt will be printed.
Total counters
Recharge: total of recharges executed from the first start up of PK300;
Sale: total sales (if PK300 doesn’t have sales, then this value is always zero).
Partial counters
Recharge: total of recharges executed from the last reset of PK300;
Sale: total sales (if PK300 doesn’t have sales, then this value is always zero).
Daily previous (previous day counters)
Recharge: total of recharges executed the previous day;
Sale: total sales (if PK300 doesn’t have sales, then this value is always zero).
Daily actual (actual day counters)
Recharge: total of recharges executed on that particular day;
Sale: total sales (if PK300 doesn’t have sales, then this value is always zero).
If you would like to reset the total, follow the instructions on screen:
RESET TOTAL? YES
NO,,
Push button “ENTER”.
23
PK300
19.3 Print key log
PK300 owns a memory for the recent transactions and offers the possibility to
print the most recent movements of every key. If the printer is available and on,
will be requested to insert a Pkey or a key’s number. Follow the procedure:
If set, type the password
In the example, the print of the operations executed with the key n. 6:
24
PK300
20 How to display the daily income
To display the daily income, follow the instructions:
If set, type the password
The display will read:
RECHARGE DAILY INCOME
SALE DAILY INCOME
21 How to customize the receipt
It is possible to customize the data on the receipt by inserting the data concerning the company into the PK300.
The following image shows the parts of the receipt that are customized:
Row
Row
Row
Row
1
2
3
4
To change rows, follow these instructions:
type the text for the first row, then press “ENTER”.
type the text for the second row, then press “ENTER”.
type the text for the third row, then press “ENTER”.
25
PK300
type the text for the fourth row, then press “ENTER”.
To type the text, use the keyboard as indicated below:
3
The keys are linked to three alphabetical characters or to punctuation signs (in
particular, the 1 is associated to “.”, to the “:” and “-”, while the “0” key contains
the characters “q”, “z” and the space). The repeated pressure of the “2” key, for
instance, causes the appearance of one “A”, of a “B”, of a “C”, of a “2” and
again of “A”.
The keys “+” and “-” move the cursor along the available space in the display.
The
key inserts a character before the current position while the
deletes the character under the cursor.
To confirm the new text press “ENTER.
26
key
PK300
22 How to manage the lost keys
PK300 is able to block until one hundred user keys, to prevent somebody to use
the key when the real owner declared that the key is lose. In this case the PK300
manager could print the counters (see the chap. 19.2 “How to print the counters”
pag. 18) and to block the lose key and then to make a new user key with a new
number.
Note for manager: to block a lost key is request the key’s number.
Therefore every time a new key is created, to write the name of the
customer and its key number on a own personal document.
The display shows the number of the first lost key (the keys are ordered in a
crescent way).
To show the lose keys list follow the instructions:
If set, insert the password.
The display will show the first lose key’s number (in case of others lost keys the
numbers are shown in increasing mode).
To add a new lost user key digit the lost key’s number, then press ENTER. To
show the list use the buttons + and -.
To delete a key’s number from list, use the buttons + or – until to show the
number, then press DEL . The display will show DELETE LOST KEY? Press ENTER
to confirm.
When a lost key is inserted to buy a product or a recharge, PK300 to notice with
a sound signal that the keys is found.
FOUND KEY 106
For instance is found the keys with the number 106, declared in the lost keys
list.
27
PK300
23 Password
To define or change the password follow the procedure:
If set, insert the password.
If the password is already setted will be request again to permit the variation.
See the example:
INSERT PASSWORD
PASSWORD OK
NEW PASSWORD
VERIFY PASSWORD
24 How to set the date and time
PK300 owns an internal watch for the control of the accounting functions.
To setting the internal watch, follow the procedure:
If set, insert the password.
23/07/03
To set date use this rule (ddmmhh). In the example has been set 23 July 2003.
To set the internal watch follow the procedure:
28
PK300
14:05
To set the correct time insert the current time (minutes must always be typed
with two digits).
25 Expiry date
The User key could have also an “Expiry date”; beyond this date the User key
will not be autorized to purchase or recharge. To activate this property follow
the procedure:
If set, insert the password.
NO
YES,
Push “ENTER” to confirm.
26 Software version
MicroHard constantly upgrades their products to introduce improvements and
new features.
When customer service and upgrade is necessary, the firmware (BIOS) and firmware (USER), numbers can be found on the menu 5 INFO.
Type:
The display will read:
MicroKey PK300 - (C) 2003 by MicroHard s.r.l.
Ver. BIOS: x.xx
Ver. USER: x.xx
System Code: XXXX
29
Notes:
P A Y K E Y
®
Paykey USA inc.
120D Old Mill Road
Greenville SC 29607 Ph.864 527-4408
Web site: www.paykeytech.com
E-mail: [email protected]
2-05-0005-00