1
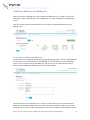
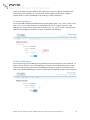
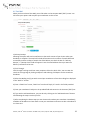
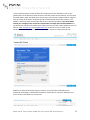
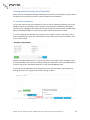
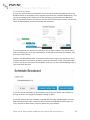
User Manual Copyright ©2015 PSPINC Table of Contents About NewsMAIL ...................................................................................................................... 3 1 Copyright Information ................................................................................................................. 3 2 What is NewsMAIL? ....................................................................................................................... 3 3 Who Should Use NewsMAIL? ..................................................................................................... 3 4 NewsMAIL Account Types & Features .................................................................................... 3 How to Use NewsMAIL ............................................................................................................ 5 1 Log In to Your Account ................................................................................................................. 5 2 Create a Mailing List ..................................................................................................................... 5 3 Add Email Addresses to a Mailing List ................................................................................... 6 3.1 Copy & Paste Batch Email Addresses .............................................................................................. 6 3.2 Copy & Paste Individual Email Addresses .................................................................................... 7 3.3 Import a Mailing List .............................................................................................................................. 8 3.4 Export a Mailing List ............................................................................................................................... 8 4 Compose a Newsletter ................................................................................................................. 9 4.1 Text Mail ................................................................................................................................................... 10 4.2 HTML Mail ................................................................................................................................................ 11 4.3 Email From Theme ............................................................................................................................... 11 5 Saving and Broadcasting Your Newsletter ......................................................................... 14 5.1 Broadcast Immediately ...................................................................................................................... 14 5.2 Schedule Broadcast .............................................................................................................................. 15 5.3 Saved Mail ................................................................................................................................................ 16 6 Using the File Manager ............................................................................................................. 17 7 Logs ................................................................................................................................................. 18 7.1 View Logs ................................................................................................................................................. 18 7.2 Statistics .................................................................................................................................................... 19 8 Settings .......................................................................................................................................... 19 8.1 My Account .............................................................................................................................................. 19 8.2 Social Links .............................................................................................................................................. 20 9 Additional Features ................................................................................................................... 21 9.1 Rejected Email ........................................................................................................................................ 21 9.2 Empty Mailing List ................................................................................................................................ 21 9.3 Subscribe and Unsubscribe Forms ................................................................................................ 22 9.4 Replacement Codes and Mail Merge ............................................................................................. 23 9.5 Custom Themes ..................................................................................................................................... 24 10 FAQ ................................................................................................................................................ 25 th PSPINC | 1404 140 Place N.E., Bellevue, WA 98007-3915 | Phone: (425) 957- 0808 | http://www.pspinc.com 2 About NewsMAIL 1 Copyright Information Copyright ©2015 PSPINC. All Rights Reserved. No part of this document may be reproduced or transmitted in any form or by any means, electronic or mechanical, for any purpose, without the express written permission of PSPINC. As between the parties, PSPINC retains title to, and ownership of, all proprietary rights with respect to the software contained within its products. Every effort has been made to ensure that the information in this manual is accurate. PSPINC. is not responsible for printing or clerical errors. Information in this document is subject to change without notice. Please refer to our Privacy Policy at http://www.pspinc.com/page/privacy for more details. 2 What is NewsMAIL? NewsMAIL is an email marketing service that broadcasts email blasts to mailing lists. If you have ever experienced the hassles of sending out identical emails to multiple recipients, you will appreciate how NewsMAIL simplifies this task and provides a user friendly interface. 3 Who Should Use NewsMAIL? NewsMAIL is available for use by business, education and nonprofit organizations. 4 NewsMAIL Account Types & Features There are four types of NewsMAIL accounts available to users: NewsMAIL 30 Day Free Trials, NewsMAIL Standard, NewsMAIL Professional and NewsMAIL Prepaid. Different features are available based on the type of account a user is subscribed to. To upgrade to an account with more features, please contact [email protected]. Mailing Lists All Accounts: Unlimited mailing lists with unlimited email addresses. Mailing List Statistics All Accounts: Reporting and statistics available to log subscriptions and unsubscribes for each Mailing List. Subscription Form All Accounts:: Fully functional subscription form available for use on your website. Email Composer All Accounts: HTML, Text Only and pre-‐designed theme options are available. th PSPINC | 1404 140 Place N.E., Bellevue, WA 98007-3915 | Phone: (425) 957- 0808 | http://www.pspinc.com 3 Attachments All Accounts: Email attachments can be broadcast either as files attached to the broadcast or as links to download attachments. Download links are trackable. File Management All Accounts: File management available for uploaded images and files to be attached to newsletters. Open Report All Accounts: Open report tracking for HTML and pre-‐designed theme newsletter broadcasts will show you who opened your email and who hasn’t, as well as which email clients were used to read your newsletter. Click-‐Through Tracking All Accounts: Detailed click through tracking reports show unique and total clicks for each link as well as a list of which recipients clicked specific links. Scheduled Email Broadcasts All Accounts: Scheduled email broadcasting is included. Compose an email newsletter at any time and schedule it to be automatically broadcast at a future time of your choosing. Advertisements 30 Day Free Trials & Standard: All newsletter broadcasts will include small advertisements at the bottom of the newsletter. Proffesional & Prepaid: Advertisement free—no ads will be displayed on newsletter broadcasts. th PSPINC | 1404 140 Place N.E., Bellevue, WA 98007-3915 | Phone: (425) 957- 0808 | http://www.pspinc.com 4 How to Use NewsMAIL 1 Log In to Your Account Enter your credentials in the Login fields at the top right hand corner of the screen. Check the box marked “Remember Me” if you wish to save your login information in your browser (not recommended for public computers). 2 Create a Mailing List Before you can broadcast your newsletter, you must set up a Mailing List that you will be broadcasting to. There are no size limitations for mailing lists for any account type. To create a mailing list, hover on the “Mailing List Admin” tab to open the menu and select “Create Mailing List” from the dropdown. Enter a name for your new mailing list in the “Mailing List Name” field and click on “Add.” At the Confirmation screen, click on “Create” to complete the creation of your Mailing List. th PSPINC | 1404 140 Place N.E., Bellevue, WA 98007-3915 | Phone: (425) 957- 0808 | http://www.pspinc.com 5 3 Add Email Addresses to a Mailing List Now that you have a Mailing List, you must add email addresses to it. To begin, hover on the “Mailing List Admin” tab and select “View Mailing Lists” to open the Mailing List management screen. From this screen you have several options as to how you can add email addresses to your Mailing List(s). 3.1 Copy & Paste Batch Email Addresses The first option is to add email addresses by copying and pasting them. To enter email addresses this way, click on the “Add” button for your Mailing List. This will take you to the “Add Email” screen. You can paste as many email addresses, one per line, as you need into the text box. When you have added your addresses, click on the “Add” button. This will take you to the “Register Email – Confirm” screen, where you may review the email addresses you entered to ensure that there aren’t any broken addresses. When you are done reviewing the list, click on “Add” at the bottom of the screen to add the email addresses to your th PSPINC | 1404 140 Place N.E., Bellevue, WA 98007-3915 | Phone: (425) 957- 0808 | http://www.pspinc.com 6 Mailing List. The system will not include any addresses that are found to be invalid or duplicates to those already in the list. 3.2 Copy & Paste Individual Email Addresses To add an individual email address to your Mailing List, click on “Register Emails Individually” on the “Add Email” screen to access the “Register Email” screen. The “Register Email” screen will allow you to enter a single email address, as well as Replacement Code information that can be used in the same way as a mail merge field in a word processing program. When you have finished entering your information, click “Save” at the bottom of the page. th PSPINC | 1404 140 Place N.E., Bellevue, WA 98007-3915 | Phone: (425) 957- 0808 | http://www.pspinc.com 7 Confirm the details you have added on the Confirmation screen to register the address and information to your Mailing List. You may enter another address by clicking on “Register Another Email” or view your Mailing List by clicking on “Back to Email List.” 3.3 Import a Mailing List You can also add multiple email addresses by importing them from a .csv, .xml or .txt file. If you have a .csv, .xml or .txt file with a list of email addresses, click on “Import” from the “View Mailing Lists” screen. Click on “Select File” and select your .csv, .xml or .txt file. Select your file type from the dropdown and click on “Import” to upload your mailing list. 3.4 Export a Mailing List You can save a copy of your Mailing List by exporting it and saving the file to your computer. To do this, click on “Export” in the “View Mailing Lists” screen. At the “Mailing List Export” screen, select what file type you prefer from the dropdown and click on “Export.” At the next screen, click on the “Download Mailing List” button to download your Mailing List file to your computer. th PSPINC | 1404 140 Place N.E., Bellevue, WA 98007-3915 | Phone: (425) 957- 0808 | http://www.pspinc.com 8 4 Compose a Newsletter The Mail Admin feature in NewsMAIL allows you to create email newsletters in different formats. You can select which format best suits your newsletter. Click on “Compose Mail” in the Mail Admin menu. Select the email format you wish to use for your newsletter broadcast from the following options: Text Mail Format Text Mail is the simplest format. Text Mail broadcasts text only with no formatting. All email clients will support this type of email. HTML Mail HTML Mail allows the user to style their email broadcast using HTML to format text and add images. Email From Theme These are pre-‐designed newsletter themes that allow users to send email broadcasts with formatted text and images. The use of a theme does not require knowledge of HTML and the newsletter elements are composed in a visual editor. th PSPINC | 1404 140 Place N.E., Bellevue, WA 98007-3915 | Phone: (425) 957- 0808 | http://www.pspinc.com 9 4.1 Text Mail When you have selected Text Mail, you will be taken to the Compose Mail (TEXT) screen. You will select your options and compose your newsletter on this screen. 1) Delivery Receipt: Selecting this option will send a notification to the email account of your choice when your broadcast is complete. The email will include information on the number of emails delivered successfully and the number of emails that failed. When you check the box for “Delivery Receipt,” a “Receipt Email” field will appear. Enter the email address where you want the delivery notification to be sent. 2) Click Through: Click Through Tracking tracks how many recipients clicked on which links. You can view the results in the Logs Page by clicking on Reports and selecting Click Report for the newsletter broadcast. 3) Select the Mailing List(s) you wish to send your newsletter to from the mailing lists displayed in the “Mail To” section. 4) Enter a “Mail From” name, “Mail From” email and “Reply To” email in the fields provided. 5) Enter your newsletter’s Subject in the provided field and content in the Contents (TEXT) box. 6) If you wish to add attachments, you can do so by clicking on the “Add Attachments” button and following the steps to select your file. 7) After completing the above steps you can choose to broadcast your newsletter immediately, schedule the broadcast at a later date or save your newsletter and return to edit or broadcast it at a later time. th PSPINC | 1404 140 Place N.E., Bellevue, WA 98007-3915 | Phone: (425) 957- 0808 | http://www.pspinc.com 10 4.2 HTML Mail The Compose Mail (HTML) screen only differs from the Compose Mail (TEXT) screen in the Contents (HTML) box. Follow the instructions to set up your options as you would for Text Mail. When you are ready to enter your content, you will do so using the HTML editor, which will allow you to format your text and insert images and links using the tools at the top of the editor. When you have finished entering your contents, you may choose to broadcast your newsletter immediately, schedule the broadcast at a later date or Save your newsletter and return to edit or broadcast it at a later time. 4.3 Email From Theme The Compose Mail (Theme) screen will require that you first select a theme before entering any information into your newsletter. You may select a category from the menu on the left side of the page to view the themes available in that category. You may preview designs and color options in full size by clicking on the thumbnails. When you have made your choice, click on “Select Theme” at the top of the page to move on to the next screen. th PSPINC | 1404 140 Place N.E., Bellevue, WA 98007-3915 | Phone: (425) 957- 0808 | http://www.pspinc.com 11 When you have selected a theme, you will be taken to the Enter Details screen. You will select your newsletter options here. 1) Delivery Receipt: Selecting this option will send a notification to the email account of your choice when your broadcast is complete. The email will include information on the number of emails delivered successfully and the number of emails that failed. When you check the box for “Delivery Receipt”, a “Receipt Email” field will appear. Enter the email address where you want the delivery notification to be sent. 2) Click Through: Click Through Tracking tracks how many recipients clicked on which links in a given newsletter broadcast. You can view the results in the Logs Page by clicking on “Reports” and selecting “Click Report” for the newsletter broadcast. 3) Select the Mailing List(s) you wish to send your newsletter to from the mailing lists displayed in the “Mail To” section. 4) Enter a “Mail From” name, “Mail From” email, “Reply To” email and “Subject” in the fields provided. 5) If you wish to add attachments, you can do so by clicking on the “Add Attachments” button and following the steps to select your file. 6) When you are ready to enter your content, click on the “Next Step” button at the bottom of the page. This will take you to the Compose Content screen. th PSPINC | 1404 140 Place N.E., Bellevue, WA 98007-3915 | Phone: (425) 957- 0808 | http://www.pspinc.com 12 7) The Compose Content screen will have all the elements of your newsletter. Click on the yellow button at the bottom of each element to edit the content of that element. This will open the HTML editor, which will allow you to format your text and insert images and links using the tools at the top of the editor. All themes will also include Header and Footer elements. The Header is where you enter the title and date of your newsletter broadcast. The footer MUST contain your company name and contact information to comply with the CAN-‐SPAM Act, so you will want to edit that information here. Please note that you will need to update the pre-‐set links for www.example.com and [email protected] as well as the text in order for the broadcast to send with correct links and not send your recipients to www.example.com. 9) When you have finished entering your contents, you may choose to Broadcast your newsletter immediately, schedule the broadcast at a later date or Save your newsletter and return to edit or broadcast it at a later time. th PSPINC | 1404 140 Place N.E., Bellevue, WA 98007-3915 | Phone: (425) 957- 0808 | http://www.pspinc.com 13 5 Saving and Broadcasting Your Newsletter When you have completed entering and editing the contents of your newsletter, you will have a few options to choose from in order to save or broadcast your newsletter. 5.1 Broadcast Immediately 1) If you are ready to send your newsletter as soon as you are finished composing, click on the Broadcast button at the bottom of the Compose screen and select “Broadcast Immediately.” This will pop up a dialog window where you can see the options you entered for the Mail From, Reply To and Subject fields so that you may confirm that the information is correct. 2) You may preview your broadcast by clicking on the “Preview” button if you wish to view it prior to broadcasting. If all of your information is correct and you are ready to broadcast, click on the “Next” button. 3) Select “Broadcast Without Save” if you do not wish to save a copy of your newsletter. This is not recommended if you have not previously saved your newsletter. Select “Save & Broadcast” to save a copy of your newsletter and send it to your selected Mailing List(s). 4) You may cancel and go back to the Compose screen at any time before you broadcast by clicking on Cancel. You may go back a step by clicking on “Back.” th PSPINC | 1404 140 Place N.E., Bellevue, WA 98007-3915 | Phone: (425) 957- 0808 | http://www.pspinc.com 14 5.2 Schedule Broadcast 1) If you are ready to send your newsletter as soon as you are finished composing, click on the Broadcast button at the bottom of the Compose screen and select “Schedule Broadcasting.” This will pop up a dialog window where you can see the options you entered for the Mail From, Reply To and Subject fields so that you may confirm that the information is correct. You will also select the date and time you wish to schedule your broadcast. 2) You may preview your broadcast by clicking on the “Preview” button if you wish to view it prior to broadcasting. If all of your information is correct and you are ready to broadcast, click on the blue “Next” button. 3) Select “Schedule Without Save” if you do not wish to save a copy of your newsletter. This is not recommended if you have not previously saved your newsletter. Select “Save & Schedule” to save a copy of your newsletter and schedule it to be sent it to your selected Mailing List(s) at your chosen date and time. 4) You may cancel and go back to the Compose screen at any time before you broadcast by clicking on Cancel. You may go back a step by clicking on “Back.” 5) You may confirm that your broadcast is scheduled by selecting “Scheduled Mail” from the Mail Admin drop down menu. You will be able to review all scheduled broadcasts from this screen and edit or delete them if necessary before they are broadcast. th PSPINC | 1404 140 Place N.E., Bellevue, WA 98007-3915 | Phone: (425) 957- 0808 | http://www.pspinc.com 15 5.3 Saved Mail 1) If you have finished composing your newsletter and wish to return to edit it at a later date, you may save it without broadcasting or scheduling a broadcast. Click on the blue “Save” button at the bottom of the screen and select “Save As (New).” This will save your newsletter in the Saved Mail which you can access from the Mail Admin. 2) If you are editing a newsletter that you have previously saved or broadcast, you may save a new copy over the old one by selecting “Save (Overwrite).” This will save any changes you’ve made and write over the old copy. 3) If you are making changes to a saved newsletter but do not wish to overwrite the old file, you may select “Save As (New)” to save a new copy to the Saved Mail without overwriting the old copy. 4) You may edit or view a saved newsletter at any time by visiting the Saved Mail screen in the Mail Admin. th PSPINC | 1404 140 Place N.E., Bellevue, WA 98007-3915 | Phone: (425) 957- 0808 | http://www.pspinc.com 16 6 Using the File Manager NewsMAIL lets you add files to your newsletters to be used as attachments or inserted images using a File Manager. Click on “Files” in the menu and select “Add Files.” This will take you to the “Upload File” screen where you can click “Select File” to browse for the file that you wish to upload on your computer. Select the file of your choosing and click on “Upload File” to add it to the File Manager. Once you have uploaded your file, you may insert or attach it to a newsletter. You may follow this same process to upload files from the editors in the HTML Email and Theme newsletter compose screens. To add a file from the editor, place the cursor where you wish to insert an image, click on “Insert Image.” This will pop up the Insert/edit Image dialog. Click on the folder icon in the “Source” field to enter the File Manager and click on the “Add File” button. Browse for the file and upload the image file. You may then select your image from the files you have uploaded in order to insert it in your newsletter contents. Files may also be added to Text Email, HTML Email and Email From Theme newsletters as attachments using the same method from the Compose screen for Text and HTML Mail and from the Enter Details screen for Email From Theme. th PSPINC | 1404 140 Place N.E., Bellevue, WA 98007-3915 | Phone: (425) 957- 0808 | http://www.pspinc.com 17 7 Logs Logs will be where you will find reports and detailed information about your newsletter broadcasts. There are two screens in the Logs menu. 7.1 View Logs 1) Logs allow you to view a summary of the details of a broadcast, including the date and time of broadcast, Mailing List(s) it was sent to, number of successes and failed emails, who sent it, the Subject and view a preview of the contents. Click on the “Content” button for the broadcast of your choosing to view this information. To view a preview the newsletter that was sent, click on “View Email Content” on the Send Log Contents screen. 2) To view more detailed information from the reports you enabled when setting up your newsletter, click on “Reports” for the newsletter in question. 3) Select the report you wish to view. “Click Report” will show which links were clicked in your broadcast, and “Open Report” will show who opened your email newsletter and display a graph of the first two weeks’ open activity. th PSPINC | 1404 140 Place N.E., Bellevue, WA 98007-3915 | Phone: (425) 957- 0808 | http://www.pspinc.com 18 7.2 Statistics The Statistics screen will show you statistics relating to your Mailing Lists for the date range you select at the top of the page. This will include the number of email addresses in the list, how many subscribers were added during that period and how many unsubscribed from the list. You may view more detailed by clicking on the Mailing List name to view the email addresses that subscribed or unsubscribed and the date the action was taken. 8 Settings You may save settings for your account information and social media accounts in the Settings menu. 8.1 My Account This screen is where you set your preferences for your Email Address, First and Last Names, and Default Timezone. You may also change your password from this screen. th PSPINC | 1404 140 Place N.E., Bellevue, WA 98007-3915 | Phone: (425) 957- 0808 | http://www.pspinc.com 19 8.2 Social Links This screen is where you can set the value for the social links that can be automatically included in your newsletter broadcasts. Linked icons will only be included in the newsletter for fields that have been filled out. Icons can be generated for Facebook, Twitter, Google+, Linkedin and Bloguru, a free blogging software from PSPINC. If you do not have a Bloguru account and would like to request one, visit http://en.bloguru.com/home/signup to set up an account. Enter the address for your social media account(s) in the format of http://en.bloguru.com/newsmail and save your changes. When you broadcast your newsletter, the links will be displayed as icons in the upper right corner of the email: th PSPINC | 1404 140 Place N.E., Bellevue, WA 98007-3915 | Phone: (425) 957- 0808 | http://www.pspinc.com 20 9 Additional Features 9.1 Rejected Email To view emails that are being rejected, go to the View Mailing Lists screen and click on “Check” under the “Rejected Mail” column for the Mailing List you wish to review. This will take you to the “Rejected Emails” screen, where you can view which addresses are rejecting, the reason why and the number of times they have rejected in the last 10 broadcasts from that Mailing List. You may also filter the information by rejection type and how many times the address has been rejected. You may delete a few or all of the rejected email addresses from the Mailing List from this page if you wish to do so. You can also export the Rejected Emails list as a report if you wish to do so by clicking on “Export” in the Rejected Mail column for your Mailing List on the View Mailing Lists screen. You will be prompted to open or save the file that is generated in order to view it. 9.2 Empty Mailing List You can delete all email addresses in your mailing list without deleting the list itself by going to View Mailing Lists and clicking the Mailing List you want to empty. Click on the “Empty Mailing List” link. Click on “Remove All Emails” button on the confirmation screen to empty the Mailing List. th PSPINC | 1404 140 Place N.E., Bellevue, WA 98007-3915 | Phone: (425) 957- 0808 | http://www.pspinc.com 21 9.3 Subscribe and Unsubscribe Forms 1) NewsMAIL provides a tool to generate Subscribe and Unsubscribe forms to place on your website to add and remove users from your Mailing List automatically. To generate a form, click on your Mailing List in View Mailing Lists and select “Generate Subscribe/Unsubscribe Form” from the options at the top of the page. 2) Select the type of form you wish to create from the dropdown and the Success and Failure URLs you want to use. You may enter a page on your own website if you have one prepared. 3) Select the form fields you would like included in your form. This information will be included in your mailing list for use in Replacement Codes for Mail Merge functions. Click on “Generate Form” when you have made your selections. 4) Select and copy the code from the pop up window and paste it into your website or have your website designer do this for you. You may preview the form using the “Preview” button in the pop up window. th PSPINC | 1404 140 Place N.E., Bellevue, WA 98007-3915 | Phone: (425) 957- 0808 | http://www.pspinc.com 22 9.4 Replacement Codes and Mail Merge Replacement Codes can be used to create a newsletter blast personalized for your recipients using a mail merge function. When you broadcast your newsletter, the replacement codes will use the information in your Mailing List to personalize the email to the recipient. 1) You can set up a Mailing List to use Replacement Codes by registering email addresses individually. When you have finished entering your information, click “Save” at the bottom of the page. Confirm the details you have added on the Confirmation screen to register the address and information to your Mailing List. 2) When you have finished entering your information, set up your email and compose the contents, using @@ in front of the field name you wish to use for your merge, such as “Dear @@prefix @@lastname,” which would be displayed in the broadcast as “Dear Mr. Smith” in Mr. Smith’s copy of the newsletter. th PSPINC | 1404 140 Place N.E., Bellevue, WA 98007-3915 | Phone: (425) 957- 0808 | http://www.pspinc.com 23 9.5 Custom Themes If you want to create your own newsletter theme with your choice of fonts, images, text color, background color, border color and footer color, you can design one using NewsMAIL’s Custom Themes feature. 1) To create a custom theme, select Custom Themes in the Mail Admin menu and click on the “Create New Theme” button. From there you can select if you want a theme with or without a header image. 2) Under the General Tab, fill in the Theme Name (this is the name your theme will be saved as and will be displayed in Custom Themes in the “Select Theme” dropdown when you select a theme to compose with). 3) Choose the Text Font, Border color, Link Color, Mouse Over Color for each Tab (General, Header, Article and Footer). If you have chosen “theme with header image”, select a header image. This image will be displayed in your theme’s header section. 4) You can preview your theme at any stage using the “Preview” button to see how your theme looks and make changes if needed. When you are done making changes, click the “Create” button to save your theme. You will now be able to use this custom theme when composing newsletters. Please note that if you created themes in an older version of NewsMAIL, you can access them under through the Mail Admin under “Migrated Themes.” th PSPINC | 1404 140 Place N.E., Bellevue, WA 98007-3915 | Phone: (425) 957- 0808 | http://www.pspinc.com 24 10 FAQ What is a Mailing List? A mailing list is a collection of names and addresses used by an individual or an organization to send information to multiple recipients. Can I create more than one Mailing List? Yes.NewsMAIL users may create as many Mailing Lists as their campaigns require. I have a lot of emails stored in a notepad file. Can I add them to my Mailing List? Yes, you can use the Import feature to add all the emails to your mailing list or you may copy and paste them into the list in a batch. I forgot to add an email address to my mailing list. Can I do that now? Yes, you can add a single email address to your Mailing List. You may do so by clicking on the Add button next to your mailing list in the View Mailing Lists page. Click on "Register Emails Individually" to add an email address and associated field information or simply add email addresses to the “Emails to Register” field, click on the Add button and follow the steps to add your additional addresses to the Mailing List. How do I import a lot of mailing addresses in my Mailing List? Create a text file (.txt), a comma separated file (.csv), or an extensible markup language file (.xml) or a tab separated (.tsv) file with your email addresses and use the Import button for your Mailing List at the View Mailing Lists screen and follow the prompts. My emails did not import correctly from my file. Make sure the email addresses in the file are not already present in the Mailing List and check that the email addresses typed in the file are spelled correctly. I changed my mind about my Mailing List’s name. Can I change it? Yes, you can do so by going to View Mailing Lists and clicking the Mailing List you wish to rename. Click on “Change Mailing List Name” and enter the new name, then click “Change” to save and confirm the change. Can I send newsletters based on different time zones? Yes. Your newsletters will be broadcast in the time zone selected in Settings in your NewsMAIL account. I need to send more emails than my current quota allows. How do I upgrade my account? If you would like to upgrade your account, please view the available plans at http://www.newsmail.com/pricing and contact [email protected] to arrange for your new account plan to be set up. th PSPINC | 1404 140 Place N.E., Bellevue, WA 98007-3915 | Phone: (425) 957- 0808 | http://www.pspinc.com 25