Transcript
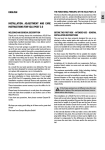
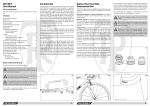
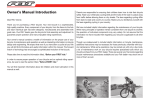
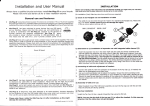
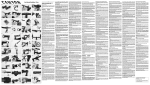
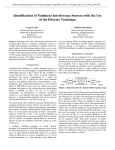
User Manual Handlebar / Stem 1 3 2 4 23 25 24 26 EN CANYON HANDLEBARS AND STEMS AS WELL AS HANDLEBAR/STEM-COMBINATIONS DEAR CANYON CUSTOMER, Congratulations for having purchased a CANYON component. You have made a very good choice. Our CANYON products are all developed, tested and manufactured with the utmost care and dedication in Germany to uphold the highest standards of quality and safety. In case of any inquiries about your CANYON products contact CANYON Bicycles GmbH Phone: +44 208 5496001 Karl-Tesche-Straße 12 [email protected] D-56073 Koblenz www.canyon.com Make sure when performing any adjusting to your CANYON component or bike that the brake levers or brake/shift levers are always within easy reach. Keep in mind that the brake levers are not within easy reach, when you ride with your hands on bar ends approved by CANYON. The same applies to the use of aero bars. GENERAL SAFETY INSTRUCTIONS This manual cannot teach you the skills of a bicycle mechanic. Even a manual as big as an encyclopaedia could not describe any possible combination of bicycle models and components or parts on the market. It therefore focuses on your newly purchased components and provides useful information and warnings. We from CANYON therefore strongly recommend that you ask an experiences CANYON technician for help. 6 27 28 Do not combine and use CANYON components with components from other brands, if possible. This is the only way to achieve optimal functioning, durability and thus safety of your product. You should not compromise, in particular when it comes to handlebars and stems. If you intend to combine the components with components from other manufacturers, make sure they are compatible, i.e. that all dimensions are exactly the same according to the specifications given in this manual. Our precise tolerances are intended to ensure component compatibility, and are carefully monitored during production and quality control so that the assembly will be easy and proper. This manual contains important notes about use, care, maintenance and mounting. 7 8 29 30 Start by reading the general information given in this user manual carefully and then the chapter providing information on the CANYON handlebars, stem or CANYON handlebar/stem-combination you have purchased. Then, nothing will stand in the way of a smooth assembly and a trouble-free use. Keep this user manual for your records and future reference and share it with the new user, if you sell, lend or leave the CANYON bicycle or component to anybody else. All CANYON components, like all lightweight components, require special care and attention. Therefore, make sure to carefully assemble the components and to only use them for their intended purpose. 9 10 31 32 The material used by CANYON, especially carbon (also referred to as CRP), is extremely strong and durable, i.e. the components are very durable, as the material combines high resistance with low weight. It is, however, important to know that these materials are relatively brittle, which means that CANYON components are more likely to break than to bend. Overstrained material can lead to internal damage that may hardly show up. There will be no visible signs of damage, such as deformations or the like, as known from other metals, e.g. aluminium. After undue stress, e.g. due to an accident, CANYON components can fail. This can lead to a fall with possibly serious health consequences. For this reason you must observe the control notes in the chapter providing you with the information on the CANYON component purchased by you. To ensure safe use after a possible loss event, make sure to have the components concerned checked by CANYON Bicycle GmbH. In such a case, be sure to seek professional advice from CANYON. 11 12 33 34 Your CANYON team wishes you lots of fun; enjoy your ride with your CANYON and the CANYON components! BEFORE YOUR FIRST RIDE – INTENDED USE CANYON handlebars and stems (1) as well as handlebar/stem-combinations (2) are designed for road racing and triathlon bikes (i.e. time trial), cyclocross bikes or mountain bikes as well as for their typical use. Only use the components according to the permitted field of us or in the stipulated condition. Road racing and triathlon bikes or time trial machines are exclusively designed for cycling on tarred or hard-surface tracks and roads with a smooth surface. 13 14 35 36 Cyclocross bikes are designed for off-road cycling over typical cyclocross terrain, e.g. on field tracks and forest trails; they are, however, not suitable for all-mountain and enduro use, downhill (DH) riding, freeriding, dual slalom, downhill/freeride parks, jumps, drops etc. Condition 1 CANYON components of this category are designed for riding on hard-surface roads where the wheels remain in permanent contact to the ground. These are in general road racing bicycles with racing handlebars or straight handlebars, triathlon or time trial bicycles. The rider’s maximum weight incl. baggage must not exceed 120 kg. Under certain circumstances this permissible maximum weight can be further limited by the component manufacturers’ recommendations for use. 15 16 37 38 Mountain bikes are designed to be used for off-road cycling and for riding over natural terrain (e.g. terrain of a mountain bike marathon and cross-country racing). Due to their design and equipment they are, however, not intended to be used on public roads. Before being used, they must be fitted accordingly. Condition 2 CANYON components of category 2 are designed for bicycles of category 1, i.e. for well paved gravel paths and off-road trails with a slight slope where a short loss of tyre contact with the ground due to small steps can occur. This condition comprises urban and city bikes as well as cyclocross bikes with road racing handlebars and cantilever or disc brakes. 17 19 18 20 39 41 40 42 Condition 3 CANYON components of this category are designed for the use on bikes of the categories 1 and 2 and are in addition suitable for rough and unpaved terrains. Sporadic jumps of a maximum height of approx. 60 cm are also included in the field of use of these bicycles. But inexperienced riders doing jumps of this height may land inappropriately, thus increasing the acting forces significantly which may result in damage and injuries. This category is represented by MTB hardtails and full suspension bicycles with short suspension travel. Condition 4 CANYON components of this category are suitable for the use according to the categories 1-3. In addition, bicycles of this category are suitable for very rough and partly blocked terrain with steep slopes and higher speeds as a result thereof. Regular, moderate jumps by experienced riders are no problem for the respective bikes. The regular and durable use of the bicycles on North Shore trails and in bike parks should, however, be excluded. Due to the higher stresses, these bicycles should be checked for possible damage after every ride. Full suspension bikes with medium suspension travel are typical for this category. Condition 5 This type of use stands for very challenging, highly blocked and extremely steep terrains, which can only be mastered by well-trained riders with technical skills. Rather high jumps at very high speeds as well as the intensive use of specific, identified bike parks or downhill trails are typical for this category. In the case of these CANYON components and the bikes, it must be considered that a thorough check for possible damage is carried out after every ride. Preliminary damage with clearly inferior further stress can result in failure. A regular replacement of safetyrelevant components should also be taken into account. Wearing special protectors is strongly recommended. Full suspension bikes with long suspension travel as well as dirt bikes are typical for this category. 21 22 43 44 i For more information read the specifications on our website www. canyon.com CANYON stems handlebar/stem-combinations are designed to be used exclusively with threadless headsets, also referred to as Aheadset®headsets. Attempting to use a CANYON stem in combination with threaded fork steerers can lead to sudden failure, resulting in a crash with unforeseeable consequences. Like all high-quality sports equipment, CANYON components require careful assembly and are best left to CANYON Bicycle GmbH. This is the only way to achieve optimum performance and long-term durability. 5 Never modify CANYON handlebars, stems and handlebar/stemcombinations. Do not saw them off and do not file or drill holes in CANYON components. This would compromise their structure and void the warranty. Before mounting aero bars, check whether they are approved by CANYON, as in the case of bar ends. Do not mount any handlebar fittings that are not approved by CANYON. Incompatible handlebar fittings can result in handlebar failure. Risk of an accident. Keep yourself informed by visiting our constantly updated website at www.canyon.com. There you will find an illustration showing in graphic form the intended use of all CANYON bikes. i Make sure the clamping areas are absolutely free of grease and other lubricants, especially when the clamping surfaces are made of carbon or carbon-fibre reinforced plastics! Grease will penetrate the surface of the CANYON carbon component and undermine the stability of joined parts by reducing the coefficient of friction. Greased CANYON carbon components may never again provide a safe clamping surface! When you mount CANYON carbon components, apply CANYON carbon assembly paste (5) to interconnecting surfaces to increase friction. This will allow you to tighten bolts to low and therefore gentle torque values. If any notches, tears, deformations, dents or discolorations etc. are visible on your CANYON carbon component, or if it makes creaking or cracking noises, do not use the component or your bike until the components have been replaced. After undue stress, a crash or other major impact, replace the component or have it inspected by CANYON. CLEANING AND CARE Clean CANYON handlebars, stems, grips and bar tapes with water and a soft rag at regular intervals. If necessary, use a non abrasive soap to remove grime. You may add a little washing-up liquid for cleaning and removing tough stains, such as oil or grease, from hard surfaces. Do not use degreasing agents, which contain organic solvents (such as acetone, trichloroethylene, methylene). Chemicals of this sort may damage the finish or substructure of the material. If you are in doubt or if you have any questions, contact the CANYON service hotline at +44 208 5496001. After your CANYON component has dried, apply a wax based polish to the surfaces (exception: brake surfaces and saddles). Polish the CANYON components after the wax has dried. With this treatment your CANYON handlebars, stem and handlebar/ stem-combinations will keep their nice appearance for years. After an accident, crash or other major impact, have your CANYON handlebars, stems and handlebar/stem-combinations as well as the bike checked, replaced or repaired, if necessary, by the CANYON service. Make absolutely sure to keep the braking surfaces or rotors free of cleaning agent, grease or oil. Otherwise the braking performance might be drastically reduced or even rendered ineffective. Do not use your bike in the following cases, but contact the CANYON service hotline at +44 208 5496001: While cleaning your CANYON bike or the bike of another manufacturer or CANYON components, watch out for cracks, scratches, dents as well as for deformed or discoloured material. If you are in doubt, contact the CANYON service hotline at +44 208 5496001 and have the damaged components replaced at once. if CANYON handlebars, stems or handlebar/stem-combinations give out cracking or creaking noises or if the mentioned CANYON components show external damage, such as notches, cracks, dents, discolorations etc. ! Have the damage thoroughly checked and the CANYON components replaced, if necessary. Do not use aero bars, unless they are approved by CANYON. If you want to mount (clip-on) aero bars, contact the CANYON service hotline at +44 208 5496001 beforehand. CANYON components are designed for a maximum rider’s weight of 110 kg including baggage, e.g. rucksack. Also observe the weight limitations of your bike. Be sure to use the CANYON component or the CANYON bike only for its intended purpose. Riding actions beyond the intended purpose, excess weight or the like bear the risk that the component or the bike will not withstand the loads and fail. Risk of a fall! ! Be sure to never store CANYON handlebars, stems and handlebar/stemcombinations in the blazing sun or near a source of heat. ! Do not use aggressive agents, such as benzene, thinners etc. for the cleaning of CANYON components. MAINTENANCE Check the torque values of all bolts after the first 100 to 300 km (60 to 180 miles) or 10 to 20 hours of use. Tighten, if necessary, the bolts gradually to the maximum torque value prescribed by CANYON. Check in between the proper fit of the CANYON component. Never exceed the maximum torque value prescribed by CANYON. Recheck the bolted connections every 2,000 km (1,200 miles) or 100 hours of use! Also check the tight fit of handlebar grips and shifters or brake levers. i BEFORE EVERY RIDE The maximum torque values are printed on the respective components. Loose or overly tightened bolts may result in an accident! Check the following points before setting off on your CANYON bike or component: 1. Verify the tight fit of the stem on the fork steerer and of the handlebars in the stem. For more information see chapters “Mounting CANYON stems and CANYON handlebar/stem-combinations“ and “Mounting and adjusting CANYON handlebars”. 2. Check whether the headset is free of play and moves easily (3). Perform a functional check as described in chapter “Adjusting the Aheadset®-headset”. 3. Check the tight fit of the brake/shift lever. Test the brakes in stationary by firmly pulling the brake levers towards the handlebars (4). The brake pads of the rim brakes must hit the rim sides with their entire surface. They must not touch the tyres. You should not be able to pull the lever all the way to the handlebars! With disc brakes you should be able to brake the bike to a stop already by applying only a little manual force and the pressure point should be reached with a clear gap between lever and handlebars. Oil or brake fluid must not leak out onto the rotor or stopping power will be reduced and cause unsafe braking performance. For more information read chapter “The brake system” in your CANYON bicycle manual or a similarly named chapter in your general bicycle user manual. 4. In addition, carry out the further checks according to the instructions given in chapters “Before your first ride” and “Before every ride” in your CANYON bicycle user manual or similarly named chapters in your general bicycle user manual. Do not use your CANYON bike or component, if it fails on one of these points! Riding a defective bicycle or component can result in serious accidents! If you are in doubt or if you have any questions, contact the CANYON service hotline at +44 208 5496001 or your bicycle dealer. Improperly closed fastenings can cause components of the CANYON bike to come loose and result in serious accidents! During use your CANYON components and your CANYON bike or the bike of another manufacturer are undergoing stress resulting from the surface of the road and through the rider’s action. Due to these dynamic loads, the different parts of your bike react with wear. Check your bicycle regularly for wear marks, scratches, deformations, colour changes and any indication of cracking. Components that have passed their normal service life may suddenly fail. Be aware that the distance you need to stop your bicycle increases, when you are riding with your hands on aero bars (road bike/triathlon bike) or bar ends (MTB). The brake levers are not within easy reach. i Let your CANYON service maintain and service your bike regularly and in cases of doubt it is always best to replace parts. i Read your CANYON bicycle user manual or the general bicycle user manual of your bicycle manufacturer before you set off! SPECIAL CHARACTERISTICS OF CARBON All CANYON products made of carbon fibre-reinforced resin or plastic, also referred to as carbon or abbreviated CFR, require special care and attention. Carbon is an extremely strong material which combines high resistance with low weight. Note that carbon, unlike metals, shows no visible deformation after undue stress even though some of its fibres may be damaged. This makes it very dangerous to continue using a CANYON carbon component after an impact or undue stress, as it may fail without previous warning, thereby causing an accident with unforeseeable consequences. If your CANYON carbon component sustained such kind of impact or undue stress, we strongly recommend that you take your complete bike to CANYON for inspection. CANYON will check the damaged bicycle and, if necessary, replace the defective component. In case there are any unanswered questions, your bicycle dealer can contact the CANYON service directly. For safety reasons, damaged CANYON components made of carbon must never be repaired! They must be replaced at once! Make sure damaged components will not be re-used. Destroy the component to prevent any re-use by a third party. Carbon components should never be exposed to high temperatures, as occurring during powder coating or enamelling. The heat generated by these processes may destroy the component. Do not leave carbon components in a car in direct sunlight for prolonged periods or near sources of heat. Components made of carbon have like all lightweight components only a limited service life. Therefore, to be on the safe side it is recommended that you replace CANYON handlebars, stems and handlebar/stem-combinations depending on use at regular intervals (every two years at least), even if they were not involved in an accident or similar incident. GENERAL NOTES ON MOUNTING AND COMPATIBILITY In general, mounting stems, handlebars, grips and handlebar/stem-combinations are jobs for a skilled mechanic. For your own safety you should have this work done by CANYON or a skilled bicycle dealer. Be sure to strictly observe each of the following instructions. Non-observance of these instructions can lead to the failure of the bike or of the assembled components, resulting in a severe accident or injuries. ! Mounting non-matching components can also result in bolt failure and consequently in a bad fall. We recommend that you use stems and handlebars from the same manufacturer, i.e. from CANYON, as the CANYON components are designed to fit and function as an integrated whole. If you decide to use the component from another manufacturer and to combine it with a CANYON component, read the user manual of this component. Check the dimensions thoroughly to achieve proper fit as well as a reliable usability with CANYON components. CANYON Bicycle GmbH assumes no responsibility for problems resulting from combining CANYON components with components from another manufacturer. Before mounting watch out for sharp edges or burrs in all clamping surfaces of the fork, the headset, the stem, the handlebars and, if mounted, the aero bars or bar ends approved for these components. Do not use these components, if they have burrs or sharp edges. If there are burrs or sharp edges on a component (no matter which manufacturer), have it checked by CANYON. CANYON Bicycle GmbH will see, whether this is a problem that can be solved or whether the component has to be replaced. WARRANTY TERMS Under European consumer law, the purchaser has full statutory warranty rights within the first two years from date of purchase. According to these laws, CANYON Bicycles GmbH is responsible for ensuring your CANYON component is free of defects that could cause premature wear from normal use. The European sales law guarantee is only valid in states where European legislation applies. Ask CANYON Bicycles GmbH about the regulations in your country. i It does not cover damage resulting from wear (worn through bar tapes and grips), neglect (insufficient care and maintenance, bearing play), fall, overstress caused by overloading, accidents, excessive stress due to overtightening, incorrect mounting, improper treatment or as a result of changes to the CANYON components. Make sure the clamp areas are absolutely free of grease, especially when the clamping surfaces are made of carbon. Open the CANYON assembly paste. Squeeze out some assembly paste and apply a thin layer of CANYON assembly paste on the inner side of the stem clamp as well as in the clamp area of the fork steerer tube (11). Strictly follow all mounting instructions (especially torque values), maintenance instructions as well as all additional instructions from manufacturers of products used together with CANYON products. Grease the threads and the connecting surfaces/heads of the steerer clamp bolts with high-value grease (12). Keep lubricants away from clamping surfaces. Observe the indicated behavioural and control procedures as well as all instructions referring to the replacement of safety-relevant components, e.g. in the case of colour changes and cracks occurring on the components etc. Keep the user manuals of all safety-relevant components for your records and future reference. Your direct contact for all issues of this user manual is the CANYON service hotline at +44 208 5496001, they will answer your inquiries competently. In the event of a defect or a guarantee claim, CANYON is your contact. You must include your original proof of purchase when initiating your claim. A NOTE ON WEAR Bicycles components are subject to wear due to normal and proper use. The wearing rate depends on care and maintenance, bicycle usage and environmental conditions, such as UV light, rain, mud, dust, and sand. Some CANYON components require regular care and maintenance. But even with the best maintenance all components will reach sooner or later the end of their service life, depending on the intensity and the conditions of use. The following CANYON components for the handlebars are subject to wear due to the nature of their intended use and not covered for wear under the warranty and guarantee: Grips and bar tape are subject to compression, abrasion and soiling. i For further components read your CANYON bicycle manual or the general user manual of your bicycle manufacturer. GUARANTEE Handlebars and stems are warranted for a period of 2 years from the date of purchase. In addition, you can benefit from our Crash Replacement program. This guarantee runs from the date of purchase and only applies to claims made by the initial buyer. It does not cover paint damage. We reserve ourselves the right to repair defective components or to replace them with the relevant successor model. These issues can be claimed under guarantee only. Additional costs, such as assembly and transport costs etc, shall not be borne by us. The guarantee does not cover damage caused by improper or other than the intended use, such as neglect (poor care and maintenance), crashes, overloading or resulting from changes made to handlebars or the stem from the mounting or remounting of additional components. Damage resulting from jumps or other types of overstress is likewise not covered by the guarantee. CANYON components are high-end components, representing lightweight construction as pinnacle of engineering. Also be a professional when it comes to handling of the material. Misuse, unprofessional assembly or insufficient maintenance can render the CANYON components unsafe. Risk of an accident! CRASH REPLACEMENT In the event of an accident or severe crash, the high forces exerted to your frame, handlebars, stem and the fork can lead to structural failure during subsequent use. With our Crash Replacement (CR) program we offer you the opportunity to replace your damaged CANYON component at a greatly reduced cost. This offer is valid up to three years after the date of purchase. You will receive your component or a comparable component, i.e. handlebars, stem, fork or frame (without add-on parts, such as seat post, front derailleur or damper). The CR-service is limited to the original owner and to damages that compromise the functionality of the bike. We reserve the right to suspend this service if we detect that the damage has been caused unreasonably. In order to claim the CR-service, contact our service hotline at +44 208 5496001. For more details visit our website at www.canyon.com To ensure the secure fixing of two components, we from CANYON regard the use of a torque wrench as (6) inevitable. NOTES ON MOUNTING AND COMPATIBILITY Exceeding the maximum torque value at the clamping bolts (e.g. at the stem) leads to an excessively high clamping force. This can cause the component to fail and hence there is a high associated risk of accidents. In addition, the product guarantee would be null and void in such a case. Screws or bolts that are too loose or are done up too tightly can cause a failure and hence lead to an accident. Strictly observe the indicated tightening torques of CANYON. In general, CANYON advises against using the stem of another manufacturer with CANYON handlebars. Put the matching bit into the holder of the CANYON torque wrench. Insert the Allen key fully into the screw head. Slowly turn at the handle of the CANYON torque wrench. Once the bolt is getting tight, the pointer moves over the scale. Stop the turning movement as soon as the pointer reaches the number for the specified torque. Assemble your CANYON using the CANYON torque wrench enclosed with the BikeGuard or purchased at www.canyon.com If you do not have a high-quality torque wrench, contact CANYON. Do not use components, if you are not absolutely sure about their compatibility. If you are in doubt, call the CANYON service hotline at +44 208 5496001. Do not use further damaged CANYON components! If you are in doubt, we recommend that you replace the component. Do not use your bike until this has been done. ! For a secure clamping force, apply CANYON carbon assembly paste to interconnecting surfaces to increase friction. USING THE CANYON ASSEMBLY PASTE Carbon fibre components are particularly vulnerable to damage caused by excessive clamping force. CANYON assembly paste creates extra friction between two surfaces, allowing the necessary tightening torque to be reduced by up to 30 %. This is especially useful in the clamping areas of handlebars and stem as well as fork steerer tube and stem, i.e. two clamping areas where too much clamping force can damage either component, causing component failure or voiding the warranty. By reducing the clamping force, CANYON assembly paste (5) relieves stress on sensitive carbon structure, preventing damage to fibres or the cracking of the carbon substructure. It also retains its effectiveness in wet conditions and provides maximum protection against corrosion. CANYON assembly paste can be used for all carbon and aluminium connections. It’s ideal for this purpose, as it does not harden. Before applying CANYON assembly paste, remove dirt particles and lubricant residues from the surfaces to be treated. Apply a thin and even film of CANYON assembly paste to the cleaned surfaces using a brush or a chamois. Mount the components, as specified. Use the CANYON torque wrench or a high-value torque wrench and never exceed the prescribed maximum torque value. Remove excessive CANYON assembly paste and re-seal the small sachet after use. Verify that the CANYON stem and fork steerer tube have matching or compatible clamp diameters (10)! If you replace the CANYON stem on a fork with carbon steerer tube, check the clamp area of the fork for notches or abrasion marks. In case damage is visible, ask CANYON whether it is necessary to have the fork replaced. CANYON Bicycles GmbH Karl-Tesche-Straße 12 D-56073 Koblenz CANYON stems (9) can be mounted in either vertical orientation. These flip-flop models allow handlebars to be positioned at two different heights by simply inverting the stem. Warranty claims will only be accepted, if the bicycle has been used solely for its intended purpose (see chapter “Before your first ride – Intended use”). USING THE CANYON TORQUE WRENCH OR A HIGH-VALUE TORQUE WRENCH MOUNTING CANYON STEMS AND CANYON HANDLEBAR/ STEM-COMBINATIONS Phone: +44 208 5496001 [email protected] www.canyon.com In case you decide for another combination on your own risk, make sure the component you intend to combine with a CANYON stem or handlebars has a matching clamp diameter. CANYON handlebars have a clamp diameter of 31.8 mm (7). CANYON road and mountain bike handlebars are available in various widths and bends (also referred to as “reach“ for road bikes and “rise“ for mountain bikes). Do not saw your CANYON handlebars. Most fork steerer tubes measure 1 1/8“ (28.6 mm) or 1 1/4” (31.8 mm). They are designed for CANYON stems. i Note the measures of CANYON handlebars and stems on our website www.canyon.com page accessories. Only use mountain bike brake levers and shifters with symmetrical clamps (8). Only mount bar ends when they are approved by CANYON. Bar ends must have a symmetrical clamp, as well. Contact the CANYON service hotline at +44 208 5496001 to inquire the compatibility of the desired type. Only mount aero bars (also referred to as clip-on), if they are approved by CANYON. Aero bars must have a symmetrical clamp, as well. Contact the CANYON service hotline at +44 208 5496001 to inquire the compatibility of the desired type. Asymmetrical clamps or handlebar grips fastened with a single bolt etc. can CANYON handlebars. Risk of failure! Make it a rule to use CANYON assembly paste to achieve maximum clamping with minimum torque values. If you mount new CANYON handlebars to an existing stem, carefully check the old handlebars at least for scratches, abrasion marks and notches after removal. Damage in the clamping area indicates insufficient processing or defective design of the stem in these areas. In general, it is recommended that you assemble CANYON handlebars with CANYON stems. Slide the CANYON stem onto the fork steerer tube (13). It must fit snugly on the fork. Do not fit stems which have play on the steerer tube. Depending on the steerer tube length and the desired stem position, insert spacers (14) on the fork steerer above the upper cover of the headset, and/or above the stem. You can stack them usually up to a maximum height of 30 mm. Spacers are available in different heights. You have installed the correct number of spacers, when the steerer tube ends 2 to 3 mm below the top edge of the stem (15). Make sure the stem provides sufficient support for the steerer tube and that the steerer tube ends 3 mm at the most below the top edge of the CANYON stem. This ensures a reliable clamping when tightening the clamping bolts of the steerer tube clamp to the prescribed torque value. If your preferred handlebar height results in a deeper position of the CANYON stem on the steerer tube, the steerer tube projects from the stem. To check whether you have found the proper position, slide spacers on the steerer by making sure that the steerer tube ends 2 mm below the top edge of the stem. After a test ride, the steerer tube must be shortened by a skilled mechanic or by CANYON, in particular in the case of carbon forks. For proper load distribution during clamping the clamping bolts of CANYON stems are designed to be screwed in in a determined direction (16). Be sure not to change the screw-in direction. Tighten the stem bolts only a little (17), if you intend to mount the handlebars right afterwards. The headset has often to be adjusted afterwards (see chapter “Adjusting the Aheadset®-headset”). The space between the top of the steerer tube and the upper edge of the CANYON stem should not exceed a maximum of 3 mm. This is the only way to ensure a safe clamping. Observe the maximum spacer height of 30 mm and do not insert permanently more than 5 mm of spacers above the stem, if your fork steerer tube is made of carbon. i MOUNTAIN BIKE – ADJUSTING BRAKE LEVERS/SHIFTERS Release the bolt(s) of the clamps by two to three turns without unscrewing them entirely. Turn the loosened units on the CANYON handlebars so that they point slightly downward. Sit in the saddle and place your fingers on the brake lever. Check whether the back of your hand forms a straight line with your lower arm (28). Make sure the brake lever is within easy reach of your index and middle fingers (29). The first phalanx of both fingers should be able to reach around the lever without pulling it. It may be necessary that you position the brake lever and the shifter at a certain distance from the handlebar grip (30). Or you have to adjust the brake lever reach according to the recommendations of the manufacturer. With your hands in the correct position adjust the shifters accordingly and tighten the clamping bolts of the brake levers and shifters to the recommended torque values. Do not exceed the torque value prescribed by the brake lever manufacturer, as the brake levers may otherwise damage the CANYON handlebars. Never shorten the ends of CANYON mountain bike handlebars by using a saw, as the handlebars are reinforced in the clamping areas of the brake levers/shifters. Select instead handlebars at the suitable width and height, if necessary. ROAD BIKE / CYCLOCROSS BIKE – ADJUSTING BRAKE LEVERS/SHIFTERS Release the bolt(s) of the clamps by two to three turns without unscrewing them entirely. Turn and shift the loosened units on the CANYON handlebars that the upper area of the brake lever/shifter unit is in horizontal position. The lower part of the brake lever is flush with the straight extension of the drops or ends a little above (31). In addition, align the units towards the front in direction of motion (32). Make sure the brake lever is within easy reach of your index and middle fingers. The first phalanx of both fingers should be able to reach around the lever without pulling it. It may be necessary that you position the brake lever and the shifter at a certain distance from the bend. Or you have to adjust the brake lever reach according to the recommendations of the manufacturer. Note that you cannot adjust the handlebars with regard to the stem, if you have a CANYON handlebar/stem-combination. In the case of typical handlebars, however, you can. Put the matching bit into the holder of the CANYON torque wrench. Release the clamping bolts of the stem face plate and remove the face plate. Open the CANYON assembly paste. Squeeze out some assembly paste. Apply a thin layer of CANYON assembly paste on the clamp area of the CANYON handlebars as well as on the inner side of the stem clamp as well as in the clamp area of the fork steerer tube (18+19). Position the stem clamp in the middle of your new CANYON handlebars (20) so that the handlebars extend the same distance from the stem on each side. The centre position is indicated with the marks on the handlebars. If the handlebars do not slide easily into the stem clamp or if there is play between the two components, contact the CANYON service hotline at +44 208 5496001 and ask whether both components are compatible. CANYON strongly recommends that you only mount CANYON handlebars on CANYON stems. Mountain bike handlebars are normally mounted with the sweep supporting a natural ergonomic hand position, i.e. bent slightly rearward. The handlebar position is correct when your wrists are relaxed and your elbows not flared out too much. In the case of road bike handlebars the straight piece of the drops should be approximately in parallel to the ground or point with the ends slightly downwards. In most cases you have found the matching position when the marking on the CANYON handlebars are in alignment with the markings on the CANYON stem (21). Check the faceplate of the stem. The logo must be in the correct position (21). Tighten the greased bolts of the stem faceplate with your fingers by a few turns (22). Do not apply grease on the clamping surfaces. Turn in the individual bolts of CANYON stems with a precisely fitting Allen key by a few turns. Then turn in only the two upper bolts until the upper clamping slot is completely closed (23). Alternative 1: Screwing in CANYON Aheadset®-stems with faceplate (24) Screw in both upper bolts (pos. 1+2) without tightening them (1 Nm). The slot should be fully closed in the end, the faceplate should be flush with the body. To do so, you may have to release both lower bolts (pos. 3+4). Continue by tightening both lower bolts (pos. 3+4) according to the tightening torques on the stem (5 or 8 Nm). Finish by re-tightening both upper bolts (pos. 1+2) according to the tightening torques on the stem. Alternative 2: Screwing in conventional Aheadset®-stems with faceplate (25) Retighten the clamping bolts of the faceplate evenly in a cross pattern until they lightly hold the handlebars in place. Make sure the upper and lower clamping slots between faceplate and stem body are parallel and identical in width. Release the clamping bolts once again, if necessary, and re-tighten them slightly and evenly. Check the brake lever/shifter or the brake grips for burrs and sharp edges. Do not use shifters or brake levers with burrs or sharp edges to prevent your CANYON handlebars from damage and dents. If the CANYON stem cannot be tightened on the fork steerer tube with the printed maximum torque value, in spite of applying CANYON assembly paste on the clamping surfaces, stem and fork are not compatible. Replace the CANYON stem by a suitable model or contact the CANYON service hotline at +44 208 5496001. CANYON forks combined with CANYON stems can also be used without i expander. Dismount in this case the expander after having adjusted the headset. In this case the maximum torque value of the stem bolts is 4 Nm. After adjusting the headset check the tight clamping of the stem by holding the front wheel between your knees and trying to turn the handlebars relative to the front wheel (37). A loose stem can lead to an accident! MOUNTING BAR ENDS ON MOUNTAIN BIKE HANDLEBARS Bar ends (38) add more hand positions to your handlebar configuration. They are usually set to a position that provides more leverage and more comfort when you pedal out of the saddle. Note that CANYON handlebars are only suitable for bar ends in exceptional cases. Make it a rule to contact CANYON and ask whether your bar ends are suitable or not. Ask in addition for the maximum torque values. Mounting bar ends to CANYON handlebars that are not approved for bar ends can lead to handlebar failure and result in an accident. ADJUSTING THE HEIGHT OF THE HANDLEBARS Both the handlebar height and the stem length determine how much your upper body will be inclined forward. Lowering the CANYON handlebars gives the rider a streamlined position and brings more weight to bear on the front wheel. An excessively low handlebar position may prove uncomfortable and can strain wrists, arms, upper body and neck. Seek the assistance of a CANYON, especially if you experience pain or discomfort after set up and use. On bicycles using a threadless headset system, also referred to as Aheadset®-system, the stem is an integral part of the headset. To modify the seating position the stem can be dismounted and re-mounted. Subsequently, the headset must be readjusted. Observe in this connection the chapters “Mounting CANYON stems and handlebar/stem-combinations” and “Adjusting the Aheadset®-headset”. The vertical position of the handlebar position is determined by the arrangement of the spacers (40). In the case of flip-flop models it is also possible to turn the CANYON stem around. Dismount the bolt for the bearing preload at the top of the fork steerer tube and/or remove the Ahead cap. Release the bolts at the side of the stem by two to four turns and pull the stem off the fork (41). Keep in mind that in the case of conventional Aheadset®-bearings the fork is loose from this moment on and can slide out to the bottom. In the case of CANYON Aheadset®-headsets a special clamp prevents the fork from sliding out. Now you can remove the spacers. Reposition the spacers on the steerer tube above the stem in order to position the CANYON handlebars or the CANYON handlebar/ stem-combination at the desired height. Check that the clamping areas of the bar ends are free of burrs. Do not use bar ends with burrs or sharp edges. Burrs are sharp and can cut into other components. In case you find sharp edges or burrs, replace the bar ends by models that are free of burrs. If you want to reduce the number of spacers, you have to shorten the steerer tube. This change is irreversible. If the number of spacers is reduced, the fork steerer tube should be shortened, as well. This is a job for a skilled mechanic or the CANYON service centre. Have this work performed only after you have found the ideal position. As soon as the unit is in the desired position, apply some CANYON assembly paste in the area of the clamping. Tighten the clamping bolts of the brake levers/shifters to the printed, maximum torque values (33). Release the clamping bolts of the brake lever/shifter units and slide them together with the handlebar grips towards the centre of the handlebars until there is enough space to mount the bar ends. If the grips have end caps, cut them off before you move the grips. If you want to go for a test ride without shortening the steerer tube, you have also the option to modify the arrangement of the spacers. Place the equal number of spacers you have removed from below the stem above the stem or vice versa. Do not exceed the torque value prescribed by the brake lever manufacturer, as the brake levers may otherwise damage the CANYON handlebars. Do not use any liquids or grease to loosen the grips; if necessary, use compressed air to loosen them. Never rotate the units on the handlebars after you have tightened the clamping bolts. Otherwise you will scratch the surface and mar the finish. In addition you run the risk of damaging the material. Loosen the bar end bolts which are in most of the cases on the bottom side of the bar ends by two to three complete turns. Apply some CANYON assembly paste on the handlebars’ clamping area and inside the bar ends. Always observe the maximum torque values indicated on the components. If there are different values, the lower value is the upper limit for the torque value. Always finish by checking the tight fit of the components. Slide the bar ends on the respective side of the handlebars. Angle the bar ends according to your personal preference and make sure they are both at the same angle. Observe possible right/left references on the bar ends. Check that the cables are still long enough when turning the CANYON handlebars including stem, fork and front wheel from far left to far right. Make sure the bowden cables and the lines are not twisted or bent, but run in a smooth curve to the cable stops or brakes. Do not change or shorten CANYON handlebars, as this would damage the handlebars or the stem and result in a severe accident during use. Any modification to a CANYON carbon component will automatically void the warranty. Retighten the bolts with your CANYON torque wrench or a high-quality torque wrench to 3 Nm. If the bar ends can still be moved, increase the torque value at the most to the indicated maximum torque value. Do not exceed the maximum torque value permitted by CANYON for the clamping bolts of the bar ends which you intend to mount to the CANYON handlebars. Mount the CANYON components, as described in the chapter “Mounting CANYON stems and CANYON handlebar/stem-combinations”, “Mounting and adjusting CANYON handlebars” and in the case of conventional Aheadset®headset “Adjusting the Aheadset®-headset”. Read through the user manuals of all components of the other manufacturers before you follow the above instructions. Always observe the maximum torque values indicated on the components. If there are different values, the lower value is the upper limit for the torque value. i CANYON stems are flip-flop stems, i.e. they allow an upward or downward oriented mounting. MOUNTING AND ADJUSTING CANYON HANDLEBARS In case the CANYON stem is still not tight enough, dismount the stem and once again apply some CANYON assembly paste on the fork steerer tube and the inside of the stem. ADJUSTING THE AHEADSET®-HEADSET Adjusting the headset is a job for a skilled bicycle mechanic. Have this work done by the bicycle manufacturer or an authorized dealer. If you nevertheless want to do the adjustment on your own, read chapter “The headset” in your CANYON bicycle manual or a similarly named chapter in your general bicycle manual or the user manual of the headset manufacturer beforehand. Note that you need special tools, e.g. the CANYON torque wrench or another highvalue torque wrench. Check the headset for play (3) by placing your fingers around the upper head cup. Bring your weight to bear on the saddle, pull the front brakes with your other hand and push your CANYON firmly back and forth with the wheel remaining on the ground. If there is play in the bearing, the upper head cap will move noticeably relative to the lower cup. Another way to check the headset is to lift the front wheel a little off the ground and then let it drop. If there is play in the bearing, you will hear a rattling or knocking noise in this area. To check the bearing for ease of running, lift the frame until the front wheel no longer touches the ground. Move the handlebars from the left to the right. The front wheel should turn very easily from far left to far right without catching anywhere. A light tap on the handlebars should be enough to turn the front wheel to the side (34). If a tight fit of the bar ends on the handlebars cannot be achieved in spite of using CANYON assembly paste on the contact surfaces, the bars ends and the handlebars are not compatible. In this case replace the bar ends by appropriate models. If something does not fit, you have to readjust. ALTERNATIVE 1: I-LOCK HEADSET The special feature of this system is that the stem is clamped onto the fork tube, which in this case is threadless. The stem is an important part of the headset bearings. Its clamping force secures the bearing in its set position. Unlike the widely spread Aheadset® system, this system allows a bearing adjustment with a firmly clamped stem. Check the clamping bolts on the side and in the rear of the stem with the CANYON torque wrench according to the torque marked on them (35). Never exceed the given maximum torque. Use a 2 mm Allen key and tighten the headless screw at the head cup carefully clockwise. Start with a quarter turn. Check the headset for play, as above described. Be sure not to tighten the bearing too much. If necessary, tighten the screw by another quarter rotation and check again. Make a final check by standing in front of your CANYON and taking the front wheel between your knees. Take hold of the handlebars at the brake levers and try to turn them relative to the front wheel. Try twisting the handlebars relative to the front wheel. If there is play in handlebars or stem, release the bolts, realign the component and tighten the stem clamping bolts to the recommended torques. If there is still play in handlebars or stem even with the maximum permitted torque value, dismount the clampings, degrease them, apply a new layer of CANYON assembly paste and reassemble. Check the secure seat of stem and handlebars after you have adjusted the bearing! Loose handlebars or stem may throw you off your bike! ! This clamping bolt is not to be tightened firm, but only intended for a careful adjustment of the play! ALTERNATIVE 2: TYPICAL AHEADSET® HEADSET If you find burrs or sharp edges, you must not use the components. If necessary, CANYON can check the components and see, whether this is a problem that can be solved or whether the component has to be replaced. Open the lateral clamping bolts of the CANYON stem by two to three turns (16) without unscrewing them entirely. Loosen clamping bolts completely to ensure clamps are open all the way before sliding the shifters and brake levers onto the handlebars. In the case of some mountain bike brake grips a part of the clamp can be folded upwards or removed. The Allen bolt located in the top cap (36) is intended to re-adjust the bearing play. The play decreases by turning clockwise, as the stem is pressed downward on the bearing. The play increases by turning anticlockwise. In the case of brake lever/shifter units on road bikes (Dual Control, Ergopower or DoubleTap) dismount the clamp completely from the unit (26). In case there is still bearing play, tighten the adjusting bolt by another quarter or half a turn. Do not overtighten the headset; otherwise there is the risk of headset failure. Carefully slide the clamp on the handlebars (27) and remount the unit to the clamp subsequently. Do not overtighten the top Allen bolt. It is intended for adjustment! Tighten the bolt carefully in quarter-turns and check the play regularly. Start tightening the clamping bolts slightly, so that the unit can still rotate freely. Bring the brake lever/shifter units to the desired position. Tighten them to the maximum torque value only after you have found the proper position. Once the play is properly adjusted, align the CANYON stem in the direction of motion. Check the alignment of the top tube and the stem with the front wheel from the top. The CANYON handlebars should be at right angle to the direction of motion. Turn the stem around and mount the handlebars as described in chapter “Mounting and adjusting CANYON handlebars”. Make sure the faceplate is mounted in the correct position (21). In the case of CANYON Aheadset®-headsets with clamping ring the bearing play has not changed. Finish by checking the reliable fit of all components. Keep in mind not to position more than 30 mm spacers below a CANYON stem. The screwings of stems, handlebars, bar ends, brake levers and shifters must be tightened to the prescribed torque values. Mounting unsuitable bar ends to CANYON handlebars can lead to handlebar breakage during use and therefore result in an accident. Some CANYON handlebars are not suitable for bar ends. Contact the CANYON service hotline at +44 208 5496001 and ask for advice. For an important change of height, unscrew the bolts of the faceplate and remove the handlebars. i Also read and observe the mounting instructions of the bar ends. MOUNTING AERO BARS TO ROAD RACING HANDLEBARS Aero bars (39) offer an additional possibility to position yourself in a lying position on the road bike. They are usually set to a position that provides more comfort to the hands when the cyclist rides in lying position with the forearms on the armrests. Have the fork steerer tube shortened by CANYON immediately, if the stacking height of the spacers above the stem exceeds 5 mm. GRIPS AND BAR TAPE Grips and bar tapes not only provide comfort, but also have a very important secondary function: they ensure that your hands’ movements communicate clearly with the steering components. Make sure the grips and the bar tape are tight and in sound, functional condition. Replace worn through or extremely dirty grips and bar tapes immediately. At least once a year it is time for them to be dismounted, chec MOUN NG H GR P w Note that CANYON handlebars are only suitable for aero bars (also referred to as extensions) in exceptional cases. Make it a rule to contact the CANYON service hotline at +44 208 5496001 and ask whether your aero bars are suitable or not. Ask in addition for the maximum torque values. m o ng g p N Position the aero bars very close to the left and right of the stem in the absolutely round area of the CANYON road racing handlebars. Loosen the bolts which are in most of the cases on the bottom side of the aero bars by two to three turns. Unscrew the bolts completely and remove the brackets. Apply some CANYON assembly paste on the handlebars’ clamping area and inside the clamping area. i m m m m A w w m w AN ON m M w n h m n n h h h m fl m n h n D n n n wh n h h n hm n h m n h WRAPP NG H BAR AP AN ON w w D m w w H m w w AN ON w m m w w w w m w m w Also read and observe the mounting instructions of the aero bars. n m h ff w www n n m n n With carbon steerer tubes, make sure the inside of the tube is supported by a suitable expander-cone mechanism for adjusting the headset. CANYON recommends in general that you use the series mechanism of the fork manufacturer. Strictly observe the chapter “The headset“ in your CANYON bicycle user manual or a similarly named chapter in your general bicycle user manual of in the user manual of the fork manufacturer, before tightening the stem. Once the play is adjusted, tighten both clamping bolts alternately and then with the CANYON torque wrench or a high-quality torque wrench. Start with a minimum of 4 Nm. m w m If a tight fit of the aero bars on the handlebars cannot be achieved in spite of using CANYON assembly paste on the contact surfaces, the aero bars and the handlebars are not compatible. In this case replace the aero bars by an appropriate model. Mounting unsuitable aero bars to CANYON handlebars can lead to handlebar breakage during use and therefore result in an accident. Some CANYON handlebars are not suitable for aero bars. Contact the CANYON service hotline at +44 208 5496001 and ask for advice. m AN ON Always observe the maximum torque values indicated on the components. If there are different values, the lower value is the upper limit for the torque value. The screwings of stems, handlebars, aero bars, brake levers and shifters must be tightened to the prescribed torque values. w w m w m Nm AN ON m Place the aero bars in the upper area on the handlebars and tighten the brackets slightly from below with the bolts. Adjust them to the desired position and make sure the angle is the same on both sides. Observe possible right/left references on the aero bars. Retighten the bolts with the CANYON torque wrench or a high-quality torque wrench to the maximum torque value permitted. If the aero bars can still be moved, increase the torque value to the maximum torque value indicated. Do not exceed the maximum torque value permitted by CANYON for the clamping bolts of the aero bars which you intend to mount on your CANYON handlebars. m mm A AN ON G m Mounting aero bars to CANYON handlebars that are not approved for aero bars can lead to handlebar breakage and result in an accident. Check that the clamping areas of the aero bars are free of burrs. Do not use aero bars with burrs or sharp edges. Burrs are sharp and can cut into other components. In case you find sharp edges or burrs, replace the aero bars by models that are free of burrs. m Check the secure clamping of the CANYON stem by holding the front wheel between your knees and trying to turn the handlebars relative to the front wheel (37). on p – www In case the stem clamping is not tight enough, increase the torque value to the printed maximum torque value. © N pho o nd g ph d gn D m m w Gm H w w m m m n h