1
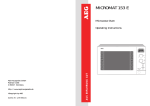
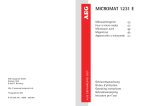
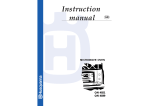
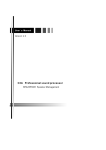
User
manual
Fireplace inserts
Dear Client,
Thank you for purchasing the Hoxter fireplace insert – the best product
without compromises.
Hoxter is honoured to provide you with these fireplace inserts, which
are the result of many years of research and development, extensive
market experience and intensive contact with customers.
You have chosen the best quality, durability and design which our
products provide.
We would like to thank you for your confidence and wish you many
pleasant and happy moments in the firelight of your fireplace.
Yours faithfully,
team Hoxter
CONTENTS
1.Safety
5
1.1.
1.2.
1.3.
1.4.
1.5.
1.6.
1.7.
1.8.
5
5
5
6
7
7
7
7
Safety instructions
Risk of burning Safe distance
Putting into operation
Open operation
Fire in the chimney
Supply of combustion air
Unauthorized technical modifications
2.Fuel
2.1.
2.2.
2.3.
2.4.
2.5.
Forbidden fuel
Permitted fuel
Types of wood
Storage of wood fuel
Recommended dose of fuel 3.Description of control elements
3.1.
3.2.
Description of control elements Options for closing the door
4.Operation of fireplace inserts
4.1.Commissioning, burning phase and regulation of air supply
4.2.
Operation with electronic burning regulation
4.3.
Operation in the transient period
5.Cleaning and maintenance
5.1.
5.2.
5.3.
5.4.
Cleaning the glass
Removing ash Cleaning the hot water exchanger
Regular specialist maintenance
8
8
8
8
8
10
11
11
12
12
12
14
14
14
15
15
16
16
6.What to do in the case of a defect
17
7.General warranty terms
18
7.1.
7.2.
7.3.
7.4.
7.5.
7.6.
Important information
Warranty conditions
Warranty period
Common wearing
Repair and maintenance
Making a claim
We reserve the right for any technical changes, printing errors and differences in display.
You can find the original manual on www.hoxter.eu.
18
18
18
19
19
19
1. Safety
1.1.
Safety instructions
Carefully read these instructions for using the fireplace insert and keep the manual in a safe
place. Hoxter fireplace inserts are certified according to European standard EN 13229 and carry
the CE indication. When assembling the fireplace insert, you must comply with local regulations
and instructions applicable to national and European standards. To ensure that your fireplace
operates correctly, the fireplace must be builded by a specialized company.
1.2.
Risk of burning
All the surfaces of fireplace insert are very hot when in operation. For servicing, use the attached
glove and:
- A
lways close the door even when fireplace is cold and only open it when starting fire, adding
wood or cleaning the insert.
- The door, handle and glass are hot when in operation – there is risk of burning!
- Do not leave children near the fireplace insert unsupervised.
1.3.
Safe distance
In the area where the fire is visible there is direct heat radiating, the minimum distance of 80
cm from flammable items must be kept (flammable parts of the construction, wood, furniture,
decorative textile, carpets, curtains, etc.). Outside the area of visibility of the fire, there must be a
minimum distance of 20 cm from flammable materials (flammable parts of the construction, wood,
furniture, decorative textile, carpets, curtains, etc.). The distance is measured from the glass in the
fireplace insert (Fig. 1).
As a protection against flying sparks on flammable types of floors (carpet, wooden floor, cork, etc.)
there must be used a fire-proof layer (ceramics, stone, glass or metal) with minimum dimensions
(see Fig. 1). The distance is measured from the glass in the fireplace insert.
5
Fig. 1
1.4.
Putting into operation
Remove all attached documents and accessories from the fireplace. When first heating up the
fireplace insert, the high temperature resistant paint will dry and harden. This drying and hardening
is accompanied by a smell. The fumes are not toxic, but are unpleasant. Follow those rules:
- Open doors and windows in the room so that the area is fully ventilated.
- The first two batches of the fuel should correspond to the lower limit of the recommended
batch for the product (Chapter 2.5).
- The paint is soft during burning so do not touch it.
Commissioning the heat-carrying fireplace insert
Before heating, check that the following conditions are fulfilled:
-
The fireplace insert is connected to the heating system.
The heat-water exchanger is filled with water and de-aerated.
S
afety elements (safety valve, thermostatic valve) are installed and their function is verified.
The thermostatic valve is connected to the fireplace insert with the pressure from
the water system by a minimum of 2 bars
1.5.
Open operation
Hoxter fireplace inserts are not designed to be operated with an open door. The fireplace must
always be closed with the exception of adding fuel so as to prevent burning wood falling out
and combustion gases leaking into the room.
6
1.6.
Fire in the chimney
When burning wood, sparks from the fireplace may get into the chimney and ignite the built up
layer of soot. Therefore, the fireplace insert, smoke flue and the chimney must be regularly cleaned.
If starting the heating after a long break in operation, then first check that the system is not blocked
anywhere.
A fire in the chimney is indicated by flames coming from the mouth of the chimney with sparking
and smoke and with a smell from the fireplace. In this case:
Call the fire brigade!
Close the air supply of the fireplace insert.
Remove all flammable items from nearby the chimney.
B
efore the arrival of the fire brigade, do not try to extinguish the fire in the chimney with water.
In the case of a chimney fire, the temperature can reach up to 1,300 °C. In this case, the water
will immediately turn into a huge quantity of steam and destroy the chimney.
- After the fire is gone, contact a chimney sweep who can assess the condition of the chimney.
-
1.7.
Supply of combustion air
The fireplace insert is technically adapted for the combustion of air supplied from the exterior.
If during assembly the fireplace insert was not connected to this external air supply, it is necessary
to ensure a sufficient quantity of combustion air in the room by ventilation. Do not use the fireplace
insert together with other heating equipment or a consumer appliance that may create underpressure in a closed room. Components for controlling the air supply into the fireplace insert must
not be modified.
1.8.
Unauthorized technical modifications
It is forbidden to interfere with the construction of fireplace insert. If any unauthorized technical
modifications are made, the manufacturer will not bear any liability for safety during the operation
of equipment and the warranty will be automatically invalidated. Only spare parts approved by
the manufacturer must be used.
2. Fuel
2.1.
Forbidden fuel
In the fireplace insert it is forbidden to burn any other fuel than that designated for its purpose.
It is also forbidden to burn liquid fuel and waste. Under no circumstances should petrol, alcohol,
solvents, etc, be used for ignition! The use of any other fuel than that permitted will damage
the fireplace insert and load the environment and will also automatically invalidate the warranty.
7
2.2.
Permitted fuel
It is only permitted to burn only wood in natural condition with the humidity ≤18 % in Hoxter
fireplace inserts.
2.3.
Types of wood
The volume of energy contained in one kilogram of wood is approximately the same for all types
of wood. However, the individual types of wood differ by volume, i.e. density.
For ignition it is recommended to use wood with a lower density – soft wood (spruce, pine,
poplar, fir).
For regular adding, wood with a higher density is recommended – hard wood (oak, beech, ash),
that burns with calm flame and creates a steady heat.
2.4.
Storage of wood fuel
It is recommended to store wood for ideally 2 to 3 years in well ventilated and dry area. Optimally,
wood is recommended to be stored to the southern part of the house on a grid to provide a flow
of air and good ventilation of wood. We recommend to cover the top of the wood to protect against
rain (Fig. 3). In this way, humidity of 15–18 % will be achieved.
Fig. 2
8
Under no circumstances should you use fresh wood. Fresh wood has humidity of approximately
60 % and a caloric capacity less than 2 kW/h per 1 kg (Fig. 4). To create the same volume of heat
energy would require twice the volume of fuel. Moreover, when using fresh wood, the fireplace
insert does not achieve the optimal burning temperature, efficiency and low emissions of pollutants.
Burning wood with high humidity excessively overloads the file place insert and rapidly shortens
its service life. In the case of repeated burning of wet wood, the insert or parts of the insert can be
damaged! This will also block the chimney and increase the risk of fire in the soot in the chimney.
Fig. 3
kWh/kg 5
dry wood
4
3
fresh wood
2
1
0
10
20
30
40
50
60
70
80
90
100
% H 2O
Graph of the dependence of the fuel and the calorific value
2.5.
Recommended dose of fuel
Doses of wood fuel used in the fireplace insert must vary between the maximum and minimum
stated value (see Table). If adding another batch of fuel than that stated, the fireplace insert can
be damaged, become less efficient and the emission values are increased. The fireplace insert
is designed for short-term combustion operation. The interval for adding fuel should vary within
the range 45-60 minutes.
9
Recommended batches of fuel for individual models
Hot-water
fireplace inserts
Hot-air
fireplace inserts
Model
10
Regulated output [kW]
Dose of fuel [kg/hour]
HAKA 37/50
6,3–11,7
1,8–3,4
HAKA 37/50 (G)
4,2–7,8
1,2–2,3
HAKA 63/51
9,1–16,9
2,6–4,9
HAKA 63/51 (G)
5,9–11,0
1,7–3,2
HAKA 63/51 a
9,1–16,9
2,6–4,9
HAKA 67/51
8,4–15,7
2,4–4,5
HAKA 67/51 (G)
6,3–11,7
1,8–3,4
HAKA 89/45
8,4–15,6
2,5–4,7
HAKA 89/45 T
7,1–13,2
2,1–3,9
HAKA 89/72
9,5–17,6
2,7–4,9
HAKA 110/51
9,5–17,6
2,7–4,9
ECKA 50/35/45
4,1–7,6
1,3–2,5
ECKA 67/45/51
8,4–15,6
2,5–4,6
ECKA 67/45/51 (G)
5,6–10,4
1,7–3,2
ECKA 90/40/40
7,7–14,3
2,2–4,2
UKA 37/55/37/57
6,3–11,7
2,0–3,6
UKA 37/75/37/57
7,7–14,3
2,4–4,4
UKA 37/95/37/57
9,1–16,9
2,9–5,2
HAKA 37/50 W
5,6–10,4
1,5–2,8
HAKA 63/51 W
10,5–19,5
2,8–5,2
HAKA 63/51 W+
15,4–24,2
4,2–6,6
HAKA 63/51 Wa
10,5–19,5
2,8–5,2
HAKA 63/51 Wa+
15,4–24,2
4,2–6,6
HAKA 63/51 WT
11,6–21,5
3,1–5,7
HAKA 67/38 W
10,2–18,9
2,9–5,3
HAKA 67/51 W
7,7–14,3
2,1–3,9
HAKA 67/51 W+
12,3–19,4
3,3–5,2
HAKA 89/45 W
9,8–18,2
2,6–4,8
HAKA 89/45 W+
15,4–24,2
4,2–6,6
HAKA 89/45 WT
7,0–13,0
2,1–3,9
HAKA 89/45 WT+
14,0–22,0
4,3–6,6
ECKA 50/35/45 W
5,3–9,8
1,7–3,2
ECKA 67/45/51 W
9,1–16,9
2,5–4,6
Note: 1 kg hard wood with 18% humidity corresponds to one 30 cm long piece of wood with
a diameter of 10 cm. During burning this quantity of wood releases approximately 4 kW/h of energy,
therefore, adapt the doses to the energy demands of your house.
Fig. 4
10 cm
10 cm
30 cm
3. D
escription
of control elements
3.1.
Description of control elements
Hoxter fire place inserts are produced in two basic versions for opening the door:
- vertically opening doors (Fig. 5a)
- liftdoors (Fig. 5b)
Fig. 5A
Fig. 5B
1. Handle for opening the door
3. Handle for regulating the air supply for burning
2. Ceramic glass
4. Handles for opening the door for cleaning
glass (only liftdoors)
11
3.2.
Options for closing the door
Hoxter fireplace inserts enable two methods of closing the door:
A1 – automatic closing of the door
A – manual closing of the door
The door is set in production for manual closing – A. If you want the door to automatically
close – A1, inform your fireplace builder before starting construction.
4. O
peration
of fireplace inserts
4.1.
Commissioning, burning phase
and regulation of air supply
First check that there is no large quantity of ash in the burning chamber. This would cause hot
particles to fall from the fireplace insert into the room when adding wood.
1. S
et the handle for regulation of the air supply for burning to the maximum (Fig. 6).
This ensure a sufficient supply of air for ignition.
Fig. 6
12
2. O
pen the door of the fireplace and on the bottom of the chamber place the dose of fuel
recommended for your type of the fireplace insert against the rear wall (Chapter 2.5).
First place the larger pieces of wood, then smaller pieces (Fig. 7a).
3. P
lace into the upper part of inserted wood (Fig. 7b), between the small pieces of wood,
the stated ignition piece then ignite it.
Fig. 7A
Fig. 7B
4. Close the door and observe the fire until it is fully burning.
5. If the file is burned and the whole dose of fuel is burning, set the regulation of the air supply into
the central position (Fig. 8) to achieve the optimal output (Chapter 2.5). If the burning did not
start, repeat the step No. 4.
Fig. 8
6. If it is not necessary, do not open the door of the fireplace and do not interfere with the burning
Leave the dose of the fuel to burn out. Add the next dose in the heat phase (active burning with
flames terminated). Slowly open the door to prevent the escape of smoke into the room and add
the dose of the fuel to your fireplace (Chapter 2.5).
7. If you do not want to add more fuel and the dose has burnt out, set the regulation of air to
the left to the minimum (Fig. 9). This will prevent burning air getting into the chamber and will
prolong the heat phase. The coal will remain hot in the chamber longer and the heat will not
escape through the chimney.
Fig. 9
13
Notification: During active burning (visible fire), never close the air supply and do not smoother
the fire! Air flowing into the burning chamber cools the ceramic glass. If closing the supply of air,
it can be overheated and irreversible changes can occur in the crystalline structure of the glass.
During burning with an insufficient air supply, an excessive amount of harmful carbon monoxide
- CO will originate. In the case of opening the air supply too fast, there may be a rapid reaction
of the collected gases with the oxygen.
4.2.
Operation with electronic burning regulation
If your fireplace is fitted with electronic burning control then follow instructions stated in the manual
for the electronic burning control.
4.3.
Operation in the transient period
For the correct function of the fireplace insert, a sufficient draught in the chimney is required, which
depends on the outdoor temperature. In winter when the outdoor temperature is low, the chimney
has the highest draught level. A problem with a sufficient draught may occur in the transient period
(before and after winter). A higher outdoor temperature worsens the burning and increases the
volume of the smoke. These undesirable phenomena can be prevented as follows:
- W
hen starting, increase the first dose of the fuel by 30 %, to quickly achieve the requested draught
in the chimney.
- Do not cut the wood into small pieces; this will result in heating the chimney too fast and stabilize
the draught.
- Leave the lever for the air supply in maximum position.
- Only add well dried wood.
5. C
leaning
and maintenance
Notification: Before starting to clean the fireplace insert, make sure that is cold and has
completely finished burning. The frequency of cleaning and the intensity of the maintenance
(fireplace insert, smoke flue, chimney) depends on the quality of the burnt wood. If the fireplace
insert was not in operation for a long time, then before heating, it is necessary to check that
the chimney is not blocked.
14
5.1.
Cleaning the glass
The door of the Hoxter fireplace insert is produced from high-quality ceramic glass and is fitted with
a self-cleaning ceramic glass system. Air supplied into the combustion chamber “rinses” the glass
from the inside. Correct regulation of air and by burning dry wood will result in clear glass that won’t
need to be cleaned very often. To clean dirty glass in the fireplace insert with the liftdoor, first open
all the handles along the perimeter (Fig. 10a). Then open the door into the cleaning position
(Fig. 10b).
Fig. 10a
Fig. 10B
Only clean the glass with a wet paper cloth. If this is insufficient, apply a small amount of clean ash
from the burning chamber of the fireplace insert. Then wash the glass again with a wet paper cloth
and polish with a dry cloth.
Do not use in any circumstances any aggressive cleaning detergents! These can damage
the components in the door of the fireplace insert (sealing, polished areas, stainless bars, imprinting
of glass, etc.).
5.2.
Removing ash
Notice: Ash can contain hot coal for up to 24 hours.
Always remove the ash when it is cold and extinguish the fireplace insert! Then place them for
24 hours into a non-flammable vessel out of the reach of children. Your Hoxter fireplace insert
uses the latest and the most effective grid-free method of burning. Remove the ash within regular
intervals adapted to the intensity of the heating. When cleaning, leave a small quantity of ash
to speed up the ignition.
15
5.3.
Cleaning the hot water exchanger
Problem-free and effective operation of the hot-water fireplace insert requires regular cleaning
of the hot-water exchanger. Depending on the intensity of the operation, it is recommended
to clean a minimum of once a month. In the case of neglecting the maintenance, there is gradual
blocking of burnt passages and a reduction in efficiency which can result in irreversible damage
to the fireplace insert. When cleaning the hot-water exchanger, proceed as follows:
- Check that the fireplace insert is cold.
- Wear protective glasses and gloves.
- Carefully lift the fireplace bed – deflector (Fig. 11).
- U
se the brush included in the delivery, gradually clean all tubes of the burnt passage to keep the
tube clear along the whole lengthy (Fig. 12).
- Re-insert the upper part of the fireplace bed (Fig. 13)
Fig. 11
5.4.
Fig. 12
Fig. 13
Regular specialist maintenance
Once a year, before starting the heating season, the fireplace insert should be inspected by
an expert - fireplace technician. This maintenance should include:
for hot-air fireplace insert:
for hot-water fireplace inserts:
16
- checking and cleaning of the burning chamber
and burnt passages
- checking the sealing parts and mechanism for opening
the door of the fireplace insert
- checking the regulation and air supply system
- checking and cleaning of the burning chamber and the burnt
passages
- checking the sealing parts and mechanism for opening the door
of the fireplace insert
- checking the regulation and air supply system
- checking the correct functioning of the safety elements safety
valve, thermostatic valve, de-aerating valve, etc .)
- checking the cleaning of the hot-water exchanger
- checking the heating system
6. W
hat to do in the
case of a defect
The glass is heavily smoked
Possible reasons: - incorrect fuel is used (Chapter 2.2)
- regulation of the combustion air is not opened (Chapter 4.1)
- the line for the external air supply is blocked (contact your fireplace
technician)
- the draught of the chimney is insufficient - in the transient period (Chapter 4.3)
- the hot water exchanger is blocked (Chapter 5.3)
The fire does not want to ignite and keeps on going out
Possible reasons: - incorrect fuel has been used (Chapter 2.2)
- regulation of the combustion air is not opened (Chapter 4.1)
- the line for the external air supply is blocked (contact your fireplace
technician))
- the draught in the chimney is insufficient - in the transient period (Chapter 4.3)
- the hot water exchanger is blocked (Chapter 5.3)
Smoke escapes into the room when wood is added
Possible reasons:
-
incorrect fuel is used (Chapter 2.2)
the draught in the chimney is insufficient – in the transient period (Chapter 4.3)
the door was opened too fast
fuel was not added in the correct phase of burning (Chapter 4.1)
the door sealing is damaged (contact your fireplace technician)
the hot water exchanger is blocked (Chapter 5.3)
The wood burns too quickly or the consumption of the wood is too high
Possible reasons:
-
incorrect fuel was used (Chapter 2.2)
recommended dose of the fuel was not kept (Chapter 2.5)
the air supply for burning did not reduce (Chapter 4.1)
the door is not completely closed
The cooling loop often switches off
Possible reasons:
-
the recommended dose of the fuel is not kept (Chapter 2.5)
there is a high temperature of the accumulation tank – stop and add wood
the valve is damaged (contact your fireplace technician)
there was an electricity breakdown – stop to add wood
water installation defect (contact your fireplace technician)
If defects continue, contact your fireplace technician.
17
7. General warranty
terms
7.1.
Important information
Hoxter products are produced from high-quality materials with a long service life. The whole
manufacturing process is the subject of regular inspection to prevent any defects.
The installation of this product requires professional knowledge and, therefore, must only be done
by qualified companies aware of the valid legal provisions.
Note: Damage which exceeds the financial framework of our delivered devices, will not be
acknowledged unless stated by law otherwise.
7.2.
Warranty conditions
- T
he fireplace insert may only be installed by a professional company in accordance with our
manuals and local standards.
- It is forbidden to make any technical changes to the fireplace.
- During operation of the fireplace insert, the operator must follow the stated user manual.
- T
he warranty does not apply to damage originated during transport due to incorrect storage
in a wet environment.
- The warranty does not apply to common wearing of the fireplace insert (Chapter 7.4).
- The warranty does not apply to damage caused by overheating the fireplace insert, i.e. excessive
volume of fuel, i.e. adding excessive volume of fuel (Chapter 2.5), or use of the forbidden flue
(Chapter 2.1).
7.3.
Warranty period
The warranty period starts from the day of sale to the end client. The warranty period for the body
of the fireplace insert is 5 years. The warranty period for all mechanical parts and parts in contact
with fire is 2 years. The warranty does not apply to for common wearing parts (chapter 7.4).
For heat-water products, the warranty does not apply to thermo-static valves, safety valves, pits
and aerating valves.
18
7.4.
Common wearing
Warranty conditions do not apply to parts which are the subject of common wearing, particular
concerning:
Wearing of the fireplace bed: Refractory / nyrolit plates are expanded or contracted during
operation due to thermal loading. During these processes, micro cracks may originate. If refractory
/ nyrolit plates keep their form and are not broken, then they fulfil their function.
Wearing of surface treatment: colour change of the varnish or galvanized surfaces due
to thermal stressing or overheating.
Wearing of sealing: decreasing the tightness due to the affection of heat, mechanical wearing
and hardening of sealing.
Wearing of glass: dirtying by soot or remainders of burnt materials, colour or other changes
by the affection of heat.
7.5.
Repair and maintenance
During the warranty period, all defects will be repaired where the reasons are proven defects
to material and manufacturing defects. Compensation for defects outside the boundaries of this
damage is excluded.Maintenance of the device or the replacement of components will not extend
the warranty period. For the replaceable parts, the warranty period stated by law is valid.
7.6.
Making a claim
To make a warranty claim, contact your fireplace technician and submit:
- warranty certificate
- description and photo documentation of the defect
Contact your fireplace technician
19
HOXTER gmbh
Hersbrucker Straße 23
91244 Reichenschwand
Germany
+49 (0)9151 8659 163
[email protected]
HOXTER a.s.
Blanenská 1902
66434 Kuřim
Czech Republic
+420 518 777 701
[email protected]
www.hoxter.eu
version 04/2015
Changes of the stated data and errors reserved.