1
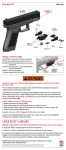
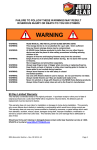
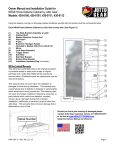
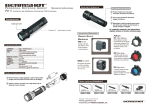
RAIL MASTER ® PRO ™ CMR-204 & CMR 205
A.
B.
LEGALLY ARMED CITIZENS AROUND THE WORLD.
TOP CHOICE OF LAW ENFORCEMENT, MILITARIES AND
ACCURACY AND SECURITY, CRIMSON TRACE IS THE
RAIL MASTER ® PRO ™ . WHEN IT COMES TO SPEED,
AND LASER SIGHTING SYSTEM: CRIMSON TRACE
Rail Lug
Insert
(4 Included)
THANK YOU FOR SELECTING THE FINEST LIGHT
Clamp
Battery
R A I L M A S T E R
®
P R O
™
—
+
INSTALLATION HANDBOOK
+
Battery Lid
Instant
Activation™
MOST M1913/PICATINNY AND WEAVER STYLE
ACCESSORY RAILS ON PISTOLS, RIFLES AND SHOTGUNS
CMR-204 & CMR- 2 0 5 for
Clamp
Screws
PRODUCT SPECIFICATIONS
RED BEAM INTENSITY: 5mW peak, Class 3R laser
GREEN BEAM INTENSITY: 5mW peak, Class 3R laser
BEAM DOT SIZE: Approximately 0.5 inches diameter at 50 feet
BATTERIES: O
ne (1) CR2 lithium battery; two hours of illumination
LIGHT INTENSITY: 100 lumen LED
ACTIVATION: Instant Activation™ - Tap on, tap off with auto shut
off at five minutes
WARRANTY: Three-year full warranty
This product complies with 21 CFR 1040.10
WARRANTY
Secure Lock
Technology™
Instant
Activation
Windage and Elevation
Adjustment
CRIMSON TRACE® (CT) warrants that this product will be free from defects in materials and workmanship for a period of three
years from the original retail purchase. CT will repair or replace with an item of equivalent value, at its option, any product or
part which is found to be defective under normal use and service, without charge during the warranty period. CT’s obligation to
repair or replace shall be the purchaser’s sole and exclusive remedy under this warranty. This warranty does not cover normal
maintenance and service and does not apply to any products or parts which have been subject to modification, misuse, carelessness, accident, improper maintenance or repair other than CT.
This limited warranty is in lieu of any and all other warranties, expressed or implied, including but not limited to, merchantability
and fit for particular purpose. CT shall not be reliable for indirect, incidental, consequential or special damages arising out of, or
in connection with, product use and performance, even if it has been informed of the possibility of such damages. This warranty
does not cover the finish of any Pro Custom products cosmetics, batteries or problems arising from faulty batteries.
For warranty service call Customer Service at 800-442-2406 or email [email protected]
for a Return Authorization Number (RMA). Fill in RMA number on the form below and attach
to outside of package. Carefully package unit and affix mailing label (as shown below).
CRIMSON TRACE CORPORATION
RMA#_________________________
9780 SW Freeman Drive
Wilsonville, OR 97070
Phone: 800-442-2406
VISIT US ONLINE AT CRIMSONTRACE.COM OR CONTACT
US AT 1-800-442-2406 TO REGISTER YOUR PRODUCT.
FAILURE TO FOLLOW ANY OF THE FOLLOWING WARNINGS MAY RESULT IN SEVERE INJURY OR DEATH
TO YOU OR OTHERS.
Prior to installing Crimson Trace products, ensure that the firearm is unloaded, the magazine is
removed, safety on and finger(s) off the trigger.
DO NOT install or use Crimson Trace product if the installation of the product in any way affects the safe
function of the firearm. If, while installing Crimson Trace products, you have any trouble with the fit or
functionality of the firearm, STOP IMMEDIATELY and call Crimson Trace Customer Service for assistance
at 1-800-442-2406.
ALWAYS FOLLOW THE 4 RULES OF FIREARM SAFETY:
27-1616 REV 001 05/14
1. Handle all firearms as if they are loaded.
2. Never let the muzzle cover anything that you are not willing to destroy.
3. Keep your finger off the trigger until your sights are on the target and you are ready to fire.
4. Be sure of your target and what is beyond.
Remember, the user is ALWAYS responsible for the safe use of a firearm.
Crimson Trace recommends that every gun owner take a gun safety course from a certified NRA
Instructor before handling or firing your firearm.
CRIMSON CLUB MEMBER.
AND WARRANTY OR JOIN FELLOW USERS AS A
VALUABLE INFORMATION ON TRAINING, TACTICS
HERE YOU CAN REGISTER YOUR PRODUCT, FIND
LASER SAFETY LABELING
VISIT US ONLINE AT WWW.CRIMSONTRACE.COM.
IMPORTANT: LASER PRODUCTS MUST ONLY BE OPERATED WITH THE SAFETY LABEL APPLIED TO THE FIREARM.
YOUR LASER SIGHT. WE ALSO ENCOURAGE YOU TO
A.Attach the “Danger” warning label to the outside of the firearm.
B.Attach the “Aperture” warning label with the arrow pointing to the laser aperture.
Use caution when activating the laser to avoid direct eye exposure, which can result in
permanent eye damage. Follow all precautions as outlined by the firearms manufacturer.
Crimson Trace holds several patents and may have other patents pending that cover its innovations.
Please review individual products for patent numbers to determine the specific patent coverage.
WITH ANY QUESTIONS YOU MAY HAVE REGARDING
FEEL FREE TO CONTACT US AT 1.800.442.2406
DETERMINING FIT
INSTALLATION INSTRUCTIONS
INSERT INSTALLATION
#
#
1 INSERT
2 INSERT
INSERT
WELL
CAVITY
CAVITY
#
#
4 INSERT
3 INSERT
1. Multiple inserts may accommodate your gun frame. Select the insert that works best ergonomically
as each insert will change the position of the instant activation buttons. Refer to chart below for popular
models. Press the selected insert with Insert Well down firmly into the Cavity as indicated above.
Inserts #1 and #2 are installed with the Insert Well positioned forward. Inserts #3 and #4 are installed with
the Insert Well positioned backward.
FIT & INSERT NUMBER CHART (FOR POPULAR MAKES/MODELS)
GUN MANUFACTURER
INSERT #
BERSA
BP CC . . . . . . . . . . . . . . . . . . . . . . . . . . . 2
Thunder Pro . . . . . . . . . . . . . . . . . . . . . 2
GUN MANUFACTURER
INSERT #
HECKLER & KOCH
P30 . . . . . . . . . . . . . . . . . . . . . . 1*, 3*, 4*
45C . . . . . . . . . . . . . . . . . . . . . . . . . . . . . 1
P2000 . . . . . . . . . . . . . . . . . . . . . . . . . . . 2
*Multiple inserts will accommodate gun.
BERETTA
PX4 Compact . . . . . . . . . . . . . . . . . . . . . 2
PX4, 92, 96 . . . . . . . . . . . . . . . . . . . . . . . 4
RUGER
SR9c, SR40c. . . . . . . . . . . . . . . . . . . . . . 2
SR9, SR40. . . . . . . . . . . . . . . . . . . . . . . . 3
SR22. . . . . . . . . . . . . . . . . . . . . . . . . . . . 2
GUN MANUFACTURER
SPRINGFIELD
XD9, XD40 Sub-Compact. . . . . . . . . . .
XD40. . . . . . . . . . . . . . . . . . . . . . . . . . . .
XD9, XD9 Tactical. . . . . . . . . . . . . . . . .
XDM - 5.25, 4.5, 3.8. . . . . . . . . . . . . . . .
XD-S . . . . . . . . . . . . . . . . . . . . . . . . . . . .
2
4
2
2
2
GLOCK
Full and Compact Models
with Rails . . . . . . . . . . . . . . . . . . . . . . . . . . 3
SIG SAUER
P220, P226, P229, P250, P2022 . . . . 1, 4
SMITH & WESSON
MP9C, MP40C. . . . . . . . . . . . . . . . . . . . . 2
MP9, MP40. . . . . . . . . . . . . . . . . . . . . . . . 1
SD9, SD40 . . . . . . . . . . . . . . . . . . . . . . . 4
WALTHER
P22-Q 4" . . . . . . . . . . . . . . . . . . . . . . . . 2
PK380. . . . . . . . . . . . . . . . . . . . . . . . . . . 2
P99. . . . . . . . . . . . . . . . . . . . . . . . . . . 2, 4
PPQ. . . . . . . . . . . . . . . . . . . . . . . . . . . . . 4
PPS. . . . . . . . . . . . . . . . . . . . . . . . . . . . . 2
ACCESSORY RAILS
AR/M16/Rifles/Shotguns with
M1913 Picatinny Accessory Rail,
Weaver Accessory Rail. . . . . . . . . . . . . 1
WINDAGE & ELEVATION ADJUSTMENTS
Crimson Trace laser sights are pre-sighted at the factory to 50 feet. Many times no further adjustments
are required. All products are fully adjustable for windage and elevation if further adjustments are
desired. A good starting point is to align the laser with the fixed sights on the firearm. (Figure 1).
A two-screw alignment system is used to adjust for windage and elevation.
The adjustment screws are located just behind the laser source, use the
supplied allen wrenches to make any adjustments.
Start by lining your laser sight up with your fixed sights at a desired
distance. Most people sight in their laser at between 20 and 50 ft.
However because of the offset between the laser sight and the bore,
the actual change in point-of-impact at these distances is very small.
Elevation
Adjustment
Windage
Adjustment
Further adjustments can be made at the range to determine where your bullet impacts in relation to your
firearms fixed sights. The laser should be moved to the actual impact point of the bullet (Figure 2).
DO NOT OVERTURN THE ADJUSTMENT SCREWS. A little adjustment goes a long way. Rarely
is more than a half a turn is required to make your needed adjustments.
WI N DAGE
FIGURE. 1: BEAM LINED UP
WITH PROPER SIGHT PICTURE.
E LE VAT IO N
LEFT
DOWN
CLOCKWISE
RIGHT
CLOCKWISE
UP
COUNTER
CLOCKWISE
ACTIVATION
ROTATE BATTERY
LID OFF
Millennium Pro. . . . . . . . . . . . . . . . . . . 2
24/7. . . . . . . . . . . . . . . . . . . . . . . . . . . . . 4
YOUR RAIL MASTER PRO COMES WITH 4 INSERTS TO ACCOMMODATE MULTIPLE FIREARM PLATFORMS. FOR INFORMATION
ON THIS FIT CHART, PLEASE CONTACT OUR CUSTOMER SERVICE DEPARTMENT AT 1-800-442-2406.
COUNTER
CLOCKWISE
BATTERY INSTALLATION
TAURUS
BUCK MARK BLACK
LABEL TACTICAL . . . . . . . . . . . . . . . . . . 4
5.7 . . . . . . . . . . . . . . . . . . . . . . . . . . . . . . . 4
P9 . . . . . . . . . . . . . . . . . . . . . . . . . . . . . . . 3
P45 . . . . . . . . . . . . . . . . . . . . . . . . . . . . . . . 3
FNX-40 . . . . . . . . . . . . . . . . . . . . . . . . . . . . 3
3. Attach Rail Master Pro at desired location on
firearm rail and rotate into place, aligning insert
with rail lug. Turn screws clockwise to secure
clamps to rail.
INSERT #
BROWNING
FN
2. Align Rail Master® Pro™ at desired rail lug for
easy tap on/tap off activation.
FIGURE. 2: BEAM MOVED TO
LINE UP WITH IMPACT POINT.
WARNING: This product contains chemicals known to the state of California to cause cancer, or birth defects or
other reproductive harm.
ACTIVATION
4. Remove Battery Lid using coin. Place provided
battery positive (+) side toward trigger guard.
Screw battery lid back into place. When changing
the batteries, swab the threads of battery cap and
the body with isopropyl alcohol or dry cotton swab.
5. Tap either Instant Activation button to turn
laser on or off. When left on, the Rail Master Pro™
will remain on for 5 minutes before automatically
shutting off (as indicated by a quick pulse of the
laser at the end of five minutes).
6.Confirm that laser and iron sights are in alignment. The laser dot should rest on top of front site post
with correct iron sight picture. See windage and elevation adjustments to fine tune or adjust for any
point of impact. See Sighting figure below left.
7. Attach laser “Danger” and “Aperture” stickers onto pistol. (See Laser Safety Labeling section in these
instructions for details.)
VISIT CRIMSONTRACE.COM FOR STEP-BY-STEP INSTALLATION VIDEOS.
ACTIVATION & MODES
The Rail Master Pro has been programmed with 4 Activation Modes for full user adaptability. It has been
factory set to the Light/Laser Constant On Mode.
> Light/Laser Constant On
> Laser Constant On
> Light Constant On
> Laser with Light Strobe
To select desired mode start with the laser and light being off. Hold both activation paddles down for 3
seconds to cycle through the modes; release buttons at desired mode. When left on, the Rail Master Pro will
remain on for 5 minutes before automatically shutting off, as indicated by a quick pulse of the laser and light
at the end of five minutes.
MAINTENANCE
Your Rail Master® Pro™ requires minimal attention and is designed to resist most common firearm chemicals
and lubricants, however, excessive exposure to these chemicals can be detrimental. To ensure the safe
and effective operation of your light:
>Remove Rail Master Pro before cleaning gun.
>Do not use pressurized or compressed air.
>Do not immerse in cleaning fluid or lubricate firearm excessively. A firearm that has too much oil will foul the
lens of the light and result in an clouded beam. This can be easily cleaned and causes no permanent damage.
>Do not allow cleaning solution to enter lens source.
>Do not allow solvents to contact your Rail Master Pro that contain: VOCs or TCE such as: carb/brake
cleaner, acetone, MEK, gasoline. Damage will result.
>Crimson Trace lights are designed and positioned to minimize exposure. Occasional cleaning of the lens
is recommended.
After extensive shooting, you may notice a degradation of light or beam quality. This is the result of
fouling on the lens surface. This is normal and can be easily cleaned with a small cotton swab dipped in
isopropyl alcohol or window cleaner. Dry the lens with a clean dry swab. When cleaning the lens do not
touch lens with any sharp objects.