1
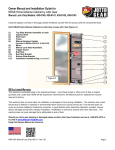
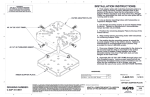
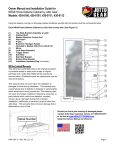
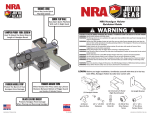
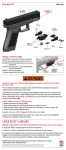
FAILURE TO FOLLOW THESE WARNINGS MAY RESULT
IN SERIOUS INJURY OR DEATH TO YOU OR OTHERS
WARNING:
WARNING:
WARNING:
WARNING:
WARNING:
WARNING:
WARNING:
WARNING:
WARNING:
WARNING:
WARNING:
READ MANUAL AND INSTALLATION GUIDE BEFORE USING
This storage device is not a substitute for a gun safe. Given sufficient
time any firearm storage device may be compromised.
All NRA® Home Defense products by Jotto Gear nor any other firearm
device can take the place of other safety procedures including advising
children of the
dangers of firearms and keeping firearms away from the untrained.
Empty firearms of all ammunition before storing. Do not store with rounds
in firearms.
Store magazines and ammunition separately.
Always keep fingers clear of trigger when removing or replacing firearms.
Keep thumb on back of hammer or slide when inserting pistol in holster to
insure pistol is not cocked during insertion.
Always store firearms in the with safety in closed
and locked position.
Use only with firearms listed in user’s manual. Do not use firearms not listed.
Always handle firearms as if they are loaded and ready to fire.
Never mix alcohol or drugs with firearms or the NRA® Home Defense products.
Always follow firearm safety rules set out by the firearm’s manufacturer.
90 Day Limited Warranty
This warranty is extended solely to the original purchaser. A purchase receipt or other proof of date of
original purchase and a Jotto Gear RGA# will be required for returned items. All defective parts for
replacement must be returned to factory.
This warranty does not cover labor for installation or damages to home during installation. This warranty
only covers failures due to defects in materials or workmanship which would occur during normal use.
This warranty does not cover any frames modified or finished by consumer, or parts failures which result
from alteration, accident, misuse, abuse, damages during theft, improper installation, modification or
service by anyone other than Jotto Gear. This warranty does not cover damage that is attributable to
acts of God.
Should you find a part missing or damaged please contact Jotto Gear Customer service at 1-800979-3375 or by chat at www.NRAJOTTOGEAR.com
NRA Biometric Holster – Rev. 00 10.14.14
Page 1
Key Features
The master biometric control unit offers an
entry switch option for Smart Home
systems and/or home security alarm
systems. This feature works similarly to
wired entry sensors of many alarms.
Sensor access hook-up connector is
located on the back of unit and is not
compatible with wireless sensor type
systems. When wired correctly, if user
scans the holster to open, it will also
signal home alarm control system.
Consult with your alarm system provider
on wiring, programming setup or entry
sensor compatibility.
Biometrics control unit can store up to 99
separate finger prints for firearm access.
Handgun Holster Adjustments
The handgun holster will only lock and unlock
with biometric control unit active and
programmed.
Upon receiving holster, a removable tab will
keep weapon unlocked while adjusting. Only
remove tab after adjusting barrel stop to
correct position.
Supplied with the handgun holster is a
security torx bit to be used with universal
drivers or to be installed in electronic screw
drivers.
Lift bale of handgun holster to insert unloaded
firearm.
Insert firearm into holster and close bale
behind firearm, adjustment to barrel stop may
be needed.
Adjust the single security screw on the top
front of holster.
Final adjustment should not bind action of
bale on handgun holster when secured. If
firearm is too tight it may prevent lock
from opening during normal operation.
Larger handguns may require removal of
barrel stop and/or shim under the trigger
guard to fit properly.
The security torx bit to adjust barrel stop
will also be used for attaching mounting bracket. Keep torx bit in safe place for future
adjustment if firearm change is needed.
NRA Biometric Holster – Rev. 00 10.14.14
Page 2
Read and understand these instructions and the labels on the Jotto Gear Handgun Holster before using.
For Automotive installations, make sure the location you choose is free of all gas lines, brake lines, gas
tank, electrical and mechanical services.
AVK Installation Procedure for vehicle or metal surface- Use QR Code
to right to view video sample of an AVK fastener installation, or you can
view at:
http://nrajottogear.gojotto.com/avk-fastener-installation-video
1.
The AVK fastener is designed to mount to metal surfaces only.
Prepare mounting area by pulling back carpet, padding or other
materials and marking where you will drill using the chosen
mounting bracket.
2.
Predrill pilot holes where you marked with 1/4” drill bit. Using the 25/64” drill bit, enlarge pilot
holes.
3.
Place 1/4"-20 x 1” long bolt though the 5/16” flange nut and hand thread bolt into the AVK fastener.
4.
Place into 25/64” drilled hole and use 1/2” box end wrench to secure the flange nut. Apply
downward pressure on the flange nut, pressing AVK fastener into hole. Using socket wrench,
tightened the 1/4"-20 x 1” bolt. This will the AVK fastener to expand and secure onto the backside
of the metal.
5.
REMOVE the 1/4"-20 x 1” bolt and flange nut to
repeat on second hole.
For Home Installations or non-metal
surfaces.
Due various surface types and
thicknesses, Customer should provide
own hardware to best secure
mounting bracket to selected
mounting surface.
Three different mounting brackets are provided to
maximize mounting position options. Choose a
secure surface when mounting bracket and mount.
After mounting bracket, use the provided security torx
bit in a universal driver to secure base of handgun
holster to mounted bracket with two provided 10-32
security screws.
Attach second biometric cable to handgun holster.
Save security torx bit and instructions for future
use.
NRA Biometric Holster – Rev. 00 10.14.14
Page 3
Programming Biometrics
Orange LED – Program Setup Mode (Master User only)
Red LED – Primary Awaken Mode
Green LED – Scanning Mode
White button – Program Button and Wake Up Button
When determining a Master User program finger, select a finger that has
the best definition and fingerprint ridges to be a master program finger.
Other fingers can be programmed later. Light, smooth or finger prints
lacking good definition may be more difficult read and not recommended
for Master User program finger. A thumb may work better due to size of
finger and surface to read.
Biometric Control Unit can ONLY be reset back to factory settings
by Master User finger or sent back to Jotto Gear. Circle chosen
master program finger on manual and keep safe for future reference.
Forgetting which finger is the Master User will prevent ability to
program new users or erasing users in future.
Troubleshooting Programming Tips:
An ORANGE LED means the biometrics reader is prompting for the Master User scan.
During initial setup, if biometrics remains ORANGE after programming. The scanner did not get a good
read during one or more attempts. Start over from the beginning of Master User setup.
At the end of programming any sequences, if biometric control unit beeps and flashes RED LED’s and
ORANGE LED’s multiple times the user may need to start over.
If the biometric unit will not open locks by Master User during a programming attempt, resetting batteries
may be necessary.
Inserting Batteries
Remove all four top screws on biometrics
control unit.
Insert six “AA” Lithium Ion Batteries Only.
Once batteries are inserted, a Master User
fingerprint will need to be present to program for
first time. Biometric control unit will continue to
cycle power and beep until Master is
programmed.
Attach top of control unit to base with four
previously removed screws.
Low Battery Warning
The biometric control unit will intermittently check if batteries are low. An alert signal will sound with four
beeps every 15 minutes, until batteries are replaced. Only “AA” Lithium Ion batteries should be used.
Recommended battery replacement is every 6 months.
NRA Biometric Holster – Rev. 00 10.14.14
Page 4
Before Starting: Be sure to read and understand each step prior to attempting. Waiting too long in
between steps will cause the scanner to time out.
Align crease below finger print on dot of scanner for
best results.
For extra help with programming setup, use QR
Codes or URL address for online video instructions.
Out-of-the-Box Setup Instructions for Master User
Note: After inserting batteries the scanner will cycle power every 30 to 40 seconds.
Start Step 1 within 5 seconds or wait until next power cycle for best results.
Step 1)
At ORANGE LED prompt, scan your selected Master User finger by pressing firmly and holding finger
still for three continuous beeps. Remove finger after third beep.
Step 2)
Wait for fourth beep without scanning finger.
Step 3)
Wait for scanner to cycle power and come up to RED LED prompt. If ORANGE LED prompt reappears,
start Out-of-the-Box programming over.
Step 4)
During RED LED prompt, scan Master User finger to open lock(s) and verify setup.
Note: Adjust finger slightly, if lock(s) do not open within 1 to 2 seconds.
Note: If biometric control unit sounds multiple beeps after third Master finger scan, one of finger scans
had a bad read. To ensure best performance, follow steps on page 19 to “Erase All Users Instructions”
and repeat “Out-of-the-Box Setup”.
NRA Biometric Holster – Rev. 00 10.14.14
Page 5
Before Starting: Be sure to read and understand each step prior to attempting. Waiting too long in
between steps will cause the scanner to time out.
To Program New Users or Additional Fingers
Only Master User finger will be able to program additional fingers/users.
Step1)
- Master User step
Press white program button on control unit.
Step 2)
- Master User step
Scan Master User finger to unlock firearms. Press white program button and wait 15 seconds for
ORANGE LED prompt to scan Master User finger a second time. Remove Master User finger quickly as
GREEN LED prompts for New User finger.
Step 3) – New User step
During GREEN LED prompt, scan New User finger by pressing firmly and holding new finger still for
three continuous beeps. Remove finger after third beep.
Step 4) – New User step
Wait for scanner to cycle power and come up to RED LED.
Step 5) – New User step
During RED LED prompt, scan new finger to open lock(s) and verify setup.
Note: Adjust finger slightly if lock(s) do not open within 1 to 2 seconds.
Note: If scanner has multiple beeps after third New User finger scan, one of the finger scans had a bad
read.
To ensure best performance repeat New User Programming steps over.
Do not erase, unless reprogramming all users including Master User.
NRA Biometric Holster – Rev. 00 10.14.14
Page 6
Before Starting: Be sure to read and understand each step prior to attempting. Waiting too long in
between steps will cause the scanner to time out.
Erasing All Users Instruction
Performing this operation will erase all users including Master User and set unit
back to factory default.
Only Master User finger will be able to perform these steps.
Step1)
- Master User step
Press white program button on control unit.
Step 2)
- Master User step
Scan Master User finger to unlock firearms. Press white program button and wait 15 seconds for
ORANGE LED.
Step 3) - Master User step
During ORANGE LED, press and hold white button and hold Master User finger in place on the scanner
simultaneously.
Note: While holding finger and button in place, ORANGE LED will alternate to GREEN LED four times
followed by two series of six beeps and flashing GREEN LEDs.
During second series of beeps, remove hands from biometrics control unit and wait for unit to reset.
Step 4)
- Master User step
Biometrics will reset back to factory default. ORANGE LED will display, user should return to Page 17
for “Out-of-the-Box Instruction” on programming a new Master User.
If not scanning new Master User right away, remove batteries to turn off biometric control unit.
General Operation
Once programmed, sliding frame open will awaken
biometric control unit for approximately 20 seconds.
Press the white button to awaken biometrics control
unit.
Scan a programmed finger to unlock for firearm
retrieval. The lock should remain open for
approximately 8 seconds before auto-locking.
The biometric control unit will light during unlocking
period.
This light will remain on for approximately 15 seconds
before turning off.
NRA Biometric Holster – Rev. 00 10.14.14
Page 7
Firearm Fit Chart
Beretta - 84, 92, 96, M9, PX4 Storm, Nano
Bersa - Thunder 380
Colt - Defender, 1911, 1991, XSE, Rail Gun, New Agent, Series 70, Combat, Delta
CZ - CZ 75
EAA - Witness
FNH - FNX, FNS, Five-Seven
Glock - 17, 19, 21, 22, 23, 26, 27, 30, 33, 34, 35, 36, 37
HK - P30, USP, USP Compact, HK45, HK45 Compact
Kel Tech - PF9
Kimber - 1911, 1911 Compact
Khar - K9
Lionheart - L9C
Remington - 1911 R1
Ruger - SR9, SR9C, SR1911
Sig Sauer - P220, P226, P228, P229, P245, P250, Mosquito, SP2022
Smith & Wesson - 5906, 6946, M&P 9, M&P 40, M&P 45, M&P Shield
Springfield - XD, XDm, XDs, 1911 Range Officer, Trophy Match, TRP, Operator, EMP,
Ultra
Steyr - M9 A1
Taurus -709 Slim, PT809, PT840, PT845, PT24/7, 1911, PT92, PT100, PT101,
Millennium
Tanfoglio - TZ75
Walther - PK380, PPS, P99, PPX, PPQ
Wilson Combat - 1911
Keep this Owners Manual as reference.
NRA Biometric Holster – Rev. 00 10.14.14
Page 8