1
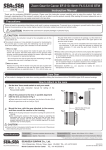
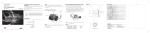
BIG DIGIT DUAL TIMER/CLOCK
USER’S MANUAL
GENERAL TOOLS & INSTRUMENTS
80 White Street
New York, NY 10013-3567
PHONE (212) 431-6100 FAX (212) 431-6499
TOLL FREE (800) 697-8665
e-mail: [email protected]
www.generaltools.com
TI872 User’s Manual
Specifications subject to change without notice
©2012 GENERAL TOOLS & INSTRUMENTS
NOTICE - WE ARE NOT RESPONSIBLE FOR
TYPOGRAPHICAL ERRORS.
MAN#TI872 9/12/12
TI872
Please read this manual carefully and thoroughly
before using this product.
SETUP INSTRUCTIONS
1. Remove the plastic film from the display.
2. Turn the unit over and open the battery
compartment by sliding the white plastic cover
above the magnet in the direction of the arrow.
3. Install the supplied “AAA” battery in the
compartment using the + and – marks inside the
compartment as a guide.
The beeper will sound quickly four times. If you
have not moved the function switch on the right
side of the unit from its factory-set CLOCK
2
position, the display will show a running clock
beginning at 12:00:00 AM. If you have moved the
function switch to another position, the display will
show 0:00:00.
4. Replace the battery compartment cover.
TO SET THE CLOCK
1. Make sure the function switch on the right side of
the unit is in the CLOCK position. Press and hold
the large START/STOP button on the right side of
the front panel. The beeper will sound once and all
six display digits will begin blinking once per
second. Within four seconds, repeatedly press the
HR button on the left side of the front panel until
the hour shown matches the current hour. To set
an afternoon or evening hour, continue pressing
the HR button until you pass 11 AM and the
AM indication above the colon is replaced by a
PM indication below the colon.
2. Again—within four seconds—press the MIN
button on the front panel repeatedly until the
minutes digits match the current minutes value.
3. (Optional) Within four seconds—press the SEC
button on the front panel repeatedly until the
seconds digits match the current seconds value.
Note: To display time in 24-hour (military) format,
press and hold the CLEAR button. To return to
12-hour (AM and PM) format, press and hold the
CLEAR button again.
TO USE THE STOPWATCH
(COUNT-UP TIMER)
1. Move the function switch on the right side of the
unit to the COUNT UP position. The display will
show 0:00:00, with COUNT UP above the seconds
digits.
3
2. Press the START/STOP button. The beeper will
sound and the display will show a stopwatch
counting up from 0:00:00.
3. To pause the count, press the START/STOP button.
The beeper will sound. To resume the count, press
the START/STOP button again. The beeper will
sound again.
4. To clear (zero out) the count, press the CLEAR
button while the count is paused.
Notes: 1) While the count-up timer is running,
moving the function switch to the CLOCK position or
either TIMER position will change the display to the
4
current time or countdown time, with the flashing
words COUNT UP above the seconds digits to remind
you that the count-up timer (stopwatch) is running.
2) The count will “roll over” to 0:00:00 one second
past 23:59:59.
TO USE EITHER COUNTDOWN TIMER
1. Move the function switch on the right side of the
unit to the TIMER 1 or TIMER 2 position. The
display will show 0:00:00, with TIMER 1 or TIMER
2 above the seconds digits.
2. Use the HR, MIN and SEC buttons to enter the
desired countdown duration. Press the MEMORY
button to save this setting. The word MEMORY will
appear on the display.
3. Press the START/STOP button to begin the
countdown. The beeper will sound. Press the
START/STOP button again to pause the
countdown. The beeper will sound again. Press the
START/STOP button again to resume the
countdown. This will cause the beeper to sound
again. To clear (zero out) the count, press the
CLEAR button while the count is paused.
4. The alarm will sound when the countdown reaches
0:00:00. For TIMER 1, the alarm is a sequence of
four beeps. For TIMER 2, the alarm is a sequence
of two beeps. When the alarm sounds, the flashing
notification TIME’S UP will appear in the upper
right corner of the display and a new timer will
begin counting up from 0:00:00 to indicate how
much time has elapsed since the alarm sounded.
To cancel the alarm, press the START/STOP
button. The display will reset to 0:00:00.
5. To use either timer to time the same period again,
move the function switch to the TIMER 1 or
TIMER 2 position and press the MEMORY button.
5
The selected timer’s last duration will be recalled
and displayed, along with the number of the timer
it is associated with. To change the memorized
duration of either countdown timer, enter the new
duration using the HR, MIN and SEC buttons and
then press the MEMORY button.
Notes: 1) TIMER 1 and TIMER 2 can run
simultaneously. The difference in the sounds of their
alarms—four beeps vs. two beeps—comes in handy
for timing two events that are part of the same
process (such as cooking a meal or brewing beer).
2) Removing the battery clears the clock as well as
the memorized durations of TIMER 1 and TIMER 2.
6
SPECIFICATIONS
• Clock Display: Hours, minutes and seconds in
12 or 24 hour format
• Range of Stopwatch (Count-up timer) and
Two Countdown Timers: 23:59:59
• Display Size: 2.25 x 0.8 in. (57 x 20mm)
• Digit Height: 0.75 in. (19mm)
• Dimensions: 2.65 x 2.4 x 0.65 in.
(67 x 61 x 17mm)
• Weight: 2.5 oz. (71g)
• Power Source: 1 “AAA” battery (included)
WARRANTY INFORMATION
General Tools & Instruments’ (General’s) TI872 Big
Digit Dual Timer/Clock is warranted to the original
purchaser to be free from defects in material and
workmanship for a period of one year. Subject to
certain restrictions, General will repair or replace this
instrument if, after examination, the company
determines it to be defective in material or
workmanship.
This warranty does not apply to damages that
General determines to be from an attempted repair
by non-authorized personnel or misuse, alterations,
normal wear and tear, or accidental damage. The
defective unit must be returned to General Tools &
Instruments or to a General-authorized service
center, freight prepaid and insured.
7
RETURN FOR REPAIR POLICY
Every effort has been made to provide you with a
reliable product of superior quality. However, in the
event your instrument requires repair, please contact
our Customer Service to obtain an RGA (Return Goods
Authorization) number before forwarding the unit via
prepaid freight to the attention of our Service Center
at this address:
8
General Tools & Instruments
80 White Street
New York, NY 10013
212-431-6100
Remember to include a copy of your proof of
purchase, your return address, and your phone
number and/or e-mail address.