1
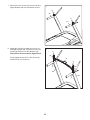
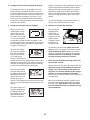
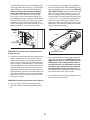
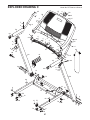
9. With the help of a second person, hold the console assembly near the Right Handrail (64).
9
Connect the Upright Wire (63) to the console
wire. See the inset drawing. The connectors
should slide together easily and snap into
place. If they do not, turn one connector and try
again. IF YOU DO NOT CONNECT THE CONNECTORS PROPERLY, THE CONSOLE MAY
BECOME DAMAGED WHEN YOU TURN ON
THE POWER. Then, remove the wire tie from
the Upright Wire.
Console
Assembly
Console
Wire
Ground
Wires
63
Connect the console ground wire to the ground
wire on the Console Crossbar (61).
61
64
Console
Wire
63
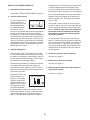
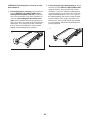
10.Insert the wires into the Right Handrail (64)
through the indicated hole as you set the console assembly on the Left and Right Uprights
(66, 76). Make sure that no wires are pinched.
10
See the inset drawing. When setting the console assembly onto the Left and Right Uprights
(66, 76), make sure that the indicated flanges
(only one is shown) on the Console Base (58) do
not sit on top of the Left or Right Uprights. They
must be on the sides of the Uprights as shown.
Console Assembly
Wires
Wires
Hole
Attach the console assembly with ten #8 x 3/4"
Screws (4). Start all ten Screws, and then
tighten them. Do not overtighten the Screws.
64
4
4
Firmly tighten the six 3/8" x 3 1/4" Screws (2) on
the lower ends of the Left and Right Uprights
(66, 76) (only side is shown).
4
4
4
76
66
Flange
58
66
2
11