1
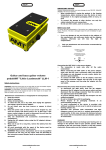
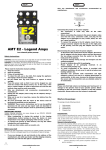
Contents
Important
Complete set
Introduction
Before you start
Specifications
Controls
Front panel
Only for qualified personnel
Tubes replacement
Connections
Block diagram
1
1
2
2
2
3
3
3
3
3
4
IMPORTANT!
SS-11
Guitar preamplifier
User’s manual
www.amtelectronics.com
If the device was transported or stored in cold environment it is necessary to
leave the device in its original packaging for at LEAST 2 hours before switching
it on!
Use only the cables specified for corresponding connections of the guitar
preamp to other devices.
Please, do not use other types of cables: e.g. speaker cables etc.
SWITCHING THE PREAMP ON:
Please switch the device on only after you have completed all audio
connections!
Before switching the preamp on make sure that the housing, the connection
cables and the power adapter mains plug are free from damages: cuts, cracks,
dents etc. and are intact.
To switch SS-11 first insert the power adapter low voltage jack into the
corresponding socket on the rear panel of the guitar preamp and then plug the
adapter into the wall outlet.
SWITCHING THE PREAMP OFF:
To switch the guitar preamp off first turn off the guitar amplifier used with
SS-11. Then disconnect the power adapter of the guitar preamp SS-11.
COMPLETE SET
Safety precautions.
CAUTION! High voltage! Danger! Even after the device has been switched
off the internal circuits might be alive with up to 500V
voltage. To avoid the electric shock DO NOT REMOVE
the bottom or top covers. The device does not contain
any user-serviceable parts. The preamp can be
repaired only by qualified personnel. Please disconnect
the device from mains if not in use.
WARNING! To avoid fire or electric shock do not let rain or water inside the device.
Do not place any liquid containing vessels on top of the device.
The icon means the presence of live and dangerous voltage
inside the device and the danger of electric shock.
The complete set includes:
1. Guitar preamp
2. Power adapter
3. Instruction manual
4. Packaging
5. Warranty card
This icon points out important information related to the
device operation and maintenance contained in enclosed
documentation.
Please read the instruction manual carefully.
1.
Keep the manual at hand.
2.
Pay attention to warnings.
3.
Follow all operational instructions.
4.
Use only dry cloth for device cleaning. Do not forget to switch
the device off.
5.
Please do not block ventilation slots. When connecting the
device follow the instructions provided by the manufacturer.
6.
Please do not place the device nearby heat sources, avoid
direct sunlight.
7.
Do not step on the mains cable, avoid sharp angles etc. If the
mains plug or plug adapter of the device are used for
disconnection from mains, they are to be easily accessible.
8.
Use only auxiliary devices and accessories recommended by
the manufacturer. Disconnect the device during thunderstorms
or when the device is not used for a long time.
9.
Any work related to the device repair must be done by
qualified service personnel.
10.
WARNING! All instructions related to the device servicing are
intended exclusively for qualified personnel. To avoid the
electric shock DO NOT fulfill repair works not described in the
instruction manual. All repairs must be done by qualified
personnel.
www.amtelectronics.com
1
www.amtelectronics.com
1
1
1
1
1
1
INTRODUCTION
Specifications
SS11A and SS-11B floor preamps are intended for use both in studio and live on
stage, for standard tuning playing as well as lower one.
Before starting the serial production of AMT SS-11 guitar preamp we conducted a
number of audio tests and experiments. As a result we arrived to the conclusion that
in order to satisfy various tastes of the guitarists army SS-11 would be produced in
at least two versions based on the same platform.
While developing SS-11 we were guided by the following concept – the quality
sound at minimum size and maximum functionality with full-bodied tube-based pre
amplification on the basis of quality electronic components.
9
9
9
9
9
9
tube-based 4-stage overdrive channel (2x12АХ7) with high anode supply
voltage (+300V).
three separate CLEAN/CRUNCH/LEAD channels. CRUNCH and LEAD have
common tone controls but separate sensitivity and output level controls plus
separate Tone-SHIFT switches.
serial insert (FX LOOP);
2
INPUT
Impedance
1.0 МОhm
Sensitivity
-20dB
RETURN
Impedance
1.0 МОhm
Sensitivity
-10dB
OUTPUT channel connection to specialized guitar amps with standard level of
+10dB (TO AMP mode) as well as directly to mixing console with standard
level of -10dB with guitar cabinet simulation feature (TO MIX mode)
OUTPUT
Output impedance
10kОhm
the preamp outputs are equipped with the improved semi-conductor buffers
providing not only the signal enrichment with low harmonics, but also smooth
transition to additional slight limitation inherent in devices using vacuum
triode-based insert.
Output signal level (TO AMP mode)
+10dB
Output signal level (TO MIX mode)
-10dB
SS-11 uses the new guitar cabinet emulator based on filed-effect transistors
possessing better natural sounding when connected to line-in.
Output impedance
10kОhm
Output signal level
-10dB
the special attention was paid to the quality of triodes anode supply: the
preamp uses specially developed high-voltage transducer eliminating
penetration of amplified signal pulse interferences.
Power supply
SS-11 Channels Description
LEAD offers an ample supply of overdrive and dense stringy sound great for
aggressive rhythm parts as well as melodious solos with excellent readability.
CRUNCH differs in lesser overall sensitivity and more open sound structure. The
wide range of sensitivity adjustment allows to obtain the sound starting from slight
crunch to nearly LEAD channel’s heavy sound.
CLEAN offers classic clean sound with slight limitation in maximum sensitivity mode
and crystal clear and bright one within the range of moderate sensitivity. CLEAN
channel has a separate 3-way tone control, sensitivity and output level adjustment
and BRIGHT switch.
SEND
Voltage
DC 12V
Current
0.56A
Power adapter
Voltage
DC 12V
Current
1.25A
Dimensions / Weight
Net dimensions (WхHхD).
(without power adapter)
Net weight (without power adapter)
119х57х103 mm.
0.52 kg
Overall dimensions (WхHхD)
Appr. 206х83х140 mm
GROSS weight
Appr. 0.8 kg
Before You Start
To provide safe transportation the device was carefully packed by the manufacturer.
However, if the the packaging is damaged it is necessary to visually inspect the
device.
¾
If you detect any damages DO NOT ship the device to our
address but inform the vendor and transportation company,
otherwise you’ll lose your compensation right.
¾
In order to avoid damages during transportation or/and storage
use the original packaging at all times.
¾
Do not allow children to play with the device and the
packaging.
¾
Please recycle
contamination.
all
packaging
to
avoid
environmental
¾
To avoid the device overheating provide enough air circulation
around it, do not cover it and do not place it next to heat
generating equipment.
¾
Using the device nearby powerful radio transmitters and highfrequency signals sources might result in significant decrease
in sound quality. If this is the case increase the distance
between the device and transmitter and use shielded cables for
all connections.
WARNING!
Please pay attention to the fact that loud sounds might impair your
hearing or/and damage your speakers. Before switching the device
on please turn the VOLUME control knobs to extreme left position
(counterclockwise). Try to use moderate volume levels at all times.
www.amtelectronics.com
2
devices
Tubes
12AX7 (ECC-83)
Architecture of SS-11:
9
Use
only
manufacturer-recommended
accessories while operating the device.
www.amtelectronics.com
2
and
WARNING! All connections are to be made ONLY when
the power supply of the guitar preamp has been
SWITCHED OFF!
CONTROLS
FRONT PANEL
ONLY FOR QUALIFIED PERSONNEL
DANGER! High voltage!
Even after the device has been switched off the internal
circuits might be alive with up to 500V voltage. To avoid
the electric shock DO NOT REMOVE the bottom or top covers.
The device does not contain any user-serviceable parts. The
preamp can be repaired only by qualified personnel. Please
disconnect the device from mains if not in use.
The circuits of the preamp are alive with the high-voltage
current. To avoid possible damage or injuries related to
fire or electric shock do not let any foreign objects or
liquids inside the device.
1.
2.
3.
4.
5.
6.
7.
8.
9.
10.
11.
12.
13.
14.
15.
16.
17.
18.
19.
20.
21.
22.
23.
24.
25.
26.
27.
28.
TO AMP / TO MIX output signal level switch
LEVEL LEAD LEAD channel volume level
LOW - DRIVE channel low frequency adjustment
OUTPUT – to amplifier/linear input of mixer (in accordance with switch
1 position)
LEVEL CR. volume level adjustment for CRUNCH channel
DRIVE channel operation indicator
RETURN – connection to external effects unit output (-10dB)
LEVEL - volume level adjustment for CLEAN channel
CLEAN channel operation indicator
LOW - CLEAN channel low frequency adjustment
T.SHIFT of CRUNCH channel highlights middle and high frequencies
MID - CLEAN channel middle frequencies adjustment
DC-12V (rear panel) for power adapter connection
HIGH - CLEAN channel high frequency adjustment
T.SHIFT of LEAD channel highlights middle and high frequencies
BRIGHT – tone correction of CLEAN channel
GAIN of CLEAN adjusts sensitivity level
SEND – signal output to external effects unit (-10dB)
Operation indicator of DRIVE in CRUNCH mode
GAIN CR. adjusts sensitivity level of CRUNCH channel
INPUT – for guitar connection
Operation indicator of DRIVE channel in LEAD mode
GAIN LEAD adjusts sensitivity level of LEAD channel
HIGH - DRIVE channel high frequency adjustment
MID - DRIVE channel middle frequency adjustment
Tubes protection cover
CRUNCH / LEAD foot switch to switch between CRUNCH and
LEAD
CLEAN / DRIVE foot switch to switch between CLEAN and DRIVE
www.amtelectronics.com
3
Tubes replacement
To replace the tubes:
1. Remove the upper protection cover (26) by unscrewing 4 (four)
screws.
2. Remove bottom cover of the preamp by unscrewing 4 (four) screws.
3. Remove old tubes.
4. Install new tubes.
5. Screw the bottom and upper protection covers on their places.
Use only the tubes recommended by the manufacturer for replacement..
AUDIO CONNECTIONS AND SWITCHING
WARNING! All connections are to be made ONLY after the
preamp power supply has been DISCONNECTED!
Possible audio connections with external devices:
www.amtelectronics.com
3
___________________________________________________________
AMT Electronics reserves the right to alter design and exterior of the device without
preliminary notice, which in no way will affect its consumer value. The device
specifications and exterior might differ from the ones shown in this document.
www.amtelectronics.com
4
www.amtelectronics.com
4