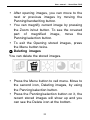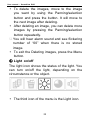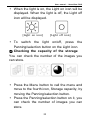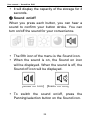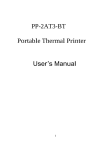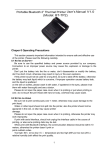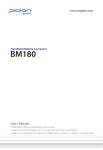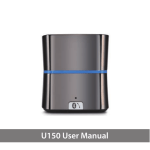
1
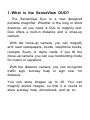
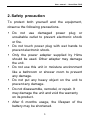
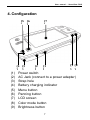
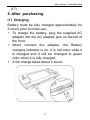
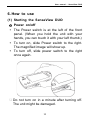
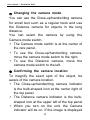
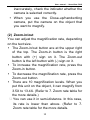
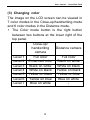
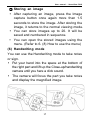
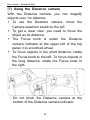
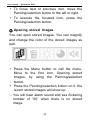
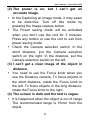
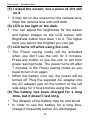
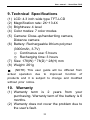
Table of Contents 1. 2. 3. 4. 5. What is the SenseView DUO? ....................4 Safety precaution ..........................................5 Package .........................................................6 Configuration..................................................7 After purchasing ............................................9 (1) Charging ................................................9 (2) Remove LCD protection film .............10 6. How to use .................................................11 (1) Starting the SenseView DUO ............11 ① Power on/off .................................11 ② Changing the camera mode........12 Confirming the camera location ..12 (2) Zoom-in/out .........................................13 (3) Changing color....................................15 (4) Changing brightness ...........................16 (5) Capturing/storing images ....................16 ① Capturing an image .....................16 ③ ② (6) Storing an image..........................17 Handwriting mode ...............................17 2 (7) Using the Distance camera ...............18 (8) (9) Using the menu ..................................19 Additional features ..............................25 ① Power saving mode .....................25 ② Checking the battery status ........26 7. Zoom rate table ..........................................27 (1) Close-up/handwriting camera .............27 (2) Distance camera .................................28 8. Troubleshooting ...........................................28 9. Technical Specifications..............................31 10. Warranty ....................................................31 1. What is the SenseView DUO? The SenseView Duo is a new designed portable magnifier. Whether in the long or short distance, all you need is Duo to magnify text. Duo offers a built-in distance and a close-up camera. With the close-up camera, you can magnify and read newspapers, books, telephone books, receipts, flyers, or name cards. If you tilt the close-up camera, you can use handwriting mode for memo or signature. With the distance camera, you can recognize traffic sign, subway map or sign over 1m distance. You can store images up to 20. You can magnify stored images, so that it is useful to store subway map, phonebook, and so on. User manual – SenseView DUO 2. Safety precaution To protect both yourself and the equipment, observe the following precautions. Do not use damaged power plug or unsuitable outlet to prevent electronic shock or fire. Do not touch power plug with wet hands to prevent electronic shock. Only the power adapter supplied by Hims should be used. Other adapter may damage the unit. Do not use this unit in moisture environment like a bathroom or shower room to prevent any damage. Do not put any heavy object on the unit to prevent any damage. Do not disassemble, remodel, or repair. It may damage the unit and void the warranty on its product. After 6 months usage, the lifespan of the battery may be shortened. 5 User manual – SenseView DUO 3. Package (1) (2) (3) (4) (5) SenseView DUO AC adapter Carrying bag Strap User manual 6 User manual – SenseView DUO 4. Configuration (7 ) (5 (6 ) ) (4 (3 ) ) (1) (2) (3) (4) (5) (6) (7) (8) (9) (2 ) (1 ) (9 (8 ) ) Power switch AC Jack (connect to a power adapter) Strap hole Battery charging indicator Menu button Panning button LCD screen Color mode button Brightness button 7 User manual – SenseView DUO (16) (15) (10) (11 (12 ) ) (10) (11) (12) (13) (14) (15) (16) (14) (13) Close-up/handwriting camera indicator Zoom-in button Zoom-out button Image capture button Camera selection switch Distance camera indicator Focus knob for distance camera 8 User manual – SenseView DUO (17) 5. After purchasing (1) Charging Battery must be fully charged approximately for 3 hours prior to initial use. To charge the battery, plug the supplied AC adapter into the AC adapter jack on the left of the front. When connect the adapter, the Battery charging indicator is on. It is red color while it is charged and it will be changed to green color when it is fully charged. A full charge takes about 3 hours. 9 User manual – SenseView DUO (2) Remove LCD protection film A protection film is covered on the LCD. Make sure to take it off before using the unit. 10 User manual – SenseView DUO 6. How to use (1) Starting the SenseView DUO ① Power on/off The Power switch is at the left of the front panel. (When you hold the unit with your hands, you can touch it with your left thumb.) To turn on, slide Power switch to the right. The magnified image will show up. To turn off, slide power switch to the right once again. ※ Do not turn on in a minute after turning off. The unit might be damaged. 11 User manual – SenseView DUO ② Changing the camera mode You can use the Close-up/handwriting camera for small text such as a regular book and use the Distance camera for objects in the long distance. You can select the camera by using the Camera mode switch. The Camera mode switch is at the center of the rare panel. To use the Close-up/handwriting camera, move the camera mode switch to the right. To use the Distance camera, move the camera mode switch to the left. ③ Confirming the camera location To magnify the exact spot of the object, be aware of the camera location. The Close-up/handwriting camera indicator is the bulb-shaped icon at the center right of the top panel. The Distance camera indicator is the bulbshaped icon at the upper left of the top panel. When you turn on the unit, the Camera indicator will be on. If the image is displayed 12 User manual – SenseView DUO inaccurately, check the indicator whether the camera is selected correctly. When you use the Close-up/handwriting camera, put the camera on the object that you want to magnify. (2) Zoom-in/out You can adjust the magnification rate, depending on the text size. The Zoom-in/out button are at the upper right of the top. The Zoom-in button is the right button with (+) sign on it. The Zoom-out button is the left button with (-) sign on it. To increase the magnification rate, press the Zoom-in button. To decrease the magnification rate, press the Zoom-out button. There are 10 magnification levels. When you put this unit on the object, it can magnify from 3.5X to 13.4X. (Refer to 7. Zoom rate table for the more details.) ※ You can use it in semi-distance. In this case, its rate is lower than above. (Refer to 7. Zoom rate table for the more details. 13 User manual – SenseView DUO 14 User manual – SenseView DUO (3) Changing color The image on the LCD screen can be viewed in 7 color modes in the Close-up/handwriting mode and 6 color modes in the Distance mode. The Color mode button is the right button between two buttons at the lower right of the top panel. Close-up/ handwriting Distance camera camera Level 1 Full color Full color Level 2 Enhanced color Black on white Level 3 Black on white White on black Level 4 White on black Yellow on black Level 5 Yellow on black Yellow on blue Level 6 Yellow on blue Blue on white Level 7 Blue on white - 15 User manual – SenseView DUO (4) Changing brightness You can adjust brightness for the darker and lighter images depending on material viewing on the LCD. The Brightness button is the left button between two buttons at the lower right of the top panel. Repeatedly pressing the button will take it through the 4 brightness levels. (5) Capturing/storing images The feature of still image is useful to read small letters such as address, and phone number. You can store the images for future. ① Capturing an image The Image capture button is at the right of the rare panel. (When you hold its right side with your right hand, you can touch it with your right fore-finger.) To capture an image, press the Image capture button. To escape this mode, press the Image capture button once again. 16 User manual – SenseView DUO ② Storing an image After capturing an image, press the Image capture button once again more than 1.5 seconds to store the image. After storing the image, it returns to the normal viewing mode. You can store images up to 20. It will be saved and numbered in sequence. You can open the stored images using the menu. (Refer to 6. (8) How to use the menu) (6) Handwriting mode You can use the Handwriting mode to take notes or sign. Put your hand into the space at the bottom of the right part and lift up the Close-up/handwriting camera until you here a click sound. The camera will focus the part you take notes and display the magnified image. 17 User manual – SenseView DUO (7) Using the Distance camera With the Distance camera, you can magnify objects over 1m distance. To use the Distance camera, move the Camera selection switch to the left. To get a clear view, you need to focus the object as its distance. The Focus knob is under the Distance camera indicator at the upper left of the top panel. It is a toothed wheel. To focus objects in the short distance, rotate the Focus knob to the left. To focus objects in the long distance, rotate the Focus knob to the right. ※ Do not block the Distance camera at the bottom of the Distance camera indicator. 18 User manual – SenseView DUO (8) Using the menu You can see and delete the stored images, turn on/off the light and sound, and check the storage. ① How to use the menu You can open and close the menu by using the Menu button and set options by using the Panning/selection button. There are two buttons at the lower left of the top panel. The left one is the Menu button and the right one is the Panning/selection button. The Panning/selection button is used for five actions: up, down, left, down and select. [Menu icons] When you press the Menu button, the menu will pop up. There are five icons. These backgrounds are yellow color. When an icon is focused, it changes to orange color. 19 User manual – SenseView DUO To focus next or previous icon, move the Panning/selection button to the left or right. To execute the focused icon, press the Panning/selection button. ② Opening stored images You can open stored images. You can magnify and change the color of the stored images as well. Press the Menu button to call the menu. Move to the first icon, Opening stored images, by using the Panning/selection button. Press the Panning/selection button on it, the recent stored images will show up. ※ You will hear alarm sound and see flickering number of “00” when there is no stored image. 20 User manual – SenseView DUO After opening images, you can move to the next or previous images by moving the Panning/handwriting button. You can magnify current image by pressing the Zoom in/out button. To see the covered part of magnified image, move the Panning/selection button. To exit the Opening stored images, press the Menu button twice. ③ Deleting images You can delete the stored images. Press the Menu button to call menu. Move to the second icon, Deleting images, by using the Panning/selection button. Press the Panning/selection button on it, the recent stored images will show up and you can see the Delete icon at the bottom. 21 User manual – SenseView DUO To delete the images, move to the image you want by using the Panning/selection button and press the button. It will move to the next image after deleting. After deleting an image, you can delete more images by pressing the Panning/selection button repeatedly. ※ You will hear alarm sound and see flickering number of “00” when there is no stored image. To exit the Deleting images, press the Menu button. ④ Light on/off The light icon shows the status of the light. You can turn on/off the light, depending on the circumstance or the object. The third icon of the menu is the Light icon. 22 User manual – SenseView DUO When the light is on, the Light on icon will be displayed. When the light is off, the Light off icon will be displayed. [Light on icon] [Light off icon] To switch the light on/off, press the Panning/selection button on the Light icon. ⑤ Checking the capacity of the storage You can check the number of the images you can store. Press the Menu button to call the menu and move to the fourth icon, Storage capacity, by moving the Panning/selection button. Press the Panning/selection button on it, you can check the number of images you can store. 23 User manual – SenseView DUO It will display the capacity of the storage for 3 seconds. ⑥ Sound on/off When you press each button, you can hear a sound to confirm your button stroke. You can turn on/off the sound for your convenience. The fifth icon of the menu is the Sound icon. When the sound is on, the Sound on icon will be displayed. When the sound is off, the Sound off icon will be displayed. [Sound on icon] [Sound off icon] To switch the sound on/off, press the Panning/selection button on the Sound icon. 24 User manual – SenseView DUO (9) Additional features ① Power saving mode In order to save the battery, the Power saving mode will be activated when you do not use the unit for few minutes. If you leave the unit turned on and unmoved for 3 minutes or more it automatically goes into a power saving mode. The LED turns off, the display goes to the darkest color and the camera indicator blinks. If the unit is left a further 7 minutes after entering the power saving mode, power is automatically switched off. To exit "sleep mode", simply touch any button or move the unit. ※ In the Capturing an image, Opening stored images, or deleting images modes, you should press any button to escape the Power saving mode not by moving the unit. 25 User manual – SenseView DUO ② Checking the battery status The battery indicator icon is displayed at lower right corner on the LCD screen as a 3 segment horizontal bars in an oblong frame. [A battery charging indicator] When you press the Brightness button and Color mode button simultaneously, the indicator will appear accompanied by an audio beep. The battery status is displayed in 4 levels: High, Medium, Low, and Very low. The icon, Empty battery status, will flicker when the battery status is needs to be charged. The battery indicator icon is red color when the unit is being charged and it will be changed to green when the unit is fully charged. When you disconnected the adaptor, it will be changed to blue. 26 User manual – SenseView DUO 7. Zoom rate table (1) Close-up/handwriting camera Zoom level Level 1 Level 2 Level 3 Level 4 Level 5 Level 6 Level 7 Level 8 Level 9 Level 10 Distance from Object On Object 15mm 3.5X 2X 3.8X 2.1X 4.6X 2.6X 5.4X 3X 6.5X 3.6X 7.3X 4X 8.2X 4.5X 9.6X 5.2X 11.2X 6.1X 13.4X 7.2X 27 User manual – SenseView DUO (2) Distance camera Zoom level Digital zoom rate※ Level 11 단 1.0X 계 Level 2 Level 3 Level 4 Level 5 Level 6 Level 7 Level 8 Level 9 Level 10 1.2X 1.4X 1.7X 2.0X 2.3X 2.5X 2.9X 3.4X 4.1X ※ Digital zoom rate is compared with the zoom level 1 on the screen. 8. Troubleshooting (1) It does not turn on. Charge the unit prior to initial use. Plug the supplied AC adapter into the AC adapter jack on the left of the front side edge for 3 hours before using the unit. 28 User manual – SenseView DUO (2) The power is on, but I can’t get an accurate image. In the Capturing an image mode, it may seem to be defective. Turn off this mode by pressing the Image capture button. The Power saving mode will be activated when you don’t use the unit for 3 minutes. Press any button or use the unit to exit from power saving mode. Check the Camera selection switch. In the short distance, put the Camera selection switch on the right. In the distance, put the Camera selection switch on the left. (3) I can’t get a clear image of the object in distance. You need to use the Focus knob when you use the Distance camera. To focus objects in the short distance, rotate the Focus knob to the left. To focus objects in the long distance, rotate the Focus knob to the right. (4) The screen is dark and the text is vague. It is happened when the object is out of range. The recommended range is 15mm from the object. 29 User manual – SenseView DUO (5) I wiped the screen, but a piece of dirt still on it. It may not on the screen but the camera lens. Wipe the camera lens with soft cloth. (6) LCD is too light or too dark. You can adjust the brightness for the darker and lighter images on the LCD screen with Brightness button from level 1 to 4. The higher level you select, the brighter you can get. (7) LCD turns off while using the unit. The Power saving mode will be activated when you don’t use the unit for 3 minutes. Press any button or use the unit, to exit from power saving mode. The power turns off after 7 minutes in the Power saving mode so you need to turn it on again. When the battery runs out, the power will be turned off. Plug the supplied AC adapter into the AC adapter jack on the bottom of the left side edge for 3 hours before using the unit. (8) The battery has been charged for a long time, but it doesn’t last long. The lifespan of the battery may be shortened. In order to use the battery for a long time, charge it frequently before it is discharged. 30 User manual – SenseView DUO 9. Technical Specifications (1) (2) (3) (4) (5) LCD: 4.3 inch wide type TFT-LCD Magnification rate: 2X~13.4X Brightness: 4 level Color modes: 7 color modes Camera: Close-up/handwriting camera, Distance camera (6) Battery: Rechargeable lithium polymer (3000mAh, 3.7V) ① Continuous use: 5 hours ② Recharging time: 3 hours (7) Size: 178(W) * 78(D) * 28(H) mm (8) Weight: 261g ※ (NOTE) This user guide will be differed from actual operation due to improved function of products and it is subject to change and modified without prior notice. 10. Warranty (1) Warranty term is 2 years from your purchasing. Warranty term of the battery is 6 months. (2) Warranty does not cover the problem due to the user’s fault. 31 User manual – SenseView DUO ※ (NOTE) The warranty term will be different from each country. NOTE: This equipment has been tested and found to comply with the limits for a Class B digital device, pursuant to part 15 of the FCC Rules. These limits are designed to pro-vide reasonable protection against harmful interference in a residential installation. This equipment generates, uses and can radiate radio frequency energy and, if not in-stalled and used in accordance with the instructions, may cause harmful interference to radio communications. However, there is no guarantee that interference will not occur in a particular installation. If this equipment does cause harmful interference to radio or television reception, which can be determined by turning the equipment off and on, the user is encouraged to try to correct the interference by one or more of the following measures: -Reorient or relocate the receiving antenna. -Increase the separation between the equipment and receiver. -Connect the equipment into an outlet on a circuit different from that to which the receiver is connected. -Consult the dealer or an experienced radio/TV technician for help. CAUTION: Changes or modifications not expressly approved by the manufacturer responsible for 32 User manual – SenseView DUO compliance could void the user’s authority to operate the equipment. 33