1
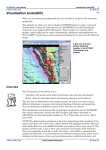
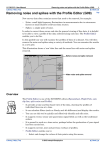
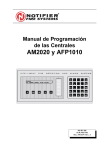
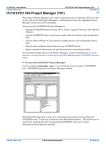
INTREPID User Manual
Library | Help | Top
Managing INTREPID datasets (G06)
1
| Back |
Managing INTREPID datasets (G06)
Top
INTREPID has a fully integrated set of dataset management features enabling you to
conveniently manipulate and configure your data.
You will use the INTREPID Project Manager, Projection Conversion tool and
Subsection tool to rename, copy, move, convert from grid back to lines and delete a
dataset, perform a projection conversion, create a dataset subsection and define a
polygon dataset.
For an introduction to the Project Manager, see Locating datasets, viewing, statistics,
launching tools (G02). For more details about the three tools in this chapter, see
INTREPID Project Manager (T02), Datum and Projection Utility (T13) and
Subsections of datasets (T21).
Defining a subsection
The resulting dataset
Overview
The tools you will use in this guided tour help you manage geophysical datasets. They
can
•
Copy, append, move and rename datasets,
•
Perform projection and datum conversion on datasets,
•
Create subsections of datasets using both spatial and mathematical criteria.
•
The tools use the underlying IO API which is a virtual abstraction of required
functionality, and so many formats for the data, and all the supported Data types,
including vector and tensor, are supported.
For an introduction to the Project Manager, see Locating datasets, viewing, statistics,
launching tools (G02). For more details about the three tools in this chapter, see
INTREPID Project Manager (T02), Datum and Projection Utility (T13) and
Subsections of datasets (T21).
The Project Manager tool provides INTREPID dataset management functions.
As well as launching tools and examining datasets, you can use the Project Manager
to rename, move and copy INTREPID datasets.
Library | Help | Top
© 2012 Intrepid Geophysics
| Back |
INTREPID User Manual
Library | Help | Top
Managing INTREPID datasets (G06)
2
| Back |
The INTREPID Projection Conversion tool
This tool enables you to change a dataset from one geographic co-ordinate system to
another. INTREPID supports an extensive list of Datums and Projections. In the case
of a vector dataset, a projection conversion operation creates an additional set of X
and Y co-ordinate fields. These can be designated the ‘active’ dataset co-ordinates by
assigning them to the X and Y aliases.
Note on projections
Projections are vendor-specific or based on standards. Examples of projections:
Vendor-specific
Standards-based
ERMapper
EPSG
ESRI
POSC
Geosoft
ISO
MapInfo
GoCAD
INTREPID examines the way datums and projections are specified and, if possible,
automatically corrects to an equivalent ISO-style coordinate system. Converting 3D
data using the vertical datum is also available for some situations.
The INTREPID Subsection tool
The Subsection tool enables you to create a new dataset that is a subset of an existing
dataset. You can define the subsection using one or more of the following methods.
Library | Help | Top
•
Create a polygon dataset (subsection region) using the mouse to define points on
the screen;
•
Load an existing polygon dataset;
•
Define the coordinates of a rectangular region;
•
Specify a conditional statement for including or excluding data;
•
Resample the data at a different sampling rate (e.g., every tenth sample of a line
dataset).
© 2012 Intrepid Geophysics
| Back |
INTREPID User Manual
Library | Help | Top
Managing INTREPID datasets (G06)
3
| Back |
Context of this guided tour
In the context of your data processing cycle, this tour represents data
maintenance and data dissemination tasks that could be required at any stage.
Should you complete this guided tour?
This guided tour is intended for introductory level users. It contains full detailed
instructions. The tour covers important INTREPID data management operations.
You can omit this guided tour if you feel that you do not need to know details of
managing INTREPID datasets, converting projections or creating subsections of
datasets.
Sample data
Location of sample data for Guided Tours
We provide two complete sets of sample datasets, one in INTREPID format and one
in Geosoft format. INTREPID works equally well with both formats. When you want
to open a dataset, navigate to the directory containing the required data format.
Where install_path is the path of your INTREPID installation, the project
directories for the Guided Tours sample data are
install_path\sample_data\guided_tours\intrepid_datasets and
install_path\sample_data\guided_tours\geosoft_datasets.
For example, if INTREPID is installed in
C:\Program Files\Intrepid\Intrepid4.5.nnn,
then you can find the INTREPID format sample data at
C:\Program Files\Intrepid\Intrepid4.5.nnn\sample_data\
guided_tours\intrepid_datasets
This is the default location for the sample data. If you have installed INTREPID
normally, the data resides there. If you have installed INTREPID elsewhere, the
exercises will work just as well. Just use the appropriate pathnames.
For more information about installing the sample data, see "Sample datasets—
installing, locating, naming" in INTREPID Guided Tours Introduction (G01)
For a more detailed description of INTREPID datasets, see Introduction to the
INTREPID database (G20). For even more detail, see INTREPID database, file and
data structures (R05).
Location of sample data for CookBooks
Right next to the Guided tours data, is a rich set of more exotic geophysics datasets
and grids, already prepared for the cookbook training sessions. A casual user might
also gain some trial and error insights into the capbilities of the software, just by
testing the Project Manger’s ability to preview and describe the attributes of each of
the cookbook datasets.
Library | Help | Top
© 2012 Intrepid Geophysics
| Back |
INTREPID User Manual
Library | Help | Top
Managing INTREPID datasets (G06)
4
| Back |
What you will do
Flowchart Summary
Library | Help | Top
Inputs
Process
Outputs
Line
dataset
Copy a line
dataset
Copy of
original line
datset
Line
dataset
Change
Projection
Changed
projection
Grid
dataset
Subsection
Subsectioned
dataset
Save a "job"
file
"job"
(BATCH) file
© 2012 Intrepid Geophysics
| Back |
INTREPID User Manual
Library | Help | Top
Managing INTREPID datasets (G06)
5
| Back |
Steps to follow
Copying datasets
Navigate to the
project
directory
1
Start the Project Manager. Navigate to the directory
install_path\sample_data\guided_tours\intrepid_datasets and select
the ebagoola_A line dataset.
See Locating datasets, viewing, statistics, launching tools (G02) for instructions
about navigating to different directories. Select (click) ebagoola_A in the
Filename panel.
Copy a dataset
2
Make a copy of the ebagoola_A line dataset.
Click the right hand mouse button. INTREPID displays a sub-menu, with a
selection of options. Select (click) on the Copy option. Using the directory tree on
the left hand side of the Project Manager, navigate to the directory above
install_path\sample_data\guided_tours\intrepid_datasets. In the
Filename panel, click the right hand mouse button. Select (click) on the Paste
option. INTREPID will create a copy of the ebagoola_A line dataset in the
current directory.
Library | Help | Top
© 2012 Intrepid Geophysics
| Back |
INTREPID User Manual
Library | Help | Top
Library | Help | Top
Managing INTREPID datasets (G06)
6
| Back |
© 2012 Intrepid Geophysics
| Back |
INTREPID User Manual
Library | Help | Top
3
Managing INTREPID datasets (G06)
7
| Back |
Rename the copy of the ebagoola_A line dataset.
Select (click) the ebagoola_A dataset that you have just copied. Click the right
hand mouse button. Select the Rename option. Position the cursor on the file text
and rename the dataset to ebagoola_AA. Press Enter. INTREPID will rename
the dataset.
4
Delete the copy of the ebagoola_A line dataset.
Select (click) the dataset that you have just renamed. Click the right hand mouse
button. Select the Delete option. INTREPID will request confirmation of the
action. Click Yes, and INTREPID will delete the dataset.
Geolocation
You can specify the datum and projection that currently applies to dataset using the
Project Manager. For a vector dataset you can also specify which fields are the X and
Y geolocatioons fields. The geolocation fields of a dataset are the ones with the
aliases X and Y.
Geolocate a
dataset1
5
Select ebagoola_A and the Fields tab. Right click a field with alias X or Y and
select the Projection and Datum Selection dialog. You could use this to select
different fields for the X and Y (geolocation) aliases and a different datum and
projection for the dataset if you wanted.
Using the Project Manager you can specify alternative sets of geolocation fields
each with their own datums and projections. See "Datum and projection for
alternative geolocation fields" in INTREPID Project Manager (T02).
Projection Conversion
You can transform your data to a different datum or projection (or both) using the
Projection Conversion tool
Launch the
Projection
Conversion tool
Library | Help | Top
6
Navigate to the install_path\sample_data\guided_tours
\intrepid_datasets directory, then launch the Projection Conversion tool.
Make sure the current directory in the Project Manager is
install_path\sample_data\guided_tours\intrepid_datasets. Choose
Projection Conversion from the Utility menu.
© 2012 Intrepid Geophysics
| Back |
INTREPID User Manual
Library | Help | Top
7
Managing INTREPID datasets (G06)
8
| Back |
Select the input dataset that you wish to transform.
INTREPID will launch a file chooser for the Projection Conversion Tool. Select the
ebagoola_B dataset and click Open. INTREPID will launch the Projection
Conversion tool.
You can specify the input, output and parameters for the Projection Conversion process
in this guided tour using the job file ch09_1.job. If you wish, load it into the
Projection Conversion tool as described in "Task specification (job) file short cuts" in
INTREPID Guided Tours Introduction (G01), then go to Step 7. At V5.0, you also have
the GOOGLE protobuf task files available for this action.
Load the
dataset to be
processed
8
Specify output
geographic
location fields
9
Library | Help | Top
Specify the fields x and y from the line dataset ebagoola_B as the input for the
projection conversion.
By default INTREPID will choose the input X and Y fields to be the ones that are
presently defined as X and Y aliases. (You can check the present Alias definitions
by highlighting the dataset in the Filename panel of the Project Manager). If you
wish to select a different set of X and Y fields as input, click the DropDown
arrow on the right hand side of the tool. INTREPID will display the Projection
and Datum selection box, which will allow you to select an alternative set of
input fields.
Specify longitude1 and latitude1 as the output X and Y coordinate fields.
10 Under Output Fields, type longitude1 for the X output and latitude1 for the Y
output.
© 2012 Intrepid Geophysics
| Back |
INTREPID User Manual
Library | Help | Top
Specify output
projection[[sp]]
Managing INTREPID datasets (G06)
9
| Back |
11 Specify the Output Datum and Projection.
Use the arrows located on the right hand side of the tool to activate the pull-down
menus which contains lists of available Datums and Projections in INTREPID.
By default the input Datum is assigned to the output Datum. In this example,
leave the output Datum as AGD66.
For the output Projection, select Geodetic from the Projection list.
Apply the
projection
conversion
process
Locate the
dataset using
the new
latitude and
longitude
fields
Library | Help | Top
12 Perform the projection conversion.
Choose OK. A message will appear informing you when the process is completed.
Choose OK to quit the tool.
13 (Optional: Locating the ebagoola_B dataset on the Earth:) Use the Project
Manager to determine the latitude and longitude range for the ebagoola_B line
dataset.
In the Project Manager window, highlight the ebagoola_B dataset to display the
list of fields. You can always use function key F5 for an updated view if required.
Click on the Statistics tab then the Thumbnail tab. The statistics for the
latitude and longitude fields (solution fields we have provided which are
identical to latitude1 and longitude1) are always refreshed on a seperate
thread, if requiring an update. Observe their minimum and maximum values. You
can then pinpoint the dataset in an atlas if this interests you. The Ebagoola
dataset is located in Cape York Peninsula, North Queensland, Australia.
© 2012 Intrepid Geophysics
| Back |
INTREPID User Manual
Library | Help | Top
Managing INTREPID datasets (G06)
10
| Back |
Creating a subsection of a dataset using a loaded polygon; Saving a task
specification (job) file.
Launch the
Subsection tool
14 Navigate to the directory install_path\sample_data\guided_tours
\intrepid_datasets in the Project Manager. Launch the Subsection tool.
Make sure the current directory in the Project Manager is
install_path\sample_data\guided_tours\intrepid_datasets. From the
Dataset menu choose Subsection. INTREPID will launch the Subsection Tool.
In this case, no dataset has been pre-selected before choosing this tool.
You can specify the input, output and parameters for the Subsection process in this
guided tour using the job file ch09_2.job. If you wish, load it into the Subsection tool
as described in "Task specification (job) file short cuts" in INTREPID Guided Tours
Introduction (G01) then go to Step 13.
Load the input
dataset
15 Specify the smooth_grid grid dataset as the input dataset.
From the File menu choose Load Grid Dataset. INTREPID displays the Load
Dataset dialog box. Select the smooth_grid grid dataset
Choose Open.
Library | Help | Top
© 2012 Intrepid Geophysics
| Back |
INTREPID User Manual
Library | Help | Top
Managing INTREPID datasets (G06)
11
| Back |
INTREPID displays the dataset in greyscale in the Subsection Tool window.
Open
Load the
polygon for the
subsection
16 Load the polygon dataset polyA to define the region for the subsection.
From the Spatial menu choose Load Existing Polygon. INTREPID displays the
Load Polygon dialog box. Select the polyA polygon dataset (polyA..DIR if you
are using Windows).
Choose Open.
Library | Help | Top
© 2012 Intrepid Geophysics
| Back |
INTREPID User Manual
Library | Help | Top
Managing INTREPID datasets (G06)
12
| Back |
INTREPID displays the grid dataset with the polygon overlaid.
Specify the
output dataset
17 Specify anomL_grid1 as the subsection output grid dataset
From the File menu choose Specify Output. INTREPID displays the Save As
Dataset dialog box. Ensure that the current directory is
install_path\sample_data\guided_tours\intrepid_datasets. Type
anomL_grid1 in the File Name text box. This will be the name of your output grid
dataset.
If you want to output a grid in a different format other than INTREPID, you must
add the correct extension to the grid name. For example, if you want a Geosoft
grid you must type anomL_grid1.grd in the File Name text box.
Choose Save.
Library | Help | Top
© 2012 Intrepid Geophysics
| Back |
INTREPID User Manual
Library | Help | Top
Apply the
Subsection
process
Managing INTREPID datasets (G06)
13
| Back |
18 Perform the subsection process.
Choose Apply. INTREPID will create the new dataset and display it in the
Subsection tool window. Two things happen a. the Subset Complete pop-up,
which you dismiss,
and b. The formal record in a text report file, with date time and all the options
selected, also pops up in an editor window.
****************************************************
Intrepid Subsection v4.5.0 HEAD for Windows (x64) by BUSTER Build 0
Start processing - 10/12/2012 13:43:37
****************************************************
About to do a subsection to output
--------------------------------------------Starting from grid C:/Intrepid/V4.5/sample_data/guided_tours/intrepid_datasets/smooth_grid.ers and
subsectioning
Clip data to polygon C:/Intrepid/V4.5/sample_data/guided_tours/intrepid_datasets/polyA..DIR IO
No Logical thinning of output
No Subsample of output samples
Shrink output to minimum required
: 1
Do not Split any line data that crosses polygon boundaries and re-emerges
Output grid C:/Intrepid/V4.5/sample_data/guided_tours/intrepid_datasets/anomL_grid1.ers
****************************************************
End
processing - 10/12/2012 13:43:38, Log = subset.rpt
****************************************************
Tip: You can also create a subsection by defining your own polygon on the screen,
specifying dimensions of a rectangular ‘clip box’, using a mathematical conditional
statement, or specifying a different data sampling rate (e.g., every second cell of a
grid)
Save a task
specification
(job) file
19 (Optional: Saving a job file) Save a job file for the task just completed. Name the
file sub_anomL1.job.
You will use this job file. See INTREPID batch processing (G19).
From the File menu choose Save Options. INTREPID displays the Save Defaults
File dialog box. Ensure that the current directory is
install_path\sample_data\guided_tours\intrepid_datasets. Type
sub_anomL1 in the File Name text box. This will be the name of your job file. You
don’t need to type the .job notation. INTREPID will insert it automatically.
Library | Help | Top
© 2012 Intrepid Geophysics
| Back |
INTREPID User Manual
Library | Help | Top
Managing INTREPID datasets (G06)
14
| Back |
Choose Save. INTREPID will save the job file.
Library | Help | Top
© 2012 Intrepid Geophysics
| Back |
INTREPID User Manual
Library | Help | Top
Exit
Managing INTREPID datasets (G06)
15
| Back |
20 Exit from the Subsection tool.
From the File menu choose Quit.
Examining your new dataset
View the
output dataset
21 (Optional:) View your new subsection dataset using the Project Manager
thumbnail, Windows Visualisation Tool or the UNIX Visualisation tool.
Refer to Visualisation tools(G05)for instructions. View the grid dataset
anomL_grid (a solution dataset we have provided which is identical to
anomL_grid1).
Key points for this guided tour
In this guided tour you have:
•
Copied, renamed and deleted a dataset
•
Performed a projection conversion
•
Created a subsection of a dataset by loading an existing polygon dataset.
Frequently Asked Questions
Q : Can the Subsection tool create subsections of line, point and grid
datasets?
A : Yes.
Q : Does the Subsection tool offer more than just spatial subsectioning?
A : Yes. Subsection provides a complete range of conditional operators. For instance,
you can create a subsection according to a rule such as raw_mag > 1992. You can
also create a subsection of a vector dataset by subsampling (e.g., using every 5th data
point).
Q : Can I add my own projections and ‘datums’?
A : Yes. INTREPID already supports a very wide range of projections and datums. The
specifications are stored in text files using a simple language. You can create your own
projection and/or datum specification (or edit an existing one) using any text editor.
Q : Does INTREPID support local projections?
A : Yes. You can specify your local projection and datum using the simple INTREPID
projection and datum language and use it with your data.
Q : Do INTREPID Datums and Projections adhere to a set of standards?
A : Yes. INTREPID supports the POSC standard, which is the most comprehensive
and internationally acknowledged source of co-ordinate systems.
Library | Help | Top
© 2012 Intrepid Geophysics
| Back |