Transcript
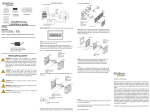
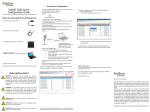
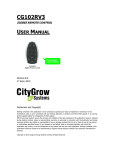
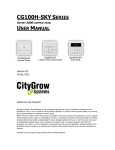
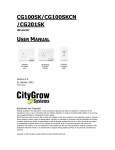
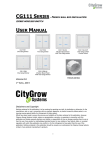
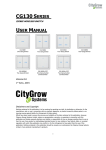
STEP 1: IMPORTANT! Turn off main power at the main switch board.
IR code learning
Before installing the CG102IR, it is advised to learn the IR codes from
the original remote of your appliances to the CG102IR.
Case 3: Ceiling mount
STEP 1: Select a location to place your CG102IR, the best location
will be maximum 8 meters away from the appliances and the IR
angle coverage is +/-60 degree.
Step 1: Remove the front cover of CG102IR, you will see the IR
learning head.
STEP 2: Connect the main power cable from the wall box to the Live
and Neutral wires of the CG101AD Mini Power Supply (purchase
separately).
Make sure the Live is connected to the Brown wire (Live) and
Neutral is connected to Blue wire (neutral) of CG101AD.
IR Learning receiver head
CG102IR , ZigBee IR Transmitter
CG102IR
Installation guide
Ratings
Operation Voltage
IR transmission range
IR transmission angle
Live (Brown)
Step 2: Install “IR Master PC software” into Window PC.( Window XP
or later version.). Then, connect CG101UTU cable (Not included),
from PC to CG102IR USB port. Please note you do not need to
connect AC power adaptor to CG102IR, since the USB will power up
the CG102IR. Then, run IR Master PC software.
DC6V, 500mA
8M
+/- 60 degree
AC input 100 to 240V
Neutral (Blue)
CG101AD
Mini power
supply
IR angle
+/- 60 deg
DC6V output
“+” Red
“-“ Bl;ack
STEP 3: Make sure the DC output from CG101AD, red wire (positive)
and black wire (negative) is correctly connected to the “DC plug of
the provided power adaptor, DC plug is “center positive”. See
following…
IR Learning Diagram
CG102IR
Accessories
STEP 2: Power up the CG102IR by provided power adaptor or
CG101AD mini power supply (purchase separately).
If you select to use CG101AD mini power supply as power supply,
follow the steps below:
• Connect the main power cable from the wall box to the Live and
Neutral wires of the CG101AD Mini Power Supply (purchase
separately).
• Make sure the Live is connected to the Brown wire (Live) and
Neutral is connected to Blue wire (neutral) of CG101AD.
Live (Brown)
AC input 100 to 240V
Neutral (Blue)
PC installed with IR
Master PC software
STEP 4: Plug the DC plug into the DC jack input of CG102IR, then plug
the IR extension cable into the rear of CG102IR. Then, install
CG102IR by fastening the two screws onto the wall box. See
following…..
Original remote
IR extension cable
(Not included)
Power adaptor
(included)
CG101AD
mini power supply
(Not included)
Before getting started
WARNING! The product must be installed by a qualified
electrician in accordance with all applicable regulations and
building codes. Improper wiring can result in personal injury or
damage to control units or other equipment. Always turn off
circuit breaker or remove main fuse from power line before
doing any work. To avoid overheating and possible damage to
equipment.
WARNING! Do not operate control units with any lamps
removed or burned out; replace any burned out lamps
immediately; use only transformers that incorporate thermal
protection or fused primary windings. ! The product is designed
for residential and commercial use, for indoor use only.
Step 3: Inside the PC user interface, select “connect” and so PC is
connected to CG102IR.
Step 4: Place the original IR remote in front of the CG102IR IR
learning head, the best distance is 50mm from the IR learning head.
Step 5: Press the button you intend to learn from the original IR
remote “once”.
Step 6: The IR Master PC software will show “Success”, then you
may input the description of this button for future use.
Step 7: When you finish learning all the IR codes, maximum 60
codes, you should save the file and give a file name for it.
Step 8: Referring to the manual of HomeNET Planner PC software,
you will be guided to import the saved IR file into HomeNET Planner
for your programming of the panels or iPad/iPhone/Android mobile
device control.
After the IR code learning process, you can install the product now.
Case 1: Control the Split type air-conditioner
.
Cover
DC plug from provided
power adaptor
Make sure the DC output from CG101AD, red wire (positive) and
black wire (negative) is correctly connected to the “DC plug of the
provided power adaptor”, DC plug is “center positive”. See
following…
CG101AD
Mini power supply
Screw x 2
Wire connector
IR extension cable
wall box
STEP 5: Route the IR extension cable to the IR receiver window of
the A/C. See fig. 1
STEP 1: Select a location to place your CG102IR, the best location
will be maximum 5 meters away from the appliances and the IR
angle coverage is +/-60 degree.
Secondly, it is recommended to locate the product at a location that
the IR transmission will not be blocked by objects or human.
CG102IR
wall box
WARNING! Install in accordance with all national and local
electrical codes.
IR angle
+/- 60 deg
IMPORTANT! Citygrow® is not liable for any damage incurred
with the misuse of this product.
IMPORTANT! Pre-setup can only be done by a professional
worker or manufacturer agent.
DC6V output
“+” Red
“-“ Bl;ack
wall box installation diagram
Case 2: Table stand
Installation instruction
CG101AD
Mini power
supply
IR extension cable
Power adaptor
Fig 1
Details:
1. For detail operation and specification, please refer to user manual
and product specification.
2. For detail programming of the product, please refer to HomeNET
Planner Software user manual.
www.Citygrowsys.com
Disclaimers and Copyright
Nothing contained in this publication is to be construed as granting any
right, by implication or otherwise, for the manufacture, sale, or use in
connection with any method, apparatus, or product covered by letters
patent, or as insuring anyone against liability for infringement of letters
patent.
Efforts have been made to ensure the accuracy and reliability of the
data contained in this publication; however, Citygrow Energy Systems
Limited. makes no representation, warranty, or guarantee in connection
with this publication and hereby expressly disclaims any liability or
responsibility for loss or damage resulting from its use or from the use
of any product or methodology described herein; for any violation of
any federal, state, or municipal regulation with which this publication
may conflict; or for the infringement of any patent from the use of this
publication. Nothing contained in this publication should be viewed as
an endorsement by Citygrow Energy Systems Limited. of any particular
manufacturer’s products.
CG102IR is placed facing to the appliances
TECHNICAL INFORMATION AND PICTURE SUBJECTED TO CHANGE WITHOUT PRIOR NOTICE
Copyright © 2012 Citygrow Energy Systems Ltd., All Rights Reserved
Copyright © 2012 Citygrow Energy Systems Limited, All Rights Reserved