1
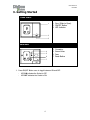
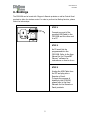
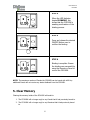
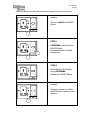
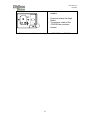
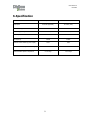
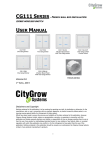
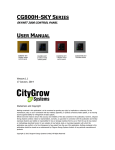
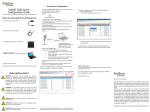
CG100SK/CG100SKCN
/CG201SK
AC SOCKET
USER MANUAL
CG100SK
AC Socket
(UK)
CG100SKCN
AC Socket
(China)
CG201SK
AC Socket
(USA)
VERSION 1.0
21 JANUARY, 2013
(PRELIMINARY)
Disclaimers and Copyright
Nothing contained in this publication is to be construed as granting any right, by implication or otherwise, for the
manufacture, sale, or use in connection with any method, apparatus, or product covered by letters patent, or as insuring
anyone against liability for infringement of letters patent.
Efforts have been made to ensure the accuracy and reliability of the data contained in this publication; however, Citygrow
Energy Systems Limited. makes no representation, warranty, or guarantee in connection with this publication and hereby
expressly disclaims any liability or responsibility for loss or damage resulting from its use or from the use of any product
or methodology described herein; for any violation of any federal, state, or municipal regulation with which this
publication may conflict; or for the infringement of any patent from the use of this publication. Nothing contained in this
publication should be viewed as an endorsement by Citygrow Energy Systems Limited. of any particular manufacturer’s
products.
Copyright © 2012 Citygrow Energy Systems Limited, All Rights Reserved
User Manual of
CG100AS
CAUTION
RISK OF ELECTRIC SHOCK DO NOT OPEN
CAUTION: TO REDUCE THE RISK OF ELECTRIC SHOCK,
DO NOT REMOVE COVER (OR BACK) NO USER-SERVICEABLE
PARTS INSIDE REFER SERVICING TO QUALIFIED SERVICE PERSONNEL
The lightning flash with arrowhead symbol within an equilateral triangle is intended to alert the user
to the presence of uninsulated “dangerous voltage” within the product’s enclosure that may be of
sufficient magnitude to constitute a risk of electric shock to persons.
The exclamation point within an equilateral triangle is intended to alert the user to the presence of
important operating and maintenance (servicing) instructions in the literature accompanying the
product.
IMPORTANT SAFETY INSTRUCTIONS
READ BEFORE OPERATING EQUIPMENT
This product was designed and manufactured to meet strict quality and safety standards.
There are, however, some installation and operation precautions which you should be particularly aware of.
1.
2.
3.
4.
5.
6.
7.
8.
9.
10.
11.
12.
13.
14.
Read these instructions.
Keep these instructions.
Heed all warnings.
Follow all instructions.
Do not use this apparatus near water.
Clean only with dry cloth.
Do not block any ventilation openings. Install in accordance with the manufacturer’s instructions.
Do not install near any heat sources such as radiators, heat registers, stoves, or other apparatus that produce heat.
Do not defeat the safety purpose of the polarized or grounding-type plug. If the provided plug does not fit into your
outlet, consult an electrician for replacement of the outlet.
Protect the power cord from being walked on or pinched particularly at plugs, convenience receptacles, and the point
where they exit from the apparatus.
Only use attachments/accessories specified by the manufacturer.
Use only with the cart, stand, tripod, bracket, or table specified by the manufacturer, or sold with the apparatus. When
a cart is used, use caution when moving the cart/apparatus combination to avoid injury from tip-over.
Unplug this apparatus during lightning storms.
Refer all servicing to qualified service personnel. Servicing is required when the apparatus has been damaged in any
way, such as power-supply cord or plug is damaged, liquid has been spilled or objects have fallen into the apparatus,
the apparatus has been exposed to rain or moisture, does not operate normally, or has been dropped.
i
User Manual of
CG100AS
Table of Contents
IMPORTANT SAFETY INSTRUCTIONS ......................................................................... i
1.
Introduction ..................................................................................................... 1
2.
Installation....................................................................................................... 2
3.
Getting Started................................................................................................. 4
4.
Bindings .......................................................................................................... 5
5.
Clear Memory ................................................................................................... 6
6.
Specification..................................................................................................... 9
ii
User Manual of
CG100AS
1. Introduction
Thank you for choosing Citygrow’s product. The CG100SK /CG100SKCN/CG201SK is AC
Socket which is designed for wireless control use.
The CG100AS /CG100AS01/CG201AS works on ZigBee and can be wirelessly controlled
by Citygrow’s remote control or control panel products.
Description
1. ZigBee wireless remote control.
2. Based on IEEE 802.15.4.
3. 2.4GHz radio frequency.
4. DIY, plug and play.
5. AC 220V 13A for UK/ China version.
6. AC120V 10A for USA version.
7. LED backlight indicator for on/off status.
8. Local on/off button
9. Support iPhone, iPad and Android mobile control if CG102BS Base station is purchased.
10. Control button graphics can be tailor-made per customer requirement.
11. No EIB / Bus required
12. Easy to install.
1
User Manual of
CG100AS
2. Installation
In order to install the CG100SK correctly, please follow the below steps. Please note, for
CG100SKCN, the installation follow the same steps described below. For USA version AC
socket CG201SK, the installation follow the same steps except that a USA wall box
should be used.
STEP 1: IMPORTANT! Turn off main power at the main switch board.
STEP 2: Loosen the screws of the original AC Socket. Remove the AC Socket and
disassemble to access the Live, Neutral and Earth wiring.
STEP 3: Connect the Live, Neutral and Earth terminals at the rear cabinet of the device.
Earth
Neutral
Earth
2
User Manual of
CG100AS
STEP 4: Fasten the screws of all terminals and check that the wires are properly
secured. Install the AC power socket on the wall by fastening the two screws.
Install
screw x2
Fuse
Reset
Door
Frame
STEP 5: Push the ON/OFF Button test whether the wiring has been connected correctly.
If the ON/OFF Button does not function as expected, please check the wiring connection
again.
3
User Manual of
CG100AS
3. Getting Started
COVER PLATE
1
1. Door (Slide to Open)
2. ON/OFF Button
3. LED Indicator
OPEN
2
3
MAIN UNIT
4
5
CONN.
6
FUSE
RESET
4.
5.
6.
7.
Connector
Screw Holes
Fuse
Reset Button
7
1. Press ON/OFF Button once to toggle between ON and OFF.
- LED ON indicates the Socket is OFF.
- LED OFF indicates the Socket is ON.
4
User Manual of
CG100AS
4. Bindings
The CG100SK can be bound with Citygrow’s Remote products as well as Control Panel
products to allow for wireless control. In order to perform the Binding function, please
follow the below steps:
STEP 1
CONN.
FUSE
Connect one end of the
provided USB Cable to the
CG100SK and the other end
to a PC.
RESET
STEP 2
-
An ID must first be
programmed into the
CG100SK. Refer to the User
Manual for the “HomeNET
Planner” software for
instructions on how to do so.
STEP 3
-
5
Unplug the USB Cable from
the PC and plug into a
Remote or Panel.
To begin the process of
binding to the CG100SK,
please refer to the User
Manuals for the Remote or
Panel products.
User Manual of
CG100AS
STEP 4
CONN.
FUSE
RESET
When the LED Indicator
begins BLINKING, this
shows that the CG100SK is
awaiting confirmation of the
binding process.
STEP 5
CONN.
FUSE
RESET
Press and release the desired
ON/OFF Button once to
confirm the binding.
STEP 6
CONN.
FUSE
RESET
Binding is complete. Ensure
the binding was successful by
using the Remote or Panel to
control the CG100SK.
NOTE: The maximum number of Panels the CG100SK can be bound with is 8. Any
additional Panels will not receive any status feedback from the CG100SK.
5. Clear Memory
Clearing the memory inside of the CG100SK will result in:
1. The CG100SK will no longer reply to any Panels that it had previously bound to.
2. The CG100SK will no longer reply to any Remotes that it had previously bound
to.
6
User Manual of
CG100AS
In order to perform the Clear Memory function, please follow the below steps:
STEP 1
CONN.
-
Press and HOLD the ON/OFF
Button.
FUSE
RESET
STEP 2
CONN.
FUSE
-
RESET
CONTINUE holding onto the
ON/OFF Button.
Press and release the Reset
Button once.
STEP 3
CONN.
FUSE
-
RESET
Wait until the LED Indicator
begins BLINKING.
Release the ON/OFF Button.
STEP 4
CONN.
FUSE
RESET
7
Press and release one of the
ON/OFF Buttons again to stop
blinking.
User Manual of
CG100AS
STEP 5
CONN.
FUSE
-
RESET
Press and release the Reset
Button.
The memory inside of the
CG100SK has now been
cleared.
The above section 3 and section 4 applies to CG100SKCN and CG201SK.
8
User Manual of
CG100AS
6. Specification
CG100SK/CG100SKCN
CG201SK
AC Socket (UK/China)
AC Socket (USA)
13A
10A
AC220 to 240V, 50HZ
AC114 to 126V, 60Hz
YES
YES
2.4GHZ
2.4GHZ
Remote control distance (M, line of sight)
100M
100M
Dimensions mm (Length x Width x Height)
115x87x46
117x70x44
0 to 40 degC
0 to 40 degC
Description
Load current (A)
Power supply voltage
Two way control function
RF frequency
Recommended operation temperature
9